BFT STOPPY User manual

D811319 ver. 04 17-06-05
I
GB
F
D
E
P
DISSUASORE DI PASSAGGIO E SOSTA
ANTI-TRANSITING AND WAITING RETRACTABLE BOLLARD
BORNE ANTI-ACCES ET ANTI-STATIONNEMENT
VERSENKBARER POLLER ZUR SPERRUNG VON DURCHFAHRTEN UND HALTEZONEN
DISUASOR DE TRANSITO Y ESTACIONAMIENTO
CONDICIONADOR DE TRÂNSITO e ESTACIONAMENTO
STOPPY
Via Lago di Vico, 44
36015 Schio (VI)
Tel.naz. 0445 696511
Tel.int. +39 0445 696533
Fax 0445 696522
Internet: www.bft.it
E-mail: [email protected]
ISTRUZIONI D’USO E DI INSTALLAZIONE
INSTALLATION AND USER’S MANUAL
INSTRUCTIONS D’UTILISATION ET D’INSTALLATION
INSTALLATIONS-UND GEBRAUCHSANLEITUNG
INSTRUCCIONES DE USO Y DE INSTALACION
INSTRUÇÕES DE USO E DE INSTALAÇÃO

2 - STOPPY - Ver. 04
D811319_04

MANUALE D’USO ITALIANO
Nel ringraziarVi per la preferenza accordata a questo prodotto, la ditta è
certa che da esso otterrete le prestazioni necessarie al Vostro uso. Leggete
attentamente l’opuscolo “Avvertenze” ed il “Libretto istruzioni” che accom-
pagnano questo prodotto in quanto forniscono importanti indicazioni riguar-
danti la sicurezza, l’installazione, l’uso e la manutenzione. Questo prodotto
risponde alle norme riconosciute della tecnica e della disposizione relativa
alla sicurezza. Confermiamo che è conforme alle seguenti direttive europee:
89/336/CEE, 73/23/CEE, 98/37/CEE (e loro modifiche successive).
1) GENERALITA’
Dissuasore di sosta interrato, compatto e robusto, indicato per la gestione del
transito e della sosta di autoveicoli in aree pubbliche o private, realizzazione
di zone pedonali urbane e in qualsiasi caso si renda necessario un controllo
degli accessi veicolari.
Costituito da stelo in acciaio rivestito da pellicola catarifrangente è comandato
da un motore in bagno d’olio, il tutto è protetto da un cilindro da interrare in
acciaio zincato a caldo.
Il quadro di comando PERSEO consente di controllare simultaneamente
fino a quattro dissuasori.
Sono disponibili oltre alla versione base STOPPY, i modelli serie “L” dotati di
luci lampeggianti di segnalazione, e su richiesta, i modelli serie “R” dotati di
resistenza riscaldante che consente di utilizzare il dissuasore anche in climi
particolarmente freddi (fino a –25°C) e i modelli serie “A” dotati di sensore
magnetico per la connessione con un impianto antifurto.
Accessori:
Kit Batterie Tampone elettrofreno che consente il mantenimento del dissuasore
in posizione di chiusura accesso anche in assenza di rete.
2) SICUREZZA
L’automazione, se installata ed utilizzata correttamente, soddisfa il grado di
sicurezza richiesto. Tuttavia è opportuno osservare alcune regole di com-
portamento per evitare inconvenienti accidentali.
Prima di usare l’automazione, leggere attentamente le istruzioni d’uso e
conservarle per consultazioni future.
• Tenere bambini, persone e cose fuori dal raggio d’azione dell’automazione,
in particolare durante il funzionamento.
• Non lasciare radiocomandi o altri dispositivi di comando alla portata dei
bambini onde evitare azionamenti involontari dell’automazione.
• Non contrastare volontariamente il movimento dello stelo.
• Non modificare i componenti dell’automazione.
• In caso di malfunzionamento, attivare i sezionatori per togliere l’alimen-
tazione di rete, comprese le batterie, in modo da consentire l’accesso e
richiedere l’intervento di un tecnico qualificato (installatore).
• Per ogni operazione di pulizia esterna, attivare i sezionatori per togliere
l’alimentazione di rete, e se presenti le batterie.
• Tenere pulite le ottiche delle fotocellule ed i dispositivi di segnalazione
luminosa. Controllare che rami ed arbusti non disturbino i dispositivi di
sicurezza (fotocellule).
• Per qualsiasi intervento diretto all’automazione, avvalersi di personale
qualificato (installatore).
• Annualmente far controllare l’automazione da personale qualificato.
3) MANOVRA MANUALE
In caso di mancanza di alimentazione il dissuasore tende spontaneamente a
scendere compiendo così una manovra di apertura, una semplice pressione
esercitata sulla superficie superiore del cilindro ne completerà la discesa,
consentendo il transito dei veicoli Fig.1.
N.B. per apertura si intende dissuasore abbassato (transito consentito),
per chiusura si intende dissuasore alzato (transito non consentito).
Nei dissuasori provvisti di batterie tampone prima di procedere alla manovra
manuale, sarà necessario togliere l’alimentazione di emergenza tramite
l’apposito interruttore che l’installatore avrà predisposto.
4) MANUTENZIONE E DEMOLIZIONE
La manutenzione dell’impianto va fatta eseguire regolarmente da parte di
personale qualificato. I materiali costituenti l’apparecchiatura e il suo imballo
vanno smaltiti secondo le norme vigenti. Le pile e le batterie non devono
essere disperse nell’ambiente.
AVVERTENZE
Il buon funzionamento dell’operatore è garantito solo se vengono
rispettati i dati e le indicazioni riportati in questo manuale, nonché
le norme di buona tecnica. La ditta non risponde dei danni causati
dall’inosservanza delle norme di installazione, delle norme di buona
tecnica e delle indicazioni riportate in questo manuale.
Le descrizioni e le illustrazioni del presente manuale non sono impe-
gnative, lasciando inalterate le caratteristiche essenziali del prodotto,
la Ditta si riserva di apportare in qualunque momento le modifiche che
essa ritiene convenienti per migliorare tecnicamente, costruttivamente
e commercialmente il prodotto.
Fig. 1
STOPPY- Ver. 04 - 3
D811319_04

USER’S MANUAL
ENGLISH
Thank you for buying this product, our company is sure that you will be more
than satisfied with its performance. This product is supplied with a “Warnings”
leaflet and an “Instruction Manual”. These should both be read carefully as
they provide important information about safety, installation, operation and
maintenance. This product complies with recognised technical standards
and safety regulations. We declare that it is in conformity with the following
European Directives: 89/336/EEC, 73/23/EEC, 98/37/EEC (and subsequent
amendments).
2) GENERAL OUTLINE
Underground anti-waiting bollard, compact and sturdy, intended for the
management of motor vehicles transiting and waiting in public or private
areas, urban pedestrian areas and in all cases where vehicle access is to
be controlled.
It consists of a steel rod coated with reflecting material, and powered by
an oil-bath motor; all protected by a hot-galvanised steel cylinder which is
fitted underground.
The PERSEO control panel allows up to four bollards to be controlled
simultaneously.
Besides the standard version, STOPPY is available in the following models:
“L” series provided with signal indication blinker lights and, on request, “R”
series provided with a heated resistor which also allows the bollard to be
used in particularly cold climates (as much as –25°C) and “A” series provided
with a magnetic sensor for connection to an antitheft system.
Accessories:
Electric brake buffer battery kit, which allows the bollard to be kept in the
access closed position even when the mains power is off.
3) SAFETY
If correctly installed and used, this automation device satisfies the required
safety level standards. However, it is advisable to observe some practical
rules in order to avoid accidental problems.
Before using the automation device, carefully read the operation instructions
and keep them for future reference.
• Keep children, persons and things outside the automation working range,
particularly during operation.
• Keep radio controls or other control devices out of children’s reach, in
order to avoid any unintentional automation activation.
• Do not intentionally oppose the rod movement.
• Do not modify the automation components.
• In case of malfunction, activate the cut-out switches to disconnect the
power supply, batteries included, in order to gain access to the automa-
tion device, and request the assistance of a qualified person (installer).
• Before proceeding to any external cleaning operation, activate the cut-
out switches to disconnect the mains powers supply and the batteries, if
provided.
• Keep the photocell optical components and light signal devices clean.
Check that none of the safety devices (photocells) are obscured by
branches or shrubs.
• For any direct assistance to the automation system, request the help of
a qualified person (installer).
• Have qualified personnel inspect the automation system once a year.
4) MANUAL MANOEUVRE
When the power supply is disconnected, the bollard tends to lower sponta-
neously, therefore carrying out an opening manoeuvre; a simple pressure
exerted on the top of the cylinder surface will complete lowering, and vehicle
transit will be allowed. See fig. 1.
N.B. opening means bollard lowered (transit allowed), closing means
bollard raised (transit not allowed)
In the case of bollards provided with buffer batteries, before proceeding to
manual manoeuvre, disconnect the emergency power supply by means of
the appropriate switch fitted by the installer.
5) MAINTENANCE AND SCRAPPING
System maintenance is to be regularly carried out by qualified personnel.
The materials making up the appliance and its packing are to be scrapped
according to current standards. Batteries must be disposed of in the ap-
propriate manner.
WARNING
Correct operation of the controller is only guaranteed when the data
specified in this manual are respected, as well as good technical practice
standards. The Company cannot be held responsible for any damage
caused by failure to observe the installation standards, good technical
practice standards and directives specified in the present manual.
The descriptions and illustrations contained in the present manual are
not binding. The Company reserves the right to make any alterations
deemed appropriate for the technical, manufacturing and commercial
improvement of the product at any time, while leaving the essential
product features unchanged.
Fig. 1
4 - STOPPY - Ver. 04
D811319_04

MANUEL D’UTILISATION FRANÇAIS
En vous remerciant pour la préférence accordée à ce produit, la maison
vous assure que vous obtiendrez de celui-ci tous les services nécessaires
à votre usage.
Lisez attentivement la brochure “Avertissements” et le “Manuel d’ins-
tructions” joints, ils fournissent des indications importantes au sujet de la
sécurité, l’installation, l’utilisation et l’entretien. Ce produit est conforme aux
normes reconnues de la technique et à la disposition relative à la sécurité.
Nous confirmons qu’il est conforme aux directives européennes suivantes:
89/336/CEE, 73/23/CEE, 98/37/CEE (et modifications successives).
2) GENERALITES
Borne anti-stationnement enterrée, compacte et robuste, indiquée pour la
gestion de l’accès et du stationnement des voitures dans des espaces publics
ou privés, pour la réalisation de zones piétonnes urbaines et dans tous les
cas où un contrôle des accès de véhicules est nécessaire.
La borne anti-stationnement se compose d’un plot d’acier revêtu d’un film
rétroréfléchissant et est commandée par un moteur en bain d’huile, le tout
protégé par un cylindre à enterrer en acier zingué à chaud.
L’unité de commande PERSEO permet de contrôler en même temps jusqu’à
quatre bornes anti-stationnement.
Outre à la version de base STOPPY, sont disponibles les modèles série
“L” dotés de feux clignotants de signalisation et, en option, les modèles
série “R” dotés de résistance chauffante qui permet d’utiliser la borne anti-
stationnement aussi si le climat est particulièrement froid (jusqu’à –25°C)
et les modèles série “A” dotés de capteur magnétique pour la connexion à
une installation antivol.
Accessoires:
Kit. Batteries de Secours électrofrein permettant le maintient de la borne
anti-stationnement en position de blocage de l’accès aussi en cas de faute
d’électricité.
3) SECURITE
Si installée et utilisée correctement, l’automation est conforme au degré de
sécurité requis. Il est toutefois conseillé de respecter ces quelques règles
de conduite afin d’éviter des inconvénients et des accidents.
Avant d’utiliser l’automation, lire attentivement les instructions d’utilisation
et les conserver en cas de besoin.
• Tenir les enfants, les personnes étrangères et les choses hors du rayon
d’action de l’automation, particulièrement pendant le fonctionnement.
• Ne pas laisser les radio commandes ou d’autres dispositifs de commande
à portée des enfants, afin d’éviter des actionnements involontaires de
l’automation.
• Ne pas contraster volontairement le mouvement du plot.
• Ne pas modifier les composants de l’automation.
• En cas de mauvais fonctionnement, activer les disjoncteurs pour cou-
per l’alimentation, y compris les batteries, afin de permettre l’accès et
demander l’intervention d’un technicien qualifié (installateur).
• Pour toute opération de nettoyage extérieur, activer les disjoncteurs pour
couper l’alimentation et, si prévues, les batteries.
• Tenir propres les optiques des cellules photoélectriques et les dispositifs de
signalisation lumineuse. S’assurer que des branches ou des arbustes ne
dérangent pas les dispositifs de sécurité (cellules photoélectriques).
• Pour toute intervention directe sur l’automation, s’adresser à un personnel
qualifié (installateur).
• Faire contrôler l’automation chaque année par un personnel qualifié.
4) MANOEUVRE MANUELLE
En cas de faute d’alimentation, la borne anti-stationnement tend à descendre
spontanément, en effectuant ainsi une manoeuvre d’ouverture. Une simple
pression sur la surface supérieure du cylindre en achèvera la descente, en
permettant ainsi le passage des véhicules Fig.1.
N.B. par «ouverture» on entend borne anti-stationnement basse (pas-
sage admis), par «fermeture» on entend borne anti-stationnement
haute (passage interedit)
Pour les bornes anti-stationnement dotées de batteries de secours, avant
d’effectuer la manoeuvre manuelle, il faudra couper l’alimentation d’urgence
avec l’interrupteur spéciale prédisposé par l’installateur.
5) ENTRETIEN ET DEMOLITION
L’entretien de l’installation doit être effectué régulièrement par un personnel
qualifié. Les matériaux composant l’appareillage et son emballage seront
mis aux rebuts selon les normes en vigueur. Les piles et les batteries doivent
être déposées dans les bacs de collecte spécifiques.
ATTENTION
Le bon fonctionnement de l’opérateur n’est assuré que si les données
et les indications fournies dans ce manuel sont respectées, ainsi que
les normes de bonne technique. La maison décline toute responsabilité
en cas de dommages dérivés du non respect des normes d’installation,
des normes de bonne technique et des indications de ce manuel.
Les descriptions et les figures de ce manuel n’engagent pas le construc-
teur. En laissant inaltérées les caractéristiques essentielles du produit,
la Société se réserve le droit d’apporter à n’importe quel moment les
modifications qu’elle juge opportunes pour améliorer le produit du
point de vue technique, commercial et de construction.
Fig. 1
STOPPY- Ver. 04 - 5
D811319_04

BEDIENUNGSANLEITUNG
DEUTSCH
Wir danken Ihnen, daß Sie sich für diese Anlage entschieden haben. Ganz
sicher wird sie mit ihren Leistungen Ihren Ansprüchen vollauf gerecht
werden.
Lesen Sie aufmerksam die Broschüre mit den “HINWEISEN” und die
“BETRIEBSANLEITUNG” durch, die dem Produkt beiliegen. Sie enthalten
wichtige Hinweise zur Sicherheit, Installation, Bedienung und Wartung der
Anlage.
Dieses Produkt genügt den anerkannten technischen Normen und Sicher-
heitsbestimmungen. Wir bestätigen, daß es mit folgenden Europäischen
Richtlinien übereinstimmt: 89/336/EWG, 73/23/EWG, 98/37/EWG (und
nachfolgende Änderungen).
2) ALLGEMEINES
Kompakter und robuster versenkbarer Poller für die Lenkung des Fahrzeug-
aufkommens auf öffentlichen oder privaten Grundstücken, zur Schaffung
städtischer Fußgängerzonen und überall dort, wo die Zufahrtskontrolle von
Fahrzeugen erforderlich ist.
Er besteht aus einem Stahlschaft und ist mit einem rückstrahlenden Film
überzogen. Angetrieben wird er von einem Motor im Ölbad, der von einem
heißverzinkten, ins Erdreich eingelassenen Stahlzylinder geschützt wird.
Mit der Steuerung PERSEO lassen sich bis zu vier versenkbare Poller
gleichzeitig kontrollieren.
Neben der Grundversion STOPPY sind Modelle der Serie “L” erhältlich, die
mit Signalblinkleuchten ausgestattet sind und - auf Anfrage - Modelle der
Serie “R”, durch deren Heizwiderstand sich der versenkbare Poller auch
bei besonders strenger Kälte (bis zu –25°C) einsetzen läßt. Die Ausführun-
gen der Serie “A” können mit einem Magnetsensor als Einbruchsicherung
nachgerüstet werden.
Zubehör:
Satz Pufferbatterien für die Elektrobremse. Mit ihm nimmt der versenkbare
Poller auch bei Stromausfall eine Position ein, in der die Zufahrt verwehrt
ist.
3) SICHERHEIT
Die automatische Anlage erfüllt, soweit sie korrekt installiert und bedient wird,
die erforderlichen Sicherheitsstandards. Trotzdem sollten einige Verhaltens-
maßregeln beachtet werden, um ungewollte Zwischenfälle zu vermeiden.
• Vor Gebrauch der Anlage muß die Betriebsanleitung aufmerksam durch-
gelesen und für zukünftige Einsichtnahme aufbewahrt werden.
• Kinder, Erwachsene und Sachwerte sollten den Aktionsradius der Anlage
meiden, besonders während des Betriebes.
• Lassen Sie keine Fernbedienungen oder andere Steuerungsvorrichtungen
in Reichweite von Kindern liegen. Sie könnten die Anlage ungewollt in
Gang setzen.
• Setzen Sie der Schaftbewegung nicht willentlich Kraft entgegen.
• Bei Betriebsstörungen die Stromversorgung mit Hilfe des Trennschalters
unterbrechen, auch die Batterien müssen abgeklemmt werden, damit
die Zufahrt möglich ist. Anschließend einen fachkundigen Techniker
(Installateur) bestellen.
• Vor jeder Außenreinigung mit Hilfe des Trennschalters die Stromversorgung
unterbrechen. Batterien müssen, falls vorhanden, abgeklemmt werden.
• Die Optiken der Fotozellen und die Leuchtsignaleinrichtungen müssen
stets sauber sein. Äste und Strauchwerk dürfen nicht die Sicherheitsvor-
richtungen (Fotozellen) beeinträchtigen.
• Wenn eine Arbeit unmittelbar an der Anlage erforderlich ist, wenden Sie
sich hierzu an fachkundiges Personal (Installateur).
• Einmal jährlich muß die Anlage von Fachleuten kontrolliert werden.
4) HANDBEDIENUNG
Bei Stromausfall fährt der versenkbare Poller normalerweise sofort zur
Öffnung herab, durch leichten Druck auf die obere Zylinderfläche versinkt
er vollständig und gestattet die Durchfahrt von Fahrzeugen Fig.1.
Zur Beachtung: Unter Öffnung wird die Absenkung des Pollers ver-
standen (Durchfahrt freigegeben), unter Schließung das Hochfahren
des Pollers (Durchfahrt verwehrt)
Bevor mit Pufferbatterie versehene Poller per Hand bedient werden, muß
die Notstromversorgung mit Hilfe des entsprechenden, vom Installateur
eingebauten Schalters unterbrochen werden.
5) WARTUNG UND VERSCHROTTUNG
Die Anlage ist regelmäßig von Fachleuten zu warten. Die Materialien, aus
denen der Apparat besteht und die Verpackung sind bestimmungsgemäß
zu entsorgen. Primärelemente und Batterien dürfen nicht in die Umwelt
gelangen.
HINWEISE
Der einwandfreie Betrieb des Antriebes ist nur dann gewährleistet,
wenn die Angaben und Hinweise aus diesem Handbuch beachtet
werden und die Installation fachgerecht erfolgt. Der Hersteller haftet
nicht für Schäden, die durch Mißachtung der Installationsvorschriften,
nicht fachgerechte Ausführungen und die Mißachtung der Angaben in
diesem Handbuch entstehen.
Für die Text- und Bildbeschreibungen in diesem Handbuch wird keine
Gewähr übernommen. Der Hersteller behält sich jederzeit Änderungen
vor, die er für technische, bauliche und kommerzielle Produktverbes-
serungen als notwendig erachtet, soweit die wesentlichen Produktei-
genschaften dadurch nicht verändert werden.
Fig. 1
6 - STOPPY - Ver. 04
D811319_04

MANUAL DE USO ESPAÑOL
Al agradecerle la preferencia que ha manifestado por este producto, la
Empresa está segura de que de él obtendrá las prestaciones necesarias
para sus exigencias.
Lea atentamente el folleto “Advertencias” y el “Manual de instrucciones”
que lo acompañan, pues proporcionan importantes indicaciones referentes
a la seguridad, la instalación, el uso y el mantenimiento.
Este producto cumple los requisitos establecidos por las normas reconocidas
de la técnica y las disposiciones relativas a la seguridad, y es conforme a
las siguientes directivas europeas: 89/336/CEE, 73/23/CEE, 98/37/CEE y
sucesivas modificaciones.
1) DATOS GENERALES
Disuasor de estacionamiento soterrado, compacto y robusto, indicado
para la gestión del tránsito y del estacionamiento de vehículos en áreas
públicas o privadas, la realización de zonas peatonales urbanas y en todos
aquellos casos en los que resulte necesario un control de los accesos de
los vehículos.
Constituido por un vástago de acero revestido por una película reflectante,
es gobernado por un motor en baño de aceite; todo el grupo está protegido
por un cilindro de acero galvanizado en caliente que se instala bajo tierra.
El cuadro de mandos PERSEO permite controlar, simultáneamente, hasta
cuatro disuasores.
Además de la versión base STOPPY, están disponibles los modelos se-
rie “L”, dotados de luces intermitentes de señalización, y, a petición, los
modelos serie “R”, dotados de resistencia de calentamiento, que permite
utilizar el disuasor incluso en climas particularmente fríos (hasta –25°C), y
los modelos serie “A”, provistos de sensor magnético para la conexión con
una instalación antirrobo.
Accesorios:
Kit de Baterías Tampón para electrofreno, que permite mantener el disua-
sor en posición de cierre del acceso incluso cuando falta el suministro de
corriente.
2) SEGURIDAD
El automatismo, si se instala y utiliza correctamente, satisface el grado de
seguridad requerido. Sin embargo, es conveniente observar algunas reglas
de comportamiento para evitar inconvenientes accidentales:
• Antes de usar el automatismo, leer atentamente las instrucciones de uso
y conservarlas para consultas futuras.
• Mantener a niños, personas y cosas fuera del campo de acción del
automatismo, especialmente durante su funcionamiento.
• No dejar radiomandos u otros dispositivos de mando al alcance de los
niños, para evitar el accionamiento involuntario del automatismo.
• No contrastar voluntariamente el movimiento del vástago.
• No modificar los componentes del automatismo.
• En caso de mal funcionamiento, activar los seccionadores para cortar la
alimentación de red, incluidas las baterías, consintiendo, de este modo, el
acceso, y solicitar la intervención de un técnico cualificado (instalador).
• Antes de realizar cualquier operación de limpieza externa, activar los
seccionadores para cortar la alimentación de red, incluidas las baterías
(si están presentes).
• Mantener limpias las lentes de las fotocélulas y los dispositivos de se-
ñalización luminosa. Controlar que ramas y arbustos no interfieran con
los dispositivos de seguridad (fotocélulas).
• Si resulta necesario efectuar una intervención directa en el automatismo,
llamar a personal cualificado (instalador).
• Una vez al año, hacer controlar el automatismo por personal cualifica-
do.
3) MANIOBRA MANUAL
En caso de falta de alimentación, el disuasor tiende espontáneamente a
bajar, efectuando, así, una maniobra de apertura; una simple presión sobre
la superficie superior del cilindro completará la bajada, permitiendo el tránsito
de los vehículos (Fig. 1).
N.B.: Por apertura se entiende disuasor bajado (tránsito permitido); por
cierre se entiende disuasor levantado (tránsito no permitido).
En los disuasores provistos de baterías tampón, antes de realizar la manio-
bra manual, es necesario cortar la alimentación de emergencia mediante el
interruptor expresamente predispuesto por el instalador.
4) MANTENIMIENTO Y DEMOLICION
El mantenimiento de la instalación debe ser efectuado, con regularidad, por
personal cualificado. Los materiales que constituyen el equipo y su embalaje
deben eliminarse de conformidad con las normas vigentes. Las pilas y las
baterías han de depositarse en los contenedores expresamente previstos.
ADVERTENCIAS
El buen funcionamiento del operador está garantizado únicamente si
se respetan los datos y las indicaciones contenidas en este manual,
así como las normas de buena técnica. La empresa no responde de los
daños causados por el incumplimiento de las normas de instalación,
de las normas de buena técnica y de las indicaciones contenidas en
este manual.
Las descripciones y las ilustraciones del presente manual tienen ca-
rácter indicativo. Dejando inalteradas las características esenciales del
producto, la Empresa se reserva la posibilidad de aportar, en cualquier
momento, las modificaciones que considere oportunas para mejorar
técnica, constructiva y comercialmente el producto.
Fig. 1
STOPPY- Ver. 04 - 7
D811319_04

MANUAL PARA DE USO
PORTUGUÊS
Agradecendo-lhe pela preferência dada a este produto, a Empresa tem a
certeza que do mesmo obterá o desempenho necessário para o uso que
entende fazer. Leia atentamente o opúsculo “Recomendações” e o “Manual
de instruções” que acompanham este produto, pois que esses fornecem
indicações importantes respeitantes a segurança, a instalação, o uso e a
manutenção. Este produto, está em conformidade com as normas reconhe-
cidas pela técnica e pelas disposições relativas à segurança. Confirmamos
que o mesmo está em conformidade com as seguintes directivas europeias:
89/336/CEE, 73/23/CEE, 98/37/CEE (e sucessivas modificações).
2) GENERALIDADES
Condicionador de estacionamento enterrado, compacto e robusto, ideal para
dirigir o trânsito e o estacionamento de veículos automóveis em zonas públicas
ou privadas, para a criação de zonas urbanas para peões e para todos os
casos em que se torne necessário um controlo da entrada de automóveis.
É constituído por um espigão em aço revestido por uma película retroreflectora
e é comandado por um motor em banho de óleo; todo o grupo é protegido
por um cilindro, a enterrar, em aço zincado a quente.
O quadro de comando PERSEO consente de controlar simultaneamente
até quatro condicionadores.
Além da versão base STOPPY, estão disponíveis os modelos série “L”
dotados de luzes lampejantes de sinalização, e a pedido, os modelos série
“R” dotados de resistência de aquecimento que consente de utilizar o con-
dicionador de trânsito mesmo em climas particularmente frios (até –25°C)
e os modelos série “A” dotados de sensor magnético para a conexão com
um sistema anti-roubo.
Acessórios:
Kit Baterias Tampão travão eléctrico que consente de manter o condicionador
de trânsito na posição de fecho do acesso ainda que na falta de rede.
3) SEGURANÇA
Se a automatização é instalada e utilizada correctamente, satisfaz o grau
de segurança exigido. Todavia, é oportuno respeitar algumas regras de
comportamento para evitar problemas acidentais.
Antes de usar a automatização, leia atentamente as instruções de uso e
conserve-as para consultá-las no futuro.
• Mantenha crianças, pessoas e coisas fora do raio de acção da automa-
tização, especialmente durante o funcionamento.
• Não deixe radiocomandos ou outros dispositivos de comando ao alcance de
crianças, para evitar accionamentos involuntários da automatização.
• Não impeça voluntariamente o movimento do espigão.
• Não modifique os componentes da automatização.
• Em caso de mau funcionamento, active os seccionadores para cortar a
alimentação de rede, incluídas as baterias, para consentir o acesso e
peça a intervenção de um técnico qualificado (instalador).
• Para efectuar qualquer operação de limpeza externa, active os secciona-
dores para cortar a alimentação de rede, e se presentes as baterias.
• Mantenha limpos os elementos ópticos das fotocélulas e os dispositivos
de sinalização luminosa. Controle que ramos e arbustos não disturbem
os dispositivos de segurança (fotocélulas).
• Sirva-se de pessoal qualificado (instalador), para executar qualquer
operação directa na automatização,.
• Faça controlar anualmente a automatização por pessoal qualificado.
4) MANOBRA MANUAL
Em caso de falta de alimentação o condicionador de trânsito tem a tendência
de descer espontaneamente executando desta maneira uma manobra de
abertura; uma simples pressão exercitada sobre a superfície superior do
cilindro irá completar a descida, consentindo o trânsito dos veículos Fig.1.
N.B. com abertura quer-se dizer condicionador de trânsito abaixado
(trânsito consentido), com fecho quer-se dizer condicionador de trânsito
levantado (trânsito não consentido)
Nos condicionadores de trânsito equipados de baterias tampão antes de
executar a manobra manual, será necessário cortar a alimentação de emer-
gência por meio do específico interruptor que o instalador terá instalado.
5) MANUTENÇÃO E DEMOLIÇÃO
A manutenção da instalação deve ser executada regularmente por pessoal
qualificado. Os materiais que constituem a aparelhagem e a sua embalagem
devem ser eliminados segundo as normas em vigor. As pilhas e as baterias
não devem ser abandonadas no ambiente.
RECOMENDAÇÕES
O bom funcionamento do operador é garantido somente se forem
respeitados os dados e as indicações contidas neste manual, assim
como as normas de boa técnica. A empresa não responde pelos danos
provocados pela inobservância das normas de instalação, das normas
de boa técnica e das indicações contidas neste manual.
As descrições e as ilustrações deste manual não constituem um com-
promisso para o fabricante. Deixando inalteradas as características
essenciais do produto, a Empresa reserva-se o direito de produzir
em qualquer momento as modificações que essa julgar convenientes
para melhorar as características técnicas, de construção e comerciais
do produto.
Fig. 1
8 - STOPPY - Ver. 04
D811319_04

MANUALE PER L’INSTALLAZIONE ITALIANO
Nel ringraziarVi per la preferenza accordata a questo prodotto, la ditta è
certa che da esso otterrete le prestazioni necessarie al Vostro uso. Leggete
attentamente l’opuscolo “Avvertenze” ed il “Libretto istruzioni” che accom-
pagnano questo prodotto in quanto forniscono importanti indicazioni riguar-
danti la sicurezza, l’installazione, l’uso e la manutenzione. Questo prodotto
risponde alle norme riconosciute della tecnica e della disposizione relativa
alla sicurezza. Confermiamo che è conforme alle seguenti direttive europee:
89/336/CEE, 73/23/CEE 98/37/CEE (e loro modifiche successive).
1) SICUREZZA GENERALE
ATTENZIONE! Un’installazione errata o un uso improprio del prodotto,
possono creare danni a persone, animali o cose.
• Leggete attentamente l’opuscolo ”Avvertenze” ed il ”Libretto istruzioni” che
accompagnano questo prodotto, in quanto forniscono Importanti indicazioni
riguardanti la sicurezza, l’installazione, l’uso e la manutenzione.
• Smaltire i materiali di imballo (plastica, cartone, polistirolo, ecc.) secondo
quanto previsto dalle norme vigenti. Non lasciare buste di nylon e polistirolo
a portata dei bambini.
• Conservare queste istruzioni di installazione per allegarle al fascicolo
tecnico della macchina e per consultazioni future.
• Questo prodotto è stato progettato e costruito esclusivamente per l’utilizzo
indicato in questa documentazione. Usi non indicati in questa documenta-
zione potrebbero essere fonte di danni al prodotto e di pericolo. La Ditta
declina qualsiasi responsabilità derivante dall’uso improprio o diverso da
quello per cui è destinato ed indicato nella presente documentazione.
• Non installare il prodotto in atmosfera potenzialmente esplosiva o in
presenza di rischio di incendio.
• Gli elementi costruttivi della macchina devono essere in accordo con
le seguenti Direttive Europee: 89/336/CEE, 73/23/CEE, 98/37 CEE e
loro modifiche successive. Per tutti i Paesi extra CEE, oltre alle norme
nazionali vigenti, per un buon livello di sicurezza è opportuno rispettare
anche le norme sopracitate.
• La Ditta declina qualsiasi responsabilità dall’inosservanza della Buona
Tecnica nella installazione del dispositivo descritto nel presente manua-
le.
• L’installazione deve essere in accordo con quanto previsto dalle Direttive
Europee: 89/336/CEE, 73/23/CEE, 98/37 CEE e loro modifiche succes-
sive.
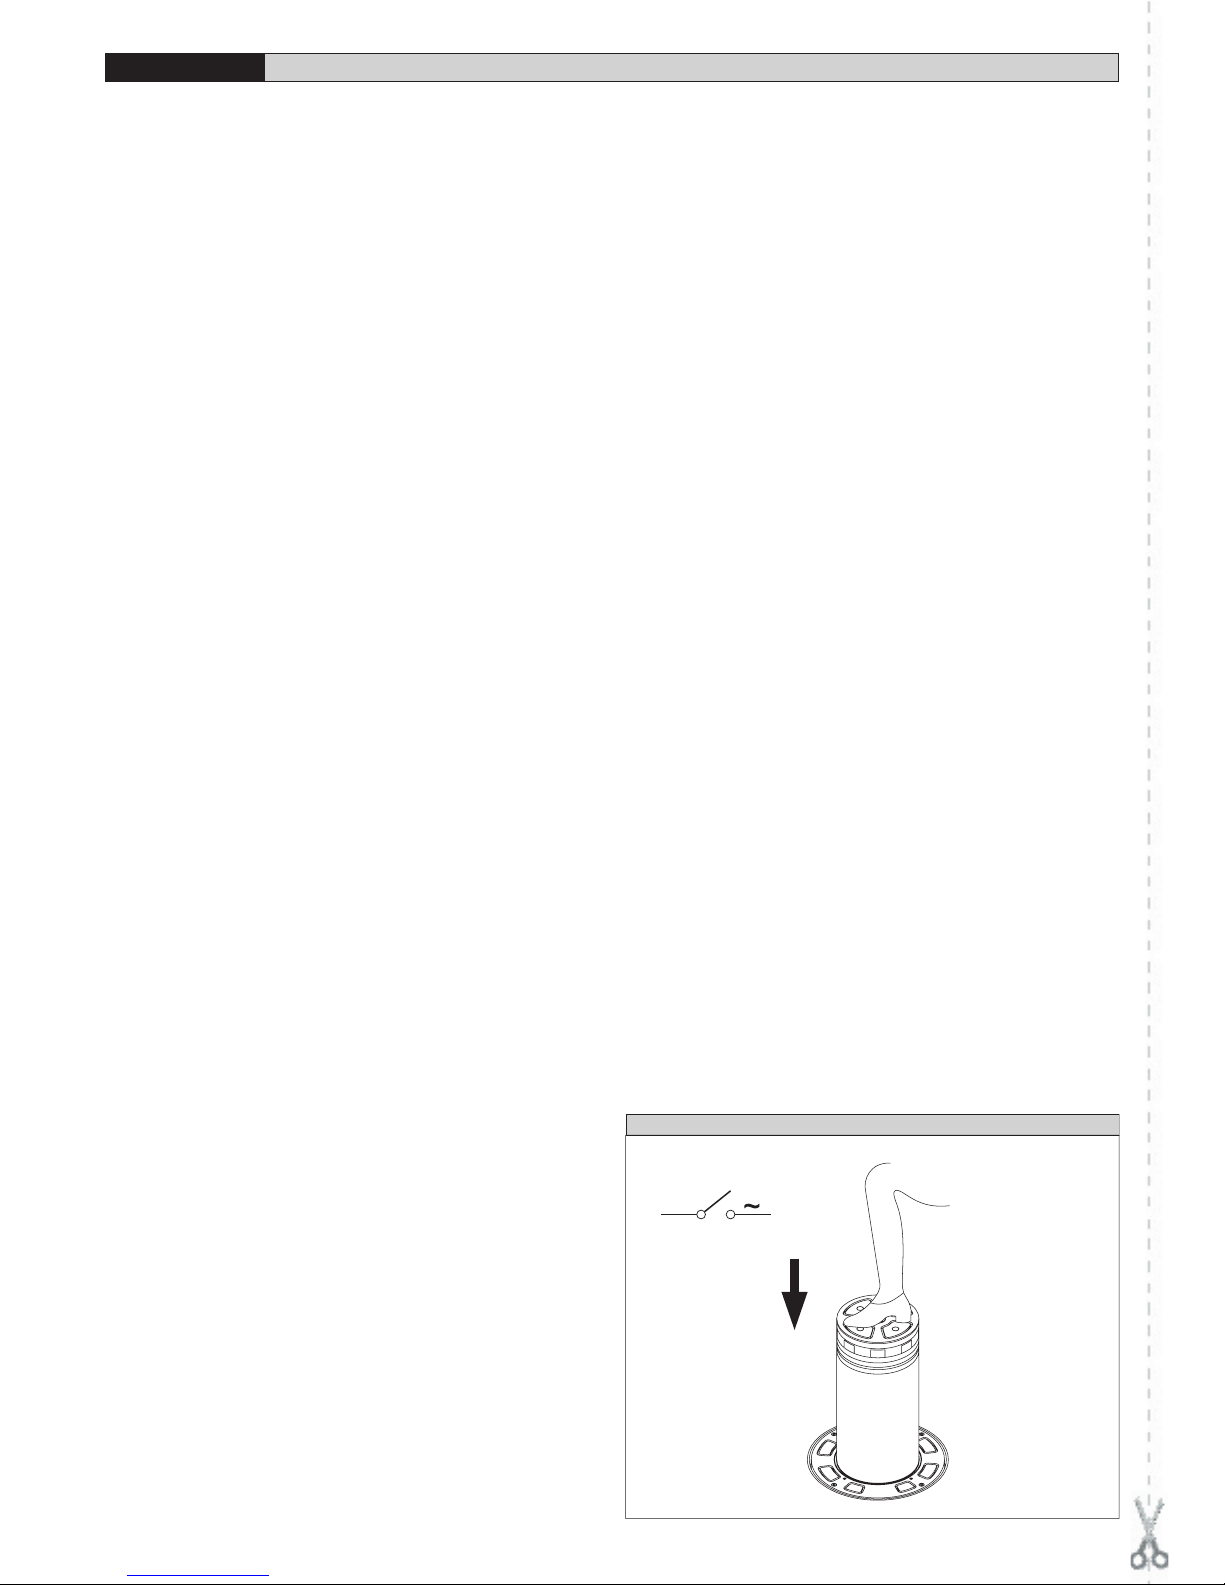
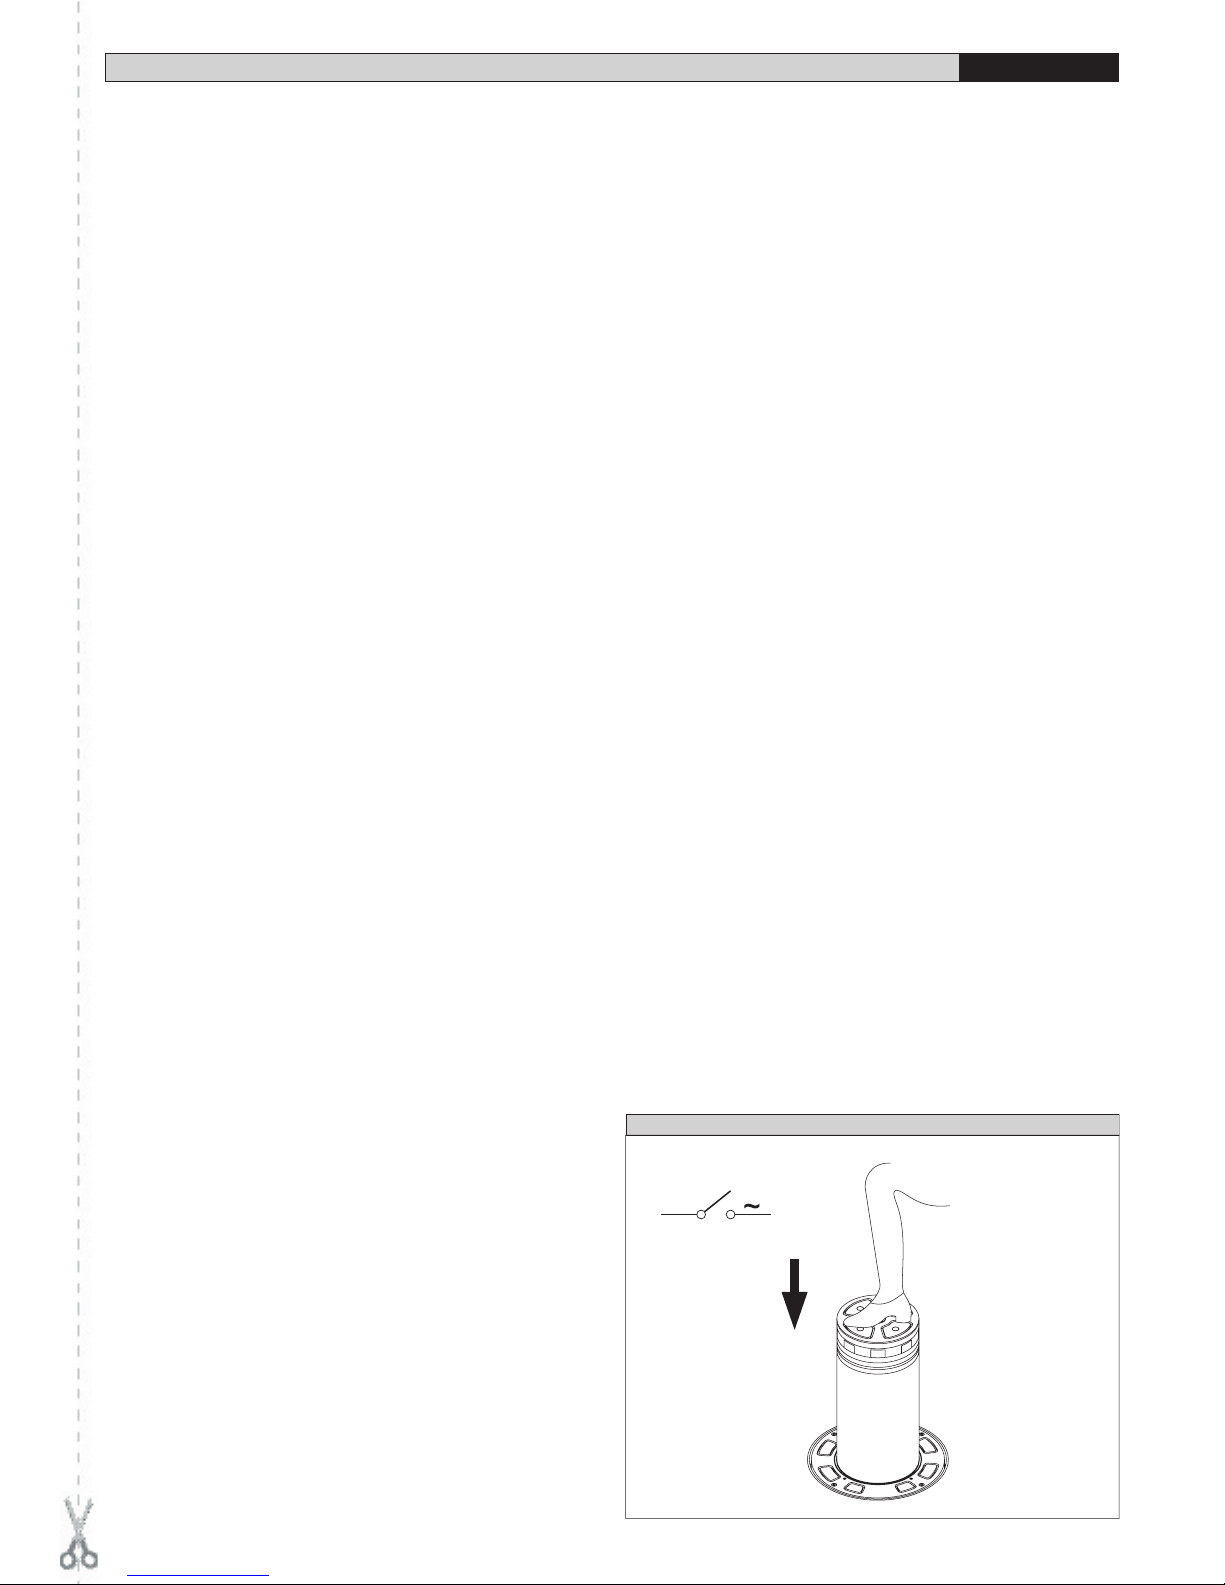
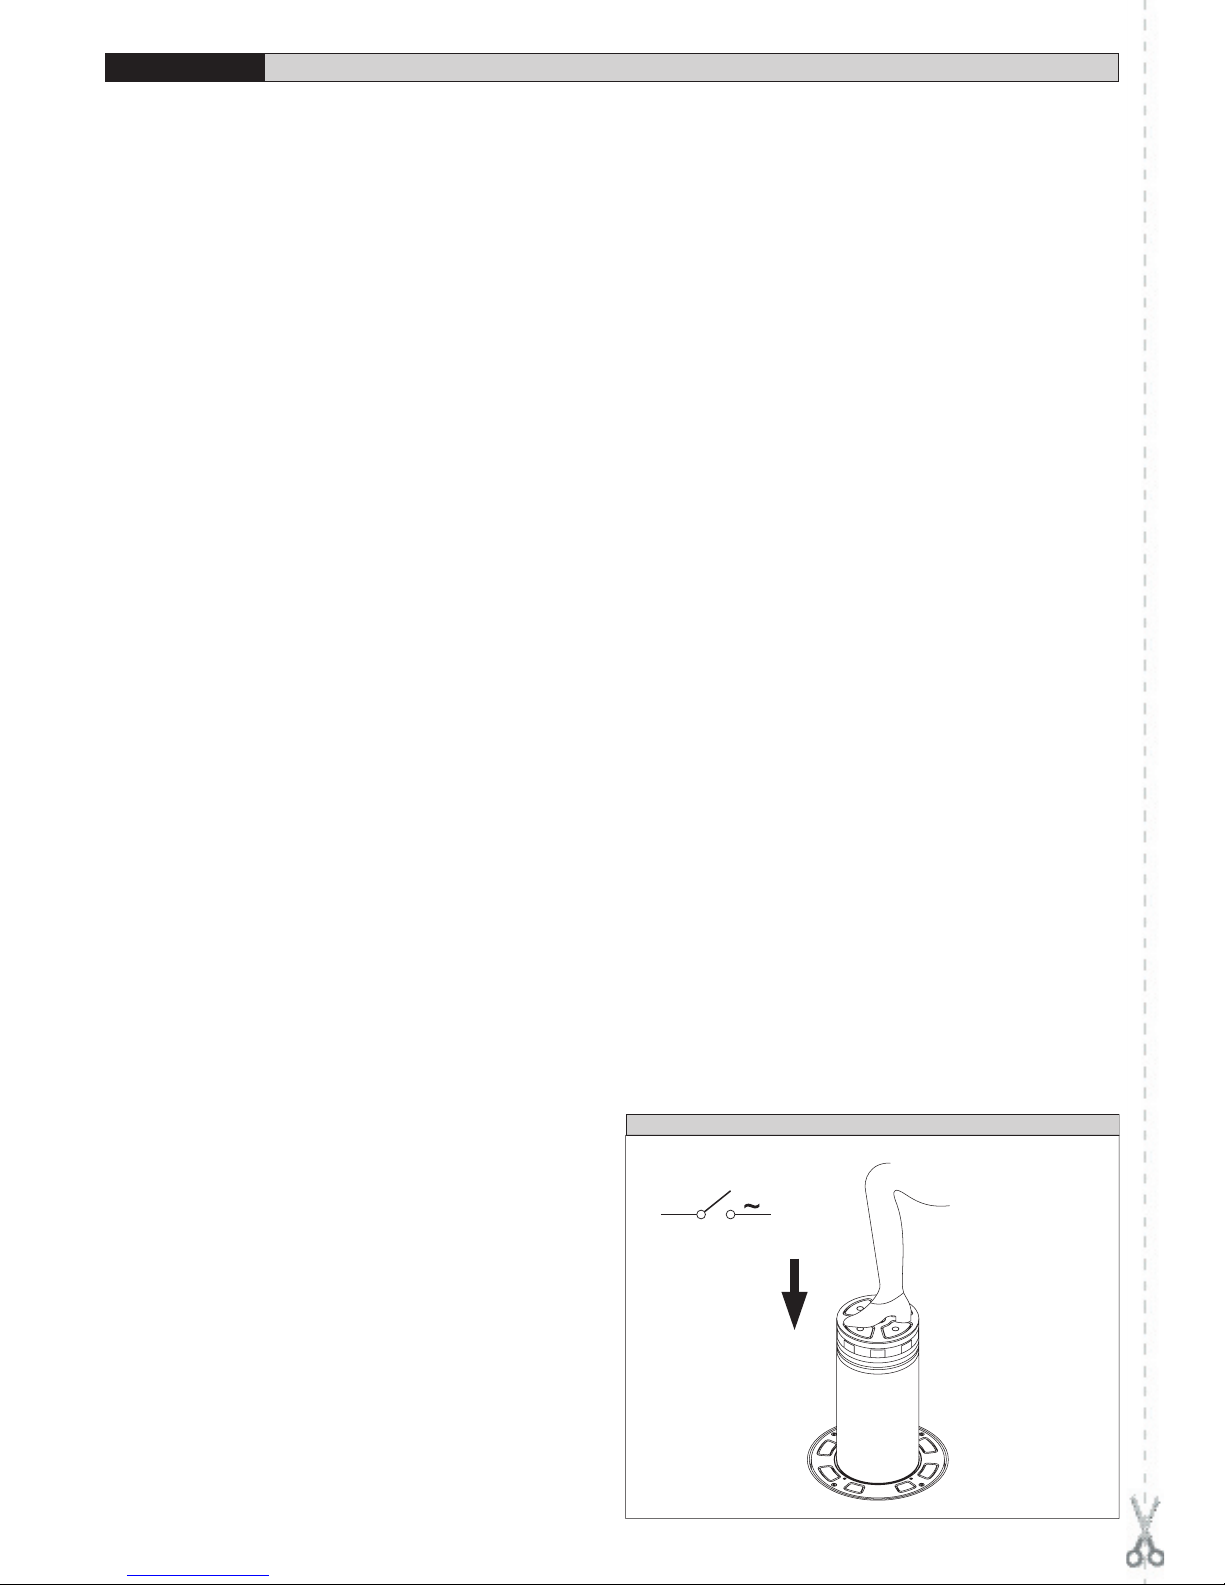
• Togliere l’alimentazione elettrica, prima di qualsiasi intervento sull’impianto.
Scollegare anche eventuali batterie tampone se presenti.
• Prevedere sulla rete di alimentazione dell’automazione, un interruttore
o un magnetotermico onnipolare con distanza di apertura dei contatti
uguale o superiore a 3,5 mm. Prevedere un dispositivo di sezionamento
adeguato anche per le batterie tampone
• Verificare che a monte della rete di alimentazione, vi sia un interruttore
differenziale con soglia da 0.03A.
• Verificare se l’impianto di terra è realizzato correttamente: collegare tutte
le parti metalliche della chiusura e tutti i componenti dell’impianto provvisti
di morsetto di terra.
• Applicare tutti i dispositivi di sicurezza (fotocellule, coste sensibili, ecc.)
necessari a proteggere l’area da pericoli di schiacciamento, convoglia-
mento, cesoiamento.
• Applicare almeno un dispositivo di segnalazione luminosa (lampeggiante)
in posizione visibile in modo visibile e vicino alla struttura un cartello di
avviso.
• La Ditta declina ogni responsabilità ai fini della sicurezza e del buon
funzionamento dell’automazione se vengono impiegati componenti di
altri produttori.
• Usare esclusivamente parti originali per qualsiasi manutenzione o ripa-
razione.
• Non eseguire alcuna modifica ai componenti dell’automazione se non
espressamente autorizzata dalla Ditta.
• Istruire l’utilizzatore dell’impianto su quanto riguarda i sistemi di comando
applicati e sull’esecuzione dell’apertura manuale in caso di emergen-
za.
• Non permettere a persone e bambini di sostare nell’area d’azione del-
l’automazione.
• Non lasciare radiocomandi o altri dispositivi di comando alla portata dei
bambini onde evitare azionamenti involontari dell’automazione.
• L’utilizzatore deve evitare qualsiasi tentativo di intervento o riparazione
dell’automazione e rivolgersi solo a personale qualificato.
• Tutto ciò che non è espressamente previsto in queste istruzioni, non è
permesso.
• L’installazione deve essere fatta utilizzando dispositivi di sicurezza e
comandi conformi alla EN 12978.
2) GENERALITA’
Dissuasore di sosta interrato, compatto e robusto, indicato per la gestione del
transito e della sosta di autoveicoli in aree pubbliche o private, realizzazione
di zone pedonali urbane e in qualsiasi caso si renda necessario un controllo
degli accessi veicolari.
Costituito da stelo in acciaio rivestito da pellicola catarifrangente è comandato
da un motore in bagno d’olio, il tutto è protetto da un cilindro da interrare in
acciaio zincato a caldo.
Il quadro di comando PERSEO consente di controllare simultaneamente
fino a quattro dissuasori (Fig.8).
Sono disponibili oltre alla versione base STOPPY, i modelli serie “L” dotati di
luci lampeggianti di segnalazione, e su richiesta, i modelli serie “R” dotati di
resistenza riscaldante che consente di utilizzare il dissuasore anche in climi
particolarmente freddi (fino a –25°C) e i modelli serie “A” dotati di sensore
magnetico per la connessione con un impianto antifurto.
Accessori:
Kit. Batterie Tampone elettrofreno che consente il mantenimento del dissua-
sore in posizione di chiusura accesso anche in assenza di rete.
3) DATI TECNICI ATTUATORE STOPPY
Motore: .................................................................230Va.c. ±10% 50/60Hz*
Condensatore: ...................................................................................... 8 µF
Assorbimento: .....................................................1,2 A (230V) 2,4 A (110V)
Frequenza Lavoro: ........................................................................ 2000/24h
Coppia Massima: ..................................................................700 N (~70Kg)
Grado di protezione: .............................................................................IP67
Quadro di comando .......................................................................... Perseo
Elettrofreno: ..................................................................................... 24Vd.c.
Tempo di lavoro: ...............................................................6s+rallentamento
Temperatura di esercizio ...................................................... –15°C + 60°C
Temperatura di esercizio versioni “R” ................................... –25°C + 60°C
Resistenza all’urto frontale sullo stelo alzato di 200 mm: ........5.000 Joule
(probabili rotture al 50%)
Carico Statico: ............................A stelo alzato peso sostenuto max 300kg
A stelo abbassato peso sostenuto max 15.000 kg
Carico Dinamico ...............................Spinta max in fase di chiusura: 100kg
Peso: ..............................................................................................90 kg ca.
Dimensioni : .................................................................................. vedi fig. 1
Manovra manuale ...................... In assenza di tensione diviene reversibile.
(* altre tensioni disponibili a richiesta)
4) DATI TECNICI QUADRO DI COMANDO PERSEO
Alimentazione: .....................................................230Va.c. ±10% 50/60Hz*
Corrente assorbita: ............................................6A max (con 4 dissuasori)
N° massimo motori ...............................fino a 4 dissuasori STOPPY (Fig.8)
Dimensioni: ..............................................................................vedi figura 4
Fusibili: .................................................... F2: T2A / F3: T2A / F4: T315 mA
(* altre tensioni disponibili a richiesta)
ATTENZIONE: le centraline a 100V 50 e 60Hz possono gestire solo due
dissuasori di passaggio in parallelo anzichè quattro.
5) VERIFICHE PRELIMINARI
Verificate che la base di posa sia stabile e pianeggiante.
Il dissuasore per il suo funzionamento non ha particolari esigenze di per-
pendicolarità, comunque si consiglia, per una buona riuscita estetica, di
provvedere al livellamento della zona di posa in modo da garantire una corsa
perfettamente verticale dello stelo.
6) PREDISPOSIZIONE DELLO SCAVO E POSA DEL DISSUASORE
•
Procedere alla realizzazione dello scavo di posa del dissuasore.Lo scavo dovrà
avere una profondità di circa 110 cm ed un diametro di circa 50/60 cm.
• Provvedere alla realizzazione di un sottofondo di drenaggio in ghiaia di
20 cm, come indicato in fig. 2. Quindi con circa 5 cm di sabbia fine si
realizzerà il fondo di posa del dissuasore.
• Posare il dissuasore, prestando attenzione alla quota di posa (la ghiera
deve essere alla stessa quota della superficie di transito) ed al livellamento
della base.
• Realizzare la predisposizione elettrica (vedi paragrafo 7)
• Riempire lo scavo fino ad una quota di circa 25 cm con della sabbia
compatta.
• A questo punto dopo aver opportunamente posizionato la guaina e
realizzato i cablaggi necessari, eseguire un getto di cemento in modo
che, successivamente, con asfalto o altro materiale di pavimentazione
si arrivi alla quota della superficie di transito.
7) PREDISPOSIZIONE IMPIANTO ELETTRICO
Predisporre l’impianto elettrico come indicato in fig.3 facendo riferimento
alle norme vigenti per gli impianti elettrici CEI 64-8, IEC364, armonizzazione
HD384 ed altre norme nazionali.
STOPPY- Ver. 04 - 9
D811319_04

MANUALE PER L’INSTALLAZIONE
ITALIANO
ATTENZIONE! Per il collegamento alla rete del quadro di comando,
utilizzare cavo multicolore di sezione minima 3x1.5mm2 e del tipo
previsto dalle normative vigenti. A titolo di esempio, se il cavo è
all’esterno (all’aperto), deve essere almeno pari a H07RN-F mentre,
se all’interno (in canaletta), deve essere almeno pari a H05 VV-F con
sezione 3x1.5mm2.
Per il collegamento del dissuasore al quadro di controllo utilizzare il cavo fornito
in dotazione e già cablato all’interno del dissuasore. Qualora la lunghezza
del cavo sia insufficiente, effettuare la giunzione all’interno di una scatola
stagna utilizzando due cavi separati per i collegamenti a bassa tensione e
per quelli a tensione di rete.
Particolare cura deve essere posta nel separare e fissare il cablaggio in
modo che non sia possibile il contatto tra i conduttori a bassa tensione e
quelli a tensione di rete.
Realizzare i collegamenti dei dispositivi di comando e di sicurezza in armonia
con le norme per la tecnica degli impianti precedentemente citate.
In fig.3 è riportato il numero di collegamenti e la loro sezione per una lun-
ghezza di circa 100 metri; per lunghezze superiori, calcolare la sezione per
il carico reale dell’automazione.
Esempio di installazione:
I Interruttore sezionatore onnipolare omologato, di adeguata portata
con apertura contatti di almeno 3,5 mm, provvisto di protezione
contro il sovraccarico ed il corto circuito. Se non presente, prevedere
a monte dell’automazione un interruttore differenziale omologato
con soglia 0,03A.
QR Quadro comando e ricevente incorporata
S Selettore a chiave
AL Lampeggiante con antenna accordata
M Dissuasore
P Pulsantiera a muro
Fte, Fre Coppia fotocellule
T Trasmittente 1-2-4 canali
SF Semaforo a luce rossa e verde
SM Spira magnetica
NOTA: La scelta del tipo e del numero dei dispositivi di sicurezza da
installare dipende dal particolare uso e dal sito di installazione.
8) COLLEGAMENTI MORSETTIERA
Passati gli adeguati cavi elettrici nelle canalette e fissati i vari componenti
dell’automazione nei punti prescelti, si passa al loro collegamento secondo
le indicazioni e gli schemi di seguito riportati.
Effettuare la connessione della fase, del neutro e della terra (obbligatoria).
Il conduttore di protezione (terra) con guaina isolante di colore giallo/verde,
deve essere collegato negli appositi morsetti contrassegnati dal simbolo di
messa a terra.
L’automazione va messa in funzione solo quando sono stati collegati e
verificati tutti i dispositivi di sicurezza.
Di seguito riportiamo le descrizioni dei morsetti della centralina mod. PER-
SEO fornita di serie (fig. 4).
CN1
1-2 Alimentazione di rete monofase (1=L) (2=N)
3-4-5 Collegamento motore (3 apertura filo colore nero, 4 comune filo colore
blu, 5 chiusura filo colore marrone) fino a 4 motori in parallelo.
N.B. per apertura si intende dissuasore abbassato (transito consentito),
per chiusura si intende dissuasore alzato (transito non consentito)
6-7-8 Uscita luci semaforo (6 Verde, 8 Rosso, 7 comune) 230V 25+25W
Max
9-10 Uscita Lampeggiante 230V
CN2
11-12 Uscite elletrofreno 24 Vd.c. (fino a 4 in parallelo) fili colore bianco
13-14 Ingresso Scheda Batterie Tampone a 12 Vd.c. per mantenimento
elettrofreno in assenza di rete.
15-16 Uscite Led di segnalazione STOPPY 24 Va.c. (fino a 4 in parallelo)
0,8 A max fili colore giallo.
17-18 Uscita contatto AUX NO temporizzato da 2s a 120s
19-20 Alimentazione accessori 24 Va.c. 1 A max.
CN3
21-22 Ingresso fotocellula (contatto NC) attive in chiusura
23-24 Ingresso comando di Stop (contato NC), arresta la manovra e lascia il
dissuasore sbloccato. Un successivo comando di Start attiva sempre
l’apertura del dissuasore, a meno che non sia già aperto, in questo
caso comanda la chiusura.
24-25 Ingresso finecorsa apertura fili colore verde.
26-29 Ingresso comando Start (contatto NO, logica a 2 passi: apri-chiudi),
a dissuasore alzato lo start inizia la manovra di discesa, durante
la quale lo start non è attivo, a dissuasore abbassato lo start inizia
la manovra e durante la salita dello stelo un nuovo comando start
interrompe la manovra e comanda la discesa.
27-29 Ingresso comando Apri (contatto NO)
Il contatto apri funziona anche da sicurezza, in quanto a dissuasore
abbassato, disabilita il comando di chiusura e start, sospendendo
inoltre la richiusura automatica sino a quando non viene liberato.
28-29 Ingresso comando Chiudi (contatto NO)
30-31 CN4 Resistenza riscaldante
Morsetto predisposto per l’alimentazione della resistenza di riscaldamento
(230Va.c. 100W Max) dei modelli serie “R”. Consente l’utilizzo del dissuasore
anche in climi particolarmente freddi. Anche avendo installato la resistenza di
riscaldamento è comunque necessario rimuovere eventuali lastre di ghiaccio
che si formassero sulla superficie del dissuasore (fili colore rosso).
32-33 CN6 Antifurto
Predisposizione sensore reed collocato sulla flangia del dissuasore della serie
“A”. Consente la connessione ad un antifurto esterno. Nel caso di tentativo
di manomissione del dissuasore il sensore attiva il sistema di allarme (fili
colore arancione, contatto NC).
CN8 Ricevente Radio
Connessione per Ricevente Radio mono-bicanale.
Il secondo canale è sempre collegato a chiudi (vedi configurazione dip 5).
Il primo canale può essere configurato, utilizzando il ponticello J1(vedi Fig. 4), come:
• start con logica 2 passi: apri-chiudi
vedi descrizione ingresso comando Start nel paragrafo collegamenti morsettiera.
• apri
accetta solo il comando di apertura.
Per comandare la chiusura e l’apertura con due tasti diversi di un trasmetti-
tore bicanale, utilizzare un ricevitore bicanale e spostare il ponticello J1 del
quadro comando Perseo in posizione Apri.
34-35 CN9 Antenna
Ingresso antenna (35 segnale, 34 calza).Cavo RG58.
I componenti: Resistenza riscaldante (cavi rossi), Elettrofreno (cavi
bianchi), Luci Led (cavi gialli), Finecorsa apertura (cavi verdi) e Con-
tatto Antifurto (cavi arancione) non sono polarizzati, risulta pertanto
intercambiabile la posizione dei cavi dello stesso colore.
9) CONNESSIONE CON PIÙ MOTORI
Per la connessione a più motori fare rif. alla Fig.8.
I condensatori dei motori devono essere collegati in parallelo. Per fare que-
sto tagliare il connettore CM del condensatore e utilizzare una morsettiera
ausiliare esterna.
I finecorsa devono essere connessi in serie come specificato in fig.8. Gli
elettrofreni devono essere connessi in parallelo come specificato in Fig.8.
Le connessioni vanno eseguite a regola d’arte.
CONFIGURAZIONE DIP-SWITCH
1 T LAVORO
LASCIARE IL DIP1 OFF!
2 T PAUSA
Abilitazione richiusura automatica
OFF = esclusa ON = tempo di pausa inserito e
regolabile tramite apposito trimmer
(t.pausa) da 2s a 120s
3 SET PAUSA
Abilitazione dei comandi di start e chiudi durante il tempo di pausa
OFF= disabilitati ON= abilitati
4 SET AP
Comando di start valido solo se attivato prima l’apri
OFF= Ingressi indipendenti ON = Ingressi legati.
5 SET CH
Comando di chiusura
OFF=Impulsivo ad attivazione ON= impulsivo a rilascio
6 PRELAMP
Prelampeggio su lampeggiante e semaforo
OFF=escluso ON=2s prima di ogni manovra con
segnalazione verde-rosso alternati sul
semaforo prima di ogni chiusura
7 LED OK AP
Funzionalità luci led dissuasore sollevato
OFF= luci fisse ON= lampeggio ad 1s
8 LED OK CH
Funzionalità luci led dissuasore abbassato
OFF =luci fisse ON= Lampeggio a 0,5s
REGOLAZIONE TRIMMER
T AUX Imposta il tempo di attivazione del contatto Aux da 2s a 120s
10 - STOPPY - Ver. 04
D811319_04

V RALL imposta la velocità di accostamento al finecorsa meccanico
di chiusura, in apertura il rallentamento è fisso
T PAUSA Imposta il tempo di pausa da 2s a 120s
10) MESSA A PUNTO CONCENTRICITA’
Per il corretto funzionamento è necessario provvedere alla messa a punto
della concentricità del cilindro in modo che durante le manovre di apertura e
chiusura il movimento avvenga in modo fluido, regolare e senza oscillazioni.
Per effettuare la messa a punto è necessario:
Svitare e rimuovere mediante una chiave a brugola N.4 i grani A (Fig. 5)
Introdurre nei fori un cacciavite a testa piatta N.3 (DIN 0,8x5) e ruotarlo in
un senso o nell’altro fino ad ottenere la concentricità. (Fig. 5)
La concentricità può essere verificata in questa fase visivamente, facendo
in modo che la distanza del cilindro rispetto alla flangia esterna sia la più
uniforme possibile.
Quindi procedere ad una verifica pratica effettuando alcune manovre durante
le quali si controllerà il movimento del cilindro.
Riavvitate con forza i 4 grani .
ATTENZIONE! La concentricità è molto importante per il corretto fun-
zionamento e la durata dell’attuatore, va tarata inizialmente in fase di
installazione, verificata a 6 mesi dall’installazione e quindi controllata
annualmente.
Il funzionamento con notevole eccentricità potrebbe portare ad un
deterioramento delle guarnizioni dello stelo.
11) SMONTAGGIO
Nel caso si renda necessario accedere ai componenti interni o al motore
del dissuasore procedere, facendo riferimento alla fig. 6, come di seguito
indicato:
1 Togliere l’alimentazione elettrica, prima di qualsiasi intervento sull’impianto.
Scollegare anche eventuali batterie tampone se presenti.
2 Svitare e rimuovere con una chiave a brugola n.6 le 4 viti esterne A e
con una chiave a brugola n.4 i grani B.
3 Rimuovere la flangia esterna C.
4 Svitare e rimuovere con la chiave da flessibile D (fornita) il blocco centrale E.
5 Tramite una chiave esagonale a tubo da 13 svitare e rimuovere il bullone
sottostante F e le relative rondelle.
6 A questo punto, servendosi di un piccolo cacciavite e facendo leva nel
punto di giuntura fra il cilindro ed il cappello, è possibile togliere la parte
superiore del cilindro G.
7 Se il modello è dotato di luci di segnalazione è necessario provvedere
alla loro disconnessione. Occorre quindi svitare lo spinotto H, e succes-
sivamente disconnettere le connessioni Faston.
8 Estrarre il cilindro I, utilizzando un cavo o un gancio passante i fori supe-
riori del cilindro. Non introdurre le mani nei fori superiori per estrarre
e reintrodurre il cilindro (la presenza del perno centrale L potrebbe
provocare lesioni). Sfilare dal cilindro l’eventuale cavo di connessione
delle luci di segnalazione.
9 Sfilare i 4 perni di regolazione M dai sostegni N, e quindi sfilare i sostegni
N dalla staffa di regolazione O.
10 Ora è possibile estrarre il gruppo motore completo e provvedere alle
eventuali verifiche e riparazioni.
12) MONTAGGIO
1 Verificare che le staffe di regolazione O siano completamente avvitate
alla staffa inferiore P, in modo che, a montaggio ultimato, sia più agevole
la messa a punto della concentricità.
2 Riposizionare il gruppo motore sul fondo del cilindro, evitando che il
cavo venga schiacciato dalla piastra inferiore. Allo scopo consigliamo di
legare un filo al cavo per mantenerlo sollevato durante il posizionamento
del motore; successivamente si provvederà alla sistemazione del cavo
eccedente sotto la flangia superiore Q, in modo che non interferisca con
la corsa dello stelo. Verificate inoltre l’allineamento dei perni di regolazione
M in riferimento ai fori presenti sul cilindro, in modo che il posizionamento
della flangia C possa avvenire senza problemi.
3 Procedere al riposizionamento dei 4 sostegni N sulle staffe di regolazione
e dei perni di regolazione M.
4 Introdurre il cilindro I, utilizzando un cavo o un gancio passante i fori supe-
riori del cilindro. Non introdurre le mani nei fori superiori per estrarre
e reintrodurre il cilindro (la presenza del perno centrale L potrebbe
provocare lesioni). Nel caso di dissuasori dotati di luci di segnalazione è
necessario provvedere al passaggio del cavo di alimentazione, (l’opera-
zione può essere agevolata legando un filo allo spinotto di connessione).
Sul fondo del cilindro è montato lo stop di fine corsa meccanico R; nel
momento del rimontaggio è necessario rispettare la posizione del fine
corsa riferita al sensore S. Nel caso di dissuasori dotati di sensore allarme
occorre prestare attenzione alla posizione del magnete T presente sulla
MANUALE PER L’INSTALLAZIONE ITALIANO
flangia che deve coincidere con la posizione del sensore U fissato sul
cilindro.
5 Ricollegare le connessioni Faston di alimentazione luci e riavvitate lo
spinotto H. Le luci di segnalazione non sono polarizzate, quindi la posi-
zione dei contatti è ininfluente.
6 Riposizionate la parte superiore del cilindro G e tramite una chiave
esagonale a tubo n.13 fissare il bullone F.
7 Con la chiave da flessibile D avvitare il blocco centrale E.
8 Avvitare con una chiave a brugola n.6 le 4 viti esterne A e con una chiave
a brugola n.4 i grani B.
ATTENZIONE! Dopo ogni operazione di smontaggio e montaggio è
necessario procedere ad una verifica della concentricità
13) MANOVRA MANUALE
In caso di mancanza di alimentazione il dissuasore tende spontaneamente a
scendere compiendo così una manovra di apertura, una semplice pressione
esercitata sulla superficie superiore del cilindro ne completerà la discesa,
consentendo il transito dei veicoli Fig.7.
Per evitare la discesa in assenza di rete è necessario installare un sistema
a batterie tampone. In questo caso l’installatore dovrà provvedere alla
realizzazione di un interruttore di sezionamento delle batterie in modo da
consentire la manovra manuale in caso di assenza di rete.
L’installatore si impegna ad istruire l’utilizzatore sull’uso corretto dell’automa-
zione, evidenziando le operazioni da effettuare in caso di emergenza.
14) MALFUNZIONAMENTI. CAUSE E RIMEDI
• Se il movimento del dissuasore non è fluido provvedere alla messa a
punto della concentricità.(vedi paragrafo 9).
• Se lo stelo non sale, verificate la presenza di tensione di rete, l’efficienza
delle eventuali batterie tampone e lo stato dei fusibili, verificate inoltre le
connessioni del motore al quadro di comando.
• Se lo stelo non scende, è probabile che arrivi costantemente un co-
mando di apri dal quadro di comando o da qualche dispositivo esterno.
Scollegate quindi temporaneamente tutti i dispositivi esterni in modo
da identificare la causa del problema. Se lo stelo resta ancora sollevato
procedere alla disconnessione dell’alimentazione e quindi alla verifica
del quadro comandi. Lo stelo comunque, in assenza di alimentazione,
deve tendere spontaneamente alla discesa; se ciò non si verificasse,
procedere allo smontaggio (paragrafo 10) al fine di verificare eventuali
impedimenti meccanici alla manovra di discesa
15) SMANTELLAMENTO
Nel caso l’automazione venga smontata per essere poi rimontata in altro
sito bisogna:
• Togliere l’alimentazione e scollegare tutto l’impianto elettrico.
• Rimuovere il dissuasore, prestando attenzione a non danneggiare la
guaina di protezione dei cavi elettrici durante le operazioni di scavo.
• Smontare il quadro di comando e tutti i componenti dell’installazione.
• Nel caso alcuni componenti non possano essere rimossi o risultino
danneggiati, provvedere alla loro sostituzione.
16) MANUTENZIONE E DEMOLIZIONE
La manutenzione dell’impianto va fatta eseguire regolarmente da parte di
personale qualificato. I materiali costituenti l’apparecchiatura e il suo imballo
vanno smaltiti secondo le norme vigenti. Le pile e le batterie non devono
essere disperse nell’ambiente.
AVVERTENZE
Il buon funzionamento dell’operatore è garantito solo se vengono
rispettati i dati e le indicazioni riportati in questo manuale, nonché
le norme di buona tecnica. La ditta non risponde dei danni causati
dall’inosservanza delle norme di installazione, delle norme di buona
tecnica e delle indicazioni riportate in questo manuale.
Le descrizioni e le illustrazioni del presente manuale non sono impe-
gnative, lasciando inalterate le caratteristiche essenziali del prodotto,
la Ditta si riserva di apportare in qualunque momento le modifiche che
essa ritiene convenienti per migliorare tecnicamente, costruttivamente
e commercialmente il prodotto.
STOPPY- Ver. 04 - 11
D811319_04

INSTALLATION MANUAL
ENGLISH
Thank you for buying this product, our company is sure that you will be more
than satisfied with its performance. This product is supplied with a “Warnings”
leaflet and an “Instruction Manual”. These should both be read carefully as
they provide important information about safety, installation, operation and
maintenance. This product complies with recognised technical standards
and safety regulations. We declare that it is in conformity with the following
European Directives: 89/336/EEC, 73/23/EEC, 98/37/EEC (and subsequent
amendments).
1) GENERAL SAFETY
WARNING! An incorrect installation or improper use of the product can
cause damage to persons, animals or things.
The Company declines all responsibility for any consequences resulting from
improper use of the product, or use which is different from that expected and
specified in the present documentation.
• The “Warnings” leaflet and “Instruction booklet” supplied with this product
should be read carefully as they provide important information about
safety, installation, use and maintenance.
• Scrap packing materials (plastic, cardboard, polystyrene etc) according
to the provisions set out by current standards. Keep nylon or polystyrene
bags out of children’s reach.
• Keep these installation instructions together with the technical brochure
for future reference.
• This product was exclusively designed and manufactured for the use
specified in the present documentation. Any other use not specified in
this documentation could damage the product and be dangerous. The
Company declines all responsibility for any consequences resulting from
improper use of the product, or use which is different from that expected
and specified in the present documentation.
• Do not install the product in potentially explosive atmosphere or wherever
there is a fire risk.
• The construction components of this product must comply with the following
European Directives: 89/336/CEE, 73/23/EEC, 98/37 EEC and subse-
quent amendments. As for all non-EEC countries, the above-mentioned
standards as well as the current national standards should be respected
in order to achieve a good safety level.
• The Company declines all responsibility for any consequences resulting
from failure to observe Good Technical Practice when installing the device
described in the present manual.
• The installation must comply with the provisions set out by the following
European Directives: 89/336/CEE, 73/23/EEC, 98/37 EEC and subsequent
amendments.
• Disconnect the electrical supply before carrying out any work on the
installation. Also disconnect any buffer batteries, if fitted.
• Fit an omnipolar or magnetothermal switch on the mains power supply,
having a contact opening distance equal to or greater than 3,5 mm. Also
fit an adequate cut-out device for the buffer batteries.
• Check that a differential switch with a 0.03A threshold is fitted just before
the power supply mains.
• Check that earthing is carried out correctly: connect all metal parts of the
closing mechanism and all system components provided with an earth
terminal.
• Fit all the safety devices (photocells, electric edges etc.) which are needed
to protect the area from any danger caused by squashing, conveying and
shearing.
• Position at least one luminous signal indication device (blinker) where it
can be easily seen, and fix a Warning sign next to the structure.
• The Company declines all responsibility with respect to the automation
safety and correct operation when other producers’ components are
used.
• Only use original parts for any maintenance or repair operation.
• Do not modify the automation components, unless explicitly authorised
by the Company.
• Instruct the product user about the control systems provided and the
manual opening operation in case of emergency.
• Do not allow persons or children to remain within the automation opera-
tion area.
• Keep radio control or other control devices out of children’s reach, in
order to avoid unintentional automation activation.
• The user must avoid any attempt to carry out work or repair on the automa-
tion system, and always request the assistance of qualified personnel.
• Anything which is not expressly provided for in the present instructions,
is not allowed.
• Installation must be carried out using the safety devices and controls
prescribed by the EN 12978 Standard.
2) GENERAL OUTLINE
Underground anti-waiting bollard, compact and sturdy, intended for the
management of motor vehicles transiting and waiting in public or private
areas, urban pedestrian areas and in all cases where vehicle access is to
be controlled.
It consists of a steel rod coated with reflecting material, and powered by
an oil-bath motor; all protected by a hot-galvanised steel cylinder which is
fitted underground.
The PERSEO control panel allows up to four bollards to be controlled si-
multaneously (Fig.8).
Besides the standard version, STOPPY is available in the following models:
“L” series provided with signal indication blinker lights and, on request, “R”
series provided with a heated resistor which also allows the bollard to be
used in particularly cold climates (as much as –25°C) and “A” series provided
with a magnetic sensor for connection to an antitheft system.
Accessories:
Electric brake buffer battery kit, which allows the bollard to be kept in the
access closed position even when the mains power is off.
3) TECHNICAL SPECIFICATIONS FOR STOPPY ACTUATOR
Motor: ..................................................................230Va.c. ±10% 50/60 Hz*
Capacitor: ............................................................................................. 8 µF
Absorption: .........................................................1.2 A (230V) 2.4 A (110V)
Work frequency: ............................................................................ 2000/24h
Maximum torque: ..................................................................700 N (~70 kg)
Degree of protection: ............................................................................IP67
Control panel .................................................................................... Perseo
Electric brake: .................................................................................. 24Vd.c.
Working time: .........................................................................6s+slow-down
Working temperature ............................................................. –15°C + 60°C
Working temperature for “R” versions ................................... –25°C + 60°C
Front impact resistance on rod raised by 200 mm: ...................5,000 Joule
(50% breakagepossibility)
Static Load: ........................ Max. sustainable weight with raised rod: 300kg
Max. sustainable weight with lowered rod: 15,000 kg
Dynamic Load: ...................................Max. pushing force on closing: 100kg
Weight: ........................................................................................... 90 kg ca.
Dimensions : ..................................................................................see fig. 1
Manual manoeuvre: .............When the current is off, it becomes reversible.
(* other voltages available on request)
4) TECHNICAL SPECIFICATIONS FOR PERSEO CONTROL PANEL
Power supply: ......................................................230Va.c. ±10% 50/60Hz*
Absorbed current: .................................................6A max (with 4 bollards)
Maximum no. of motors: ......................... up to 4 STOPPY bollards (Fig.8)
Dimensions: ..............................................................................see figure 4
Fuses: ......................................................F2: T2A / F3: T2A / F4: T315 mA
(* other voltages available on request)
WARNING! The 100V 50 and 60Hz control units can control two anti-
transiting bollards in parallel only, instead of four.
5) PRELIMINARY CHECKS
Check that the installation base is stable and level.
For correct operation, the bollard does not require precise verticality; however,
to obtain a good aesthetic result, it is advisable to proceed to levelling the
installation area so as to ensure that the rod stroke is perfectly vertical.
6) FOUNDATION DIGGING AND BOLLARD POSITIONING
• Proceed to digging a hole in the ground to fit the bollard in. The hole must
have a depth of about 110 cm and a diameter of about 50/60 cm.
• Lay a 20-cm thick gravel foundation for drainage, as shown in fig. 2. Then
lay a 5-cm thick fine sand layer to complete the foundation base for the
bollard.
• Position the bollard, paying attention to the foundation level (the ring nut
must be placed at the same level as the transit surface) and base level-
ling.
• Carry out electrical installation (see paragraph 7).
• Fill the hole up to a level of about 25 cm with compact sand.
• At this point, suitably position the sheath and carry out the necessary wiring
installation, then lay out a concrete casting, which will be later covered by
asphalt or other flooring material to reach the transit surface level.
7) ELECTRICAL INSTALLATION SET-UP
Lay out the electrical installation as shown in fig. 3, making reference to the
current CEI 64-8, IEC 364 (HD 384 harmonised) electrical standards, and
other national standards.
WARNING! For connection of the control panel to the mains, use a
multicolour cable having a minimum 3x1.5 sq mm cross section of
the type set out by the current standards. For example, if the cable is
installed outside (in the open air), it must be at least equal to H07RN-F,
12 - STOPPY - Ver. 04
D811319_04

INSTALLATION MANUAL ENGLISH
whereas, if it is installed inside (in a raceway), it must be at least equal
to H05 VV-F and have a 3x1.5 sq mm cross section.
To connect the bollard to the control panel, use cable supplied as standard
and already wired inside the bollard. Should the cable be too short, join it
inside a watertight box, using two separate cables for low voltage and mains
voltage connections.
Particular attention must be paid in separating and fixing the wiring, so that
the low voltage and mains voltage cables are prevented from coming into
contact.
Connect the control and safety devices in compliance with the installation
technical standards mentioned previously.
Fig. 3 shows the number of connections and their cross section for an ap-
proximate length of 100 metres: in case of longer cables, calculate the cross
section for the true automation load.
Example of installation:
I Type-approved omnipolar circuit breaker, which must be adequately
rated and have at least 3,5 mm contact opening, provided with
protection against overloads and short circuits. If not already
installed, place a type-approved differential switch with a 0.03A
threshold just before the automation system.
QR Control panel and incorporated receiver
S Key selector
AL Blinker with tuned antenna
M Bollard
P Wall-mounted pushbutton panel
Fte, Fre Pair of photocells
T 1-2-4 channel transmitter
SF Red and green traffic lights
SM Magnetic coil
NOTE: The choice of the type and number of safety devices to be installed
depends on the particular use and installation location.
8) TERMINAL BOARD CONNECTIONS
Having passed adequate electric cables through the raceways, and fixed
the various automation components in the chosen points, these must be
connected according to the indications given in the diagrams below.
Carry out connection of the phase, neutral and earth (compulsory) wires. The
protection (earth) wire with yellow/green insulating sheath must be connected
to the appropriate terminals marked by the earthing symbol.
The automation system must only be commissioned after all the safety
devices have been connected and inspected.
Here follows the description of the PERSEO mod. control unit supplied as
standard (fig. 4).
CN1
1-2 Single-phase mains supply (1=L) (2=N)
3-4-5 Motor connection (3 opening - black wire, 4 common - blue wire, 5
closing - brown wire) up to 4 motors in parallel
N.B. opening means bollard lowered (transit allowed), closing means
bollard raised (transit not allowed)
6-7-8 Traffic light output (6 green, 8 red, 7 common) 230V 25+25W max
9-10 Blinker output 230V
CN2
11-12 Electric brake outputs 24Vd.c. (up to 4 in parallel) white wires
13-14 Buffer battery board input at 12 Vd.c. to maintain electric brake with
mains power off
15-16 STOPPY signalling LED outputs 24Va.c. (up to 4 in parallel) 0.8 A
max yellow wires
17-18 AUX NO contact output timed from 2s to 120s
19-20 Supply to accessories 24 Va.c. 1 A max
CN3
21-22 Photocell input (NC contact) active on closing
23-24 Stop command input (NC contact) - stops the manoeuvre and leaves
the bollard released. A subsequent Start command always activates
bollard opening, unless already opened, in which case it controls
closing.
24-25 Opening limit switch input - green wires
26-29 Start command input (NO contact, 2-step logic: open-close) - with the
bollard raised, the Start command initiates the lowering manoeuvre,
during which this command is not active; with the bollard lowered, the
Start command initiates the manoeuvre, and during rod raising, a new
Start command interrupts the manoeuvre and controls lowering.
27-29 Open command input (NO contact)
The contact “open” also acts as safety device in that, after the bollard
has beeen lowered, it deactivates the closing and start command,
interrupting also the automatic re-closing until it is released.
28-29 Close command input (NO contact)
30-31 CN4 Heating resistor
Terminal preset for supplying the heating resistor (230Va.c. 100W max)
on the “R” series models. Allows the bollard to be used even in particularly
cold climates. However, even with the heating resistor installed, it may be
necessary to remove any layers of ice which have formed on the bollard
surface (red wires).
32-33 CN6 Antitheft device
Presetting of reed sensor located on the flange of the “A” series bollard. Allows
the bollard to be connected to an external antitheft device. In the case of an
attempt to tamper with the bollard, the sensor activates the alarm system
(orange wires, NC contact).
CN8 Radio Receiver
Connection for single and double-channel radio receiver
The second channel is always connected to the close command (see dip-
switch 5 configuration).
The first channel can be configured, by means of the J1 jumper (see fig.
4), as:
• Start with 2-step logic: open-close
see Start command description in the paragraph concerning terminal board
connections.
• Open
only accepts the opening command.
To control closing and opening by means of two different keys on a double-
channel transmitter, use a double-channel receiver and move the J1 jumper
on the Perseo control panel to the Open position.
34-35 CN9 Antenna
Antenna input (35 signal, 34 braid). RG58 Cable.
The components - Heating resistor (red cables), Electric brake (white
cables), LED lights (yellow cables), Opening limit switches (green cables)
and Antitheft contact (orange cables) - are not polarised, therefore the
position of the cables of the same colour is interchangeable.
9) CONNECTION TO SEVERAL MOTORS
Refer to Fig.8. for the connection to several motors.
The motor capacitors must be connected in parallel. To do this, cut the CM
connector of the capacitor and use an auxiliary external terminal board.
The limit switches must be connected in series as indicated in Fig.8. The
electric brakes must be connected in parallel as indicated in Fig.8. The con-
nections must be completed in a workmanlike manner.
DIP-SWITCH CONFIGURATION
1 T LAVORO
LEAVE THE DIP1 OFF!
2 T PAUSA
Enables subsequent automatic closing
OFF= excluded ON= dwell time to be entered and set by
means of appropriate trimmer (dwell time)
from 2s to 120s
3 SET PAUSA
Enables Start and Close commands during dwell time
OFF= disabled ON= enabled
4 SET AP
Start command only valid when activated after Open command
OFF= independent inputs ON= restricted inputs
5 SET CH
Closing command
OFF= impulse activated ON= impulse released
6 PRELAMP
Pre-blinking on blinker and traffic light
OFF= excluded ON= 2s before each manoeuvre with alter
nate green-red signal on the traffic light
before each closing operation
7 LED OK AP
Operation of LED lights with bollard raised
OFF= fixed lights ON= blinking at 1s
8 LED OK CH
Operation of LED lights with bollard lowered
OFF= fixed lights ON= blinking at 0,5s
TRIMMER SETTING
T AUX Sets the Aux contact activation time from 2s to 120 s
V RALL Sets the approaching speed towards the mechanical closing
liminting device (on opening the slow-down is steady).
TPAUSA Sets the dwell time from 2s to 120s.
STOPPY- Ver. 04 - 13
D811319_04

INSTALLATION MANUAL
ENGLISH
10) CONCENTRICITY SETTING UP
For correct operation, proceed to setting up the cylinder concentricity in order
that, during the opening and closing manoeuvres, movement occurs smoothly,
regularly and without oscillation. To set up the cylinder, proceed as follows:
Use a no.4 Allen key to unscrew and remove dowels A (fig. 5).
Insert a no.3 flathead screwdriver (DIN 0,8x5) and turn it one way or the
other until obtaining concentricity (fig. 5).
During this phase concentricity can be checked visually, making sure that
the distance between the cylinder and external flange is as uniform as
possible.
Then proceed to a practical check, carrying out a few manoeuvres during
which the cylinder movement can be checked.
Screw the 4 dowels in tight.
WARNING! Concentricity is very important for the correct operation
and life of the actuator; it is to be first calibrated during the installation
phase, checked after 6 months and then every year.
Operation with marked eccentricity could lead to deterioration of the
rod seals.
11) DISASSEMBLY
Should it be necessary to gain access to the bollard internal components or
motor, refer to fig. 6 and proceed as follows:
1 Disconnect the electrical supply before carrying out any operation on the
system. Also disconnect any buffer batteries, if fitted.
2 Use a no.6 Allen key to unscrew and remove 4 external screws A, and a
no.4 Allen key to remove dowels B.
3 Remove external flange C.
4 Use special wrench D (supplied) to unscrew and remove central block E.
5 Use a no.13 socket spanner to unscrew and remove underlying nut F
and respective washers.
6 At this point, use a small screwdriver as a lever on the junction between
cylinder and cap to remove the upper part of cylinder G.
7 If the model is supplied with signal indication lights, these must be dis-
connected. Then unscrew piston pin H, and subsequently the Faston
connections.
8 Take out cylinder I, using a cable or a hook passing through the upper
cylinder holes.
Do not place your hands in the upper holes to take out or put back
the cylinder (the presence of centre pin L could cause injuries). Withdraw
the signal light connection cable from the cylinder.
9 Withdraw 4 adjustment pins M from supports N, and then withdraw sup-
ports N from adjustment bracket O.
10 It is now possible to take out the entire motor unit and proceed to any
inspections or repairs needed.
12) ASSEMBLY
1 Check that adjustment brackets O are completely screwed onto lower
bracket P, in order that it might be easier to set up concentricity after
assembly is completed.
2 Reposition the motor unit on the bottom of the cylinder, making sure
that the cable is not squashed under the lower plate. For this purpose,
we advise you to tie a wire to the cable to keep it raised during motor
positioning; later you can proceed to arrange the exceeding cable under
upper flange Q, so that it does not interfere with the rod stroke. Also
check the alignment of adjustment pins M with reference to the holes in
the cylinder, in order for positioning of flange C to take place without any
problems.
3 Proceed to repositioning 4 supports N on the adjustment brackets, as
well as adjustment pins M.
4 Insert cylinder I, using a cable or a hook passing through the upper
cylinder holes. Do not place your hands in the upper holes to take
out or put back the cylinder (the presence of central pin L could cause
injuries). In the case of bollards supplied with signal lights, provide for
the power supply cable to pass through (this operation can be made
easier by tying a wire to the connection pin). Mechanical end-of-stroke
R is fitted to the bottom of the cylinder; during re-assembly, the position
of the end-of-stroke referred to sensor S must be respected. In the case
of bollards provided with alarm sensors, pay attention to the position of
magnet T fitted to the flange, which must coincide with the position of
sensor U fixed to the cylinder.
5 Reconnect the light supply Faston connections and retighten piston pin
H. The signal indication lights are not polarised, therefore the position of
the contacts is irrelevant.
6 Reposition the upper part of cylinder G and fix nut F by means of a no.13
socket spanner.
7 Use special wrench D to screw central block E.
8 Use a no.6 Allen key to tighten 4 external screws A, and a no.4 Allen key
to tighten dowels B.
WARNING! After each disassembly and assembly operation, proceed
to checking concentricity.
13) MANUAL MANOEUVRE
When the power supply is disconnected, the bollard tends to lower sponta-
neously, therefore carrying out an opening manoeuvre; a simple pressure
carried out on the top cylinder surface will complete lowering, and vehicle
transit will be allowed. See fig. 7.
To prevent the cylinder from lowering when the mains power is off, a buffer
battery system is required. In this case, the installer must fit a battery cut-
out switch, in order to allow manual manoeuvre to be carried out when the
mains power is off.
The installer undertakes to instruct the user on correct automation use,
highlighting the operations to be carried out in case of emergency.
14) MALFUNCTIONS. CAUSES AND REMEDIES
• If the bollard does not move smoothly, proceed to setting up concentricity
(see paragraph 9).
• If the rod does not move up, check that the mains power supply is on, any
buffer batteries supplied are efficient, and the fuses are in good condition;
also check the motor connections to the control panel.
• If the rod does not move down, it is probable that an Open command is
constantly given from the control panel or other external device. Therefore
temporarily disconnect all the external devices in order to identify the cause
of the problem. If the rod still remains raised, proceed to disconnecting
the power supply and then checking the control panel. Anyway, when
the power supply is off, the rod should spontaneously tend to lower; if
this does not happen, proceed to disassembly (paragraph 10) in order to
identify any mechanical problems preventing the lowering manoeuvre.
15) DISMANTLING
When the automation device is disassembled to be reassembled on another
site, proceed as follows:
• Disconnect the power supply and the entire electrical installation
• Remove the bollard, taking care not to damage the sheath which is to
protect the electric cables during the digging operations.
• Disassemble the control panel and all the installation components.
• In the case where some of the components cannot be removed or are
damaged, they must be replaced.
16) MAINTENANCE AND SCRAPPING
System maintenance is to be regularly carried out by qualified personnel.
The materials making up the appliance and its packing are to be scrapped
according to current standards. Batteries must be disposed of in the ap-
propriate manner.
WARNING
Correct operation of the controller is only guaranteed when the data
specified in this manual are respected, as well as good technical practice
standards. The Company cannot be held responsible for any damage
caused by failure to observe the installation standards, good technical
practice standards and directives specified in the present manual.
The descriptions and illustrations contained in the present manual are
not binding. The Company reserves the right to make any alterations
deemed appropriate for the technical, manufacturing and commercial
improvement of the product at any time, while leaving the essential
product features unchanged.
14 - STOPPY - Ver. 04
D811319_04

MANUEL D’INSTALLATION FRANÇAIS
En vous remerciant pour la préférence accordée à ce produit, la maison
vous assure que vous obtiendrez de celui-ci tous les services nécessaires à
votre usage. Lisez attentivement la brochure “Avertissements” et le “Manuel
d’instructions” joints, ils fournissent des indications importantes au sujet de
la sécurité, l’installation, l’utilisation et l’entretien. Ce produit est conforme aux
normes reconnues de la technique et à la disposition relative à la sécurité.
Nous confirmons qu’il est conforme aux directives européennes suivantes:
89/336/CEE, 73/23/CEE, 98/37/CEE (et modifications successives).
1) SECURITE GENERALE
ATTENTION! Une installation erronée ou une utilisation impropre du
produit peuvent provoquer des dommages aux personnes, aux animaux
ou aux choses.
• Lisez attentivement la brochure “Avertissements” et le “Manuel d’instruc-
tions” qui accompagnent ce produit, puisqu’ils fournissent d’importantes
indications concernant la sécurité, l’installation, l’utilisation et l’entre-
tien.
• Éliminer les matériaux d’emballage (plastique, carton, polystyrène etc.)
selon les prescriptions des normes en vigueur. Ne pas laisser des enve-
loppes en nylon et polystyrène à la portée des enfants.
• Conserver ces instructions pour les joindre à la fiche technique de la
machine et pour les consulter en cas de besoin.
• Ce produit a été conçu et réalisé exclusivement pour l’utilisation indi-
quée dans cette documentation. Des utilisations non indiquées dans
cette documentation pourraient provoquer des dommages au produit et
représenter une source de danger pour l’utilisateur. La Société décline
toute responsabilité dérivée d’une utilisation impropre ou différente de
celle à laquelle le produit a été destiné et qui est indiquée dans cette
documentation.
• Ne pas installer le produit dans une atmosphère potentiellement explosive
ou en cas de risque d’incendie.
• Les éléments constituant la machine doivent être conformes aux Di-
rectives Européennes suivantes: 89/336/CEE, 73/23/CEE, 98/37/CEE
et modifications successives. Pour tous les Pays extra-CEE, outre les
normes nationales en vigueur, pour assurer un bon niveau de sécurité il
est conseillé de respecter aussi les normes indiquées ci-haut.
• La Société décline toute responsabilité en cas de non respect des normes de
Bonne Technique dans l’installation du dispositif décrit dans ce manuel.
• L’installation doit être conforme aux prescriptions des Directives Européen-
nes: 89/336/CEE, 73/23/CEE, 98/37/CEE et modifications successives.
• Couper l’alimentation électrique avant d’effectuer n’importe quelle intervention
sur l’installation. Débrancher aussi les éventuelles batteries de secours.
• Prévoir sur la ligne d’alimentation de l’automation un interrupteur ou un
magnétothermique omnipolaire avec distance d’ouverture des contacts
égale ou supérieure à 3,5 mm. Prévoir un dispositif de disjonction adéquat
aussi pour les batteries de secours.
• Vérifier qu’en amont de la ligne d’alimentation il y a un interrupteur dif-
férentiel avec seuil de 0,03A.
• Contrôler si l’installation de terre est effectuée correctement: connecter
toutes les parties métalliques de la fermeture et tous les composants de
l’installation dotés de borne de terre.
• Appliquer tous les dispositifs de sécurité (cellules photoélectriques, barres
palpeuses etc.) nécessaires à protéger la zone des dangers d’écrasement,
d’entraînement, de cisaillement.
• Appliquer au moins un dispositif de signalisation lumineuse (feu clignotant)
en position visible, et un panneau d’avertissement près de la structure.
• La Société décline toute responsabilité en matière de sécurité et de bon
fonctionnement de l’automation si des composants d’autres producteurs
sont utilisés.
• Utiliser exclusivement des pièces originales pour n’importe quel entretien
ou réparation.
• Ne pas effectuer des modifications aux composants de l’automation si
non expressément autorisées par la Société.
• Faire connaître à l’utilisateur de l’installation les systèmes de commande
appliqués et l’exécution de l’ouverture manuelle en cas d’urgence.
• Ne pas permettre à des personnes et à des enfants de stationner dans
la zone d’action de l’automation.
• Ne pas laisser des radio commandes ou d’autres dispositifs de commande
à portée des enfants afin d’éviter des actionnements involontaires de
l’automation.
• L’utilisateur doit éviter toute tentative d’intervention ou de réparation de
l’automation et ne s’adresser qu’à du personnel qualifié.
•
Tout ce qui n’est pas expressément prévu dans ces instructions, est interdit.
• L’installation doit être faite en utilisant des dispositifs de sécurité et des
commandes conformes à la norme EN 12978.
2) GENERALITES
Borne anti-stationnement enterrée, compacte et robuste, indiquée pour la
gestion de l’accès et du stationnement des voitures dans des espaces publics
ou privés, pour la réalisation de zones piétonnes urbaines et dans tous les
cas où un contrôle des accès de véhicules est nécessaire.
La borne anti-stationnement se compose d’un plot d’acier revêtu d’un film
rétroréfléchissant et est commandée par un moteur en bain d’huile, le tout
protégé par un cylindre à enterrer en acier zingué à chaud.
L’unité de commande PERSEO permet de contrôler en même temps jusqu’à
quatre bornes anti-stationnement (Fig.8).
Outre à la version de base STOPPY, sont disponibles les modèles série
“L” dotés de feux clignotants de signalisation et, en option, les modèles
série “R” dotés de résistance chauffante qui permet d’utiliser la borne anti-
stationnement aussi si le climat est particulièrement froid (jusqu’à –25°C)
et les modèles série “A” dotés de capteur magnétique pour la connexion à
une installation antivol.
Accessoires:
Kit. Batteries de Secours électrofrein permettant le maintient de la borne anti-station-
nement en position de blocage de l’accès aussi en cas de faute d’électricité.
3) CARACTERISTIQUES TECHNIQUES DE L’ACTIONNEUR STOPPY
Moteur: .................................................................230Va.c. ±10% 50/60Hz*
Condensateur: ...................................................................................... 8 µF
Puissance absorbée: ..........................................1,2 A (230V) 2,4 A (110V)
Fréquence de travail: .................................................................... 2000/24h
Couple maxi: .........................................................................700 N (~70Kg)
Degré de protection: .............................................................................IP67
Tableau de commande: .................................................................... Perseo
Electrofrein: ..................................................................................... 24Vd.c.
Temps de travail: ...................................................................... 6s+ralentiss.
Température d’exercice: ......................................................... –15°C + 60°C
Température d’exercice versions “R” .................................... –25°C + 60°C
Résistance au choc frontal sur le plot soulevé de 200 mm: ...5.000 Joules
(ruptures probables à 50%)
Charge Statique: ...............Avec le plot soulevé, poids soutenu maxi 300kg
Avec le plot baissé, poids soutenu maxi 15.000 kg
Charge Dynamique ........Poussée maxi dans la phase de fermeture: 100kg
Poids: ........................................................................................... 90 kg env.
Dimensions: ................................................................................... voir fig. 1
Manoeuvre manuelle: ........... En cas de faute électrique elle devient réversible.
(* d’autres tensions disponibles en option)
4) CARACTERISTIQUES TECHNIQUES DU TABLEAU DE COMMANDE
PERSEO
Alimentation: ........................................................230Va.c. ±10% 50/60Hz*
Courant absorbé: ...................6A maxi (avec 4 bornes anti-stationnement)
N° maxi de moteurs .........jusqu’à 4 bornes anti-stationnement STOPPY(Fig.8)
Dimensions: ..............................................................................voir figure 4
Fusibles: .................................................. F2: T2A / F3: T2A / F4: T315 mA
(*d’autres tensions disponibles en option)
ATTENTION! Les unités de commande à 100V 50 et 60Hz ne peuvent
gérer que deux bornes anti-passage en parallèle, au lieu de quatre.
5) VERIFICATIONS PRELIMINAIRES
Vérifier que la surface d’appui est stable et plate.
Pour son fonctionnement, la borne anti-stationnement n’exige pas une per-
pendicularité parfaite, mais il est conseillé, pour un bon résultat esthétique,
d’effectuer au moins le nivellement de la zone de pose, de telle façon à
assurer une course parfaitement verticale du plot.
6) PREDISPOSITION DE LA TRACHEE ET POSE DE LA BORNE ANTI-
STATIONNEMENT
• Creuser une tranchée pour la pose de la borne anti-stationnement. La tranchée
devra avoir une profondeur d’environ 110 cm et un diamètre de 50/60 cm.
• Réaliser un hourdis de drainage en gravier de 20 cm, comme indiqué
à la fig. 2. Avec environ 5 cm de sable fin, réaliser le fond de pose de la
borne anti-stationnement.
• Poser la borne anti-stationnement, en faisant attention au niveau de pose
(la bague doit se trouver au même niveau que la surface de passage) et
au nivellement de la base.
• Réaliser la prédisposition électrique (voir paragraphe 7)
•
Remplir la tranchée à un niveau d’environ 25 cm avec du sable compact.
• A ce point, après avoir opportunément positionné la gaine et réalisé
les câblages nécessaires, effectuer une coulée en béton, de telle façon
à arriver ensuite, avec du goudron ou autre matériau, au niveau de la
surface de passage.
7) PREDISPOSIITON DE L’INSTALLATION ELECTRIQUE
Prédisposer l’installation électrique comme indiqué à la fig. 3, se référant
aux normes en vigueur pour les installations électriques CEI 64-8, IEC364,
harmonisation HD384 et autres normes nationales.
STOPPY- Ver. 04 - 15
D811319_04

MANUEL D’INSTALLATION
FRANÇAIS
Attention! Pour la connexion à la ligne du tableau de commande, uti-
liser un câble multicolore ayant une section minimale de 3x1,5 mm2,
du type prévu par les normes en vigueur. A titre indicatif, si le câble
se trouve à l’extérieur il doit être du type H07RN-F, tandis que s’il se
trouve à l’intérieur (dans une conduite à câbles) il doit être d’au moins
H05 VV-F avec une section de 3x1,5 mm2.
Pour la connexion de la borne anti-stationnement au tableau de contrôle,
utiliser le câble fourni en dotation et déjà câblé à l’intérieur de la borne. Si
la longueur du câble est insuffisante, effectuer la jonction à l’intérieur d’une
boîte étanche en utilisant deux câbles séparés pour les connexions à basse
tension et pour celles à tension de ligne.
Un soin particulier doit être pris pour la séparation et la fixation du câblage,
de telle façon à exclure le contact entre les conducteurs à basse tension et
ceux à tension de ligne.
Réaliser les connexions des dispositifs de commande et de sécurité selon
les normes pour la technique des installations précédemment citées.
La fig. 3 fournit le nombre des connexions et leur section pour une longueur
d’environ 100 mètres; pour des longueurs supérieures, calculer la section
pour la charge réelle de l’automation.
Exemple d’installation:
I Interrupteur disjoncteur omnipolaire homologué, ayant une
puissance adéquate, avec ouverture des contacts d’au moins
3,5 mm, doté de protection contre la surcharge et le court-
circuit. S’il n’est pas présent, prévoir en amont de l’automation
un interrupteur différentiel homologué avec seuil 0,03A.
QR Tableau de commande et récepteur incorporé
S Sélecteur à clé
AL Feu clignotant avec antenne accordée
M Borne anti-stationnement
P Clavier mural
Fte, Fre Couple de cellules photoélectriques
T Emetteur 1-2-4 canaux
SF Feu à lumière rouge et verte
SM Boucle magnétique
NOTE: Le choix du type et du nombre des dispositifs de sécurité à
installer dépend du type d’utilisation et du lieu d’installation.
8) CONNEXINS AU BORNIER
Après avoir passé les câbles électriques dans les conduites et une fois avoir
fixé aux endroits choisis les différents composants de l’automation, il faut les
connecter selon les indications et les schémas fournis de suite.
Effectuer la connexion de la phase, du neutre et de la terre (obligatoire). Le
conducteur de protection (terre) avec gaine isolante jaune/verte doit être
connecté dans les bornes spécialement prévues et marquées du symbole
de mise à la terre.
L’automation ne peut être mise en fonction qu’après avoir effectué toutes les
connexions et vérifié le bon fonctionnement des dispositifs de sécurité.
Nous fournissons de suite les descriptions des bornes de l’unité de com-
mande mod. PERSEO fournie en dotation (fig. 4)
CN1
1-2 Alimentation de ligne monophasée (1=L) (2=N)
3-4-5 Connexion moteur (3 ouverture fil noir, 4 fil commun bleu, 5 fer-
meture fil brun) jusqu’à 4 moteurs en parallèle
N.B. par «ouverture» on entend borne anti-stationnement basse
(passage admis), par «fermeture» on entend borne anti-station-
nement haute (passage interedit)
6-7-8 Sortie feux (6 Vert, 8 Rouge, 7 fil commun) 230V 25+25W Max
9-10 Sortie feu clignotant 230V
CN2
11-12 Sorties électrofrein 24 Vd.c. (jusqu’à 4 en parallèle) fils blancs
13-14 Entrées Carte Batteries de Secours à 12 Vd.c. pour maintenir
l’électrofrein en absence de ligne
15-16 Sorties Leds de signalisation STOPPY 24 Va.c. (jusqu’à 4 en
parallèle) 0,8 A maxi fils jaunes.
17-18 Sortie contact AUX NO temporisé 2 s à 120 s
19-20 Alimentation accessoires 24 Va.c. 1 A maxi.
CN3
21-22 Entrée cellule photoélectrique (contact NF) active en fermeture
23-24 Entrée commande de Stop (contact NF), elle arrête la manoeuvre et
laisse la borne anti-stationnement débloquée. Une autre commande
de Start active toujours l’ouverture de la borne, sauf si elle est déjà
ouverte, car dans ce cas elle en commande la fermeture.
24-25 Entrée fin de course ouverture fils verts
26-29 Entrée commande Start (contact NO, logique à 2 pas: ouvre-fermei),
si la borne anti-stationnement est soulevée, le start commence la
manoeuvre de descente, pendant laquelle le start n’est pas actif,
avec la borne anti-stationnement baissée, le start commence la
manœuvre et pendant la montée du plot une nouvelle commande
de start interrompt la manoeuvre et commande la descente.
27-29 Entrée commande Ouvre (contact NO)
Le contact “ouvre” fait aussi fonction de sécurité, puisque, avec la
borne baissée, il désactive la commande de fermeture et de start,
en interrompant en outre la refermeture automatique jusqu’à son
dégagement.
28-29 Entrée commande Ferme (contact NO)
30-31 CN4 Résistance chauffante
Borne prédisposée pour l’alimentation de la résistance de chauffage (230Va.
c. 100W Maxi) des modèles série “R”. Permet l’utilisation de la borne anti-
stationnement aussi en cas de températures particulièrement froids. Même
si on a installé la résistance de chauffage, il faut enlever les éventuelles
couches de glace qui se forment sur la surface de la borne anti-stationne-
ment (fils rouges).
32-33 CN6 Antivol
Prédisposition capteur reed placé sur la bride de la borne anti-stationnement
série “A”. Il permet la connexion d’un antivol extérieur. En cas de tentative
de violation de la borne anti-stationnement , le capteur active le système
d’alarme (fils oranges, contact NF).
CN8 Récepteur Radio
Connexion pour Récepteur Radio à un ou deux canaux.
Le deuxième canal est toujours connecté à «ferme» (voir configuration dip 5).
Le premier canal peut être configuré en utilisant le cavalier J1(voir Fig. 4),
comme:
• start avec logique 2 pas: ouvre-ferme
voir description entrée commande Start au paragraphe connexions au bornier.
• ouvre
n’accepte que la commande d’ouverture.
Pour commander la fermeture et l’ouverture avec deux touches différentes
d’un émetteur à deux canaux, utiliser un récepteur à deux canaux et déplacer
le cavalier J1 du tableau de commande Perseo en position Ouvre.
34-35 CN9 Antenne
Connexion Antenne (35 signal, 34 gaine).Câble RG58
Les composants: Résistance chauffante (câbles rouges), Electrofrein
(câbles blancs), Lumières Led (câbles jaunes), Fin de course ouver-
ture (câbles verts) et Contact Antivol (câbles oranges) ne sont pas
polarisés, donc la position des câbles ayant la même couleur est
interchangeable.
9) CONNEXION AVEC PLUSIEURS MOTEURS
Pour la connexion avec plusieurs moteurs, se référer à la Fig. 8.
Les condensateurs des moteurs doivent être connectés en parallèle. Pour
produire cela, couper le connecteur CM du condensateur et utiliser un
bornier auxiliaire externe.
Les fin de course doivent être connectés en série, comme spécifié dans la
Fig. 8. Les électrofreins doivent être connectés en parallèle comme spécifié
dans la Fig. 8. Les connexions sont à exécuter dans les règles de l’art.
CONFIGURATION DES INTERRUPTEURS DIP
1 T LAVORO
LAISSER LE DIP1 OFF!
2 T PAUSA
Activation refermeture automatique
OFF = exclue ON = temps de pause inséré et réglable
avec le temporisateur spécial (t.pause) 2 s à 120 s
3 SET PAUSA
Activation des commandes de start et ferme pendant le temps de pause
OFF= désactivées ON= activées
4 SET AP
Commande de start valable uniquement si ouvre a été activé
OFF= Entrées indépendantes ON = Entrées liées.
5 SET CH
Commande de fermeture
OFF=Impulsive à activation ON= impulsive à relâchement
6 PRELAMP
Préclignotement sur feu clignotant et feu
OFF=exclu ON=2 s avant chaque manoeuvre avec
signalisation verte-rouge alternées sur le
feu avant chaque fermeture
7 LED OK AP
Fonctionnement lumières led avec la borne anti-stationnement soulevée
OFF= lumières fixes ON= clignotement à 1 s
16 - STOPPY - Ver. 04
D811319_04

MANUEL D’INSTALLATION FRANÇAIS
8 LED OK CH
Fonctionnement lumières led avec la borne anti-stationnement baissée
OFF =lumières fixes ON= clignotement à 0,5 s
REGLAGE TEMPORISATEURS
T AUX Programmation du temps d’activation du contact Aux de 2 s à 120 s
V RALL Programmation de la vitesse d’approche à la butée de fin de
course mécanique defermeture (en ouverture le ralentissement
est fixe).
T PAUSA Programmation du temps de pause de 2 s à 120 s
10) MISE AU POINT DE LA CONCENTRICITE
Pour le bon fonctionnement, il faut mettre au point la concentricité du cylindre
de telle façon que, pendant les manoeuvres d’ouverture et de fermeture, le
mouvement puisse avoir lieu d’une façon fluide, régulière et sans oscillations.
Pour effectuer la mise au point, il faut:
Desserrer et enlever avec une clé hexagonale n° 4 les vis sans tête à six
pans creux A (Fig. 5)
Introduire dans les trous un tournevis à tête plate n° 3 (DIN 0,8x5) et le tourner
dans un sens ou dans l’autre jusqu’à obtenir la concentricité (Fig. 5)
Dans cette phase, la concentricité peut être vérifiée visuellement, en faisant
en sorte que la distance du cylindre par rapport à la bride extérieure soit la
plus uniforme possible.
Procéder ensuite à une vérification pratique en effectuant quelques manœu-
vres pendant lesquelles il faudra contrôler le mouvement du cylindre.
Resserrer énergiquement les 4 vis sans tête à six pans creux.
ATTENTION! La concentricité est très importante pour le bon fonction-
nement et la durée de l’actionneur: il faut la régler au début dans la
phase d’installation, la vérifier 6 mois après l’installation et la contrôler
chaque année.
Le fonctionnement avec une excentricité importante pourrait provoquer
l’usure des joints du plot.
11) DEMONTAGE
S’il est nécessaire d’accéder aux composants internes de la borne anti-sta-
tionnement procéder comme indiqué de suite se référant à la fig. 6:
1 Couper l’alimentation électrique avant d’effectuer n’importe quelle inter-
vention sur l’installation. Débrancher aussi les éventuelles batteries de
secours.
2 Desserrer et enlever avec une clé hexagonale n° 6 les 4 vis extérieures
A et avec une clé hexagonale n° 4 les vis sans tête à six pans creux B.
3 Enlever la bride externe C.
4 Desserrer et enlever avec la clé spéciale D (fournie en dotation) le bloc
central E.
5 Avec une clé hexagonale de 13, desserrer et enlever le boulon situé
au-dessous F et les rondelles correspondantes.
6 A ce point, avec un petit tournevis et en s’appuyant sur le point de jonction
entre le cylindre et le chapeau, il est possible d’enlever la partie haute
du cylindre G.
7 Si le modèle est doté de lumières de signalisation, il faut les débrancher.
Il faut donc desserrer la broche H, puis débrancher les cosses.
8 Enlever le cylindre I, en utilisant un câble ou un crochet passant par les
trous supérieurs du cylindre. Ne pas introduire les mains dans les trous
supérieurs pour enlever et réintroduire le cylindre (la présence du
pivot central L pourrait provoquer des blessures). Retirer du cylindre le
câble éventuel de connexion des lumières de signalisation.
9 Enlever les 4 pivots de réglage M des supports N, puis retirer les supports
N de la patte de réglage O.
10 Il est à ce point possible de retirer le groupe moteur complet et effectuer
les vérifications et les réparations éventuelles.
12) MONTAGE
1 Vérifier que les pattes de réglage O sont complètement serrées à la patte
inférieure P, de telle façon que, à la fin du montage, la mise au point de
la concentricité soit plus facile.
2 Repositionner le groupe moteur sur le fond du cylindre, en faisant attention
que le câble ne soit pas écrasé par la plaque inférieure. Il est conseillé de
lier un fil au câble pour le maintenir soulevé pendant le positionnement du
moteur; ensuite l’on placera le câble en excès sous la bride supérieure
Q, de telle façon qu’elle n’entrave pas la course du plot. Vérifier en outre
l’alignement des pivots de réglage M par rapport aux trous présents sur
le cylindre, de telle façon que le positionnement de la bride C puisse avoir
lieu sans problèmes.
3 Repositionner les 4 supports N sur les pattes de réglage et les pivots de
réglage M.
4 Introduire le cylindre I, en utilisant un câble ou ou un crochet passant par
les trous supérieurs du cylindre. Ne pas introduire les mains dans les
trous supérieurs pour enlever et réintroduire le cylindre (la présence
du pivot central L pourrait provoquer des blessures). En cas de bornes
anti-stationnement dotées de lumières de signalisation, il faut faire passer
le câble d’alimentation (cette opération peut être facilitée en liant un fil à
la broche de connexion). Sur le fond du cylindre, est monté le stop de fin
de course mécanique R; lors du remontage, il faut respecter la position de
la fin de corse référée au capteur S. En cas de bornes anti-stationnement
dotées de capteur alarme, il faut faire attention à la position de l’aimant
T situé sur la bride, qui doit coïncider avec la position du capteur U fixé
sur le cylindre.
5 Reconnecter les cosses d’alimentation des lumières et resserrer la broche
H. Les lumières de signalisation ne sont pas polarisées, donc la position
des contacts n’a aucune incidence.
6 Repositionner la partie haute du cylindre G et, avec une clé hexagonale
n° 13, fixer le boulon F.
7 Avec la clé spéciale D, serrer le bloc central E.
8 Serrer avec une clé hexagonale n° 6 les 4 vis extérieures A et avec une
clé hexagonale n° 4 les vis sans tête à six pans creux B.
ATTENTION! Après claque opération de démontage et montage, il faut
vérifier la concentricité.
13) MANOEUVRE MANUELLE
En cas de faute d’alimentation, la borne anti-stationnement tend à descendre
spontanément, en effectuant ainsi une manoeuvre d’ouverture. Une simple
pression sur la surface supérieure du cylindre en achèvera la descente, en
permettant ainsi le passage des véhicules Fig. 7.
Pour éviter la descente en absence de courant, il faut installer un système
à batteries de secours. Dans ce cas, l’installateur devra prévoir un interrup-
teur de disjonction des batteries, de telle façon à permettre la manoeuvre
manuelle en cas de faute électrique.
L’installateur s’engage à apprendre à l’utilisateur l’utilisation correcte de
l’automation, en soulignant les opérations à effectuer en cas d’urgence.
14) MAUVAIS FONCTIONNEMENTS. CAUSES ET SOLUTIONS
• Si le mouvement de la borne anti-stationnement n’est pas fluide, il faut
mettre au point la concentricité (voir paragraphe 9).
• Si le plot ne monte pas, vérifier la présence d’alimentation, le bon fonc-
tionnement des batteries de secours éventuelles et l’état des fusibles,
ainsi que les connexions du moteur au tableau de commande.
• Si le plot ne descend pas, il est probable que le tableau de commande ou
un autre dispositif extérieur envoie sans cesse une commande d’ouverture.
Il faudra donc débrancher provisoirement tous les dispositifs extérieurs,
de telle façon à identifier la cause du problème. Si le plot reste encore
soulevé, débrancher l’alimentation et vérifier le tableau des commandes.
En tous les cas le plot, en absence d’alimentation, doit spontanément
tendre à descendre; si cela n’est pas le cas, il faudra le démonter (pa-
ragraphe 10) afin de vérifier des problèmes mécaniques éventuels qui
empêchent la manoeuvre de descente.
15) DEMONTAGE
Si l’automation est démontée pour être ensuite remonté ailleurs, il faudra:
• Couper l’alimentation et débrancher toute l’installation électrique.
• Enlever la borne anti-stationnement en faisant attention à ne pas en-
dommager la gaine de protection des câbles électriques pendant les
opérations de creusement.
• Démonter le tableau de commande et tous les composants de l’installation.
• Si des composants ne peuvent pas être démontés ou s’ils sont endom-
magés, il faudra les remplacer.
16) ENTRETIEN ET DEMOLITION
L’entretien de l’installation doit être effectué régulièrement de la part de
personnel qualifié. Les matériaux constituant l’appareillage et son emballage
doivent être mis au rebut conformément aux normes en vigueur. Les piles
et les batteries constituent des déchets spéciaux.
ATTENTION
Le bon fonctionnement de l’opérateur n’est assuré que si les données
et les indications fournies dans ce manuel sont respectées, ainsi que
les normes de bonne technique. La maison décline toute responsabilité
en cas de dommages dérivés du non respect des normes d’installation,
des normes de bonne technique et des indications de ce manuel.
Les descriptions et les figures de ce manuel n’engagent pas le construc-
teur. En laissant inaltérées les caractéristiques essentielles du produit,
la Société se réserve le droit d’apporter à n’importe quel moment les
modifications qu’elle juge opportunes pour améliorer le produit du
point de vue technique, commercial et de construction.
STOPPY- Ver. 04 - 17
D811319_04

MONTAGEANLEITUNG
DEUTSCH
Wir danken Ihnen, daß Sie sich für diese Anlage entschieden haben. Ganz
sicher wird sie mit ihren Leistungen Ihren Ansprüchen vollauf gerecht wer-
den.Lesen Sie aufmerksam die Broschüre mit den “HINWEISEN” und die
“BETRIEBSANLEITUNG” durch, die dem Produkt beiliegen. Sie enthalten
wichtige Hinweise zur Sicherheit, Installation, Bedienung und Wartung der
Anlage.
Dieses Produkt genügt den anerkannten technischen Normen und Sicher-
heitsbestimmungen. Wir bestätigen, daß es mit folgenden Europäischen
Richtlinien übereinstimmt: 89/336/EWG, 73/23/EWG, 98/37/EWG (und
nachfolgende Änderungen).
1) ALLGEMEINE SICHERHEITSVORSCHRIFTEN
VORSICHT! Montagefehler oder der unsachgemäße Gebrauch des
Produktes können zu Personen- oder Sachschäden führen.
• Lesen Sie aufmerksam die Broschüre mit den “Hinweisen” und die “Ge-
brauchsanweisung”, die dem Produkt beiliegen. Sie enthalten wichtige
Hinweise zur Sicherheit, Montage, Bedienung und Wartung der Anlage
• Verpackungsmaterialien (Plastik, Karton, Polystyrol u. a.) sind nach den
einschlägigen Vorschriften zu entsorgen. Nylon- oder Polystyroltüten
dürfen nicht in Reichweite von Kindern liegenbleiben.
• Die Anleitung ist für zukünftige Einsichtnahme als Beilage zur technischen
Akte aufzubewahren.
• Dieses Produkt wurde ausschließlich für den Gebrauch geplant und
gebaut, wie er in dieser Dokumentation beschrieben wird. Davon ab-
weichende Verwendungen können Schadens- und Gefahrenquellen
darstellen. Der Hersteller lehnt jede Verantwortung für Schäden ab, die
durch den unsachgemäßen oder nicht bestimmungsgemäßen, weil in
dieser Dokumentation nicht genannten Gebrauch entstehen.
• Die Anlage darf nicht in explosionsgefährdeter oder feuergefährlicher
Atmosphäre installiert werden.
• Die Bauteile der Maschine müssen den folgenden Europäischen Richtlinien
entsprechen: 89/336/EWG, 73/23/EWG,98/37 EWG und nachfolgenden
Änderungen. Für alle Länder außerhalb der EWG gilt: Außer den gelten-
den Landesvorschriften sollten aus Sicherheitsgründen auch die oben
genannten Bestimmungen beachtet werden.
• Der Hersteller lehnt jede Verantwortung für Folgen ab, die durch nicht
fachgerechte Installation der in diesem Handbuch beschriebenen Anlage
entstehen.
• Die Montage muß im Einklang mit folgenden Europäischen Richtlinien
erfolgen: 89/336/EWG, 73/23/EWG, 98/37 EWG und nachfolgende Än-
derungen.
• Vor jedem Eingriff an der Anlage die Stromversorgung unterbrechen.
Auch Pufferbatterien abklemmen, falls vorhanden.
• Versehen Sie die Vorsorgungsleitung der Anlage mit einem Schalter oder
allpoligen magnetthermischen Schutzschalter mit einem Kontaktabstand
von mindestens 3,5 mm. Auch für die Batterien muß eine geeignete
Trennvorrichtung geschaffen werden.
• Der Versorgungsleitung muß ein Fehlerstromschutzschalter mit einer
Schwelle von 0.03A vorgeschaltet sein.
• Prüfen Sie den Erdungsanschluß: Alle Metallteile der Schließvorrichtung
und alle Anlagenkomponenten mit Erdungsklemme anschließen.
• Alle Sicherheitsvorrichtungen (Fotozellen, Sicherheitsleisten u. a.) anbrin-
gen, die verhindern, daß sich im Torbereich niemand quetscht, schneidet
oder mitgerissen wird.
• Mindestens eine Leuchtsignaleinrichtung (Blinklicht) an gut sichtbarer
Stelle anbringen. Befestigen Sie in Nähe des Gestells ein Warnschild.
• Der Hersteller lehnt jede Verantwortung für die Sicherheit und die Funk-
tionstüchtigkeit der Anlage ab, wenn Komponenten anderer Produzenten
verwendet werden.
• Für Wartungen und Reparaturen dürfen ausschließlich Originalteile
verwenden.
• Es dürfen keine Umbauten an Anlagenkomponenten vorgenommen
werden, die nicht ausdrücklich vom Hersteller genehmigt wurden.
• Weisen Sie den Anlagenbetreiber in die vorhandenen Steuerungssysteme
und die manuelle Toröffnung im Notfall ein.
• Kindern oder Erwachsenen ist es nicht gestattet, im Aktionsbereich der
Anlage zu verweilen.
• Keine Fernbedienungen oder andere Steuerungsvorrichtungen in Reich-
weite von Kindern liegenlassen. Sie könnten die Anlage versehentlich in
Gang setzen.
• Der Betreiber hat sich jeden Versuches zu enthalten, selbst an der Anlage
tätig zu werden oder sie zu reparieren. Stattdessen muß er Fachleute
hinzuziehen.
• Alles, was nicht ausdrücklich in dieser Anleitung genannt ist, ist unter-
sagt.
• Die Installation muß mit Sicherheits- und Steuerungsvorrichtungen vor-
genommen werden, die der Norm EN 12978 entsprechen.
2) ALLGEMEINES
Kompakter und robuster versenkbarer Poller für die Lenkung des Fahrzeug-
aufkommens auf öffentlichen oder privaten Grundstücken, zur Schaffung
städtischer Fußgängerzonen und überall dort, wo die Zufahrtskontrolle von
Fahrzeugen erforderlich ist.
Er besteht aus einem Stahlschaft und ist mit einer rückstrahlenden Folie
überzogen. Angetrieben wird er von einem Motor im Ölbad, der von einem
heißverzinkten, ins Erdreich eingelassenen Stahlzylinder geschützt wird.
Mit der Steuerung PERSEO lassen sich bis zu vier versenkbare Poller
gleichzeitig kontrollieren (Fig.8).
Neben der Grundversion STOPPY sind Modelle der Serie “L” erhältlich, die mit
Signalblinkleuchten ausgestattet sind, und - auf Anfrage - Modelle der Serie
“R”, mit deren Heizwiderstand der Poller sich auch bei besonders strenger
Kälte (bis zu –25°C) einsetzen läßt. Die Ausführungen der Serie “A” können
mit einem Magnetsensor als Einbruchsicherung nachgerüstet werden.
Zubehör:
Satz Pufferbatterien für die Elektrobremse. Mit ihm nimmt der Poller auch
bei Stromausfall eine Position ein, in der die Zufahrt verwehrt ist.
3) TECHNISCHE DATEN DES ANTRIEBS STOPPY
Motor: ...................................................................230Va.c. ±10% 50/60Hz*
Kondensator: ........................................................................................ 8 µF
Aufnahme: ..........................................................1,2 A (230V) 2,4 A (110V)
Betriebsfrequenz: ......................................................................... 2000/24h
Max. Drehmoment: ...............................................................700 N (~70Kg)
Schutzart: ............................................................................................. IP67
Steuerung ......................................................................................... Perseo
Elektrobremse: ................................................................................ 24Vd.c.
Arbeitsdauer: ............................................................ 6s+Endlagedämpfung
Betriebstemperatur ................................................................ –15°C + 60°C
Betriebstemperatur Versionen “R” ........................................ –25°C + 60°C
Widerstandskraft gegen einen frontalen Stoß gegen den um 200 mm ange-
hobenenSchaft: ........................................................................5.000 Joule
.............................................................. (Bruchwahrscheinlichkeit bei 50%)
Statische Belastung:...Bei angehobenem Schaft werden max. 300 kg Ge-
wicht ausgehalten
Bei abgesenktem Schaft werden max. 15.000 kg ausgehalten
Dynamische Belastung: ...........Schub bei Schließvorgang max:........100kg
Gewicht: ......................................................................................... 90 kg ca.
Abmessungen: ...........................................................................siehe Fig. 1
Handbedienung: .........Liegt keine Spannung an, ist die Anlage reversibel.
(* spezielle Spannungen auf Anfrage erhältlich)
4) TECHNISCHE DATEN STEUERUNG PERSEO
Versorgungsspannung: ........................................230Va.c. ±10% 50/60Hz*
Stromaufnahme: ......................................................6A max (bei 4 Pollern)
Max. Anzahl Motoren .......................................bis 4 Poller STOPPY (Fig.8)
Abmessungen: ................................................................siehe Abbildung 4
Schmelzsicherungen: .............................. F2: T2A / F3: T2A / F4: T315 mA
(* spezielle Spannungen auf Anfrage)
VORSICHT! Die Steuerungen mit 100V 50 und 60Hz sind nur für zwei
Poller ausgelegt anstatt für vier.
5) VORABKONTROLLEN
Prüfen Sie, ob die Installationsbasis stabil und eben ist.
Der versenkbare Poller muß, damit er funktioniert, nicht unbedingt in der
Senkrechten stehen, aus optischen Gründen wird jedoch empfohlen, den Instal-
lationsbereich zu nivellieren, damit der Schafthub genau vertikal verläuft.
6) VORBEREITUNG DER GRUBE UND INSTALLATION DES POLLERS
• Heben Sie eine Grube zum Einlassen des Pollers aus. Sie muß etwa 110
cm tief sein und einen Durchmesser von 50-60 cm haben.
• Der Drainage dient ein 20 cm dicker Kiesuntergrund, wie er in Fig. 2
gezeigt wird. Die darüber liegende Schicht von ungefähr 5 cm Feinsand
bildet die Unterlage, auf dem der Poller verlegt wird.
• Installieren Sie ihn unter Beachtung des Niveaus (die Ringmutter muß das
gleiche Niveau haben wie die Durchfahrtstraße), die Basis ist waagerecht
auszurichten.
• Anschließend wird die elektrische Anlage ausgeführt (siehe Abschnitt 7)
• Füllen Sie die Grube bis auf eine Höhe von etwa 25 cm mit kompaktem Sand
auf.
• Nun, nachdem der Kabelmantel richtig positioniert und die Kabel an-
geschlossen sind, wird die Grube so mit Beton aufgeschüttet, daß die
Oberfläche anschließend mit dem Asphalt oder anderem Fahrbahnbelag
auf Durchfahrtsniveau liegt.
7) AUSFÜHRUNG DER ELEKTRISCHEN ANLAGE
Führen Sie die elektrische Anlage (Fig. 3) nach den einschlägigen Vorschrif-
18 - STOPPY - Ver. 04
D811319_04

MONTAGEANLEITUNG DEUTSCH
ten für elektrische Anlagen CEI 64-8, IEC364, Harmonisierung HD384 und
anderen landesspezifischen Normen aus.
VORSICHT! Für den Anschluß der Steuerung an das Stromnetz ein
mehrfarbiges Kabel mit Mindestquerschnitt 3x1.5mm2 benutzen, wie
es von den geltenden Vorschriften zugelassen wird. Wenn das Kabel
beispielsweise draußen (im Freien) liegt, muß es mindestens dem
Standard H07RN-F entsprechen, liegt es drinnen (im Kabelkanal), muß
es zumindest dem Standard H05 VV-F genügen und einen Querschnitt
von 3x1.5mm2 haben.
Für die Verbindung des Pollers mit der Steuerung benutzen Sie ein Kabel
das bei der Lieferung bereits im Innern des Pollers angeschlossen ist. Reicht
die Kabellänge nicht aus, verbinden Sie zwei Kabel in einem dicht schlie-
ßenden Kasten, für die Nieder- und Netzspannungsanschlüsse benutzen
Sie zwei separate Kabel.
Zu achten ist besonders darauf, daß die Kabel so getrennt und fixiert werden,
daß sich Nieder- und Netzspannungsleitungen nicht berühren können.
Die Steuerungs- und Sicherheitsvorrichtungen müssen im Einklang mit den
vorstehend zitierten Anlagenormen angeschlossen werden.
In Fig. 3 ist die Anzahl der Anschlüsse und der Qerschnitt für eine Kabellänge
bis 100 Meter aufgeführt; Für längere Kabel ist der Querschnitt anhand der
Anlagenreallast zu berechnen.
Installationsbeispiel:
I Allpoliger geprüfter Trennschalter mit ausreichender Festigkeit
und Kontaktabstand von mindestens 3,5 mm, versehen mit einer
Sicherung gegen Überlastung und Kurzschlüsse. Falls noch nicht
vorhanden, muß der Anlage ein geprüfter Fehlerstromschutzschalter
mit einer Schwelle von 0.03A vorgeschaltet werden.
Qr Schaltkasten und eingebautes Empfangsteil.
S Abschließbarer Funktionsschalter.
AL Blinkleuchte mit abgestimmter Antenne.
M Poller
P Wandhängende Knopftafel
Fte, Fre Fotozellenpaar.
T 1-2-4-Kanal-Sendeeinheit.
SF Ampel mit Rot-Grün-Umschaltung
SM Magnetspule
ANMERKUNG: Art und Anzahl der Sicherheitsvorrichtungen hängen
vom jeweiligen Gebrauch und dem Installationsort ab.
8) KLEMMBRETTANSCHLÜSSE
Nach der richtigen Verlegung der Kabel in den Kabelkanälen und nach Be-
festigung der einzelnen Anlagenkomponenten an den vorgesehenen Stellen
erfolgt der Anschluß nach den folgenden schematischen Darstellungen.
Außenleiter, Mittelleiter und Erde (obligatorisch) sind anzuschließen. Der
Schutzleiter (Erde), zu erkennen am gelb-grünen Isoliermantel, muß mit
den Klemmkontakten verbunden werden, die durch ein Erdungszeichen
gekennzeichnet sind.
Die Anlage darf erst dann in Betrieb gehen, wenn sämtliche Sicherheitsvor-
richtungen angeschlossen und geprüft wurden.
Nachstehend finden Sie die einzelnen Klemmen der serienmäßigen Steue-
rung PERSEO beschrieben (Fig. 4).
CN1
1-2 Einphasige Netzversorgung (1=L) (2=N)
3-4-5 Motoranschluß (3 Öffnung schwarzer Draht, 4 gemeinschaftlich
blauer Draht, 5 Schließung brauner Draht), bis zu 4 Motoren
können parallel geschaltet werden.
Zur Beachtung: Unter Öffnung wird die Absenkung des Pollers
verstanden (Durchfahrt freigegeben), unter Schließung das Hoch-
fahren des Pollers (Durchfahrt verwehrt)
6-7-8 Ausgang Ampellampen (6 Grün, 8 rot, 7 gemeinschaftlich) 230V
25+25W Max
9-10 Ausgang Blinkleuchte 230V
CN2
11-12 Ausgänge Elektrobremse 24 Vd.c. (bis zu 4 parallel schaltbar)
weiße Drähte
13-14 Eingang Pufferbatteriekarte 12 Vd.c. für das Betreiben der Elek-
trobremse bei Stromausfall
15-16 Ausgänge Signal-Led STOPPY 24 Va.c. (bis zu 4 parallel schaltbar)
0,8 A max, gelbe Drähte.
17-18 Ausgang Kontakt AUX NO zeitgeschaltet von 2 bis 120 Sek.
19-20 Zubehörspeisung 24 Va.c. 1 A max.
CN3
21-22 Eingang Fotozelle (Kontakt NC) bei Schließung aktiv
23-24 Eingang Stop-Befehl (Kontakt NC), unterbricht den Vorgang und
entsperrt den Poller. Der darauffolgende Startbefehl veranlaßt
stets die Öffnung des Pollers, falls er nicht bereits geöffnet ist, in
diesem Fall veranlaßt er die Schließung.
24-25 Eingang Endschalter Öffnung, grüne Drähte
26-29 Eingang Startbefehl (Kontakt NO, 2-Schritt-Betriebslogik: Öffnen-
Schließen), bei angehobenem Poller beginnt mit dem Startbefehl
der Absenkvorgang, währenddessen ist der Startbefehl nicht
ansprechbar; ist der Poller unten, veranlaßt der Startbefehl den
Anstieg. Während der Schaft hochfährt, unterbricht ein neuerlicher
Startbefehl den Vorgang und veranlaßt das Herunterfahren.
27-29 Eingang Öffnungsbefehl (Kontakt NO)
Der Oeffnungskontakt dient auch als Sicherheit, denn bei ab-
gesenktem Poller deaktiviert er den Schließ- und Startbefehl.
Außerdem hebt er die automatische Wiederöffnung solange auf,
bis er wieder freigegeben wird.
28-29 Eingang Schließbefehl (Kontakt NO)
30-31 CN4 Heizwiderstand
Klemme, die bei den Modellen der Serie “R” den Heizwiderstand (230Va.c.
100W Max) speist. Mit ihm kann der Poller auch bei ausgesprochen strengem
Frost betrieben werden. Jedoch auch wenn der Heizwiderstand installiert
wurde, müssen Eisplatten, die sich auf der Oberfläche des Pollers bilden,
entfernt werden (rote Drähte).
32-33 CN6 Einbruchsicherung
Einrichtung Reed-Sensor auf dem Flansch des Pollers der Serie “A”. Ermög-
licht den Anschluß einer externen Einbruchsicherung. Beim Versuch, den
Poller aufzubrechen, aktiviert der Sensor die Alarmanlage (orangefarbene
Drähte, Kontakt NC).
CN8 Funkempfänger
Anschluß für Ein-/Zweikanalfunkempfänger.
Kanal 2 ist immer mit Schließen verbunden (siehe Konfiguration dip 5).
Der erste Kanal kann mit Hilfe der Drahtbrücke J1 (siehe Fig. 4) wie folgt
konfiguriert werden:
• Start mit 2-Schritt-Logik: Öffnen-Schließen
Siehe Beschreibung Eingang Startbefehl im Abschnitt zu den Klemmbrett-
anschlüssen.
• Öffnen
spricht nur auf den Öffnungsbefehl an.
Möchten Sie Öffnung und Schließung mit zwei verschiedenen Tasten eines
Zweikanalsenders steuern, verwenden Sie ein Zwei-Kanal-Empfangsteil und
legen die Drahtbrücke J1 der Steuerung Perseo in die Stellung Öffnen.
34-35 CN9 Antenne
Antennenanschluß (52 Signal, 53 Geflecht). Kabel RG58.
Die Komponenten Heizwiderstand (rote Kabel), Elektrobremse (wei-
ße Kabel), Led-Lampen (gelbe Kabel), Öffnungs-Endschalter (grüne
Kabel) und Einbruchsicherungskontakt (orangefarbene Kabel) sind
nicht gepolt, die Position des Kabels mit derselben Farbe kann also
vertauscht werden.
9) VERBINDUNG MIT MEHREREN MOTOREN
Für den Anschluß an mehrere Motoren siehe die Abb. 8.
Die Motorkondensatoren müssen parallel geschaltet sein. Dazu den Kon-
densatorstecker CM abschneiden und einen externen Hilfsklemmenblock
verwenden.
Die Endschalter müssen in Reihe geschaltet werden, wie in Abb. 8 dargestellt.
Die Elektrobremsen sind parallel zu schalten, wie aus Abb. 8 ersichtlich. Die
Anschlüsse müssen fachgerecht ausgeführt werden.
KONFIGURATION DIP-SWITCH
1 T LAVORO
LASSEN SIE DIP 1OFF!
2 T PAUSA
Zuschaltung Schließautomatik
OFF = Ausgeschaltet
ON = Pausendauer eingeschaltet und mittels
Trimmer (t.Pause) von 2 bis 120s regelbar.
3 SET PAUSA
Zuschaltung der Start- und Schließbefehle während der Pausendauer
OFF= Deaktiviert ON= Freigegeben
4 SETAP
Startbefehl nur wirksam, wenn vorher Öffnen aktiviert wurde
OFF= Unabhängige Eingänge ON = Verbundene Eingänge.
5 SET CH
Schließbefehl
OFF=Aktivierungsimpuls ON=Impuls beim Loslassen
6 PRELAMP
Vorblinken der Blinkleuchte und Ampel
OFF=aus ON=2 Sek. vor jedem Vorgang mit
wechselndem Grün-Rot-Signal der Ampel
vor jeder Schließung
7 LED OK AP
Funktionsweise LED Poller im angehobenen Zustand
OFF= durchgängig leuchtend ON= Blinken 1s
STOPPY- Ver. 04 - 19
D811319_04

MONTAGEANLEITUNG
DEUTSCH
8 LED OK CH
Funktionsweise LED Poller im abgesenkten Zustand
OFF =durchgängig leuchtend ON= Blinken 0,5s
TRIMMEREINSTELLUNG
T AUX Regelung Aktivierungsdauer des Kontaktes Aux von 2 bis
120s
V RALL
Gibt bei der Schließung die Annäherungsgeschwindigkeit an
den mechanischen Endanschlag vor (bei der Oeffnung ist die
Verlangsamung unveränderlich).
T PAUSA Regelung Pausendauer von 2 bis 120s
10) HERSTELLEN DER KONZENTRIZITÄT
Damit die Anlage einwandfrei funktioniert, muß die Konzentrizität des Zylinders
hergestellt werden, damit die Bewegung bei Öffnung und Schließung flüssig,
gleichmäßig und ruckfrei abläuft. Gehen Sie folgendermaßen vor:
Mit einem Inbusschlüssel die 4 Gewindestifte A abschrauben (Fig. 5)
In die Öffnungen führen Sie einen 3er-Schlitzschraubendreher (DIN 0,8x5) und stellen
die Konzentrizität durch Drehen in einer der beiden Richtungen her (Fig. 5).
Sie läßt sich in dieser Phase nach Augenschein prüfen. Der Abstand des
Zylinders zum Außenflansch muß dabei so gleichmäßig wie möglich sein.
Anschließend werden in einem praktischen Test einige Vorgänge gefahren,
um die Zylinderbewegung zu kontrollieren.
Nun die 4 Gewindestifte wieder fest anziehen.
VORSICHT! Die Konzentrizität hat große Bedeutung für den einwand-
freien Betrieb und die Haltbarkeit des Antriebs. Sie ist erstmals bei der
Installation zu justieren, 6 Monate später zu prüfen und dann jährlich
zu kontrollieren.
Der Betrieb mit starker Exzentrizität kann zu vorzeitigem Verschleiß
der Schaftdichtungen führen.
11) DEMONTAGE
Sollte es notwendig sein, auf die internen Komponenten oder den Motor des
Pollers zuzugreifen, gehen Sie so vor, wie es in Fig. 6 gezeigt wird:
1 Vor jedem Eingriff an der Anlage die Stromversorgung unterbrechen.
Auch vorhandene Pufferbatterien müssen abgeklemmt werden.
2 Mit einem Inbusschlüssel der Größe 6 schrauben Sie die 4 Außenschrau-
ben A ab, mit einem Inbusschlüssel der Größe 4 die Gewindestifte.
3 Nun den Außenflansch C entfernen.
4 Mit dem Spezialschlüssel D (im Lieferumfang enthalten) den Mittelblock
E lösen und entfernen.
5 Mit einem Sechskantsteckschlüssel 13 den darunter befindlichen Schrau-
benbolzen F und ihre Beilegscheiben lösen und entfernen.
6 Nun einen kleinen Schraubendreher an der Verbindungsstelle zwischen Zylinder
und Haube ansetzen und den oberen Teil des Zylinders G aushebeln.
7 Falls das Modell mit Signallampen ausgestattet ist, müssen die zugehörigen
Anschlüsse unterbrochen werden. Also den Steckerstift H abschrauben
und anschließend die AMP-Verbindungen lösen.
8 Entnehmen Sie den Zylinder I unter Zuhilfenahme eines Kabels oder
Hakens, den man durch die oberen Öffnungen des Zylinders führt. Nicht
die Hände in die oberen Öffnungen stecken, um den Zylinder her-
auszuziehen oder wieder einzulegen (am Mittelstift L kann man sich
leicht verletzen). Ziehen Sie das Anschlußkabel für die Signallampen aus
dem Zylinder.
9 Nehmen Sie die 4 Stellstifte M aus ihren Halterungen N, anschließend
die Halterungen N aus dem Stellbügel O ziehen.
10 Nun kann das komplette Motoraggregat zur Prüfung und Reparatur
entnommen werden.
12) MONTAGE
1 Die Stellbügel O müssen ganz an den unteren Bügel P geschraubt sein, damit
sich nach dem Zusammenbau die Konzentrizität leichter einrichten läßt.
2 Nun das Motoraggregat wieder auf dem Zylinderboden positionieren;
dabei sollte vermieden werden, daß das Kabel von der unteren Platte
zusammengedrückt wird. Zweckmäßig ist es in diesem Fall, am Kabel
einen Draht anzubringen, mit dem es dann während der Positionierung
des Motors angehoben wird. Anschließend muß das überschüssige
Kabel unter dem oberen Flansch Q so verstaut werden, daß es nicht
dem Schafthub in die Quere kommt. Prüfen Sie außerdem die lineare
Ausrichtung der Stellstifte M im Verhältnis zu den Zylinderlöchern, damit
sich der Flansch C problemlos positionieren läßt.
3 Nun müssen die 4 Halterungen N (auf den Stellbügeln) und die Stellstifte
wieder an Ort und Stelle gebracht werden.
4 Führen Sie den Zylinder I mit Hilfe eines Kabels oder Hakens ein, der
durch die oberen Zylinderöffnungen geführt wird. Nicht die Hände in
die oberen Löcher stecken, um den Zylinder herauszuziehen oder
wieder einzuführen (am Mittelstift L kann man sich leicht verletzen). Bei
Pollern mit Signallampen muß das Stromkabel durchgeführt werden (dies
geht leichter vonstatten, wenn man einen Draht an den Verbindungsstift
bindet). Auf dem Zylinderboden ist der Stopkontakt des mechanischen
Endanschlages R montiert. Beim Zusammenbau muß die richtige Lage
des Endschalters im Verhältnis zum Sensor S beachtet werden. Sind
die Poller mit Alarmsensor ausgestattet, achten Sie auf die Position des
Magneten T auf dem Flansch. Sie muß mit der Lage des auf dem Zylinder
fixierten Sensors U übereinstimmen.
5 Stellen Sie die AMF-Verbindung für die Speisung der Lampen wieder her
und schrauben Sie den Steckerstift H wieder auf. Die Signallampen sind
ungepolt, d. h. es spielt keine Rolle, wo die Kontakte angelegt werden.
6 Bringen Sie das Oberteil des Zylinders G wieder an Ort und Stelle, mit
einem Sechskantsteckschlüssel 13 wird dann der Schraubenbolzen F
befestigt.
7 Mit dem Spezialschlüssel D den Mittelblock E festschrauben.
8 Mit einem Inbusschlüssel der Größe 6 die 4 Außenschrauben A, mit
einem Inbusschlüssel 4 die Gewindestifte B festschrauben.
ACHTUNG! Nach jeder Zerlegung und Wiedermontage muß eine Prüfung
auf Konzentrizität erfolgen.
13) HANDBEDIENUNG
Bei einem Stromausfall sinkt der Poller normalerweise sofort herab, was
einem Öffnungsvorgang entspricht, ein leichter Druck auf die obere Fläche
des Zylinders läßt ihn vollends nach unten fahren, so daß die Fahrzeuge
passieren können, Fig.7.
Um zu vermeiden, daß die Anlage bei Stromausfall herabfährt, muß eine
mit Pufferbatterie betriebene Vorrichtung eingebaut werden. In diesem Fall
muß der Installateur einen Trennschalter für die Batterien einbauen, damit
sich die Anlage bei Stromausfall von Hand bedienen läßt.
Der Installateur ist verpflichtet, den Betreiber in den korrekten Gebrauch
der automatischen Anlage einzuweisen. Dazu gehört auch das Verhalten
im Notfall.
14) FEHLFUNKTIONEN. URSACHEN UND ABHILFE
• Wenn sich der versenkbare Poller nicht flüssig bewegt, muß die Konzen-
trizität neu hergestellt werden (siehe Abschnitt 9).
• Fährt der Schaft nicht nach oben, prüfen Sie, ob Netzspannung anliegt,
ob die Pufferbatterien, falls vorhanden, funktionieren und in welchem
Zustand die Schmelzsicherungen sind. Überprüfen Sie außerdem die
Verbindungen zwischen Motor und Steuerung.
• Fährt der Schaft nicht herab, erhält er wahrscheinlich ständig ein Öff-
nungssignal von der Steuerung oder einer der externen Vorrichtungen.
Unterbrechen Sie also vorübergehend sämtliche externen Anschlüsse,
um der Problemursache auf den Grund zu gehen. Bleibt der Schaft immer
noch oben, unterbrechen Sie die Stromversorgung und überprüfen dann
die Steuerung. Der Schaft muß ohne Stromversorgung sofort nach unten
gehen; geschieht dies nicht, zerlegen Sie die Anlage (Abschnitt 10), um
mögliche mechanische Hindernisse beim Abstieg aufzuspüren.
15) ZERLEGUNG
Wird die automatische Anlage zerlegt, um an anderer Stelle wieder aufgebaut
zu werden, ist folgendes nötig:
• Stromversorgung unterbrechen und die gesamte elektrische Anlage
abklemmen.
• Entfernen Sie den versenkbaren Poller. Vorsicht, daß der Schutzmantel
der Stromkabel während der Aushubarbeiten nicht beschädigt wird.
• Bauen Sie die Steuerung und sämtliche Anlagenkomponenten aus.
• Falls es Komponenten gibt, die nicht entfernt werden können oder schad-
haft sind, müssen sie ersetzt werden.
16) WARTUNG UND VERSCHROTTUNG
Die Anlage muß regelmäßig von Fachleuten gewartet werden. Die Materi-
alien, aus denen der Apparat besteht und seine Verpackung sind bestim-
mungsgemäß zu entsorgen. Primärelemente und Batterien dürfen nicht in
die Umwelt gelangen.
HINWEISE
Der einwandfreie Betrieb des Antriebes ist nur dann gewährleistet,
wenn die Angaben und Hinweise aus diesem Handbuch beachtet
werden und die Installation fachgerecht erfolgt. Der Hersteller haftet
nicht für Schäden, die durch Mißachtung der Installationsvorschriften,
nicht fachgerechte Ausführungen und die Mißachtung der Angaben in
diesem Handbuch entstehen.
Für die Text- und Bildbeschreibungen in diesem Handbuch wird keine
Gewähr übernommen. Der Hersteller behält sich jederzeit Änderungen
vor, die er für technische, bauliche und kommerzielle Produktverbes-
serungen als notwendig erachtet, soweit die wesentlichen Produktei-
genschaften dadurch nicht verändert werden.
20 - STOPPY - Ver. 04
D811319_04
Other manuals for STOPPY
1
Table of contents
Languages:
Other BFT Industrial Electrical manuals
Popular Industrial Electrical manuals by other brands

Murata
Murata GRM2165C1H681JA01 Series Reference sheet

Alpha IP
Alpha IP FSM 26001 instruction manual

Wavetronix
Wavetronix Click 304 quick start guide

ABB
ABB ArcLimiter Technical and application guide

Murata
Murata GCM2195C1H102JA16 Series Reference sheet

Murata
Murata GRM0335C1H160GA01 Series Reference sheet

Boston gear
Boston gear ORC-F Series Trig-O-Matic Installation and operation

Murata
Murata GRM022R60J103KE19 Series Reference sheet

Texas Instruments
Texas Instruments Klixon 2ACE Series Installation and operating instructions

Murata
Murata GRM033C80J123KE01 Series Reference sheet

Simplex
Simplex Saturn Series manual

Eaton
Eaton Ulusoy HMH24-01 user manual