BHCnav NAVA 200 User manual

Owner’s Manual
1
Introduction
Thank you for purchasing NAVA handheld
GPS. NAVA is lightweight, compact,
rugged, reliable positioning and navigation
assistant to your outdoor activities. This
manual provides you the instructions to
use NAVA 200, 300, 400, and 600.
If you have further questions, please refer
to our website: Http://www.BHCnav.com
or contact us at Email:
NAVAsales@BHCnav.com and
NAVAsupport@BHCnav.com
Features of NAVA Series
Excellent GPS performance: With
its high-sensitivity, SBAS-enabled
GPS receiver, NAVA locates your
position quickly and precisely and
maintains its GPS location even in
heavy cover and deep canyons.
Long battery life: Powered by two
AA batteries, NAVA can work for up
to 15 hours. Powered by special
Li-ion battery, NAVA can work for
up to 25 hours.
User data compatibility: Export and
import user data from gpx, shp, kml,
dxf, csv to NAVA proprietary format.
Built-in Sensors (NAVA600): The
built-in 3-axis E-compass provides
you the bearing even when you stand
still, and its barometer

Owner’s Manual
2
pinpoints air pressure. Also, you can
use the thermometer to know
temperature conditions.
User POI icons: You can design your
own POI icons and load it to NAVA
unit.
Multi-power source: NAVA GPS
can be powered by 2xAA, Lithium,
USB, vehicle power adapter, AC
adapter.
Micro SD expandable: Uses a Micro
SD card to enlarge the storage
memory up to 4G. The card slot is
located inside the waterproof battery
compartment, so you don't have to
worry about getting it wet.
Lightweight and compact: NAVA is
lightweight and compact —the
perfect size for all your travels.
Basemap, city detail map, topo map
support: NAVA supports built-in
basemap and city detail/topo map on
the Micro SD card
Waterproof: IPX7.
Readable under sunlight: 65k
colors Transflective TFT LCD
Fast data transfer: USB 2.0
Drop resistance: 1.5m drop from
all 6 edges.

Owner’s Manual
3
Optional Accessories
For a complete list of available accessories
and maps for use with the NAVA GPS,
please refer to the BHCnav website:
Http://www.BHCnav.com
Manual Conventions
In this manual, small arrows () indicate
that you should highlight a series of items
on the screen using the ROCKER key, and
press in to ENTER after each item.

Owner’s Manual
4
Table of Contents
Introduction .............................1
Features of NAVA Series........................ 1
Optional Accessories.............................. 3
Manual Conventions.............................. 3
Getting Started.........................5
Key Functions........................................ 5
Installing the Batteries........................... 6
Turning the NAVA On and Off ..............7
Acquiring GPS Satellite Signals............ 7
Adjusting the Backlight......................... 7
Basic Operation .......................8
Waypoints .............................................. 8
Finding................................................. 12
Tracks................................................... 15
Routes.................................................. 17
Main Pages.............................19
GPS Status Page .................................. 19
Map Page............................................. 20
Compass Page...................................... 21
Weather Page (NAVA600 only)........... 23
Trip Computer Page............................. 23
Main Menu Page.................................. 24
Setting Page......................................... 24
USB Setting Page ................................ 25
Tools Page............................................ 27
Area Calculation.................................. 29
Coordinate System Setting .................. 29
Appendix.................................30
Specifications ...................................... 30
Connecting NAVA to Your Computer.. 33
Installing a Micro SD Card.................. 33
Declaration of Conformity................... 34

Owner’s Manual
5
Getting Started
Key Functions

Owner’s Manual
6
Installing the Batteries
The NAVA operates on two AA batteries or
special Li-ion batteries
(NAVA300/400/600).
To install AA batteries:
1. Remove the battery cover by turning
the D-ring counter-clockwise and
pulling the cover.
2. Insert the AA batteries, observing
the proper polarity.
To install special Li-ion batteries:
1. Remove the battery cover from the
back of the unit. Turn the D-ring
counter-clockwise and pull the cover.
2. Insert the Li-ion batteries.
Warning:Remove the batteries when you
do not plan to use the unit for long period.
Stored waypoint, trail, route data is not lost
when batteries are removed.
+
+
Pull

Owner’s Manual
7
Turning the NAVA On and Off
To turn the NAVA on, press and hold the
POWER key for more than 2 seconds. To
turn the NAVA off, press and hold the
POWER key for more than 2 seconds,
when the unit is on.
Acquiring GPS Satellite Signals
Before the NAVA can find your current
location and start navigation, you must
acquire GPS signals.
To quickly acquire GPS satellite signals:
1. Go outdoors to an open area, away
from tall buildings and trees.
2. Turn the NAVA on. Acquiring satellite
signals is automatic.
Please refer GPS Status Page (p.19) to
check the status of GPS satellite.
Adjusting the Backlight
1. When the NAVA is on, Press and
quickly release POWER key to open
the Backlight page.
2. Press right on the ROCKER key to
increase the brightness, press left to
decrease the brightness.
3. Press NEXT/EXIT key to close the
Backlight page.
Owner’s Manual
8
Basic Operation
This section explains basic operations you
can perform with your NAVA, including
creating and using waypoints, tracks,
routes, and using the Find Menu.
Waypoints
Waypoints are locations or landmarks you
record and store in your GPS. You can
mark a waypoint at your current location
on the map, or enter coordinates to create a
waypoint. You can add waypoints to routes
and navigate to a saved waypoint.
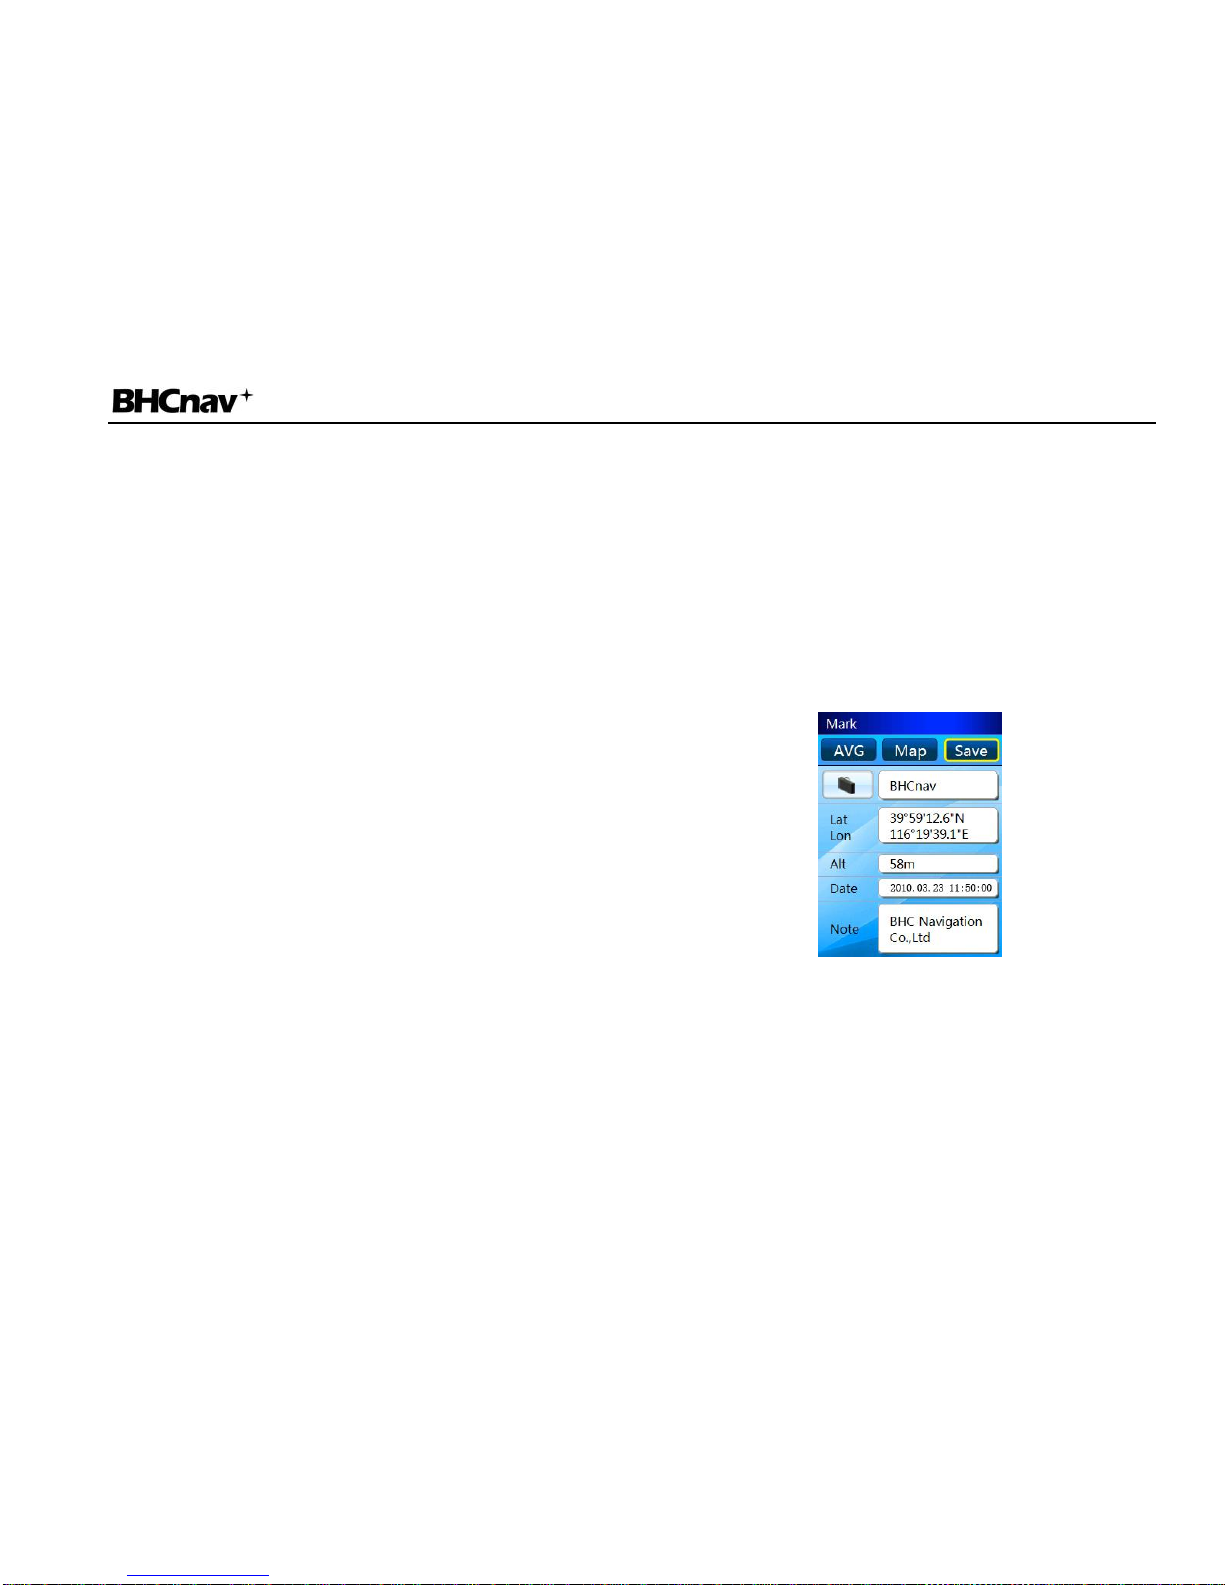
Marking Your Current Location
1. Press and release the MARK key.
2. To accept the waypoint with the
default information, select Save, and
press the ENTER key.
OR
To change waypoint name and note on
the Mark page, select the appropriate
field and press the ENTER key to
open the on-screen keypad. After
entering and confirming your changes,
select OK, and press ENTER key.

Owner’s Manual
9
Marking a Waypoint on the Map Page
1. On the Mark page, select Map.
2. On the Map Page, use the ROCKER
key to move the pointer ( )to the
location where you want to mark a
waypoint.
3. Press and quickly release ENTER to
capture the pointer location. If the
location captured contains no
information, a “No waypoint found,
add a waypoint?” message appears.
Select Yes to save the new waypoint.
Editing a Waypoint Attribution
You can edit a waypoint to change its icon,
name, coordinates, elevation and note.
1. Press and release the FIND key.
2. Select Waypoint.
3. Select the waypoint you want to edit,
and press ENTER key.
4. Make changes by highlighting each
field. Use the waypoint icon chart,
on-screen keypad and the ROCKER
key to enter new data.

Owner’s Manual
10
Deleting a Waypoint
1. Press and release the FIND key.
2. Select Waypoint.
3. Select the waypoint you want to
delete, and press ENTER key.
4. Press the MENU key, select Delete
Waypoint from submenu.
Warning: When you delete a waypoint,
you cannot recover it from the unit.
Moving a Waypoint on the Map Page
1. Press FIND key Waypoint.
2. Select the waypoint you want to
move, and press ENTER key.
3. Select Map to show the waypoint on
the map.
4. Press ENTER key to select the
Waypoint that you want to move.
5. Use ROCKER key to move the
pointer to a new location, and press
ENTER key.
6. Select OK to save the new waypoint.
Calculating Current Location By
Averaging
1. When NAVA acquires good GPS fix,
press MARK key AVG.
2. NAVA will average the location’s
longitude, latitude, altitude
automatically.
3. Press ENTER key, and Save the
waypoint.
Note: If NAVA doesn’t acquire GPS fix,
AVG button is disabled.

Owner’s Manual
11
Alerting Waypoints
1. Access Alert from the Main Menu
page, press ENTER key.
2. To define the alert range by
highlighting the Alert field, use the
ROCKER key to enter new data.
3. Press the MENU key, select Add Alert
Waypoint.
4. Select a waypoint from the waypoint
list. Select OK.
5. Close the Alert Waypoint page by
pressing the NEXT/EXIT key.
To clear one or all alert waypoints from
the list:
1. Access Alert from the Main Menu
page, press ENTER key.
2. With one waypoint to be selected on
the Alert Waypoint page, press the
ENTER key, select Delete to clear the
current waypoint.
3. Press MENU key, select Clear to clear
all the alert waypoints.

Owner’s Manual
12
Finding
Press the FIND key to open the Find page
and search for waypoints, POI, cities and
the addresses in the NAVA map.
Finding a Waypoint
1. Press the FIND key.
2. Access Waypoint and select a
waypoint from a list of waypoints.
3. On the Waypoint Details page, select
Map to view or edit the information of
the waypoint, or select Goto to guide
you to the destination on the Map
page.
Finding a Waypoint By Name
1. Press the FIND key to open the Find
page.
2. Select Waypoint.
3. Press MENU Search By Name.
4. Use the ROCKER to operate the
on-screen keypad and enter the name
you want to find.
5. If the Find list contains a match, select
the item from the Find list.

Owner’s Manual
13
Finding a Point of Interest
If your unit is loading a detail map, you
can open POI on the Find page to locate a
nearby place, government, education,
hospital, public service, traffic, etc.
To find a point of interest:
1. Press the FIND key
2. Select All POI to show a list of all
POIs near your current location.
3. Select an item from the list, and press
ENTER key.
Finding a History
The History page shows a list of the last
items you have searched for or gone to
recently.
1. Press the FIND key.
2. Select History.
3. Use the ROCKER key to select the
item you want to go to, and press
ENTER key.
4. Select Goto to begin navigation.

Owner’s Manual
14
Finding an Item From Another Location
on the Map
1. Press the FIND key.
2. Select an icon on Find page. Press
ENTER key to the Result page.
3. Press MENU key, select Alter
Reference Point. The Map page
appears.
4. Use the ROCKER key to move the
panning pointer to the map location
where you want to search around.
Press the ROCKER key, select Yes.
The Find list shows a list of items near
the new map location.
Finding an Address
If your unit is loading a detail map, you
can open the Address page from the Find
page to find the address where you want to
go.
To find an address:
1. Press the FIND key Address
2. Select the Province field. In the Result
list, select the name.
3. Select City field, input the city name.
4. Press down on the ROCKER key,
select the City name, Road name and
the Crossroad name.
5. Select Goto to navigate to the
destination on the Map page.

Owner’s Manual
15
Tracks
As you travel, NAVA records “track log”
automatically. The log contains
information about points along its path.
Saving the Entire Track Log
After acquiring the GPS fix, travel with the
NAVA.
1. On the Track page, select Save. A
message appears asking you if you
want to save the entire track.
2. Select Yes to save the track.
.
Saving a Portion of the Track Log
1. After acquiring the GPS satellite
signals, travel with the NAVA.
2. On the Track page, select Save. A
message appears asking you if you
want to save the entire track.
3. When the message appears, select No
to save only a portion of the track log.
4. Use the ROCKER to move the pointer
to the point on the track that you want
to set as the beginning point, and press
ENTER.
5. Use the ROCKER to move to the point
on the track that you want to set as
the ending point. Select OK.

Owner’s Manual
16
Viewing a Track on the Map
On the Track Details page, select Map. A
map showing the entire track appears.
Begin and End markers and waypoints are
added to the track.
Navigating a Saved Track
1. Access the Track page from the Main
Menu. The saved tracks are listed.
2. Select any saved track and press
ENTER key.
3. On the Track Details page, select
Goto.
4. Select Yes to start the back track.
5. To exit the Back Track page, press the
NEXT/EXIT key.
Clearing the Track Log
1. Press MENU key to open the Main
Menu.
2. Select Track.
3. Press the MENU key. Select Delete
All Tracks or Clear Current Track. A
confirmation message appears. Select
Yes.
Setting up a Track
1. Press MENU key Main Menu
Track.
2. Press MENU key, select Track Setting
to set the Record Mode, Record
interval, Track color and Display the
Current Track or not.
3. Press NEXT/EXIT key to close the
page.

Owner’s Manual
17
Routes
A route consists of a sequence of
waypoints or POIs. The NAVA stores 60
routes with up to 100 points each.
Creating a Route
1. Access the Route page from the Main
Menu.
2. Use ROCKER key to select Create,
and then press ENTER key to open the
Create A Route page.
3. Move down to the Add A Point field,
and press ENTER key to open Find
page.
4. Search and add a via point from
Waypoint, History, POI, etc.
5. To add more via points to your route,
repeat the process 3 and 4, and select
Save. A route includes at least two
waypoints.
OR
When you have completed the route
creation, select Goto to begin
navigation on the Map page while the
route is saved automatically.
Navigating a Saved Route
1. Press MENU key Main Menu
Route
2. Select a saved route Goto.
3. Follow the instructions on the Map
page.
4. To stop navigation at any time, press
MENU key, select Stop Navigation
from submenu of Map page.

Owner’s Manual
18
Change the Name of the Route
1. Press MENU key Main Menu
Route.
2. Select a saved routeselect the
route name field on the Route Details
page.
3. Use on-screen keypad to rename the
route.
Reviewing Individual Route Points
1. Press MENU keyMain
MenuRoute.
2. Select a saved routeselect a point
on the Route details page
ENTERView
3. Select OK or Map.
Delete a Route
From the page for that route, press MENU
keyDelete Route.

Owner’s Manual
19
Main Pages
NAVA200, NAVA300 and NAVA400 have
five recurring default main pages :GPS
Status, Map page, Compass page, Main
Menu, Trip computer. NAVA600 has an
extra default Weather page. Press and
release NEXT/EXIT to cycle through the
pages. You can add more pages and edit
page sequence from the Page Setting page.
GPS Status Page
The GPS status page shows your current
location, the accuracy, your current
elevation, satellite location, and satellite
signal strength.
The satellite signal bars on the GPS status
page indicate satellite strength. When bars
are green, the NAVA has acquired valid
satellite signals that are used to calculate
your position.

Owner’s Manual
20
Map Page
On the Map page, your current position is
indicated by a position marker .
Changing Map Zoom Range
Press the Zoom IN/OUT key on the side of
the unit.
Reviewing a Location on the Map
1. Use the ROCKER key to move the
panning pointer to the location you
want to review,
2. The information box shows the Lat &
Lon, Bearing and distance.
Showing or Hide Data Fields
1. On the Map page, press the MENU
key,
2. On the submenu of the map page,
select Hide Data Field, 2 Data Fields,
or 4 Data fields.
3. Press ENTER key, to show or hide the
data fields.
Changing a Data Field Display
1. Press MENUChange Data Fields.
The first data field is highlighted.
2. Press ENTER to open Data Field page
3. Select an option from the list of data
fields.
Other manuals for NAVA 200
1
This manual suits for next models
3
Table of contents
Other BHCnav GPS manuals


Popular GPS manuals by other brands

Garmin
Garmin NUVI 500/550 Schnellstartanleitung

Delphi
Delphi TNR800 - Navigation System With DVD-ROM installation instructions

Garmin
Garmin echomap chirp 50 series installation instructions

ZY International
ZY International TK-102B manual

Optimus
Optimus 2.0 manual

Astrium
Astrium IRITRACK Assembly instructions


