Bibliotheca flex AMH Manual

G-LBIS1065EN.003
flex AMH™
hardware installation guide (Siemens PLC)
bibliotheca.com, page 2
Copyrights & Trademarks
Copyright © bibliotheca 1999-2017, all rights reserved. The bibliotheca name and device is a
registered trademark of bibliotheca.
bibliotheca provides this document to customers and prospective customers only. The content of
this document is strictly confidential and may not to be reproduced in any form or transferred by any
means, in whole or in part, to any third party without the explicit and prior written consent of
bibliotheca.
All product names presented with the TM symbol within this document are trademarks of
bibliotheca and may not be used without the express written permission. Windows is a registered
trademark of the Microsoft Corporation in the United States and other countries.
Terms & Conventions
Text boxes containing a green circle and white “i” contain important information
pertaining to the use or configuration of the product. These may also contain tips
or recommendations from bibliotheca or bibliotheca customers.
Text boxes containing a red circle with a white triangle and exclamation point
contain either information critical to the successful use or configuration of the
product, or a warning. It is important to read and consider the information
presented in the hazard text boxes carefully.
Text boxes containing a blue circle and question mark contain a definition or
explanation of a specific term or concept that may not be immediately apparent
or common knowledge to all users. The information in these text boxes should assist
the reader’s understanding of this document’s content.
Clickable/Writeable Fields – Bold Text denotes a button, tab, text field, or menu that a user can
select or otherwise interact with.
Location/Reference – Italic text denotes the location of a file or folder on a computer, or a specific
section within the document or reference to a separate document

bibliotheca.com, page 3
Table Of Contents
1 Tools and Equipment required 4
2 Installation 5
2.1 Pre-requisites 5
2.2 Install Hardware 6
2.2.1 Unpackaging 6
2.2.2 Placing the return unit and adjusting the height 7
2.2.3 Placing the sorting units 10
2.2.4 Levelling 11
2.2.5 Connecting the devices 12
2.2.6 Fixation 13
2.2.7 Attaching the sorter runs 14
2.2.8 Attaching the emergency stop buttons 16
3 Cabling, Initialisation and Configuration 18
4 Contact bibliotheca Support 19

bibliotheca.com, page 4
1 Tools and Equipment required
To complete the hardware installation, you will need:
lA set of Alan Keys
l13mm Spanner Wrench
l14mm Spanner Wrench
lSet Level (Spirit Level)
lTorx screwdriver set
To complete the full installation, you will also need a copy of the latest flex AMH™ Support Guide to
give instructions on cabling and configuration.

bibliotheca.com, page 5
2 Installation
2.1 Pre-requisites
The building work has to be completed to a point where no more big dust producing work needs to
be done.
lFloor, ceiling and walls finished.
lIf needed, wall cuts have to be finished and measurements checked.
lElectrical and network cabling finished and ready to use.
lIf the System is not connected to a standard outlet, the connection from the Power
Distribution Unit (PDU) to the house-installation has to be done by a certified electrician.
lbibliotheca does not recommend connecting the PDU to a standard outlet as the
system can be accidentally unplugged. Where possible, always use a fixed connection.
lA layout of the system, including device numbers has to be present.
bibliotheca.com, page 6
2.2 Install Hardware
2.2.1 Unpackaging
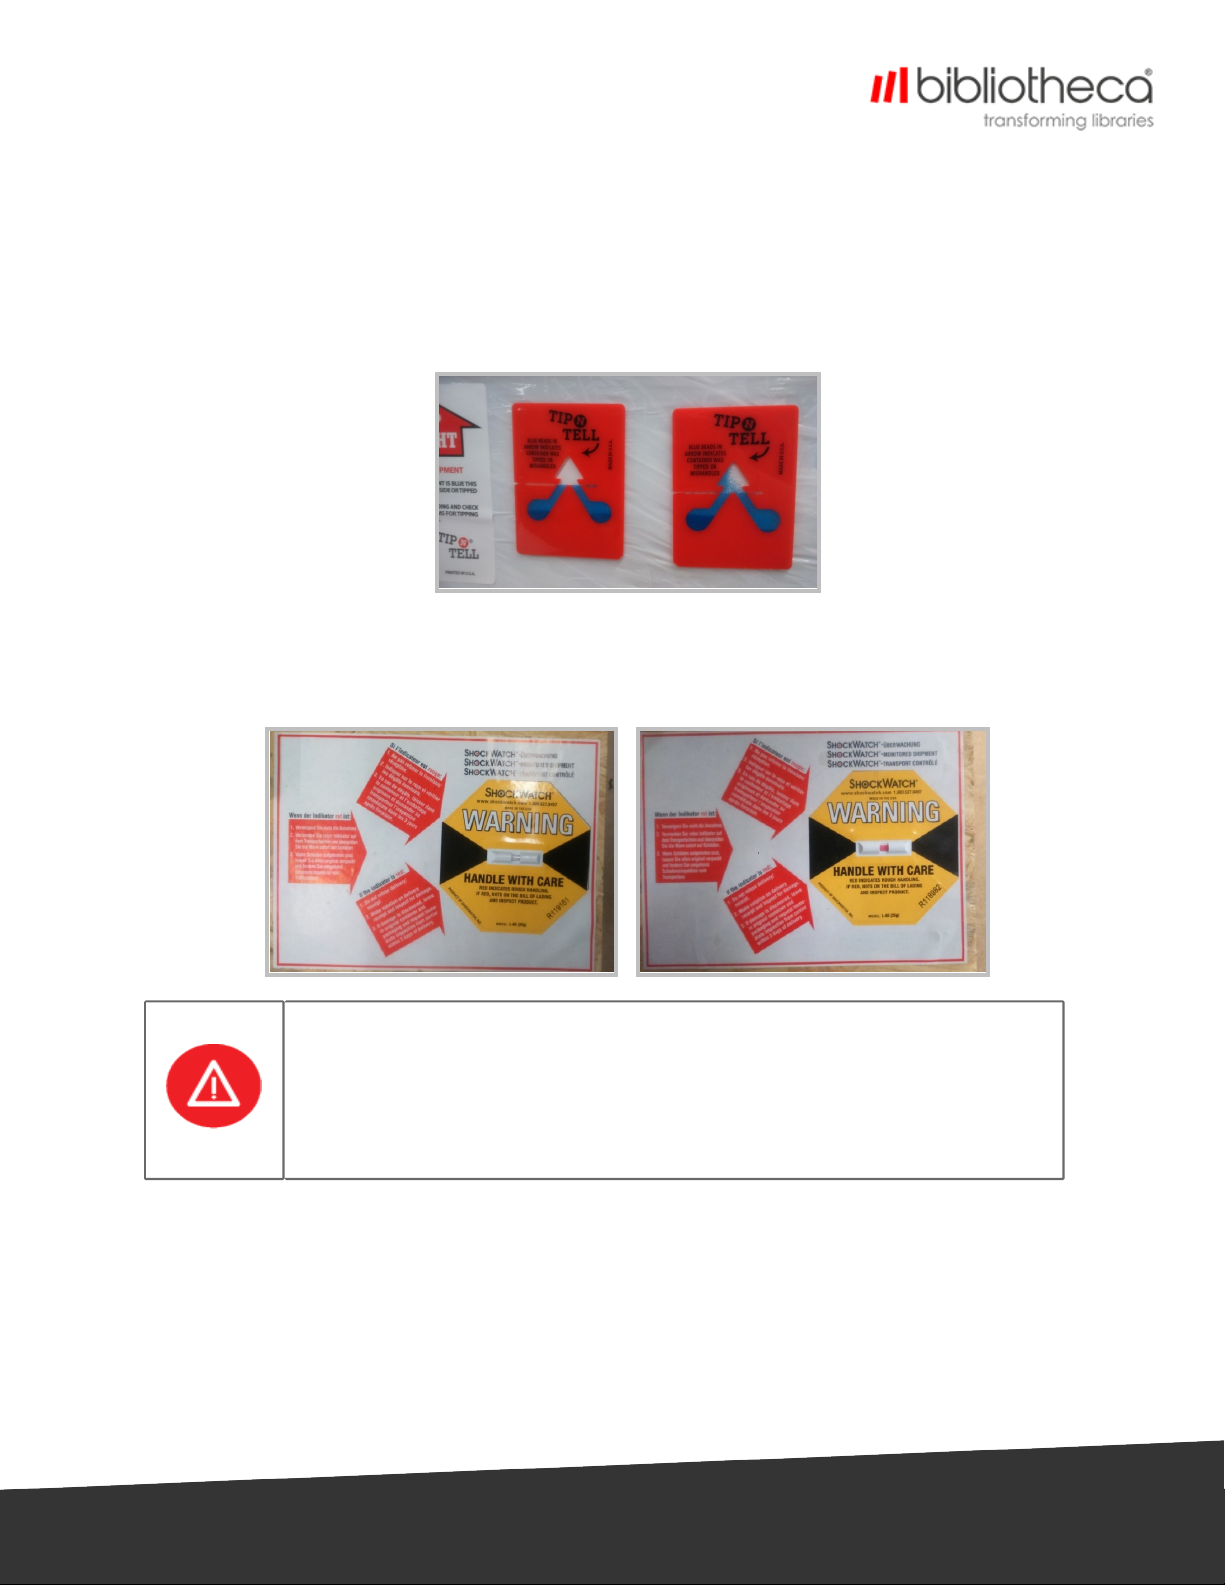
1. Check for the Tilt label on each crate,
lIf the device has moved from a horizontal position, the blue powder will have been
released into the point of the arrow,
2. Check the shock label on the pallet,
lIf the pallet has been subjected to large vertical shock, the centre of the label will be
red,
If the Tilt label or Shock label have been activated, or there are scratches or
mechanical damage on the unit prior to unpacking, contact either the
Project Manager or bibliotheca Support for further instruction.
DO NOT INSTALL THE UNIT UNLESS INSTRUCTED TO DO SO BY BIBLIOTHECA
PERSONNEL.
3. Remove packing from the device. Take care not to scratch the components while
unpacking,
lCheck for any scratches or other mechanical damage on the device.
4. Remove screws securing the devices to the pallet.

bibliotheca.com, page 7
2.2.2 Placing the return unit and adjusting the height
1. Starting with the return points, place the units in the correct location, as shown in the
installation plan. Return points only - DO NOT FIX YET,
2. The standard (optimal) height for the shelf on the return point should be 95cm from the
ground. This may vary and you should consult the installation plans prior to setting up,
3. If a wall opening already exists, place the return unit into the space at the correct height,

bibliotheca.com, page 8
4. If you need to adjust the height on any of the return devices, all four feet on a unit are
adjustable,
luntighten the upper screw nut of the desired leg (clockwise),
ladjust the height by turning the lower nut,
ltighten the upper screw (counterclockwise),
5. Use a 14mm spanner wrench to adjust the height and 13mm spanner wrench to lock the
height. The top nut can lose the thread on the leg so it may become loose. When re-fixing,
make sure it is straight,

bibliotheca.com, page 9
You can only adjust one foot at a time.
6. Should you need to adjust the height further, you can also adjust all four legs on the device.
This should only be attempted by at least two engineers and should only be done before the
devices are fixed to each other. Fine tuning of height adjustment should be done using the
feet.
lUnscrew the middle and top screw, but do not remove,
lAdjust the height of the leg to the required height,
lScrew the middle and top screw back in.
The height of the devices will be preset at production to the specifications
agreed.
Changing the leg height requires at least two engineers as it may include
lifting and holding the device at the required height.

bibliotheca.com, page 10
2.2.3 Placing the sorting units
1. Now that the returns points are in place, start to add the other parts of the sorting line as
shown in the installation plan.
2. All the belts on every device should be at the same height. The flex AMH™ does not need any
height difference between devices. The device heights are preset at production for the
specific installation,
lIf you need to adjust the height, please follow the instructions for adjusting the feet
height detailed in the previous section. Only adjust the leg heights if you cannot
achieve the required height using the feet height adjusters.
3. Sorting tables must be high enough for the bins to fit underneath them. Note that at the top of
the bins is tubular metal and therefore it is slightly higher on the corners.
Levelling is extremely important, and is the process of making sure that the
unit is perfectly level across. All units must be level in all orientations.
On soft surfaces (like carpeted areas), units will need to be levelled again
after a few weeks of operation.
bibliotheca.com, page 11
2.2.4 Levelling
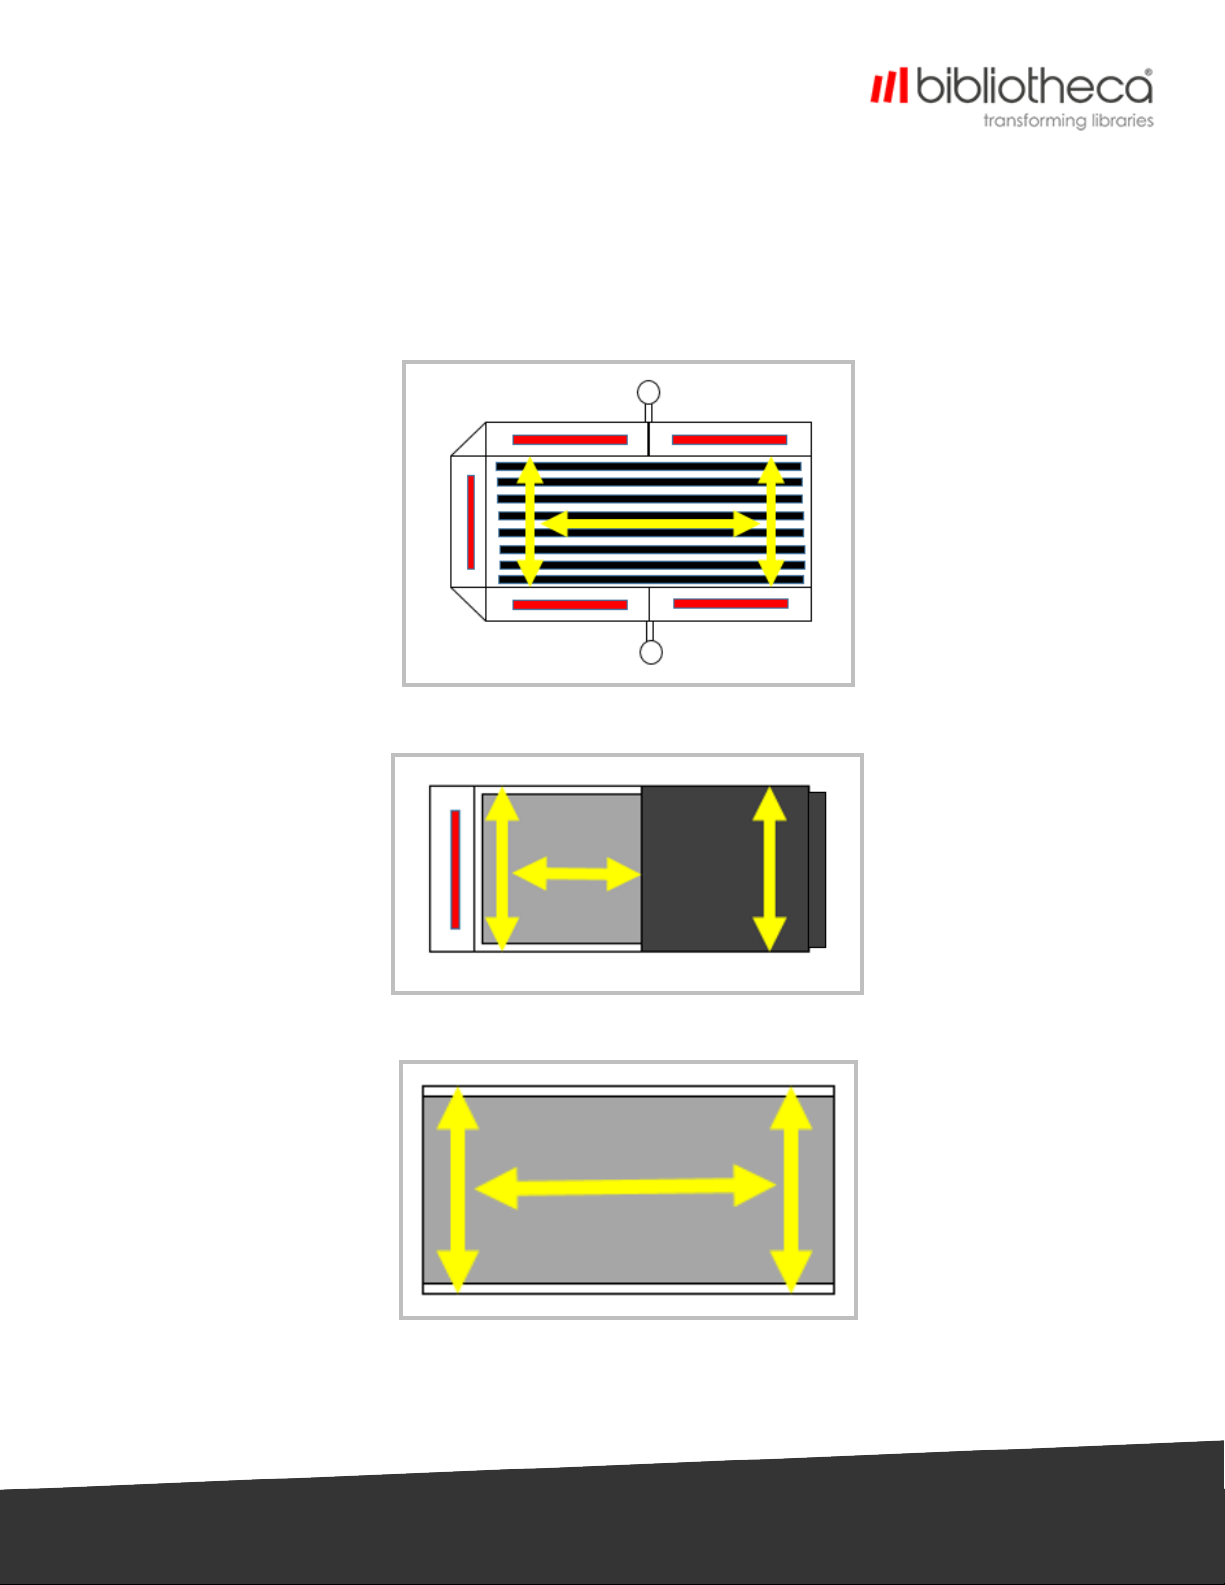
1. Place a Set Level (Spirit Level) across the device (recommended across the front two legs,
across the back two legs, and down the middle of the unit – indicated by the yellow arrows in
the images below), and make sure that it is level (0°) in all orientations. Level all devices in the
system.
lIf the device is not level, continue to gradually adjust the height of each foot until level.
Sorter belt (0° in all orientations)
Return unit (0° in all orientations)
Conveyor belt (0° in all orientations)

bibliotheca.com, page 12
2.2.5 Connecting the devices
1. Once the system is in place, and each device is aligned and level, secure the devices
together using the fixing plates on the underside of each device,
2. To attach 90° conveyor devices, attach each end of the conveyor bracket (shown below) to
the hole in the middle, underside of the conveyor device.
bibliotheca.com, page 13
2.2.6 Fixation
Fixing should only be attempted if it has previously been approved by the Project
Manager.
Furthermore, the floor surface should be flat, not cracked or damaged, and thick
enough to securely drill in to.
As all units are connected together, the flex AMH™ device normally does not require fixing to the
floor, as it is usually stable enough.
However, if movement is observed during operation, the system is a standalone return or three way
sorter system, or building regulations require it, the flex AMH™ system can be fixed to the ground. It is
recommended that only the patron and staff induction units are fixed, although, on larger
installations, you may also secure a sorter in the middle of the system and at the end of the system
for additional stability.
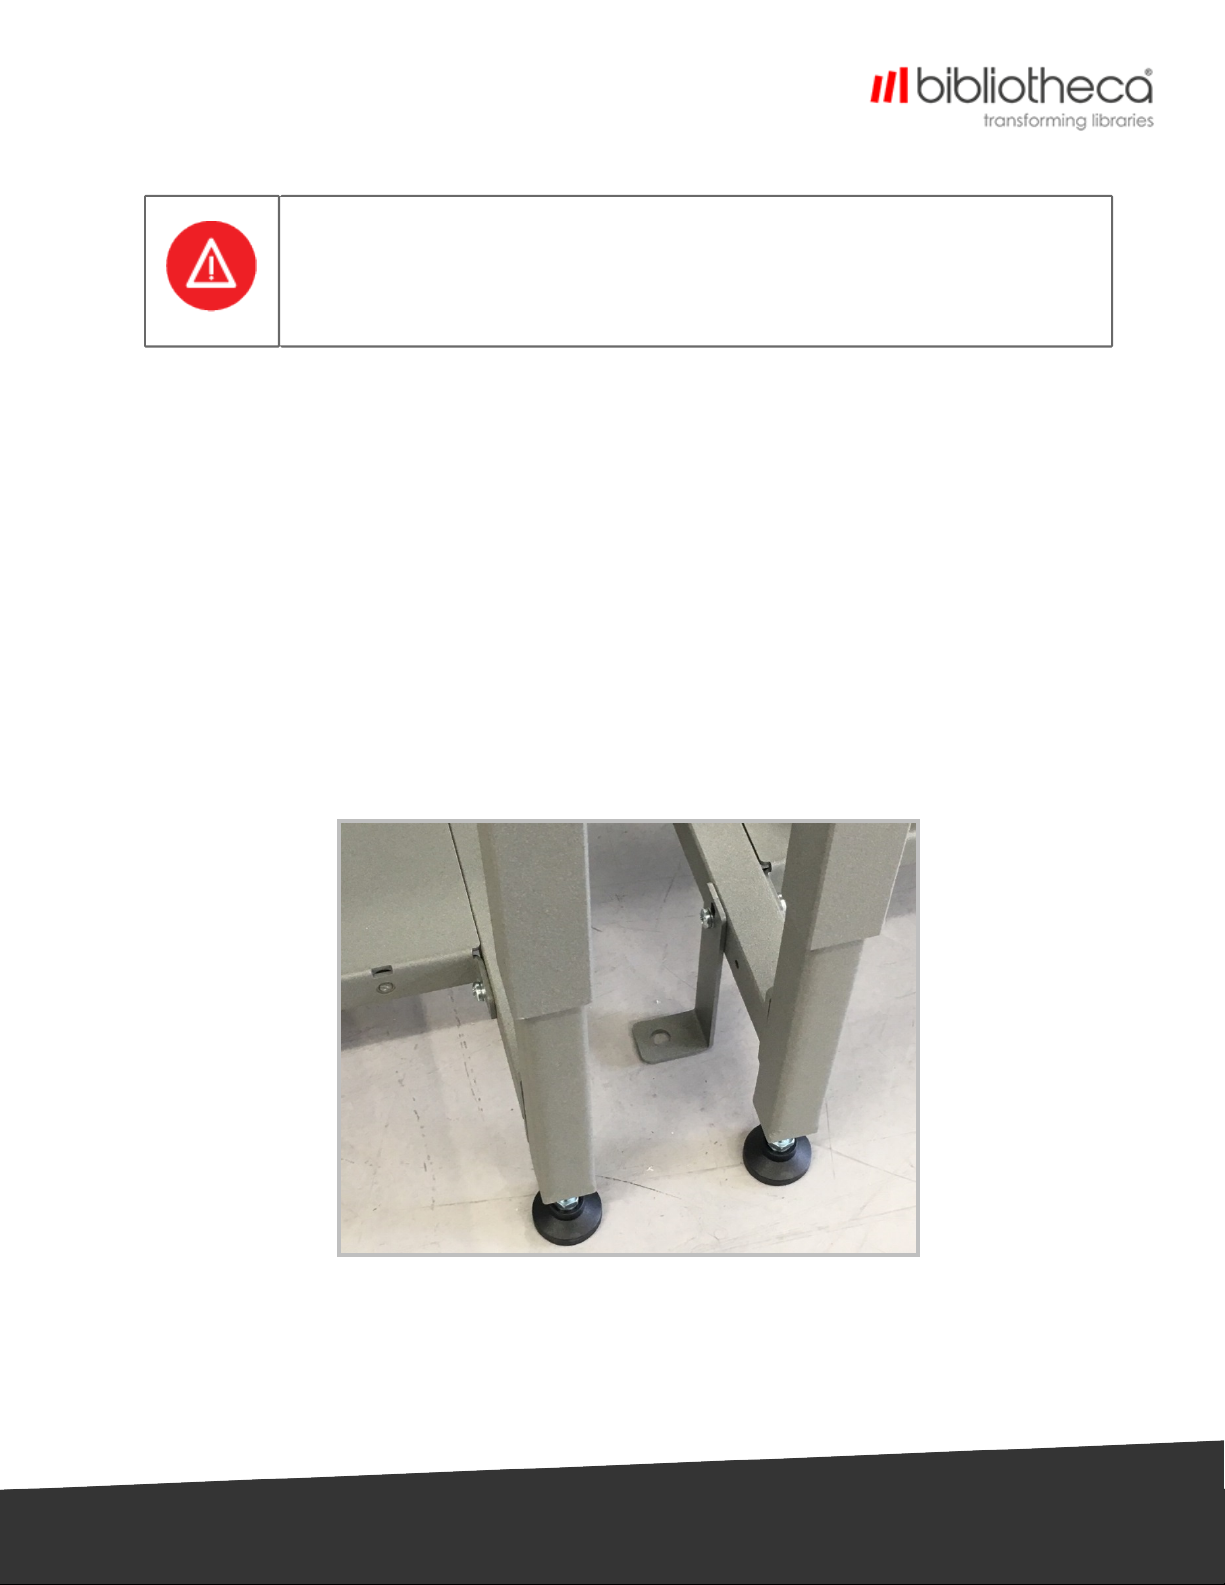
To fix a unit to the floor:
lOn each required unit, you will find two brackets to be used for fixation,
lLoosen the screw attaching them to the device (without removing the screw) and position so
that the hole is flat to the floor surface,
lDrill a screw with a dowel through the hole to secure the device to the floor.
lClear away any dust produced by drilling.

bibliotheca.com, page 14
2.2.7 Attaching the sorter runs
The sorter runs are not attached to the flex AMH™ on delivery.
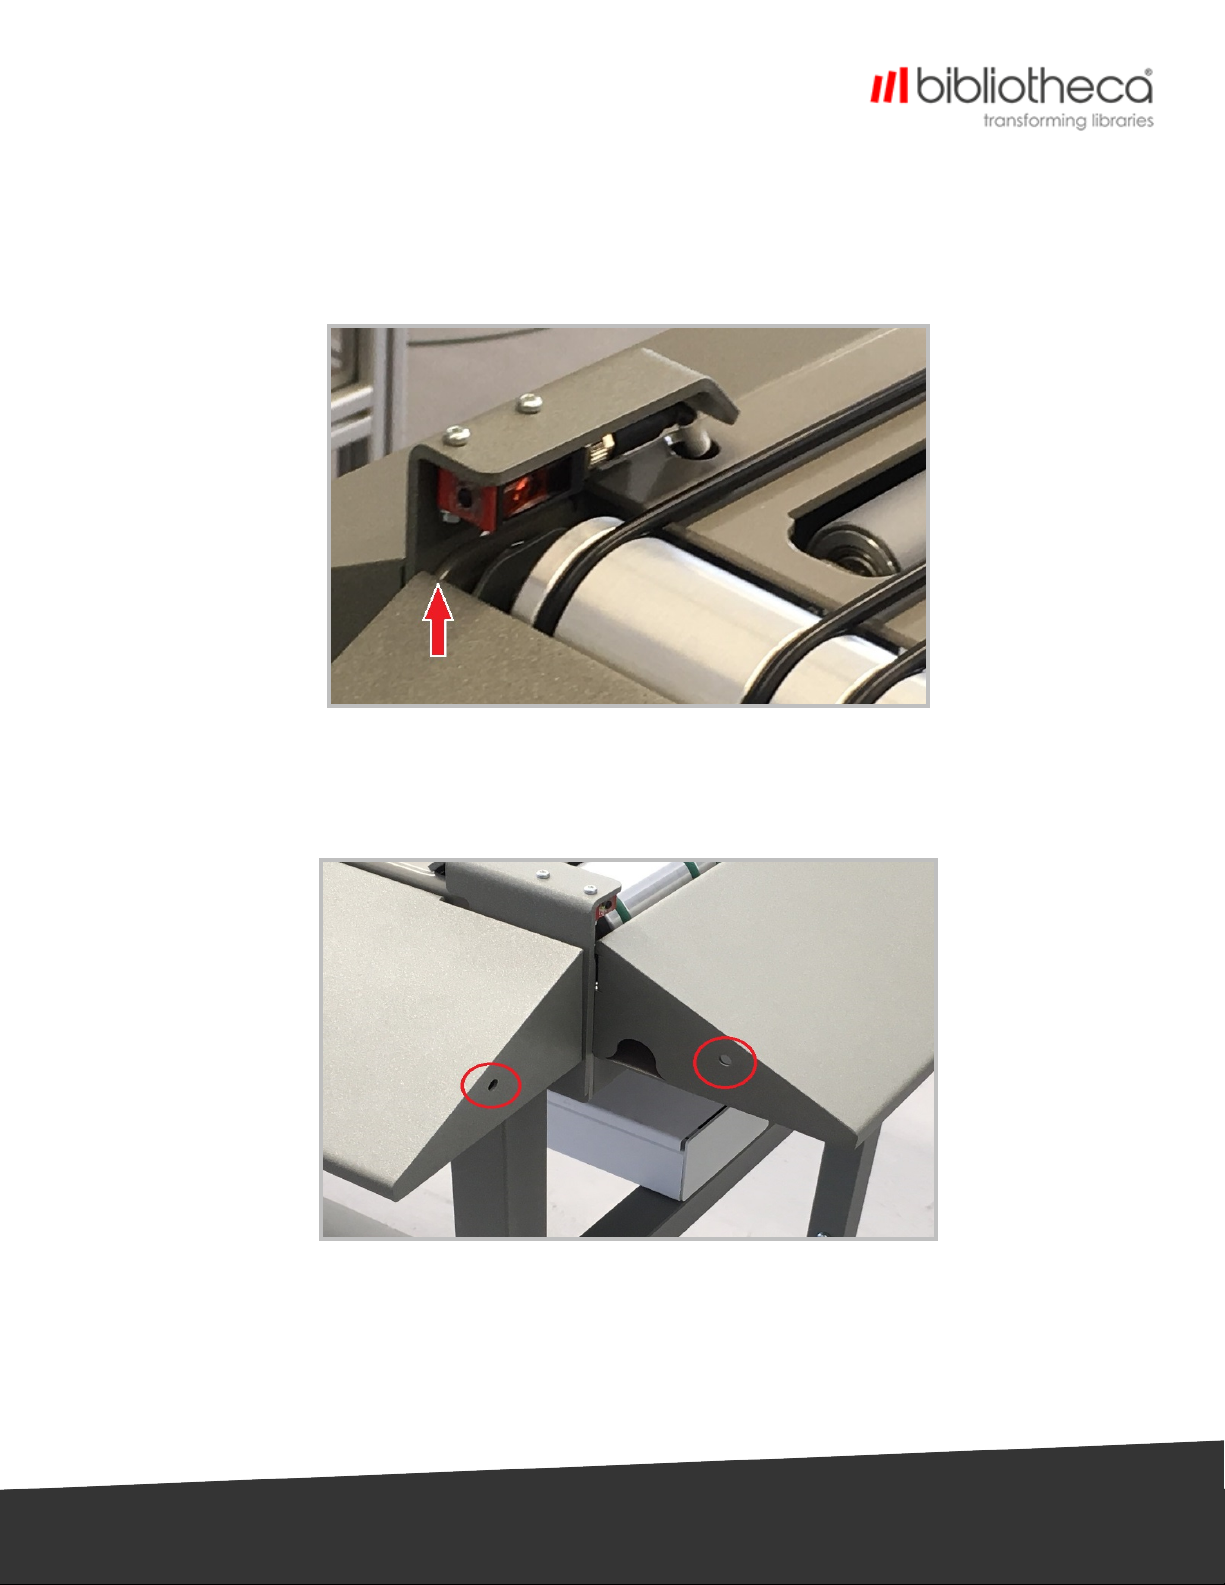
To attach the sorter run on to a side facing bin destination:
lLine up the bracket on the sorter run with the two screws either side of the bin sensors and
simply place on top. The sorter runs are not all identical, so you will need to use the correct
sorter run for each destination point.
lEnsure that the sorter run is flat to the device (so items cannot get caught in any gaps) and
that they are level with the other sorter runs on the system.
lTighten the two screws to fix the sorter run.
bibliotheca.com, page 15
To attach the sorter run on to an end bin destination:
lLine up the two hooks on the end of the sorter run with the gaps either side of the roller and
simply hook the sorter run on,
lEnsure that the sorter run is flat to the device (so items cannot get caught in any gaps) and
that they are level with the other sorter runs on the system.
To attach the blanking corners (without emergency stop buttons):
lEnsure that the sorter runs either side are in place,
lLine the blanking corner up with both sides,
lScrew the blanking corner to each sorter run, using the holes highlighted in the image above.

bibliotheca.com, page 16
2.2.8 Attaching the emergency stop buttons
The emergency buttons are not attached to the flex AMH™ on delivery.
To attach a corner with an emergency button on it:
lEnsure that the sorter runs either side are in place,
lRun the wiring for the Emergency Stop button through the cable access hole on the side
sorter run,
lLine the Emergency button corner up with both sides,
lScrew the corner to each sorter run, using the holes highlighted in the image above,

bibliotheca.com, page 17
lConnect the cabling to the required socket.
To attach an Emergency button on an arm:
lPlace the arm so that it is underneath the middle of a 5 way sorter,
lScrew the arm on to the underside of the sorter device using 4 screws,
lConnect the cabling to the required socket,
lRepeat for the other side of the sorter device.

bibliotheca.com, page 18
3 Cabling, Initialisation and Configuration
Please refer to the latest flex AMH™ Support Guide.

bibliotheca.com, page 19
4 Contact bibliotheca Support
Please be ready with your library’s customer number, case number, any applicable error messages
or conditions, and the product version or serial number.
The Americas
+1 877 207 3127 (select option 2)
support-us@bibliotheca.com
+1 877 207 3127 (select option 2)
support-ca@bibliotheca.com
+55 19 2515 7930
support-br@bibliotheca.com
UK and Europe
+32 (0)38 087 148
support-be@bibliotheca.com
+45 7027 1008
support-dk@bibliotheca.com
+33 (0)1 56 24 11 76
support-fr@bibliotheca.com
+49 7121 9264 115
support-de@bibliotheca.com
+39 800 011 060
support-it@bibliotheca.com
+31 (0)85 7600 840
support-nl@bibliotheca.com
+41 41 726 9950
support-ch@bibliotheca.com
+44 (0)161 498 1150
support-uk@bibliotheca.com
Asia and Pacific
+61 3 8555 3388
support-au@bibliotheca.com
+86 21 51078671
support-cn@bibliotheca.com
+85 2 3719 8122
support-hk@bibliotheca.com
+81 3 6273 0159
support-jp@bibliotheca.com
+82 02 6310 6565
support-kr@bibliotheca.com
+65 6 9044 270
support-sg@bibliotheca.com

Table of contents


