BIELMEIER BHG 403 User manual
BHG 403 / 410
DE 08 Bedienungsanleitung Brausystem
GB 22 Beer brewing system instruction manual
FR 36 Notice d'utilisation du système de brassage
IT 50 Istruzioni per l'uso sistema per fare la birra
CZ 64 Návod k použití - pivní systém
ES 78 Instrucciones de uso del cervecero
32
CONTENUTO
Componenti del vostro sistema per
fare la birra . . . . . . . . . . . . . . . . . . . . . . . . . . . . . . . 4
Indicazioni sulla tutela dell’ambiente . . . . . 6
Importanti indicazioni di sicurezza . . . . . . . . 50
Informazioni generali . . . . . . . . . . . . . . . . . . . . . 52
Informazioni importanti per l'utilizzo
dell'apparecchio . . . . . . . . . . . . . . . . . . . . . . . . . . 53
Montaggio . . . . . . . . . . . . . . . . . . . . . . . . . . . . . . . . 53
Pulizia . . . . . . . . . . . . . . . . . . . . . . . . . . . . . . . . . . . . . 53
Utilizzo dell'apparecchio . . . . . . . . . . . . . . . . . . 54
Modo di inserimento della temperatura . . 54
Modo di inserimento del tempo . . . . . . . . . . 55
Come fare la birra . . . . . . . . . . . . . . . . . . . . . . . . . 56
Procedimento per fare la birra . . . . . . . . . . . . 56
Tempo/Temperatura . . . . . . . . . . . . . . . . . . . . . . 61
Ulteriori possibilità d’uso . . . . . . . . . . . . . . . . . . 61
Dati tecnici . . . . . . . . . . . . . . . . . . . . . . . . . . . . . . . . 62
Garanzia . . . . . . . . . . . . . . . . . . . . . . . . . . . . . . . . . . 63
IT
CONTENTS
Parts of your beer brewing system . . . . . . . . . . 4
Please help preserve the environment . . . . . . 6
Important safety instructions. . . . . . . . . . . . . . . . 22
General information . . . . . . . . . . . . . . . . . . . . . . . . 24
Important instructions for using. . . . . . . . . . . . . 25
Assembly . . . . . . . . . . . . . . . . . . . . . . . . . . . . . . . . . . . 25
Cleaning and Maintenance . . . . . . . . . . . . . . . . . 25
Operating the appliance. . . . . . . . . . . . . . . . . . . . . . 26
Temperature setting mode . . . . . . . . . . . . . . . . . . . 26
Time setting mode . . . . . . . . . . . . . . . . . . . . . . . . . 27
The brewing process . . . . . . . . . . . . . . . . . . . . . . . . 28
The brewing method . . . . . . . . . . . . . . . . . . . . . . . 28
Time / temperature . . . . . . . . . . . . . . . . . . . . . . . . 33
Other uses of the mash tun. . . . . . . . . . . . . . . . . . 33
Technical details . . . . . . . . . . . . . . . . . . . . . . . . . . . . 34
Warranty . . . . . . . . . . . . . . . . . . . . . . . . . . . . . . . . . . . . 35
INHALT
Teile Ihres Bierbrausystems . . . . . . . . . . . . . . . . . 4
Der Umwelt zuliebe bitte beachten . . . . . . . . . 6
Wichtige Sicherheitshinweise . . . . . . . . . . . . . . . 8
Allgemeine Informationen . . . . . . . . . . . . . . . . . . 10
Wichtige Hinweise zum Gebrauch des Gerätes 10
Montage . . . . . . . . . . . . . . . . . . . . . . . . . . . . . . . . . . . . 11
Reinigung . . . . . . . . . . . . . . . . . . . . . . . . . . . . . . . . . . 11
Bedienung des Gerätes. . . . . . . . . . . . . . . . . . . . . . 12
Temperatureingabe-Modus . . . . . . . . . . . . . . . . . 12
Zeiteingabe-Modus . . . . . . . . . . . . . . . . . . . . . . . . . 12
Der Brauvorgang . . . . . . . . . . . . . . . . . . . . . . . . . . . 13
Das Brauverfahren . . . . . . . . . . . . . . . . . . . . . . . . . . 14
Zeit/ Temperatur . . . . . . . . . . . . . . . . . . . . . . . . . . . 19
Weitere Anwendungsmöglichkeiten . . . . . . . . 19
Technische Angaben . . . . . . . . . . . . . . . . . . . . . . . 20
Garantie . . . . . . . . . . . . . . . . . . . . . . . . . . . . . . . . . . . . 21
DE GB
OBSAH
Části pivního systému . . . . . . . . . . . . . . . . . . . . . 5
Pokyny k ochraně životního prostředí . . . . . 7
Důležité bezpečnostní pokyny
. . . . . . . . . . . . . 64
Všeobecné informace . . . . . . . . . . . . . . . . . . . . . 66
Důležitá upozornĕní k používání spotřebiče 66
Montáž . . . . . . . . . . . . . . . . . . . . . . . . . . . . . . . . . . . 66
Údržba . . . . . . . . . . . . . . . . . . . . . . . . . . . . . . . . . . . 67
Obsluha přístroje . . . . . . . . . . . . . . . . . . . . . . . . . 68
Režim nastavení teploty. . . . . . . . . . . . . . . . . . . 68
Režim nastavení času . . . . . . . . . . . . . . . . . . . . . 69
Vaření piva . . . . . . . . . . . . . . . . . . . . . . . . . . . . . . . . 70
Technologie vaření piva . . . . . . . . . . . . . . . . . . 70
Doba / teplota . . . . . . . . . . . . . . . . . . . . . . . . . . . . 75
Další možnosti využití . . . . . . . . . . . . . . . . . . . . . 75
Technické údaje . . . . . . . . . . . . . . . . . . . . . . . . . . 75
Záruční list . . . . . . . . . . . . . . . . . . . . . . . . . . . . . . . 77
CZ ES
ÍNDICE
Partes de su cervecero. . . . . . . . . . . . . . . . . . . . . 5
Por amor al medio ambiente . . . . . . . . . . . . . . 7
Indicaciones de seguridad. . . . . . . . . . . . . . . . . 78
Informaciones generales . . . . . . . . . . . . . . . . . . 80
Informaciones importantes sobre
el uso del aparato . . . . . . . . . . . . . . . . . . . . . . . . . 80
Montaje . . . . . . . . . . . . . . . . . . . . . . . . . . . . . . . . . . 81
Limpieza . . . . . . . . . . . . . . . . . . . . . . . . . . . . . . . . . . 81
Manejo del aparato . . . . . . . . . . . . . . . . . . . . . . . 82
Modo de introducción de temperatura . . . 82
Modo de introducción de los tiempos . . . . 83
El proceso de elaboración de cerveza . . . . . 84
El procedimiento de elaboración de cerveza 84
Tiempo / temperatura . . . . . . . . . . . . . . . . . . . . 89
Otras posibilidades de aplicación. . . . . . . . . . 89
Datos técnicos. . . . . . . . . . . . . . . . . . . . . . . . . . . . . 90
Garantía. . . . . . . . . . . . . . . . . . . . . . . . . . . . . . . . . . . 91
TABLE DES MATIERES
Eléments de votre système de brassage . . . 4
Pour l‘amour de l‘environnement . . . . . . . . . 6
Recommandations de sécurité . . . . . . . . . . . . 36
Informations générales . . . . . . . . . . . . . . . . . . . 38
Informations importantes concernant
l'utilisation de cet appareil . . . . . . . . . . . . . . . . 38
Montage . . . . . . . . . . . . . . . . . . . . . . . . . . . . . . . . . . 39
Nettoyage et entretien . . . . . . . . . . . . . . . . . . . . 39
Utilisation de l'appareil . . . . . . . . . . . . . . . . . . . . 40
Mode saisie de la température . . . . . . . . . . . . 40
Mode saisie de la durée . . . . . . . . . . . . . . . . . . . 41
Le processus de brassage . . . . . . . . . . . . . . . . . 42
Le procédé de brassage . . . . . . . . . . . . . . . . . . . 42
Temps / Température . . . . . . . . . . . . . . . . . . . . . 47
Autres possibilités d’utilisation . . . . . . . . . . . . 47
Données techniques . . . . . . . . . . . . . . . . . . . . . . 48
Garantie . . . . . . . . . . . . . . . . . . . . . . . . . . . . . . . . . . 49
FR
Lizenz Nr.:
5452569
WEEE-Reg.- Nr.:
DE30751975

54
SISTEMA PER FARE LA BIRRA
1 Coperchio
2Caldaia
3Parte inferiore con resistenza
4Display / Pannello di comando
(illustrato a pagina 54)
Regolamento elettronico, inserire il display LCD
per la spiegazione del campo di comando
5 Cavo di alimentazione
6 Rubinetto di scarico
7 Gorgogliatore
8 Riduttore
9 Coperchio
10 Clip di chiusura
11 Tino
12 Ramaiolo
13 Paletta per birra
in legno o plastica
14 Serpentina di raffreddamento
(raffreddamento del mosto)
(Non incluso nel set!)
15 Fondo perforato
16 Densimetro
17 Cilindro graduato
Il prodotto può essere soggetto a modifiche.
IT
BREWING SYSTEM
1Lid
2Vessel
3Base unit with heating element
4Display / control panel (explained on page 26)
electronic control, LCD display add for
explanation control panel
5Mains plug
6Drain tap
7 Airlock
8 Adapter
9 Lid
10 Sealing clamp
11 Pot
12 Ladle
13 Beer paddle, wooden or plastic
14 Spiral Cooler (wort cooling)
(not included in the set!)
15 Strainer insert
16 Hydrometer
17 Measuring Cylinder
Product may be subject to change.
BRAUSYSTEM
1 Deckel
2 Kessel
3 Unterteil mit Heizelement
4 Digitales Thermostat / LCD Display
(erklärt auf Seite 12)
5 Netzanschlusskabel
6 Auslaufhahn
7 Gärspund
8 Adapter
9 Deckel
10 Verschlussklammer
11 Bottich
12 Schöpfer
13 Bierpaddel, Holz oder Kunststoff
14 Kühlspirale (Würzekühlung)
(Nicht im Set inkludiert!)
15 Siebboden
16 Bierspindel
17 Messzylinder
Änderungen vorbehalten.
DE GB
SYSTÈME DE BRASSAGE
1 Couvercle
2 Cuve
3Partie inférieure avec élément de chauffage
4Ecran / tableau de commande
(explications page 40)
Insérer régulation électronique, affichage LCD
pour explication du panneau de commande
5 Câble de raccordement au réseau
6 Vanne d’évacuation
7 Bonde de fermentation
8 Adaptateur
9 Couvercle
10 Clip de fermeture
11 Cuve
12 Louche
13 Spatule de brassage
en bois ou en plastique
14 Serpentin de refroidissement
(refroidissement du moût)
(non compris dans le kit!)
15 Fond à tamis
16 Hydromètre à bière
17 Eprouvette graduée
Sous réserves de modification.
FR
SISTEMA DE ELABORACIÓN
DE CERVEZA
1 Tapa
2Caldera
3Parte inferior con calentador
4Display / panel de mando
(explicado en la página 82)
de la regulación electrónica, introducir
indicador LCD para explicación del cuadro
de mando
5Cable de conexión a la red
6Grifo de purga
7 Tapón de fermentación
8 Adaptador
9 Tapa
10 Cierre
11 Cuba
12 Cucharón
13 Remo cervecero
de madera o plástico
14 Espiral enfriador
(enfriamiento del mosto)
(¡No incluido en el set!)
15 Fondo perforado
16 Densímetro
17 Probeta
Se reserva el
derecho a efectuar
modificacciones.
ES
PIVNÍ SYSTÉM
1 Víko
2 Kotel
3 Spodní část s topným tělesem
4 Displej / kontrolní panel (viz. s. 68)
elektronická regulace, vložit LCD
ukazatel - vysvětlení displeje
5 Síťový kabel
6 Výpustný ventil
7 Zátka
8 Adaptér
9 Víko
10 Svorka
11 Káď
12 Naběračka
13 Pivní vařečka dřevo nebo umělá hmota
14 Chladicí spirála (chlazení mladiny)
(není součást dodávky)
15 Sítové dno
16 Pivní hustoměr
17 Odměrný válec
Změny vyhrazeny.
CZ
14 15
12
1716
°C min.
40 20
30
40 50 60
70
80
90
100
110
120
0
50
60 70
80
90
100
1
2
3
4
5
6
7
8
6
9
10
11
13

DE
76
GB
IT
INDICAZIONI SULLA
TUTELA DELL’AMBIENTE:
Non disperdere nell’ambiente il materiale
d’imballaggio e l’apparecchio da rottama-
re, ma destinarli ad operazioni di riciclo.
Si prega di richiedere presso la propria
amministrazione comunale informazioni
sui punti di raccolta differenziata e smal-
timento di rifiuti.
Per usufruire dei servizi in garanzia si pre-
ga di rivolgersi al proprio rivenditore o al
centro di servizio alla clientela BIELMEIER
del proprio paese.
Conformemente alla direttiva europea
2002/96/CE sulle vecchie apparecchiature elet-
triche ed elettroniche ed alla sua adozione nel
diritto nazionale, le apparecchiature elettriche
usate devono essere raccolte separatamente
riciclate nel rispetto dell'ambiente. Richiedere
alle autorità locali o all'amministrazione muni-
cipale le normative vigenti sullo smaltimento
per le apparecchiature elettriche non più uti-
lizzabili.
FR
POUR L'AMOUR DE
L'ENVIRONNEMENT:
Ne pas jeter les emballages et les appa-
reils usagés aux ordures ménagères, mais
les faire recycler.
Veuillez consulter le point de recyclage ou
de collecte de votre commune.
Pour l'application de vos droits relatifs
à la garantie, veuillez contacter votre
revendeur ou le centre de service client
BIELMEIER de votre pays.
Conformément à la directive européenne
2002/96/CE relative aux déchets d'équipe-
ments électriques et électroniques et à sa
transposition dans le droit national, les appa-
reils électriques usagés doivent être collectés
séparément et soumis à un recyclage respec
-
tueux de l'environnement. Informez-vous
auprès des services administratifs de votre
commune ou de votre ville sur les mesures
d'élimination actuellement applicables aux
appareils électriques hors service.
ES
POR AMOR AL MEDIO
AMBIENTE:
No tire simplemente a la basura el material
de embalaje y el aparato fuera de servicio,
sino entréguelo para su reciclaje. Pregunte
en su administración local por la estación
de reciclaje competente o el punto limpio
más próximo
.
Para tener derecho a los servicios de ga-
rantía, por favor, diríjase a su comerciante
o a la central de atención de al cliente de
BIELMEIER en su país.
Conforme a la directriz europea 2002/96/CE
sobre dispositivos eléctricos y electrónicos
y a la incorporación al Derecho nacional, los
aparatos eléctricos usados tienen que ser re-
cogidos por separado y entregados para un
reciclaje conforme al medio ambiente. Por
favor, infórmese en su Ayuntamiento sobre las
medidas de recogida actualmente vigente para
aparatos eléctricos usados.
CZ
POKYNY K OCHRANĚ
ŽIVOTNÍHO PROSTŘEDÍ:
Obalový materiál a starý přístroj nevyha-
zujte, ale dovezte k recyklaci.
Na příslušné recyklační místo nebo sběrný
dvůr se informujte na vašem obecním ne-
bo městském úřadě.
V případě uplatnění opravy v záruční do-
bě se obraťte na vašeho prodejce nebo
přímo na servisní centrum společnosti
BIELMEIER.
Podle evropské směrnice 2002/96/EG o použi-
tých elektrických a elektronických přístrojích a
její aplikace v národním právu se musí nepou-
žitelné přístroje třídit odděleně a ekologicky
recyklovat. Na aktuální opatření o likvidaci
elektroodpadu se informujte na příslušném
obecním nebo městském úřadu.
PLEASE HELP PRESERVE
OUR ENVIROMENT:
Please recycle packaging and old appli-
ances.
Please consult your local government for
information about the nearest recycling
centre.
For warranty claims, please contact your
dealer or the BIELMEIER customer service
centre in your country.
According to the European Directive 2002/96/
EC on waste electrical and electronic equip-
ment and its transposition into national law
any used electrical appliances must be collect-
ed separately and recycled in an environmen-
tally correct manner. Ask your local municipal
administration for currently valid measures of
disposal for waste electrical equipment.
DER UMWELT ZULIEBE
BITTE BEACHTEN:
Verpackungsmaterial und ausgediente
Geräte nicht einfach wegwerfen, sondern
der Wiederverwertung zuführen.
Den zuständigen Recyclinghof bzw. die
nächste Sammelstelle bitte bei Ihrer Kom-
munalverwaltung erfragen.
Zur Inanspruchnahme von Garantielei-
stungen wenden Sie sich bitte an Ihren
Händler oder die BIELMEIER Kunden-
dienstzentrale Ihres Landes.
Gemäß Europäischer Richtlinie 2002/96/EG über
Elektro- und Elektronik-Altgeräte und Umset-
zung in nationales Recht müssen verbrauchte
Elektrogeräte getrennt gesammelt und einer
umweltgerechten Wiederverwertung zugeführt
werden. Derzeit gültige Entsorgungsmaßnahmen
für ausgediente Elektrogeräte erfragen Sie bitte
bei Ihrer Gemeinde- oder Stadtverwaltung.
DE

DE DE
98
WICHTIGE SICHERHEITSHINWEISE
Wir freuen uns, dass Sie sich für dieses Produkt entschieden haben und be-
danken uns für Ihr Vertrauen. Die Sicherheit von BIELMEIER-Elektrogeräten
entspricht den anerkannten Regeln der Technik und den gesetzlichen
Bestimmungen.
Das BIELMEIER Brausystem besteht aus dem Maische-/Sudkessel mit
eingebauter Heizung und dem Läuter-/Gärbottich mit Siebboden sowie
dem Kühler. Alle diese Komponenten sind aus hochwertigem Edelstahl
gefertigt. Im Lieferumfang enthalten sind weiters ein Schöpfer, Bierpaddel,
Digitalthermometer, Bierspindel und Messzylinder.
Damit Sie viel Freude an Ihrem neuen BIELMEIER Brausystem haben, bit-
ten wir Sie, die nachfolgenden Hinweise sorgfältig zu beachten.
LESEN SIE DIE GEBRAUCHSANWEISUNG VOR
DER ERSTEN INBE
TRIEBNAHME SORGFÄL
TIG DURCH UND BEWAHREN SIE DIESE AUF!
Das Gerät darf nicht in Betrieb genommen werden, wenn:
– die Zuleitung beschädigt ist,
– das Gerät sichtbare Schäden aufweist,
– das Gerät heruntergefallen sein sollte,
– das Gerät außen nass oder feucht ist.
Bei offensichtlichen Schäden an Gerät bzw. Zuleitung, lassen Sie das
Gerät von einem
Fachmann oder dem BIELMEIER Kundendienst
prüfen.
Das Gerät nur an Wechselstrom gemäß dem Typenschild anschließen
(Schuko-Steckdose).
Wickeln Sie die Zuleitung vollständig ab.
Lassen Sie jedoch die Zuleitung nie herunterhängen.
Der Netzstecker (5) ist zu ziehen:
– bei Störungen während des Betriebes,
– vor jeder Reinigung und Pflege,
– nach dem Gebrauch.
Das Gerät muss auf eine stabile, ebene und freie Fläche gestellt werden.
Stellen Sie
Gerät und Zuleitung nie auf heiße
Oberflächen oder in die
Nähe von offenem Feuer, Gaskochern, etc
.
Achtung! Platzieren Sie Ihr Gerät dort, wo Sie es verwenden wollen.
Denken Sie daran, dass die Maische mit dem Schöpflöffel vom Maische-
und Sudkessel in den Läuter- und Gärbottich gefüllt wird. Das Gerät
sollte also nicht zu hoch platziert sein. Befüllen Sie erst den Maische- /
Sudkessel mit Wasser, wie unter „Maischen“ (siehe S. 14) angegeben.
Stecken Sie erst dann den Stecker (5) in eine geerdete Steckdose.
Transportieren Sie das Gerät nur im leeren und kalten Zustand!
Befüllt hat der Maische- /Sudkessel ein hohes Gewicht, wodurch Ver-
letzungsgefahr besteht!
Das Gerät nur im kalten und vollständig geleerten Zustand an den
Griffen anheben! Bei Missachtung droht die Gefahr von Verbrühungen
und / oder Verbrennungen.
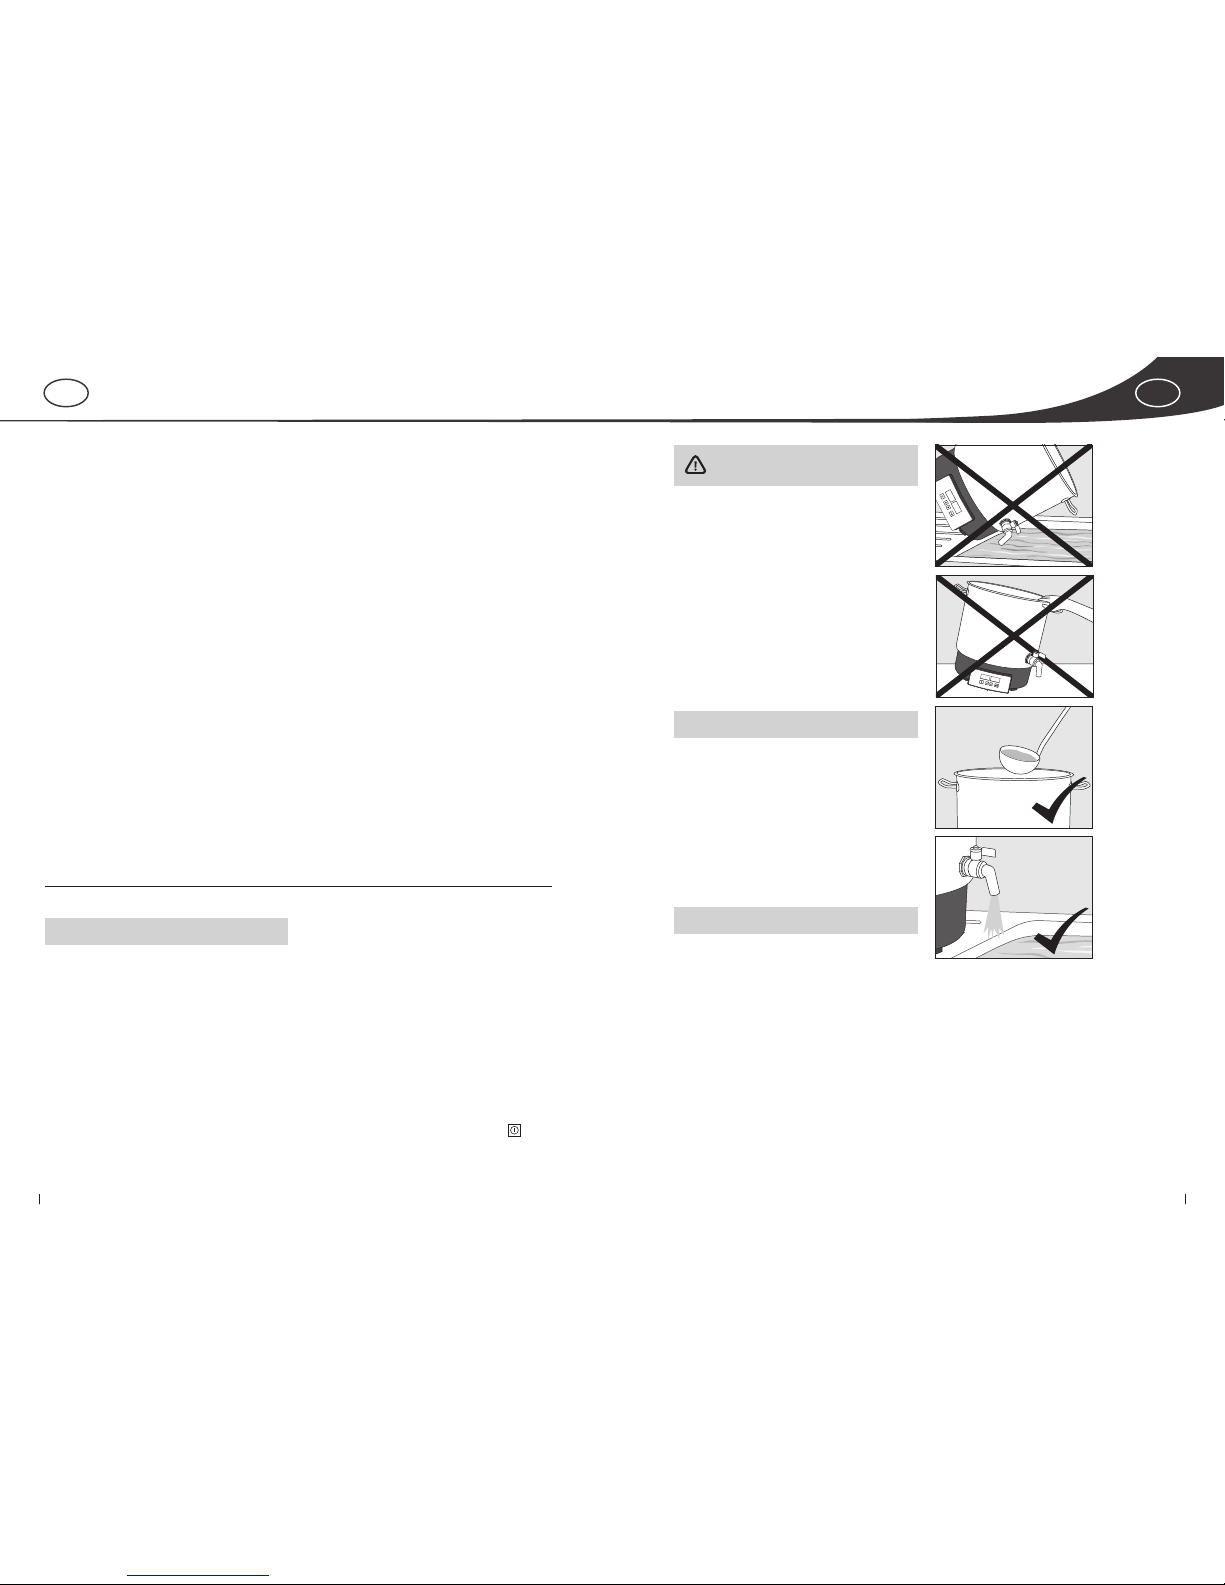
Entleeren Sie das Gerät im heißen Zustand niemals durch Kippen
des Gerätes. Im heißen Zustand ist der Inhalt ausschließlich durch den
Auslaufhahn, falls vorhanden,zu entnehmen. Sollte dies nicht möglich
sein, muss abgewartet werden bis das Gerät und der Inhalt abgekühlt
sind. Beim Kippen des Geräts im befüllten und heißen Zustand be-
steht die Gefahr von Verbrennungen und/oder Verbrühungen.
Befüllen Sie das Gerät bevor Sie es einschalten.
Schalten Sie das Gerät nicht ohne Wasser ein, da sonst die Emailierung
und der beschichtete Auflagerost (nicht im Lieferumfang enthalten)
beschädigt werden könnten. Sollte dies trotz aller Vorsicht doch passie-
ren, muss mit dem Einfüllen von Wasser gewartet werden, bis das Gerät
abgekühlt ist, ansonsten könnte die plötzliche Dampfentwicklung zu
Verbrühungen führen.
Füllen Sie den Kessel
(2)
bis höchstens 4 cm unterhalb des Randes (ent-
spricht 23 Liter Kochmodus). Ein Überlaufen ist ge
fährlich und kann das
Gerät beschädigen
.
Vorsicht! Durch austretenden Dampf besteht
Verbrühungsgefahr!
Vorsicht, das Gerät wird im Betrieb heiß!
Fassen Sie daher das Gerät nur an den isolierten Griffen an, ansonsten nur
mit wärmeisolierenden Topflappen.

DE DE
1110
MONTAGE
Die Auslaufhähne (6) für den Maische-/Sudkessel
(BHG 410000) und den Läuter-/Gärbottich (BHG
040002) liegen bei.
Montieren Sie die Hähne so, dass die Silikondich-
tung jeweils an der Außenseite des Behälters am
Hahn liegt. Im Läuter-/Gärbottich (BHG 040002)
muss die Mutter so angezogen werden, dass eine
flache Seite des 6-Kant nach oben zeigt, damit
der Siebboden waagrecht im Bottich liegt.
REINIGUNG
Ziehen Sie vor dem Reinigen immer den Netz-
stecker aus der Steckdose. Tauchen Sie das Gerät
nie ins Wasser! Wischen Sie es bei gezogenem
Stecker (5) außen feucht ab. Verwenden Sie kei-
ne scharfen und scheuernden Reinigungsmittel.
Waschen Sie es innen aus. Etwa auftretende
Kalkrückstände können Sie mit Essigwasser
oder handelsüblichem Entkalker von Zeit zu Zeit
beseitigen – anschließend mit klarem Wasser
auskochen!
Schöpfen Sie die Reinigungsf
lüssigkeit ab oder
lassen Sie sie über den Auslaufhahn (6) – falls
vorhanden – ab. Kippen Sie das Gerät nicht!
Von Zeit zu Zeit muss der Auslaufhahn
(6)
- falls
vorhanden - mit heißem Wasser, dem Spülmittel
zugesetzt werden kann, gereinigt werden.
(Abb. 1)
(Abb. 2)
(Abb. 3)
(Abb. 4)
Tauchen Sie das Gerät nie in Wasser! Schützen Sie ebenso die Zuleitung
vor Feuchtigkeit.
Ziehen Sie nach dem Gebrauch immer den Netzstecker und lassen Sie
das Gerät abkühlen
Dieses Gerät ist nicht dafür bestimmt, durch Personen (einschließlich Kin-
der) mit eingeschränkten physischen, sensorischen oder geistigen Fähig-
keiten oder mangel Erfahrungen und/ oder mangels Wissen benutzt zu
werden, es sei denn, Sie werden durch eine für ihre Sicherheit zuständige
Person beaufsichtigt oder erhielten von ihr Anweisungen, wie das Gerät
zu benutzen ist. Kinder sollten beaufsichtigt werden, um sicherzustellen,
dass sie nicht mit dem Gerät spielen.
Dieses Gerät ist nur für den hauswirtschaftlichen Gebrauch und nicht
für den gewerblichen Einsatz geeignet.
Bei Zweckentfremdung oder falscher Handhabung kann keine Haftung
für evtl. Schäden übernommen werden.
Aus hygienischen Gründen sollten Sie vor dem
ersten Gebrauch das Gerät mit ca. 6 l Wasser
einmal ca. 15 min lang auskochen – Tempe-
ratur auf 100°C stellen, Zeit auf Dauerbetrieb
( -- ) stellen und Gerät einschalten ( ) .
Die Mühle kann auch zur Herstellung von Mehl
und zum Quetschen von Getreideflocken für
Müsli verwendet werden.
WICHTIGE HINWEISE ZUM
GEBRAUCH DES GERÄTES
Vor dem ersten Gebrauch die Innenseite des
Kessels (2) sorgfältig reinigen. Bitte beachten
Sie hierzu den Abschnitt „Reinigung“.
Befüllen Sie das Gerät bevor Sie es einschalten.
Überfüllen Sie den Kessel
(2)
nicht! Füllen Sie
den Topf
(2)
bis maximal 4 cm unterhalb des
Randes. Ein Überlaufen ist gefährlich und
kann das Gerät beschädigen.
Flüssigkeiten, die nach Gebrauch noch im Kessel
(2)
vorhanden sind, müssen abgeschöpft oder
über den Auslaufhahn
(6)
– falls vorhanden – ab-
gelassen werden. Kippen Sie das Gerät nicht!
ALLGEMEINE INFORMATIONEN
Fassungsvermögen: Der BIELMEIER Maische-
/Sudkessel fasst 27l. Der Flüssigkeitsstand darf
bis max. 4cm unter den oberen Rand reichen,
das entspricht ca. 23 l.
Das Gerät ist über das Bierbrauen hinaus viel-
seitig verwendbar: Einkochen, Wärmen im
Wasserbad, Zubereiten von heißen Getränken,
Kochen, Aufwärmen, Blanchieren von Gemü-
se usw.
Dicke, zum Anbrennen neigende Speisen müs-
sen langsam und unter ständigem Rühren er-
wärmt werden.
Bitte beachten Sie: Sollte Ihr Gerät einmal
leer kochen, so verhindert ein zusätzlicher
Trockengehschutz zu starke Überhitzung.
WICHTIG: Das Gerät gut abkühlen lassen,
bevor wieder Wasser nachgefüllt wird,
sonst besteht Verbrühungsgefahr durch
Dampfbildung. Außerdem kann der Be-
hälter beschädigt werden.
Beim ersten Gebrauch kann Geruch entstehen,
der sich aber nach kurzer Betriebsdauer verliert.
DE DE
1312
Netzstecker einstecken
Display leuchtet
Einschalten bzw. Betriebs-Modus
Taste: 1x drücken:
EINSCHALTEN DES GERÄTES
Nach dem Einschalten des Gerätes durch Betäti-
gung des Ein-Aus-Schalters leuchten alle LCD-Seg-
mente (Liquid Crystal Display) für eine Sekunde auf.
Die zuletzt verwendete Temperatur wird ange-
zeigt.
Die Ziffern der Temperaturanzeige blinken,
wenn die im Einkocher gemessene Temperatur
von der eingestellten Temperatur (Soll-Tempe-
ratur) abweicht.
Ist die eingestellte Temperatur erreicht, leuchten
die Ziffern stetig.
Zeit: - - = Dauerbetrieb
Gerät heizt auf eingestellte Temperatur auf und
läuft im Dauerbetrieb bis zum erneuten Betäti-
gen der "Ein/Aus" Taste.
TEMPERATUREINGABEMODUS
"Temp./Zeit" Taste 1x drücken
Das Temperatur-Symbol (°C) blinkt, Ziffern leuchten
stetig, wenn die Soll-Temperatur nicht erreicht ist.
Zeit: - - im Dauerbetrieb; Die Heizung ist während
des Eingabe-Modus nicht unterbrochen, es wird
auf die Soll-Temperatur geheizt bzw. die Soll-Tem-
peratur gehalten.
"Minus"-Taste
Herunterzählen der Temperatur; bei kurzem Drü-
cken der Taste wird in Einer-Schritten herunter
gezählt; bis auf 30°C (niedrigste Temperaturein-
stellung). Solange die Taste gehalten wird, wird die
Temperatur schnell herunter gezählt.
"Plus"-Taste
Hochzählen der Temperatur; bei kurzem Drücken
der Taste wird in Einerschritten hoch gezählt; bis
auf 100°C (höchste Temperatureinstellung). Die
Temperatur wird schnell hoch gezählt, solange
die Taste gehalten wird.
Wird nach Start des Temperatureingabe-Modus bzw.
nach Änderung der Temperatur mit der "Minus"-
bzw. "Plus"-Taste 5 sec. keine Änderung vorgenom-
men, wird der Temperatureingabe-Modus verlassen
und das Gerät geht in den Betriebs-Modus.
ZEITEINGABEMODUS
"Temp./Zeit" Taste 2x drücken
Das Zeitsymbol (min) blinkt und die zuletzt einge-
stellte Zeit wird angezeigt und kann mit "Minus"
oder "Plus" verändert werden. Wird nach Start des
Zeiteingabe-Modus bzw. nach Änderung der Zeit,
mit "Minus"- bzw. "Plus"-Taste 5 sec. keine Ände-
rung vorgenommen, wird der Zeiteingabe-Modus
verlassen und das Gerät geht in den Betriebs-Mo-
dus. Die zuletzt eingestellte Zeit wird bei Erreichen
der eingestellten Temperatur (Soll-Temperatur)
herunter gezählt.
"Minus"-Taste
Herunterzählen der Zeit; bei kurzem Drücken der
Taste wird in Einer-Schritten herunter gezählt; (1
Minute = niedrigste Einstellung). Solange die Ta-
ste gehalten wird, wird die Zeit schnell herunter
gezählt.
Befand sich das Gerät vor dem Aufrufen des Zeit-
Modus im Dauerbetrieb (Zeit-Anzeige: - - min),
springt die angezeigte Zeit von - - Dauerbetrieb
zunächst auf 120 min und wird dann bis 0 min
herunter gezählt.
"Plus"-Taste
Hochzählen der Zeit; bei kurzem Drücken der Ta-
ste wird in Einerschritten hoch gezählt; (120 Minu-
ten / - - Dauerbetrieb = höchste Einstellung). Die
Zeit wird schnell hoch gezählt, solange die Taste
gehalten wird.
Um erneut in den Dauerbetrieb zu wechseln, muss
im Zeiteingabe-Modus die Zeit auf - - Dauerbe-
trieb gesetzt werden. Auch während des Herun-
terzählens der Zeit können Temperatur und Zeit
jederzeit verändert werden.
AUSSCHALTEN DES GERÄTES
Ausschalten durch Drücken der Taste
"Ein/Aus".
Das Gerät kann in jedem Zustand ausgeschaltet
werden. Zeiteingaben im Zeiteingabe-Modus wer-
den nicht gespeichert.
Die zuletzt eingestellte Temperatur wird gespei-
chert und erscheint bei Wiedereinschalten des
Einkochers, auch wenn das Gerät in der Zwischen-
zeit vom Netz getrennt wurde.
Ziehen Sie zusätzlich nach dem Gebrauch den
Netzstecker (5).
DER BRAUVORGANG
Selbst gebrautes Bier ist ein hochwertiges
Naturprodukt. Beste Qualität wird durch hohe
Güte und Frische der Rohstoffe erzielt. Ein wich-
tiger Rohstoff ist das Brauwasser: Es soll frei von
Fremdaromen (z.B. Chlor) sein und eine Härte von
etwa 10–12°dH aufweisen (Ihr Wasserversorger
gibt Ihnen diesen Wert bekannt). Entspricht das
Leitungswasser nicht Ihren Anforderungen, kann
in der Zuleitung Ihrer Wasserarmatur ein Filter-
system für einwandfreies Trinkwasser installiert
werden.
Malz, Hopfen und Brauhefe sind als eingewogene
Rezeptur für 6 unterschiedliche Biersorten bei
BIELMEIER erhältlich.
Bierbrauen lässt sich, vereinfacht gesagt, in einige
wenige Schritte zusammenfassen:
Zuerst muss, falls notwendig, das Braumalz
geschrotet, d.h. vermahlen werden. Dabei ist
darauf zu achten, dass nicht zu fein, aber auch
nicht zu grob geschrotet wird.
Das geschrotete Malz wird dann mit Brauwas-
ser vermengt und über verschiedene Zeiträu-
me bei bestimmten Temperaturen bis auf 78–
80°C erhitzt. Dieser Vorgang wird als Maischen
bezeichnet (siehe Brauverfahren, S. 14).
Anschließend folgt der Schritt des Läuterns,
d.h. die festen Bestandteile der Maische (Treber)
werden von den flüssigen (Würze) im Läuter-
bottich getrennt.
Die so erhaltene Würze wird im Sudkessel
über einen bestimmten Zeitraum (60–90min)
gekocht. Bei diesem Vorgang erfolgt auch die
Hopfung der Würze.
Nach Beendigung der Würzekochung folgt der
sogenannte Whirlpool, bei dem durch starke
Rotation der Würze feine Trübteile, die wäh-
rend der Kochung entstanden sind, sich in der
Mitte der Sudkessels absetzen und somit zu ei-
ner weitgehenden Klärung der Würze führen.
Anschließend wird die Würze auf Gärtem-
peratur gekühlt, in den Gärtank überführt und
mit Hefe versetzt, welche den gewonnenen
Zucker aus der Würze in Ethanol und CO2
umwandelt. Dieser Vorgang dauert, je nach
verwendeter Hefe, 3–7 Tage.
min°C
Ein/Aus Wahlschalter
Temperatur/Zeit
Zeitanzeige
1-120 Minuten und
- - = Dauerbetrieb
Temperaturanzeige
30°-100°C
Minus Plus
BEDIENUNG DES GERÄTES

DE DE
1514
Zuletzt wird das Jungbier in Flaschen gefüllt
und für 4–8 Wochen gelagert. Dabei erfolgt
eine natürliche Klärung und Aromaentwick-
lung sowie die Produktion von CO
2
(Kohlen-
säure) und Ethanol (Alkohol). Dieser Prozess
wird als Nachgärung bezeichnet.
Sauberkeit und Hygiene sind unerlässlich für den
Brauvorgang. Sorgfältiges Reinigen und Desin-
fizieren der Brau-Ausrüstung und insbesondere
der Flaschen ist die Voraussetzung für die erfolg-
reiche Bierherstellung.
ACHTUNG!
In manchen Ländern ist gesetzlich vorgeschrieben,
die Bierherstellung für den eigenen Verbrauch
bei der Behörde anzumelden.
DAS BRAUVERFAHREN
Was Sie zur optimalen Kontrolle des Braupro-
zesses noch benötigen:
Indikatorpapier für das Bestimmen des pH-
Wertes Ihres Brauwassers
80%ige Milchsäure zum Einstellen des rich-
tigen pH-Wertes
Jodlösung für die Verzuckerungsprobe
(Stärkenachweis)
Die folgende Beschreibung ist beispielhaft, bitte
folgen Sie den für die jeweilige Rezeptur gelten-
den Angaben.
Bedenken Sie, dass es Verfahrensschritte
gibt, in denen die heiße Flüssigkeit von
einem Bottich in den anderen laufen soll.
Positionieren Sie die Bottiche bereits vor
diesen Schritten so, dass Sie niemals den
vollen Maische-/Sudkessel (BHG 410000)
anzuheben brauchen – es besteht Verletzungs-
gefahr durch Verbrühen!
SCHROTEN
Füllen Sie den Aufsatz der Mühle und drehen
Sie die Kurbel. Die Spelzen (Schalen der Körner)
werden geöffnet und die Körner aufgebrochen.
Die Spelzen bleiben beim Schrot und bilden beim
Läutern einen natürlichen Filter. Verwenden Sie
geschrotetes Malz innerhalb der nächsten Tage;
es ist nur begrenzt haltbar und verliert schnell
an Qualität.
Sammeln Sie das geschrotete Malz z.B. in einer
großen Schüssel, damit die gesamte Menge
Malz in einem Zug eingemaischt werden kann.
Für das Schroten benötigen Sie ½–2 Stunden je
nach Mühle.
MAISCHEN
Maische-/Sudkessel (BHG 410000) auf einem
Arbeitstisch (Abb. 7) ca. 40 cm Höhe standsicher
aufstellen.
Es können bis zu 23l Brauwasser in den Maische- /
Sudkessel (BHG 410000) vorgelegt werden (Auf-
heizen auf Einmaischtemperatur: 45–55°C; sobald
die gewünschte Temperatur erreicht ist, den Tem-
peraturregler auf 50°C einstellen).
Mit 80%-iger Milchsäure, falls notwendig, einen
pH-Wert von ca. 5,5-6 (Überprüfung mit pH-
Papier) einstellen.
Einrühren von geschrotetem Malz mit dem Bier-
paddel (13). Temperatur 15 Minuten lang, unter
ständigem Rühren, auf ca. 50°C halten.
Alle angeführten Haltezeiten und Tempera-
turen können je nach Rezept variiert werden.
Die hier angeführten Zeiten und Tempera-
turen sind beispielhaft.
AUFHEIZEN AUF 62°C
Temperatureinstellung (4): 62°C
Zeiteinstellung (4): 20 min
Ständiges Umrühren ist notwendig, da sich
sonst das Malz absetzt und eine ungleichmäßige
Temperaturverteilung herrscht. Mit dem Bier-
paddel den Kesselboden frei von Ablagerungen
halten!
Sobald die Temperatur von ca. 62°C erreicht ist,
wird Zeitschaltuhr (4) auf 20 min eingestellt.
Während der Haltezeit ständig rühren und die
Temperatur kontrollieren. Bei diesem Verfahrens-
schritt wird die β-Amylase aktiviert.
AUFHEIZEN AUF 68°C
Temperatureinstellung (4): 68°C
Zeiteinstellung (4): 25 min
Ständiges Umrühren ist notwendig, da sich
sonst das Malz absetzt und eine ungleichmäßige
Temperaturverteilung herrscht. Mit dem Bier-
paddel den Kesselboden frei von Ablagerungen
halten!
Sobald die Temperatur von ca. 68°C erreicht wird,
wird die Zeitschaltuhr (4) auf 25 min eingestellt.
Während der Haltezeit ständig rühren und die
Temperatur kontrollieren (α– und β-Amylase).
AUFHEIZEN AUF 72°C
Temperatureinstellung (4): 72°C
Zeiteinstellung (4): 30 min
Ständiges Umrühren ist notwendig, da sich
sonst das Malz absetzt und eine ungleichmäßige
Temperaturverteilung herrscht. Mit dem Bier-
paddel den Kesselboden frei von Ablagerungen
halten!
Sobald die Temperatur von ca. 72°C erreicht wird,
wird die Zeitschaltuhr (4) auf 30 min eingestellt.
Während der Haltezeit ständig rühren und die
Temperatur kontrollieren (α-Amylase).
Nach Ende der Haltezeit wird die Verzucke-
rungsprobe durchgeführt (etwas Maische auf
einen weißen Teller schöpfen und ein paar Trop-
fen Jodlösung zugeben):
Bei Gelbfärbung ist die Verzuckerung abge-
schlossen.
Bei Blau-Violettfärbung ist die Verzuckerung
unvollständig. In diesem Fall noch einige
Minuten auf 72°C halten und die Verzucke-
rungsprobe dann wiederholen.
AUFHEIZEN AUF 80°C:
Temperatureinstellung (4): 80°C
Zeiteinstellung (4): 5 min
Ständiges Umrühren ist notwendig, da sich
sonst das Malz absetzt und eine ungleichmäßige
Temperaturverteilung herrscht. Mit dem Bier-
paddel den Kesselboden frei von Ablagerungen
halten!
Sobald die Temperatur von ca. 80°C erreicht wird,
wird die Zeitschaltuhr (4) auf 5 min. (=Haltezeit)
eingestellt. Während der Haltezeit ständig rüh-
ren, die Dauer auch mit einer Uhr kontrollieren.
Anschließend wird abgemaischt (Überführung
der Maische in den Läuterbottich (BHG 040002)
mit dem Schöpflöffel (12) ; siehe „Läutern“ (S. 15).
Sorgfältige Reinigung des Maischekessels (2) ist
wichtig!
ACHTUNG!
Verwenden Sie immer den Schöpfer (12) zum
Überführen der Maische, keinesfalls den Sud-
kessel (BHG 410000) hochheben – es besteht
Verletzungsgefahr!
LÄUTERN
Für das Läutern werden bis zu 12 l heißes Wasser
benötigt.
Vorbereitung des Läuter-/Gärbottichs (BHG
040002) neben dem Maische-/Sudkessel (BHG
410000) (Abb. 6):
Einsetzen des Siebbodens (15) in den Läuter-
bottich (BHG 040002) (Auslaufhahn (6) ge-
schlossen) und Einfüllen von heißem Wasser
(70–80°C) bis dieses den gelochten Siebbo-
den (15) erreicht (ca. 5 l) (Abb. 5).
Überführen der Maische in den Läuterbot-
tich (BHG 040002) mit dem Schöpflöffel (12)
(Abb. 6). Auf keinen Fall darf dazu der Aus-
laufhahn (6) geöffnet werden (Verstopfungs-
gefahr) oder der Maische- und Sudkessel (BHG
410000) angehoben oder gekippt werden – es
besteht Verbrühungsgefahr (Abb. 2)!!!
Nach dem Überführen den Deckel (9) des
Läuterbottichs (BHG 040002) auflegen zur
Läuterrast von 10-15min. Den Läuterbottich
(BHG 040002) dazu am besten so aufstellen,
dass die Würze über den Auslaufhahn (6) in
den Sudkessel (BHG 410000) laufen kann,
beispielsweise auf einem Arbeitstisch. Den
Sudkessel (BHG 410000) auf ca. 40 cm Höhe
platzieren (Abb. 7).
Halten Sie die für den Nachguss benötigte
Menge an heißem Wasser (70-80°C) bereit.
Anschließend beginnt das Läutern:
Sudkessel sorgfältig reinigen und unter den
Auslaufhahn des Läuterbottichs stellen .

DE DE
1716
Diesen langsam öffnen und ca. 1–2l
„Trübwürze“ in einem Behälter auffangen.
Sobald die Flüssigkeit klar erscheint, lässt
man, ohne den Auslaufhahn (6) nochmals
zu schließen,die Würze in den gereinigten
Sudkessel (BHG 410000) fließen.
Die Trübwürze wird langsam wieder in den
Läuterbottich (BHG 040002) zurückgeleert.
Nach ca. 5–7l wird der Stammwürzegehalt der
„Vorderwürze“ bestimmt: Messzylinder (17)
nicht bis zum Rand mit Würze füllen, rasch auf
20°C abkühlen und die trockene Bierspindel
(16) vorsichtig hineingleiten lassen. Dazu die
Bierspindel am dünnen Ende halten und lang-
sam eintauchen, damit sie nicht am Boden des
Messzylinders aufschlägt. Ablesen des Stamm-
würzegehaltes wo die Flüssigkeitsoberfläche
die Skala schneidet (Abb. 8).
Falls es zu einem Stillstand des Auslaufens
kommt, obwohl noch Flüssigkeit über dem
Treberkuchen steht, den Auslaufhahn (6)
schließen, mit dem Bierpaddel (13) den Treber
aufrühren und ca. 5min warten. Anschließend
verfährt man wie zu Beginn des Läuterns
(außer der Stammwürzemessung).
Wenn der Treberkuchen sichtbar wird, kann
man, je nach gewünschtem Stammwür-
zegehalt, ca. 25–30% des ursprünglich
vorgelegten Brauwassers als sogenannten
Nachguss (=Gewinn des noch in den Trebern
vorhandenen Zuckers) über dem Treber-
kuchen gleichmäßig verteilen, am besten
verwenden Sie dazu den Schöpfer (12).
(Abb. 8)
Dabei ist zu beachten, dass dieses Wasser eine
Temperatur von ca. 70–80°C aufweisen muss,
da ansonsten eine Viskositätserhöhung statt-
findet und die Fließeigenschaften der Würze
dadurch verschlechtert werden!
Ist die Würze abgelassen, wird der Auslaufhahn
geschlossen, der Treber mit dem Schöpfer (12)
aus dem Läuterbottich entnommen und dieser
anschließend sorgfältig gereinigt. Auch den
Auslaufhahn gut durchspülen!
Werte für Stammwürze und Nachguss für die
BIELMEIER-Rezepturen:
BIERTYP STAMMWÜRZE NACHGUSS
Märzen 12,5–13° 6–6,5l
Pils 11–11, 5° 7l
Bock 15–16° 7l
Weißbier 12–12,5° 6–6,5l
Ale 13–15° 6–6,5l
Gerstengold 12–12,5° 6–6,5l
WÜRZEKOCHUNG, WHIRLPOOL,
ABFÜLLUNG
Nach Abschluss des Läutervorgangs wird die
Würze gekocht.
Temperatureinstellung (4): 100°C
Uhr: -- Dauerbetrieb
Während des Aufheizens den Deckel (1) auf
den Sudkessel (BHG 410000) geben und nur
zum Umrühren alle 2–3 min öffnen. Darauf
achten, dass sich die Inhaltsstoffe nicht am
Kesselboden anlegen. Würze mit hohem Zu-
ckergehalt häufiger umrühren, ein Anbrennen
beeinträchtigt den Geschmack!
Sobald die Würze wallend kocht, wird
Bitterhopfen nach und nach unter Rühren zu-
gegeben, da ansonsten die Gefahr des Über-
schäumens besteht.
In der Regel wird der Deckel (1) des Sudkes-
sels (BHG 410000) nicht aufgesetzt. Die Koch-
zeit beträgt 60 bis 90 Minuten, dabei immer
wieder umrühren.
Fünf bis zehn Minuten vor Ende des Kochvor-
gangs wird die gewünschte Menge Aroma-
hopfen unter Rühren zugegeben.
(Abb. 5)
°C
min.
40 20
30
40 50 60
70
80
90
100
110
120
0
50
60 70
80
90
100
(Abb. 6)
°C
min.
40 20
30
40 50 60
70
80
90
100
110
120
0
50
60 70
80
90
100
40 cm
(Abb. 7)
Am Ende der Kochzeit wird die Heizung ausge-
schaltet und der Netzstecker (5) gezogen.
Sobald keine „Siedewallungen“ mehr vorhan-
den sind (=glatte, ruhige Flüssigkeitsoberflä-
che), kann der Verfahrensschritt „Whirlpool“
durch-geführt werden:
Den gereinigten und mit 70%-igem Ethanol
desinfizierten Gärbottich (BHG 040002) ohne
Siebboden (15) unter den geschlossenen Aus-
laufhahn (6) des Sudkessels (BHG 410000)
stellen. Durch kreisförmiges Rühren mit dem
Bierpaddel (13) die Würze in starke Rotation
versetzen und das Bierpaddel (13) aus der
rotierenden Würze ziehen. Den Deckel (1)
auf den Sudbottich (BHG 410000) auflegen
(Abb. 9).
Sobald sich die Flüssigkeit nicht mehr in
Rotation befindet (nach ca. 10–15min), den
Auslaufhahn (6) langsam öffnen und die
Würze in den gereinigten Gärbottich (BHG
040002) laufen lassen.
Nach dem Überführen die Flüssigkeit auf Gär-
temperatur abkühlen (obergärig: ca. 15–20°C,
untergärig: ca. 10–15°C). Dazu z.B. die Kühl-
spirale (14), die vorher durch Besprühen mit
70%-igem Ethanol zu desinfizieren ist, durch
Anschluss an die Wasserleitung verwenden.
Ist die richtige Gärtemperatur erreicht, die
laut Herstellerangaben angesetzte Hefe in die
Würze geben. Achten Sie beim Kühlprozess
darauf, nicht mehr Kühlwasser als nötig zu
verbrauchen: Das abfließende Wasser sollte
bis kurz vor dem Ende des Kühlprozesses wär-
mer als das zufließende Wasser sein. Bewegen
Sie die Kühlspirale (14) in der Würze, um den
Wärmeübergang zu verbessern. Zum schnel-
len Erreichen einer niedrigen Gärtemperatur
können auch Kühlakkus eingesetzt werden.
Auf Sauberkeit und Keimfreiheit achten!
Mit dem Deckel (9) verschließen, in den Gär-
spund (7) bis zur Markierung 70%-iges Etha-
nol geben und bei der gewünschten Gärtem-
peratur lagern. Eine höhere Gärtemperatur
beschleunigt den Gärprozess (Abb. 10).
Durch den Gärspund (7) entweicht während der
Gärung das CO2.
ACHTUNG!Auf gute Durchlüftung des Raumes
achten! CO2ist ungiftig aber schwerer als Luft und
führt zum Ersticken, wenn es eingeatmet wird!
DE DE
1918
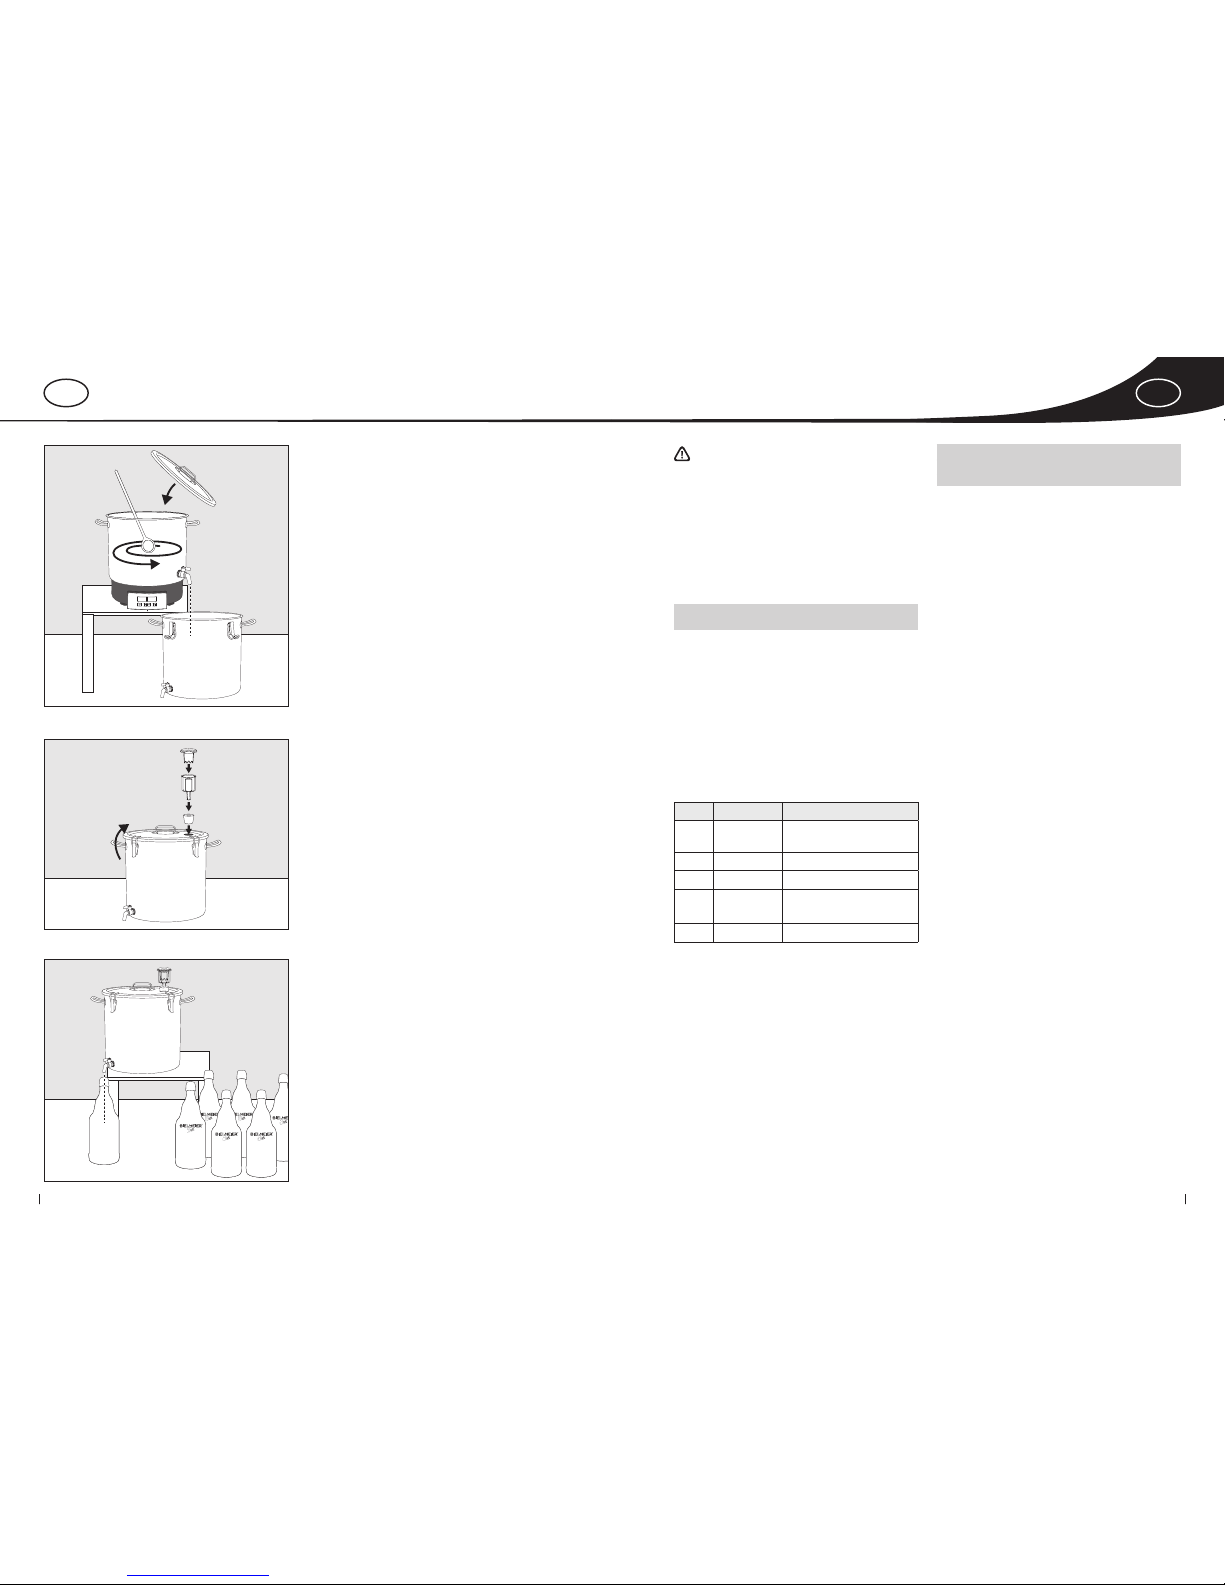
FLASCHEN FÜLLEN
Kann man keine Gasblasen mehr im Gärspund
(7) beobachten, ist die Gärung abgeschlossen.
Das Jungbier kann nun zur Nachgärung in die
vorbereiteten Flaschen gefüllt werden (Abb. 11).
Vorbereiten der Flaschen:
Gummiringe der Bügelverschlüsse in 70%-igen
Ethanol einlegen. Flaschen mit heißem Wasser
gut ausspülen, anschließend 4 Stunden bei 160°C
im Backofen sterilisieren und mit Alufolie ver-
schließen. Keine Geschirrspülmittel verwenden,
diese setzen die Oberflächenspannung herab
und verhindern so, dass Ihr Bier beim Einschen-
ken eine Schaumkrone entwickelt.
Die Zeitspanne zwischen der Flaschenreinigung
und dem Abfüllen sollte so kurz wie möglich sein,
und die Umgebungstemperatur der Flaschen so
kühl wie möglich.
Damit die erforderliche Nachgärung für die Ent-
wicklung der Kohlensäure (CO
2
) in Gang kommt,
wird dem Jungbier Zucker zugegeben:
Lösen der entsprechenden Zuckermenge
gemäß Tabelle in 1 l kochendem Wasser (Steri-
lität!), abkühlen und in das Jungbier einrühren.
Anschließend das Bier in gereinigte Flaschen/
Fässer abfüllen.
Das Jungbier kann auch vor dem Ende der
Hauptgärung in Flaschen gefüllt werden (Rest-
stammwürze: ca. 4°). In diesem Fall keinen Zucker
zugeben.
Während und gegen Ende der Gärung muss
gespindelt werden, um den richtigen Zeitpunkt
für die Flaschenfüllung zu erkennen. Dazu, wie
bereits beim Läutern (siehe S. 15) beschrieben,
vorgehen. Der Zeitpunkt ist gekommen, wenn
der Gärschaum eine braune Färbung erreicht
hat und die Hefe sich zum größten Teil am Bo-
den abgesetzt hat. Die Spindelung sollte einen
Wert von etwa 4° Plato (kommt auf das Rezept
an) ergeben.
ACHTUNG!
Wird das Jungbier zu früh in Flaschen gefüllt oder
eine zu hohe Zuckermenge zugegeben, können
durch den Druck des CO
2
Flaschen explodieren!
Verwenden Sie ausschließlich BIELMEIER Bierfla-
schen bzw. druckfeste Flaschen aus dem Fach-
handel.
Dauer der Nachgärung: 4–6 Wochen
ZEIT / TEMPERATUR
TABELLEN FÜR DIE
ORIGINALREZEPTUREN
Märzen, Bock, Ale:
Brauwasser: 23 l
Gerstengold:
Brauwasser: 23 l
Pils, Weizen:
Brauwasser: 23 l
Maischen (Anleitung ab S. 14):
MIN. TEMP. °C BEMERKUNGEN
10 45 pH-Wert messen, Malz
zugeben
20 62 Ständig rühren
25 68 Ständig rühren
30 72 Ständig rühren,
Verzuckerungsprobe
580 Ständig rühren
WEITERE ANWENDUNGS
MÖGLICHKEITEN
EINKOCHEN
Kessel (2) füllen.
Deckel (1) aufsetzen.
Stecker (5) in Schukosteckdose stecken.
Temperatur (4) wählen.
Zeiteingabemodus (4) auf benötigte Einkoch-
zeit stellen.
Der Einkochvorgang läuft automatisch ab. Am
Ende der Einkochzeit schaltet das Gerät ab.
ENTSAFTEN
Mindestens 6 l Wasser in den Kessel (2)
einfüllen.
Entsafteraufsatz BHG 630 (nicht im Lieferum-
fang enthalten) auf das Gerät setzen.
Entsaftungsgut in Fruchtkorb geben.
Deckel (1) aufsetzen.
Stecker (5) in Schukosteckdose.
Temperatur: 100°C
Uhr: --
Dauerbetrieb
Gerät heizt.
Vor jedem weiteren Entsaftungsvorgang
Wasser einfüllen.
Bei Betriebsende Aus-Taste drücken und Ste-
cker (5) ziehen.
°C
min.
40 20
30
40 50 60
70
80
90
100
110
120
0
50
60 70
80
90
100
(Abb. 9)
(Abb. 10)
(Abb. 11)

DE DE
2120
TECHNISCHE ANGABEN
Stromquelle: 220– 230 V ~ / 50 Hz
Anschlusswert:
1800 W
Schutzklasse:
I
Kesselvolumen:
27 Liter im Normalmodus
23 Liter im Kochmodus
(entspricht einer Befüllung
4 cm unterhalb des Geräterandes)
Gewicht: 6,05 kg
Das Gerät entspricht den EU-Richtlinien Nr. 73/23
EWG und Nr. 89/336 EWG.
Technische Änderungen vorbehalten.
ANGABEN ZUR GÄRUNG
BIERTYP TEMP. CO2NATÜRL. GELÖST NÖTIGE CO2MENGE ZUGABE ZUCKER
Märzen 10°C 2,28 g/l 4,5–5,5g/l 4,30–6,3g/l
Märzen 20°C 1,67 g/l 4,5–5,5g/l 5,5–7,45g/l
Pils 10°C 2,28 g/l 4,5–5,5g/l 4,30–6,3 g/l
Pils 20°C 1,67 g/l 4,5–5,5g/l 5,5–7,45g/l
Bock 10°C 2,28 g/l 4,5–5,5g/l 4,3–6,3g/l
Bock 20°C 1,67 g/l 4,5–5,5g/l 5,5–7,45g/l
Weißbier 10°C 2,28 g/l 7–9 g/l 9,2–13 g/l
Weißbier 20°C 1,67 g/l 7–9 g/l 10,4–14,25g/l
Ale 10°C 2,28 g/l 3,5–4,5 g/l 2,4–4,3 g/l
Ale 20°C 1,67 g/l 3,5–4,5 g/ 3,6–5,5 g/l
Gerstengold 10°C 2,28 g/l 4,5–5,5g/l 4,30–6,3 g/l
Gerstengold 20°C 1,67 g/l 4,5–5,5g/l 5,5–7,45g/l
Diese Mengen beziehen sich auf endvergorenes Jungbier; d.h. wenn keine CO
2
-Entwicklung nach der
Hauptgärung mehr vorhanden ist (kein „Blubbern“ im Gärspund (7) feststellbar)!
W i r w u“ n s c h e n
Ihnen viel Vergnu“gen mit
Ihrem BIELMEIER Brausystem!
GARANTIE
Für die am Verkaufstag beginnende Garantie gelten innerhalb der EU und der Schweiz folgende
Bestimmungen:
Für dieses Gerät leisten wir 2 Jahre Garantie für Mängel, die auf Fertigungs- oder Material-
fehler zurückzuführen sind. Die Garantiezeit beginnt mit dem Tag der Übergabe und wird nur
bei Vorlage der Garantiekarte und der Verkaufsrechnung gewährt. Weitergehende Ansprüche
bestehen nicht.
1. Garantiedauer: 2 Jahre
2. Garantieleistungen:
a) Nach unserer Wahl Reparatur oder Aus-
tausch von Teilen, die nach unserer Über-
prüfung Material- oder Fertigungsfehler
aufweisen.
b) Die Garantie wird nur bei Vorzeigen dieser
Garantiekarte und der Verkaufsrechnung
geleistet. Die Karte ist nur gültig, wenn sie
am Verkaufstag vollständig ausgefüllt wurde.
c) Die Garantieleistung gilt nur gegenüber
dem Erstverbraucher.
d) Durch die Reparatur oder den Austausch
von Teilen innerhalb der Garantiedauer,
wird die ursprüngliche Garantiezeit weder
verlängert noch erneuert.
e) Transportkosten gehen zu Lasten des Käu-
fers (gilt nicht für die ersten 6 Monate der
Garantiezeit).
f) Sofern der Schaden oder Mangel nicht be-
seitigt werden kann oder die Nachbesse-
rung von uns abgelehnt oder unzumutbar
verzögert wird, wird innerhalb von 6 Mona-
ten ab Kauf-/Lieferdatum auf Wunsch des
Endabnehmers entweder kostenfrei Ersatz
geliefert oder der Minderwert vergütet oder
das Gerät gegen Erstattung des Kaufpreises,
jedoch nicht über den marktüblichen Preis
hinaus, zurückgenommen.
3. Die Garantie gilt nicht:
Für Kratzer und Flecken am Gerät.
Für Beleuchtungs- und Kontrolllampen.
Für leicht zerbrechliche Teile aus Bakelit, Glas,
Plastik und so weiter, es sei denn, es handelt
sich um Materialfehler, die von uns als solche
anerkannt werden.
Für Beschädigungen, die durch falsche Instal-
lation oder Befestigung verursacht wurden.
Wenn das Gerät an ein Stromnetz mit hö-
herer Spannung, als auf dem Gerät angege-
ben, angeschlossen wird.
Bei falscher oder unsachgemäßer Bedie-
nung.
Bei mangelnder Sorgfalt.
Bei ungenügender oder falscher Wartung.
Bei Fallenlassen des Gerätes oder einzelner
Teile.
Bei unsachgemäßem Transport oder unsach-
gemäßer Verpackung für den Transport.
4. Die Garantie erlischt:
Wenn das Gerät für andere als für Haushalts-
zwecke eingesetzt wird.
Wenn Personen, die nicht von unserer Firma
dazu ermächtigt sind, Reparaturen oder Än-
derungen durchführen.
Stempel und Unterschrift des Verkäufers Verkaufsdatum
Wichtig! Bitte notieren Sie hier den auf
dem Typenschild am Gerät befindlichen
FD-Code:
Modell:

GBGB
2322
IMPORTANT SAFETY INSTRUCTIONS
We're delighted that you've chosen our product and we thank you for your
business! The safety of all electronic appliances from BIELMEIER complies
with generally accepted technical standards and with safety legislation.
The BIELMEIER brewing system consists of a mash tun with a built-in heater,
which is used for mashing and wort boiling, and a lauter-/fermenting tun
with a removable strainer insert and cooler, which is used for lautering and
fermenting. All of these items are made of high-quality stainless steel. The
set also includes a ladle, spoon, digital thermometer, hydrometer and meas-
uring cylinder.
In order to ensure the maximum of satisfaction with your new BIELMEIER
brewing system, please pay careful attention to the following safety in-
structions.
READ THE INSTRUCTIONS CAREFULLY
BEFORE USING THE APPLI
ANCE FOR THE
FIRST TIME AND KEEP THESE INSTRUCTIONS IN A
SAFE PLACE.
Do not use the appliance if:
– the mains cable is damaged,
– the appliance is visibly damaged,
– the appliance has previously been dropped,
– the appliance is wet outside.
If the appliance or mains cable are visibly damaged, please have your
appliance checked by an expert or by customer service.
Only connect this appliance to an AC power outlet as specified on the
appliance's rating plate (Schuko (Type F) socket – using an adapter if
required).
Unwind the mains cable fully before use.
Never leave the mains cable dangling.
Unplug the appliance from the mains:
– if any fault occurs during operation
– before cleaning and servicing
– after each use
Position the appliance in an unobstructed space on a stable, level sur-
face.
Never place the appliance or mains cable on a hot surface or near an
open flame, e.g. gas cooker.
Caution!Set up your brewing pots so that you do not need to move them
during operation. Remember that you will need to ladle the mash from
the mash tun into the lauter-/fermenting tun. Make sure that both are at
a height where you can access them comfortably and safely from above.
First fill the mash tun with water and malt, as described in “Mashing”
(p. 29). Only after the water and malt are in the mash tun you should plug
the electric power cable (6) into an earthed mains socket.
Move the appliance only, when it’s empty and cold! Filled, the pre-
serving cooker has a high weight, which may cause injuries!
Raise the appliance at the handle only if it is cold and empty! Dan-
ger of scalding and / or burns by non-observance.
Never empty the preserving cooker, if it’s hot by tilting the device.
If the appliance is hot, just empty it through the tap. If this is not possible,
you have to wait until the appliance and the contents have cooled off.
Danger of scalding and / or burns, when tilting the device in hot and
filled state.
Fill the appliance before switching it on.
Do not switch the unit on when there is no water in it as otherwise the
enamel and the coated rack (not included with the product) could be
damaged. If this should happen in spite of all precautions, you must wait
until the unit has cooled down before filling it with water as otherwise
the sudden emission of steam could lead to scalding.
Do not fill container to a level higher than 4 cm below the rim. Hot water
may spurt out if the pot is overfilled.
Caution!
Risk of scalding due to escaping steam!
GBGB
2524
IMPORTANT INSTRUCTIONS
FOR USING
Carefully clean the inside of the pot (2) before
using the appliance for the first time. For more
information, refer to the “Cleaning” section.
Fill the appliance with water before switching
it on.
Take care not to overfill the pot (2)! Fill the
pot (2) to a level no higher than 4 cm below
the rim. Hot water may spurt out if the pot is
overfilled.
If liquids still in the pot (2) after use, you have
to skim it or drain it by the tap (6) – if available.
Never tilt the device!
ASSEMBLY
The taps (6) for the mash tun (BHG 410000) and
the lauter-/fermenting tun (BHG 040002) are in-
cluded in the package.
Install the taps such that the silicone gasket is al-
ways on the outside of the vessel on the tap. The
nut must be tightened in the lauter-/fermenting
tun (BHG 040002) with one flat side of the six-
edged nut facing upward, so that the strainer
insert can sit horizontally in the vessel.
CLEANING AND MAINTENANCE
Drag always the power plug from the socket be-
fore cleaning. Never immerse the appliance in
water! Unplug from the mains, wipe down the
exterior. Don't use strong or abrasive cleaning
agents. Wash out the interior. Limescale depos-
its can be removed by regular descaling with a
mixture of vinegar and water or a commercial
descaler, followed by boiling of a pot full of clean
water.
Skim cleaning emulsion in the pot (2) or drain it
by the tap (6) – if available. Never tilt the device!
Clean the tap (6) – if available – occasionally with
hot water, which can be mixed with a cleaning
agent.
Caution!
The appliance becomes hot when is in use!
For this reason, only take hold of
–
stainless steel appliances by the handles while wearing a heat-insu-
lating oven mitt.
–
enamel appliances by their insulated handles.
–
plastic appliances by the handle rims.
Never immerse the appliance in water! As well, do not expose the mains
cable to moisture.
Always pull out the plug after use and allow the unit to cool down.
Children are unaware of the possible dangers associated with electrical
appliances. For this reason, never leave a child alone and unsupervised
with the appliance and be extra cautious when using the appliance
when children are around.
This appliance is designed for household use only and is not suitable
for commercial use.
The manufacturer accepts no responsibility for possible damages in
cases where the appliance is used incorrectly or for purposes other than
those for which it is intended.
GENERAL INFORMATION
Volume: the BIELMEIER boiler pot holds a vol-
ume of 27 L. The maximum allowed liquid level
is 4 cm below the upper rim which corresponds
to approx. 23 L.
The mash tun can be used for many other
purposes besides brewing beer: preserving,
heating in a water bath, preparing hot drinks,
cooking, reheating, blanching vegetables etc.
Thick food that tends to burn easily requires
slow, constant stirring.
Please note: In the event that the cooker boils
dry, a built-in circuit breaker will protect the
appliance from overheating. IMPORTANT:
Allow the appliance to cool down com-
pletely before adding any liquid. If you
add liquid to the hot appliance, there is a
danger of scalding by steam and a risk of
damage (deformation) to the bottom of the
cooker.
The mash tun may produce a slight smell on first
use, which should go away after it has been in
operation for a short while.
For hygienic reasons, you should boil about
6 l of water for about 15 minutes in the mash
tun before using it the first time – set the tem-
perature to 100°C and the time to continuous
operation ( -- ) and turn the unit on ( ).
The malt mill can also be used to produce flour
and crush grains for cereal.
(fig. 1)
(fig. 2)
(fig. 3)
(fig. 4)

GBGB
2726
Insert plug
Display is lit
Switching on or operating mode
Button: press once:
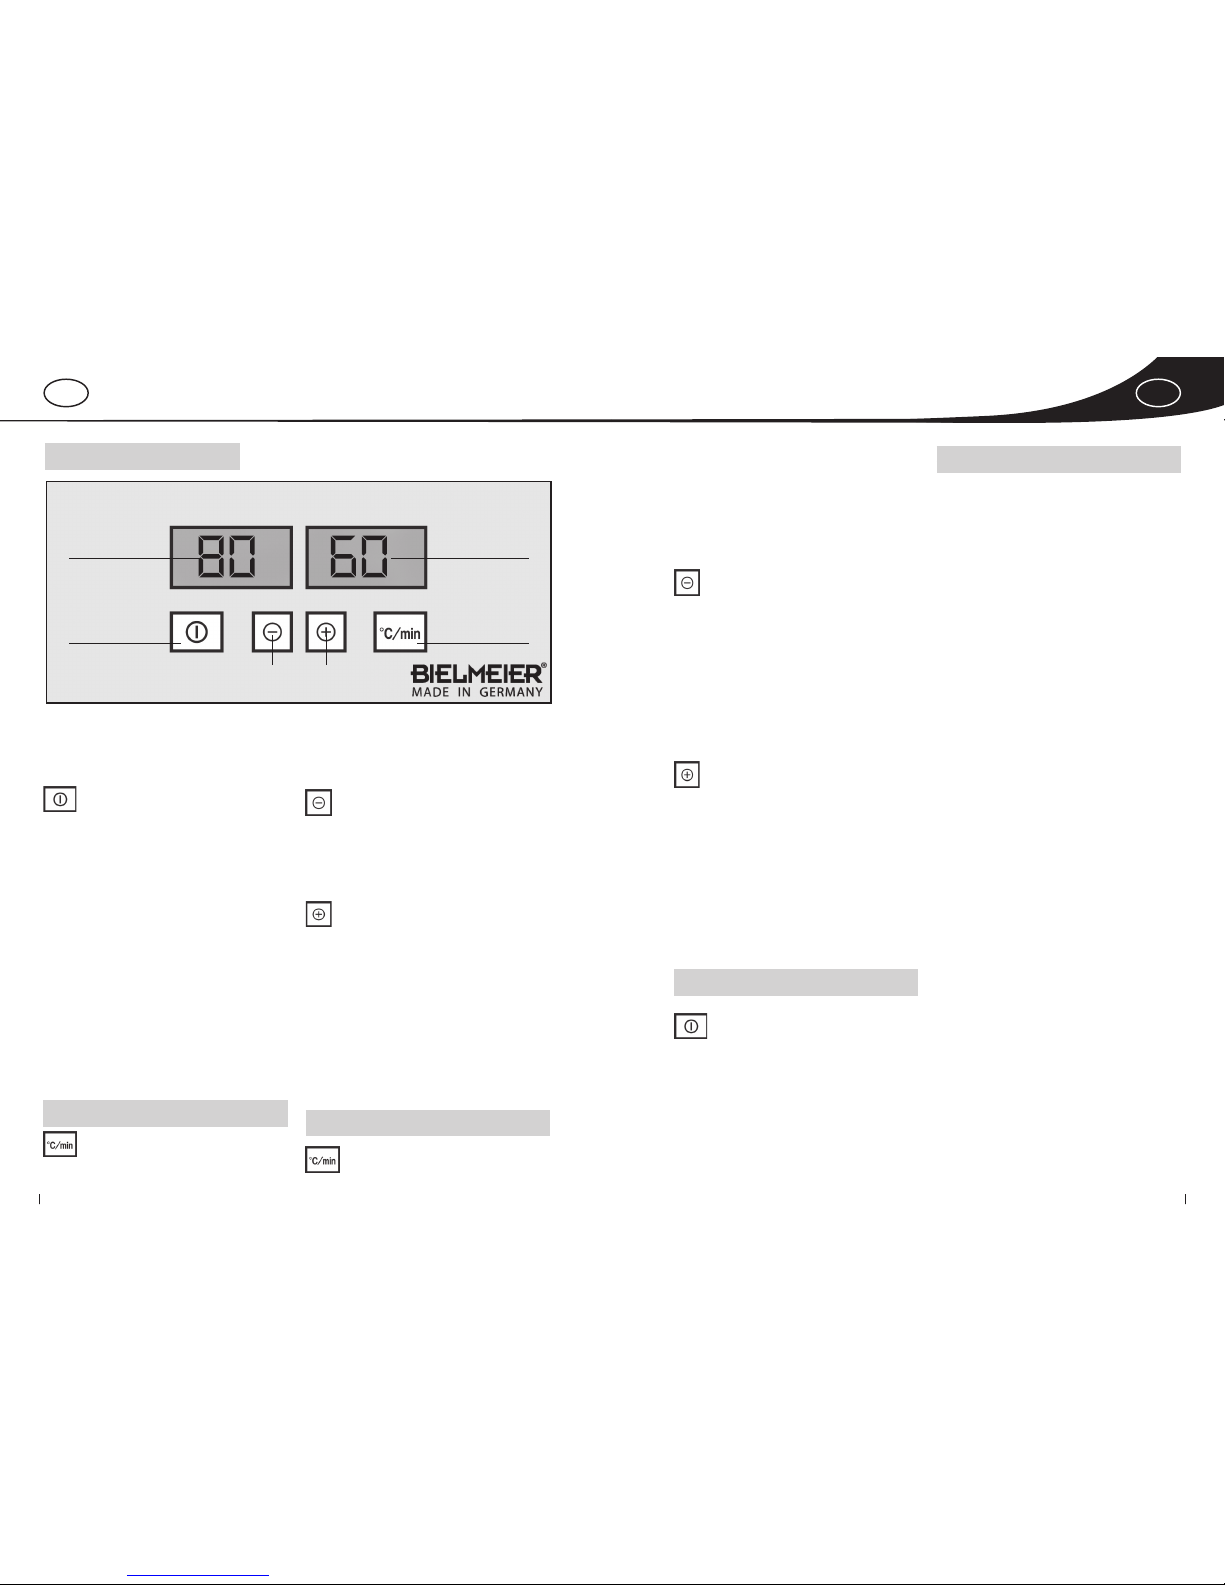
SWITCHING THE APPLIANCE ON
After switching the appliance on by pressing the
On-Off-button all LCD-segments (liquid crystal
display) are lit for a second.
The temperature that was last set is indicated.
The ciphers of the temperature display blink when
the temperature measured by the boiler differs
from the set temperature (nominal temperature).
Once the set temperature is reached, the ciphers
are constantly lit.
Time: – – = continuous operation mode
Appliance heats up until set temperature is
reached and runs in continuous mode until ‚On/
Off’ button is pressed again.
TEMPERATURE SETTING MODE
Press ‚Temp/Time’ button once
The temperature symbol (°C) blinks, ciphers are
permanently lit when the set temperature has not
been reached.
Time: – – in continuous operation mode; The heat-
ing goes on working during setting mode to heat
up until set temperature is reached or set tempera-
ture is maintained.
‚Minus’button
Count down of temperature count down; when
pressing the button shortly, a countdown number
by number is effected until 30°C are reached (low-
est possible temperature setting). If you keep the
button pressed, countdown is done fast.
‚Plus’button
Count up of temperature; when pressing the button
shortly the temperature is count up number by num-
ber until 100°C are reached (highest possible tem-
perature setting). If you keep the button pressed,
count up is done fast.
If after starting the temperature setting mode and
changing the temperature by means of the ‚Minus’
or ‚Plus’ button no entry is made for 5 seconds, the
temperature setting mode is left and the appliance
returns to the operating mode.
TIME SETTING MODE
Press ‚Temp./Time’ twice
The time symbol (min) blinks and the time that
was last set is indicated and can be changed by
the ‚Minus’ or ‚Plus’ button, respectively.
If after starting the time setting mode or after
changing the time by means of the ‚Minus’ or ‚Plus’
button no entry is made for 5 seconds, the time
setting mode is left and the appliance returns to
the operating mode. Upon reaching the set tem-
perature (nominal temperature), the time that was
last set is counted down.
‚Minus’ button
Count down of the time; when pressing the but-
ton shortly, a countdown number by number is ef-
fected; (1 minute = lowest possible setting). If you
keep the button pressed, countdown is done fast.
If the appliance was set to continuous operation
mode before choosing the time setting mode
(time indicated: – – min), the display changes from
– – continuous operation mode to 120 min and
then countdown to 0 min is started.
‚Plus’ button
Count up of time; when pressing the button short-
ly the time is count up number by number; (120
minutes / – – continuous operation = maximum
setting). If you keep the button pressed, count up
is done fast.
To change again to the continuous operation
mode, the time must be set to – – continuous
operation in time setting mode. Even during
countdown of the time it is possible to change
temperature and time.
SWITCHING THE APPLIANCE OFF
Switch off by pressing the button
‚On/Off’.
The appliance may be switched off any time. Time
settings made in the time setting mode will not
be saved.
The last temperature setting is saved and is dis-
played again after restarting the boiler, even if the
appliance had been disconnected from the mains
in the meantime.
It is necessary to pull the plug from the socket after
switching off the appliance.
min°C
O n / O ff Selector switch
Temperature/Time
Time display 1-120
minutes and
– – = continuous
operation
Temperature display
30°-100°C
Minus Plus
OPERATING THE APPLIANCE

GBGB
2928
THE BREWING PROCESS
Self-brewed beer is a high-quality natural prod-
uct. High quality can be assured by using pre-
mium and fresh ingredients. Brewing water is an
important ingredient. It should be free of odors
(such as chlorine) and should feature a hardness
of approx. 10–12°dH (German degrees). Your
water supplier will inform you about your water
hardness. If your tap water does not meet these
requirements, you may want to install a filter sys-
tem in the supply pipe of your water tap to ensure
impeccable tap water.
Pre-weighed quantities of malt, hops and brew-
er’s yeast for 6 different beer recipes are available
at BIELMEIER.
The brewing process consists of a few main
stages:
If the recipe uses whole malted grain, the first
step is cracking the malt, which means milling
it roughly (usually in a roller mill) so that the
grains are broken open. Care is needed to mill
the grain neither too fine nor too coarse.
The cracked malt is then mixed with brewing
water and warmed to a series of temperatures
(up to a final temperature of 78–80°C) for ex-
act times (see Brewing Method, p. 28). This
step is called mashing.
The next step is lautering, in which the liquid
in the mash is separated from the solids in a
lautering tun.
The liquid, called wort, is then boiled in the
mash tun for a specific period (60–90 min-
utes). During this time, hops are added.
When the wort boil is finished, the wort is swirled
in the kettle, which allows particles formed dur-
ing the boil to settle out in the centre of the pot.
This procedure is called the “whirlpool”.
The wort is then cooled down to fermenting
temperature and transferred into the ferment
-
ing tun. Yeast is added, and over a period of
3–7 days, the yeast ferments the sugar in the
wort to ethanol and
CO
2
.
The “green beer” is then transferred to bot-
tles for 4–8 weeks, where a natural process
of clarification, aroma development, and
CO
2
and ethanol production occurs; this is called
the secondary fermentation or conditioning.
Cleanliness and hygiene are essential for success-
ful brewing: careful cleaning and sanitising of all
equipment that comes into contact with the beer,
and especially of the bottles, is very important.
ATTENTION!
In some countries, it is required by law to register the
production of beer for self-use with the authorities.
THE BREWING METHOD
For an optimal control of the brewing process
you need:
Indicator paper to determine the pH value of
your brewing water
80% lactic acid to adjust to the correct pH value
Iodine solution for the sugar analysis (deter-
mination of starch)
The following method is intended as an example
and will need to be adapted depending on the
specific beer recipe. Please follow the instructions
included with your ingredients pack.
Before you start, remember that the process will
involve transferring hot liquid from one pot into
the other. Make sure you position the pots such
that you will never need to lift a container full of
hot liquid. If you attempt to move a pot full of hot
liquid, there is a danger of burning or scalding.
MILLING
Fill the hopper of the mill and turn the handle.
The husks (grain shells) are opened and the grains
are broken up.
The husks remain in the malt and create a natural
filter bed during lautering. Use milled malt within
a few days; it has a limited lifespan and quickly
deteriorates in quality.
Collect the crushed malt (e.g. in a large bowl), so
that the entire amount can be mashed at once.
You will need 1/2 - 2 hours for milling depending
on the mill used.
MASHING
For the mashing procedure, use the mash tun
(BHG 410000) as a mash tun. Set up the mash
tun on a steady and level platform (fig. 7) approx.
40 cm off the floor.
You can fill the mash tun (BHG 410000) with a
maximum of 23 l of brewing water. Heat the wa-
ter up to the mashing temperature of 45–55°C;
when this temperature is reached, set the ther-
mostat control knob to 50°C.
If necessary, adjust the pH of the water to 5–5.5
using 80% lactic acid solution (use pH paper to
test the pH value).
Stir in a maximum of 5 kg of cracked malt using
the large spoon. Maintain the temperature at ap-
prox. 50°C for 15 minutes with constant stirring
using the spoon (13).
The following temperature steps and hold
times are just one example; different recipes
will need use of different temperatures and/
or times.
HEAT TO 62°C
Temperature setting (4): 62°C
Timer setting (4): 20 min
Constant stirring is necessary to prevent the malt from
settling and causing an uneven temperature distribu-
tion in the liquid. Use the spoon to prevent the malt
from burning on to the bottom of the vessel!
As soon as the temperature reaches 62°C set the
timer (4) to 20 minutes.
During the hold time, stir the mash constantly
and monitor the temperature. This step activates
the “β-amylase“.
HEAT TO 68°C
Temperature setting (4): 68°C
Timer setting (4): 25 min
Constant stirring is necessary to prevent the malt
from settling and causing an uneven tempera-
ture distribution in the liquid. Use the spoon to
prevent the malt from burning on to the bottom
of the vessel!
As soon as the temperature reaches 68°C set the
timer (4) to 25 minutes.
During the hold time, stir the mash constantly
and monitor the temperature (α- and β-amylase).
HEAT TO 72°C
Temperature setting (4): 72 °C
Timer setting (4): 30 min
Constant stirring is necessary to prevent the malt
from settling and causing an uneven tempera-
ture distribution in the liquid. Use the spoon to
prevent the malt from burning on to the bottom
of the vessel!
As soon as the temperature reaches 72°C set the
timer (4) to 30 minutes.
During the hold time, stir the mash constantly and
monitor the temperature (α-amylase).
At the end of this hold time, test the starch con-
version (put a small sample of the mash on a
white plate and add a few drops of iodine solu-
tion):
If the iodine turns yellow, the starch has been
fully converted to sugar.
If it turns a blue-purple colour, the conversion
is not yet complete. If this is the case, hold the
mash at 72°C for several minutes more and
repeat the test with iodine.
HEAT TO 80°C:
Temperature setting (4): 80°C
Timer setting (4): 5 min
Constant stirring is necessary to prevent the malt
from settling and causing an uneven tempera-
ture distribution in the liquid. Use the spoon to
prevent the malt from burning on to the bottom
of the vessel!
As soon as the temperature reaches 80°C, set the
timer (4) to 5 minutes (hold time). Stir constantly
during the hold time and monitor the duration
with a watch.
At the end of this hold time, the mash is transferred
into the straining pot (BHG 040002) using the ladle
(see Lautering p. 30).
Thorough cleaning of the mash tun is important!
CAUTION!
Always use the ladle (12) to transfer the
mash. Danger – Never lift the full mash tun
(BHG 410000)!

GBGB
3130
LAUTERING
The lautering process requires up to 12 l of hot
water.
First prepare the lauter-/fermenting tun (BHG
040002), which you will now use as a lautering
tun. Set the lauter-/fermenting tun (BHG 040002)
up next to the mash tun (BHG 410000) (fig. 6):
Insert the strainer (15) into the lauter-/fer-
menting tun (BHG 040002). Make sure the
drain tap (6) is closed. Then add hot water
(70–80°C) until the water is level with the bot-
tom of the strainer (15) (approx. 5 l) (fig. 5).
Now use the ladle (12) to scoop out the mash
and transfer it to the lauter-/fermenting tun
(BHG 040002) (fig. 6). Do not open the drain
tap (6) (it will become blocked), and never lift
or tip the mash tun (BHG 410000) (danger of
scalding) (fig. 2)!!!
When all the liquid has been transferred, put
the lid on the lauter-/fermenting tun (BHG
040002) and allow the mash to stand for
10-15 minutes. Ideally, you should set up the
lauter-/fermenting tun (BHG 040002) so that
you can transfer the wort via the drain tap into
the mash tun (BHG 410000), e.g. on a work
table. Place the mash tun (BHG 410000) again
approx. 40 cm above the floor (fig. 7).
Have plenty of hot water (70–80°C) ready for
the second wort.
The lautering can now begin:
Clean the mash tun (BHG 410000) thoroughly
and place it below the drain tap of the lauter-/
fermenting tun (BHG 040002).
Open the tap slowly and collect the first 1–2 l
of cloudy liquid (trub) in the jug.
As soon as the liquid runs clear, let it flow into
the well-cleaned mash tun (BHG 410000)
without closing the drain tap.
Pour the trub gently back into the lauter-/fer-
menting tun (BHG 040002).
After 5-7 l, test the specific gravity of the first
wort (fill the measuring cylinder (17) with
wort, cool it to 20°C and use the hydrometer
(16) to measure the specific gravity). To do so,
hold the hydrometer at its thin end and im-
merse it gently, so that it does not touch the
bottom of the measuring cylinder. Read the
gravity where the surface of the liquid crosses
the scale (fig. 8).
If the flow of liquid stops while there is still
some liquid above the grain bed, close the
drain tap (6), stir up the grain with the large
spoon (13) and allow it to settle again for ap-
prox. 5 minutes. Then repeat the procedure
from the beginning (without the specific grav-
ity measurement).
When the grain bed is exposed, you can wash
it (called sparging) with approx. 25–30% of the
original amount of brewing water, depending
on the specific gravity you are aiming for. This
allows you to extract more sugar from the
mash. Make sure to add the water evenly and
gently over the grain bed. Use the ladle (12)
for this task.
The sparging water must be at a temperature
of 70–80°C, otherwise the wort can become
too viscous!
Once the wort has been collected, close the drain
tap of the lauter-/fermenting tun. Scoop out the
used grain with the ladle (12). Clean the lauter-/
fermenting tun thoroughly. Remember to rinse
the drain tap well!
Values for original wort and second wort of the
BIELMEIER recipes:
BEER TYPE ORIGINAL WORT SECOND
WORT
Maerzen 12,5–13° 6–6,5l
Pilsner 11–11, 5° 7l
Bock 15–16° 7l
Wheat Beer 12–12,5° 6–6,5l
Ale 13–15° 6–6,5l
Gerstengold 12–12,5° 6–6,5l
WORT BOIL, WHIRLPOOL, FILLING
When the lautering process has been completed
you can begin with the wort boil.
Temperature setting (4): 100°C
Timer (4): -- (continuous operation mode)
While the wort is heating up, keep the lid (1)
on the mash tun (BHG 410000), opening it
only every 3–5 minutes to stir the wort. Stir
enough to make sure that nothing burns onto
the bottom of the pot. The higher the sugar
content of the wort, the more you will need
to stir it. Burning is bad for the flavour of the
beer!
Once the wort has reached a rolling boil, add
the bitter hops. Do this slowly and carefully
while stirring the wort because it can foam up
and boil over at this point.
Normally, you should leave the lid (1) off the
mash tun (BHG 410000), after adding the
bitter hops. Continue the boil for between 60
and 90 minutes, stirring repeatedly.
5–10 minutes before the end of the boil, stir
the aroma hops into the wort.
At the end of the boil, switch off the heater
and unplug the mains plug (5).
Once the wort has stopped boiling hard (the sur-
face is quiet and smooth), you can perform the
whirlpool step:
Place the cleaned (with 70% ethanol) lauter-/
fermenting tun (BHG 040002), without the
strainer insert (15), under the closed drain
tap (6) of the mash tun (BHG 410000). Stir
the wort vigorously with the large spoon (13)
to set it swirling. Take the spoon out and put
the lid on the mash tun (fig. 9).
When the liquid stops swirling (after 10–15
minutes), open the drain tap (6) carefully and
let the wort flow into the cleaned lauter-/fer-
menting tun (BHG 040002).
When all the liquid has been transferred, cool
the wort to the fermentation temperature
(top fermentation: 15–20°C; bottom fermenta-
tion: 10–15°C) using the sanitised spiral cooler
(spray it with 70% ethanol) by connecting the
cooler to the cold water supply. When the wort
reaches the fermentation temperature, pre-
pare the yeast according to the supplier’s in-
structions / recipe, and then add it to the wort.
(fig. 5)
°C
min.
40 20
30
40 50 60
70
80
90
100
110
120
0
50
60 70
80
90
100
(fig. 6)
°C
min.
40 20
30
40 50 60
70
80
90
100
110
120
0
50
60 70
80
90
100
40 cm
(fig. 7)
(fig. 8)

GBGB
3332
Make sure you do not use more cooling water
than necessary during the cooling process.
The draining water should be warmer than the
feeding water almost until the end of the cool-
ing process. Move the spiral cooler in the wort
in order to improve the heat transfer. You may
also use cold packs to accelerate the cooling
process. Be sure to ensure absolute cleanliness
and sterility!
Close the straining pot with the lid (9). Fill the
airlock (7) up to the mark with 70% ethanol
and allow the mixture to ferment at the de-
sired fermentation temperature (fig. 10).
The CO2produced during fermentation escapes
through the airlock (7).
CAUTION! Ensure that the room in which the
fermentation occurs is well ventilated. CO2is non-
toxic but heavier than air and causes asphyxiation
if it is breathed in!
BOTTLING
If no more gas bubbles are passing though the
airlock (7), the fermentation is complete. The
green beer can now be filled into bottles for
conditioning (secondary fermentation) (fig. 11).
Preparation of bottles:
Soak the rubber bands of the swing tops in 70%
ethanol. Rinse the bottles well with hot water, then
sterilise them in the oven at 160°C for 4 hours and
cover the openings with aluminium foil. Do not
use any dishwashing detergent since this reduce
the surface tension and therefore prevent the beer
from getting a perfect head when pouring.
The bottle should be washed shortly before filling
as possible, and the ambient temperature should
be as cool as possible.
To support the secondary fermentation (which
carbonates the beer), sugar (called priming sugar)
is added to the green beer before filling:
Dissolve the amount of sugar indicated in the table
in 1l of boiling water (to ensure sterility), allow it to
cool, and stir it into the green beer.
Then fill the beer into cleaned bottles or kegs. The
green beer can also be filled in bottles before the
end of the main fermentation (original wort ap-
prox. 4°). In this case, do not add any sugar.
During and towards the end of the fermentation,
use the hydrometer to identify the ideal moment
for bottling (see Lautering p. 30). The time is right
when the fermentation foam has turned brown
and the yeast has largely settled on the bottom.
The beer should have a value of approx. 4° Plato
(depending on the recipe).
CAUTION!
If the green beer is bottled too soon, or if you
add too much sugar, the pressure created by the
secondary fermentation can make the bottles
explode!
Use only BIELMEIER beer bottles or pressure-tight
bottles from specialist retailers.
Duration of secondary fermentation: 4–6 weeks
TIME / TEMPERATURE
TABLES FOR THE ORIGINAL RECIPES
Maerzen, Bock, Ale:
Brew water: 23l
Gerstengold:
Brew water: 23l
Pilsner, Wheat Beer:
Brew water: 23l
Mash (Instructions on p. 29):
MIN. TEMP. °C COMMENTS
10 45 Measure pH, add malt
20 62 Stir constantly
25 68 Stir constantly
30 72 Stir constantly,
starch conversion test
580 Stir constantly
°C
min.
40 20
30
40 50 60
70
80
90
100
110
120
0
50
60 70
80
90
100
(fig. 9)
(fig. 10)
(fig. 11)
OTHER USES OF THE MASH TUN
PRESERVING
Fill the mash tun (BHG 410000).
Put on lid (1).
Plug in the mains (5).
Set temperature (4).
Set timer mode (4) to the required cooking
time.
The timer begins counting down as soon as
the set temperature is reached. When the
timer reaches zero, the heater is switched off
automatically.
JUICE EXTRACTION
Pour at least 6 l of water into the mash tun
(BHG 410000).
Insert the Juice Extractor Top BHG 630 (not in-
cluded with the BIELMEIER Braukaiser brewing
set).
Place the fruit (or vegetables) into the fruit
container.
Put the lid (1) on the pot.
Plug the mains plug (5) into a power socket.
Set temperature to 100°C.
Set time to continuous operation symbol ( -- ).
The appliance heats up.
Refill the water before starting each subse-
quent juice extraction run.
At the end of the operation, press the "Off but-
ton" and pull out the plug.

GBGB
3534
FERMENTATION INFORMATION
BEER TYPE TEMP. NATURAL CO2
CONCENTRATION REQUIRED CO2
AMOUNT PRIMING SUGAR
Maerzen 10°C 2,28 g/l 4,5–5,5g/l 4,30–6,3 g/l
Maerzen 20°C 1,67 g/l 4,5–5,5g/l 5,5–7,45g/l
Pilsner 10°C 2,28 g/l 4,5–5,5g/l 4,30–6,3 g/l
Pilsner 20°C 1,67 g/l 4,5–5,5g/l 5,5–7,45g/l
Bock 10°C 2,28 g/l 4,5–5,5g/l 4,3–6,3g/l
Bock 20°C 1,67 g/l 4,5–5,5g/l 5,5–7,45g/l
Wheat Beer 10°C 2,28 g/l 7–9 g/l 9,2–13 g/l
Wheat Beer 20°C 1,67 g/l 7–9 g/l 10,4–14,25 g/l
Ale 10°C 2,28 g/l 3,5–4,5 g/l 2,4–4,3 g/l
Ale 20°C 1,67 g/l 3,5–4,5 g/ 3,6–5,5 g/l
Gerstengold 10°C 2,28 g/l 4,5–5,5g/l 4,30–6,3 g/l
Gerstengold 20°C 1,67 g/l 4,5–5,5g/l 5,5–7,45g/l
These amounts are suitable for fully fermented green beer, i.e. when no detectable fermentation is
taking place at the end of the primary fermentation (no bubbles rising in the airlock (7)).
We wish you happy brewing with
the BIELMEIER Beer Brewing System!
WARRANTY
In the EU and Switzerland, the following conditions apply for the warranty, which begins on the
date of purchase of the product:
A 2-year warranty is provided for damage caused by defects in material or workmanship. The
warranty period shall begin on the day of delivery or on the day the buyer takes possession
of the item, and the warranty will only be honoured upon presentation of the warranty card
and the purchase receipt. No further claims shall be granted.
1. Warranty period: 2 years
2. Conditions of warranty:
a) Parts which exhibit defects in material and/or
workmanship after our inspection will either
be repaired or replaced at our discretion.
b) The warranty will only be honoured upon
presentation of this warranty card and
purchase receipt. This warranty is only valid
if it is filled out on the date of sale and in a
complete and appropriate manner.
c) This warranty is only valid for the first owner
of the device.
d) No replacement or repair of parts performed
within the warranty period shall provide
grounds for any extension of the original
warranty period.
e) Any transportation costs shall be borne by
the purchaser (this shall not apply during the
first 6 months of the warranty).
f) Within the first 6 months after the purchase/
delivery of the device, if the damage or de-
fect cannot be eliminated, if we refuse to
repair the defect, or in the event of a delay
in our repairing of the device, then the end
user can choose from one of three options:
the device will be replaced free of charge, its
value will be reimbursed, or the device will
be taken back with a refund of the original
purchase price which shall not exceed the
usual market price.
3. The warranty does not apply to:
spots and scratches on the device
control lamps and lights
motor brushes
easily breakable parts (e.g. bakelite, plastic,
glass), even in the case of defects in material
as recognized by us
damage due to improper installation or im-
proper repair
damage caused by an inappropriate vol-
tage supply or an inappropriate electricity
network
improper or inappropriate use of the equipment
unsatisfactory care
damage caused by incompetent or insufficient
maintenance
damage caused by dropping the equipment
or part of it
improper transportation or insufficient
packaging during transportation
4. The warranty shall be deemed void:
in the case of use or application of the device
for something other than its intended use for
household purposes.
in the case of any servicing or repairing of the
device performed by third parties that have
not been authorized for such purpose by our
company.
Stamp and signature of salesperson Date of sale
Important! Please write down the FD-code
located on the rating plate here:
Model:
TECHNICAL DETAILS
Power source: 220 –230 V ~ / 50 Hz
Power consumption:
1800 Watt
Protection class:
I
Capacity:
27 litres in normal mode
23 litres in cooking mode
(corresponds to filling height of 4 cm below
the rim of the pot)
Weight:
6.05 kg
This appliance conforms with EU Directive 73/23
EEC and 89/336/EEC.
Technical changes reserved.

FR FR
3736
L'appareil doit être placé sur une surface libre, plane et stable.
Ne posez jamais l'appareil et son cordon d'alimentation sur des surfaces
chaudes ou à proximité de gazinières, de feux, etc.
Attention!Installez l'appareil à l'endroit où vous désirez les utiliser Rap-
pelez-vous que la cuve de filtrage et de fermentation est remplie de
moût avec la louche depuis la cuve de moût et de brassage. L'appareil ne
doit pas non plus être placé trop haut. Commencez par remplir la cuve de
moût et de brassage avec l'eau, comme indiqué sous Brassage (v. 42).
Insérez d'abord la prise (5) dans une prise de courant mise à la terre.
Transport de l'appareil uniquement quand celui-ci est entièrement
vidé et refroidi! Une fois remplie, la cuve de moût et de brassage
atteint un poids très élevé, ce qui constitue un danger de blessure!
Ne soulever l’appareil qu’à l’aide des poignées et uniquement lorsqu’il
est refroidi et complètement vidé! Dans le cas contraire, il y a risque de
brûlures.
Ne videz jamais l'appareil lorsqu'il est chaud en l'inclinant. Lorsque
le contenu est chaud, celui-ci doit être exclusivement enlevé avec la
louche (pour le moût) ou à travers la vanne d'évacuation (6) (cuisson du moût).
Si vous inclinez l'appareil lorsqu'il est rempli et chaud, vous vous exposez
à un danger de brûlure ou d'échaudage.
Remplissez l'appareil avant de l'allumer.
Remplissez la cuve (2) jusqu'à 4 cm au-dessous du bord. Il est dangereux
de déborder et cela pourrait endommager l'appareil.
Attention! La vapeur qui s'échappe peut provoquer des brûlures!
Attention!Durant son utilisation, l'appareil est chaud! Ne la prenez par
les poignées qu'avec des maniques isolantes.
Ne jamais plonger l'appareil dans l'eau ! Protégez également le tuyau
de l'humidité.
RECOMMANDATIONS DE SÉCURITÉ
Nous sommes heureux de votre achat et vous remercions de votre
confiance. La sécurité des appareils électriques BIELMEIER répond aux
directives techniques et légales officiellement reconnues.
Le système de brassage de bière BIELMEIER comprend la cuve de moût et
de brassage, avec une résistance intégrée, et la cuve de filtrage et de fer-
mentation, munie d'un fond perforé et d'un refroidisseur. Tous ces compo-
sants sont fabriqués dans un acier inoxydable de haute qualité. La livraison
comprend également la louche, la spatule de brassage, le thermomètre
numérique, l’hydromètre à bière et l’éprouvette graduée.
Afin de profiter pleinement de votre nouvelle machine de brassage
BIELMEIER, nous vous prions de suivre très soigneusement les instruc-
tions ci-dessous.
VEUILLEZ LIRE ATTENTIVEMENT CE MODE D'EMPLOI AVANT D'UTI
LISER VOTRE APPAREIL POUR LA PREMIÈRE FOIS ET SUIVRE SES
RECOMMANDATIONS!
Ne mettez pas l'appareil en marche dans les situations suivantes:
– si l'alimentation est endommagée,
– si l'appareil est visiblement abîmé,
– après une chute de l'appareil,
– si l'extérieur de l'appareil est mouillé ou humide.
Si l'appareil ou son alimentation affichent des dégâts visibles, vous
devez le confier à un technicien autorisé ou au service clientèle de
BIELMEIER pour contrôle.
Branchez l'appareil uniquement sur du courant alternatif, conformément aux
indications de la plaque signalétique (prise à contact de protection).
Déroulez entièrement le cordon d'alimentation.
Ne laissez jamais traîner le cordon d'alimentation.
Débranchez la prise de courant (5) dans les situations suivantes
– en cas de défaut de fonctionnement,
– avant tout nettoyage ou opération d'entretien,
– après utilisation.

FR FR
3938
Cet appareil ne doit pas être utilisé par des enfants et des adultes dont
les capacités physiques, sensorielles ou mentales sont réduites ou qui
manquent d'expérience et/ou de connaissances, à moins qu'ils ne soient
surveillés en permanence par une personne chargée de leur sécurité ou
qui leur a expliqué comment ils doivent utiliser l'appareil. Les enfants
doivent être surveillés afin qu'ils ne jouent pas avec l'appareil.
Cet appareil est destiné à un usage exclusivement domestique, non à un
usage commercial.
Une utilisation détournée ou une mauvaise manipulation ne pourront
pas, en cas de dommage éventuel, engager la responsabilité du fabri-
cant.
MONTAGE
Les robinets de purge (6) pour la cuve de moût
et de brassage (BHG 410000) et la cuve de clari-
fication et de fermentation (BHG 040002) sont
compris dans la livraison.
Montez les robinets de sorte que le joint en sili-
cone se situe sur le côté de la cuve à l'extérieur sur
le robinet. Dans la cuve de clarification et de fer-
mentation (BHG 040002), l’écrou doit être vissé
de façon à ce qu’un côté plat de l’hexagone soit
dirigé vers le haut afin que le fond à tamis repose
horizontalement dans la cuve.
NETTOYAGE ET ENTRETIEN
Avant le nettoyage, toujours débrancher le câble
de raccordement au réseau. Ne plongez jamais
l'appareil dans l'eau! Débranchez la prise (5) et
lavez l'intérieur en maintenant la prise à l'abri de
l'humidité. Vous pouvez éliminer les dépôts de
calcaire en utilisant de l'eau vinaigrée ou un pro-
duit anticalcaire approprié – veillez à terminer le
nettoyage avec de l'eau claire!
Enlevez tout liquide restant dans la cuve
ou vi-
dez-le à l'aide du robinet de vidange (6) – si
l'appareil en est équipé. Ne faites pas basculer
l'appareil!
De temps à autre, nettoyez le robinet de vidange
(6)
avec de l'eau chaude et du liquide vaisselle.
INFORMATIONS GÉNÉRALES
Contenance: La cuve de moût et de brassage
BIELMEIER a une contenance de 27 l. Le niveau
de liquide doit se situer à 4 cm maximum sous
le bord supérieur, ce qui correspond env. à 23 l.
L'appareil a différentes fonctions, en plus du
brassage de la bière : réduire par ébullition,
chauffer au bain-marie, préparer des bois-
sons chaudes, cuire, réchauffer, blanchir les
légumes, etc.
Les préparations épaisses devront être agitées
en continu afin d'éviter qu'elles ne brûlent.
Veuillez remarquer: Si le contenu du stérilisa-
teur pour conserves s'évapore entièrement,
il existe une protection qui empêche d'en-
dommager l’appareil. IMPORTANT: Laissez
l'appareil refroidir avant de le remplir à
nouveau. Il existe sinon un risque de bru-
lure par formation de vapeur. De plus, le
fond du stérilisateur peut se deformer.
Pour des raisons d'hygiène, avant la première
utilisation veuillez bouillir environ 6litres
d'eau pour 15 minutes dans l'appareil – ré-
glez la température à 100 °C et la durée sur
( -- ) Fonctionnement en continu et mettez
l'appareil en marche ( ) .
Au cours de la première utilisation, une odeur
peut apparaître, qui disparaîtra après un temps
d'utilisation.
Le moulin peut aussi être utilisé pour la fabrica-
tion de farine ou pour concasser des céréales
afin de faire du muesli.
INFORMATIONSIMPORTANTES
CONCERNANTL'UTILISATION
DE CET APPAREIL
Avant la première utilisation, nettoyez soi-
gneusement l'intérieur des deux cuves. Veuil-
lez consulter à ce sujet la partie « Nettoyage
et Entretien » (v. 39).
Remplissez l'appareil avant de l'allumer.
Ne remplissez pas trop la cuve (2)! Remplissez
la cuve (2) jusqu'à 4 cm au-dessous du bord. Il
est dangereux de déborder et cela pourrait
endommager l'appareil.
L'écume du liquide doit être retirée ou
être drainée par la vanne d'évacuation.
N'inclinez pas l'appareil!
(Ill. 1)
(Ill. 2)
(Ill. 3)
(Ill. 4)
Other manuals for BHG 403
1
This manual suits for next models
1
Table of contents
Languages:
Other BIELMEIER Dispenser manuals


Popular Dispenser manuals by other brands


Brightwell
Brightwell Microplus II manual

Stern
Stern TRENDY SOAP DISPENSER B Installation and maintenance guide

Nordson
Nordson Auto-Flo II Customer product manual

ophardt
ophardt SanTRAL Plus PTU 15 Instructions for use

Tork
Tork Image Design 460013 instruction manual

Prince Castle
Prince Castle PANCAKE BATTER DISPENSER 149 Specifications


