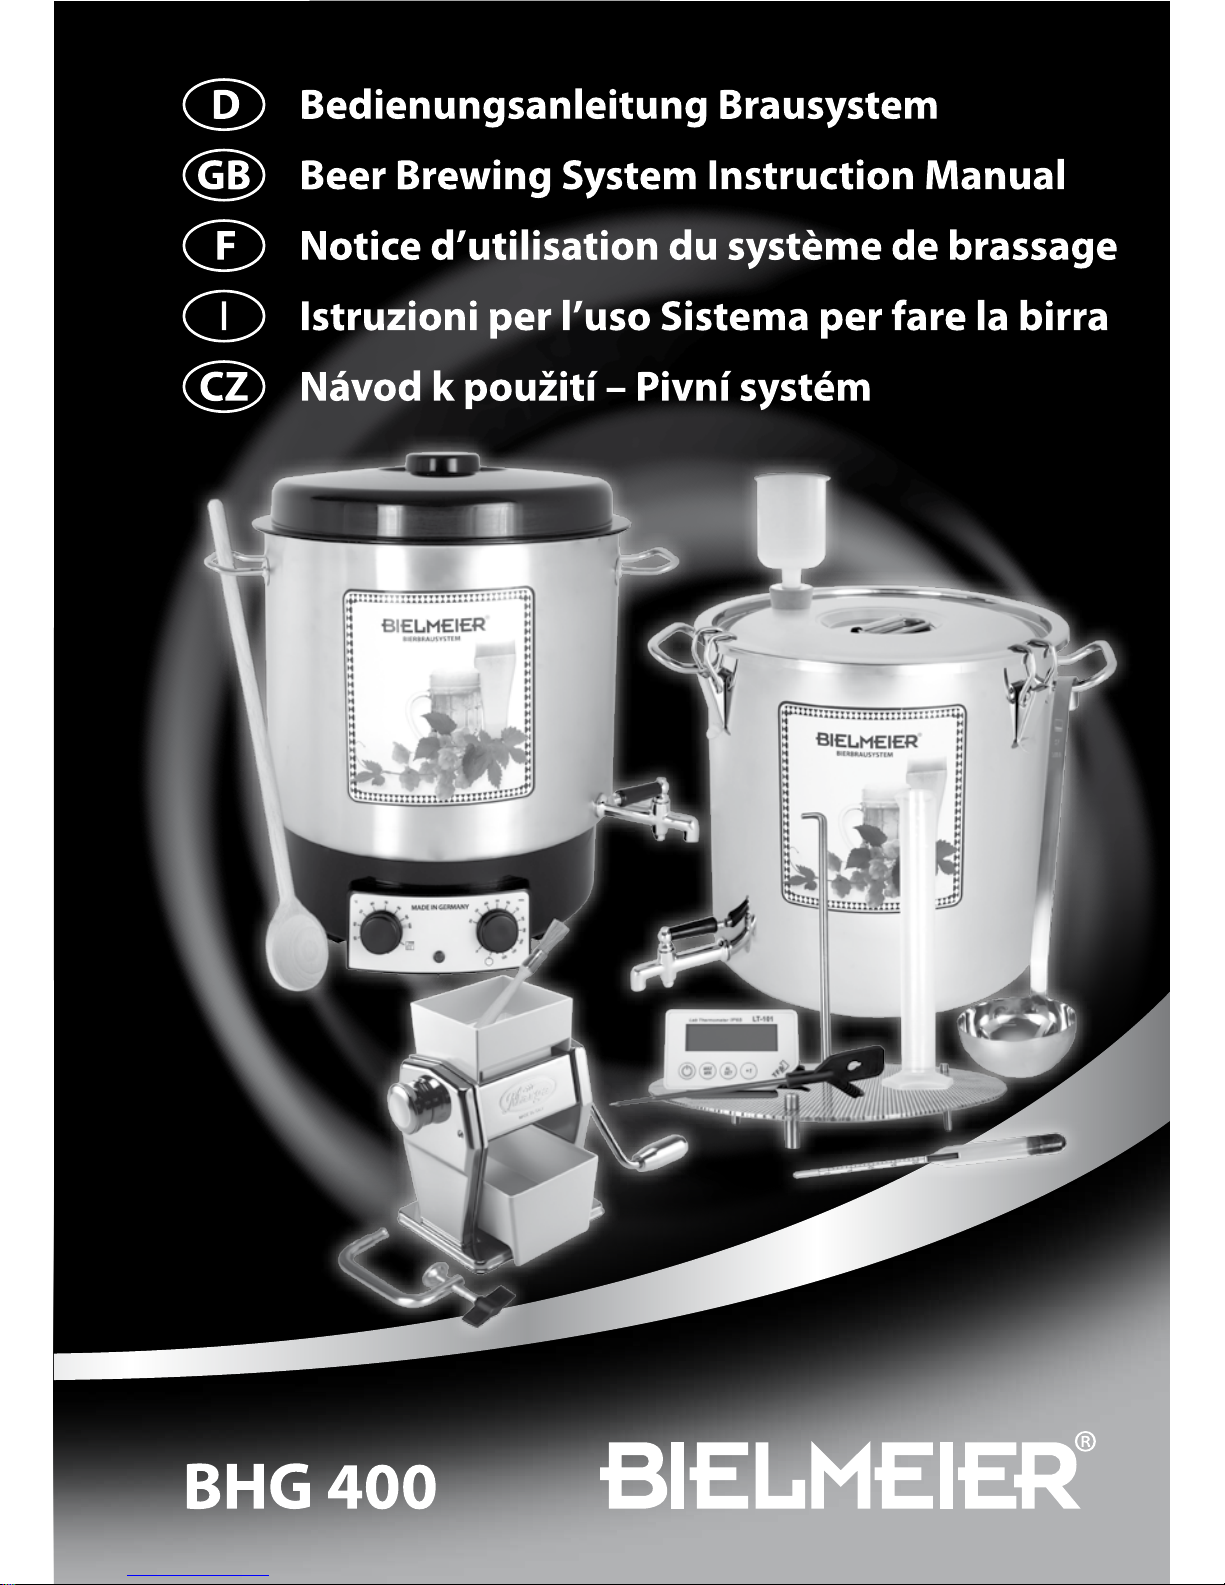
BIELMEIER BHG 400 User manual
32
BHG 400
BHG 400
TABLE DES MATIERES
Pour l‘amour de l‘environnement.......... 3
Eléments de votre système de brassage .. 6
Consignes de sécurité . . . . . . . . . . . . . . . . . . . . . 33
Informations générales ................... 34
Utilisation ................................. 34
Montage .................................. 34
Nettoyage ................................ 34
Thermostat ............................... 35
Minuteur ................................. 36
Le processus de brassage ................. 36
Le procédé de brassage ................... 37
Temps / Température ..................... 43
Autres possibilités d’utilisation ............ 44
Donnee s techniques...................... 44
Garantie .................................. 45
CONTENUTO
Indicazioni per la tutela dell’ambiente .... 3
Componenti del vostro sistema per
fare la birra ............................... 6
Avvertenze per la sicurezza ............... 46
Informazioni generali ..................... 47
Uso ....................................... 47
Montaggio ................................ 47
Pulizia ..................................... 47
Termostato ............................... 48
Timer ..................................... 49
Come fare la birra ......................... 49
Procedimento per fare la birra ............ 50
Tempo/Temperatura ...................... 56
Ulteriori possibilità d’uso .................. 57
Dati tecnici ................................ 57
Garanzia .................................. 58
F I
INHALT
Teile Ihres Bierbrausystems ............... 3
Der Umwelt zuliebe bitte beachten ....... 6
Sicherheitshinweise . . . . . . . . . . . . . . . . . . . . . . . 7
Allgemeine Informationen ................ 8
Bedienung ................................ 8
Montage .................................. 8
Reinigung ................................ 8
Thermostat ............................... 8
Zeitschaltuhr ............................. 10
Der Brauvorgang ......................... 10
Das Brauverfahren ........................ 11
Zeit/ Temperatur .......................... 17
Weitere Anwendungsmöglichkeiten ...... 18
Technische Angaben ..................... 18
Garantie .................................. 19
CONTENTS
Parts of your Beer Brewing System ........ 3
Please help preserve the environment .... 6
Important Safety Instructions ............. 20
General Information ...................... 21
Operating Instructions .................... 21
Assembly ................................. 21
Cleaning and Maintenance ............... 21
Thermostat ............................... 22
Timer Switch .............................. 23
The Brewing Process ...................... 23
The Brewing Method ..................... 24
Time / Temperature ...................... 30
Other Uses ................................ 31
Technical Data ............................ 31
Warranty .................................. 32
D GB
OBSAH
Přátelský k životnímu prostředí............ 3
Části pivního systému .................... 6
Bezpečnostní upozornění ................. 59
Všeobecné informace ..................... 60
Obsluha .................................. 60
Montáž ................................... 60
Údržba ................................... 60
CZ
Termostat ................................. 61
Časový spínač ............................ 62
Vaření piva ................................ 62
Technologie vaření piva .................. 63
Doba / teplota ............................ 69
Další možnosti využití ..................... 70
Technické údaje .......................... 70
Záruční doba ............................. 71
°C
70
80
90
60
50
40
30
70
90
80
100
110
120
0
60
50
40
30
20
1
2
3
4
5
6
14 15 16 17
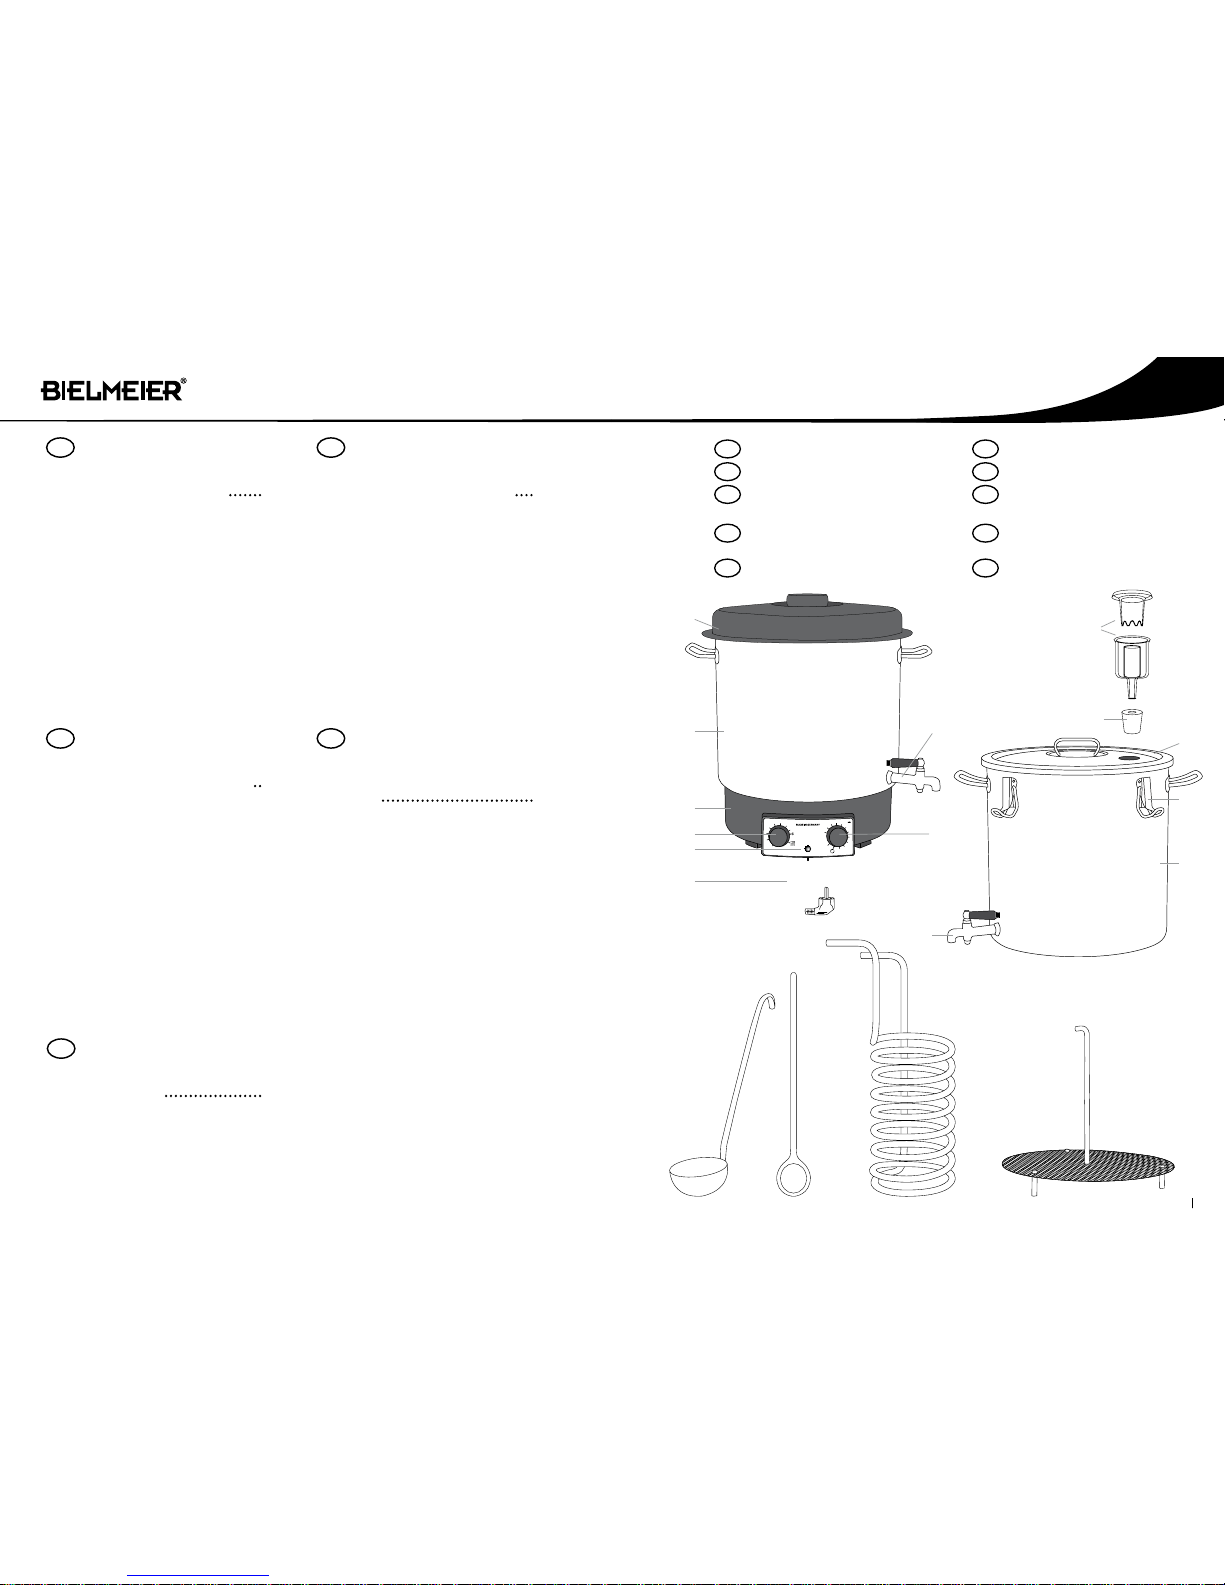
Maische-/Sudkessel (BHG 40001)
Broiler Pot (BHG 40001)
Cuve de moût et de brassage
(BHG 40001)
Caldaia di ammostatura/cottura
(BHG 40001)
Vystírací / varný kotel (BHG 40001)
Läuter-/Gärbottich (BHG 40002)
Strainer Pot (BHG 40002)
Cuve de ltrage et de fermentation
(BHG 40002)
Tino di ltraggio/fermentazione
(BHG 40002)
Scezovací / kvasná káď
(BHG 40002)
CZ CZ
GB GB
D D
F F
I I
8
7
11
12
13
9
10
8

54
BHG 400
BHG 400
Lab Thermometer IP65
LT-101
TFA
MAX
MIN
AL
SET +1
18
19 20
21 22
23
1 Deckel
2 Kessel
3 Unterteil mit Heizelement
4 Thermostat
5 Kontrollleuchte
6 Netzanschlusskabel
7 Synchronzeitschaltuhr
8 Auslaufhahn
9 Gärspund
10 Adapter
11 Deckel
12 Verschlussklammer
13 Bottich
14 Schöpfer
15 Bierpaddel
16 Kühlspirale (Würzekühlung)
(Nicht im Set inkludiert!)
17 Siebboden
18 Mühle
19 Befestigung der Mühle
20 Reinigungs-Pinsel
21 Bierspindel
22 Messzylinder
23 Digital-Thermometer mit Messfühler
Änderungen vorbehalten.
1 Lid
2Vessel
3Base unit with heating element
4Thermostat
5Indicator light
6Mains plug
7Timer switch
8Drain tap
9Airlock
10 Adapter
11 Lid
12 Sealing clamp
13 Pot
14 Ladle
15 Spoon
16 Spiral Cooler (wort cooling)
(not included in the set!)
17 Strainer insert
18 Malt mill
19 Clamp for attaching the mill
20 Wooden cleaning brush
21 Hydrometer
22 Measuring Cylinder
23 Digital thermometer with sensor
Product may be subject to change.
D GB
1 Couvercle
2 Cuve
3Partie inférieure avec élément de chauffage
4Thermostat
5Voyant lumineux
6 Câble de raccordement au réseau
7Minuteur synchrone
8Vanne d’évacuation
9 Bonde de fermentation
10 Adaptateur
11 Couvercle
12 Clip de fermeture
13 Cuve
14 Louche
15 Spatule de brassage
16 Serpentin de refroidissement (refroidisse-
ment du moût) (non compris dans le kit!)
17 Fond à tamis
18 Moulin
19 Fixation du moulin
20 Pinceau de nettoyage
21 Hydromètre à bière
22 Eprouvette graduée
23 Thermomètre numérique avec capteur
Sous réserves de modication.
1 Víko
2 Kotel
3 Spodní část s topným tělesem
4 Termostat
5 Světelná kontrolka
6 Síťový kabel
7 Synchronní časový spínač
8 Výpustný ventil
9 Zátka
10 Adaptér
11 Víko
12 Svorka
13 Káď
14 Naběračka
15 Pivní vařečka
1 Coperchio
2Caldaia
3Parte inferiore con resistenza
4Termostato
5Spia luminosa
6Cavo di alimentazione
7Timer sincronizzato
8Rubinetto di scarico
9 Gorgogliatore
10 Riduttore
11 Coperchio
12 Clip di chiusura
13 Tino
14 Ramaiolo
15 Paletta per birra
16 Serpentina di raffreddamento (raffredda-
mento del mosto) (Non incluso nel set!)
17 Fondo perforato
18 Mulino
19 Fissaggio del mulino
20 Pennello di pulizia
21 Densimetro
22 Cilindro graduato
23 Termometro digitale con sonda di
misurazione
Il prodotto può essere soggetto a modiche.
F
CZ
I
16 Chladicí spirála (chlazení mladiny)
(není součást dodávky)
17 Sítové dno
18 Mlýnek
19 Fixace mlýnku
20 Štětec – čištění
21 Pivní hustoměr
22 Odměrný válec
23 Digitální teploměr s čidlem
Změny vyhrazeny.
Lizenz Nr.:
5452569
WEEE-Reg.- Nr.:
DE30751975

D
76
BHG 400
6
D
F I
CZ
GB
DER UMWELT ZULIEBE
BITTE BEACHTEN:
Verpackungsmaterial und ausgediente
Geräte nicht einfach wegwerfen, sondern
der Wiederverwertung zuführen.
Den zuständigen Recyclinghof bzw. die
nächste Sammelstelle bitte bei Ihrer Kom-
munalverwaltung erfragen.
Zur Inanspruchnahme von Garantielei-
stungen wenden Sie sich bitte an Ihren
Händler oder die BIELMEIER Kunden-
dienstzentrale Ihres Landes.
INDICAZIONI SULLA
TUTELA DELL’AMBIENTE:
Non disperdere nell’ambiente il materiale
d’imballaggio e l’apparecchio da rottama-
re, ma destinarli ad operazioni di riciclo.
Si prega di richiedere presso la propria
amministrazione comunale informazioni
sui punti di raccolta dierenziata e smal-
timento di riuti.
Per usufruire dei servizi in garanzia si pre-
ga di rivolgersi al proprio rivenditore o al
centro di servizio alla clientela BIELMEIER
del proprio paese.
POUR L'AMOUR DE
L'ENVIRONNEMENT:
Ne pas jeter les emballages et les ap-
pareils usagés aux ordures ménagères,
mais les faire recycler.
Veuillez consulter le point de recyclage ou
de collecte de votre commune.
Pour l'application de vos droits relatifs
à la garantie, veuillez contacter votre
revendeur ou le centre de service client
BIELMEIER de votre pays.
PLEASE HELP PRESERVE
OUR ENVIROMENT:
Please recycle packaging and old appli-
ances.
Please consult your local government for
information about the nearest recycling
centre.
For warranty claims, please contact your
dealer or the BIELMEIER customer service
centre in your country.
POKYNY K OCHRANĚ
ŽIVOTNÍHO PROSTŘEDÍ:
Obalový materiál a starý přístroj nevyha-
zujte, ale dovezte k recyklaci.
Na příslušné recyklační místo nebo sběrný
dvůr se informujte na vašem obecním ne-
bo městském úřadě.
V případě uplatnění opravy v záruční do-
bě se obraťte na vašeho prodejce nebo
přímo na servisní centrum společnosti
BIELMEIER.
7
Wir freuen uns, dass Sie sich für dieses Produkt
entschieden haben und bedanken uns für Ihr
Vertrauen. Die Sicherheit von BIELMEIER-Elektro-
geräten entspricht den anerkannten Regeln der
Technik und den gesetzlichen Bestimmungen.
Das BIELMEIER Brausystem besteht aus dem
Maische-/Sudkessel mit eingebauter Heizung
und dem Läuter-/Gärbottich mit Siebboden
sowie dem Kühler. Alle diese Komponenten sind
aus hochwertigem Edelstahl gefertigt. Im Liefer-
umfang enthalten sind weiters eine Mühle,
Schöpfer, Bierpaddel, Digitalthermometer, Bier-
spindel und Messzylinder.
Damit Sie viel Freude an Ihrem neuen BIELMEIER
Brausystem haben, bitten wir Sie, die nach-
folgenden Hinweise sorgfältig zu beachten.
WICHTIG!
Diese Bedienungsanleitung enthält wichtige
Informationen über Gebrauch und Wartung
Ihres neuen Gerätes. Lesen Sie die Hinweise
sorgfältig durch, bevor Sie das Gerät verwen-
den. Bewahren Sie die Bedienungsanleitung
für den weiteren Gebrauch auf. Bei sorgfäl-
tiger Wartung werden Sie viele Jahre Freude
an Ihrem Gerät haben.
SICHERHEITSHINWEISE
Der Maische-/Sudkessel darf nicht in Betrieb
genommen werden, wenn:
– das Anschlusskabel beschädigt ist,
– das Gerät sichtbare Schäden aufweist,
– das Gerät heruntergefallen sein sollte,
– das Gerät außen nass oder feucht ist.
Bei oensichtlichen Schäden an Gerät bzw.
Zuleitung lassen Sie das Gerät von einem
Fachmann oder dem BIELMEIER Kunden-
dienst prüfen.
Schließen Sie das Gerät nur an Wechselstrom
gemäß dem Typenschild an (Schuko-Steck-
dose).
Wickeln Sie die Zuleitung vollständig ab.
Lassen Sie jedoch die Zuleitung nie herunter-
hängen.
Ziehen Sie den Netzstecker 6:
– bei Störungen während des Betriebes,
– vor jeder Reinigung und Pege,
– nach dem Gebrauch.
Stellen Sie das Gerät auf eine stabile, ebene
und freie Fläche.
Stellen Sie Gerät und Zuleitung nie auf heiße
Oberächen oder in die Nähe von oenem
Feuer, Gaskochern, etc.
ACHTUNG!
Platzieren Sie Ihr Gerät dort, wo Sie es ver-
wenden wollen. Denken Sie daran, dass die
Maische mit dem Schöpöel vom Mai-
sche- und Sudkessel in den Läuter- und
Gärbottich gefüllt wird. Das Gerät sollte al-
so nicht zu hoch platziert sein. Befüllen Sie
erst den Maische- /Sudkessel mit Wasser,
wie unter „Maischen“ (S. 11) angegeben.
Stecken Sie erst dann den Stecker (6) in eine
geerdete Steckdose.
Transportieren Sie das Gerät nur im leeren
und kalten Zustand! Befüllt hat der Mai-
sche- /Sudkessel ein hohes Gewicht, wodurch
Verletzungsgefahr besteht!
Das Gerät nur im kalten und vollständig
geleerten Zustand an den Grien anheben!
Andernfalls droht die Gefahr von Verbrühungen
und/oder Verbrennungen.
Entleeren Sie das Gerät im heißen Zustand
niemals durch Kippen des Gerätes. Im hei-
ßen Zustand ist der Inhalt ausschließlich mit
dem Schöpöel (Maischen) oder durch den
Auslaufhahn 8 (Würzekochen) zu entneh-
men. Beim Kippen des Geräts im befüllten
und heißen Zustand besteht die Gefahr von
Verbrennungen und/oder Verbrühungen.
Befüllen Sie das Gerät bevor Sie es einschalten.
Füllen Sie den Kessel (2) höchstens bis 4 cm
unterhalb des Randes. Ein Überlaufen ist
gefährlich und kann das Gerät beschädigen.
VORSICHT!
Durch austretenden Dampf besteht Verbrü-
hungsgefahr!
VORSICHT!
Das Gerät wird im Betrieb heiß!
Fassen Sie es daher ausschließlich mit wärme-
isolierenden Topappen an den Grien an.

D
98
D
Tauchen Sie das Gerät nie in Wasser! Schützen
Sie ebenso die Zuleitung vor Feuchtigkeit.
Kinder erkennen die Gefahr nicht, die beim
Umgang mit elektrischen Geräten entstehen
kann. Lassen Sie deshalb Kinder nie unbeauf-
sichtigt mit dem Elektrogerät und lassen Sie
in Gegenwart von Kindern besondere Sorgfalt
walten.
Dieses Gerät ist nur für den hauswirtschaft-
lichen Gebrauch und nicht für den gewerb-
lichen Einsatz geeignet.
Bei Zweckentfremdung oder falscher Hand-
habung kann keine Haftung für evtl. Schäden
übernommen werden.
ALLGEMEINE INFORMATIONEN
Fassungsvermögen: Der BIELMEIER Maische-
/Sudkessel fasst 29 l. Der Flüssigkeitsstand darf
bis max. 4cm unter den oberen Rand reichen.
Das Gerät ist über das Bierbrauen hinaus viel-
seitig verwendbar: Einkochen, Wärmen im
Wasserbad, Zubereiten von heißen Getränken,
Kochen, Aufwärmen, Blanchieren von Gemüse
usw.
Flüssigkeiten mit Zucker- oder Stärkegehalt
neigen zum Anbrennen. Beim Erhitzen ist
ständiges Umrühren erforderlich.
Sollte Ihr Maische-/Sudkessel einmal leer-
kochen, verhindert ein zusätzlicher Trocken-
gehschutz Schäden am Heizelement. Lassen
Sie das Gerät dann gut abkühlen, bevor Sie es
wieder befüllen. Es besteht ansonsten Verbrü-
hungsgefahr durch Dampfbildung. Außer-
dem kann sich dadurch der Behälterboden
verziehen.
Aus hygienischen Gründen sollten Sie vor dem
ersten Gebrauch das Gerät mit ca. 6l Wasser
einmal auskochen – Thermostat (4) auf ""
stellen.
Beim ersten Gebrauch kann Geruch entstehen,
der sich aber nach kurzer Betriebsdauer verliert.
Die Mühle kann auch zur Herstellung von Mehl
und zum Quetschen von Getreideocken für
Müsli verwendet werden. Die Mühle (18) darf
nicht mit Wasser in Berührung kommen.
BEDIENUNG 2 13
Vor dem ersten Gebrauch die Innenseiten
beider Kessel (2), (13) sorgfältig reinigen. Bitte
beachten Sie hierzu den Abschnitt „Reini-
gung“ (S. 8 und 9).
Befüllen Sie das Gerät bevor Sie es einschalten.
Überfüllen Sie den Kessel (2) nicht! Füllen Sie
den Kessel (2) bis maximal 4 cm unterhalb des
Randes. Ein Überlaufen ist gefährlich und
kann das Gerät beschädigen.
Flüssigkeiten müssen abgeschöpft oder über
den Auslaufhahn (8) abgelassen werden.
Kippen Sie das Gerät nicht!
MONTAGE
Die Auslaufhähne (8) für den Maische-/Sudkessel
(BHG 40001) und den Läuter-/Gärbottich (BHG
40002) liegen bei.
Montieren Sie die Hähne so, dass die Silikondicht-
ung jeweils an der Innenseite des Behälters in
der Ausnehmung der Befestigungsmutter liegt.
Im Läuter-/Gärbottich (BHG 40002) muss die
Mutter so angezogen werden, dass eine ache
Seite des 6-Kant nach oben zeigt, damit der Sieb-
boden waagrecht im Bottich liegt.
REINIGUNG
Tauchen Sie den beheizten Kessel (BHG
40001) nie ins Wasser (Abb.1)! Wischen Sie
ihn bei gezogenem Stecker (6) außen feucht
ab und waschen ihn innen aus. Etwa auf-
tretende Kalkrückstände (z.B. bei Verwendung
als Einkochautomat) können Sie mit Essigwasser
oder handelsüblichem Entkalker von Zeit zu Zeit
beseitigen – anschließend mit klarem Wasser
auskochen!
Schöpfen Sie die Reinigungsüssigkeit ab (Abb. 3)
oder lassen Sie sie über den Auslaufhahn (8) ab.
Kippen Sie das Gerät nicht (Abb. 2)!
Nach jeder Verwendung muss der Auslauf-
hahn (8) mit heißem Wasser – dem Spülmittel
oder Soda zugesetzt werden kann – gereinigt
werden. Sie können zusätzlich Pfeifenput-
zer verwenden und den Auslaufhahn (8) mit
Ethanol 70% desinzieren.
Reinigen Sie die Mühle (18) nur mit dem beiliegen
Pinsel oder einem trockenen Tuch, niemals mit
Wasser!
THERMOSTAT (4)
Der heizbare Kessel (BHG 40001) ist mit einem
Präzisions-Thermostat (Kapillarrohr-Regler) (4)
ausgerüstet. (Abb. 5)
Der Thermostat (4) ist von ca. 30°C bis zum
Siedepunkt stufenlos einstellbar. Die eingestellte
Temperatur wird automatisch geregelt. Für das
exakte Einhalten der Temperaturstufen beim
Brauen ist die begleitende Kontrolle mit einem
Thermometer erforderlich.
TEMPERATUREINSTELLUNG
Drehen Sie den Thermostat (4) nach rechts
bis zum Anschlag, dann bis zur gewünschten
Temperatur zurück.
Drehen Sie am Ende der Betriebszeit und bei
Betriebsunterbrechungen den Thermostat (4)
ganz nach links (gegen den Uhrzeigersinn)
und ziehen Sie den Netzstecker (6).
THERMOSTATEINSTELLUNG 100°C
Die Kochtemperatur des Wassers ist vom Luftdruck
bzw. von der örtlichen Höhenlage abhängig.
Wird also der Thermostat (4) am Gerät (BHG
40001) höher als nötig eingestellt, heizt das
Gerät ständig und es entsteht starke Dampfbil-
dung, d.h. Wasserverlust im Kessel und Energie-
verschwendung.
So nden Sie die richtige Kochpunkteinstellung
an Ihrem Gerät leicht heraus:
1 Drehen Sie den Thermostat (4) im Uhrzeiger-
sinn nach rechts bis zur Kochen-Markierung
(100°C).
2 Warten Sie ab, bis der Siedepunkt des Kessel-
inhalts erreicht ist.
3 Drehen Sie den Thermostat (4) langsam nach
links bis die Heizung ausschaltet. Das Siede-
geräusch wird leiser und es bildet sich weni-
ger Dampf. In dieser Thermostateinstellung
wird die Heizung automatisch geregelt.
THERMOSTATEINSTELLUNG
In dieser Stellung regelt der Thermostat nicht, die
Heizung ist auf Dauerbetrieb geschaltet. Diese
Einstellung ist beim Würzekochen für das rasche
Erreichen des Siedepunkts geeignet (Abb. 6).
(Abb. 1)
(Abb. 2)
(Abb. 3)
(Abb. 4)
°C
70
80
90
60
50
40
30
11
120
0
60
50
40
30
20
11
120
0
60
50
40
30
20
(Abb. 5)
°C
70
80
90
60
50
40
30
°
C
70
80
90
60
50
40
30
(Abb. 6)
Table of contents
Languages:
Other BIELMEIER Dispenser manuals


Popular Dispenser manuals by other brands

BOWMAN
BOWMAN CL003-0111 manual

SIKA
SIKA Power Cure operating instructions

Silver King
Silver King Majestic SK12MAJ Technical manual and replacement parts list

Franke
Franke F3Dn Twin Service manual

HURAKAN
HURAKAN HKN-MT1 manual

STIEBEL ELTRON
STIEBEL ELTRON UltraHot Plus Operation and installation instructions


