Big Red Rooster BRRC105 User manual

Sleep Training Alarm Clock
Model # BRRC105
An instruction video is available at the link below
or search “BRRC105 Instruction Video” on Youtube.
www.londonjohnson.com/pages/BRRC105
HOW TO SET THE CLOCK
TIME SET: Hold TIME SET button for 2 seconds. The word SET will
flash on the screen. Release TIME SET button. Adjust hours/minutes.
Press TIME SET to lock time.
ALARM 1 SET and ALARM 2 SET: Hold ALARM SET button for
2 seconds. The word SET and the corresponding bell will flash on
the screen. Release ALARM SET button. Adjust hours/minutes.
Press the same ALARM SET button to lock the alarm time.
ALARM TIME REVIEW: To check the alarm time press and release
ALARM SET button. The alarm time, the word REVIEW and the
corresponding bell will appear on the screen for 3 seconds.
ALARM 1 ON/OFF and ALARM 2 ON/OFF: Press to turn alarm
ON/OFF. The ball will turn red and the corresponding bell will show
on the screen when alarm is active. There are 2 alarms to save
2 different wake up times. Only 1 alarm can be active at a time.
The alarm must be turned on each night.
NAP TIMER: Hold NAP TIMER button for 2 seconds. The words SET
and NAP ON will flash on the screen. Release NAP TIMER button.
Adjust hours/minutes. The nap timer can be set for 1 minute to
12 hours. Press NAP TIMER button to lock time and begin the count
down. Press NAP TIMER button for 1 second to turn the nap timer
ON or OFF. The ball will turn red, the count down time and the words
NAP ON will show on the screen when the nap timer is active.
BUZZER ON/OFF: Press to turn buzzer ON/OFF. When OFF there
will be no buzzer sound at the alarm time or at the end of nap timer
count down. Only the ball will change from red to green at the alarm
time and at the end of nap timer count down. If the words BUZZER
ON show on the screen the buzzer sound is active. If you do not see
the words BUZZER ON on the screen the buzzer sound is inactive.
BRIGHTNESS: Press to change brightness: 0% (OFF), 25%, 50%,
75%, 100%. The word BRIGHTNESS will flash on the screen.
The brightness setting will lock after 5 seconds.
GREEN LIGHT DURATION: Press to change green light duration:
0:15, 0:30, 1:00, 1:30, 2:00. The word DURATION will flash on the
screen. The green light duration setting will lock after 5 seconds.
RESET: If your alarm clock is malfunctioning use a paper clip to press
the RESET button. This will reset the clock to the default settings.
BACK LIGHT: Press to turn the LCD screen back light on for
10 seconds.
BUZZER & GREEN LIGHT OFF: Press to turn the buzzing sound or
green light off (how kids turn off the alarm). This button will not
deactivate the alarm prior to the wake up time. Use the buttons in the
parent compartment to turn off the alarm or nap timer prior to the wake
up time.
PARENT CONTROLS
BALL GLOWS RED OR GREEN
RED – TIME TO SLEEP
GREEN – TIME TO WAKE
LCD SCREEN
CHILD CONTROLS
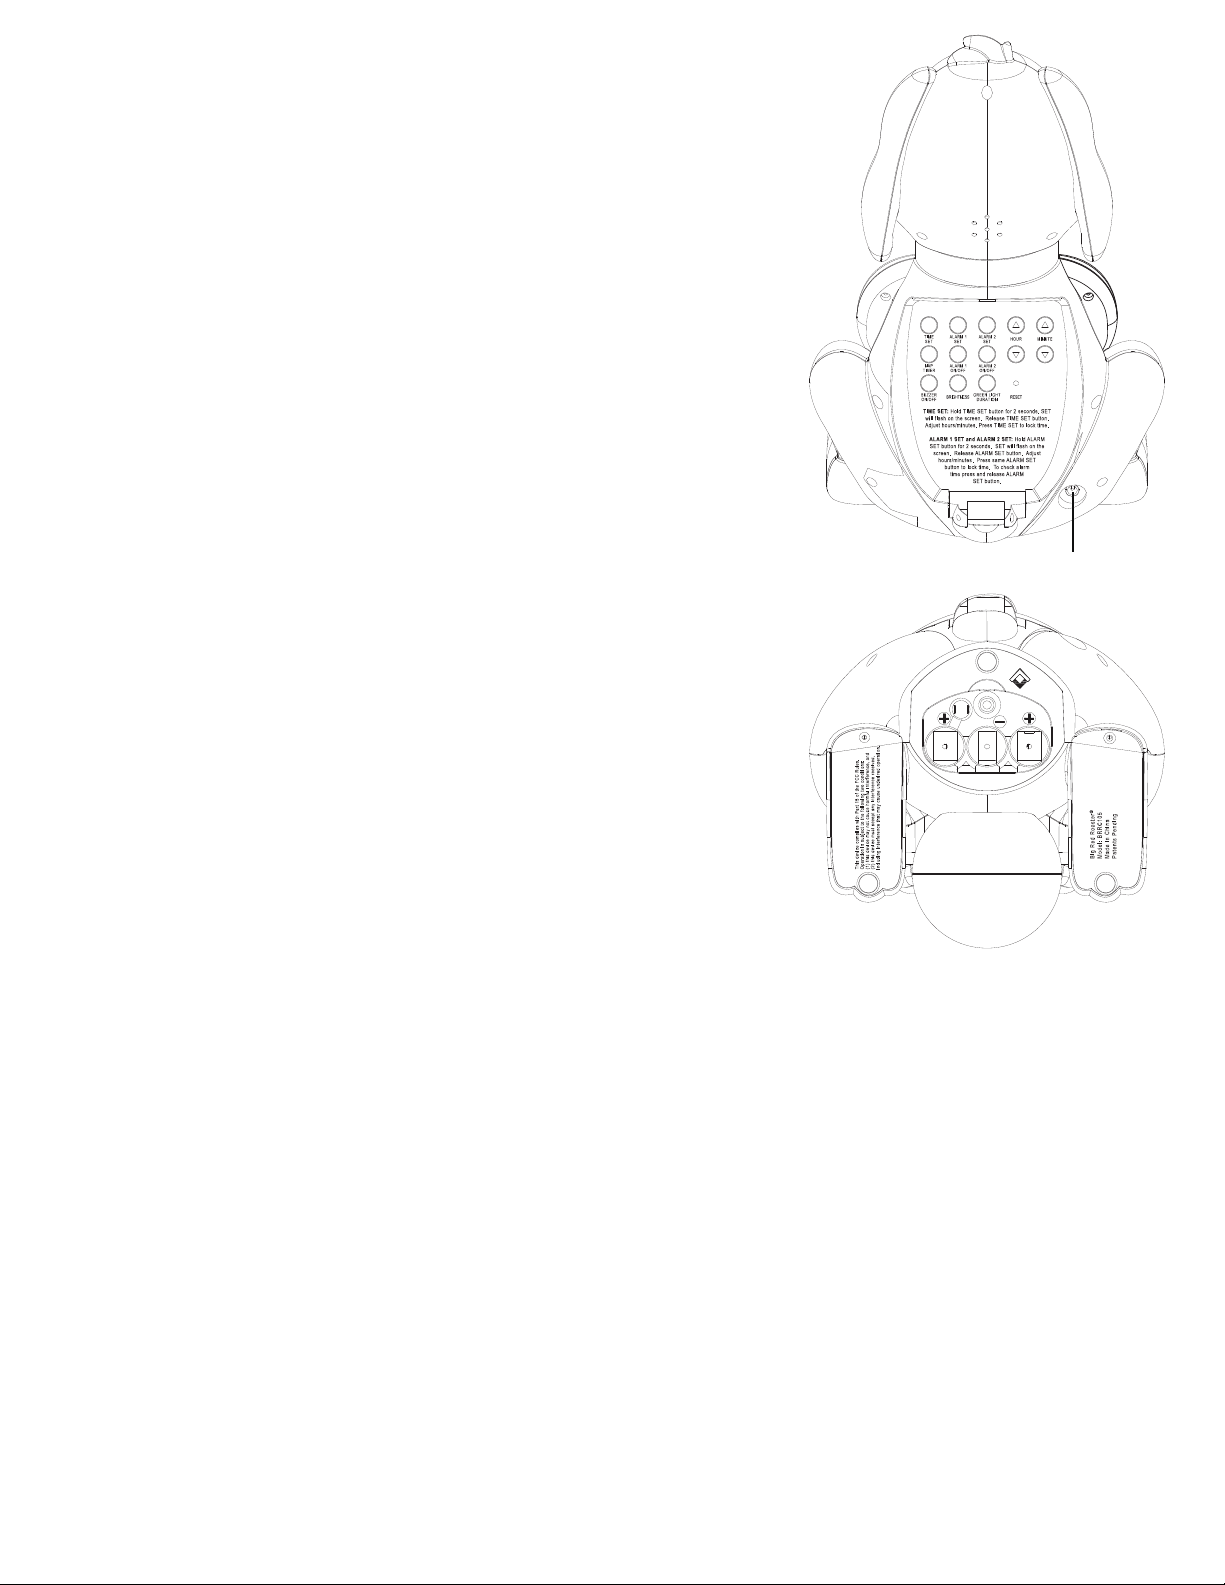
This clock operates on an AC adaptor or 3 AA batteries.
AC ADAPTOR POWER CORD:
Plug the AC adaptor into the adaptor plug (see image to the right). Plug the
adaptor into your household electrical outlet. Only use the adaptor provided.
Using any other adaptor will void the warranty. The clock will draw power from the
adaptor prior to drawing power from the batteries. If the power goes out and
batteries are in the clock the clock will stay on
.
WARNING: THE AC ADAPTOR IS NOT SUITABLE FOR CHILDREN
UNDER 36 MONTHS. LONG CORD. STRANGULATION HAZARD. IF YOUR
CHILD IS UNDER 36 MONTHS USE BATTERIES TO POWER THE CLOCK.
NEVER LEAVE CORDS OF ANY KIND NEAR AN INFANT.
BATTERIES:
1. Remove battery compartment cover with a Phillips #2 screwdriver
(not included).
2. Remove old batteries (if replacing batteries).
3. Insert 3 NEW AA alkaline batteries (not included).
4. Be sure to follow the battery polarity guide (see image to the right).
5. Replace battery compartment cover with a Phillips #2 screwdriver.
Do not over tighten screw.
BATTERY PRECAUTIONS:
1. Use only the size and type of batteries specified.
2. Always purchase the correct size and grade of battery most suitable for the
intended use.
3. Be sure to follow the correct polarity when installing the batteries as indicated in
the battery compartment. Reversed batteries may cause damage to the device.
4. Do not mix alkaline, standard (Carbon-Zinc), or rechargeable (Nickel Cadmium)
batteries.
5. Replace all batteries of a set at the same time. Do not mix old and new batteries.
6. Clean the battery contacts and also those of the device prior to battery installation.
7. Do not dispose of batteries in fire.
8. Remove batteries if consumed or if product is to be left unused for an extended
period of time.
FCC STATEMENT: This device complies with Part 15 of the FCC Rules. Operation is subject to the following two conditions:
(1) This device may not cause harmful interference, and (2) this device must accept any interference received, including interference that
may cause undesired operation.
NOTE: This equipment has been tested and found to comply with the limits for a Class B digital device, pursuant to Part 15 of the FCC
Rules. These limits are designed to provide reasonable protection against harmful interference in a residential installation. This equip-
ment generates, uses and can radiate radio frequency energy and, if not installed and used in accordance with the instructions, may
cause harmful interference to radio communications. However, there is no guarantee that interference will not occur in a particular
installation. If this equipment does cause harmful interference to radio or television reception, which can be determined by turning the
equipment off and on, the user is encouraged to try to correct the interference by one or more of the following measures:
• Reorient or relocate the receiving antenna.
• Increase the separation between the equipment and receiver.
• Connect the equipment into an outlet on a circuit different from that to which the receiver is connected.
• Consult the dealer or an experienced radio/TV technician for help.
WARNING: Modifications to this product not approved by the party responsible for compliance could void the user’s authority to operate
the product.
ONE-YEAR LIMITED WARRANTY:
This product is warranted to the original purchaser that the product will be free from defects in materials and workmanship for a period of
one year from the date of purchase. Additional details are available at www.bigredroosterproducts.com.
©2018 London Johnson, Inc. All Rights Reserved.
www.bigredroosterproducts.com
Made In China
Adaptor Plug
Other Big Red Rooster Alarm Clock manuals


