Bikecomm BK-T1 User manual

BK-T1 Quick Operation Guide
1. Package and Accessory /
Notes: 1. Headset Fixture is with cables to connect to speakers (Red connector),the microphone (Yellow
connector) and a two-way radio separately (Black Connector).
2. Only one microphone is included in the package and depending on the helmet type,you can choose
either to have Microphone for Full Face Helmet or Microphone for 3/4 Face Helmet.
2.Installation / Install the speakers
2.1 Headset Fixture Installation with the Adhesive Pad or the Spring Clip.
2.1.1 Install with Adhesive Pads
Remove the cover of adhesive pads at the back of the headset fixture and fix them to the helmet.
Note: Clean the area with the cleaning pad before applying the adhesive pads.
2.1.2 Install with the Spring Clip
1. Insert the spring clip from the lower edge by pushing it into the slot. The spring clip CANNOT be
removed after fixed. Please make sure of the direction before applying.
2. Mount the fixture to the helmet by pulling open the spring clip to attach it to the helmet.

2.2 Mount the Headset into Fixture
2.2.1 Guide and slide the headset into the top left side of the fixture.
2.2.2 Press the headset down to secure it to the fixture and when a click sound is heard, the installation is
completed.
2.3 Install the Speakers
2.3.1 Tear off the paper cover of the speaker pad and paste it to the internal side of the
helmet. Locate the proper positions for the speakers before pasting.
2.3.2 Fix the speakers onto the Speaker Pads.
2.3.3 Connect both speakers to the RED connectors of the headset fixture.
Note: For optimal audio clarity, the speakers should be placed as closely as possible to your ears without
compromising comfort.
3.Installation / Microphone
3.1 Microphone for 3/4 Face Helmet
3.1.1 Detach the inner left side lining of the helmet and use a cleaning pad to clean the urface before pasting.
Remove the paper of the microphone fabric fastener pad, and attach it to the helmet behind the inner
lining.
3.1.2 Fix the microphone to the fabric fastener pad.
3.1.3 Connect the microphone to the headset fixture cable connector (Yellow connector).
3.1.4 For optimal performance, the microphone must be as close to the mouth (1-2 cm) of the user as possible
when installing the microphone.
3.2 Microphone for Full Face Helmet
3.2.1 Attach the fabric fastener pad for microphone to the position inside the helmet right in
front of mouth.
3.2.2 Fix the microphone to the fabric fastener pad.
3.2.3 Connect the microphone to the headset fixture cable connector (Yellow connector).

4.Installation / Two Way Radio Connector
4.1 Remove the cover of the two way radio pad and attach it to the outside of the helmet.
4.2 Do not remove it within 24 hours to make sure it is tightly secured.
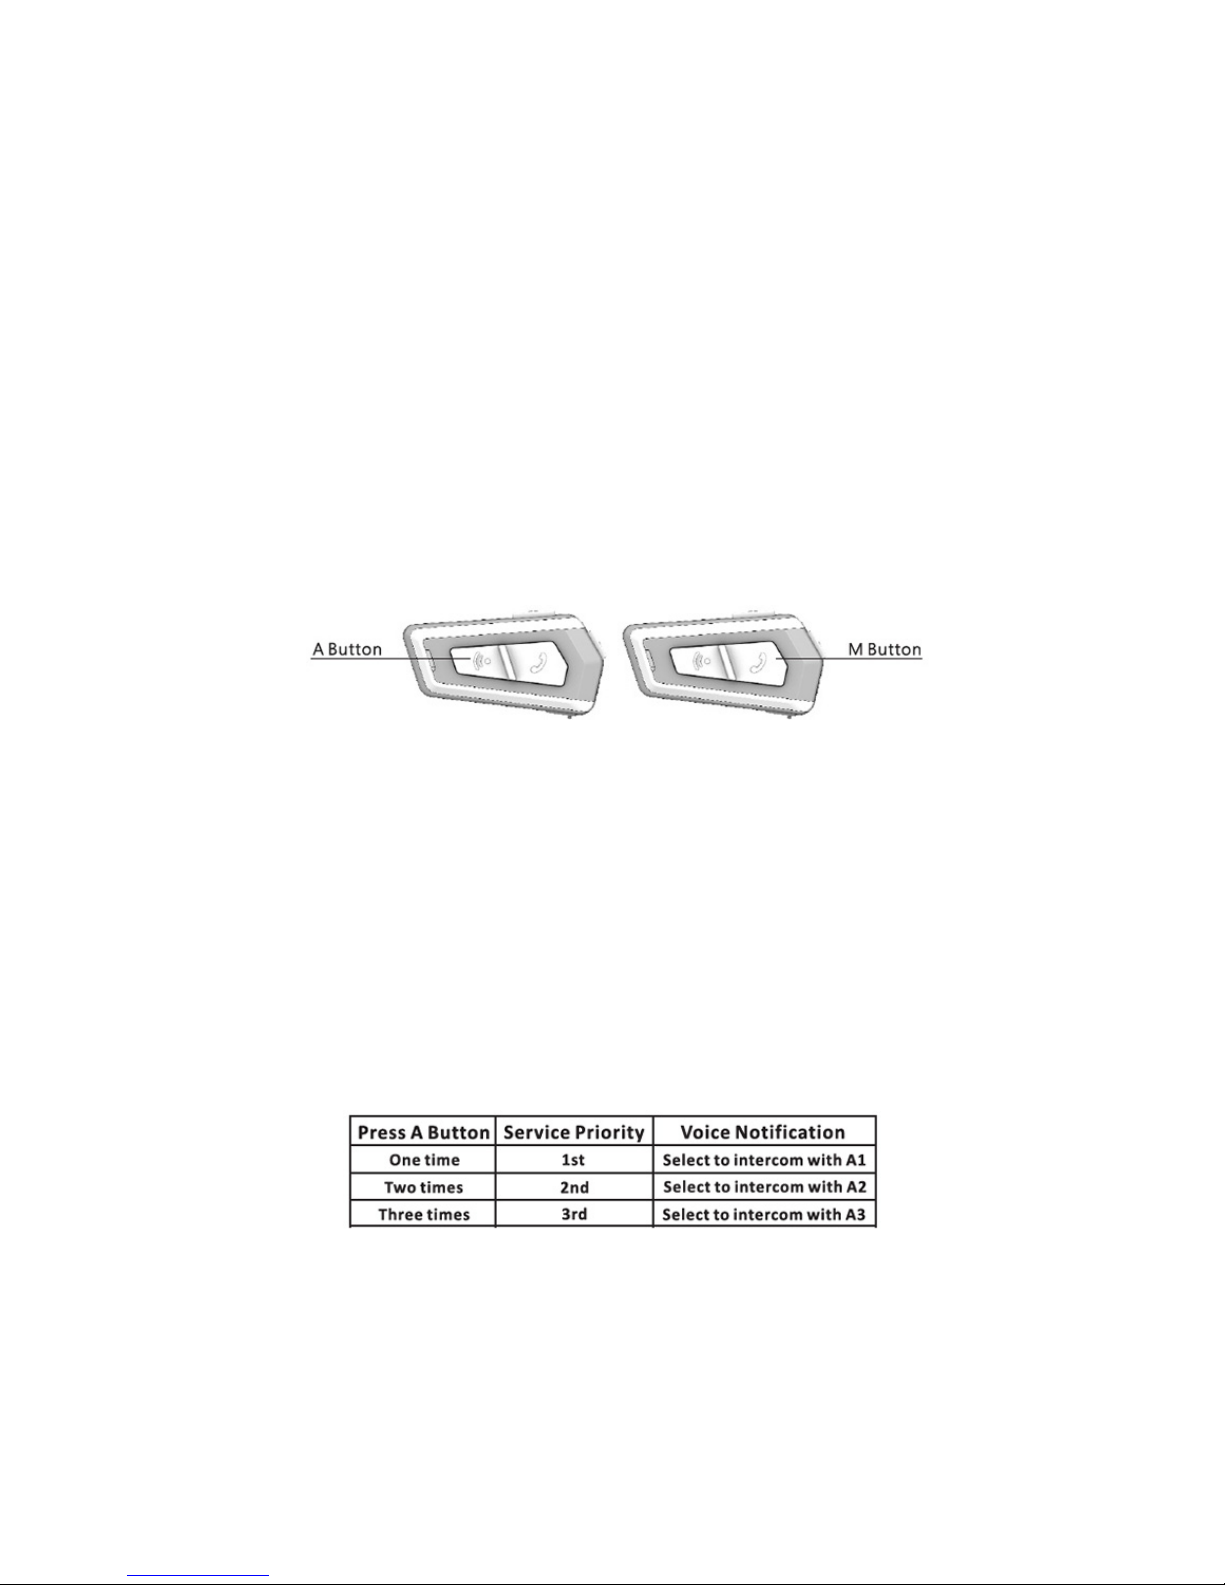
5.Headset Buttons /
A Button: To select intercom with A1, A2 and A3.
M Button: Mobile phone music play/ pause, last number redial, voice dialing and speed dial.
V+ Button: Next music and Volume up
V- Button: Previous music and Volume down
6.Power ON/OFF and Recharge /
Power ON: Press both A and M buttons simultaneously until LED stays blue and release both buttons.
Power OFF: Press A and M buttons simultaneously unit the LED stays red.
Recharge: Use Micro USB cable to recharge. During recharging, LED stays red. When fully charged, LED stas
blue. It takes 3 hours to fully charge the battery.
Note: 1. Mobile power bank could be used to recharge while the headset is in operation.
2. Always secure rubber Micro USB cover tightly for waterproof.
7.Volume Adjustment /
Volume UP: Press V+. Volume DOWN: Press V-.
7.1 When adjusting volume, a sound <dun-dun> can be heard. When reaching the maximum or minimum
volume, a <beep> tone can be heard. The volume adjustment settings are designed for various audio
sources and the settings will be kept even after the Bluetooth headset is powered off and powered on
again.
7.2 To adjust cell phone and headset volume, the cell phone function must be activated and
7.3 Volume Adjustment for “Voice Notification” and “Incoming Call Ring”
When the headsets enter into Pairing Mode, a sound <doo> can be heard. You can press
Volume UP or DOWN button to adjust the volume. When the pairing is completed, the volume adjustment

settings are also saved. Note: “Incoming Call Ring” of iPhone can't be set here.
8.Warranty Policy /
8.1 A 12-month warranty period for headset and a 3-month warranty period for accessory from date of
purchase are provided.
8.2 The product is shipped under strict quality control. In case of malfunction, the warranty applies only to the
headset. Costs incurred by accessories, parts, maintenance costs, and upgrades are not covered by the
warranty.
8.3 Please note that the warranty may not be applicable if the appearance of the headset shows a severe
damage or a crack.
8.4 In case repair is required during warranty, you must provide proof of purchase to confirm the date of
purchase. If you are unable to provide proof of purchase, the warranty period will be counted starting on
the product shipping date. Contact your local dealer or our company. Please note that the sending of the
product may not be accepted when you do not contact local deal or us in advance.
8.5 Please note that certain cost may still incur on rare occasions even within the warranty period.
9.G-Sensor Operation /
By tapping on the headset, G-Sensor is activated to trigger various functions. G-Sensor sensitivity level could
be adjusted by BK-T1 Tool Program downloaded from www.openroad.com.tw.

10.Pairing with Mobile Phone and GPS Navigation/
10.1 With BK-T1 switched on, press M button until LED flashes red/blue, or press M button and tap on the
headset one time (By activating G-Sensor), then the LED flashes red/blue to enter pairing mode.
10.2 Activate Bluetooth function in mobile phone to search for BK-T1. If the mobile phone asks for a password,
enter password <0000> (four zeros) to complete the connection. The LED flashes blue slowly to indicate a
successful pairing.
Note: 1. If the Bluetooth connection between the headset and the mobile phone is disconnected, press M
button one time will restore the connection.
2. BK-T1 is capable of connecting with 2 mobile phones or 2 Bluetooth devices at the same time.
10.3 Settings of Mobile Phone Answering Mode/
10.3.1 Manual Answering Mode
Press both M button and V- button at the same time for 8 seconds and a voice notification will confirm
that you are in <Manual Answering Mode>.
10.3.2 Automatic Answering Mode
Press both M button and V+ button at the same time for 8 seconds and a voice notification will confirm
that you are in <Automatic Answering Mode>.
Note: After BK-T1 is paired with a mobile phone, the default setting is Manual Answering Mode.
11.Mobile Phone and GPS Navigation Operation /
11.1 Mobile Phone Operation
11.1.1 In Manual Answering Mode, press M button or tap on the headset (G-Sensor) to answer an incoming
call.
11.1.2 In Automatic Answering Mode, the incoming call will be answered automatically after ringing for 8
seconds.
11.1.3 In Manual Answering Mode, press M button for 3 seconds to reject an incoming call or waiting for ring
to last for 16 seconds to automatically reject the incoming call.
11.1.4 Voice Dialing: Press the M button one time once and speak into headset microphone The Mobile phone
MUST provide voice dial function and iPhone Siri is supported too. Refer to mobile phone user's
manual.
11.1.5 Re-dial the last number: Press M button twice rapidly.
11.1.6 Speed Dial: Setting 3 Speed Dial Numbers in BK-T1 Tool Program and press M button 3 times to dial the
1st number, press M button 4 times to dial the 2nd number and press M button 5 times to dial the 3rd
number. BK-T1 Tool Program could be downloaded from www.openroad.com.tw.
11.2 Mobile Phone Music Playing (AVRCP)
Play/Pause: Press M button for 2 seconds and release. Or tap headset one time (G Sensor activating.)
Next: Press V+ button two times rapidly. Or tap headset 2 times (G Sensor activating.)
Previous: Press V- button two times rapidly. Or tap headset 3 times (G Sensor activating.)
11.3 Music Sharing
You can share the music or the mobile phone navigation APP instruction audio with intercom friend.
11.3.1 Connect to your friend for 1-to-1 intercom.
11.3.2 During intercom, press M button for 2 seconds and release.
11.3.3 The intercom will end and the music you are listening to will be shared with your friend.
11.3.4 To end music sharing, press V- button quickly for 3 times.
11.4 GPS Navigation
By pairing BK-T1 with a GPS Navigation device, you can hear navigation while riding. GPS Navigation
Setting is available in BK-T1 Tool Program.
12.Headset Pairing for Intercom /
12.1 With BK-T1 #1 (1st BK-T1) powered on and press A button until the LED flashes blue rapidly. Or Press
BK-T1 #1 A button and tap G-Sensor one time to make LED flash blue rapidly.
12.2 Press BK-T1 #2 M button until the LED flashes red/blue rapidly. Or Press BK-T1 #2 M button and tap
G-Sensor one time to make LED flash red/blue rapidly.
12.3 The two headsets begin to pair with each other and after the completion, a voice notification <Headset A
pairing completed.> and the LED flashes blue slowly.
13. Headset Intercom Operation (1 on 1) /
13.1 Make sure your BK-T1 had completed “Headset Pairing for Intercom”Each BK-T1 can memorize 3 other
paired headsets and these 3 headsets will have different service priorities. The latest paired one will have
the 1st service priority. For example, with 3 other headsets (A1, A2 and A3) already paired with a BK-T1, if
A1 is the latest paired one, so it has the 1st service priority. If A3 is the first paired one, then it has the 3rd
service priority.
13.2 Activate/ End Intercom
Press A button for 2 seconds to activate intercom.
Press A button for 2 seconds to end intercom.
13.3 In case of 3 other headsets are paired with BK-T1:
14.Group Intercom /
For BK-T1, Group Intercom is easy by chaining the 1 on 1 intercom. Refer to the figure illustrated below.
14.1 With headset A paired with B, B paired with A and C, and C paired with B and D, then A, B, C and D can
intercom all together.
14.2 Press A button of headset A to intercom with headset B.
14.3 Press A button of headset B to intercom with headset C. Now headset A can intercom with headset B and
headset C.

14.4 Press A button of headset C to intercom with headset D. Now all 4 headsets can intercom with each
other.
14.5 If there are more than 4 headsets, you can add more headsets one by one for group intercom.
15.Two Way Radio Operation /
15.1 To use a two way radio with BK-T1, please purchase the two way radio connection cable from authorized
dealers of BIKECOMM and connect it to BK-T1 and the two way radio correctly.
15.2 Listen to the two way radio
With BK-T1 connected to the two way radio, the audio from other two way radio can be heard all the
time. If there are other audio sources (Mobile phone call, music and intercom) connected to BK-T1, as
BK-T1 audio mixing function, you can hear these audio all together.
15.3 Talk to the two way radio
Press PTT button of the two way radio, you can use the BK-T1 microphone to talk.
Release the PTT button to end the talk. While in the state of mobile phone call, 1 on 1 intercom or group
intercom, pressing PTT to talk allows all other people to hear your voice.
16. Problem Solving /
16.1 Clean Pairing Data
With BK-T1 powered off, press V+ button and A button for 8 seconds to clean all pairing data and after
the completion, LED flashes red for 5 times.
16.2 BK-T1 Reset
If BK-T1 is not working normally or is entering into an unknown error state, press both V+ button and V-
button for 5 seconds to Reset and Power OFF the headset. Remember to power on BK-T1 again (by
pressing A button and M button at the same time.) to use headset functions. The reset operation will not
restore the default factory settings and all the user's settings will be kept the same as before.

FCC Notices
This device complies with Part 15 of the FCC Rules. Operation is subject to the following two
conditions: (1) this device may not cause harmful interference, and (2) this device must accept
any interference received, including interference that may cause undesired operation.
This equipment has been tested and found to comply with the limits for a Class B digital
device, pursuant to Part 15 of the FCC Rules. These limits are designed to provide reasonable
protection against harmful interference in a residential installation. This equipment generates,
uses and can radiate radio frequency energy and, if not installed and used in accordance with
the instructions, may cause harmful interference to radio communications. However, there is no
guarantee that interference will not occur in a particular installation. If this equipment does
cause harmful interference to radio or television reception, which can be determined by turning
the equipment off and on, the user is encouraged to try to correct the interference by one or
more of the following measures:
--Reorient or relocate the receiving antenna.
--Increase the separation between the equipment and receiver.
--Connect the equipment into an outlet on a circuit different from that to which the receiver is
connected.
--Consult the dealer or an experienced radio/TV technician for help.
CAUTION:
Any changes or modifications not expressly approved by the grantee of this device could void
the user's authority to operate the equipment.
RF exposure warning:
The equipment complies with FCC RF exposure limits set forth for an uncontrolled environment.
The equipment must not be co-located or operating in conjunction with any other antenna or
transmitter.
Table of contents
Other Bikecomm Headset manuals


