Bikecomm HOLA-F10 User manual

1
Owner's Manual
Bluetooth Helmet Headset
Hola-F10

2
Table of Contents
1. PACKAGE CONTENTS……………………………………………………………………….……2
2. SET UP YOUR OPENROAD HEADSET.......................................................................................3
P
OWER AND
LED
INDICATOR
__________________________________________________________3
A
BOUT
P
AIRING
____________________________________________________________________4
Why Pairing?..................................................................................................................................4
What Device Needs Pairing?..........................................................................................................4
How to Pair?...................................................................................................................................4
Pairing with Cell Phone .............................................................................................................................4
Pairing with GPS........................................................................................................................................5
Pairing with Another Headset.........................................................................................................6
Pairing steps................................................................................................................................................6
Pairing Examples.........................................................................................................................................8
3. USE YOUR OPENROAD HEADSET..............................................................................................9
V
OLUME
C
ONTROL
錯誤
錯誤錯誤
錯誤!
尚未定義書籤
尚未定義書籤尚未定義書籤
尚未定義書籤。
。。
。
USE CELL PHONE
___________________________________________________________________11
INTERCOM BETWEEN HEADSETS
(
A
)
VOICE
A
CTIVATION MODE
(
B
)
MANUAL ACTIVATION MODE
_______12
(a).Voice Activation Mode .........................................................................
錯誤
錯誤錯誤
錯誤
!
尚未定義書籤
尚未定義書籤尚未定義書籤
尚未定義書籤。
。。
。
(b).Manual Activation Mode......................................................................
錯誤
錯誤錯誤
錯誤
!
尚未定義書籤
尚未定義書籤尚未定義書籤
尚未定義書籤。
。。
。
U
SE
GPS 15
RESTORE MANUFACTURER
’
S SETTINGS
________________________________________________16
QUICK REFERENCE FOR OPERATION ...................................................錯誤! 尚未定義書籤。
SPECIFICATIONS...........................................................................................錯誤! 尚未定義書籤。
3
一
一一
一、
、、
、P
PP
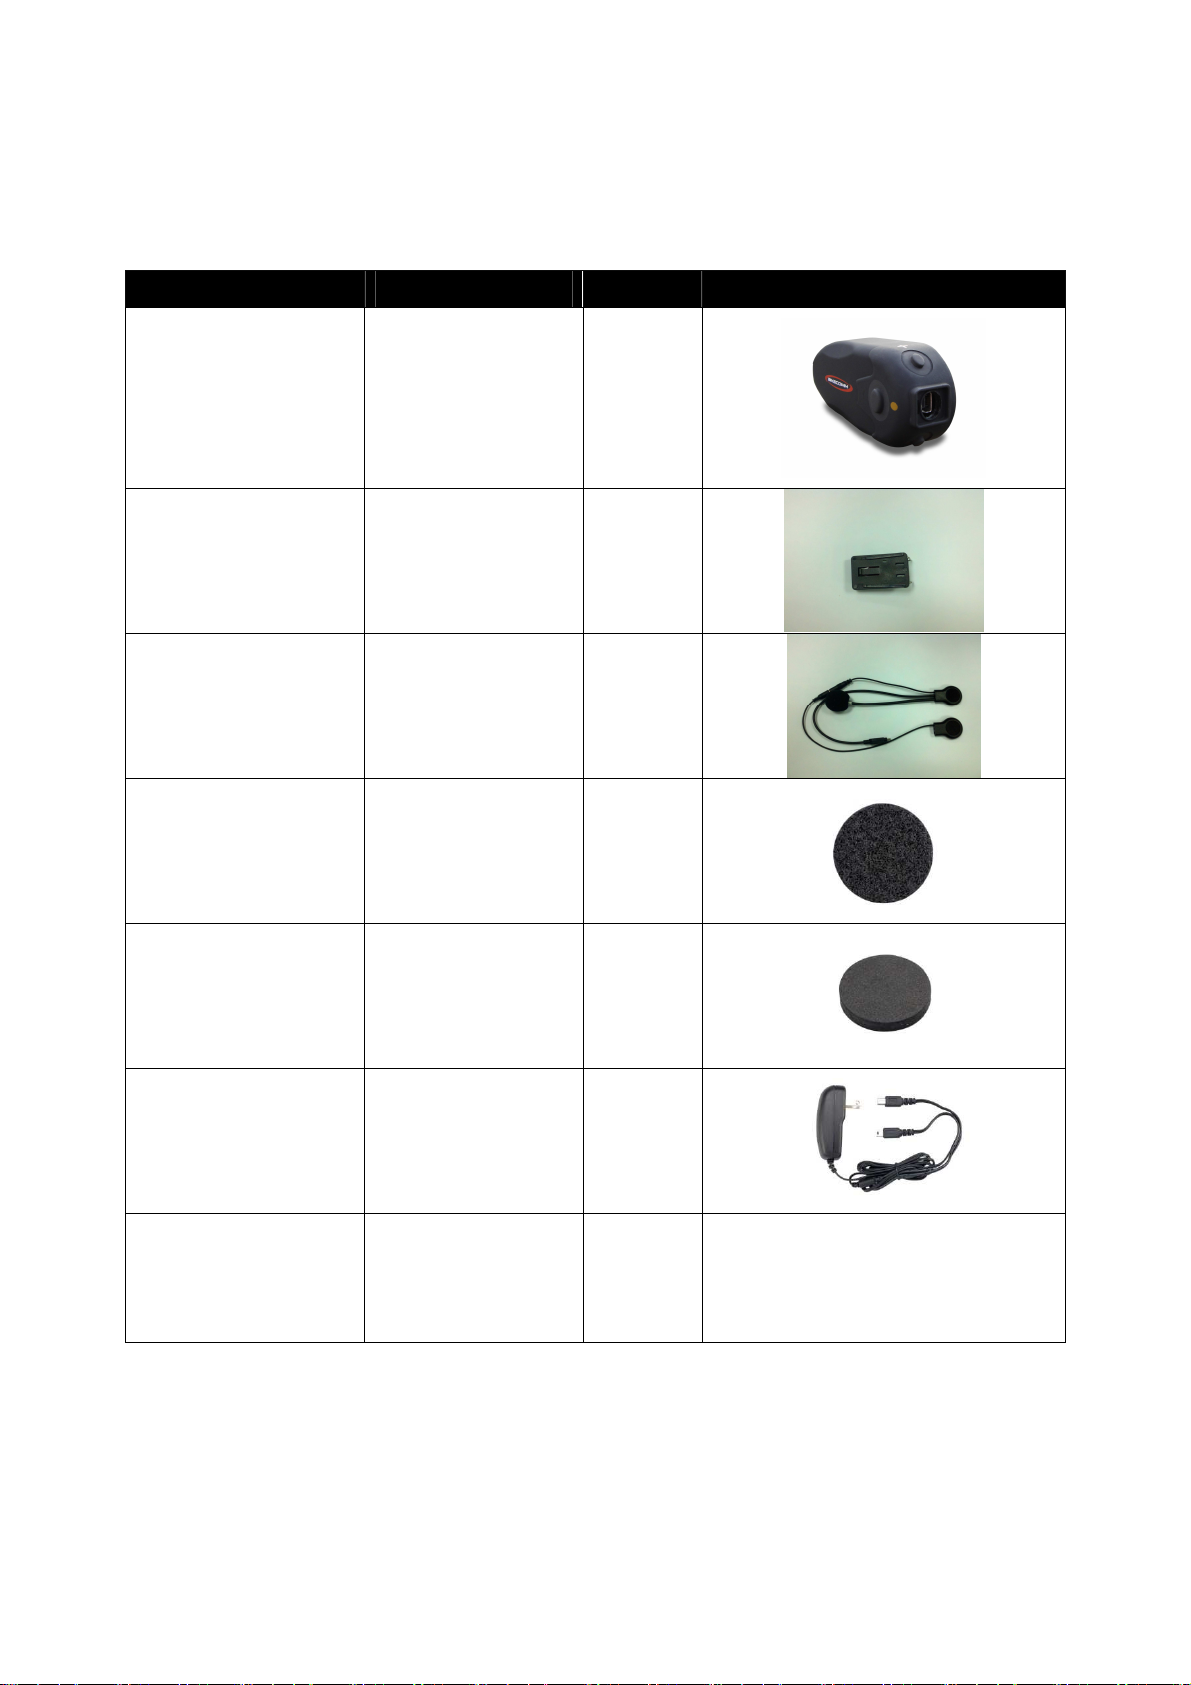
Package Conten
ackage Contenackage Conten
ackage Content
tt
ts
ss
s
組件
組件組件
組件 說明
說明說明
說明 數量
數量數量
數量 圖像
圖像圖像
圖像
OpenRoad Headset Core of the
OpenRoad System 1
Helmet Headset Clip Attaches to the
Helmet 1
Boom Microphone Adjustable
Microphone 1
Speaker Fastening
Dot(Hook and loop
fastener type)
For fastening the
Speakers
inside the helmet
2
Speaker Ear Pocket
Spacer Dot
For adjusting the
Speaker space
inside the helmet 4
Power Supply Unit For charging the
Helmet Headsets 1
User Guide User Guide 1
4
2. Set Up Your OpenRoad Headset
The three main functions of OpenRoad headset are (1) calling/answering cell
phone, (2) receiving audios (music, and/or GPS instruction) from other
wireless devices, and (3) intercom with other OpenRoad headsets. Each
button of the OpenRoad headset is designed for multiple function settings, and
the following section will guide you through in setting up your OpenRoad
headset.
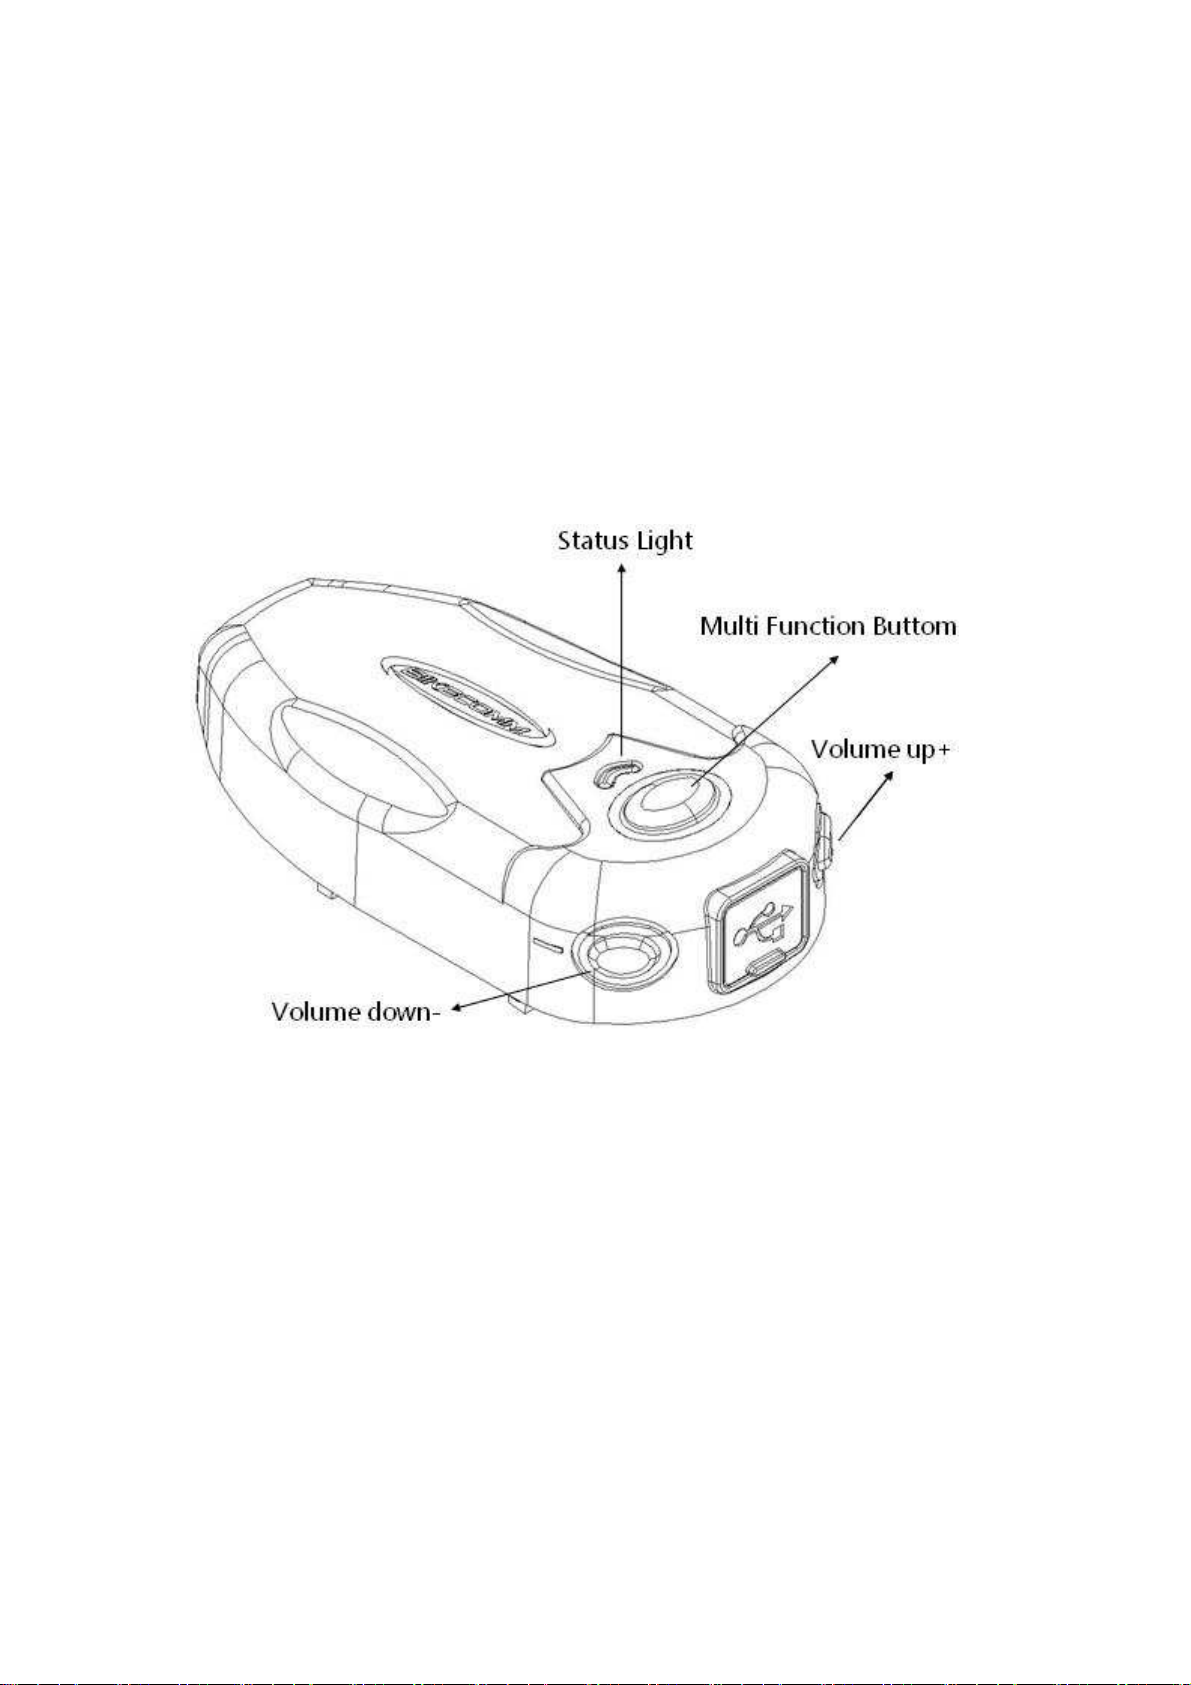
Power and LED Indicator:
1. Power ON: Press[MFB] button until the LED turns blue.
Power OFF: Press [MFB] button until the LED turns red.
2. Recharge: During recharging, the LED remains red. When finishing
recharging, the LED light is off. It takes about 2.5 hours to fully recharge the
battery.
3. Low Battery Warning: when the battery is low, you can hear three <beep>
sounds, i.e.,<beep,beep,beep> as a reminder.

5
About Pairing
Why Pairing?
The OpenRoad headset is based on Bluetooth Protocol for wireless
connections and communication. Bluetooth Protocol requires any two
Bluetooth devices to be “paired” before any communication can takes place
between them. Once paired, turning on and off any Bluetooth device will
not affect the pairing. In other words, after the pairing correctly executed, a
Bluetooth device will automatically reconnect to the originally paired device
when it is powered on.
What Device Needs Pairing?
To use the OpenRoad headset with a cell phone, GPS, MP3, another
OpenRoad headset, or other Bluetooth devices, a pairing process must
be executed for the OpenRoad headset and each device respectively.
How to Pair:
Pairing with Cell Phone:
(1) When the OpenRoad headset is in OFF state, press the [MFB] on the
OpenRoad headset for about 8 seconds until the LED flashes
red/blue alternatingly.
(2) Activate the Bluetooth function on cell phone to search for the
OpenRoad headset to connect.
(3) Input password <0000> to complete connection. The LED flashes blue
slowly to indicate successful pairing.
(4) At this point, you can set the answering mode of the cell phone as (a)
voice answer, or (b) automatic answer.

6
(a) Voice Answer: Press [V+] for about 7 seconds until the LED turns
green.
(b) Automatic answer: Press [V-] for about 7 seconds until the LED
turns green.
Pairing with GPS:
**The GPS must support simultaneous connections to Headset and
cell phone. (Ex. Garmin Zumo 550, 660 Model, for any specific GPS
model, please consult your GPS user’s manual for details.)
(1). On GPS, search for cell phone and connect to cell phone.
(2). When the OpenRoad headset is in OFF state, press the [MFB] on the
OpenRoad headset for about 6 seconds until the LED flashes
red/blue alternatingly.
(3). Activate GPS Bluetooth and search for the OpenRoad headset.
(4). Input password <0000> to complete connection. The LED flashes
blue slowly to indicate successful pairing.
** For those GPS models not supporting simultaneous connections
to headset and cell phone (consult your GPS user’s manual for
details), you could only choose to connect your OpenRoad headset
to either cell phone or GPS, but not both.
(1). When the OpenRoad headset is in OFF state, press the [MFB] on the
OpenRoad headset for about 6 seconds until the LED flashes red/blue
alternatingly.
(2). Activate GPS Bluetooth and search for the OpenRoad headset.
(3). Input password <0000> to complete connection. The LED flashes
blue slowly to indicate successful pairing.

7
Pairing with Another OpenRoad Headset:
The OpenRoad headset can also be paired with up-to 3 other OpenRoad
headsets for intercom.
(1).To pair two OpenRoad headsets (e.g., A and B), the following operations
must be performed on both A and B, respectively.
(2).When the OpenRoad headset is in OFF state, press the [MFB] on the
OpenRoad headsets (A, B) simultaneously for about 6 seconds until the
LED flashes red/blue alternatingly to enter the “pairing” state.
(3).For pairing between A headset and B headset, you can choose any of
[MFB], [V+] or [V-] on A headset to pair with B headset. Likewise, you
could also choose any of [MFB], [V+] or [V-] on B headset to pair with A
headset. The button you choose to set the pairing is also the button that
you later to use to activate the intercom with that headset.
(a) Choose [MFB] for pairing: Press [MFB] on A headset so that the LED
on A headset will flash faster until the LED lights on both A head and
B headset display blue to indicate successful pairing. (At this point,
you have successfully pair the [MFB] on A head to B headset.)
(b) Choose [V+] for pairing: Press [V+] on A headset for about 3 seconds
until the LED light on A headset changes ( red/blue/green alternating
for about 5 seconds, and then red/blue alternating.). Then, press
[MFB] on A headset again so that the LED on A headset flashes
faster until the LED lights on both A head and B headset display blue

8
to indicate successful pairing. (At this point, you have successfully
pair the [V+] on A head to B headset.)
**NOTE: For the headset in the “pairing” state, the default [MFB] will
be used as the pairing button if you do not choose otherwise. For
example, when both A headset and B headset are in the “pairing”
state, if you choose [V+] on A headset and do not make any choice
on B headset, the [MFB] on B headset will be the default for the
pairing. In other words, [MFB] on B headset will be paired with A
headset, and [V+] on A headset will be paired with B headset.
(c) Choose [V-] for pairing: Press [V-] on A headset for about 3 seconds
until the LED light on A headset changes ( red/blue/green alternating
for about 5 seconds, and then red/blue alternating.). Then, press
[MFB] on A headset again so that the LED on A headset flashes
faster until the LED lights on both A head and B headset display blue
to indicate successful pairing. (At this point, you have successfully
pair the [V-] on A head to B headset.)
(4). You can use [MFB], [V+], and [V-] to pair with different OpenRoad
headset, respectively.
(5). The pairing between OpenRoad headsets is not necessary to be
symmetrical. For example, A head can use [MFB] to pair with B headset,
but B headset can use [V+] to pair with A headset and use [MFB] to pair
with C headset.

9
(6) Each button can only remember the pairing with one OpenRoad headset.
When you use the same button to pair with a different OpenRoad
headset, the previous pairing will be replaced.
Pairing Example:
Although there is no priority exists among the [MFB], [V+] and [V-] buttons
on the OpenRoad headset, it is suggested to pair the [MFB] button to the
OpenRoad headset as you most often in contact because the location and the
size of the [MFB] is more prominent and easy to access. For example, to pair
up A, B, C and D headsets, wherein A head and B headset are most often in
contact, while C headset and D headset are most often in contact with each
other, the following choice of buttons for pairing can be used:
Alternatively, if A headset most often speaks to B headset, B headset
often speaks to C headset, C headset often speaks to D headset and D
headset often speaks to A headset (forming a cyclic loop), then the choice of
buttons for pairing in the following table is suggested:

10
4. Use Your OpenRoad Headset
Volume Control
It is advisable that you should complete the volume control settings prior
to your ride. In case you should need to adjust volume during the ride, extreme
caution must be taken to ensure safety.
The [V+] and [V-] buttons on OpenRoad headset are for volume control.
When the volume is adjusted to the highest or lowest level, you could hear a
<beep> sound to remind you.
To adjust the volume of any function of any device connected to the
OpenRoad headset, the function of that device must be turned on. For
example, to adjust the “talk” volume of the cell phone, the cell phone must be
in ”talk” mode. Similarly, to adjust the “music” volume on the cell phone, the
cell phone must be in “music” playing mode. Each volume must be individually
controlled. The adjustment of one volume will not affect the volume of another
function.
**NOTE: when adjusting music volume on cell phone, excessively fast
press to the cell phone may switch the cell phone into the AVRCP function.

11
(1) Automatic volume increase function:
The automatic volume increase capability of the OpenRoad headset
will automatically increase the volume of the headset when the
environmental noise level is high, and automatically resume to original
volume setting when the environmental noise level is lowered.
(2) Voice Control Feature:
The Open Road headset provides voice control to both answering cell
phone and activating intercom with another headset. The voice
activation (VOX) level can be adjusted according to your travel speed
and the environment noise level so that the microphone will not turn on
unexpectedly because of the noise of high wind speed.
Use Your Cell Phone
When you have an incoming call, you could use one of the following options to
answer or reject the incoming call:
(1). Press [MFB] to answer the incoming call.
(2). Use VOX to answer the incoming call, by speaking into microphone
directly, for example, “hello.”
**NOTE: The Voice Answer for cell phone and the Voice Activation (VOX)
for intercom with another headset are independent of each other. The
setting of Voice Answer to answer incoming call is different from the
setting of VOX. (Please refer to: OpenRoad Headset Voice Activation
(VOX)).

12
(3). Use automatic answering, by setting the automatic answering function,
the phone will be automatically answer after 5 second of ringing.
(4). Reject the incoming call, by press [MFB] for about 3 seconds.
(5). Voice Dial: press [MFB] once and speak into microphone (the cell phone
MUST provide voice dial function).
(6). If your cell phone supports AVRCP function (consult your cell phone
user’s manual), you can play music directly:
(a). Play/Pause: Press [MFB] twice.
(b). Previous: Press [V-] twice.
(c). Next: Press [V+] twice.
Intercom with Another Headset:
(VOX vs. Manual Activation)
Voice Activation (VOX) Mode
You can use voice activation (VOX) to activate your OpenRoad headset
for an intercom with another headset. However, the first intercom between two
headsets after the successful pairing can only be activated manually. During
the intercom, any silence lasts more than 10 seconds will automatically end
the intercom connection. To initiate the intercom again, you can speak into the
microphone directly (VOX), and then you will hear <do><dodo> sound to
indicate the successful inte4rcom connection.
The memory in the OpenRoad headset automatically remembers the last
headset the OpenRoad headset had initiated the intercom connection with.
Hence, the next VOX will automatically establish intercom connection with the
last remembered headset.

13
** Manual Activation of Intercom: Press [MFB], [V+] or [V-] button
(whichever headset you pair with), until you hear a <do> sound. Release the
button and you will hear a <dodo> sound to indicate the successful intercom
connection.
** NOTE: The Voice Answer for cell phone and the Voice Activation (VOX)
for intercom with another headset are independent of each other. The setting
of Voice Answer to answer incoming call is different from the setting of VOX.
(Please refer to: Voice Answer for cell phone).
Scenario 1: After manually activating A headset to intercom with B headset,
the next time A headset is voice-activated, A head will automatically connect to
B headset.
Scenario 2: After manually activating A headset to B headset, if you want to
intercom with C headset, you MUST manually activate A headset for intercom
connection with C headset. Also, the next time, you voice activate A headset
for intercom connection, A head will be connected to C headset, instead of B
headset.
Scenario 3: After manually activating A headset to B headset, you receive
an intercom connection from C headset. The next time, you voice activate A
headset for intercom connection, A head will be connected to B headset,
instead of C headset.
VOX Level: The OpenRoad headset provides four volume levels for setting
the voice volume required to activate the intercom connection. You could
adjust the required voice volume according to your needs. Level 1 means
that the VOX has a lower activation threshold, i.e., you could use a lower
voice volume to activate the headset intercom connection. The higher the
level is, the higher the voice volume is required to activate the intercom
connection. The indicate speed is only for reference, and the application
depends on the actual environmental noise level and the wind speed.
VOX Level Control: When the OpenRoad headset is ON (but without any
voice signals transmitted), press [V+] or [V-] twice to raise or lower the

14
voice level. Different voice signals will be provided to indicate the
transition from a level to a different level. The following gives the details:
Level 1(default):
Description: a short <do> sound can be heard when moving from Level 1 to
Level 2
Note: if your intercom will activated unexpected by the wind, you should adjust
to a higher level.
Level 2:
Description: a short <do> sound can be heard when moving from Level 2 to
Level 3,and a long <doobeep> can be heard when moving from Level 2
to Level 1.
Level 3:
Description: a short <do> followed by two long <doodoo> sound (i.e.,
<do><doodoo>) can be heard when moving from Level 3 to Level 4,and
a long <doo> can be heard when moving from Level 3 to Level 2.
Level 4:
Description: music can be heard when moving from Level 4 to Level 5,and a
long <doo> can be heard when moving from Level 4 to Level 3.
Level 5: (Manual activation mode)
Description: At Level 5, it means you are in Manual activation Mode. A
long <doo> followed by two long <doodoo> sound (i.e.,
<doo><doodoo>) can be heard when moving from Level 5 to Level 4
to indicate that you have moved from manual activation mode back to
VOX mode.
Manual Activation Mode
Manual Activation Mode: Press [V+] twice to adjust the OpenRoad Headset
to Level 5.

15
(1). If you need to stay in intercom connection for a long period of time, it
is suggested that you set both your headset and your target headset to
Level 5 (i.e., Manual Activation Mode). In manual activation mode, the
function to automatically end an intercom connection when detecting
10-second silence will be disabled. In manual activation mode, you must
manually terminate an intercom connection.
(2). During an intercom connection, any incoming call (cell phone) to one
of the two headsets will automatically end the intercom connection. The
headset without the incoming call will resume the state prior to the
intercom connection, until the headset with the incoming call terminate or
reject the call, and then the intercom connection resumes.
Use Your GPS
If you have paired your OpenRoad headset with GPS, you could hear the
voice instruction from the GPS through the headset. If you are on an intercom
with another headset when the GPS voice instruction comes in, you can hear
<dodo> through your OpenRoad headset to indicate the incoming GPS
instructions. If you want to listen to the voice instruction from GPS, you can
press [MFB] to end the intercom and the GPS voice instruction will
immediately pass to your OpenRoad headset.
During the GPS voice instruction, you cannot activate the intercom. You
must wait until the GPS voice instruction is over before you can activate the
intercom.

16
Reset to Manufacturer’s Settings
To reset the OpenRoad headset to the original manufacture’s default
settings, you can press [MFB] and [V+] simultaneously for about 7 seconds
until the LED turns red when the OpenRoad headset in the OFF state. Caution:
with this operation, all your previous settings will be lost.
Quick Reference for Operations
FUNCTION BUTTON
INSTRCUTION
Power ON Press [MFB] until LED turns blue
Power OFF Press [MFB] until LED turns red
Pairing
Press [MFB] for about 6 seconds until LED flashes red/blue alternatingly
Volume Up Press [V+]
Volume Down Press [V-]
VOX Level Up Press [V+] twice
VOX Level Down Press [V-] twice
Set Automatic Answer Press [V-] for about 7 seconds until LED turns green
Set Voice Answer Press [V+] for about 7 seconds until LED turns green
CELL PHONE TALK
Answer incoming call Press [MFB]
Automatic Answer Automatic answer after ringing for 5 seconds
Voice Answer Speak into microphone directly, e.g., “Hello.”
End a call Press [MFB]
Reject a call Press [MFB] for about 3 seconds
Voice dial Press [MFB], and speak into microphone
INTERCOM WITH A HEADSET
Manual Activation
Press [MFB] until hearing <do> and release the [MFB].
Then, a <dodo> sound is heard to indicate successfully
establishing the intercom
Voice Activation (VOX)
Speak into microphone until hearing <do><dodo> to
indicate successfully establishing the intercom
End Intercom Stay silence for about 10 seconds or press [MFB]
MUSIC

17
Play Press [MFB] twice
Pause Press [MFB] twice
Previous Song Press [V-] twice
Next Song Press [V+] twice
SPECIFICATIONS
SPECIFICATIONSSPECIFICATIONS
SPECIFICATIONS
OpenRoad HEADSET
Dimensions 78mm*40mm*17mm
Weight 100g
Bluetooth Bluretooth Version:2.1
Bluetooth Profile A2DP/HSP/AVRCP/HFP
Power
Power Supply Type Input:100-240V,Output:5V
Charging Time 2.5 hours
Charging Interface Mini USB
Battery 720mAh
Talk Time 14 hours
Operating Temperature -10°C - 50°C
FCC ID WTU28658913000002
Certification CE-FCC-BQB

18
Federal Communication Commission Interference Statement
This equipment has been tested and found to comply with the limits for a Class
B digital device, pursuant to Part 15 of the FCC Rules. These limits are
designed to provide reasonable protection against harmful interference in a
residential installation. This equipment generates, uses and can radiate radio
frequency energy and, if not installed and used in accordance with the
instructions, may cause harmful interference to radio communications.
However, there is no guarantee that interference will not occur in a particular
installation. If this equipment does cause harmful interference to radio or
television reception, which can be determined by turning the equipment off and
on, the user is encouraged to try to correct the interference by one of the
following measures:
- Reorient or relocate the receiving antenna.
- Increase the separation between the equipment and receiver.
- Connect the equipment into an outlet on a circuit different from that
to which the receiver is connected.
- Consult the dealer or an experienced radio/TV technician for help.
FCC Caution: Any changes or modifications not expressly approved by the
party responsible for compliance could void the user's authority to operate this
equipment.
This device complies with Part 15 of the FCC Rules. Operation is subject to the
following two conditions: (1) This device may not cause harmful interference,
and (2) this device must accept any interference received, including
interference that may cause undesired operation.
IMPORTANT NOTE:
Radiation Exposure Statement:
The product comply with the US/Canada portable RF exposure limit set forth
for an uncontrolled environment and are safe for intended operation as
described in this manual. The further RF exposure reduction can be achieved
if the product can be kept as far as possible from the user body or set the
device to lower output power if such function is available.
This transmitter must not be co-located or operating in conjunction with any
other antenna or transmitter.

19
Industry Canada statement:
This device complies with RSS-210 of the Industry Canada Rules. Operation is
subject to the following two conditions: (1) This device may not cause harmful
interference, and (2) this device must accept any interference received, including
interference that may cause undesired operation.
Ce dispositif est conforme à la norme CNR-210 d'Industrie Canada applicable aux
appareils radio exempts de licence. Son fonctionnement est sujet aux deux
conditions suivantes: (1) le dispositif ne doit pas produire de brouillage préjudiciable,
et (2) ce dispositif doit accepter tout brouillage reçu, y compris un brouillage
susceptible de provoquer un fonctionnement indésirable.
IMPORTANT NOTE:
IMPORTANT NOTE:IMPORTANT NOTE:
IMPORTANT NOTE:
Radiation Exposure Statemen
Radiation Exposure StatemenRadiation Exposure Statemen
Radiation Exposure Statement:
t:t:
t:
The product comply with the US/Canada portable RF exposure limit set forth for an
uncontrolled environment and are safe for intended operation as described in this
manual. The further RF exposure reduction can be achieved if the product can be
kept as far as possible from the user body or set the device to lower output power if
such function is available.
NOTE IMPORTANTE:
Déclaration d'exposition aux radiations:
Le produit est conforme aux limites d'exposition pour les appareils portables RF
pour les Etats-Unis et le Canada établies pour un environnement non contrôlé.
Le produit est sûr pour un fonctionnement tel que décrit dans ce manuel. La
réduction aux expositions RF peut être augmentée si l'appareil peut être conservé
aussi loin que possible du corps de l'utilisateur ou que le dispositif est réglé sur la
puissance de sortie la plus faible si une telle fonction est disponible.
Table of contents
Other Bikecomm Headset manuals


