BIKND JETPACK User manual

JETPACK
SAC DE TRANSPORT POUR VÉLO / BIKE CASE
BIKND.COM
GARANTIE BIKND
BIKND WARRANTY
DÉCHARGE
DISCLAIMER
Version J01
US Pat #8196740b2
Can Pat #2680357
Les produits BIKND sont garantis auprès du propriétaire d’origine contre tout défaut de matériel et de
fabrication durant un an à partir de la date d’achat. Pour obtenir plus de détails sur la politique de garantie,
consultez notre site web à l’adresse www.biknd.com.
BIKND products are warranted to the original owner against defects in materials and workmanship for
, please visit our
website at www.biknd.com.
En raison du caractère imprévisible du traitement des bagages, BIKND n’est pas responsable des
dommages que pourraient subir votre vélo ou votre sac de transport pour vélo durant le voyage. Pour
minimiser les risques, nous vous recommandons de bien suivre les instructions de mise en sac.
Due to the unpredictable nature of luggage handling, BIKND is not accountable for dammage to your bike or
bike case during travel. To avoid damage, we strongly recommend following the packing instructions.
Si vous avez des questions, vous pouvez consulter la FAQ dédiée au JETPACK sur notre site internet

FIXATION D’AXES + ADAPTATEURS / AXLES FASTENINGS + ADAPTERS
GOUPILLES / PINS
ALLEN KEYS / CLÉS ALLEN
x4
x2
x2
x2
x2
x2
x4
ACCESSOIRES INCLUS / INCLUDED ACCESSORIES
COUSSINS D’AIR / AIR CUSHIONS
PROTECTION DE CADRE / FRAME PAD
x2
Pédale de droite
Right pedal
Pédale de gauche
Left pedal
ETAPE 8
ÉTAPE 1 / STEP 1
ÉTAPE 2 / STEP 2
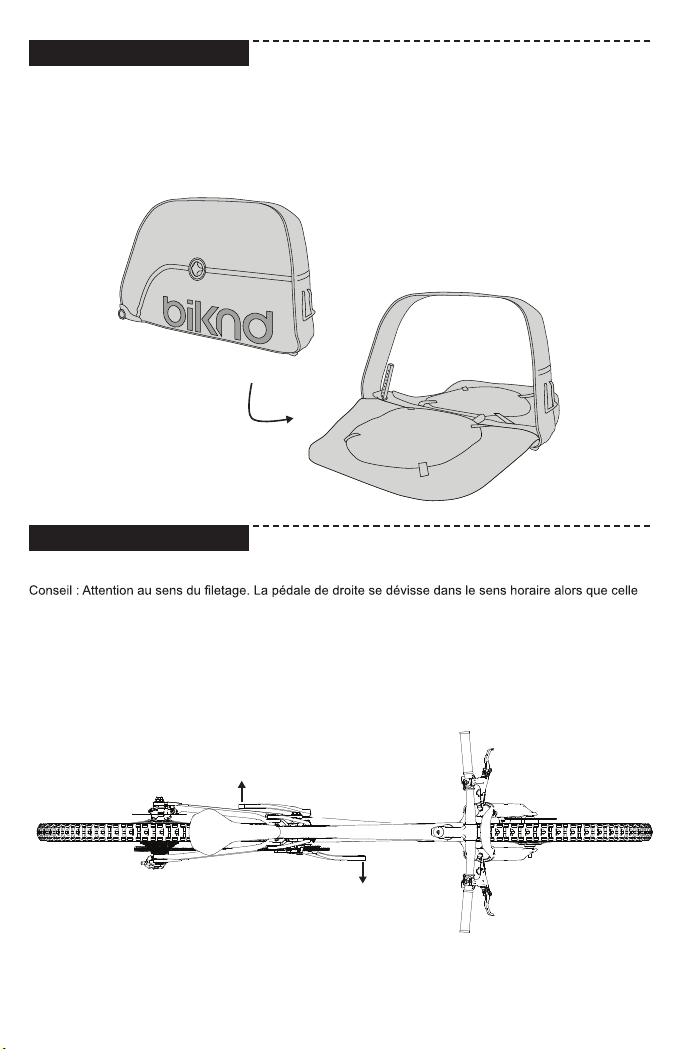
DÉPLOYER LE SAC JETPACK. / UNZIP AND UNFOLD YOUR JETPACK BIKE CASE.
DÉMONTEZ LES PÉDALES. / REMOVE PEDALS.
Pour commencer, déployez complètement le sac Jetpack. Assurez-vous d’avoir en main les outils
nécessaires pour descendre la selle et retirer les pédales, le dérailleur arrière et le guidon.
de gauche se dévisse dans le sens antihoraire.
First, unzip your Jetpack bike case and fully unfold it. Make sure you have all the tools you will need to
lower your seatpost and remove your pedals, handlebar, and rear derailleur.
Tip : The pedal on the right side unscrews in the clockwise direction, while the left pedal unscrews
counterclockwise.

Gonfler les sacs
ETAPE 8
Gonfler les sacs
ETAPE 8
ÉTAPE 3 / STEP 3
ÉTAPE 4 / STEP 4
RETIRER LE DÉRAILLEUR ARRIÈRE. / REMOVE REAR DERAILLEUR.
RETIREZ LES ROUES DU VÉLO. / REMOVE WHEELS.

Gonfler les sacs
ETAPE 8
ÉTAPE 5 / STEP 5
ÉTAPE 6 / STEP 6
RETIREZ LE GUIDON ET DESCENDRE LA SELLE. / REMOVE THE HANDLEBAR AND LOWER THE
SEATPOST.
Conseil : Marquez la tige de selle avant de la descendre.
Tip : Mark the seat height on your seatpost before lowering it.
INSTALLEZ LA HOUSSE DE PROTECTION DE CADRE ET ATTACHER LE GUIDON. / INSTALL THE
FRAME PAD AND STRAP THE HANDLEBAR DOWN.
droite selon la disposition des câbles.
On the frame pad, the velcro straps can be set on right or left side according to the wires.

Gonfler les sacs
Gonfler les sacs
ETAPE 8
INSTALLEZ LES SACS GONFLABLES. / INSTALL AIR CUSHIONS.
Place the air cushions on each side of the bag between the side of the bag and the foam protector. Then
wrap the air cushions with dedicated covers. Pass the covers by the middle of the air cushions.
Gonfler les sacs
GONFLEZ LES COUSSINS D’AIR. / INFLATE AIR CUSHIONS.
le bouchon de la valve
ÉTAPE 7 / STEP 7
ÉTAPE 8 / STEP 8

Gonfler les sacs
ETAPE 8
Gonfler les sacs
ETAPE 8
ÉTAPE 9 / STEP 9
RANGEZ LES ROUES DANS LE SAC. / STOW THE WHEELS.
1.
2.
3.
4.
Retirez les blocages rapides des axes si vous en avez. 1. Installez les roues de chaque côté du sac entre
coussin d’air. 3. Fixez les roues à l’aide des hubcaps et des courroies de velcro. 4. Rattachez chaque
protection de mousse à la paroi du sac à l’aide des velcros.
Remove your wheel axle quick release if necessary. 1. Put the wheels on each side of the bag between
the air cushion and the foam protector. 2.The cassette of the rear wheel must be placed on the bottom. 3.
Fasten the wheels with hubcaps and velcro straps. 4.Fasten the foam protectors to the bag sides with velcro
straps.

ÉTAPE 10 / STEP 10
ÉTAPE 11 / STEP 11
MONTEZ LE TUBE CARRÉ. / MOUNT THE SQUARE TUBE.
ASSEMBLEZ LES FIXATIONS D’AXES DE ROUES ET LES ADAPTATEURS. / ASSEMBLE WHEELS
AXLES FASTENINGS AND ADAPTERS.
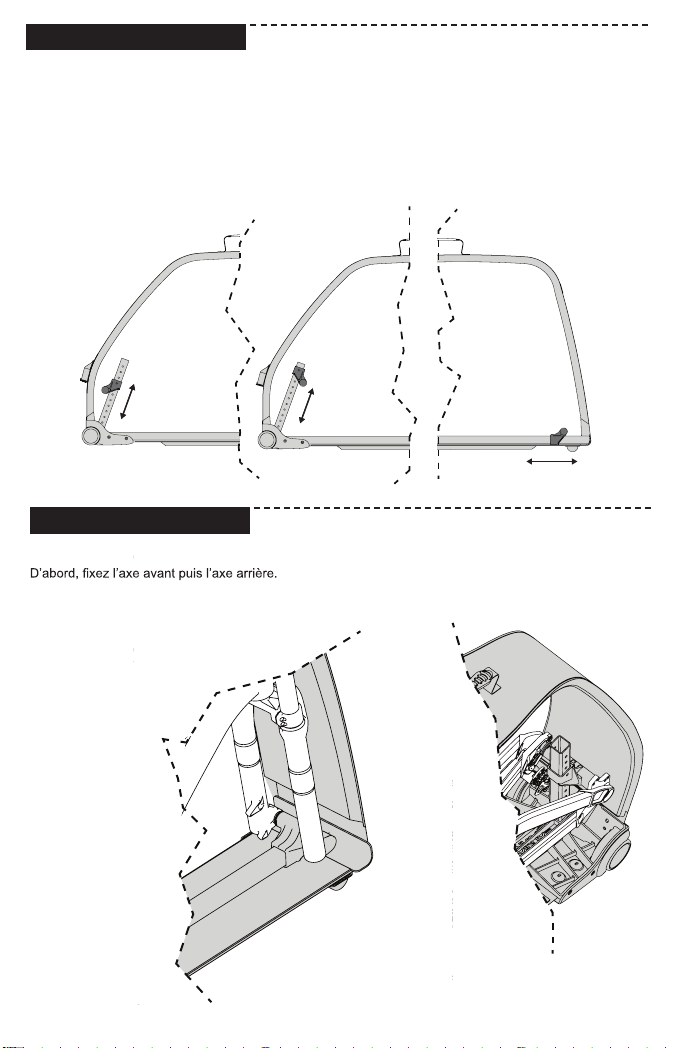
Placez le tube carré support d’axe arrière dans le logement pratiqué à l’extrémité de la barre horizontale.
Verrouillez l’assemblage avec une goupille. Le support d’axe arrière coulisse sur le tube et sa position sera
bloquée par l’autre goupille.
x4
9/10 mm
12 mm
15 mm
20 mm
spacers
x2
x2
x2
x4
The
rear wheel axle fastening slides on the square tube and its position will be locked by the other pin.
Mount adapters (and spacers if necessary) on fastenings according to your wheels axles.

Axe de roue avant / Front wheel axle
Assemblage pour axe / Assembly for axle
9-10mm x 100mm
Assemblage pour axe / Assembly for axle
15mm x 100mm
Assemblage pour axe / Assembly for axle
20mm x 110mm
Axe de roue arrière/ Rear wheel axle
Assemblage pour axe / Assembly for axle
9-10mm x 130mm
Assemblage pour axe / Assembly for axle
9-10mm x 135mm
Assemblage pour axe / Assembly for axle
12mm x 142mm
Assemblage pour axe / Assembly for axle
12mm x 150mm
adapter 12mm x2
adapter 9-10mm x2
spacers x2
adapter 9-10mm x2
adapter 12mm x2
spacers x4
adapter 9-10mm x2
adapter 15mm x2
adapter 20mm x2
Road
MTB
ÉTAPE 12 / STEP 12
ASSEMBLEZ LES FIXATIONS D’AXES DE ROUES ET LES ADAPTATEURS. / ASSEMBLE WHEELS
AXLES FASTENINGS AND ADAPTERS.
Mount adapters (and spacers if necessary) on fastenings according to your wheels axles.
ÉTAPE 13 / STEP 13
ÉTAPE 14 / STEP 14
RÉGLEZ LES POSITIONS DES AXES. / ADJUST THE AXLES POSITION.
VÉLO DE MONTAGNE.
/ MOUNTAIN BIKE.
VÉLO DE ROUTE.
/ ROAD BIKE.
1.
2.
INSTALLEZ LE VÉLO DANS LE SAC. / INSTALL THE BIKE IN THE CASE.
La hauteur de l’axe arrière peut être ajustée selon les dimensions du vélo. La position de l’axe avant dépen-
dra de la longueur du vélo. Conseil : On ajustera la hauteur de l’axe arrière lorsque le vélo sera installé. On
utilisera la deuxième goupille pour verrouiller le support d’axe arrière.
You can adjust the height of the rear wheel axle according to the bike dimensions. The position of the front
wheel axle will depend of the wheelbase of the bike. Tip : Adjust the height of the rear wheel axle when the
bike is mounted on the axles fastenings. Then use the second pin to lock the rear wheel axle fastening.
First mount the front wheel axle, then the rear wheel axle.
ÉTAPE 15 / STEP 15
BON VOYAGE / HAVE A NICE TRIP
ÉTAPE 16 / STEP 16
AJUSTEZ LA POSITION DU VÉLO. / ADJUST THE BIKE POSITION.
REFERMEZ LE SAC DE TRANSPORT POUR VÉLO. / CLOSE THE BIKE CASE.
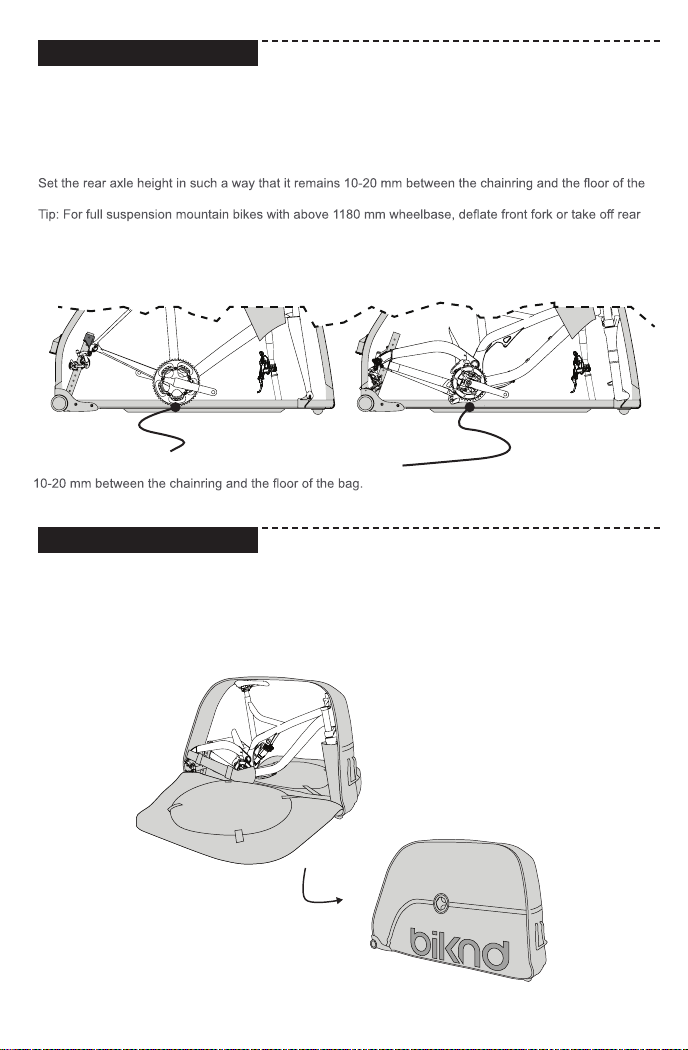
Réglez la hauteur de l’axe arrière de telle sorte qu’il reste un espace entre le pédalier et le fond du sac de
10 à 20 mm.
Conseil: Si vous avez un vélo double suspension de plus de 1180 mm d’empattement, décompressez la
fourche ou démontez l’amortisseur.
Tout est en place, vous pouvez fermer le sac. BIKND vous souhaite un bon voyage.
10 à 20 mm d’espace entre le pédalier et le fond du sac.
You are now ready to go. Enjoy your trip.
Choix de l’adaptateur
ETAPE
bag.
shock.

NOTES / NOTES
Si vous avez des questions, vous pouvez consulter la FAQ dédiée au JETPACK sur notre site internet
If you have any question, you can check online our FAQ on the website www.biknd.com. Otherwise,
Table of contents
Other BIKND Bicycle Accessories manuals


Popular Bicycle Accessories manuals by other brands


EUFAB
EUFAB 11235 operating instructions

Biketronics
Biketronics PowerGrill BT100 Installation

Bosch
Bosch Nyon BUI275 Original instructions

Transition Bicycle Company
Transition Bicycle Company CARBON COVERT 26 manual

Burley
Burley BEE Owner's instruction & safety manual

Bobike
Bobike EXCLUSIVE MINI Assembly instructions