EUFAB 11235 User manual

1
Art.-Nr. 11235
Art.-Nr. 11236
Art.-Nr. 11238
Art.-Nr. 11237
Art.-Nr.: 11235, 11236, 11237, 11238
Abnehmbarer Rahmenhalter
Bedienungsanleitung ...................... 2
Article number 11235, 11236, 11237, 11238
Removable frame holder
Operating instructions ..................... 3
Réf. 11235, 11236, 11237, 11238
Support de cadre amovible
Manuel de l‘opérateur ..................... 5
Cod. art. 11235, 11236, 11237, 11238
Supporto per telai amovibile
Istruzioni per l‘uso .................... 6
© EAL GmbH, 11235, 11236, 11237, 11238 09.2020
1
2

2
WARNUNG!
Lesen Sie die Bedienungsanleitung vor Inbetriebnahme sorgfältig durch und beachten Sie
alle Sicherheitshinweise! Nichtbeachtung kann zu Personenschäden, Schäden am Gerät oder
Ihrem Eigentum führen!
Bewahren Sie die Originalverpackung, den Kaufbeleg sowie diese Anleitung zum späteren
Nachschlagen auf!
Bei der Weitergabe des Produkts geben Sie auch diese Anleitung weiter.
Prüfen Sie vor Inbetriebnahme den Inhalt der Verpackung auf Unversehrtheit und
Vollständigkeit!
1. BESTIMMUNGSGEMÄSSER GEBRAUCH
4. BEDIENUNGSANLEITUNG
3. SICHERHEITSHINWEISE
2. SPEZIFIKATIONEN
Befestigung eines Fahrradrahmens am U-Bügel eines Fahrradheckträgers.
Schließen Sie das Schloss mit dem Schlüssel in der Knaufmutter auf (der rote Punkt bendet sich gegenüber dem
Schlosssymbol). Ziehen Sie den Schlüssel ab. Drehen Sie die Knaufmutter entgegen dem Uhrzeigersinn soweit bis
sich die Halteklammer für den Fahrradrahmen weit geönet hat. Drücken Sie die Halteklammer und die Knaufmutter
zusammen, dadurch wird der klappbare Teil der Rohrschelle freigegeben. Halten Sie die Klammer und Mutter
zusammengedrückt. Önen Sie die Rohrschelle und legen Sie sie, an einer für Ihr Fahrrad geeigneten Stelle, um das Rohr
des U-Bügels. Schließen Sie die Rohrschelle und entlasten Sie die Halteklammer und Knaufmutter. Stellen Sie sicher,
dass die Verriegelung korrekt sitzt. Stellen Sie den Rahmenhalter auf eine für Ihr Fahrrad passende Position ein. Legen
sie die Halteklammer um den Rahmen Ihres Fahrrades und drehen Sie die Knaufmutter im Uhrzeigersinn so fest, bis das
Fahrrad und der Rahmenhalter am U-Bügel sicher befestigt sind. Um Diebstahl vorzubeugen schließen das Schloss in der
Knaufmutter ab (der rote Punkt bendet sich am Schlosssymbol).
Abstand U-Bügel - Fahrradrahmen [cm] ca. 10 (11235, 11237)
ca. 30 (11236, 11238)
Geeignet für U-Bügeldurchmesser [mm] ca. 25 (11235, 11236)
ca. 30 (11237, 11238)
Rahmendurchmesser des Fahrrades [mm] 30 - 60
INHALT
1. BESTIMMUNGSGEMÄSSER GEBRAUCH ___________________________________________ 2
2. SPEZIFIKATIONEN________________________________________________________ 2
3. SICHERHEITSHINWEISE ____________________________________________________ 2
4. BEDIENUNGSANLEITUNG ___________________________________________________ 2
5. WARTUNG ____________________________________________________________ 3
7. HINWEISE ZUM UMWELTSCHUTZ ______________________________________________ 3
8. KONTAKTINFORMATIONEN __________________________________________________ 3
Abnehmbarer Rahmenhalter
• Halten Sie Kinder fern und lassen Sie Kinder dieses Gerät nicht bedienen!
• Benutzen Sie dieses Produkt nur für die dafür vorgeseheneVerwendung!
• Verwenden Sie zu Ihrer eigenen Sicherheit ausschließlich Zubehör oder Ersatzteile, die in der Anleitung angegeben
sind, oder deren Verwendung durch den Hersteller empfohlen wird!
• Wenn die Rahmenhalter sichtbar beschädigt sind, ist ein gefahrloser Einsatz nicht mehr möglich. Der Rahmenhalter
darf jetzt nicht mehr verwendet werden.
• Beachten Sie die Spezikationen und Sicherheitshinweise in der Anleitung Ihres Fahrradträgers!
Gewicht ca. 0,400 kg (11235, 11237)
ca. 0,500 kg (11236, 11238)

3
EAL GmbH
Otto-Hausmann-Ring 107
42115Wuppertal, Deutschland
+49(0)202 42 92 83 0
+49 (0) 202 42 92 83 – 160
info@eal-vertrieb.com
www.eal-vertrieb.com
WARNING!
Pleasereadtheoperatinginstructionscarefullypriortouseandobserveallsafetyinstructions!
Not observing such may lead to personal injury, damage to the device or to your property!
Store the original packaging, the receipt and these instructions so that they may be consulted
at a later date! When passing on the product, also include these operating instructions.
Check the contents of package for integrity and completeness prior to use!
1. PROPER USE OF THE PRODUCT
5. WARTUNG
7. HINWEISE ZUM UMWELTSCHUTZ
8. KONTAKTINFORMATIONEN
Reinigung: Reinigen Sie den Rahmenhalter nur mit einem trockenen und weichenTuch.
Bitte entsorgen Sie dieses Gerät über dieWertstotonne oder die öentlichen/kommunalen Sammelstellen.
Die Materialien sind recycelbar. Durch Recycling, stoicheVerwertung oder andere Formen derWiederverwendung von
Altgeräten leisten Sie einen wichtigen Beitrag zum Schutz unserer Umwelt!
CONTENTS
1. PROPER USE OFTHE PRODUCT ________________________________________________ 3
2. SPECIFICATIONS _________________________________________________________ 3
3. SAFETY NOTES __________________________________________________________ 4
4. OPERATING INSTRUCTIONS __________________________________________________ 4
5. MAINTENANCE__________________________________________________________ 4
7. NOTES REGARDING ENVIRONMENTAL PROTECTION____________________________________ 4
8. CONTACT INFORMATION ____________________________________________________ 4
Removable frame holder
Wartung: Nach einem langen Einsatz in starkem Regen sollte das Schloss mit einem leichten, harzfreien Öl schmiert
werden.
Aufbewahrung: Bei Nichtbenutzung bewahren Sie den Rahmenhalter an einem trockenen Ort auf.
Securing a bicycle frame to the U-bolt of a rear-mounted bicycle rack.
2. SPECIFICATIONS
Distance between U-bolt and bicycle frame [cm] approx. 10 (11235, 11237)
approx. 30 (11236, 11238)
Suitable for U-bolt diameter [mm] approx. 25 (11235, 11236)
approx. 30 (11237, 11238)
Frame diameter of the bicycle [mm] 30 - 60
Weight approx. 0,400 kg (11235, 11237)
approx. 0,500 kg (11236, 11238)

4
4. OPERATING INSTRUCTIONS
3. SAFETY NOTES
Open the lock with the key in the knob nut (the red point is located opposite the lock symbol). Remove the key. Rotate
the knob nut anti-clockwise until the holding clamp for the bicycle frame has opened wide. Press the holding clamp and
the knob nut together, this releases the folding section of the pipe clip. Hold the clamp and nut together. Open the pipe
clip and position it at a suitable location, for your bicycle, on the pipe for the U-bolt. Close the pipe clip and release the
holding clamp and knob nut. Make sure that the lock is correctly seated. Set the frame holder to a position that is suitable
for your bicycle. Place the holding clamp around the frame of your bicycle and rotate the knob nut clockwise tightly so
that the bicycle and frame holder are securely attached at the U-bolt. To prevent theft, lock the lock in the knob nut (the
red point is on the lock symbol).
• Keep children away and do not allow children to operate this device!
• Only use this product for its designated purpose!
• For your own safety, only use accessories and spare parts that are stated in these instructions or that are
recommended by the manufacturer!
• If the frame holder is visibly damaged, safe use is no longer possible.The frame holder may thus no longer be used.
• Observe the specications and safety precautions in the instructions for your bicycle rack!
EAL GmbH
Otto-Hausmann-Ring 107
42115Wuppertal, Germany
+49(0)202 42 92 83 0
+49 (0) 202 42 92 83 – 160
info@eal-vertrieb.com
www.eal-vertrieb.com
5. MAINTENANCE
7. NOTES REGARDING ENVIRONMENTAL PROTECTION
8. CONTACT INFORMATION
Cleaning: Clean the frame holder with a dry and soft cloth only.
Please dispose of this device via the recycling facilities or public/ community collection points.
The materials can be recycled. By recycling, reuse of materials or other forms of reuse of old devices, you make an
important contribution to the protection of our environment!
Maintenance: After long use in heavy rain, lubricate the lock with a light, resin-free oil.
Storage:When not in use, store the frame holder in a dry place.

5
SOMMAIRE
1. UTILISATION CONFORME ___________________________________________________ 5
2. SPÉCIFICATIONS ________________________________________________________ 5
3. CONSIGNES DE SÉCURITÉ ___________________________________________________ 5
4. INSTRUCTIONS DE SERVICE__________________________________________________ 5
5. ENTRETIEN____________________________________________________________ 6
7. REMARQUES RELATIVES À LA PROTECTION DE L‘ENVIRONNEMENT__________________________ 6
8. DONNÉES DE CONTACT ____________________________________________________ 6
Support de cadre amovible
AVERTISSEMENT !
Lisez attentivement la notice d‘utilisation avant la mise en service et respectez toutes les
consignes de sécurité !
Tout non-respect de ces consignes peut entraîner des dommages corporels, endommager
l‘appareil ou vos biens !
Conservez l‘emballage d‘origine, le justicatif d‘achat et la présente notice pour vous y référer
ultérieurement ! Si vous revendez ou remettez l‘appareil à des tiers, veuillez également leur
remettre cette notice d‘utilisation.
Avant la mise en service, veuillez contrôler le contenu de l‘emballage quant à l‘absence de
dommages et vérier si toutes les pièces sont présentes !
1. UTILISATION CONFORME
4. INSTRUCTIONS DE SERVICE
3. CONSIGNES DE SÉCURITÉ
2. SPÉCIFICATIONS
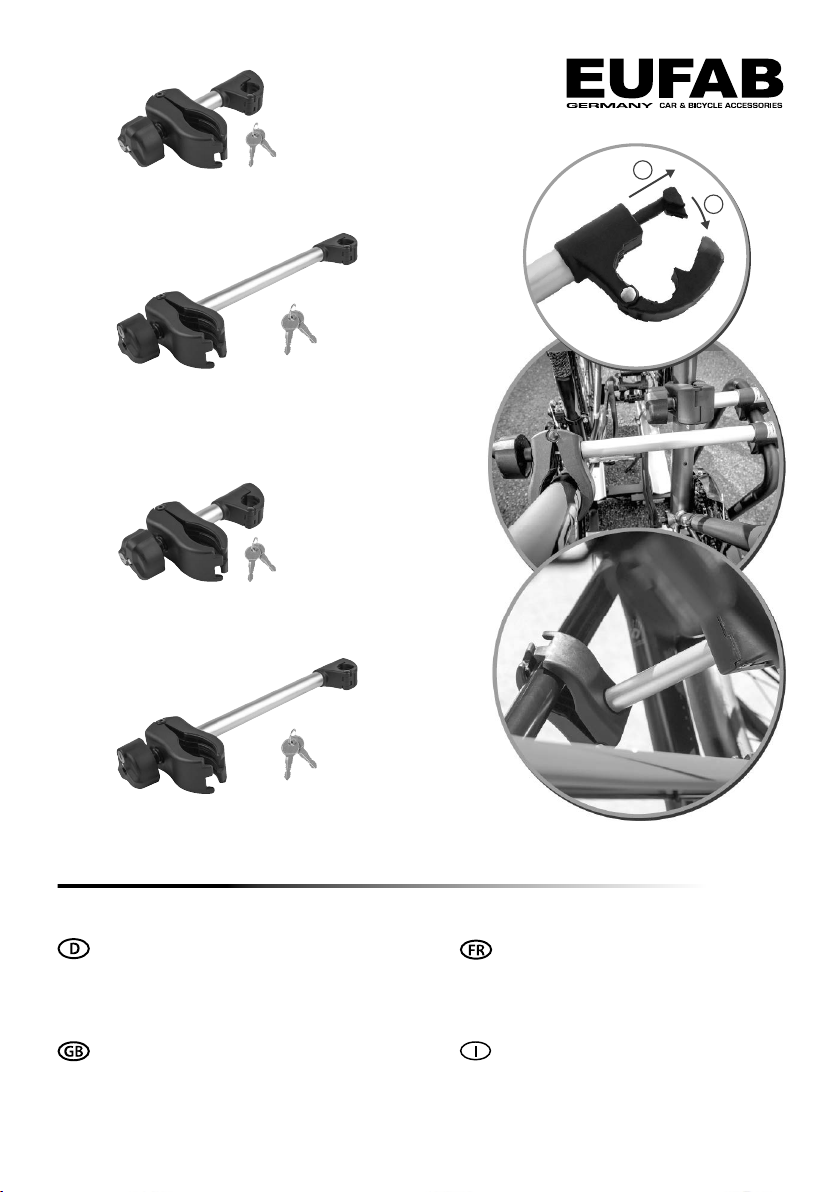
Fixation d‘un cadre de vélo sur l‘étrier en U d‘un porte-vélo arrière.
Déverrouiller la serrure à l‘aide de la clé qu‘il faut insérer dans l‘écrou à bouton (le point rouge se trouve en face du
symbole de serrure). Retirer la clé. Tourner l‘écrou à bouton dans le sens inverse des aiguilles d‘une montre jusqu‘à ce
que le clip de xation du cadre de vélo se soit largement ouvert. Enfoncer le clip de xation contre l‘écrou à bouton pour
libérer la pièce repliable de la bride d‘attache. Maintenir le clip et l‘écrou enfoncés. Ouvrir la bride d‘attache et la poser
sur l‘endroit approprié au vélo respectif, autour du tube et de l‘étrier en U. Fermer la bride d‘attache et délester le clip de
xation et l‘écrou à bouton. S‘assurer que le verrouillage soit sur la position correcte.
Ajuster le porte-cadre sur l‘endroit approprié au vélo. Poser le clic de xation autour du cadre de vélo et tourner l‘écrou
à bouton dans le sens des aiguilles d‘une montre jusqu‘à ce que le vélo et que le porte-cadre sur l‘étrier en U soient
fermement xés. An de prévenir le risque de vol, fermer la serrure dans l‘écrou à bouton (le point rouge se trouve sur
le symbole de serrure).
Écart étrier en U - cadre de vélo [cm] env. 10 (11235, 11237)
env. 30 (11236, 11238)
Pour diamètre d‘étrier en U [mm] env. 25 (11235, 11236)
env. 30 (11237, 11238)
Diamètre du cadre de vélo [mm] 30 - 60
• Tenez les enfants à distance et ne les laissez pas utiliser ou jouer avec cet appareil !
• N‘utilisez cet appareil qu‘aux ns pour lesquelles il a été prévu !
• Pour votre propre sécurité, utilisez exclusivement les accessoires ou pièces de rechange qui sont indiqué(e)s dans la
notice d‘utilisation ou dont l‘utilisation est conseillée par le fabricant !
• Si le support de cadre est visiblement endommagé, il ne peut plus être utilisé sans danger. Le support de cadre ne
doit pas être réutilisé.
• Respectez également les spécications et les consignes de sécurité dans les instructions de votre porte-vélo !
Poids env. 0,400 kg (11235, 11237)
env. 0,500 kg (11236, 11238)

6
EAL GmbH
Otto-Hausmann-Ring 107
42115 Wuppertal, Allemagne
+49(0)202 42 92 83 0
+49 (0) 202 42 92 83 – 160
info@eal-vertrieb.com
www.eal-vertrieb.com
5. ENTRETIEN
7. REMARQUES RELATIVES À LA PROTECTION DE L‘ENVIRONNEMENT
8. DONNÉES DE CONTACT
Nettoyage : Nettoyer exclusivement le porte-cadre avec un chion doux sec.
Veuillez vous débarrasser de cet appareil dans des conteneurs pour matériaux recyclables ou auprès des services de
collecte publics/communaux/cantonaux.
Les matériaux sont recyclables. Par le recyclage, la récupération des matières ou d’autres formes de réutilisation
d’anciens appareils, vous contribuez activement à la protection de notre environnement !
Entretien : Après une utilisation prolongée sous forte pluie, graisser la serrure avec une huile légère sans résines.
Conservation : Lorsque le porte-cadre n‘est pas utilisé, le ranger à un emplacement sec.
AVVERTENZA !
Leggere attentamente le istruzioni per l‘uso prima della messa in funzione e osservare tutte
le avvertenze di sicurezza!
La mancata osservanza di queste istruzioni può provocare lesioni personali, danni al prodotto
o alla vostra proprietà!
Conservare l‘imballo originale, la ricevuta di acquisto e il presente manuale per poterlo
eventualmente consultare in seguito! In caso di cessione del prodotto, consegnare anche le
presenti istruzioni.
Prima della messa in funzione vericare l‘integrità e la completezza del contenuto della
confezione!
1. USO CONFORME
2. SPECIFICAZIONI
Fissaggio di un supporto per telai sulla staa a U di un portabiciclette posteriore
Distanza staa U-telaio della bicicletta [cm] ca. 10 (11235, 11237)
ca. 30 (11236, 11238)
Adatto per staa a U del diametro di [mm] ca. 25 (11235, 11236)
ca. 30 (11237, 11238)
Diametro telaio bicicletta [mm] 30 - 60
INDICE
1. USO CONFORME ________________________________________________________ 6
2. SPECIFICAZIONI ________________________________________________________ 6
3. AVVERTENZE DI SICUREZZA _________________________________________________ 7
4. ISTRUZIONI PER L’USO ____________________________________________________ 7
5. MANUTENZIONE________________________________________________________ 7
7. AVVERTENZE SULLA TUTELA AMBIENTALE________________________________________ 7
8. COME CONTATTARCI _____________________________________________________ 7
Supporto per telai amovibile
Peso ca. 0,400 kg (11235, 11237)
ca. 0,500 kg (11236, 11238)

7
4. ISTRUZIONI PER L’USO
3. AVVERTENZE DI SICUREZZA
Aprire la serratura con la chiave nel dado pomellato (il punto rosso si trova di fronte al simbolo della serratura).Togliere
la chiave, girare il dado pomellato in senso antiorario no a quando la morsa ssatelaio si è aperta completamente.
Comprimere la morsa ssatelaio e il dado pomellato. Questo sbloccherà la parte ribaltabile della graa per tubi. Tenere
premuti la morsa e il dado. Aprire la graa per tubi e sistemarla in un punto adatto per la vostra bicicletta attorno al
tubo della staa a U. Chiudere la graa e scaricare la morsa ssatelaio e il dado pomellato. Assicurarsi della sicurezza
del bloccaggio. Mettere il supporto per telai in una posizione adatta per la bicicletta. Sistemare la morsa attorno al
telaio della bicicletta e stringere il dado pomellato in senso orario nché la bicicletta e il supporto per telai sono ssati
saldamente alla staa a U. Per prevenire furti, chiudere la serratura nel dado pomellato (il punto rosso si trova sul
simbolo della serratura).
• Tenere il dispositivo lontano dalla portata dei bambini e vietare loro l‘utilizzo!
• Utilizzare questo prodotto solo per lo scopo previsto!
• Per la propria sicurezza, utilizzare solo gli accessori e i pezzi di ricambio indicati nelle istruzioni o consigliati dal
produttore!
• Qualora il braccio di ssaggio sia visibilmente danneggiato, il suo utilizzo non è sicuro. In questo caso, il braccio di
ssaggio non va più utilizzato.
• Rispettare le speciche e le avvertenze di sicurezza contenute nelle istruzioni del portabiciclette!
Peso ca. 0,400 kg (11235, 11237)
ca. 0,500 kg (11236, 11238)
EAL GmbH
Otto-Hausmann-Ring 107
42115 Wuppertal, Germania
+49(0)202 42 92 83 0
+49 (0) 202 42 92 83 – 160
info@eal-vertrieb.com
www.eal-vertrieb.com
5. MANUTENZIONE
7. AVVERTENZE SULLATUTELA AMBIENTALE
8. COME CONTATTARCI
Pulizia: Pulire il supporto per telai solo con un panno morbido asciutto.
Smaltire questo prodotto gettandolo nel bidone per il riciclo o consegnandolo ai punti di raccolta pubblici/comunali.
I materiali sono riciclabili. Con il riciclo, il recupero del materiale e altre forme di riutilizzo di prodotti usati si fornisce un
contributo importante per la protezione dell‘ambiente!
Manutenzione: Dopo un uso prolungato sotto la pioggia battente, la serratura dovrebbe essere lubricata con un olio
leggero, non resinoso.
Conservazione: Se non viene utilizzato, conservare il supporto per telai in un luogo asciutto.

8
Art.-Nr. 11235
Art.-Nr. 11236
Art.-Nr. 11238
Art.-Nr. 11237
EAL GmbH
Otto-Hausmann-Ring 107
42115Wuppertal
Deutschland
+49 (0)202 42 92 83 0
+49 (0) 202 42 92 83 – 160
info@eal-vertrieb.com
www.eal-vertrieb.com
1
2
This manual suits for next models
3
Table of contents
Other EUFAB Bicycle Accessories manuals