Hotsy 5645 User manual

OPERATING INSTRUCTIONS
Read instructions carefully before attempting to assemble, install, operate or service this pressure
washer. Failure to comply with instructions could result in personal injury and/or property damage!
THE HOTSY CORPORATION
SERIAL NUMBER: 21 INVERNESS WAY EAST
ENGLEWOOD, CO 80112
(303) 792-5200
WWW.HOTSY.COM
DATE PURCHASED:
FOR SALES AND SERVICE, PLEASE CONTACT:
SPECIFICATIONS
●Pump Volume At Pump Head: 6.0 GPM/360 GPH
● Pump Pressure At Pump Head: 3000 PSI
● Burner Type: Fuel Oil Fired - 528,000 BTU/Hr.
● Burner Fuel Pressure: 135 PSI
● Machine Power: 24 HP Gasoline Engine, Electric Start
● Machine Weight: 1025 Lbs.
● Shipping Weight: 1200 Lbs.
● Exhaust Stack Size: 8"
● Machine Dimensions: Length = 61.5", Width = 32", Height = 50.5"
MODEL 5645


Page 3Hotsy 5645 • 97-6850 • Rev. 8/03
WARNING
RISK OF
ASPHYXIATION.
USE ONLY IN A WELL
VENTILATED AREA.
WARNING
READ OPERATOR’S
MANUAL
THOROUGHLY
PRIOR TO USE.
WARNING
HIGH PRESSURE
SPRAY CAN PIERCE
SKIN AND TISSUES.
WARNING
KEEP WATER SPRAY
AWAY FROM
ELECTRICAL WIRING.
GENERAL SAFETY INFORMATION
CAUTION:To reduce the risk of
injury, read operating instruc-
tions carefully before using.
1.Read owner's manual thor-
oughly. Failure to follow instruc-
tions could cause malfunction
of the machine and result in
death, serious bodily injury
and/or property damage.
2. Know how to stop machine and bleed pressures
quickly. Be thoroughly familiar with the controls.
3. Stay alert — watch what you are doing.
4. All installations must comply with local codes. Con-
tact your electrician, plumber, utility company or
the selling distributor for specific details.
WARNING: Risk of asphyxiation.
Use this product only in a well
ventilated area.
5. When the machine is working,
do not cover or place in a
closed space where ventila-
tion is not sufficient.
WARNING: Risk of fire. Do not
add fuel when the machine is
operating.
6. Risk of explosion — do not
spray flammable liquids or op-
erate in an explosive location.
Operate only where open
flame or torch is permitted.
WARNING: Keep water spray
away from electrical wiring or fa-
tal electrical shock may result.
7. To protect the operator from
electrical shock, the machine
must be electrically grounded.
It is the responsibility of the
owner to connect this ma-
chine to a UL grounded re-
ceptacle of proper voltage
and amperage ratings. Do not spray water on or
near electrical components. Do not touch machine
with wet hands or while standing in water. Always
disconnect power before servicing.
8. Grip cleaning wand securely with both hands be-
fore starting the cleaner. Failure to do this could
result in injury from a whipping wand.
WARNING: High pressure stream
of fluid that this equipment can
produce can pierce skin and its
underlying tissues, leading to
serious injury and possible am-
putation.
9. High pressure developed by
these machines can cause
personal injury or equipment
damage. Use caution when
operating. Do not direct discharge stream at people,
or severe injury and/or death may result.
10. Never make adjustments on machine while in op-
eration; disconnect from electrical source or shut
off gas valve.
WARNING: High pressure spray
can cause paint chips or other
particles to become airborne
and fly at high speeds.
11. Eye safety devices and foot
protection must be worn when
using this equipment.
WARNING: Risk of injury. Hot
surfaces can cause burns. Use
only designated gripping areas
of spray gun and wand. Do not
place hands or feet on non-in-
sulated areas of the pressure
washer when starting gasoline
engine.
12. Machines with shut-off trigger gun should not be
operated with the trigger in the off position for ex-
tensive periods of time as this may cause damage
to the pump.
13. Protect from freezing.
14. Be certain all quick coupler fittings are secured be-
fore using pressure washer.
15. Do not allow acids, caustic, or abrasive fluids to
pass through the pump.
16. Inlet water must be from a cold, fresh city water
supply.
17. To reduce the risk of injury, close supervision is nec-
essary when a machine is used near children. Do
not allow children to operate the pressure washer.
This machine must be attended during operation.
18. The best insurance against an accident is precau-
tion and knowledge of the machine.
19. Do not operate this product when fatigued or un-
der the influence of alcohol or drugs. Keep operat-
ing area clear of all persons.
20. Hotsy will not be liable for any changes made to
our standard machines, or any components not
purchased from Hotsy.
WARNING
RISK OF INJURY.
HOT SURFACES
CAN CAUSE BURNS
WARNING
RISK OF FIRE.
DO NOT ADD FUEL
WHEN OPERATING
MACHINE.
WARNING
PROTECTIVE
EYEWEAR AND
CLOTHING MUST
BE WORN.

Page 4 Hotsy 5645 • 97-6580 • Rev. 8/03
Figure 1 - Machine Layout
High Pressure
Outlet
Float
Tank
Detergent
Inlet Hoses
Fresh
Water Inlet
Unloader
Valve
Burner
Exhaust
Battery
Box
Pump
Engine
Key Switch
Burner
Fuel Tank
Engine
Gas Tank
High Pressure
Hose
Control
Panel
Burner
Switch
Hour
Meter
Porta Gear Kit
(Optional)

Page 5Hotsy 5645 • 97-6850 • Rev. 8/03
Ref. No. Part No. Description Qty.
7 817312 Cap, Tank w/Fuel Gauge 1
8 952730 Tank, Fuel, 11 Gal., Black 1
9 952731 Tank, Fuel, 11 Gal., Red 1
10 813150 Battery Box 1
830491 ▲Pump, 12V Fuel, Facet 1
11 296391 Lid, 24" Painted 1
12 817313 Cap, Tank w/Gas Gauge 1
13 241207 Coil, Oil, 22" 1
▲Not Shown
Figure 2 - Machine Component Layout
4
8
1
2
3
6
5
11
9
12
10
7
Ref. No. Part No. Description Qty.
1 886538 Meter, Hour AC w/U-Bracket 1
2 875858 Switch Rocker w/Neon Light 1
3 835150 DialThermostat 32°-248°F 1
915390 Plate MountingThermostat 1
955930 Thermostat, w/Meter Capillary 1
4 971576 Valve, Detergent, Dual Metering 1
5 785061 MufflerTop Mount 1
6 5-01094 Engine, Gas, 24 HP, Honda 1
13

Page 6 Hotsy 5645 • 97-6580 • Rev. 8/03
21. Do not overreach or stand on unstable support.
Keep good footing and balance at all times.
22. Follow maintenance instructions specified in
manual.
23. Cleaning area should be provided with adequate
slopes and drainage to reduce possibility of falls
because of slippery surfaces.
24. Turn burner off and cool to 100°F before turning
machine off.
25. If gas odor is present, extinguish any open flame,
and test all joints with a soap solution. If the odor
persists, call your gas supplier immediately.
26. Use extreme caution when moving pressure washer
over rough or uneven surfaces.
27. When applying detergents follow the safety rules
on the detergent label. Use detergent from a cov-
ered D.O.T. approved container.
28. This machine has been provided with warning and
instruction decals for the safety of the operator. If
these decals are removed or become damaged
they should be replaced. Contact your dealer for
replacement decals.
INTRODUCTION
Thank you for purchasing a Hotsy Pressure Washer.
This manual covers the operation and maintenance of
the 5645 pressure washer. All information in this manual
is based on the latest product information available at
the time of printing.
Hotsy, Inc. reserves the right to make changes at any
time without incurring any obligation.
Responsibility:
The owner and/or user must have an understanding of
the manufacturer’s operating instructions and warnings
before using this Hotsy pressure washer. Warning in-
formation should be emphasized and understood. If the
operator is not fluent in English, the manufacturer’s in-
structions and warnings shall be read to and discussed
with the operator in the operator’s native language by
the purchaser/owner, making sure that the operator
comprehends its contents.
Owner and/or user must study and maintain for future
reference the manufacturers’ instructions.
This manual should be considered a permanent
part of the machine and should remain with it if
machine is resold.
When ordering parts, please specify model and se-
rial number.
ASSEMBLY
Unpacking
Unpack carefully. Wear safety glasses or goggles while
unpacking, assembling, or operating pressure washer. If
there are missing components or hidden damage,
immediately contact carrier concerning discrepancies.
Parts Included
•Pressure Washer
•Pressure Hose
•Pressure Nozzles (4 Ea.)
•Wand
•Trigger Gun
•Operating Instructions and Parts Manual
•Gasoline Engine Manual
Pressure Hose, Trigger Gun and Wand
1. Install the pressure hose on the pressure washer as
shown in Figure 3.
NOTE: The pressure nozzle is not to be installed at
this time.
2. Assemble wand components as shown in Figure 4.
3. Make sure all connections are secure.
Figure 3 - Pressure Hose Installation
Pressure
Hose
Figure 4 - Trigger Gun/Wand Assembly
Wand
Trigger
Gun
Pressure Hose

Page 7Hotsy 5645 • 97-6850 • Rev. 8/03
INSTALLATION
Getting Started
IMPORTANT: Proper initial installation of equipment
will assure more satisfactory performance, longer
service life, and lower maintenance cost.
IMPORTANT: The use of backflow preventer on the
water supply hose is recommended and may be
required by local code.
The pressure washer should be run on a level surface
and in a protected area where it is not readily influenced
by outside forces such as strong winds, freezing
temperatures, rain, etc. The pressure washer should be
located to assure easy access for filling fluids, adjustment
and maintenance. Normal precautions should be taken
by the operator to prevent moisture from reaching the
pressure washer. It is recommended that a partition be
made between the wash area and the pressure washer
to prevent direct spray from the high-pressure wand from
coming in contact with the pressure washer. Moisture
reaching the pressure washer will reduce its service life.
All installations should comply with the local codes
covering such installations.
IMPORTANT: DO NOT run machine indoors or in an
enclosed area where high ambient temperatures
exist. High ambient temperatures (above 100°F) can
cause engine oil failure and will greatly reduce the
engine’s performance.
Venting
CAUTION: All venting must be in accordance with
applicable federal and state laws, and local ordi-
nances. Consult local heating contractors.
If the pressure washer is to be used in an enclosed area,
a flue must be installed to vent burner and engine exhaust
to the outside atmosphere. Be sure the flue is the same
size as the burner exhaust vent on the pressure washer
lid. Poor draft will cause the pressure washer to soot and
not operate properly. When selecting the location for
installation, beware of poorly ventilated locations or areas
where exhaust fans may cause an insufficient supply of
oxygen. Proper combustion can only be obtained when
there is a sufficient supply of oxygen available for the
amount of fuel being burned. If it is necessary to install
the machine in a poorly ventilated area, outside fresh air
will have to be supplied to the machine. Locate the
pressure washer so that the flue will be as straight as
possible and protrude through the roof at a proper height
and location to provide adequate draft. This oil fired
pressure washer must have a draft regulator installed in
the flue (available from most heating contractors). A draft
regulator will permit proper upward flow of exhaust flue
gases.
Battery
WARNING: Batteries generate explosive gases dur-
ing normal battery operation. DO NOT expose the bat-
tery to flame or sparks as these gases may ignite.
WARNING: Battery fluid is highly acidic. If battery fluid
contacts skin or clothing, wash immediately with soap
and water. If battery fluid enters eye, immediately flood
eye with running cold water for at least 15 minutes
and get immediate medical attention.
1. Refer to Figure 5.
2. Install battery (battery not included) in battery box
as shown. Use a standard automotive battery mini-
mum 500 CCA (Cold Cranking Amps). It is recom-
mended that a dual cell battery (a battery with a
separate cell for emergency starting) be used.
3. To reduce the possibility of sparking attach the bat-
tery cables in the following order. First attach the posi-
tive battery cable (red) to the positive “+” terminal of
the battery. Next, attach the negative battery cable
(black) to the negative “-” terminal of the battery. To
disconnect the battery, remove the cables in the op-
posite order as installed.
4. Install battery box lid and secure with strap provided.
Oil Burner
Burner Air Adjustment: The oil burner is preset for
operation at altitudes below 3000 feet. If operated at
higher altitudes, it may be necessary to adjust the air
band setting. Adjust the air band for a #1 or #2 smoke
spot on the Bacharach scale.
Figure 5 - Battery Installation
Battery Box
12 Volt
Battery
Black Cable
Red Cable
Battery Box
Lid

Page 8 Hotsy 5645 • 97-6580 • Rev. 8/03
OPERATION
Before Starting
WARNING: Check hoses, fittings, wand, trigger gun
and fuel connections daily for signs of wear, cracks
and looseness, replace as required.
1. Read all manuals provided with this pressure washer.
Become familiar with location and function of all op-
erating and safety controls.
2. Connect the water supply hose to the float tank water
inlet (standard garden hose connector). The water
faucet and supply hose must be capable of providing
6.0 GPM.
3. Fill the burner fuel tank. Use kerosene, #1 grade home
heating oil, #1 or #2 diesel fuel. DO NOT USE GASO-
LINE.
4. Fill the gasoline tank. Use lead free gasoline mini-
mum 86 octane. DO NOT use gasoline containing
more than 10% ethanol, 15% MTBE, or 5% metha-
nol.
5. Check pump and engine oil levels.
To adjust, start machine and turn burner ON (refer to
Operation for details). Loosen two locking screws found
in the air shutter openings (refer to Figure 6) and close
air shutter until black smoke appears from burner exhaust
vent. Note air band position. Next, slowly open the air
shutter until white smoke just starts to appear. Turn air
shutter halfway back to the black smoke position
previously noted. Tighten locking screws.
A 1/2" NPT 3-way ball valve will need to be installed in
the water inlet line. Refer to Figure 7. Hotsy recommends
the use of Watts Regulator Valve #1/2 B6780 M1 (Hotsy
P/N 921363) for this application. With this valve in place
this machine will be capable of using both a pressurized
or gravity feed water supply without additional
modifications. For proper operation it is important that the
valve be fully open for its intended supply.This will prevent
air from being drawn into the system from the nonactive
source. Also the pressure supply must still be connected
to the float tank. The connection of a pressurized supply
directly to the 3-way valve will prevent detergent from
being drawn into the system.
Figure 7 - Gravity Tank Plumbing Connection
To Pump
Inlet
To Gravity Feed Tank
(Minimum 5/8" ID Hose
Maximum Length 10')
To Float
Tank
Float Valve
Inlet
3-Way Ball
Valve
If the desired position cannot be obtained using only the
air shutter, lock the air shutter in as close a position as
can be obtained, then repeat the above procedure on the
air band setting.
CAUTION: If white smoke appears from burner
exhaust vent during start-up or operation, discontinue
use and readjust air bands.
NOTE: If a flue is installed, have a professional ser-
viceman adjust your burner for a #1 or #2 smoke spot
on the Bacharach scale.
For additional burner component information, see
Figure 16. It is recommended that the oil burner be
serviced yearly or as needed. Contact your local service
center.
Gasoline Engine
This gasoline engine is preset for operation at altitudes
below 3000 feet above sea level. If operated at higher
altitudes, it may be necessary to install a high altitude
main jet in the carburetor. Contact an authorized engine
sales and service center for details.
Water Supply
This machine is designed to be connected to a
pressurized (20 to 100 PSI) water supply, capable of
maintaining a minimum of 6.0 GPM. If it is necessary to
use a gravity feed water tank, the following plumbing
modifications will be required.
Figure 6 - Burner Air Band Adjustment
Air Band
Air
Adjustment
Locking
Screw
Fuel
Pump

Page 9Hotsy 5645 • 97-6850 • Rev. 8/03
To Start
DANGER: DO NOT point wand or spray gun at your-
self or at any person. Bodily injury may result from
water under high pressure.
IMPORTANT: The water must be turned on before
starting. Running the pump dry will cause damage
and void warranty.
IMPORTANT: DO NOT allow the machine to run with
trigger gun closed for more than 3 minutes at any
time or damage to pump may occur.
1. Turn water ON.
2. Hold wand firmly with trigger gun in the closed posi-
tion.
3. Turn fuel shut-off valve counterclockwise (CCW) to
open. Move choke lever to full choke position. Choke
may not be needed on warm engine.
4. Move throttle control to half throttle.
5. Turn key on engine clockwise (CW) hold until engine
starts. DO NOT crank engine for longer than 15 sec-
onds at any one time or starter damage may occur. If
the engine does not start, it may have air in the gas
lines and be unable to pull gasoline from the fuel tank.
This symptom may appear if the engine has not been
run recently or had been run until all gasoline was
depleted from gas lines.
6. When the engine starts, move choke lever until
engine runs smoothly. Then move throttle control to
full throttle. When engine warms, move choke to no
choke position.
IMPORTANT:To allow for proper battery charging and
AC generator operation the throttle control MUST be
kept in full throttle position as soon as choke lever is
placed in no choke position.
7. Holding wand firmly, squeeze the trigger gun open.
Allow air to purge from system.
8. If hot water is desired, adjust the thermostat to
proper temperature. Close the trigger gun and turn
burner switch ON.
IMPORTANT: The throttle control must be in the full
throttle position or damage to the AC generator or
burner may result.
9. Open the trigger gun.The burner will fire immediately
with a puff of smoke. If smoke continues, refer to the
Troubleshooting Guide in this manual. When the trig-
ger gun is closed or the temperature setting is
reached, the burner will automatically turn off.
To Clean
1. Insert the detergent inlet line into the container of
mixed detergent. The detergent metering valve can
be opened gradually to meter the desired amount of
detergent.The flow may be observed through the clear
detergent line. Allow detergent to reach the end of
wand before proceeding.
Pressure Nozzle
Figure 8 - Nozzle Installation/Manual Trigger Lock
Manual Trigger Lock
6. If detergents are to be used, only use detergent for
pressure washers. Follow instructions on detergent
container.
IMPORTANT: Before installing the pressure nozzle
on initial start-up, turn on the water supply and allow
water to run from the end of the wand until clear to
prevent the pressure nozzle from clogging.
IMPORTANT: If the pressure washer has not been
used for an extended period of time, remove the pres-
sure nozzle from the end of the wand and turn on the
water supply. Allow water to run from the end of the
wand until clear.
7. Install the proper pressure nozzle for your cleaning
needs on end of wand, refer to Figure 8.
IMPORTANT:The trigger gun provided with this pres-
sure washer is equipped with a manual trigger lock
to prevent accidental operation of the trigger gun,
refer to Figure 8. The manual trigger lock should be
used whenever the trigger gun is not in use.
Fuel Pump
The model 5645 is equipped with an electric fuel pump
which operates only when the engine is running. The
pump is primed when the key switch is held in the start
position. In the event that the engine stalls for any reason
the fuel pump will shut off.
WARNING: The fuel pump installed on this machine
has been adjusted at the factory to provide a maxi-
mum pressure of 1.3-1.7 PSI at the pump outlet.When-
ever the fuel pump is replaced the new pump must
be adjusted using the following procedure:
1. Place the ignition switch in the OFF position.
2. Disconnect the fuel line from the engine mounted fuel
filter and connect a fuel pump pressure gauge (0-5
PSI) to the fuel pump discharge line.
3. Turn the ignition key to the start position and
observe pressure gauge. Pressure must be set to
between 1.3 and 1.7 PSI. It will be necessary to bleed
off accumulated pressure in line prior to each gauge
reading.Turn screw on top of fuel pump to adjust pres-
sure (CCW to decrease, CW to increase).
4. After adjustment, reconnect fuel line to engine
mounted fuel filter and start machine. Check for fuel
leakage and tighten fittings/clamps as required.

Page 10 Hotsy 5645 • 97-6580 • Rev. 8/03
2. Wash from the bottom to the top, using side-to-side
motions.This washes away heavy dirt and allows the
detergent to soak as you work toward the top.
3. Do not wash at a 90° angle to the work (straight at it).
This will allow water to splash back at you and
reduces your cleaning power. Wash at a 30° to 60°
angle to the work. This will allow the water to splash
away from you and the water will wash the dirt away
faster and easier.
4. Use the full width of the spray pattern to wash in a
wide path. Overlap spray paths for complete cover-
age. Wash from side to side, using slow, steady
motions.
5. The nozzle should be 12" to 24" from work, closer for
tough areas. Be careful on painted or delicate sur-
faces, the pressure may damage surface if the nozzle
is to close.
6. Small parts should be washed in a basket so the pres-
sure does not push them away. Larger, lightweight
parts should be clamped down so the pressure does
not push them away.
7. To rinse, turn the detergent metering valve clockwise
to stop the detergent flow through the valve. Always
rinse with cold water after using detergent. Rinse from
the top to the bottom to prevent the detergent from
dripping onto a rinsed area. For the best results, con-
tact your Hotsy dealer to help you select the best
detergent for your application.
To Stop
1. If detergents were used, draw clear water through the
system to purge detergent.
2. If burner was used, turn OFF burner switch, and
allow pump to run cold water through coil.
3. Move throttle control to idle position.
4. Turn key on engine counterclockwise (CCW) to OFF
position.
5. Turn OFF fuel shut-off valve.
6. Turn OFF water supply.
7. Squeeze trigger gun open to relieve system pressure.
STORAGE
DANGER: Do not store flammable liquids (gasoline,
solvents, etc.) near pressure washer, or in non-venti-
lated areas.
Protect from freezing by storing in a heated area, or by
flushing the system with antifreeze. To flush the system,
fill the float tank with antifreeze and remove spray nozzle
from wand. Start the machine and allow it to run until
antifreeze flows from the end of the wand. Place end of
wand into float tank and circulate the antifreeze through
system for several minutes. Open and close the trigger
gun several times to circulate antifreeze through the
unloader valve. Place detergent line into the float tank.
Open the detergent metering valve to draw antifreeze into
the detergent system.
If the pressure washer is not to be used for a considerable
length of time, it is recommended to flush the system
with antifreeze for rust protection.
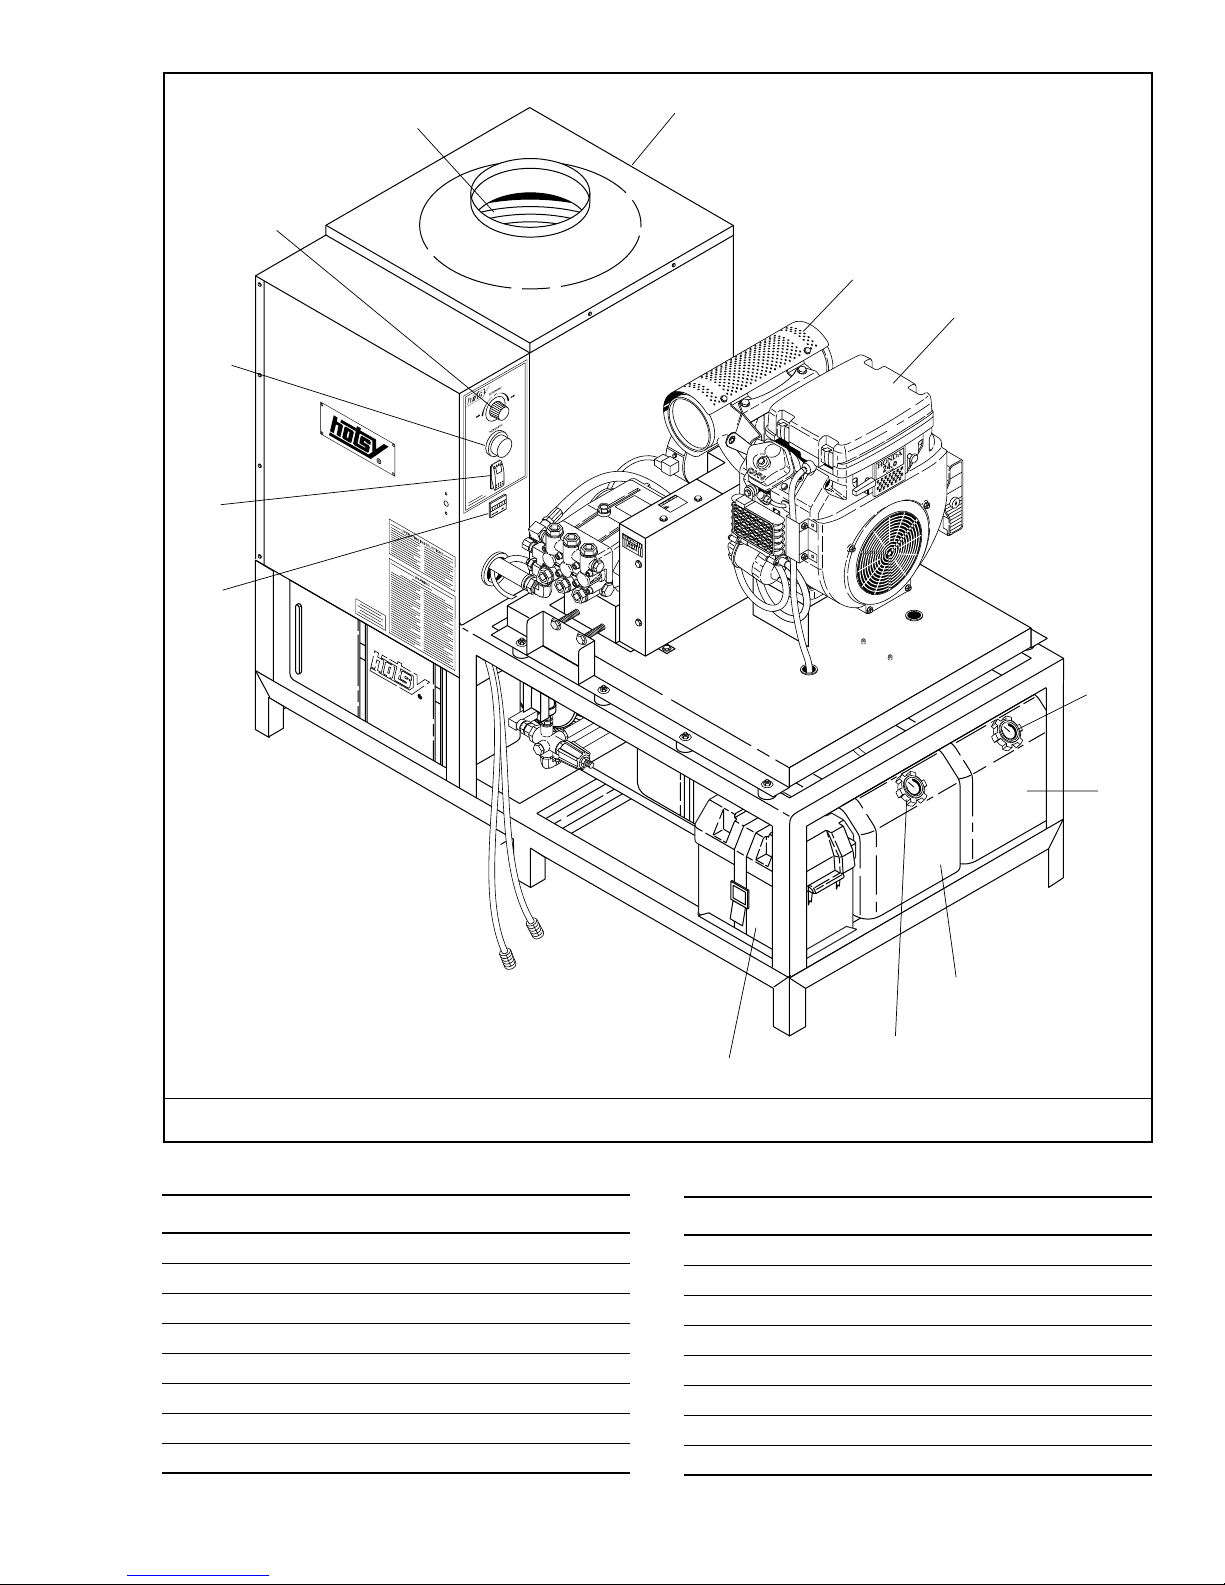
MAINTENANCE
WARNING: Unauthorized machine modification or use
of non-approved replacement parts may cause per-
sonal injury and/or property damage and will void the
manufacturer warranty.
Pump
Use HOTSY Pump Oil (P/N 315068) or equivalent 30W
non-detergent oil for pump crankcase. Crankcase must
be filled to the full mark on the dipstick or to center of
sight glass window found on the rear of the pump. During
the break-in period, make sure the oil is changed after
the first 25 hours of operation. After that, replace oil every
3 months or 300 hours, whichever comes first.
DO NOT:
1. Pump acids.
2. Fail to winterize in freezing temperatures.
3. Allow pump to run dry.
4. Allow machine to run with trigger gun closed for more
than 3 minutes at any one time or damage to pump
may occur.
DO:
1. Use a water softener on the water system if known to
be high in mineral content.
2. Use only high quality detergents and follow manu-
facturer’s mix recommendations.
3. Immediately after using detergent solutions the sys-
tem should be flushed thoroughly with clear water.
4. Clean strainer screen on detergent line periodically.
Hour Meter
An optional hour meter (P/N 783865) is available for use
on the Model 5645. The hour meter will monitor the total
hours of operation of the pressure washer to signal when
routine maintenance is required.
Unloader Valve
WARNING: The unloader valve on this pressure
washer has been factory set and sealed and is a field
nonadjustable part. Tampering with the factory set-
ting may cause personal injury and/or property dam-
age, and will void the manufacturer warranty.
Relief Valve
WARNING: The relief valve on this pressure washer
has been factory set and sealed and is a field nonad-
justable part.Tampering with the factory setting may
cause personal injury and/or property damage, and
will void the manufacturer warranty.
Burner Fuel Filter
Drain water that has accumulated in fuel filter and clean
filter element as needed.

Page 11Hotsy 5645 • 97-6850 • Rev. 8/03
Heating Coil
Coil Descaling: In hard water areas, scale buildup within
the heating coil will occur. Scale deposits will decrease
the water temperature rise and may eventually clog the
heating coil. Contact your local service center when
descaling is needed.
Coil Desooting: Poor grades of fuel oil or inadequate
combustion air will cause heavy soot buildup on the
outside surface of the heating coil. This will restrict the
airflow through the coil, further aggravating the soot
buildup. Contact your local service center when desooting
is needed.
Engine
Refer to engine manual provided with this pressure
washer for recommended maintenance.
Oil Burner Blower Motor
The motor bearings are permanently lubricated and will
not require any additional lubrication.
Battery
Refer to battery manufacturer’s literature for recom-
mended maintenance

Page 12 Hotsy 5645 • 97-6580 • Rev. 8/03
Ref. No. Part No. Description Qty.
1 375602 Base, Pump 1
2 370803 Tubing Round, 0.25 x 0.093 ✽
3 612694 Bolt, G8.8 10mm x 20mm 4
4 698023 Nipple, Hose 3/8" NPT x 1/4" 1
5 615285 Bushing, Reducer 1/2" x 3/8" 1
6 935165 Screen, Suction 1
Figure 9 - Pump Assembly
1
3
9
11
7
5
4
8
6213
12
10
Ref. No. Part No. Description Qty.
7 954717 Tee, 1/2" x 3/8" STR 2
8 644754 Elbow, 1/2" STL 1
9 644601 Elbow, 3/4" JIC x 1/2" NPT 1
10 HC800 Pump, HC800 1
11 644602 Swivel, 3/4" Push-On 1
12 644603 Swivel, 1/2" Push-On 1
13 644600 Elbow, 1/2" JIC 1
✽Order Amount In Feet

Page 13Hotsy 5645 • 97-6850 • Rev. 8/03
Figure 10 - Unloader Valve Assembly
34
6
5
2
1
Ref. No. Part No. Description Qty.
1 875651 Pressure Switch 1
2 971580 UnloaderValve, 3000 PSI 1
3 801102 Nipple, 3/8" Hex x 1.45" 1
4 698025 Nipple, 3/8" NPT x 1/2" H 1
5 644751 Elbow, 3/8" 1
6 815220 Bush, 1/2" x 3/8" 1

Page 14 Hotsy 5645 • 97-6580 • Rev. 8/03
Figure 11 - Float Tank Assembly
2
1
4
3
Ref. No. Part No. Description Qty.
1 334937 RodTHD, 1/4" x 11" 1
2 807169 Ball, Plastic Float 4" 1
3 952721 Tank, Float 1
4 971421 FloatValve 1

Page 15Hotsy 5645 • 97-6850 • Rev. 8/03
Figure 12 - Pulley Assembly
Ref. No. Part No. Description Qty.
1 875061 Generator 1
2 919541 Pulley, BK40H 1
3 809150 Belt, BX22 1
4 830569 Pulley, 3TB40 1
5 815200 Bushing, P1 x 1 1/8" 1
6 809010 Belt, BX41 2
7 919560 Pulley, 2BK100 1
8 815131 Bushing, H x 5/8" 1
3
1
2
7
6
5
4
8

Page 16 Hotsy 5645 • 97-6580 • Rev. 8/03
Ref. No. Part No. Description Qty.
9 703185 Nut, 1/4" ESNA, NC 2
10 698019 Hose Barb, 1/4" Barb x
1/8" ML Pipe 2
11 676897 Fuel Filter, Plastic, MTM 1
12 823988 Clamp, Hose, UNI .46-.54 5
Ref. No. Part No. Description Qty.
1 867361 Hose, 1/4" ID, 250 PSI,
Grip, Red 2 ft
2 952731 FuelTank, Red 1
3 815230 Bushing 1
4 676575 Elbow, 1/4" Hose x Stand, Pipe 1
5 817313 FuelTank Cap w/Gauge 1
6 444432 FuelTank Decal 1
7 830491 Pump, 12V Fuel, Facet 1
8 615533 Screw, 1/4" x 3/4", HH NC,
Whiz Loc 2
Figure 13 - Engine FuelTank Assembly
To
Engine
5
6
3
4
2
9
7
8
1
10
10 11
12
12
12
3
4
12
Fuel Pump Assembly
(1290SSG Model Only)

Page 17Hotsy 5645 • 97-6850 • Rev. 8/03
Figure 14 - Burner FuelTank Assembly
Ref. No. Part No. Description Qty.
1 844595 Elbow, 1/4" x 1/4" Hose 1
2 676575 Elbow, 1/4" Hose x Stand Pipe 1
3 815230 Bushing 1
4 952730 FuelTank, Black 1
Ref. No. Part No. Description Qty.
5 817312 FuelTank Cap w/Gauge 1
6 444433 FuelTank Decal 1
7 971186 FuelValve 1
2
7
1
5
6
4
3

Page 18 Hotsy 5645 • 97-6580 • Rev. 8/03
Figure 15 - Pump Assembly

Page 19Hotsy 5645 • 97-6850 • Rev. 8/03
Ref. No. Part No. Description Qty.
1 827321 Crankcase 1
2 860360 Plunger Guide 3
3
▼❖
Plunger Seal 3
4
▼◆
Pressure Ring O-Ring 3
5
▼
Pressure Ring 25 mm 3
6
▼◆
V-Sleeve 25 mm 6
7
▼◆
Support Ring 25 mm 6
8
▼
Intermediate Ring 25 mm 3
9 915634 Plug 1/2" 1
10 936932 CopperWasher 1/2" 1
11 884470 Manifold Housing 1
12
★
Valve Seat O-Ring 6
13 877648 Valve Assembly Kit 6
14 915631 Manifold Plug 6
15
★
Manifold Plug O-Ring 6
16 612692 Manifold Stud Bolt 8
17 780560 Washer 16
18 780565 CopperWasher 3/8" 1
19 915630 Plug 3/8" 2
20
★
Valve Seat 6
21
★
Valve Plate 6
22
★
Valve Spring 6
23
★
Valve Cage 6
24 735314 Hex Screw 8
25 867750 Bearing Housing 2
26 707413 Closed Bearing Housing 1
27 926649 Bearing Housing O-Ring 2
28 926651 Crankshaft Seal 2
29 808401 Roller Bearing 2
30 827399 Double-Ended Crankshaft N/A
Ref. No. Part No. Description Qty.
31 NA Single-Ended Crankshaft NA
32 877399 Crankshaft Key 8 x 7 x 25 mm 1
33 835280 Oil Dipstick 1
34 944784 Shim 2
35
✤
Plunger Assembly Bolt 3
36
✤
Copper Spacer 3
37
✤
Plunger Rod O-Ring 3
38
✤
Teflon Ring 3
39
✤
Plunger Sleeve 25 mm 3
40
✤
Copper Spacer 3
41 829931 Plunger Rod 3
42 928640 Connecting Rod Assembly 3
43 914138 Connecting Rod Pin 3
44 735311 Allen Screw 6
45 926691 Connecting Rod Pin Snap Ring 6
46 936933 Spring Washer 6
47 855893 Gasket 3/8" 1
48 826680 Crankcase Cover 1
49 855890 Crankcase Cover Gasket 1
50 858430 Sight Glass 1/2" 1
51 735313 Crankcase Cover Allen Screw 6
Replacement Parts
◆
877650 Seal Packing Kit 1
▼
877647 Complete Seal Packing Kit 3
✤
877652 Ceramic Sleeve Kit 3
❖
877653 Plunger Rod Seal Kit 1
PUMP
EXPLODED VIEW PARTS LIST

Page 20 Hotsy 5645 • 97-6580 • Rev. 8/03
Figure 16 - Burner Assembly
6, 7
5
8
1
7/16"
5/32"
1/16"
3
4
1/16" 2
Ref. No. Part No. Description Qty.
1 615971 Burner, Small 1
2 825617 Air Cone 1
3 727467 Burner Nozzle 1
4 723367 Electrode Assembly 1
5 830493 Fuel Pump w/115V Solenoid 1
6 698020 Nipple, 1/4" NPT x 1/4" Hose 2
7 823988 Clamp, Hose, UNI .46 - .54 2
8 783814 Motor 115V 1
Ref. No. Part No. Description Qty.
NS 848608 Blower Fan 1
NS 848609 Fan Coupling 1
NS 851140 Filter, Fuel, Oil 1
NS 944840 Fuel Pump Stem 1
NS 944841 Fuel Pump Screen 1
NS 826167 Strain Relief 1
NS 703127 Strain Relief Nut 1
NS Not Shown
Table of contents
Other Hotsy Pressure Washer manuals

Hotsy
Hotsy 781SS Service manual

Hotsy
Hotsy Trailer 3500 User manual

Hotsy
Hotsy HHD 5/30 G User manual

Hotsy
Hotsy 790SS Service manual

Hotsy
Hotsy TRB Series User manual

Hotsy
Hotsy 1424SS User manual

Hotsy
Hotsy 965SS Service manual

Hotsy
Hotsy BXA-252739 User manual

Hotsy
Hotsy 800 Series User manual

Hotsy
Hotsy 1800 Series User manual

Hotsy
Hotsy 1260SS User manual

Hotsy
Hotsy 1467SS User manual

Hotsy
Hotsy 558 User manual

Hotsy
Hotsy 680SS Service manual

Hotsy
Hotsy ET-201006D User manual

Hotsy
Hotsy 1.109-691.0 User manual

Hotsy
Hotsy 1830SS User manual

Hotsy
Hotsy 981SS Service manual

Hotsy
Hotsy BX-2527 User manual

Hotsy
Hotsy 965SS User manual