manuals.online logo
Brands
  1. Home
  2. •
  3. Brands
  4. •
  5. Billyoh
  6. •
  7. Outdoor Furnishing
  8. •
  9. Billyoh 7ft Expert T & G Corner Summerhouse INS-0088 Instruction Manual

Billyoh 7ft Expert T & G Corner Summerhouse INS-0088 Instruction Manual

Pressure Treated Buildings Only
"Do NOT treat for the first 6 months
following the delivery of your building"
V3.8 - 010321
2) Reacquaint
yourself with the
parts, QTy’s and
Sizes on the
PACKING LIST.
PACKING
LIST
1) Take 5
minutes
and have
a coffee.
3) Read the
instructions
thoroughly and
then re-read if
necessary.
BEFORE
YOU
START
7ft GABLE:
CoverED Size:
7x7
CODE:
INS-0088
TONGUE & GROOVE
SUMMERHOUSE
7ft Expert T & G Corner Summerhouse Building Instructions
Please read the instructions carefully
and please retain for future reference
Please note that all images are for illustration purposes only.
For Queries and Help please contact Product Support: 01909 768840
Pre - Treated
Pressure Treated
IMPORTANT SAFETY NOTICES
GARDEN BUILDINGS: These products are intended for domestic & outdoor use only. These products have been designed as an
affordable solution to most popular light domestic uses. WARNING: Playhouses are not suitable for children under 36 months
as they are not stable on their feet. Children are unaware of the dangers of play, therefore, It is important to supervise your
child at all times whilst playing in a playhouse.
Important Safety Tips
• This building should be constructed by at least two adults.
• Do not use this product if it has been modified or damaged.
• Allow adequate time to complete construction. If you hit any snags, take a break, keep calm, & seek additional help if needed.
• Ensure that there is adequate space around the construction site to enable access to all sides of the building during
construction.
• Do not attempt to construct the building in strong winds or poor weather conditions.
• Make sure that any ladders used during construction are in a good condition & that all tools are in good working order.
• The building is not completely stable until construction is complete & the roof of this building is not intended to support
significant weight. Do not climb on the roof.
• Keep bags, nails & fixings out of the reach of children.
• Please retain the instructions for future reference
Due to the nature of wooden panel products please watch out for the following minor blemishes:
• Protruding nails = hammer in the nails so that they are flush with the wood’s surface.
• Splintered wood and sharp edges = smooth down with sandpaper.
• Loose or dead knots = use a non-toxic wood glue to secure.
• Wear protective gloves & robust clothes during construction.
• Ensure that any paint or preservative that you use is non-toxic.
• Perform periodical checks throughout the life of the building to ensure that the original condition is maintained.
• Construct your building within a month of delivery to reduce the chances of the panels / boards warping.
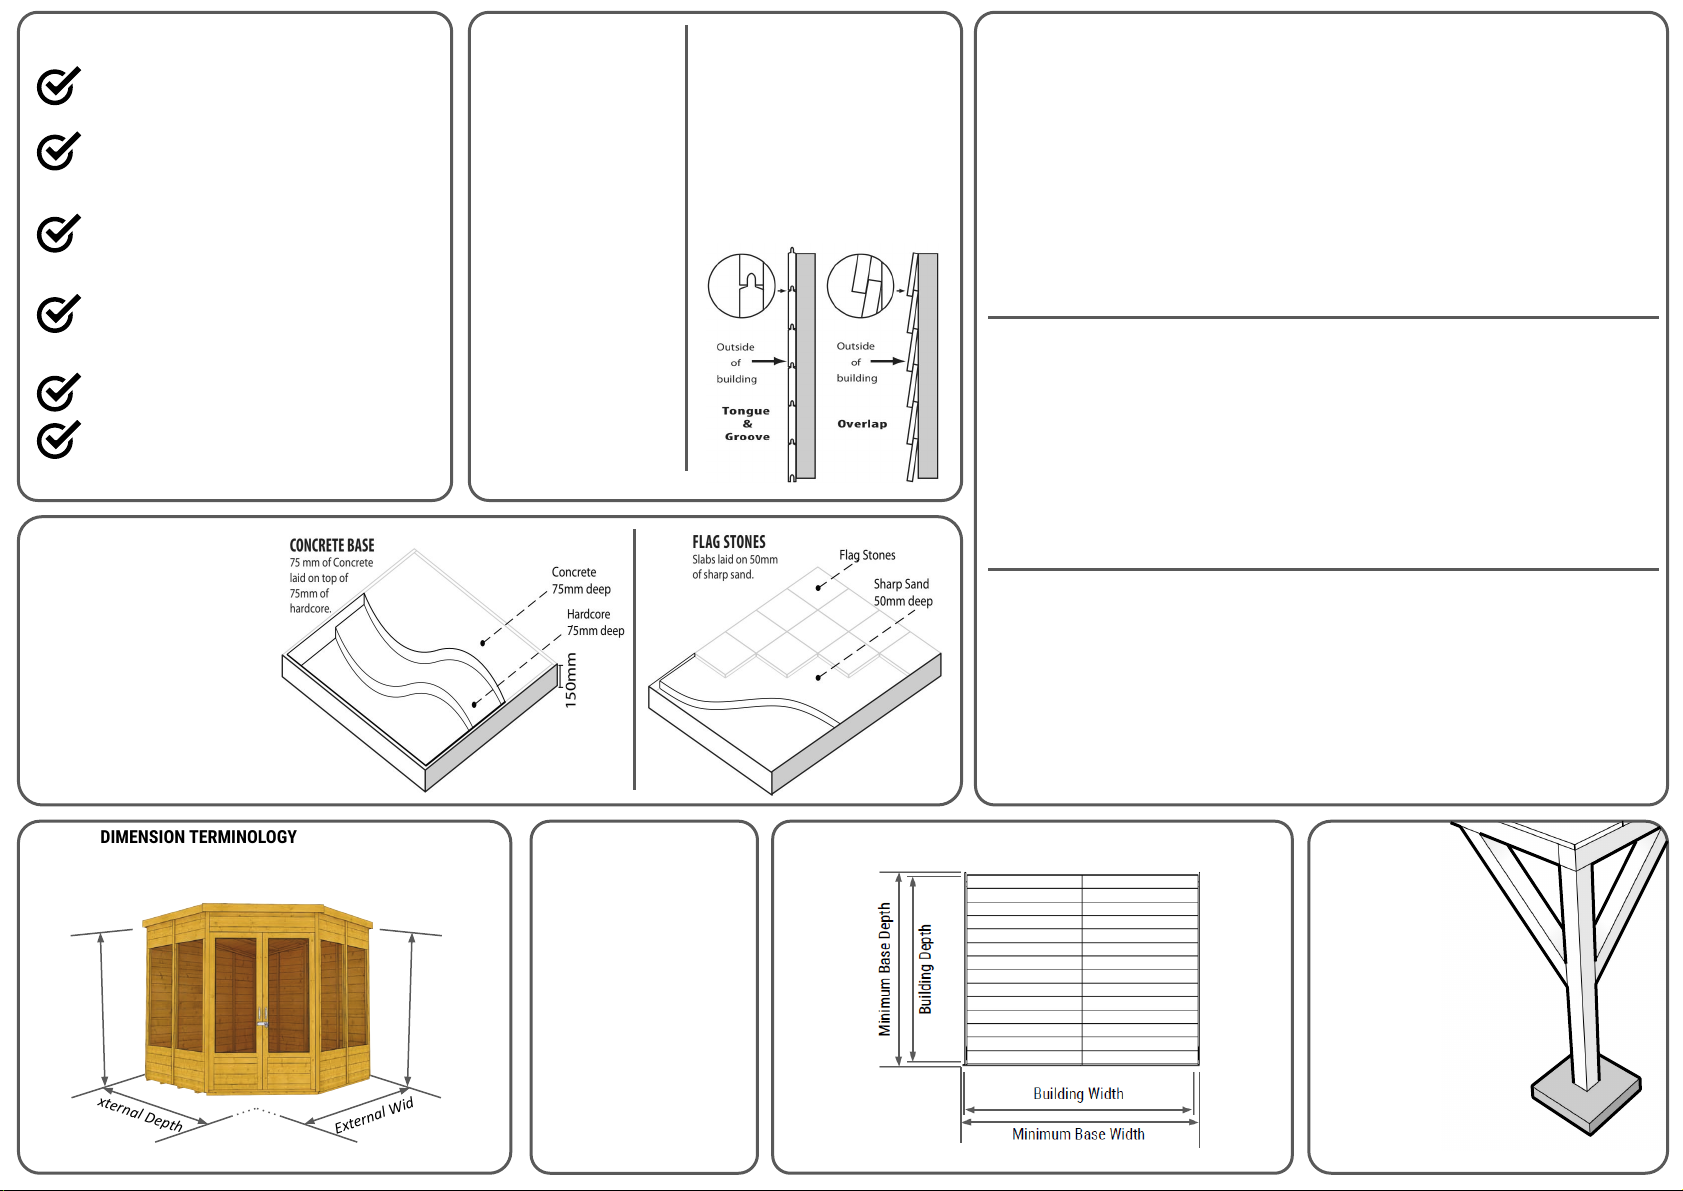
• Some boards have a rough side and a smoother side. Ensure that these are placed appropriately, i.e. floorboards are smooth
side up, roof boards are smooth side down
AFTER MARKET MODIFICATION
• We do not recommend modifying this product. However, customers do enjoy modifying their buildings with their own
specific needs in mind as our products allow for a wide range of uses.
• If you modify this product for your own personal requirements you are doing so at your own risk.
• Customers who modify their buildings should ensure they do so safely & so that they do not affect the integrity of the
structure.
• If you are considering modifying this building be aware that any modifications invalidate your warranty & may affect
your consumer rights.
• We do not recommend fitting optional building parts, such as a base, from another manufacturer to ensure safety standards
MAINTENANCE
If there is any cause for concern or any other problems are found on or after delivery, such as damaged parts do not build, please
visit our Support Centre - billyoh.co.uk/help for further advice & resolution & stop all use before assembly until issues are
resolved. Ensure any replacement parts are fitted in accordance to the product instructions.
Important
• Throughout the life of the building please conduct checks to ensure the original condition is maintained.
• It is advised that the building is checked over prior to use each & every time.
• Please check the structural integrity of the building.
• Ensure the hinges of the door(s) are still in good working order regularly.
• Check the whole of the building for splintering. If this occurs please sand down the problem area & re-treat.
• Check that the fixings of the building are fit for purpose over the product’s life.
• Please ensure that any cracks that should appear in the product are not situated on any joints.
• Cleaning of the building on a regular basis is advised to increase longevity.
Playhouses
• Important: throughout the life of the playhouse please conduct checks to ensure the original condition is maintained. Failure
to carry out maintenance on this building could cause the product to be hazardous.
• Important: product must be checked at the start of each season minimum, ensuring it is safe to use. It is advised therefore
that the playhouse is checked over prior to use each & every time.
PRODUCT WARRANTY
• Products are built to the highest quality standards & should provide the intended purpose for years to come, this of
course being subject to reasonable use, care & transportation.
• If in doubt about the product’s limitations please read & understand all of the instructions & guidance notes. If
necessary please contact the retailer that the item was purchased from.
• Please visit our website for warranty & guarantee information.
• Please note, the warranty does not extend to damage caused post-delivery
• Treat your building annually with a quality timber treatment to comply with the buildings warranty.
GENERAL RECOMMENDATIONS
Thank you for purchasing this building. We hope you will be delighted with your new building for many years to come. These
instructions have been written as a guide to assembling this building & will provide you with an overview of the process of
constructing this building. There are a number of considerations to be thought of before constructing the building & how to
maintain your building upon completion. This section is also aimed at ensuring you are aware of considerations such as:
location for construction, treatment of the building & construction information.
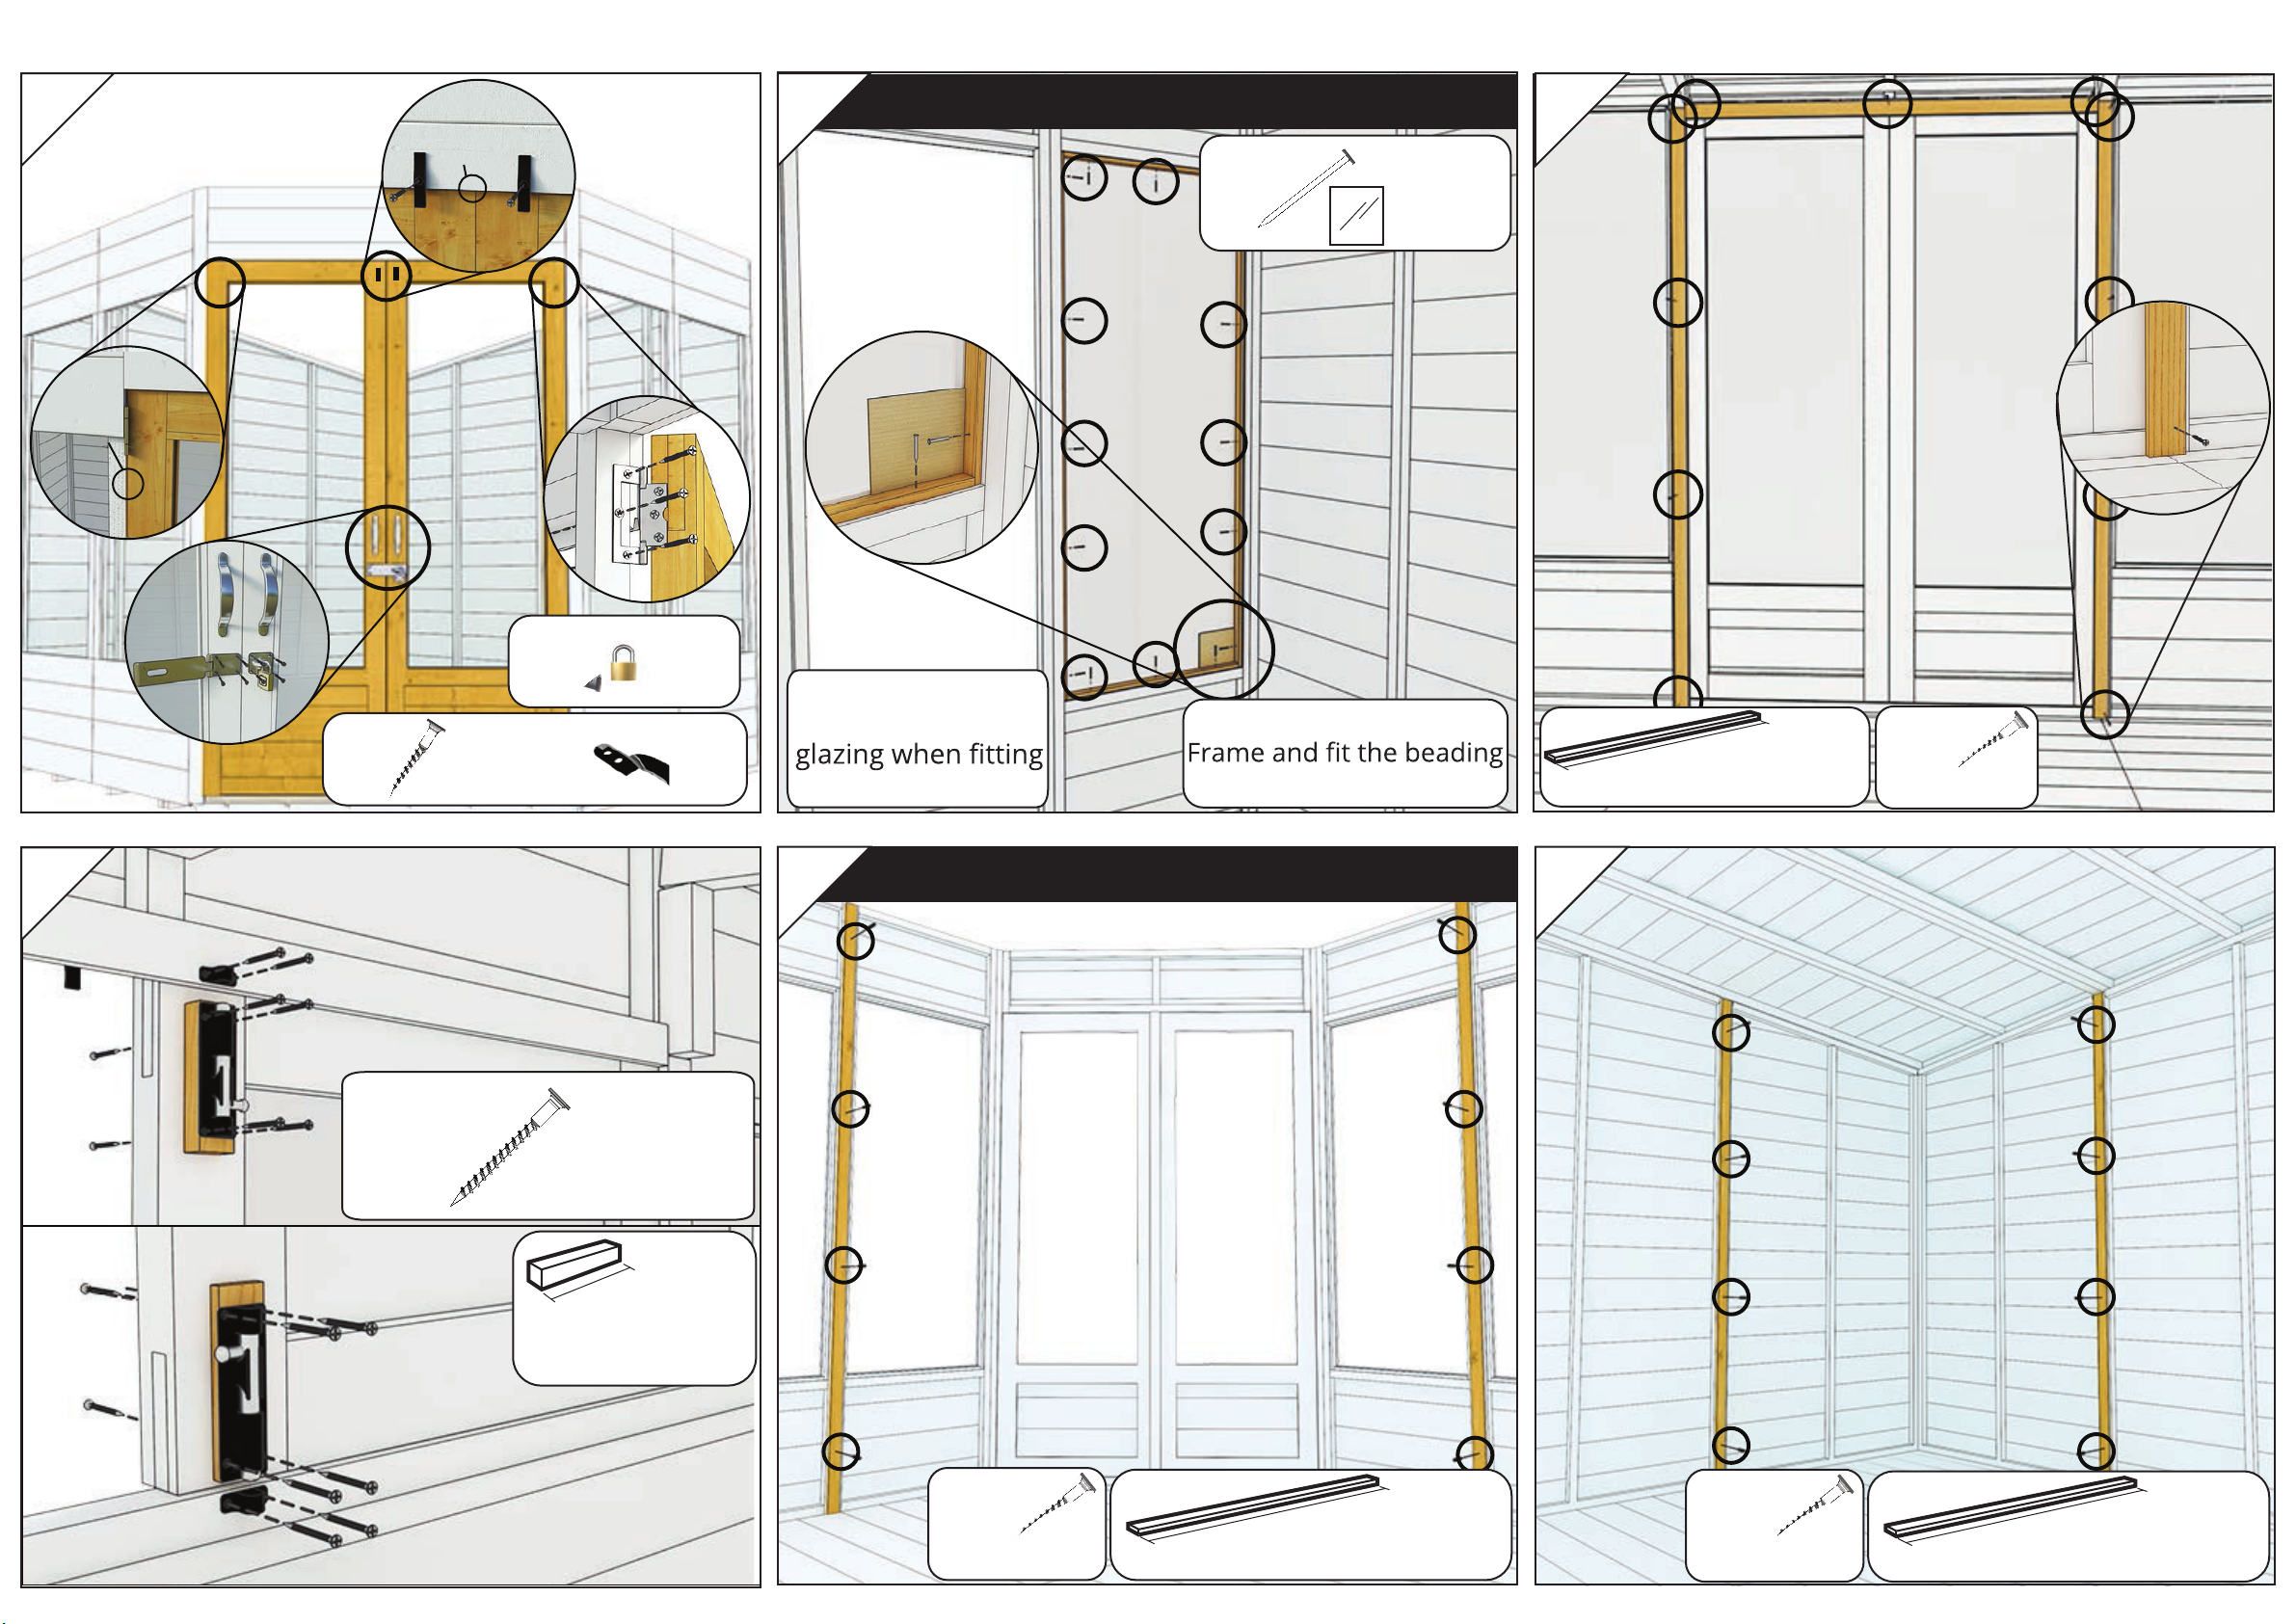
Glazing: The glazing is generally sealed in plastic together. It may even be in between two of the panels. Remove protective film
from glazing before use. The glazing is safer to use than glass & is an economic solution for garden building use, but must be
installed correctly, carefully & safely. Glazing that is fitted to the outside of buildings is an uncomplicated method that does not
require beading. The glazing on all the garden buildings does not make the windows watertight & we suggest using a silicon
sealant to improve water resistance around the edges of the glazing.
Doors: Generally the doors are sent loose for all buildings. Some buildings such as summerhouses may have the doors already
fixed to the door frame. If your building is not built on a flat, level surface you may experience difficulties when fitting your
doors. The doors are not waterproof & you may find a gap between the doors or around the edges. This is not a fault as the
doors will move, shrink & expand during different weather conditions. Occasionally during transit the door frame can become
misaligned. This is easily solved by hanging the door on a level surface before the panels are attached.
Summerhouses: Some summerhouse doors are held together at the base of the frame with a screw or nail for transportation
purposes. Remove this screw or nail before commencing construction.
Building location & construction: Locate your building in a suitable & well prepared area, which is flat & protects the building as
much as possible from extreme weather conditions such as high moisture elements. It is very important that a solid & level
foundation is prepared to ensure the building will be level & square. This will help ensure that all parts fit correctly. The building
is not fully structurally sound until construction is complete. You may experience moments, such as when building the wall
panels, where you feel the building is not safe & may be flexing too much. This is perfectly natural so do not worry & take your
time as full rigidity for the building will only occur on completion of the construction process. We recommend that you
construct your building within 1 month of delivery as the timber may begin to warp. The building should be constructed leaving
a 2ft perimeter around the building.
Keep panels & your building away from extreme temperatures & away from trees, fences & other high moisture containing
elements to reduce & help prevent warping. This building is water resistant, but not water tight. Please wait for weather to
change before notifying us if you notice changes in the structure.
Playhouses: There are two holes in the rear gable for ventilation purposes.
Treatment: Treating the product when assembled is essential to ensure the building will not deteriorate. We recommend you
apply the finishing product to a small area to ensure it provides the intended result before proceeding. Always use an EN71
compliant treatment. Important notice: The natural moisture content of wood will change according to season. We recommend
applying a quality timber treatment to minimise the effects. Re-apply treatment annually to prolong the building’s life.
Wood Characteristics: Wood is a natural material, which means that no two boards on your building will be identical & will
expand & contract due to moisture levels. This natural effect of expansion & contraction is inevitable & is compensated for by
the tongue & groove construction in tongue & groove buildings. The timber in overlap buildings may warp & twist over time,
which is a natural process. The timber may crack naturally over time, but will not affect the structural integrity of the building
provided it has been assembled as advised.
Customer Service: If there are any queries regarding the building construction or aftercare please contact BillyOh and we will do
our utmost to ensure customer satisfaction.
Additional Safety Rules & Guidelines:
• No one should use the equipment until properly assembled.
• Read the instructions thoroughly a couple of times before attempting each section of the build.
• Make sure you have adequate space, a safe working environment & a flat level base to work on.
• Take your time, do not panic.
• Construct your building within one month of delivery to stop parts warping / bowing.
Additional Safety Rules & Guidelines Specific for Playhouses only:
• If your child suffers from any physical condition that could affect his/her ability to use the building it is highly recommended
that you consult a doctor before allowing them to use the equipment.
• Playhouses are designed for children between 3-10 years of age, with a maximum individual user weight of 50kg.
• Adults should not use playhouse equipment.
Slide & Ladder Options on Playhouses:
Important: The slide should be positioned to avoid full direct sunlight at the hottest part of the day to avoid overheating &
causing injury. The slide should not be installed over concrete, asphalt, slabs or any hard surface. If your product comes with a
ladder or slide it is extremely important to continually check the fixings of the slide & the ladder to the building as injuries may
occur if these parts become loose or detached.
For help & support, call 01909 768840
PRODUCT MAINTENANCE CHECKLIST
Wooden Sheds / Playhouses / Summerhouses
Level Base: A firm level base & protection from
moisture penetration is key to maintaining the building.
Seal The Windows: Use a silicone sealant on the inside
& outside of the windows as soon as possible after
assembly is a strong way of sealing the windows.
Annually Treat The Building: Treat your building after
construction with a good quality water resistant
treatment. Repeat this annually inside & out. (You do
not need to treat the building initially if you received a
pressure treated building)
The Building Must Not Be In Contact With Anything:
Overhanging hedges or trees must be cut back as a
branch may pierce roofing felt or glazing & would allow
water ingress.
Regularly Check / Replace Damaged Felt: Check the
felt regularly. Any damaged felt must be replaced.
Lubrication: Use a suitable oil to lubricate all moving
parts, such as hinges, for continued proper use.
CLADDING STYLE
Overlap: This style of
cladding is very traditional &
uses rough sawn timber. This
gives the panels their
unfinished look & helps the
building to blend in to its
natural surroundings. When
the wood has dried through
hotter weather knots may
become loose, which is
natural. Overlap is an
economic solution for lower
impact use.
Tongue & Groove: This style
of cladding allows the timber
to interlock giving greater
strength to the building. It
also creates a smoother finish
& continuous lines throughout
the panel. Due to the natural
movement of wood the lines
between tongue & groove
panels may not marry up.
PANEL ORIENTATION
It is essential to ensure that the panels
of your building are in the correct
orientation. Assembly in the wrong
orientation may lead to water ingress &
deterioration.
Boards overhang the edge of the floor:
In most cases the lower edge of the
panels overhangs the floor of the
building & the panel is fixed to floor with
screws through the frame on the inside
of the panel.
External Depth
External Eaves Height
BASE DIMENSIONS
Use the dimensions that are on
the technical details
documentation for your specific
building to workout the required
dimensions when laying your
solid base.
Do not forget about the roof
overhang when choosing your
building location. Keep in mind
where the roof will finish & how
you will maintain the building.
FOOTPRINT OF BUILDING
BUILDING DIMENSION TERMINOLOGY
TROUBLESHOOTING GUIDE
Pre-Assembly:
Q: What type of base should I use? A: You must lay a solid flat & level base. Failure to do so will result in
your building fitting together incorrectly. We highly recommend a properly laid & flat & level concrete or
flagstone base (see Building a Base section of this instruction document).
Q: I have glazing / fixing kit missing. What should I do? A: Firstly check that all of your building’s parts are
there by laying them all out on the ground. Check between the panels / larger parts as the glazing comes
banded together & is placed between the panels, along with the fixing kit, for safer transportation. If they
are still not found please visit our Support Centre - billyoh.co.uk/help
Q: Are tower playhouses freestanding? A: We recommend that tower playhouses are positioned on a flat /
level base raising the legs away from ground moisture. Please read the Protecting Playhouse Tower Legs
section of this document for more details.
Q: Are my window & plain panels interchangeable? A: On apex buildings the window & plain panels are
interchangeable where they are the same size or make up the same size panel as the opposing wall with
more than one part. Some pent building may also allow for panels to be interchangeable but ensure they
are the same size before securing.
During Assembly:
Q: How are the windows fixed to the building? A: This process depends on the individual building. Please
read the instructions to find out which method your particular building uses.
Q: Which way do the joists run? A: This process depends on the individual building. Please read the
instructions to find out which way the joists run.
Q: My building seems a little flimsy? A: Your building won’t reach full rigidity until fully assembled so do
not panic.
Q: Construction seems tricky? A: Take your time & read the instructions thoroughly. These buildings
should be constructed by two people. If in doubt seek professional help.
Q: The felt seems a little tight? A: To reduce waste, to help protect the environment & reduce costs for our
customers we only supply the required amount of felt for roofing material.
Q: My building isn’t going together properly, it is twisted. A: It sounds like you are building on an uneven
surface. You must build on a flat / level base for your building to fit together correctly.
Post-Assembly:
Q: Why is there a gap around the doors? A: During the year the wood of your building will shrink & expand,
which will create a gap around you building’s doors. This is natural.
Q: Why is there a gap around my playhouse door? A: This gap is to stop finger trapping & is an EN-71
testing requirement.
Q: Why does my playhouse have holes in the back panel? A: These holes are for ventilation & is an EN-71
testing requirement.
Q: My building is not water tight around the windows. A: These products have been designed as an
affordable solution to most popular light domestic uses & we do not state that they are watertight. Use
silicon sealant around the windows to improve the water resistant qualities of the building.
Q: My building has developed a leak A: Use silicon sealant to stop the leak & make sure that your building
is not in a damp area & if necessary move it & replace the damaged boards.
BUILDING A BASE
When thinking about where the building
& base are going to be constructed
ensure that there will be access to all
sides for maintenance work & annual
treatment. This building should be
situated at least 2 feet away from
any structures or obstructions (such
as fences, buildings, trees, laundry
lines, electrical wires etc). We
recommend that areas around playhouses
have a soft surface such as play bark or grass.
All garden buildings must be built on a level, flat base
to be erected correctly
PLAYHOUSES:
PROTECTING
PLAYHOUSE TOWER
LEGS
We strongly recommend that
the legs of all of the platforms in
the tower range of playhouses
should be kept off of grass & soil &
out of moisture.
The minimum protection needed is to
be treated annually with a water
repellent treatment.
Placing the tower legs on a
solid base, preferably concrete or
flagstones, will help prevent water
penetration.
External Width
External Ridge Height
For Queries and Help please call Product Support: 01909 768840
Floor Stages
Lay floor sections with
joists facing upwards.
S50 x 5
Ensure floor Joists are
alligned before fixing.
Recommend
x2 for speed
1 2 3 4
85
9
6 7
Approximate building time is
4 to 8 Hours assembly
based on experience and size.
1. Cordless drill
2. Phillips bit
and drill bits
3. Hammer
4. Measuring Tape
5. Pencil
6.Utility Knife
7. Woodsaw
8. Step ladder
9. Spirit level
What you need
Glazing,strips and fixings found in packs.
7x4 Extension Kit - contains addi-
tional strips, framing and fixing kit.
7x7 Building Woodkits - contains all strips,
framing, fixings and Instruction for the
building size.
Truss pack - contains rafters and collar ties.
Where to find everything
HANDY TIP: Sort fixings and wood kit by size and piece
before starting.”All pack list found at the end of document”.
Use a suitable drill bit for pilot hole
- 3mm is recommended for most.
3mm or 4mm
Avoid splitting wood by pre-
drilling pilot holes for all screws
This is needed for all screw codes:
S12, S30, S40, S50, S70 and S100
IMPORTANT: Pre pilot drill
all screw holes
Pilot Drilling
Building Size Floor Sections Roof Sections
7 x 7 2 2
Please note on the number of Floor and Roof
sections according to your building size.
11 x 7 3 3
Floor / Roof Details
1
45 6
2 3
Part ID - 24907
P.T. ID - 29133
Part ID - 24908
P.T. ID - 29134
For Queries and Help please call Product Support: 01909 768840
Plain Gable Section
Corner Post
Top View Diagram
Flip floors back over
Gable Panel Stages
Lay gable panel, fix
bottom rails. Repeat
for all gable panels
Pilot drill holes
before fixing
S50 x 3 (FR-0969-SQ)
969 mm
Place the corner
post along the edge
of the floor. It should
line up with edges
of the floor.
Wall Panel Stages
1750 mm
38-1750-SQ
Window Panel Fixing Stages
S50 x 4 (FR-0530-SQ - 2ft Window Panel)
530mm
Pilot drill holes
before fixing
Lay window panel,
fix bottom rails.
Repeat for all window
panels
Place gable panel
along the edge of
the floor and
corner post. It
should line up with
edges of the floor.
TIP: Don’t fix panels to floor until roof is in place.
7
10 11 12
8 9
For Queries and Help please call Product Support: 01909 768840
Place the window panel
next to the gable section
Pilot drill holes
before fixing
S50 x 4
Pilot drill holes
before fixing
S50 x 4
Pilot drill holes
before fixing
Place the gable panel
(Left back)
S50 x 4
Pilot drill holes
before fixing
Place the gable panel
(Right back)
S50 x 4 S50 x 4
Pilot drill holes
before fixing
Place the gable panel
(Left front)
S50 x 4
Pilot drill holes
before fixing
Place the gable panel
(Right front)
13
16 17 18
14 15
For Queries and Help please call Product Support: 01909 768840
Position the T & G roof
sheet with the framing
S70 x 10
Place the window panel
next to the gable section
Pilot drill holes
before fixing
S50 x 4
Pilot drill holes
before fixing
S50 x 4 1997 mm
FI-1997-SQ135S50 x 4
Fix the corner fillet along
the edge of the floor and
window panel
Pilot drill holes
before fixing
1997 mm
FI-1997-SQ135S50 x 4
Repeat on the other side Fix Valance and Threshold
between the two corner fillets
Pilot drill holes
before fixing
Valance = 25666
S50 x 10 (FR-1172-SQ)
1172 mm
19
22 23 24
20 21
Part ID - 26044
P.T. ID - 29124
For Queries and Help please call Product Support: 01909 768840
S30 x 18
x 6
P30 x32
GL x 2
Place the Glazing in the
Frame and fit the beading
around the edges
Cardboad can be used to protect
the glazing when fitting the Beading
Fixing Door Glazing
S50
Screw the wall panels
to the floor. Make sure
it will hit the bearers
S70 x 12
Apply a downward
force from the roof so
it will allign to the
gable panel
Hinges fix
to the
Framing.
Back View of Doors
Door Fixing Stage
S70 x 5
Fix both the roof from
the inside. Pilot drill
holes before fixing.
For 11x7 corner building,
please see INS-0089
25
28 29 30
26 27
Part ID - 26045
P.T. ID - 29125
For Queries and Help please call Product Support: 01909 768840
S30 x 32 x 2
x 1
2mm
Gap
4mm
Gap
Cardboad can be
used to protect the
the Beading
PP x16
GL x 1
Place the Glazing in the
around the edges
Fixing Window Glazing
(CL-1754-40RS)
1754mm
S30 x 11
S30 x 16
x 2
x 2
100mm
Top
Bottom
Cloaking Strip Fixing Stages
(CL-1907-40RS)
1907mm
S30 x 8
(CL-1757-40RS)
1757mm
S30 x 8
31
34 35 36
32 33
For Queries and Help please call Product Support: 01909 768840
T10
Fold over
Corner
100mm
Repeat previous stages
T10
T10
Mineral Felt
Sand Felt T8
70mm overhang
at each end
Tack to hold
in place
100mm
Felt Fixing Stage
Length of
roof + 140mm
x 3
Felt
Felt
Felt
Side View
(3 PIECES OF FELT)
STAGE 3
STAGE 1
STAGE 2 LENGTH
CL-1907-40RS
N30 1907mm
Cloaking Strip Fixing Stage
Cut to size
Leave space for fascia
CL-1757-40RS
CL-1730-40RS
N30 1730mm & 1757mm
This will require cutting to size
37
40 41 42
38 39
Repeat previous stages
T10 N30 x 6
(FB-1280-90RS)
1280mm
Fascia Fixing Stage
N30 x 8
(FB-1280-90RS)
1280mm
Treat after assembly and
annually to protect
Protect your building
7x7 Picton Corner Summerhouse Shown
43
46
44 45
For Queries and Help please call Product Support: 01909 768840
Name: Woodkit Building Pent 7ftx7ft Summerhouse Long Window U1754 Rear Eaves
PACKED PART
ID:
26049
Pack List
GROUP PART ID Description / Image Part Code Length Z (m) QTY
Tick when
Packed
Door Strip 31784
11mm x 40mm Cloak Strip - Rough Sawn
CL-0100-40RS 0.100 2
Door Rebates
Top 34439
11mm x 40mm Cloak Strip - Rough Sawn
CL-1148-40RS 1.148 1
Door Cloak 31771
11mm x 40mm Cloak Strip - Rough Sawn
CL-1754-40RS 1.754 2
Panel Cloak 35218
11mm x 40mm Cloak Strip - Rough Sawn
CL-1730-40RS 1.730 2
Panel Cloak 35217
11mm x 40mm Cloak Strip - Rough Sawn
CL-1757-40RS 1.757 4
Panel Cloak 35216
11mm x 40mm Cloak Strip - Rough Sawn
CL-1907-40RS 1.907 6
Fascia 34472
11mm x 90mm Fascia Board - Rough Sawn
FB-1280-90RS 1.280 7
Door Block 31139
28mm x 28mm Framing Rough Sawn - Homegrown
FR-0100-SQ 0.100 2
Top & Bottom
rails 25811
28mm x 28mm Framing Rough Sawn - Homegrown
FR-0530-SQ 0.530 12
Bottom Rails
Gable 31768
28mm x 28mm Framing Rough Sawn - Homegrown
FR-0969-SQ 0.969 4
Door Threshold 31105
28mm x 28mm Framing Rough Sawn - Homegrown
FR-1172-SQ 1.172 1
Corner Post 34785
38mm x 38mm Framing Rough Sawn - Homegrown
38-1750-SQ 1.750 1
Corner Fillets 34474
55mm x 38mm Corner Fillet Trapeze Shape @ angle 135°
FI-1997-SQ135 1.997 2
Instructions -
INS-0088 -7x7 Corner Summerhouse Instructions
INS-0088 -1
Fixing Kit 26053
Fixing Kit Building Pent 7ftx7ft Summerhouse Long Window U1754 Rear Eaves
FK-7x7-P-CRN-
LW-U1754-RS -1
FINAL PART CHECKING: TO BE FILLED IN BY THE FINAL PACKER OR CHECKER:
I, __________________________, have checked that all components have been packed in good quality on ____/____/__________
Kybotech, Claylands Avenue, Worksop S81 7BQ
V3.1 010520
Name: Woodkit Pressure Treated Building Pent 7ftx7ft Summerhouse Long Window U1754 Rear Eaves
PACKED PART
ID:
29126
Pack List
GROUP PART ID Description / Image Part Code Length Z (m) QTY
Tick when
Packed
Door Strip 29096
11mm x 40mm Cloak Strip - Rough Sawn
CL-0100-40RS-(PT) 0.100 2
Door Rebates
Top 29097
11mm x 40mm Cloak Strip - Rough Sawn
CL-1148-40RS-(PT) 1.148 1
Door Cloak 29015
11mm x 40mm Cloak Strip - Rough Sawn
CL-1754-40RS-(PT) 1.754 2
Panel Cloak 35215
11mm x 40mm Cloak Strip - Rough Sawn
CL-1730-40RS-(PT) 1.730 2
Panel Cloak 35214
11mm x 40mm Cloak Strip - Rough Sawn
CL-1757-40RS-(PT) 1.757 4
Panel Cloak 35213
11mm x 40mm Cloak Strip - Rough Sawn
CL-1907-40RS-(PT) 1.907 6
Fascia 29127
11mm x 90mm Fascia Board - Rough Sawn
FB-1280-90RS-(PT) 1.280 7
Door Block 29019
28mm x 28mm Framing Rough Sawn - Homegrown
FR-0100-SQ-(PT) 0.100 2
Top & Bottom
rails 29020
28mm x 28mm Framing Rough Sawn - Homegrown
FR-0530-SQ-(PT) 0.530 12
Bottom Rails
Gable 29128
28mm x 28mm Framing Rough Sawn - Homegrown
FR-0969-SQ-(PT) 0.969 4
Door Threshold 29025
28mm x 28mm Framing Rough Sawn - Homegrown
FR-1172-SQ-(PT) 1.172 1
Corner Post 29129
38mm x 38mm Framing Rough Sawn - Homegrown
38-1750-SQ-(PT) 1.750 1
Corner Fillets 29130
55mm x 38mm Corner Fillet Trapeze Shape @ angle 135°
FI-1997-SQ135-(PT) 1.997 2
Instructions -
INS-0088 -7x7 Corner Summerhouse Instructions
INS-0088 -1
Fixing Kit 26053
Fixing Kit Building Pent 7ftx7ft Summerhouse Long Window U1754 Rear Eaves
FK-7x7-P-CRN-LW-
U1754-RS -1
FINAL PART CHECKING: TO BE FILLED IN BY THE FINAL PACKER OR CHECKER:
I, __________________________, have checked that all components have been packed in good quality on ____/____/__________
Kybotech, Claylands Avenue, Worksop S81 7BQ
V2.1 010520
Part Name:
Fixing Kit Building Pent 7ftx7ft Summerhouse Long Window U1754 Rear Eaves
Part ID:
26053
Code Name Image QTY Ticked
N30 30mm Nails 56
S30 30mm Screws 66
S50 50mm Screws 105
S70 70mm Screws 27
FH04 4 INCH Flush
Hinge - Silver 6
TBT Tower Bolt Silver 2
HS Hasp and staple,
Padlock 1
PH6 6 INCH Plain
Handle - Silver 2
TB Turn Button -
Silver 2
FINAL PART CHECKING: TO BE FILLED IN BY THE FINAL PACKER OR CHECKER:
I, __________________________, have checked that all components have been packed in good quality on
____/____/__________
Kybotech, Claylands Avenue, Worksop S81 7BQ
V2.1-300420
* PLEASE NOTE: Not all buildings are independently QA checked - these are done at scheduled intervals.
Name:
PACKED PART
ID:
GROUP
PART ID Description / Image
Profile or
Clad
Part Code Length Z (m) QTY
Tick when
Packed
Beading Top -
10mm x 20mm Beading -Planed
10x20PL BD20-0510-SQ 0.510 2
Beading Sides -
10mm x 20mm Beading -Planed
10x20PL BD20-1281-SQ 1.281 2
Glazing 23024
Glazing 1.8mm Styrene Fixed Window W0.525xH1.278m
1.8STY
1.8STY-FW-
525x1278
-1
Panel Pins -
30mm Panel Pins
-P30 -14
25722
Pack List
FINAL PART CHECKING: TO BE FILLED IN BY THE FINAL PACKER OR CHECKER:
I, __________________________, have checked that all components have been packed in good quality on ____/____/__________
Kybotech, Claylands Avenue, Worksop S81 7BQ
V1.0 050117
Glazing Pack Fits 2ft Long Window Section W0.525xH1.278
Name: Glazing Pack Pressure Treated Fits 2ft Long Window Section W0.525xH1.278
PACKED PART
ID: 29094
Pack List
GROUP PART ID Description / Image
Profile
or Clad Part Code Length Z (m) QTY
Tick when
Packed
Beading Top 29102
PT Component Woodkit: BD-0510D-10mm x 20mm Planed Beading
10x20PL BD20-0510D-SQ-(PT) 0.510 2
Beading Sides 29103
PT Component Woodkit: BD-1281D-10mm x 20mm Planed Beading
10x20PL BD20-1281D-SQ-(PT) 1.281 2
Glazing 23024
Glazing 1.8mm Styrene Fixed Window W0.525xH1.278m
1.8STY 1.8STY-FW-525x1278 -1
Panel Pins -
30mm Panel Pins
-P30 -14
FINAL PART CHECKING: TO BE FILLED IN BY THE FINAL PACKER OR CHECKER:
I, __________________________, have checked that all components have been packed in good quality on ____/____/__________
Kybotech, Claylands Avenue, Worksop S81 7BQ
V1.0 010218
Name:
PACKED PART
ID:
GROUP
PART ID Description / Image
Profile or
Clad
Part Code Length Z (m) QTY
Tick when
Packed
Beading Top -
10mm x 10mm Beading -Planed
10x10PL BD10-0449-SQ 0.449 4
Beading Sides -
10mm x 10mm Beading -Planed
10x10PL BD10-1276-SQ 1.276 4
Glazing 23025
Glazing 1.8mm Styrene Door W0.465xH1.275m
1.8STY
1.8STY-DR-
465x1275
-2
Panel Pins -
30mm Panel Pins
-P30 -28
25723
Pack List
FINAL PART CHECKING: TO BE FILLED IN BY THE FINAL PACKER OR CHECKER:
I, __________________________, have checked that all components have been packed in good quality on ____/____/__________
Kybotech, Claylands Avenue, Worksop S81 7BQ
V1.0 050117
Glazing Pack Fits Summerhouse Door W0.465xH1.275
Name: Glazing Pack Pressure Treated Fits Summerhouse Door W0.465xH1.275
PACKED PART
ID: 29095
Pack List
GROUP PART ID Description / Image
Profile
or Clad Part Code Length Z (m) QTY
Tick when
Packed
Beading Top 29099
PT Component Woodkit: BD-0449D-10mm x 10mm Planed Beading
10x10PL BD10-0449D-SQ-(PT) 0.449 4
Beading Sides 29100
PT Component Woodkit: BD-1276D-10mm x 10mm Planed Beading
10x10PL BD10-1276D-SQ-(PT) 1.276 4
Glazing 23025
Glazing 1.8mm Styrene Door W0.465xH1.275m
1.8STY 1.8STY-DR-465x1275 -2
Panel Pins -
30mm Panel Pins
-P30 -28
FINAL PART CHECKING: TO BE FILLED IN BY THE FINAL PACKER OR CHECKER:
I, __________________________, have checked that all components have been packed in good quality on ____/____/__________
Kybotech, Claylands Avenue, Worksop S81 7BQ
V1.0 010218

Popular Outdoor Furnishing manuals by other brands

Crivit 273846 Instructions for use

Crivit

Crivit 273846 Instructions for use

Hanover TRADDN9PCSQ-RED manual

Hanover

Hanover TRADDN9PCSQ-RED manual

PIZZELL Cart Pro Assembly instructions

PIZZELL

PIZZELL Cart Pro Assembly instructions

Courtyard Creations TGS24SV Assembly instructions

Courtyard Creations

Courtyard Creations TGS24SV Assembly instructions

Crosley Furniture CO6214 Assembly instructions

Crosley Furniture

Crosley Furniture CO6214 Assembly instructions

Multi Nautic QP-427D Assembly and installation guide

Multi Nautic

Multi Nautic QP-427D Assembly and installation guide

Sunjoy Newport L-GZ660PST-PK Assembly instruction

Sunjoy

Sunjoy Newport L-GZ660PST-PK Assembly instruction

CAZEBOO COM-000443 Assembly instructions

CAZEBOO

CAZEBOO COM-000443 Assembly instructions

PHI VILLA THD7-103-344B Use and care guide

PHI VILLA

PHI VILLA THD7-103-344B Use and care guide

Apex Garden YH-20S117HD Assembly instructions

Apex Garden

Apex Garden YH-20S117HD Assembly instructions

BICA SET RIALTO Assembly instructions

BICA

BICA SET RIALTO Assembly instructions

RioOutdoors 4P-SH installation instructions

RioOutdoors

RioOutdoors 4P-SH installation instructions

Solar Gibraltar SDPK installation instructions

Solar

Solar Gibraltar SDPK installation instructions

Blumfeldt Sunwave manual

Blumfeldt

Blumfeldt Sunwave manual

Safavieh Outdoor PAT6756 Assembly instructions

Safavieh Outdoor

Safavieh Outdoor PAT6756 Assembly instructions

Safavieh PAT6729 Assembly instructions

Safavieh

Safavieh PAT6729 Assembly instructions

Hanover Monaco MONDN7PCSW6RDTL-SU manual

Hanover

Hanover Monaco MONDN7PCSW6RDTL-SU manual

Outsunny 846-028 Assembly instruction

Outsunny

Outsunny 846-028 Assembly instruction

manuals.online logo
manuals.online logoBrands
  • About & Mission
  • Contact us
  • Privacy Policy
  • Terms and Conditions

Copyright 2025 Manuals.Online. All Rights Reserved.