Binatone FS-404 User manual

Food Steamer
Instruction Manual
FS-404

Food Steamer FS-404
B
A

3
ENGLISHFRANÇAISÐÓÑÑÊÈÉ
ÓÊÐÀ¯ÍÑÜÊÀ
ENGLISH ........................................ 4
FRANÇAIS .....................................18
ÐÓÑÑÊÈÉ .....................................34
ÓÊÐÀ¯ÍÑÜÊÀ ................................50

4
Food Steamer FS-404
Please read the safety instructions carefully before using this ap-
pliance. Please retain the instructions for future reference.
SAFETY MEASURES
When using your appliance, the following basic
safety precautions should always be followed:
Before using for the first time, check that the appli-
ance voltage is the same as your local supply.
Only use the appliance for the purposes stipulated
by the instructions.
Only use attachments supplied with the equipment.
To avoid electric shocks, do not immerse the appliance, plug
or power cord in water or any other liquids. Do not place
the appliance where it could come into contact with water or other
liquids. If the appliance comes in contact with water, immediately
disconnect it from the mains. Do not use the machine again until it
has been serviced by an authorized service center.
Do not let children use the appliance without supervision.
If the power cord plug does not fit to your wall socket,
consult a qualified electrician.
Use of various adapters may result in damage to the
appliance and termination of warranty.
Always supervise the equipment while in use.
To avoid a circuit overload, do not operate another high voltage
equipment on the same circuit.
Always unplug before moving the appliance from one
place to another, cleaning and storing.
Never pull the cord to disconnect the appliance, instead grasp the
plug and pull it to disconnect.
Do not allow the cord or the machine itself to come in contact with
hot surfaces.
Position the equipment and the cord so that nobody can acciden-
tally overturn the equipment.
Do not use the appliance if it has been dropped, or it has a dam-
aged power cord or plug. Do not modify or repair the machine
yourself.
Do not dismantle the appliance as improper assembly might result
in an electric shock during the subsequent use of the equipment.
Repairs should only be done by authorized service cen-
ters.
Do not use the device in areas where combustible gas mixtures
or inflammable liquid vapors could present in the air, or in areas
with inflammable air-borne dust or fibers.
This equipment is intended for household use only, not for com-
mercial or industrial use.
Please follow all the requirements of this guide.
Do not use the appliance if it has mechanical defects (dents, cracks
etc.), get it checked by the nearest authorized service center.

5
ENGLISH
SPECIAL SAFETY MEASURES
Do not place the food steamer near or under cur-
tains, shelves, cupboards or other items, which
may be damaged by steam.
Do not touch hot surfaces of the steamer – bas-
kets, lid, rice bowl or drip tray.
Remove steamer lid, baskets and the rice bowl
using oven gloves or a towel. To prevent accidents
we recommend that you slowly open the lid so that steam escapes
in a direction away from yourself. Only lift baskets by the handles.
Never switch the appliance on without water in the water reser-
voir, as this may lead to damage to the heating element.
While operating the steamer, make sure the water level does not
drop below the minimum mark as it may result in the appliance’s
failure. If the water level is dropping to the minimum mark, add
water into the water reservoir (see subsection “Assembly and
operation of the steamer”).
Do not place paper or foil on the bottom of steamers as it can
block steam vents.
Put nothing on top of the steamer when in use.
For steamer operation try to use water with minimum amount of
salts as this will help to reduce mineral deposits on the steamer’s
heating element. Remember that deposits shorten the service life
of the appliance. Always keep the heating element clean. Use only
recommended cleaning agents (see section “Care and clean-
ing”).
Do not wrap the power cord around the steamer’s housing.
Never clean the device immediately after using it. Leave it cool
down.
PARTS OF THE
APPLIANCE
Figure A:
1. Lid
2. Steam outlet
3. Upper steam basket
4. Middle steam basket
5. Lower steam basket
6. Steam basket handles
7. Clamp for fixing removable bottom
8. Steam basket removable bottom (Fig. B)
9. Rim of steam basket removable bottom
10.Adapter ring
11.Rice cup
12.Steam condensing tank
13.Removable steam concentrator
14.Water tank
15.Heating element
16.Food steam base
17.Water level indicator
18.Switch-on indicator

6
19.Switch/ timer
20.Water inlet
21.Power cord winding attachment
BEFORE USING
THE APPLIANCE
Read the instruction book.
Unpack the appliance.
Wash the steamer thoroughly; especially those
parts that are going to be in contact with food
(see “Care and Cleaning” section).
Before plugging into the mains supply, make
sure that the voltage stated on the appliance
corresponds to your mains supply.
OPERATING INSTRUCTIONS
Food steamer assembly and
operation
1. Install the food steamer base (16) on a solid
even heat-insulated surface near a socket and
out of children s reach.
2. Install removable steam concentrator (13).
3. Fill the tank (14) with water taking note of the water level indica-
tor (17). 850 ml is enough for 1 hour of normal operation of the
food steamer.
Note: Fill the reservoir (14) with cold tap water only. Do
not use other liquids or food dressings!
4. Install the steam condensation tank (12) on the water tank (14).
5. Put the food in container(s). When using several containers, please
remember that foods that take longer to cook should be placed in
the lower basket, with fast cooking foods - in the upper basket.
6. For cooking bulk and liquid products as well as products loozing
liquids during cooking, use the special rice cup (11) to be installed
in the steam basket.
7. Install the basket (5) on the steam condensing tank (12). When
using two tanks, put the upper basket (3) on the lower basket (5).
When using three baskets, install container (5) on the steam con-
densing tank (12), then put the middle container (4) on top, after
that - ring (10) and upper basket (3). For convenience of assem-
bly, there are installation marks, on the handles. The baskets are
numbered from top to bottom.
8. If the rice cup is used (11), put it into the upper basket.
9. Cover the upper basket with the lid (1).
10.Plug the appliance in.
11.Set the required time for cooking on the timer (19) by turning the
timer switch clockwise as far as the required mark showing on the
timer. The light in the water level indicator (18) will light up and
the food steamer will start operating.

7
ENGLISH
12.If water level is approaching the lowest level, refill the water tank
(14) via the water inlet (20).
13.When products in the upper container are ready, gently take that
basket off the food steamer and cover the remaining basket(s) with
the lid.
Attention: Steam can escape during operation. Be careful
and always use oven gloves when removing baskets
from the food steamer. Be sure the upper container is
covered with the lid.
14.When the cooking time has finished (19), the food steamer will
switch off automatically. You will hear an audible warning signal
and the indicator (18) lamp will go out.
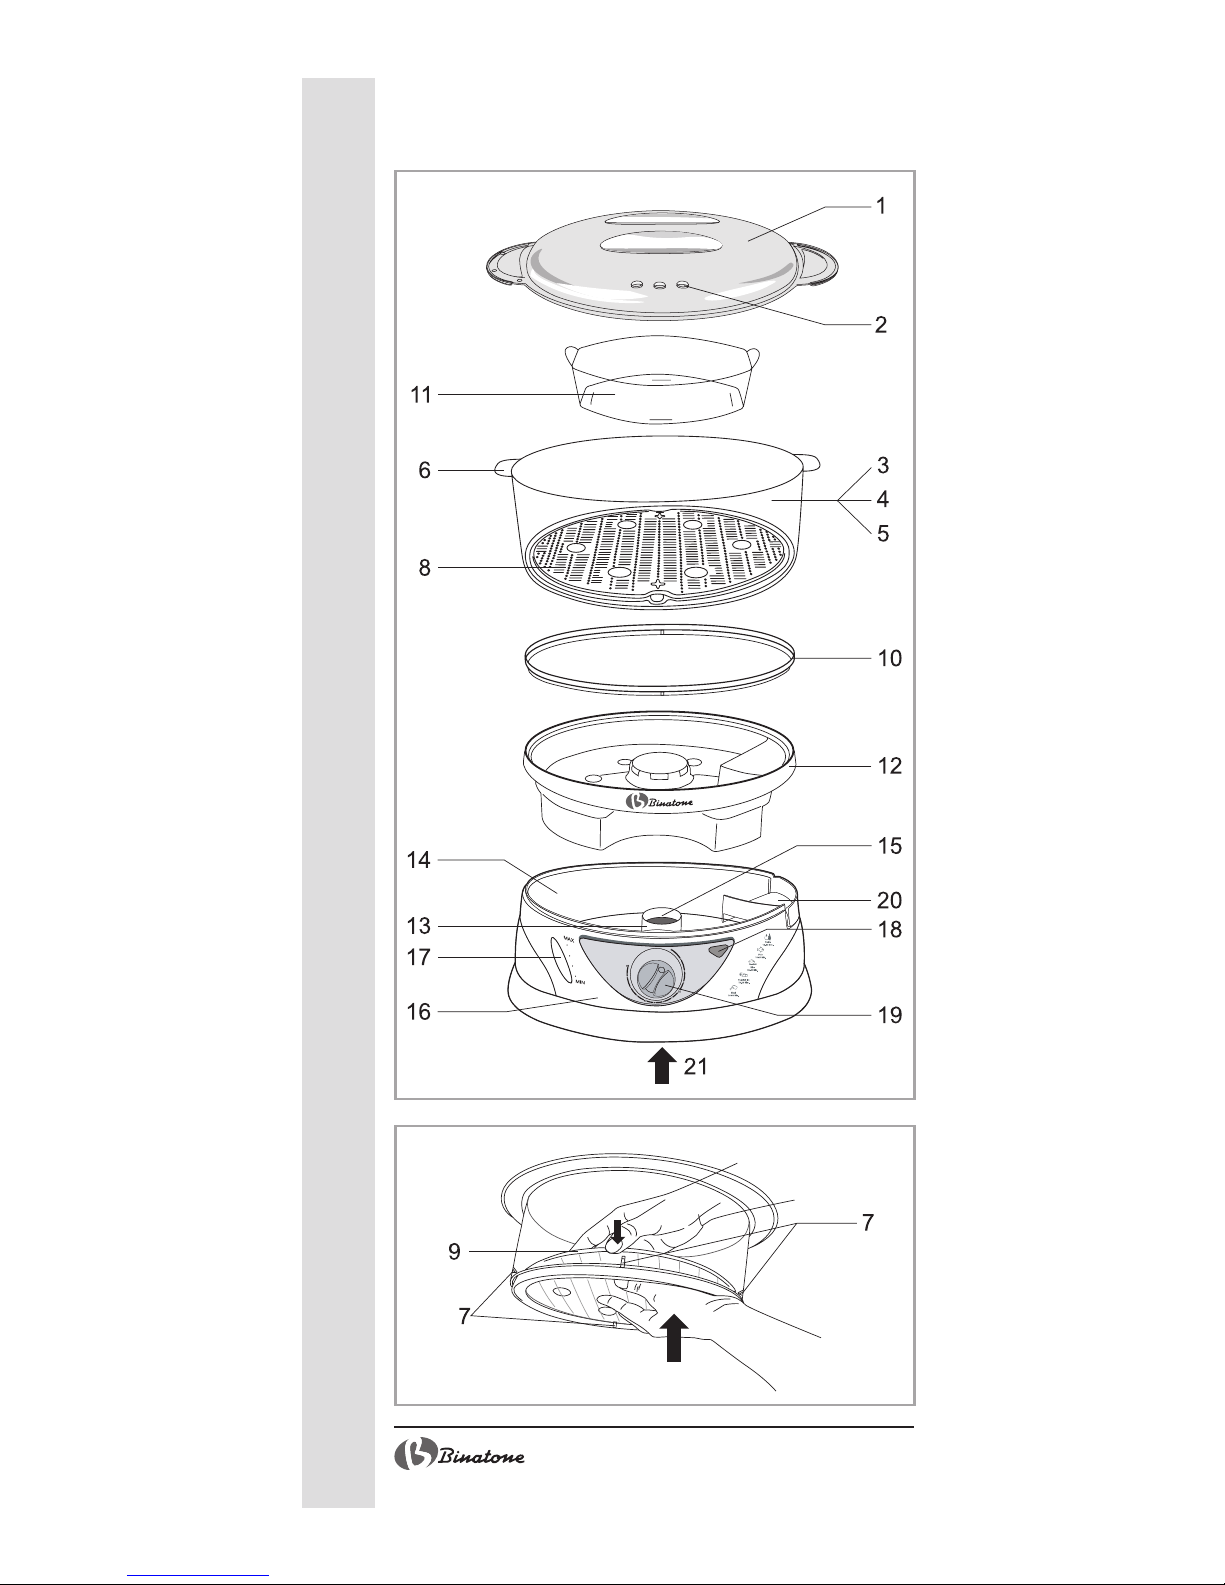
Note: While cooking big dishes (chicken, for instance), you
can remove the bottom of the steam basket (8) to
increase the useful capacity of the food steamer (ref.
to Fig. B). For this purpose, push the bottom of the
steam container from below with your left hand and
hold the removable bottom from inside with your
right hand, simultaneously releasing the rim (9) from
one of the clamps of the steam container (7). Release
the rim (9) from the remaining three clamps (7) by
pushing it with the right hand thumb (Fig. B). To
reinstall the container bottom, place the rim (9) in
the steam container (7) clamp from one side. Follow
the same procedure and fix the bottom (8) in the
three remaining clamps (7) by pushing the container
bottom toward the center to allow the clamp (7) to
sit under the rim of the steam container (9).
Cooking
Food (with the exception of frozen vegetables) to be steam cooked
must be completely defrosted. Do not salt products before cooking
and do not use food dressings. Sauces, seasonings and food dress-
ings should be added after cooking. The tables presented below con-
tain recommendations on cooking different products provided that
these products are laid in one layer. If several containers are used,
the cooking time will increase since the same amount of vapor is em-
ployed for a bigger volume of products. If you put products in upper
containers, cooking time shall also be increased.
Do not forget: the further products are away from the heating ele-
ment, the longer the food cooking process will be. Cooking time should
be increased if products are layered in the basket. In this case, all
slices of the product must be either of equal size, or bigger slices must
be laid on the bottom.
To determine the exact cooking time and achieve the desired result,
you will need to experiment at first. If you are using a food steamer for
the first time, follow the guidelines written in the tables or tips on the
base (16), checking the degree of food readiness from time to time.

8
Always put meat and chicken in the lowest basket this is to prevent
liquid coming into contact with other foods. The liquids gathered in the
steam condensing tank can be used for making the sauce or gravy.
Remember that fish is ready when it is white and flaky. Meat is
ready when the juices run clear. Cook greens like cabbage, broccoli,
etc., very quickly to keep a good colour and texture.
Keeping an eye on cooking time is necessary. If you noticed that
most of the product in the basket is ready, turn it over using a long
handled spoon and oven gloves. Upon finishing the cooking time,
immediately remove the containers from the food steamer, otherwise
the cooking process continues. Put the containers on a dish or food-
tray to let any remaining water dissapear. Then serve your foods.
Rice
There are several kinds of rice, so follow the guidelines.
Carefully measure the required amount of rice and water and mix
them in the rice cup (11). Pure sufficient amount of water in the
tank (14). Close the lid and cook.
To cook soft rice, increase the amount of water mixed with rice, in
accordance with the table. To cook firm rice, reduce the amount of
water.
Check when the rice is ready at the minimum time indicated for the
type of rice you are cooking; stir rice more frequently.
While checking and stirring the rice, do not allow water from the
lid (1) to enter the cup (11) as this might affect the quality and
taste of steamed rice.
After rice is cooked, salt, pepper, oil or a bouillon cube may be
added in the rice.
Brown
– standard
– parboiled
Mixture of wild and
long-grained
– standard
– fast-cooked
– instant
White
– round-grained
– long-grained
Mix in the rice bowl
Rice
(cups)
Water
(cups)
Approximate
cooking time
(minutes)
42–45
45–50
18–20
16–18
12–15
45–50
50–55
Type of rice
½
1
1
1
1
1
1
1
1½
1½
1¾
1½
1½
12
/
3
Vegetables
Thoroughly wash and clean vegetables and slice them, if required.
Time required for cooking small slices is less the time required for
cooking big slices.
Quality, quantity, freshness, size/evenness and temperature of
frozen vegetables will influence the cooking time. Choose the
amount of water and cooking time at your discretion, bearing in
mind the guidelines shown in the table.
Do not defrost the frozen vegetables before cooking.

9
ENGLISH
Frozen vegetables that give off a lot of liquid during cooking should
be placed in the rice cup (11) and covered with foil for the dura-
tion of the cooking period. Frozen products must be separated
from each other or mixed 10-12 minutes after starting cooking.
Use a fork or a long-handled spoon for this purpose.
Artichoke, whole
Asparagus, sprouts
Green beans
Oats
Beetroot
Broccoli sprouts
Brussels sprouts
Cabbage
Celery
Cauliflower, whole
Aubergine
Mushrooms, whole
Okra
Onions
Parsnip
Peas
Sweet peppers, whole
Potatoes
Potato, whole
French turnip
Spinach
Marrow squash
– summer yellow
and Zucchini
– winter Acom
and Buttemut
Turnip
Frozen vegetables
4 whole ones
with peeled top
450 g
230 g
450 g
450 g cut
450 g
450 g
450 g cut
230 g fine cut
450 g
450 g
450 g
450 g
230 g fine cut
230 g
450 g split
up to 4 medium
ones (not stuffed)
about 450 g
6 small ones
1 medium-sized,
diced
230 g
450 g sliced
450 g sliced
450 g
300 g
30–32
12–14
12–14
20–22
25–28
20–22
24–26
16–18
14–16
20–22
16–18
10–12
18–20
12–14
8–10
12–13
12–13
30–32
28–30
14–16
12–14
22–24
20–22
28–30
25–27
Type Weight/number
of pieces
Approximate
cooking time
(minutes)
Fish and marine products
Fish and marine products are quick to cook. So, for even cooking,
these products are recommended to be cooked in small quanti-
ties.
Approximate time for cooking fresh or frozen (that has been de-
frosted) marine products and fish are given in the table. Before
cooking, clean and prepare fresh marine products and fish.
Since the opening time for shells of mollusks, oysters and mussels is
different, check whether shells are open, to prevent overcooking.
You can also cook fish fillet in the rice cup (11).
Steamed marine products and fish can be served plain or with
butter or margarine and with lemon or with sauce.

10
Meat and meat products
Type Weight/number
of pieces
Approximate
cooking time
(min)
Shellfish in shells
– hard shelled
Crab
– King crab, legs/claws
Lobster
– tail
– dressed
– whole, fresh
Mussels (fresh, in shells)
Oysters (fresh, in shells)
Scallop (fresh)
– freshwater (shelled)
– seawater (shelled)
Shrimps
– medium, in shells
– large, in shells
FISH
– whole
– dressed
– fillet
– pieces
450 g
230 g
2-4 pieces
450-560 g
450-560 g
450 g
350 g
450 g
350 g
450 g
450 g
230-340 g
230-340 g
450 g
340 g
10–12
20–22
16–18
18–20
18–20
14–16
18–20
14–16
18–20
10–12
12–14
16–18
14–16
10–12
10–12
Type Weight/number
of pieces
Approximate
cooking time
(min)
Beef
– chop
– minced steak
– cutlet
Chicken
– pieces
Lamb
– pieces
450 g
450 g
450 g
450 g (2–4 pieces)
450 g
28–30
16–18
22–24
24–26
26–28
Eggs and egg dishes
Type Number
of eggs
Ap-
proxi-
mate
time
(min)
Cooking
instructions
Shell egg
–boiled egg
– hard boiled
egg
1–12
1–12
15–18
19–22
Prick eggs at the blunt end
with a needle so they do not to
crack during steaming, and
place them into the indents in de-
tachable bottom of the basket.

11
ENGLISH
Warming up: bread and ready-to-eat food
When warming up bread, do not cover the steamer with the lid.
Warming time of ready-to-eat food depends on the temperature,
at which they were stored in the fridge.
While warming up ready-to-eat dishs, distribute them evenly in
the rice bowl and cover them with aluminum foil.
Warming time of ready-to-eat dishes is established by experi-
menting.
MAINTENANCE AND
CLEANING
Before cleaning, unplug the food steamer from
the power supply and let it completely cool down.
Scale deposit removal
During the food steamer operation, scale de-
posits can form on the water tank (14) walls and
heating element (15). If scale deposit is not re-
moved, the appliances service life reduces dramatically.
To clean the food steamer from scale deposits, follow the below
procedure:
Fill the tank (14) with water up to MAX mark;
Add 6-7 table spoons of 9% table vinegar;
Plug in the appliance and set the timer at 20 minutes;
Note: While performing this procedure, its necessary to air
the kitchen since the vinegar vapors have an
unpleasant odor.
Type Number
of eggs
Ap-
proxi-
mate
time
(min)
Cooking
instructions
Fried eggs
– scrambled
eggs
– sunny-side
up eggs
Poached eggs
Omelet
1–4
1–4
1–4
10–12
12–14
7–8
20–22
Break fresh eggs into the rice
bowl, add salt, pepper and but-
ter or margarine to your liking.
Pour two cups of water into
the rice bowl. Steam the water.
Carefully break an egg into a
small cup, carefully pour the egg
into the hot water and steam till
cooked.
Beat together 6 eggs and 2
tablespoons of milk in the rice
bowl. Add salt and pepper to
taste. Stir eggs after ten minutes.
1–4

12
Do not put any container on the water tank (14).
After 20 minutes, continue doing so until the case is fully cooled.
Then, pour out the vinegar solution and thoroughly wash the tank
(14) with cold water to remove vinegar residues.
Note: Do not allow any liquid to come into contact with
external parts of the appliance case (16) or power
cord. Carefully pour the liquid out of the tank.
Thoroughly wipe the food steamer base (16).
Cleaning
Wash the lid (1), all the baskets and removable bottoms (3, 4, 5),
rice cup (11), steam condensing tank (12), removable steam con-
centrator (13) in warm soapy water. Then thoroughly rinse and
wipe dry. For a more thorough cleaning wash the containers (3,
4, 5),with the bottoms removed and clean using a brush (Fig. B).
Removable parts of the food steamer can also be washed in a
washing machine. Follow strictly the users guide for washing ma-
chine operation.
Wipe the food steamer base (16) with a damp lint free cloth. Do
not submerse the base in water.
Do not use abrasive cleansers and solvents.
Storage
Your food steamer is specially designed to occupy the smallest
possible space during storage. If you are not going to use the food
steamer in the near future, assemble it as follows: put the upper con-
tainer on the base (16), place the middle and lower containers in the
upper container, one after another. Then put the rice cup (11) in the
containers and cover it with the lid.
HELPFUL HINTS
This section contains delicious and healthy recipes
which you may easily cook with a steamer.
Banana flan
4 servings
Banana 3 pieces
Sugar 120 g
Milk 200 ml
Eggs 3
Flour 25 g
Butter 10 g
Put in a mixer or blender the bananas, sugar, milk, eggs and flour.
Mix until a smooth mixture is obtained. Butter the rice bowl, fill it with
the mixture, cover with aluminium foil and put in a steamer basket.
Cover with the lid and cook for 35 minutes. Serve warm.
Note: You may replace bananas with 300 g of fruits or
berries, which have been cooked: rhubarb, apricots,
cherries, etc.

13
ENGLISH
Three-colour vegetable pate
3-4 servings
Carrots 250 g
Cauliflower 250 g
Broccoli 250 g
Cream 150 ml
Egg 3 whites
Salt to your taste
Cook the vegetables in the steamer. Put the carrots in a blender
or a kitchen processor, add 50 ml of cream, 1 white of the egg,
some salt and blend. In the same way prepare cauliflower and
broccoli puree. Put the resulting puree in layers in the rice bowl,
cover with foil and steam for 15 minutes. Then take the pate out
and cut. Serve warm or cold.
Veal cutlets
2-3 servings
500 g veal
100 g mushrooms
1 egg
Chopped fresh herbs, lemon and salt to taste.
Mince the veal using a meat grinder. Add steamed mushrooms cut
into small slices and an egg to the minced veal. Mold the minced mix-
ture into cutlet shapes, put them into the steamer basket and steam for
25-30 minutes. When serving, add salt, decorate with a slice of lemon
(peeled and without pits) on top of each cutlet and serve topped with
the chopped herbs.
Manty with garlic and yogurt sauce
2 servings
400 g boneless lamb meat
1 onion
1 glass flour
2 glasses water
1 tablespoon lamb fat
200 g natural yogurt
2 cloves garlic
Salt, ground pepper to taste
Mince lamb meat and onion using a meat grinder, add salt, pep-
per and mix well.
Mix flour, salt and water to make dough. Knead dough and
roll it out into a 2mm thick layer and cut into 6-8 cm. diameter
circles. Put some of the minced meat into the center of each circle
and crimp the edges to seal them. Butter the bottom of the steamer
basket and steam the manty until done. Beat the yogurt, garlic
and salt in a small bowl until smooth and evenly mixed. Cover the
bowl and put the sauce into the fridge for no less than 15 min-
utes. Put the cooked manty onto preheated serving plates. Pour
garlic and yogurt sauce over them. Serve hot.
Note: Instead of the meat filler, you may also prepare
a filling of 300 g of frozen spinach and 150 g of
cheese.

14
Chicken fillet with oregano
4 servings
500 g chicken or turkey tenderloin
2 tablespoons oregano
250 ml dairy cream
Salt to taste
Cut fillet or tenderloin into 4 pieces, put them into the steaming
basket, add 1 tablespoon of oregano. Steam for 15 minutes. Add
salt and pepper. In a pan boil dairy cream with remaining oregano,
salt and pepper. Serve hot with the sauce.
Chicken breasts a la Mediterranean
4 servings
4 chicken breasts
½ onion
160 g mushrooms
200 g frozen spinach
50 g soft cheese
3 tablespoons olive oil
Chop ½ of the onion and brown in olive oil. Add 160 g of mush-
rooms and fry for another 2-3 minutes. Add spinach and seasonings.
Cook until the mixture becomes very tender. Make cuts in the chicken
breasts, fill them with the prepared filling and add slices of cheese.
Wrap each breast with foil and steam for another 15-20 minutes. Serve
hot.
Chicken liver Souffle
4 servings
150 g chicken liver
1 clove garlic
2 whole eggs and 2 yolks
1 tablespoon chopped parsley
175 g sour cream
Salt, pepper to taste
Peel and chop garlic. Put chicken liver and garlic into a food pro-
cessor or blender and mix until smooth and well combined. Add eggs,
sour cream, chopped parsley, salt and pepper. Put the resulting mix-
ture into the rice bowl and cover it with aluminum foil. Place into the
steaming basket and cook for 25-30 minutes. Serve chilled.
Carp in champignon sauce
2 servings
500 g chilled fillet of carp
2 tablespoons olive oil
1 onion
200 g champignons
200 g dairy cream
½ tablespoon flour
Herbs and seasonings to taste
Steam the mushrooms then chop and brown them in olive oil to-
gether with finely chopped onion. Cut the carp fillet into pieces put
them into a steaming basket in one layer and top with herbs. Steam

15
ENGLISH
for 12-15 minutes. Pour the cooking juices from the drip tray into a
small pan and add the dairy cream, flour, mushrooms with onion and
seasonings, mix thoroughly and bring to the boil. When serving, pour
prepared sauce on carp fillet.
Note: You may prepare the dish with any other firm fleshed
whitefish.
Prawns with garlic, red pepper and onion
4 servings
500 g shelled prawns
1 onion
4 large garlic cloves
1 sweet red pepper
1 ½ teaspoons dried oregano
1 tablespoon finely chopped parsley
3 tablespoons olive oil
Salt and black pepper to taste
Place prawns into a bowl, then rub them on all sides with finely
chopped garlic and oregano. Add 2 tablespoons of olive oil and mix.
Cover and place into a fridge for 30 minutes.
Install the drip tray and a steamer basket; put rings of onion and
stripes of red pepper into the rice bowl. Place prawns and marinade
in a layer on top of the vegetables. Place the bowl into the steaming
basket, cover with the lid and steam for 10-15 minutes. Transfer prawns
with vegetables onto serving plates. Mix with the remaining table-
spoon of olive oil and parsley. Add salt and pepper to taste.
Sweet pepper stuffed with cottage cheese and
mushrooms
3-4 servings
6-8 sweet peppers
300 g mushrooms chopped
1 onion chopped
300 g cottage cheese that isnt sour
Salt to taste
Core the peppers, place them into the steamer and cook for 10
minutes, then remove them and let them cool down. Fry mushrooms
with onion in a frying pan, mix with cottage cheese, add salt and put
this filling into the peppers. Put the peppers into the rice bowl with
openings up and steam in the steaming basket until done. Serve hot
with sour cream.
Pumpkin puree
3-4 servings
600 g pumpkin
1 potato
2 tablespoons sour cream
1 liter chicken stock (for example, made from stock cubes)
Nutmeg, salt & pepper to taste
Peel the pumpkin and the potato, cut into cubes and place them
into the steaming basket. Steam for 25 minutes. While vegetables are
cooking, heat the chicken stock in a pan. Prepare a puree from the

16
steamed vegetables and mix it with the stock. Add sour cream, nut-
meg, salt and pepper. Serve in a tureen.
Apples with raisins
4 servings
4 apples
4 teaspoons raisins
2 teaspoons sugar
2 teaspoons cinnamon
Maple, chocolate or caramel syrup for serving
Core the apples. Put 1 teaspoon of raisins into the middle of each
apple and top them with ½ teaspoon of sugar. Season with the cinna-
mon. Place apples into the steaming basket, cover with the lid and
cook for 12-15 minutes until the apples became tender. Transfer the
apples into a small serving plate. Serve warm or at room temperature
topped with the syrup.
Vanilla desert
4 servings
4 egg yolks
4 tablespoons sugar
425 g dairy cream
1 package of vanilla sugar
Beat yolks, sugar, vanilla sugar and dairy cream together. Place
into the rice bowl and steam for 20-25 minutes. Serve cold or hot,
with fruits or fruit salad.
DISPOSAL
The appliance should be disposed of in accordance
with waste disposal regulations in your country and
with the least damage to the environment.
Only ecologically safe materials are used in the pack-
aging of our products and the cardboard and paper
can be disposed of with normal paper waste.
AFTER-SALES SERVICE
If your appliance does not operate at all or
operates poorly, call an authorized service cen-
ter for help or repairs.
The warranty does not cover the
following:
Non-observance of the above safety measures and operation in-
structions.
Commercial use (use outside the scope of personal household
needs).
Plugging into a mains socket with a voltage different from the volt-
age on the appliance rating plate.
Improper care (filling with liquids other than water, ingress of liq-
uid, dust, insects, and other foreign items and substances inside

17
ENGLISH
the appliance).
Use of excessive force during appliance operation or other dam-
ages (mechanical damages resulting from incorrect use, shocks or
dropping of the appliance).
Unauthorized repairs or replacement of the appliance parts per-
formed by an unauthorized person or service center.
Scale deposit on the appliance regardless of the use of water.
Accidents, such as lightning strike, flood, fire and other acts of God.
Features may be changed by Binatone without any notice.
Warranty details are set out in the warranty card provided with
the product.
Exploitation period: 3 years after the day of purchase.
Manufacture: Binatone Industries Ltd, Great Britain, Vitabiotics
House,1 Apsley Way, Staples Corner, London, NW2 7HF, UK.

18
Bain de vapeur FS-404
Lisez attentivement cette instruction avant le premier usage pour
prendre connaissance du fonctionnement de l’appareil. Gardez
l’instruction pour s’y référer ultérieurement.
MESURES DE SECURITE
En exploitant l’appareil, respectez toujours les
mesures de sécurité suivantes:
Avant le premier usage, assurez-vous que la ten-
sion indiquée sur l’appareil correspond à la tension
du réseau électrique dans votre maison.
Utilisez l’appareil seulement à des fins indiquées
dans cette instruction.
Utilisez seulement les dispositifs qui font partie de la garniture de
l’appareil.
Pour éviter un choc électrique, ne pas plonger l’appareil, la
fiche ou le câble dans l’eau ou dans un autre liquide.
Installez l’appareil dans un endroit où il ne peut pas tomber dans
l’eau ou dans un autre liquide. Si l’appareil a été accidentellement
mouillé, débranchez-le du réseau immédiatement. N’utilisez pas
l’appareil qui est tombé dans l’eau. Portez-le dans un centre de
maintien.
Ne pas laisser les enfants manier l’appareil sans contrôle des
adultes.
Si la fiche mâle de l’appareil ne coïncide pas avec votre
prise selon sa structure, consultez auprès de l’expert.
L’utilisation de différents raccords peut conduire à une
panne de l’appareil et la cessation des garanties.
Ne pas laisser l’appareil branché sur le réseau sans surveillance.
Pour éviter la surcharge du réseau électrique, ne pas brancher un
autre appareil de haute puissance au même réseau que votre
appareil.
Déconnectez l’appareil du réseau avant le déplacement
d’un endroit à l’autre et avant le nettoyage et la conser-
vation.
Ne tirez jamais sur le câble pour déconnecter l’appareil du réseau ;
prenez la fiche et faites-la sortir de la prise de courant.
Eviter le contact du câble ou de l’appareil avec des surfaces
chauffées.
Placer l’appareil et le câble de façon à éviter le basculement
accidentel.
Ne pas utiliser l’appareil si le câble ou la fiche de contact est
endommagé. N’essayez pas de réparer l’appareil vous-même.
Le remplacement du câble électrique et de la fiche de contact doit
être effectué par un centre de maintien agréé.
Ne démontez jamais l’appareil vous-même ; l’assemblage incor-
rect peur résulter en choc électrique pendant l’usage ultérieur de
l’appareil. Tous les travaux de réparation doivent être
effectués seulement par un centre de service agréé.
Ne pas utiliser lappareil dans des locaux où lair peut contenir
des mélanges des gaz combustibles, des vapeurs des liquides
inflammables, ou des poussières et fibres inflammables.
Cet appareil est destiné à l’usage personnel et n’est pas destiné à
l’usage commercial et industriel.

19
FRANÇAIS
Respectez toutes les règles de la présente instruction.
Ne pas utiliser l’appareil qui a des défauts mécaniques
(enfoncements, cassures,…): vérifiez son fonctionnement dans un
centre de service agréé.
MESURES SPECIALES DE
SECURITE
Ne pas placer l’appareil près ou sous les rideaux,
rayons, armoires ou autres objets qui peuvent être
endommagés par l’action de la vapeur.
Ne pas toucher aux parties chaudes de l’appareil-
conteneurs, couvercle, bol au riz ou récipient de
condensation de vapeur.
Enlevez le couvercle, les conteneurs et le bol à
l’aide d’une moufle ou d’une serviette. Ouvrez le couvercle
lentement du côté opposé à vous pour éviter le contact avec la
vapeur. Prenez tous les récipients seulement par les poignées.
Ne jamais mettre en marche l’appareil qui n’a pas d’eau dans le
réservoir. Ceci peut conduire à l’endommagement de l’élément
chauffant.
Quand l’appareil est en marche, veillez que le niveau d’eau ne
tombe pas au-dessous de la marque minimum: ceci peut conduire
à l’endommagement de l’appareil. Si le niveau d’eau s’approche
de la marque minimum, ajoutez de l’eau dans le réservoir (voir
section “Assemblage et exploitation de l’appareil”).
Ne pas mettre du papier ou des feuilles d’aluminium au fond des
conteneurs à vapeur, pour éviter le blocage des orifices de sortie
de vapeur.
Lors de l’utilisation de l’appareil ne rien mettre dessus.
Pour faire fonctionner le bain de vapeur, utilisez l’eau avec la
teneur minimale en sels, ceci permettra de réduire les dépôts de
tartre sur l’élément chauffant de l’appareil. Le tartre réduit la durée
de vie de l’appareil. L’élément chauffant doit être toujours propre.
Pour détartrer l’appareil, n’utilisez que des produits recommandés
(voir section “Entretien et nettoyage”).
Ne pas enrouler le câble d’alimentation autour du corps de
l’appareil.
Ne nettoyez jamais l’appareil tout de suite après son utilisation.
Laissez-le se refroidir.
DESCRIPTIF DES PIECES DE
L’APPAREIL
Dessin A:
1. Couvercle
2. Orifices de sortie de vapeur
3. Conteneur de vapeur supérieur
4. Conteneur de vapeur intermédiaire
5. Conteneur de vapeur inférieur
6. Poignées des conteneurs de vapeur
7. Attaches du fond amovible

20
8. Fond amovible du conteneur de vapeur (Dessin B)
9. Sertissure du fond amovible du conteneur de vapeur
10.Anneau adaptateur
11.Bol pour le riz
12.Récipient de condensation de vapeur
13.Concentrateur de vapeur amovible
14.Réservoir à l’eau
15.Elément chauffant
16.Corps du bain de vapeur (base)
17.Echelle du niveau d’eau
18.Indicateur de mise en marche
19.Interrupteur/minuterie
20.Orifice pour rajouter l’eau
21.Emplacement pour enrouler le cordon
AVANT L’UTILISATION
Lisez attentivement ce manuel.
Dépaquetez l’appareil.
Lavez soigneusement la casserole à vapeur et
surtout ses parties qui seront en contact avec
les aliments (voir la partie “Entretien et
nettoyage “).
Avant de brancher l’appareil au réseau,
vérifiez si la tension indiquée à l’appareil cor-
respond à celle du réseau électrique chez vous.
NOTICE D’UTILISATION
Assemblage et opération du bain de
vapeur
1. Installez le corps du bain de vapeur (16) sur
une surface solide, plane et calorifugée à côté
de la prise de courant et hors de portée des
enfants.
2. Installez le concentrateur de vapeur amovible (13).
3. Remplissez le réservoir (14) d’eau, en vous guidant par les
marques du niveau d’eau de l’échelle (17). 850 ml d’eau suffisent
pour 1 heure de fonctionnement normal du bain de vapeur.
Note: remplissez le réservoir (14) seulement d’eau froide
du robinet. Ne pas utiliser d’autres liquides ou
assaisonnements.
4. Installez le récipient de condensation de vapeur (12) sur le
réservoir d’eau (14).
5. Mettez les ingrédients dans le(s) conteneur(s). Si vous utilisez
plusieurs conteneurs, n’oubliez pas de mettre les aliments longs à
cuire dans le conteneur inférieur, et ceux à préparation rapide,
dans les conteneurs supérieurs.
6. Pour préparer des produits mouvants, liquides et des aliments qui
détachent beaucoup de jus lors de la cuisson, utilisez le bol à riz
spécial (11) qui est installé dans le conteneur de vapeur.
Table of contents
Languages:
Other Binatone Electric Steamer manuals