BINDTEC YL-420 User manual

YL-420(S)
USER MANUAL

CONTENTS
1. Safety Features Overview and Precaution
2. Product Introduction and Accessories
3. Part Names and Functions
4. Band Installation
4-1) How to feed the band for 420(30)(50)
4-2) How to feed the band for 420S
5. Operation
5-1) How to change Standby Time before Banding
5-2) Banding Regardless of Sensor Detecting an Object
6. Sheet Replacement
6-1) Life expectancy of Heater Sheet
6-2) How to check the Condition of Sheet
7. Failed Band Removal
8. Checking before Troubleshooting
9. Extra Functions
9-1) Band Removal in case of Jam
9-2) Banding Black or Transparent Objects
9-3) Banding Soft Object
10. Specifications
Product Warranty

1
Safety Features Overview and Precaution
For your safety
Please read this user manual carefully
before operating the banding machine.
Maintenance requirements
1. Make sure that the power is supplied. Voltage fluctuation must be kept at a
minimum.
2. High temperature and humidity or any other environmental conditions may
render the unit nonoperational as the band may get jammed around the roller
and so on.
3. Please clean the unit often. In particular, it is important to keep the sensor part
and upper cover clean using dry and soft fabrics.
4. Warranty will be void if the unit is tampered with or disassembled by anyone
other than the designated service personnel.
5. Touching the heater when the unit is in operation or within 10 min of the
machine’s shutdown may cause burns and injuries.
6. Ensure that the power is off after using the unit.
* Don’t lift the arch when moving the machine.

2
Product Introduction and Accessories
Automatic banding machine with paper/film YL-420(30)(50),420S
*Easy installation for easy relocation
* Korea’s first rail banding machine
* Compatible of paper and film bands
* Banding without warming up
* Banding without any odor and harmful substances
[Accessories]
Manual: 1 copy
Band: 1 roll
Guide: 1 set
Heater Sheet: 3 pcs
Tool: 1 pc
Power Cable: 1 pc
YL-420(30)
YL-420(50)
YL-420S
3
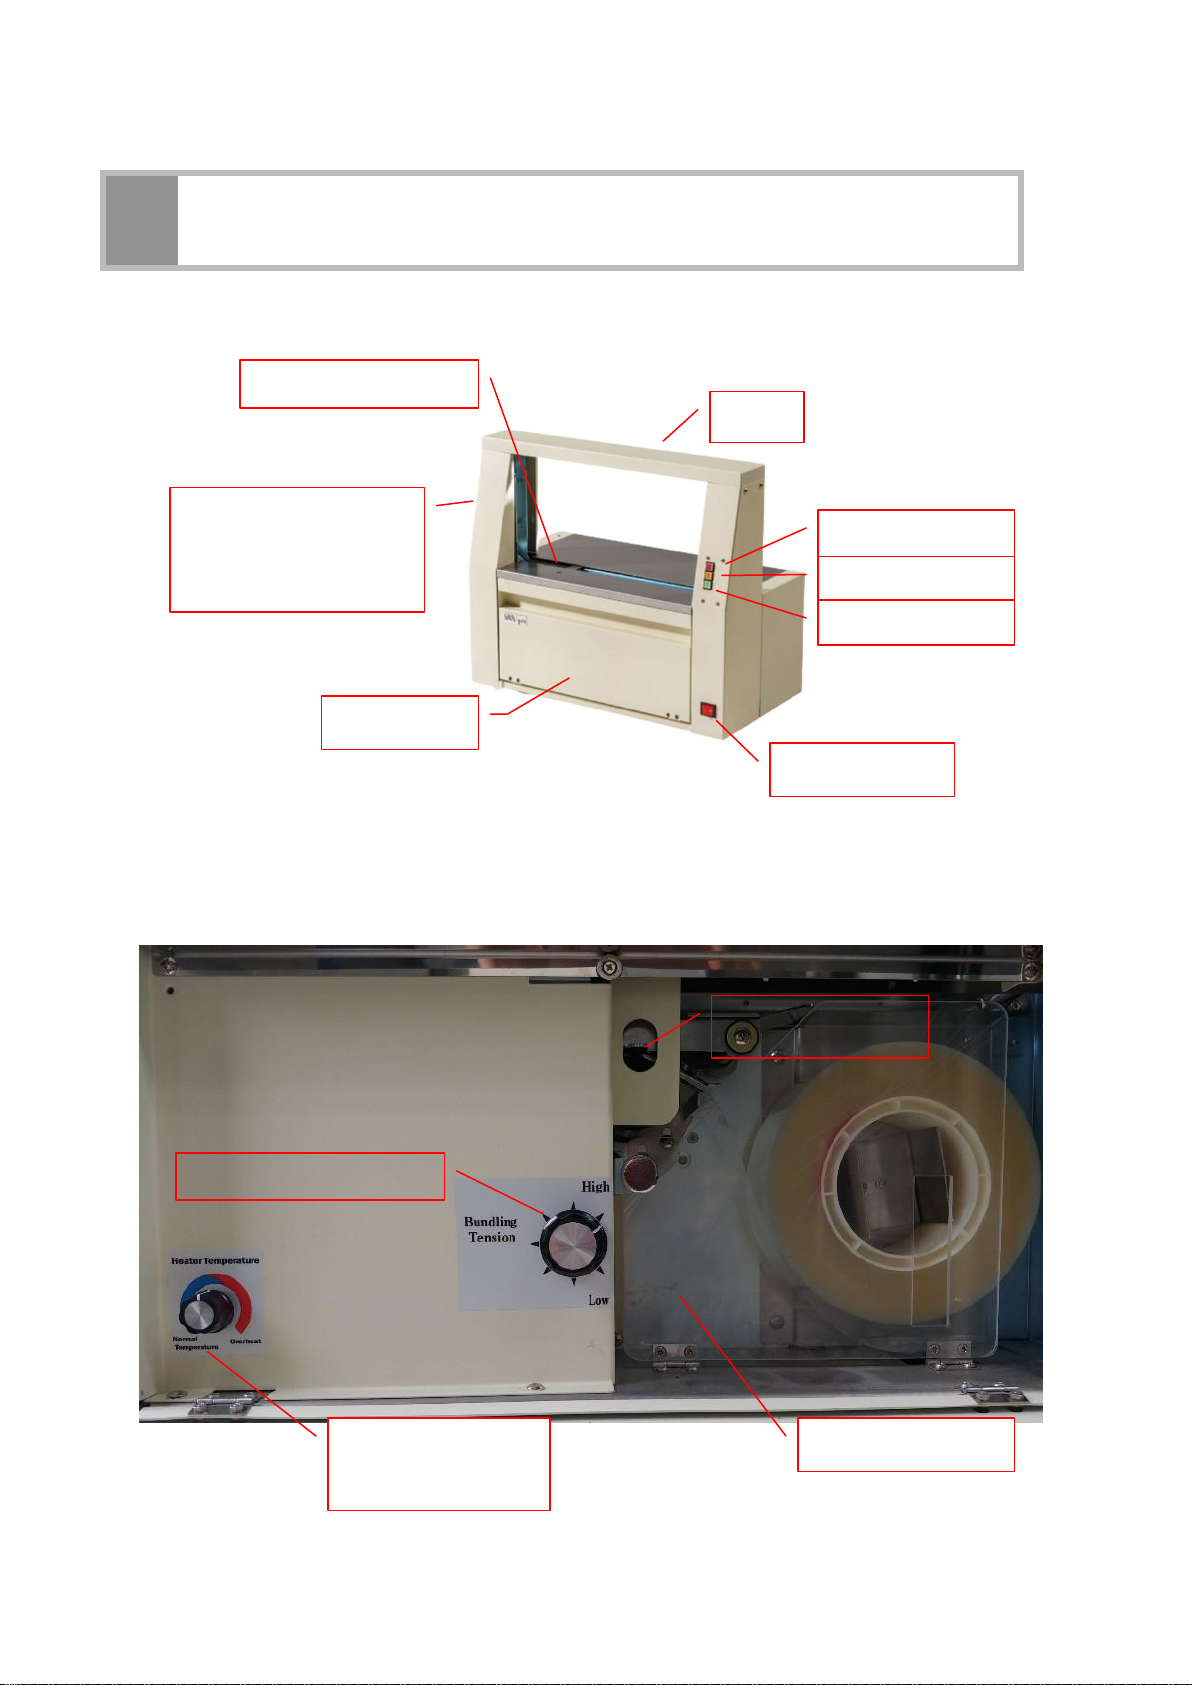
Part Names and Functions
Arch
2. Feed Button
3. Auto Button
4. Start Button
1. Power Switch
5. Object Sensor
9. Rail
Opening/Closing
Lever
7. Tension Control Knob
Band Reel Cover
6. Temperature
Control Knob
8. Band Set Lever
Front Cover

1. Power Switch
Turn the power ON or OFF.
2. Feed Button
The band is fed to the rail when the red button is pressed.
The RED LED lights up when the band is normally set.
Otherwise, the RED LED blinks.
3. Auto Button
The ORANGE LED lights up, and the auto mode is enabled when the button
is pressed. The ORANGE LED turns off, and manual mode is enabled when it is
pressed again. The machine works in auto banding when the sensor detects
any object in auto mode.
4. Start Button
The GREEN LED lights up, and manual mode is enabled when the power is
turned ON.
5. Object Sensor
It detects an object that is put on the machine for banding, and then the
GREEN LED blinks.
6. Temperature Control Knob
This control knob is used to adjust the heater temperature
for banding.
The heater temperature rises when the control knob
is turned clockwise.
7. Tension Control Knob
This control knob is used to adjust
banding tension, which increases
when the control knob is turned clockwise.
8. Band Set Lever
This lever is used to set the band. Raise the lever, insert the band, and press
the feed button to transfer it to the rail.
9. Rail Opening/Closing Lever
Press or release this lever to open or close the rail respectively.
Open the rail you can remove the band when jammed.

4
Band Installation
4-1) How to feed the band for 420(30)(50)
1) Check the condition of the band.
Cut off the end of the new band with scissors if it is roughly cut, wrinkled, or
contaminated, as such poor conditions may cause a jam.
2) Pull the front cover and band reel cover to open them.
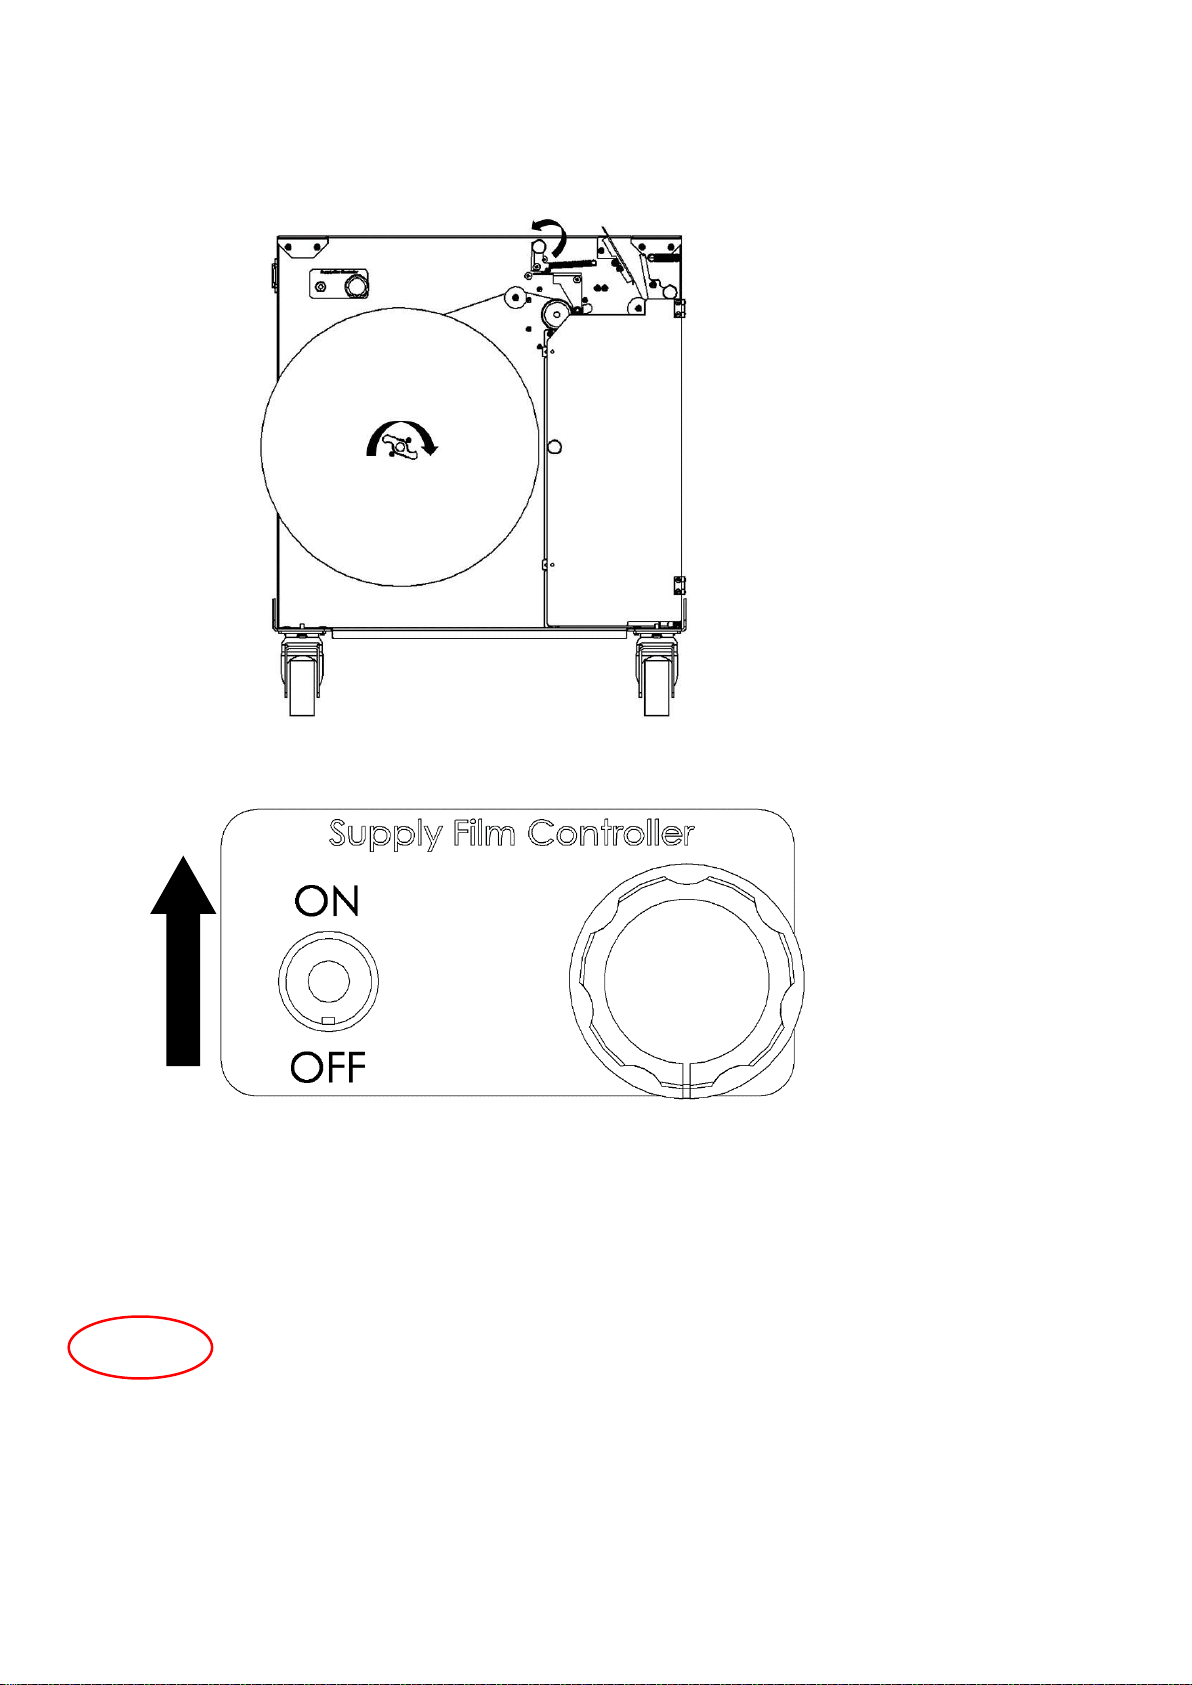
3) Set the band such that the reel rotates clockwise to feed the band, as shown in
the following figures.
4) Raise the band set lever, and then insert the band between the rollers.
5) Close the band reel and front covers.
6) Turn ON the power using the power switch, and press the feed button.
The FEED BUTTON LED lights up when the feed motor runs, and the band is
set.
- If the end of the band becomes damaged, it may have been installed
incorrectly. As such, cut off the end using scissors.
- Make sure to close the band reel cover.
- Pay attention as the adhesive on the start and end of the band roll may cause
a jam and damage the machine.
Caution
band’s direction

4-2) How to feed the band for 420S
1) Check the condition of the band.
Cut off the end of the new band with scissors if it is roughly cut, wrinkled, or
contaminated, as such poor conditions may cause a jam.
2) Turn the toggle switch to OFF.
3) Open the band reel cover and front cover.

4) Turn the band feed lever to widen the gap between the rollers.
5) Insert the band so that the feeding rotation
direction of the band is clockwise as shown
in the figure.
6) While holding the band anti-skid lever
with your hand, insert the band in order
and release the band anti-slip lever again.
(If the band is inserted normally, the band
will rise from the bottom of YL-420 on top.)
7) Close the band feed lever, the band cover, and the front cover.
8) After turning the toggle switch to ON, supply the band.
9) When the band supply is complete, insert the band from ‘6)’ into the YL-420
and press the feed button. At this time, the feed motor rotates and the band is
accurately seated on the rail.
- If the end of the band becomes damaged, it may have been installed
incorrectly. As such, cut off the end using scissors.
- Make sure to close the band reel cover.
- Pay attention as the adhesive on the start and end of the band roll may cause
a jam and damage the machine.
Caution

5
Operation
1) Turn ON the power using the power switch.
2) Check whether the FEED BUTTON LED and
START BUTTON LED are lit.
3) Auto Mode: Press the Auto Button
to turn on the ORANGE LED. Then, put an object on
the object sensor to allow the machine to start
banding automatically.
4) Manual Mode: Turn on the ORANGE LED.
Put an object on the object sensor, and press
the Start Button while holding the object.
5) Take out the object when the banding is completed.
- Pay attention as banding may unintentionally start in auto mode. As such,
disable auto mode, or turn off the power switch when the machine is not in
use.
- Make sure to put the object on the sensor for banding.
For banding without putting an object or banding an undetectable object,
refer to “5-2) Banding Regardless of Sensor Detecting an Object”.
Caution
Auto Button
Power
Feed Button
Start Button

5-1) How to change Standby Time before Banding
You can adjust the time to start banding after the sensor detects an object in auto
mode using the heater temperature control knob.
Turn OFF the power switch →Press the feed button →Turn ON the power switch
→The buzzer rings twice →Turn the feed button OFF →Control using the
heater temperature control knob →Turn OFF the power switch →Setting of
standby time is completed
Return the heater temperature control knob to its original position as
follows:
Turn ON the power switch →Set the original heater temperature →Ready to
start banding with the changed time
※Factory default = 0.5 sec
The standby time function is only available in auto mode.
5-2) Banding Regardless of Sensor Detecting an Object
The object sensor can be disabled for special objects or user convenience (e.g., black or
transparent objects).
Turn OFF the power switch →Press the start button →Turn ON the power switch
→Long buzzer sound rings once →Turn the start button OFF →Setting for
banding regardless of the sensor detecting an object is completed
Turn the power OFF, and then turn it ON again after 2–3 s to enable the setting.
This function is only available in manual mode.
Caution
Caution
Max 1.0 sec
Min 0.0 sec
6
Sheet Replacement
1) Take out the installed band.
2) Turn OFF the power switch →Turn ON the power switch while pressing the
feed and auto buttons together →Check if both FEED BUTTON LED and
AUTO BUTTON LED are blinking →Release the feed and auto buttons
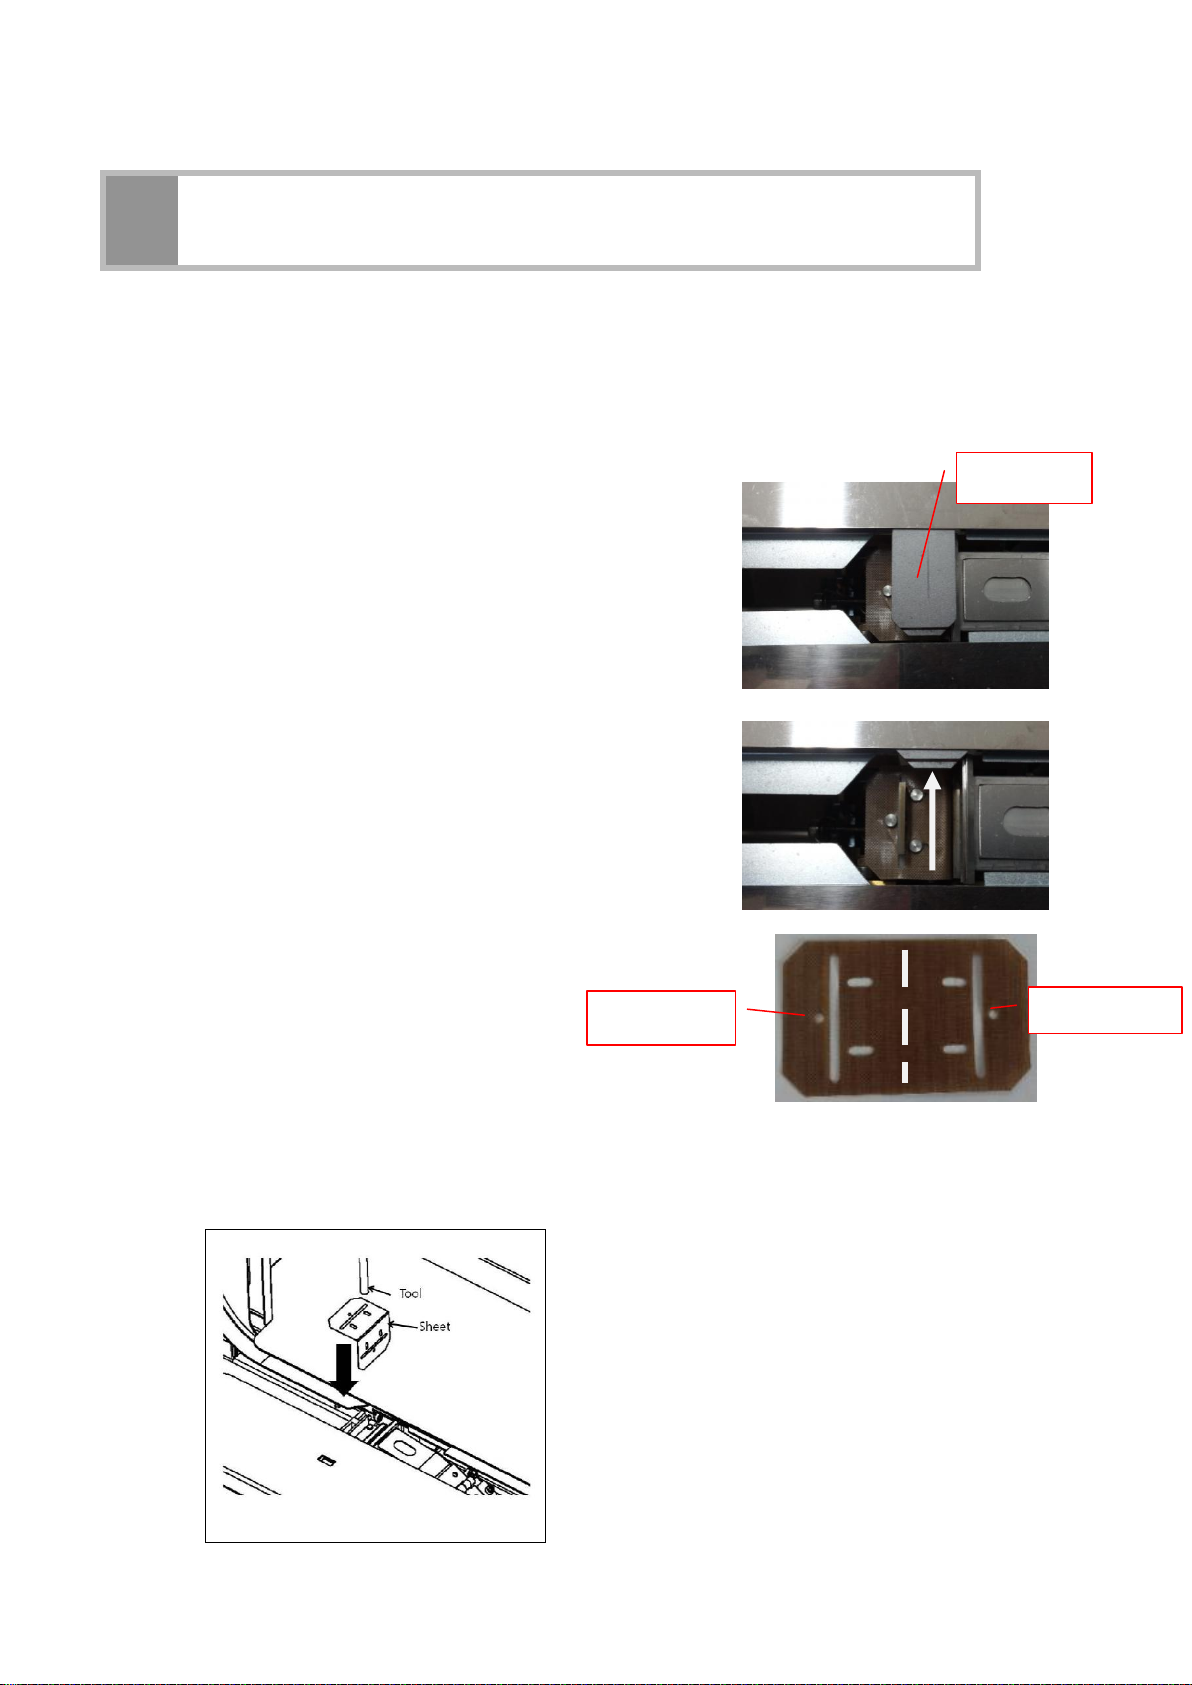
3) Operate the machine by repeatedly pressing the
feed button for a short period until the hold plate
is positioned, as shown in the figure.
4) Turn OFF the power switch.
5) Push the hold plate backward to make the entire
sheet visible.
6) Remove the sheet using tweezers.
7) The sheet has a symmetrical shape
and can be used twice.
8) Insert the right side of the new sheet between the cutter and heater head, and
then fix the sheet with the three pins using the supplied tool.
Hold plate
Second time
First time

9) Turn ON the power by pressing the power switch.
10) Press the start button, and the rail and hold plate will return to their initial
positions.
6-1) Life expectancy of Heater Sheet
Check the condition of the heater sheet before starting the banding operation.
The sheet has expired if its color has changed to black, and it would need to be
replaced with a new one.
The sheet may be torn if the banding operation continues without replacing the
old sheet and could make the surface of the deposited portion opaque when the
band is bound. This may result in jams or shortening of the heater’s life.
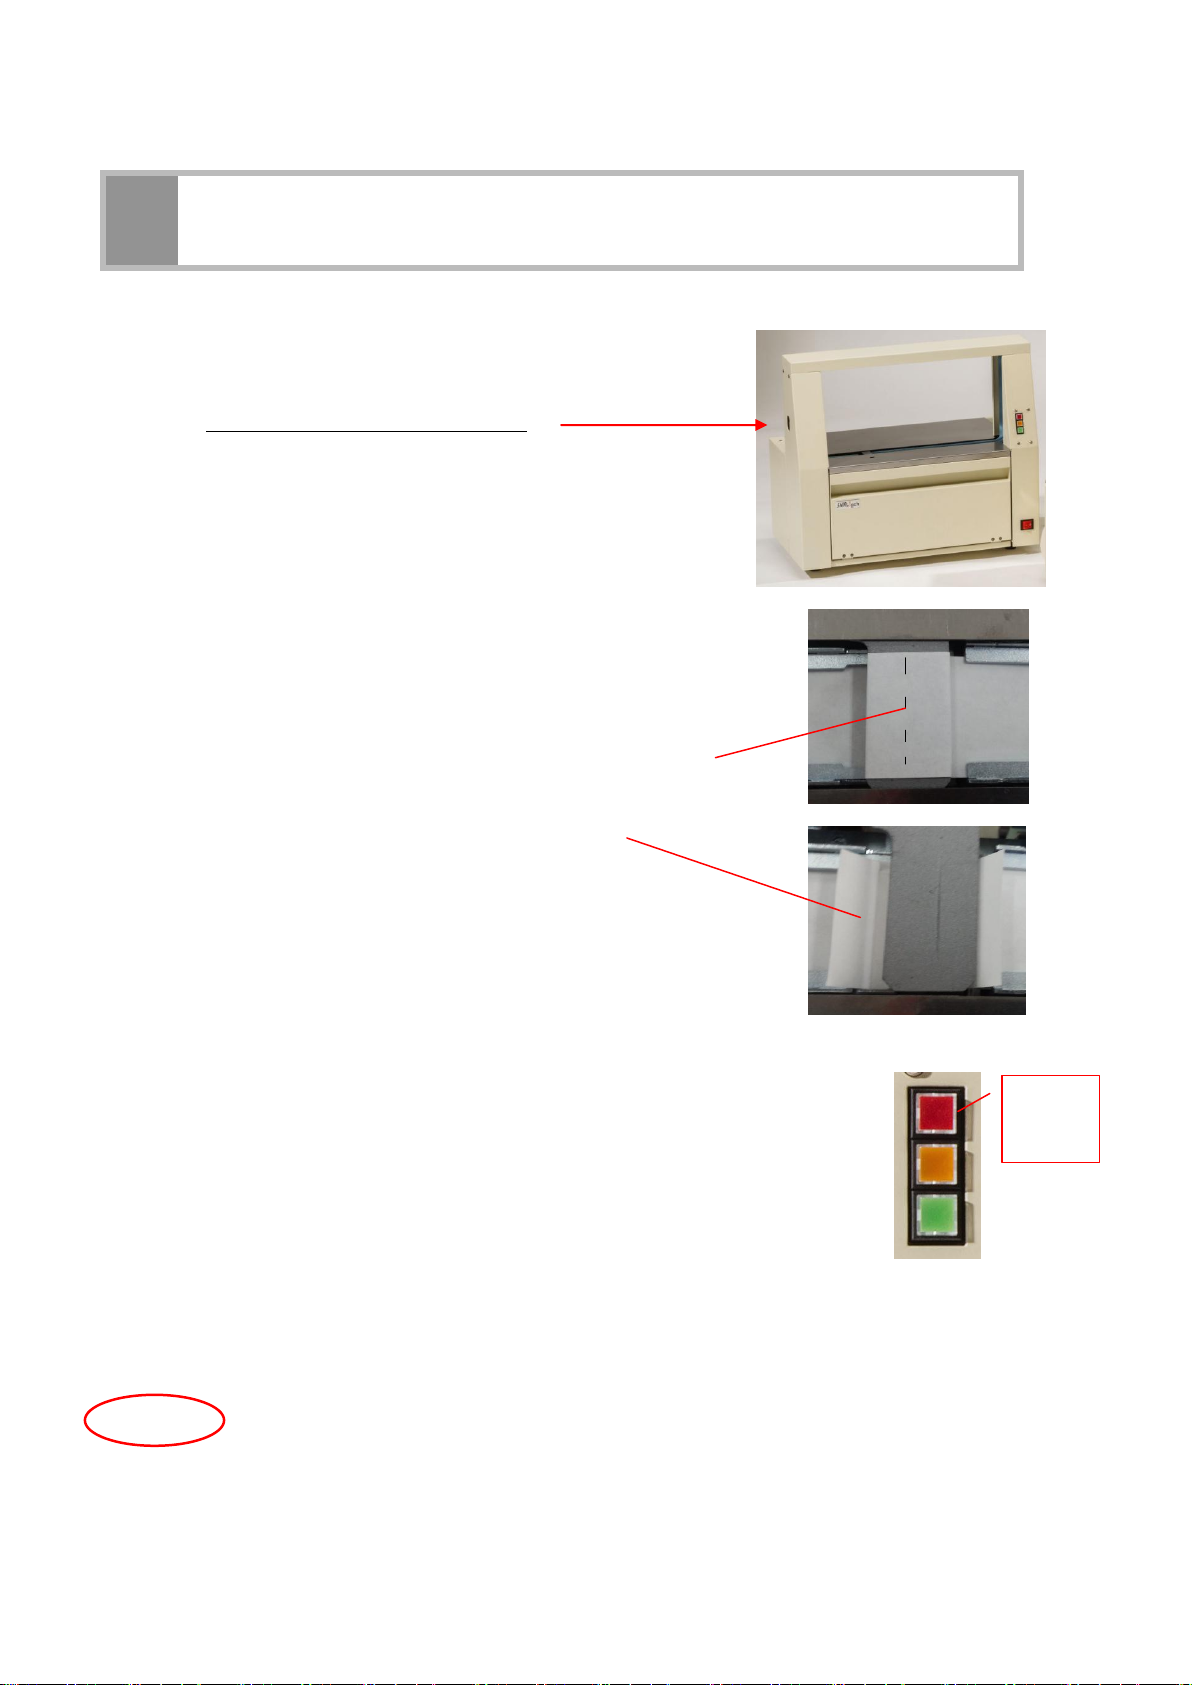
6-2) How to check the Condition of Sheet
Replace the heater sheet with a new one if the
color of the heater section changes to black,
as shown in the figure on the right.
To replace the sheet, refer to “6. Sheet Replacement”.
①Power
switch
Spa
cer
7
Failed Band Removal
When the rail is jammed with the band:
1) Turn OFF the power switch.
2) Press the rail opening/closing lever
to open the rail.
3) Cut the band around the hold plate using scissors.
4) Turn the band roll counterclockwise to completely
remove the band.
5) Set the band according to “4. Band Installation”.
When the band is wound around the hold plate:
1) Turn OFF the power switch.
2) Cut the band that is wound around the hold plate,
as shown in the figure.
3) Pull the left end of the band to remove it.
4) Turn ON the power switch.
5) Press the feed button to feed the band
if the band is incorrectly set in the rail.
* The band is incorrectly set if the FEED BUTTON LED is blinking.
As such, take action as follows:
- If the band is fed well after pressing the feed button again:
Do the banding 2–3 times to ensure that the machine works
normally as the cut end of the band may become rough or wrinkled.
- If it does not work even after pressing the feed button again:
Open the front and band reel covers, cut the band (around the band set lever),
and remove it while pressing and holding the rail opening/closing lever.
When the power is ON, do not put your hand in the rail or hold plate.
Pay attention during auto mode because the machine may start operating
once a part of your body is detected.
Caution
Feed
Button

8
Checking before Troubleshooting
Check the following if the machine cannot operate or the operation is not smooth:
1) If the START BUTTON LED is OFF:
*Check if the power cord is plugged.
*Check if the power switch is turned OFF.
→Plug the power cord, and turn ON the power switch.
2) If the FEED BUTTON LED is blinking:
*Check if the band is fed.
*Check if the band is fed well to the hold plate.
→Press the feed button to set the band to its initial position.
3) If the banding is not performed even if an object is put on the object sensor in
auto mode:
*Check if the banding is set to start regardless of the sensor detecting an object.
→Turn OFF the power switch, and then turn it ON.
4) If the START BUTTON LED is blinking (manual) or banding is performed
automatically (auto) without any object:
*Check if the sensor is dirty.
→Turn OFF the power switch, and then clean the object sensor.
5) If the band cannot be cut:
→Ask for A/S as the cutter is expired.
6) If the deposition is weak:
*Check if the heater temperature is too low.
→Increase the heater temperature by turning the heater temperature control knob
clockwise.
*Check if the band roll is set in the opposite direction.
→Set it correctly according to “4. Band Installation”.
7) If the deposition is weak even though the temperature is raised using the
temperature control knob:
*Check the heater sheet.
→Replace the heater sheet according to the replacement method.
*Ask for A/S as the heater is expired.
8) If the deposited portion is scorched or odors (fumes) are generated at the
deposition: →Lower the temperature as the heater temperature is too high.

9
Extra Functions
The following functions operate when each button is pressed and held:
9-1) Band Removal in case of Jam
Feed Button (Red): Used to remove the band in a jam
-Press and hold the feed button.
-The cam motor will rotate, retracting the hold plate slide (this state will be
maintained).
-Remove the jammed band.
-Press (do not hold) the feed button once again to return the slide to its
original position.
-Re-feeding the band is allowed to prepare for banding.
9-2) Banding Black or Transparent Objects
Auto Button(Yellow)): Used to enter or exit the “Banding regardless of sensor
detecting an object” mode
-Press and hold the auto button.
-The buzzer will ring twice to confirm that the object sensor has been
deactivated.
-If the machine is currently in auto mode, it will automatically switch back to
manual mode.
-This mode will remain even after the machine has been turned OFF and ON.
9-1) Feed Button
9-2) Auto Button
9-3) Start Button

-Press and hold the auto button once again to exit. Then, the buzzer will ring
once to confirm that the mode has been deactivated.
9-3) Banding Soft Object
Start Button(Green): Used to enter or exit the “After banding, the slide moves
forward and feeds if no object is sensed” mode
-Press and hold the start button.
-The buzzer will ring thrice to confirm that the slide has retracted.
-Soft object banding is used to prevent the slide from getting stuck between
the band when banding objects with unstable shapes.
-This mode will remain even after the machine has been turned OFF and ON.
-Press and hold the start button once again to exit. Then, the buzzer will ring
once to confirm that the mode has been deactivated.
Functions 2 and 3 cannot be used at the same time.
The machine will only function using the last command inputted
when both commands are entered.
Caution

10
Specifications
Banding Speed
420(30): 26 cycles/min
420(50): 24 cycles/min
Banding Size
Min: 30 (W) ×10 (H) mm
Max: 400 (W) ×200 (H) mm
Power Supply
AC 110/220 V, 50/60 Hz
Power Consumption
250 W
Tension
0.5~4 kg
Band Width
420(30): paper/film 30 mm
420(50): paper/film 50 mm
Dimensions
560 (W) ×300 (D) ×490 (H) mm
Stand : 600(W) x 510(D) x 660(H)mm
Weight
420(30): 35 kg
420(50): 39 kg
Stand: 28 kg

Product Warranty
BINDTEC Co., Ltd. warrants that it will repair and replace parts under the
following terms if any defects in the material or workmanship of the machine
occur within 12 months from the day of purchase by the user.
A purchase receipt or other evidence for the date of purchase must be shown to
receive warranty services.
Warranty terms
This warranty is valid only while and if the product is used and handled in a
normal and reasonable manner following the User Manual and installation
instructions.
Paid services
*Please read the User Manual carefully, as you will be charged for any services
requested except for product malfunctions guaranteed under the warranty.
*The product is not covered by warranty if damages or defects have occurred
because of:
- Customer misuse or unauthorized tampering or repairs;
- Use of parts other than those designated by BINDTEC Co., Ltd; or
- An act of God or the expiration of the normal service lives of any
expendable parts.
Model
Applicable
Band
Date of
Purchase
Serial No.
Purchased At
This manual suits for next models
3
Table of contents
Other BINDTEC Packaging Equipment manuals


