BinTec elmeg S560 User manual

Manual
System telephones elmeg S560 / elmeg S530
Reference English
Copyright© Version 3.0, 2013 bintec elmeg GmbH
bintec elmeg GmbH Manual
System telephones elmeg S560 /elmeg S530 1

Legal Notice
Aim and purpose
This document is part of the user manual for the installation and configuration of bintec elmeg devices. For the latest information
and notes on the current software release, please also read our release notes, particularly if you are updating your software to a
higher release version. You will find the latest release notes under www.bintec-elmeg.com .
Liability
This manual has been put together with the greatest possible care. However, the information contained in this manual is not a guar-
antee of the properties of your product. bintec elmeg GmbH is only liable within the terms of its conditions of sale and supply and
accepts no liability for technical inaccuracies and/or omissions.
The information in this manual can be changed without notice. You will find additional information and also release notes for bintec
elmeg devices under www.bintec-elmeg.com .
bintec elmeg devices make WAN connections as a possible function of the system configuration. You must monitor the product in
order to avoid unwanted charges. bintec elmeg GmbH accepts no responsibility for data loss, unwanted connection costs and dam-
age caused by unintended operation of the product.
Trademarks
bintec elmeg trademarks and the bintec elmeg logo, bintec trademarks and the bintec logo, elmeg trademarks and the elmeg logo
are registered trademarks of bintec elmeg GmbH.
Company and product names mentioned are usually trademarks of the companies or manufacturers concerned.
Copyright
All rights reserved. No part of this manual may be reproduced or further processed in any way without the written consent of bintec
elmeg GmbH. The documentation may not be processed and, in particular, translated without the consent of bintec elmeg GmbH.
You will find information on guidelines and standards in the declarations of conformity under www.bintec-elmeg.com .
How to reach bintec elmeg GmbH
bintec elmeg GmbH, Südwestpark 94, D-90449 Nuremberg, Germany, Phone: +49 911 9673 0, Fax: +49 911 688 07 25
Teldat France S.A.S., 6/8 Avenue de la Grande Lande, F-33174 Gradignan, France, Phone: +33 5 57 35 63 00, Fax: +33 5 56 89
14 05
Internet: www.teldat.fr
Manual bintec elmeg GmbH
2 System telephones elmeg S560 /elmeg S530

Table of Contents
Chapter 1 System telephones description . . . . . . . . . . . . . . . . . . . . . . . . . . 1
Chapter2 Safetynotices.................................... 2
Chapter 3 Unpacking the device and setting it up . . . . . . . . . . . . . . . . . . . . . . 3
Chapter4 Systemtelephones................................. 4
Chapter 5 System telephone installation . . . . . . . . . . . . . . . . . . . . . . . . . . . 6
5.1 Connect the system telephone . . . . . . . . . . . . . . . . . . . . . . . . . . . . . . 6
5.2 Adjustthebase..................................... 7
5.3 Adjustthedisplayangle................................. 8
5.4 Cleanthesystemtelephone............................... 8
5.5 Addlabelstrips..................................... 8
5.6 Connect and adjust the headset (headset not supplied) . . . . . . . . . . . . . . . . . . . 9
Chapter 6 elmeg T500 system telephone extension . . . . . . . . . . . . . . . . . . . . 10
6.1 Packcontents.................................... 10
6.2 T500extension.................................... 10
6.3 Connector elmeg T500 module . . . . . . . . . . . . . . . . . . . . . . . . . . . . . 11
6.4 Installing the elmeg T500 extension . . . . . . . . . . . . . . . . . . . . . . . . . . . 11
Chapter7 Wallmounting................................... 12
7.1 Assemblykit..................................... 12
7.2 Mountthewallbrackets................................ 13
7.3 Attach the system telephone to the wall . . . . . . . . . . . . . . . . . . . . . . . . . 13
Chapter 8 System telephone display and keys . . . . . . . . . . . . . . . . . . . . . . . 15
8.1 Systemtelephoneonidle............................... 15
8.2 Pictograms ..................................... 17
8.3 Keyfunctions .................................... 18
8.4 Keyassignment ................................... 21
Chapter 9 Use the system telephone for the first time . . . . . . . . . . . . . . . . . . . 23
bintec elmeg GmbH Table of Contents
System telephones elmeg S560 /elmeg S530 i

9.1 Select the language for the display . . . . . . . . . . . . . . . . . . . . . . . . . . . 23
9.2 Entercallnumber................................... 24
Chapter10 Keyfunctions................................... 25
10.1 Functionkeys.................................... 25
Chapter 11 Controls or configuration . . . . . . . . . . . . . . . . . . . . . . . . . . . . . 33
11.1 Basicfunctions.................................... 33
11.2 Access the controls or configuration (example) . . . . . . . . . . . . . . . . . . . . . . 33
Chapter12 Menu ....................................... 35
12.1 Calllists....................................... 35
12.2 Phonebook..................................... 37
12.3 Callforwarding.................................... 38
12.4 Settings....................................... 40
12.5 Sound........................................ 49
12.6 Service....................................... 54
Chapter13 Telephoning.................................... 56
Chapter14 Temporarysettings................................ 57
14.1 Soundvolumesettings ................................ 57
14.2 Keypad and tone dialling (DTMF / MFC dialling) . . . . . . . . . . . . . . . . . . . . . 58
Chapter15 Dialling ...................................... 59
15.1 Dial a call number manually - without option to make a correction . . . . . . . . . . . . . . 59
15.2 Dial a number - with option to make a correction . . . . . . . . . . . . . . . . . . . . . 59
15.3 Options....................................... 60
15.4 Callconnection.................................... 60
15.5 Info......................................... 61
15.6 Phonebook..................................... 61
15.7 Dial or delete missed calls . . . . . . . . . . . . . . . . . . . . . . . . . . . . . . . 62
15.8 Redialling...................................... 63
15.9 Calls........................................ 64
15.10 Switch the microphone, loudspeaker and hands-free on and off. . . . . . . . . . . . . . . 65
Table of Contents bintec elmeg GmbH
ii System telephones elmeg S560 /elmeg S530

15.11 Usingtheheadset .................................. 66
15.12 Voicebox ...................................... 67
15.13 Announcement.................................... 68
15.14 Simplexoperation .................................. 69
15.15 Automaticcallback.................................. 70
15.16 Parallel call (mobile subscribers) . . . . . . . . . . . . . . . . . . . . . . . . . . . . 71
15.17 Telephoning with several people . . . . . . . . . . . . . . . . . . . . . . . . . . . . 72
Chapter 16 The elmeg hybird's PBX menu. . . . . . . . . . . . . . . . . . . . . . . . . . 79
16.1 GoingtothePBXmenu................................ 79
Chapter17 Menustructure.................................. 84
Chapter18 Technicaldata .................................. 86
Index ....................................... 88
bintec elmeg GmbH Table of Contents
System telephones elmeg S560 /elmeg S530 iii

Table of Contents bintec elmeg GmbH
iv System telephones elmeg S560 /elmeg S530

Chapter 1 System telephones description
The elmeg S560 and elmeg S530 system telephones have been designed for internal digital connection to the el-
meg hybird system. These high-quality system telephones, when connected to the elmeg hybird system, provide
an extensive range of features which are only properly exploited when the relevant functions have been programmed
onto a function key and when an LED is showing the function stati (e. g. engaged).
The light display and the 15 function keys provide a constant overview and enable you to manage call lists and your
personal settings.
You can add up to three elmeg T500 key extensions so that you can fully monitor large teams. Note: A power supply
unit is required as soon as one extension is added.
bintec elmeg GmbH 1 System telephones description
System telephones elmeg S560 /elmeg S530 1

Chapter 2 Safety notices
• Note the ambient temperature for the storage and operation of the device in the specifications. The device must
only be connected once the permissible ambient operating temperature is reached.
• Please note that condensation may form on or within the device during transitions from cold to warm temperatures
. Only remove the device from the packaging when the permissible ambient operating temperature has been
reached.
• During a storm, you should not connect or disconnect any cables and do not make any calls.
• Only connect the cords to the connectors provided.
• Lay the cords so that they are protected in the event of an accident.
• Avoid the following influencing factors:
• Direct sunlight
• Heat sources (e. g. heating elements)
• Electronic devices (e. g. sound systems, office equipment or microwave devices).
• Penetration of humidity or liquids
• Corrosive liquids or vapours
• High levels of dust
• Do not use the device in humid rooms or in explosive atmospheres.
• Only open the areas of the device indicated in the assembly/operating instructions.
• Do not touch the plug contacts with sharp, metal or damp objects.
• If the device is not permanently mounted, position the device or the accessory on a non-slip surface.
• Only clean the device with the antistatic cloth provided.
• Please ensure you only use approved accessories.
• Only terminals that offer SELV (safety extra low voltage) and/or meet ETS 300047 may be connected to the
device. Correct use of the permitted terminals meets these requirements.
Plug power supply unit
• Only use the plug power supply unit which is available as an accessory.
• Do not use any plug power supply units that show signs of damage (breaks or cracks in the casing).
Electrostatic charges (ESD protection)
• The system telephone is supplied with ESD protection above the permissible values against the effects of electro-
static charges. In spite of this, be sure to avoid excessive static charges. Various causes can result in the electro-
static charge achieving values that far exceed the permissible values required and that exceed interference im-
munity of the system telephone. The causes or circumstances such as low humidity or carpets must be eliminated.
The manufacturer of the system telephone accepts no liability for damages resulting from these causes.
2 Safety notices bintec elmeg GmbH
2 System telephones elmeg S560 /elmeg S530

Chapter 3 Unpacking the device and setting it up
Pack contents:
• 1 elmeg S560 or elmeg S530 system telephone
• 1 receiver
• 1 receiver cord
• 1 connector cord with RJ45 plugs
• 1 base
• 1 documentation
• 1 antistatic cloth
bintec elmeg GmbH 3 Unpacking the device and setting it up
System telephones elmeg S560 /elmeg S530 3
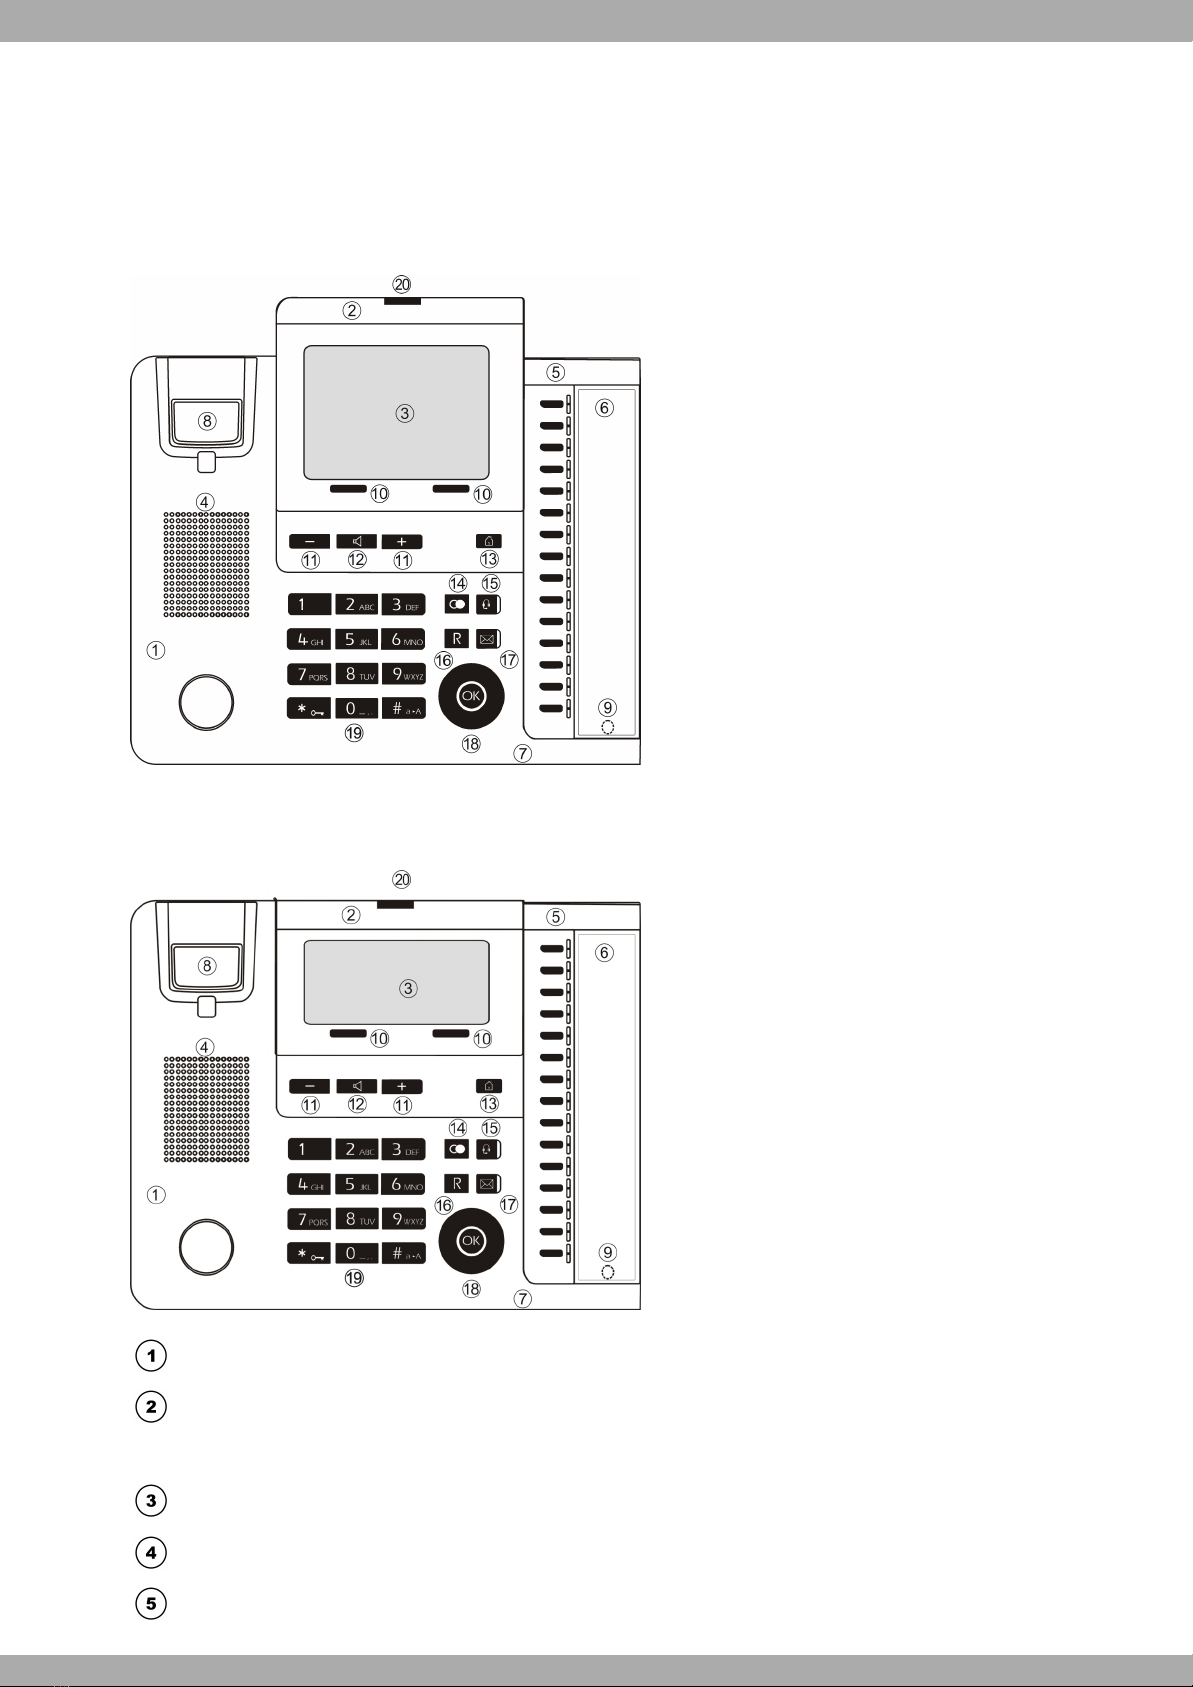
Chapter 4 System telephones
elmeg S560 system telephone interface with display
elmeg S530 system telephone interface with display
System telephone
elmeg S560 8-row graphic display
elmeg S530 4-row graphic display
Display text field
Loudspeaker port
Function keys with two-colour LED (white / blue)
4 System telephones bintec elmeg GmbH
4 System telephones elmeg S560 /elmeg S530

Label field
Microphone
Cradle switch
Magnetic clamp in label field
Softkeys
+ / - keys for settings
Key for loudspeaker / hands-free
Home key
Redial key
Headset key
Hold key
Mail key
Navigator with OK key
Dialling keys
Blue status LED
bintec elmeg GmbH 4 System telephones
System telephones elmeg S560 /elmeg S530 5

Chapter 5 System telephone installation
System telephone underside
System telephone
elmeg S560 or elmeg S530 display
Holder inserted into bracket
Connection plug module (connection sockets for S0 / Up0)
Mini USB connection (latest release)
Headset connector with cable guide
Receiver connector (handset) with cable guide
Connection socket for extension
Connector for the plug power supply unit for the elmeg T500 extensions with cable guide.
Mount for elmeg T500.
Cable retainer
5.1 Connect the system telephone
In order to operate your system telephone, you must insert the cords for the telephone connector and the receiver.
5.1.1 Connection module (connection sockets for S0 / Up0)
The socket for selecting the connection is located on the underside of the system telephone. Here you can select
between the S0 and Up0 connection. To do this, you press the module's two clips together, take the module out
and, depending on the connection type, turn it round and put it back in.
S0 connector
5 System telephone installation bintec elmeg GmbH
6 System telephones elmeg S560 /elmeg S530

The picture shows the connector for S0.
The external S0 connector is connected to the »Line in« socket.
Another ISDN system telephone or ISDN telephone can be connected to the »Line out« socket. The maximum length
of the cable to the telephone here is 10 metres.
Up0 connector
The picture shows the connector for Up0.
The external Up0 connector is connected to the »Line in« socket.
Another ISDN system telephone or ISDN telephone can be connected to the »Line out« socket. The maximum length
of the cable to the telephone here is 10 metres.
5.1.2 Connect the receiver
Insert the RJ11 plug into the RJ11 socket on the receiver.
Insert the RJ11 plug into the RJ11 »Handset« socket on the underside of the receiver. Clamp the connector cord
beneath the cable retainers.
5.2 Adjust the base
You can adjust the telephone's gradient by putting the base into the rear or front retainer.
bintec elmeg GmbH 5 System telephone installation
System telephones elmeg S560 /elmeg S530 7

Caution
Do not carry the system telephone by the base. The retainer is not designed to take such a load.
5.3 Adjust the display angle
You can alter the display angle to one of three steps between 0° and about 60°. To do this, you gently pull or press
the frame of the display into the position you want.
5.4 Clean the system telephone
The system telephone has been designed for normal usage conditions. Only clean the device when necessary with a
slightly damp cloth, or use the antistatic cloth supplied. Never use solvents. Never use a dry cloth; the electrostatic
charge could cause electronic faults. Make sure that no moisture can enter the system telephone and cause dam-
age.
5.5 Add label strips
The cover for the label strips on the system telephone is put on as shown in the picture. Two hooks are used
to put the cover into the holder for label strips , and a magnet is used to secure it on the underside. The el-
meg hybird configuration system can be used to label the label strips and print them out.
System telephone
Holder for label strips
Label strips
Cover
Magnetic clamp for the cover (not visible)
5 System telephone installation bintec elmeg GmbH
8 System telephones elmeg S560 /elmeg S530
5.6 Connect and adjust the headset (headset not supplied)
You can connect a headset to the system telephone. Please ask your dealer or consult the Internet to find out which
headsets are compatible.
The headset connector on the system telephone is an 8-pin socket. Headsets with a DSHG interface (e. g. cordless
DECT headsets) can be connected directly to the system telephone without any accessories.
5.6.1 Connect the headset
The headset is connected to the headset socket on the system telephone. You then insert the headset cable into the
cable guide and secure it beneath the cable retainers.
To connect standard headsets (4-pin conector cable, e. g. U10PS), use the headset adapter which is available sep-
arately.
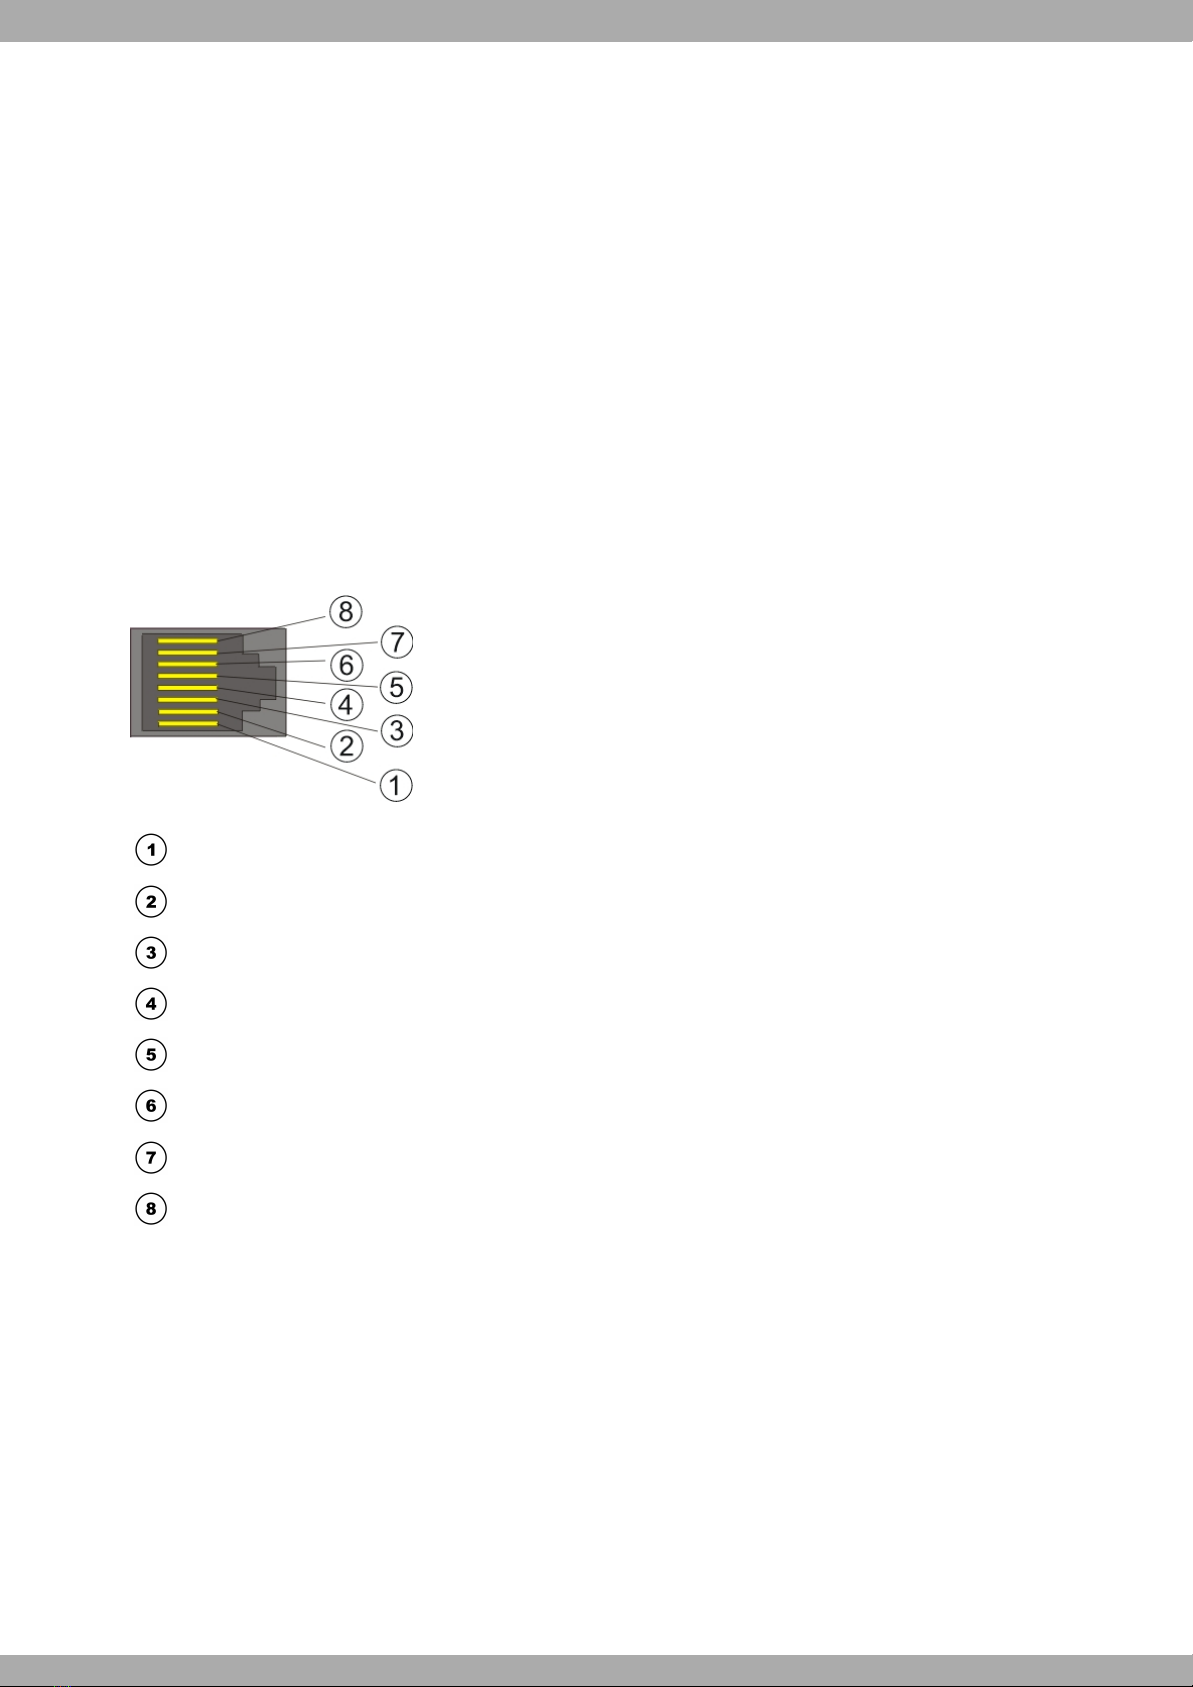
5.6.2 elmeg S560 and elmeg S530 headset socket assignment
DSHG receiver
Earth (Ground)
Microphone +
Receiver (Ground)
Receiver (3.3 V switchable over resistance)
Microphone - (Ground)
V+ (3.3 V)
DSHG transmitter
5.6.3 Other settings for using a headset
You can use either the receiver or the headset to make a call. When using a headset, the following settings are re-
quired or available:
• The connected headset can be used automatically for certain operations on the system telephone.
• If you want to use the headset to automatically receive calls, set the time to automatic pickup. When you use the
elmeg hybird to configure the system telephone, set up a function key to switch automatic call pickup on and off.
bintec elmeg GmbH 5 System telephone installation
System telephones elmeg S560 /elmeg S530 9

Chapter 6 elmeg T500 system telephone extension
The key extension has 15 keys, each with two LEDs, that can be used at two levels as function keys.
6.1 Pack contents
• 1 elmeg T500 extension
• 1 base
• 2 screws
• 1 Connector elmeg T500 module
Caution
The associated plug power supply unit does not come supplied, but should be ordered separately. It is
essential for running the elmeg T500 extension.
6.2 T500 extension
• An elmeg T500 extension can be used to add 30 function keys to any system telephone.
• Up to 3 elmeg T500 extensions can be connected.
• The elmeg T500 extensions are powered by the additional power supply unit in the system telephone.
elmeg T500
Function keys with two-colour LED (white / blue)
Label field (the PC configuration system can be used to label and print the label strips.)
Fixing to the system telephone (2 screws)
6 elmeg T500 system telephone extension bintec elmeg GmbH
10 System telephones elmeg S560 /elmeg S530

6.3 Connector elmeg T500 module
The T500 Connector produces the electrical connection between the elmeg T500 extension and the system tele-
phone or another elmeg T500 extension.
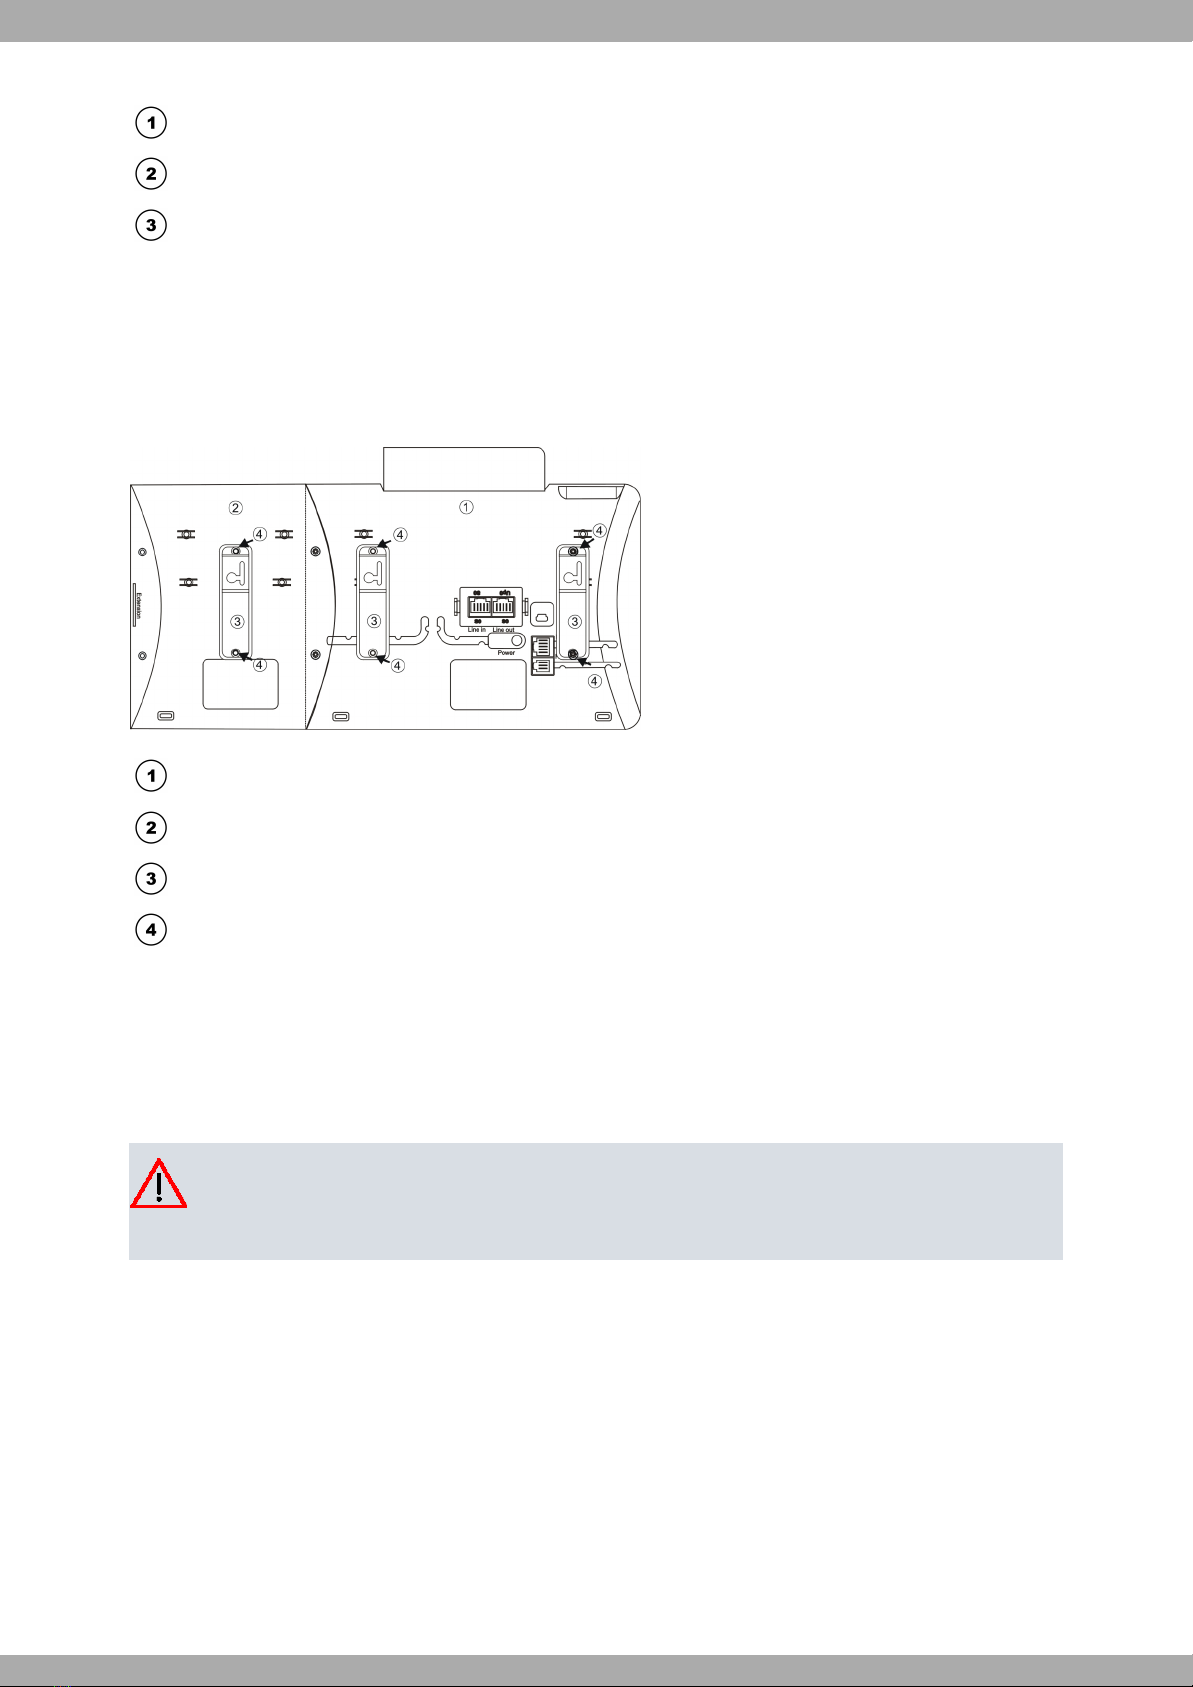
6.4 Installing the elmeg T500 extension
System telephone
elmeg T500 extension
Screws
Extension for connecting other elmeg T500 extensions via the T500 Connector module
T500 Connector module: It connects the system telephone and the elmeg T500 extension. The T500
Connector module is not visible from the outside.
bintec elmeg GmbH 6 elmeg T500 system telephone extension
System telephones elmeg S560 /elmeg S530 11

Chapter 7 Wall mounting
The elmeg S560 /elmeg S530 system telephones and the elmeg T500 extension can be used as desk or wall units.
An assembly kit is required to attach them to a wall.
7.1 Assembly kit
7.1.1 Pack contents
• 10 wall brackets
• 5 receiver brackets
• 20 screws for connecting the system telephone to the wall brackets
• 10 wood screws 3x30
• 10 dowels for 5 mm holes
• 1 drilling template
7.1.2 Assemble the receiver brackets
The system telephone is supplied without the receiver brackets for wall mounting. To mount the system telephone on
the wall, the receiver bracket needs to be replaced by the receiver bracket from the assembly kit. To change
it over, it can be pulled gently upwards and out.
Note
Before the wall brackets are mounted, the connections for the receiver and the headset (and the plug
on the plug power supply unit with the elmeg T500) must be plugged in.
7.1.3 Wall bracket
7 Wall mounting bintec elmeg GmbH
12 System telephones elmeg S560 /elmeg S530
Wall bracket
Telephone side of the wall bracket
Wall side of the wall bracket
7.2 Mount the wall brackets
The wall brackets are screwed in below on the rear of the system telephone, as shown in the picture. The example in
the picture shows an elmeg T500 extension. If you intend to attach more than one elmeg T500 extension, a wall
bracket needs to be attached to each extension.
System telephone
elmeg T500 extension
Wall bracket
Screws
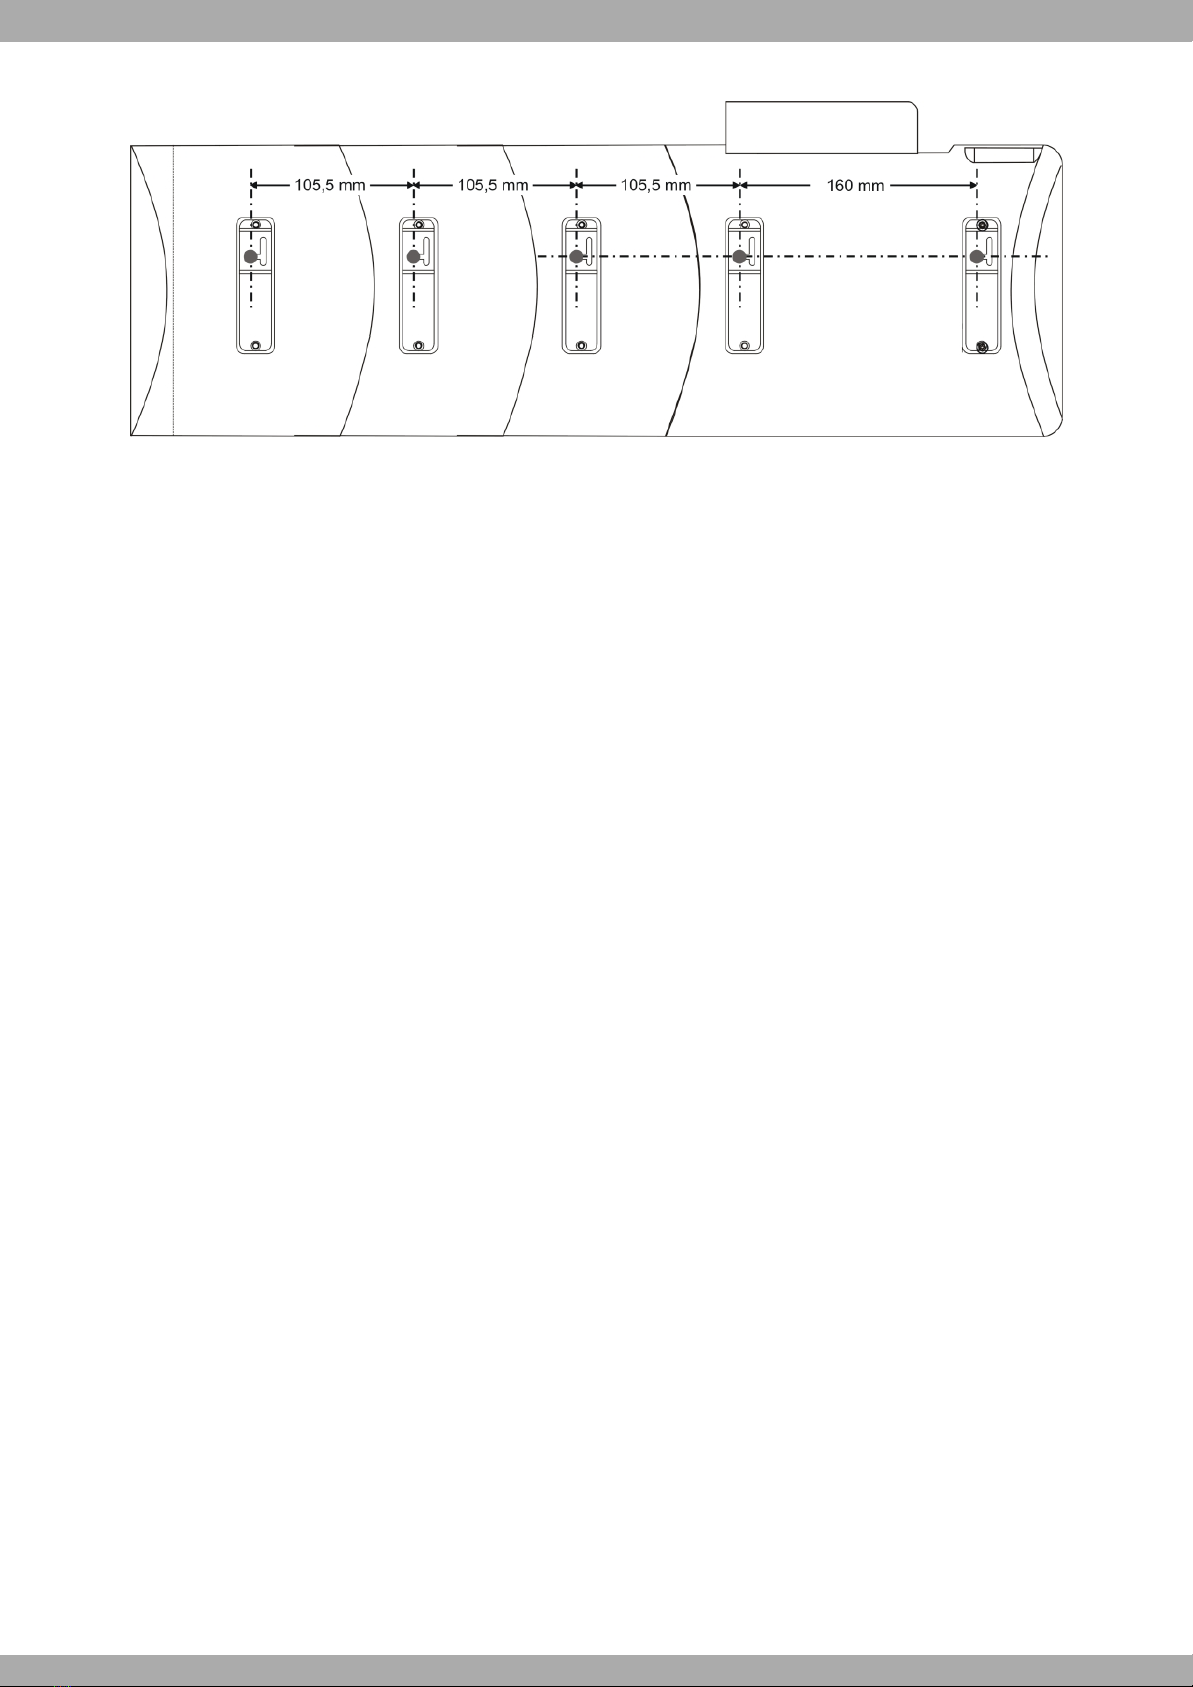
7.3 Attach the system telephone to the wall
Dimensions and gaps
Caution
An extremely flat wall must be used for mounting. This will prevent the system telephone from moving.
It is important that you get the distances between the drill holes absolutely accurate.
(1) To do so, use the drilling template. You can use it for a telephone and an elmeg T500 extension.
(2) Drill the holes in the wall, as shown in the drawing below or the drilling template, and insert the dowels.
(3) Screw the screws into the dowels until the gap between the head of the screw and the wall is about 5 mm.
(4) Hang the system telephone on the screws' heads.
(5) Pull the system telephone a little to the right until it slots into the slit in the wall bracket, and then press it down.
bintec elmeg GmbH 7 Wall mounting
System telephones elmeg S560 /elmeg S530 13
7 Wall mounting bintec elmeg GmbH
14 System telephones elmeg S560 /elmeg S530
This manual suits for next models
1
Table of contents
Other BinTec Telephone manuals


