Bio-Well Bio-Well Quick start guide

1
Bio-Well
Operational Manual
March 2015
Purpose ......................................................................................................................... 1!
Beginning of operations................................................................................................ 1!
“Full Scan” mode.......................................................................................................... 4!
Human Energy screens ................................................................................................. 6!
Before - After Scans ................................................................................................... 12!
Stress Test Scan .......................................................................................................... 13!
Environment mode...................................................................................................... 13!
BioClip mode.............................................................................................................. 16!
Left-side panel ............................................................................................................ 16!
Calibration mode ........................................................................................................ 16!
Work off-line mode .................................................................................................... 18!
GDV readings saved in computer............................................................................... 19!
Important remarks....................................................................................................... 20!
Purpose
The Bio-Well device is intended to perform the following functions:
1. Analyze the complete energetic state of a person by scanning 10 fingers.
2. Produce a functional analysis of a person’s Energy, Stress and Balance levels by
scanning 2 fingers.
3. The dynamic recording of signals, during a period ranging from a few minutes
to many hours, using a special sensor which detects variations of environmental
energy parameters.
4. Record a person’s Human Energy Field (HEF) response to environmental
stimuli, including potential allergens, food, medicine, etc.
Initial Operation
To begin operation of the device, first download and install the latest version of the
software from www.Bio-Well.com.Download and/or installation may be affected by
the computer’s firewall, antivirus, or similar security software. Disabling of one or
more of these resident programs may be necessary for successful installation. Once the
installation process is completed, and a subscription has been purchased, connect one
end of the included USB cable to the rear of the Bio-Well device, and the other end to
the computer.
Subscription login and payment information can be reviewed and updated via the
2
website.
1. Click the Bio-Well software shortcut, or find and click Bio-Well.exe to launch
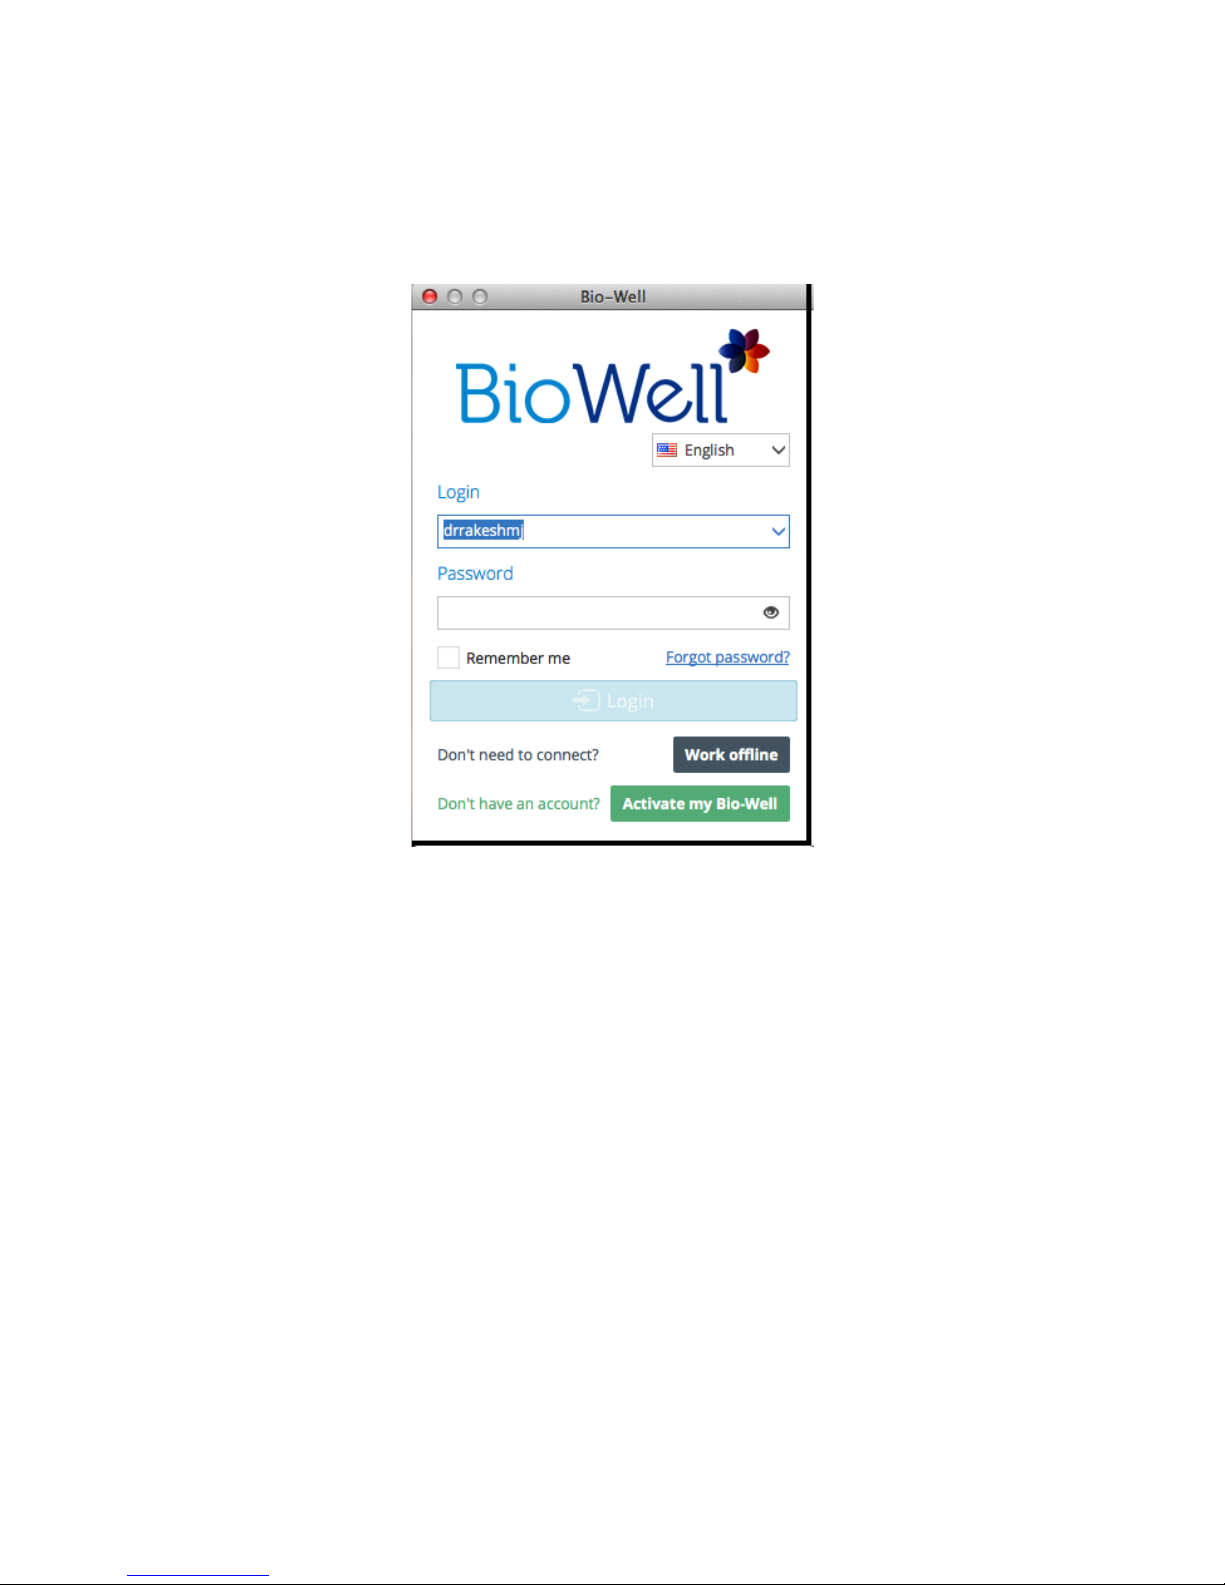
the software directly. The Login window appears (Fig.1).
Fig.1
For standard online operation (connected to the Internet), enter the subscription Login
(username) and Password and click Login. If testing a new device, or one associated
with a different subscription account, it will be necessary to use the temporary-
demonstration account Login/Password: demopro/demopro.Note: Each Bio-Well
device requires its own separate subscription account (Login/Password). Attempting
to connect multiple devices to a single subscription will result in the inability to log
into the subscription.
For offline operation (not connected to the Internet), choose the Language and click
Work offline.
Once logged in, the main window will appear (Fig.2). This dashboard-style layout
provides access to all software functions and scan history. You may choose
Professional or Personal setup by clicking the button near the top-center of the screen
(Fig.2-!).
Every screen of the program may be saved as picture by clicking the Screenshot
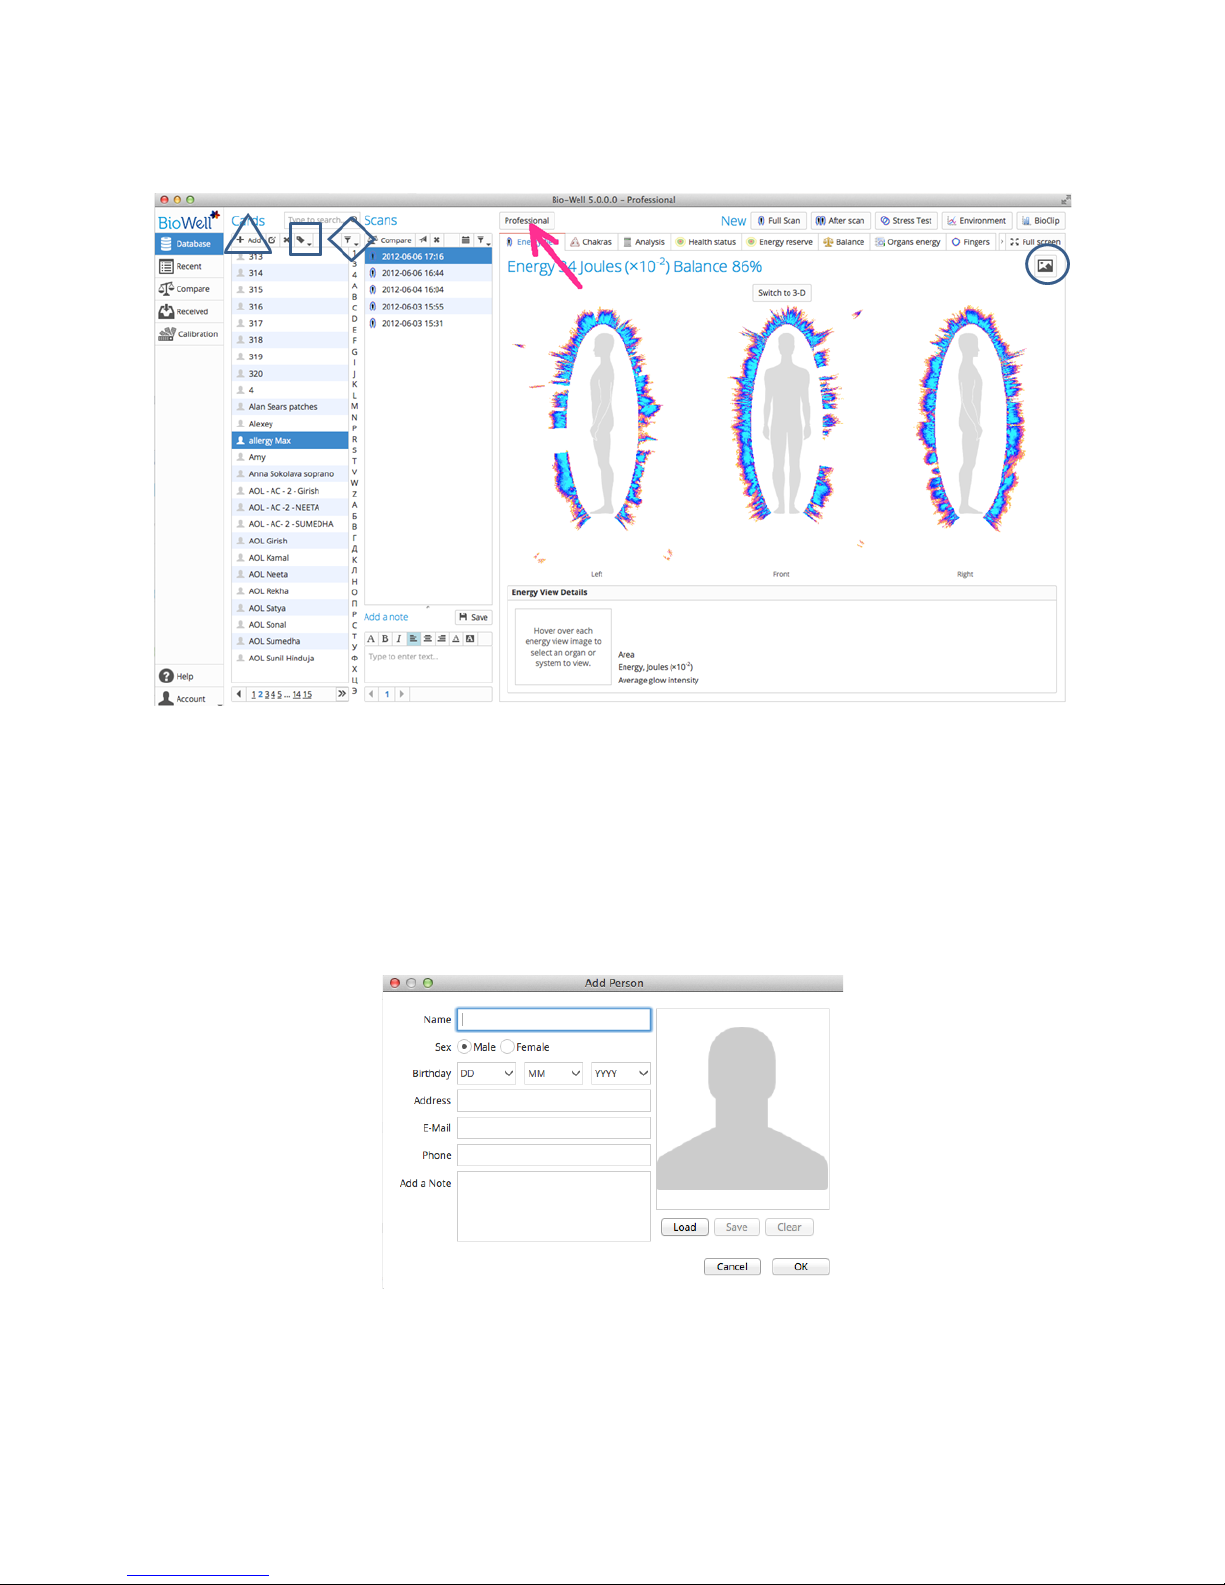
3
button located at the upper-right of the main window (Fig2-!).
Fig.2
To conduct a scan, a Card (Fig.3) must first be created by clicking the + Add button
(Fig.2-!). Name, Gender and Birthdate are required. Adding a picture and other
information is optional. All data will be kept in the online Database associated with
the subscription account. For those users who prefer or require a high degree of
privacy for their clients, consider using numeric or alphanumeric identification
instead of actual names.
Fig.3
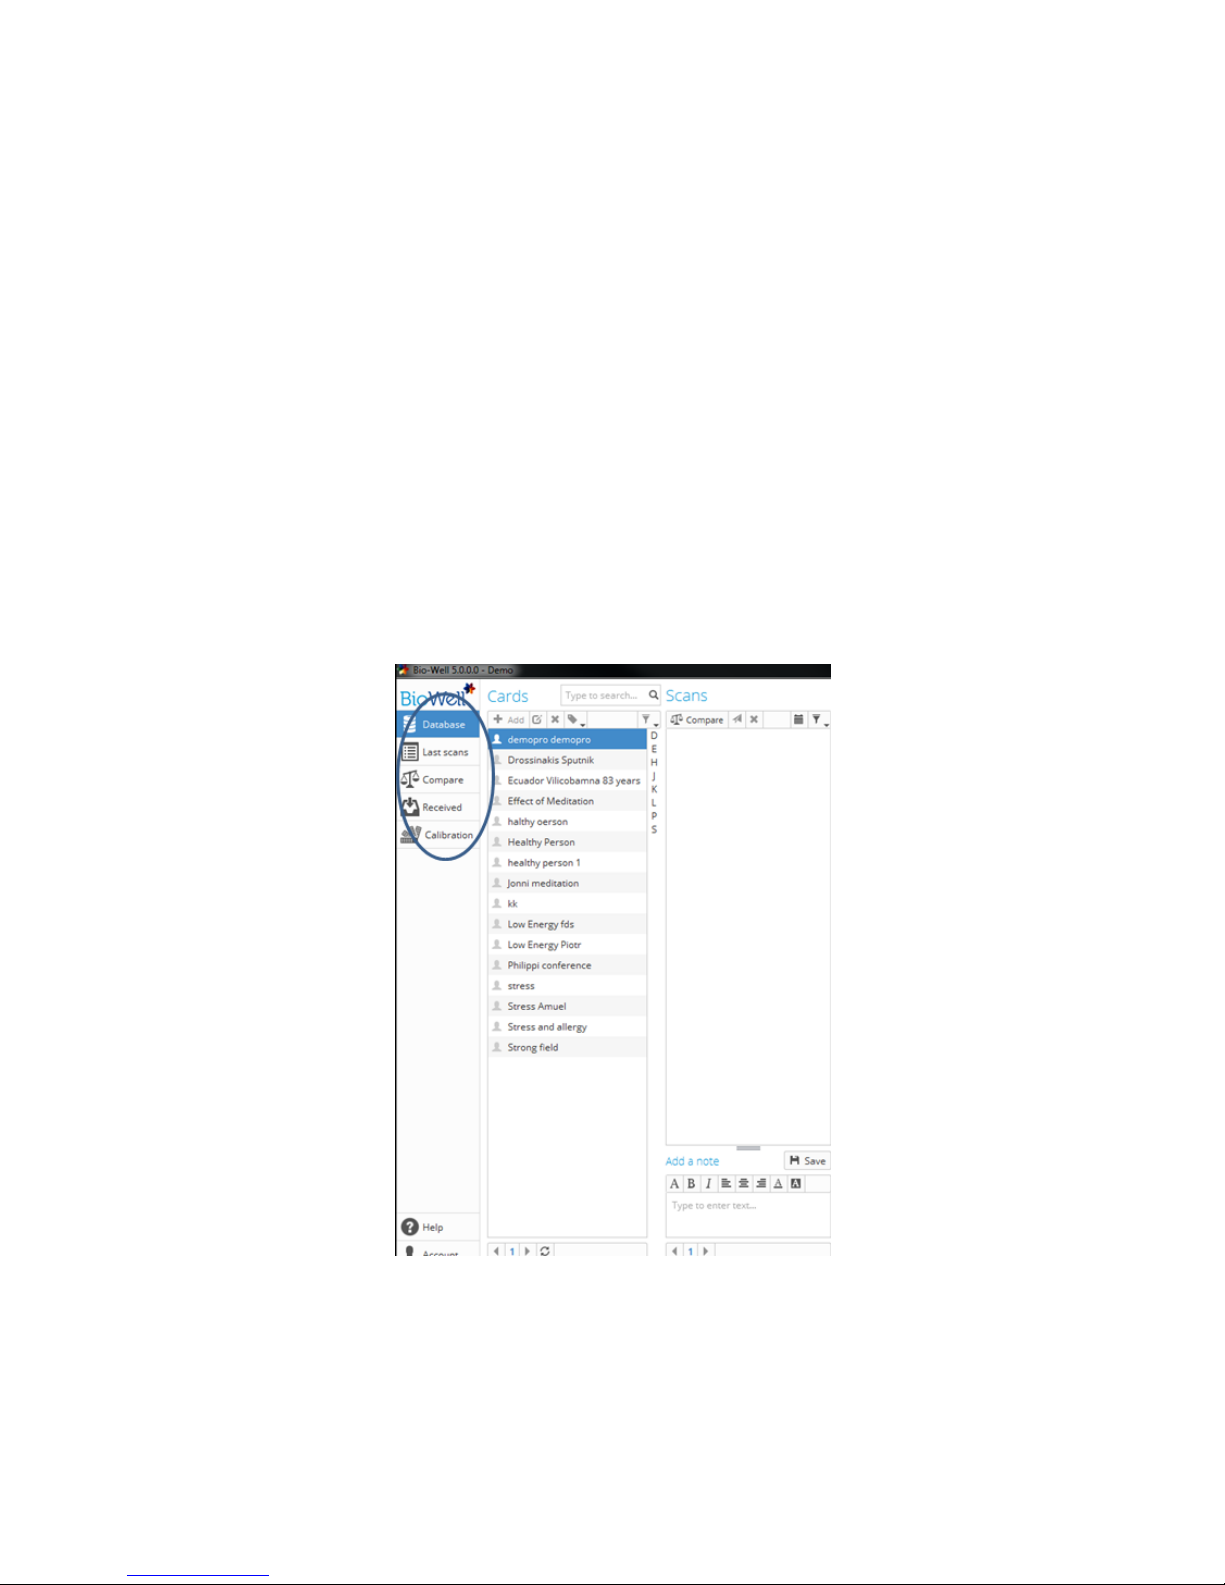
The Database is searchable by name. Cards are listed alphabetically in the Cards
column (Fig.2), and may be edited or deleted.
4
Multiple Cards may be grouped together by creating Labels. Click on a Card, then
click the Label button (Fig.2-") to assign a label name and color. The labeled Cards
will now appear with their assigned color within the Card column, and may be seen
together by using the Filter (Fig.2-#) to display the particular label.
At the bottom of the Cards column, SCROLL arrows are available to navigate the
entire list of Cards.
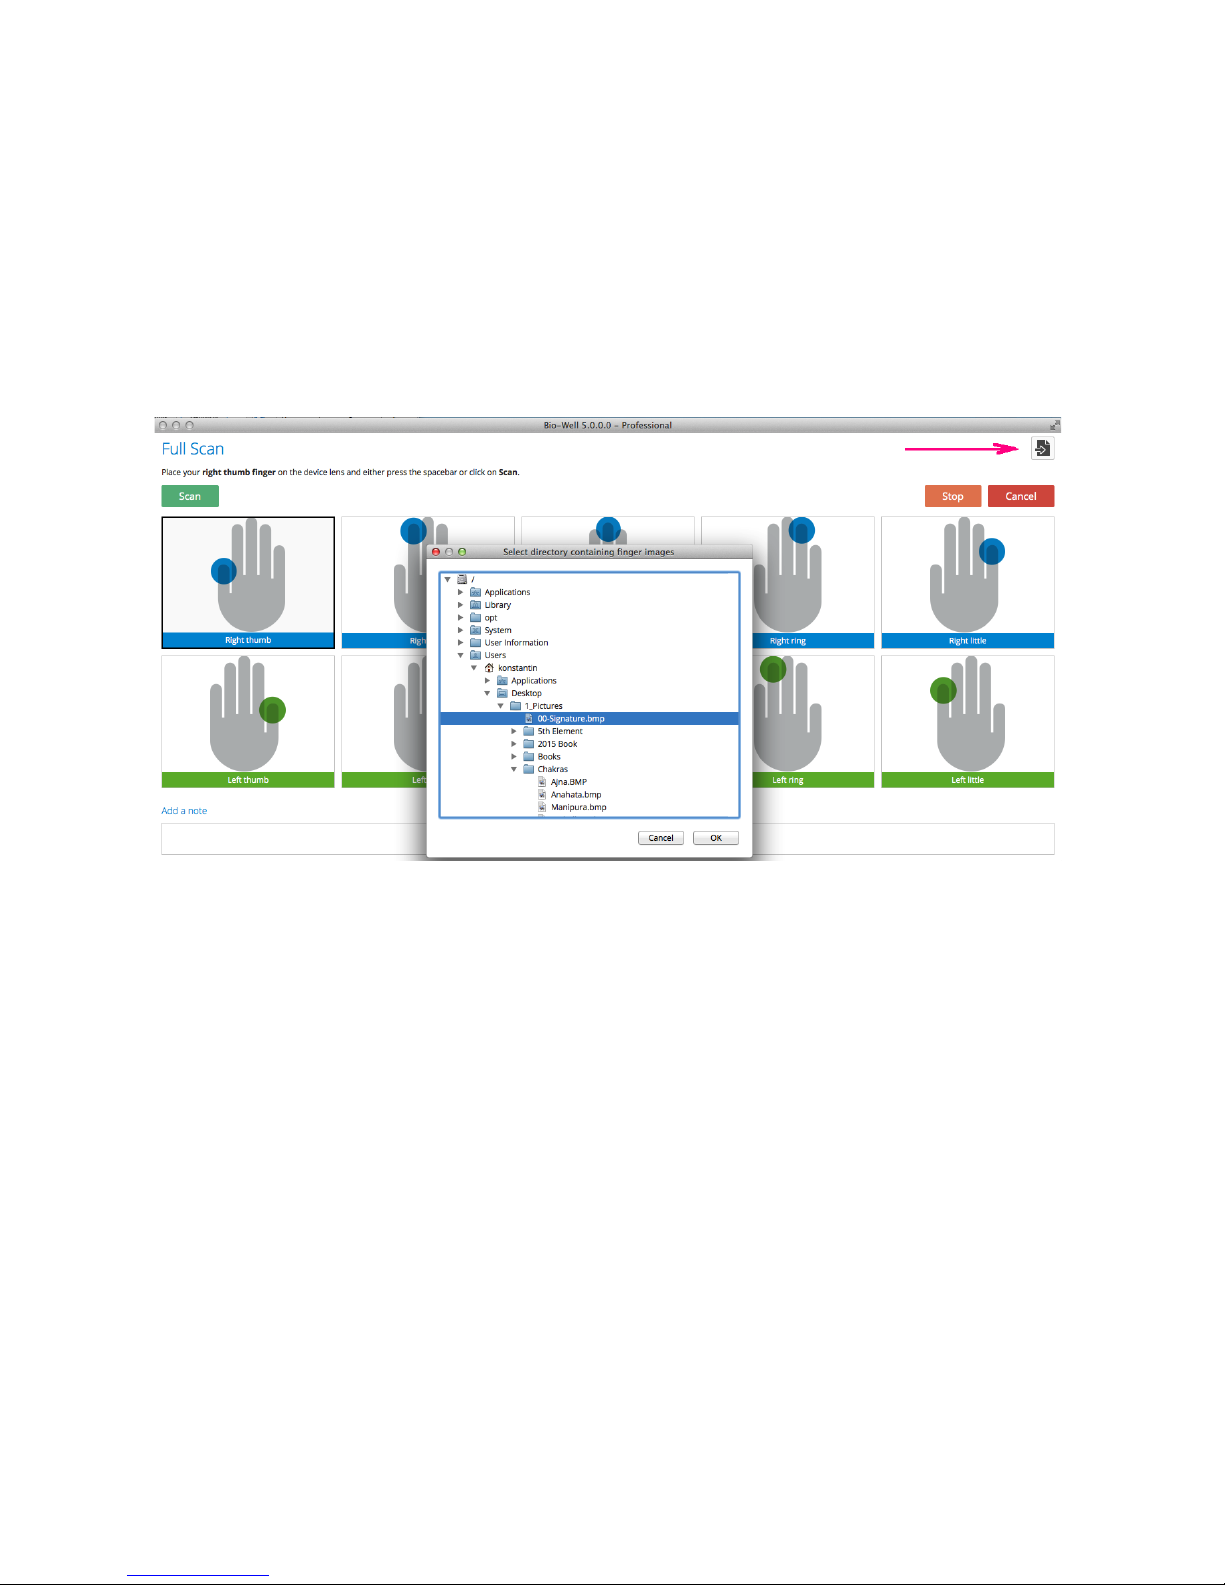
Full Scan Mode
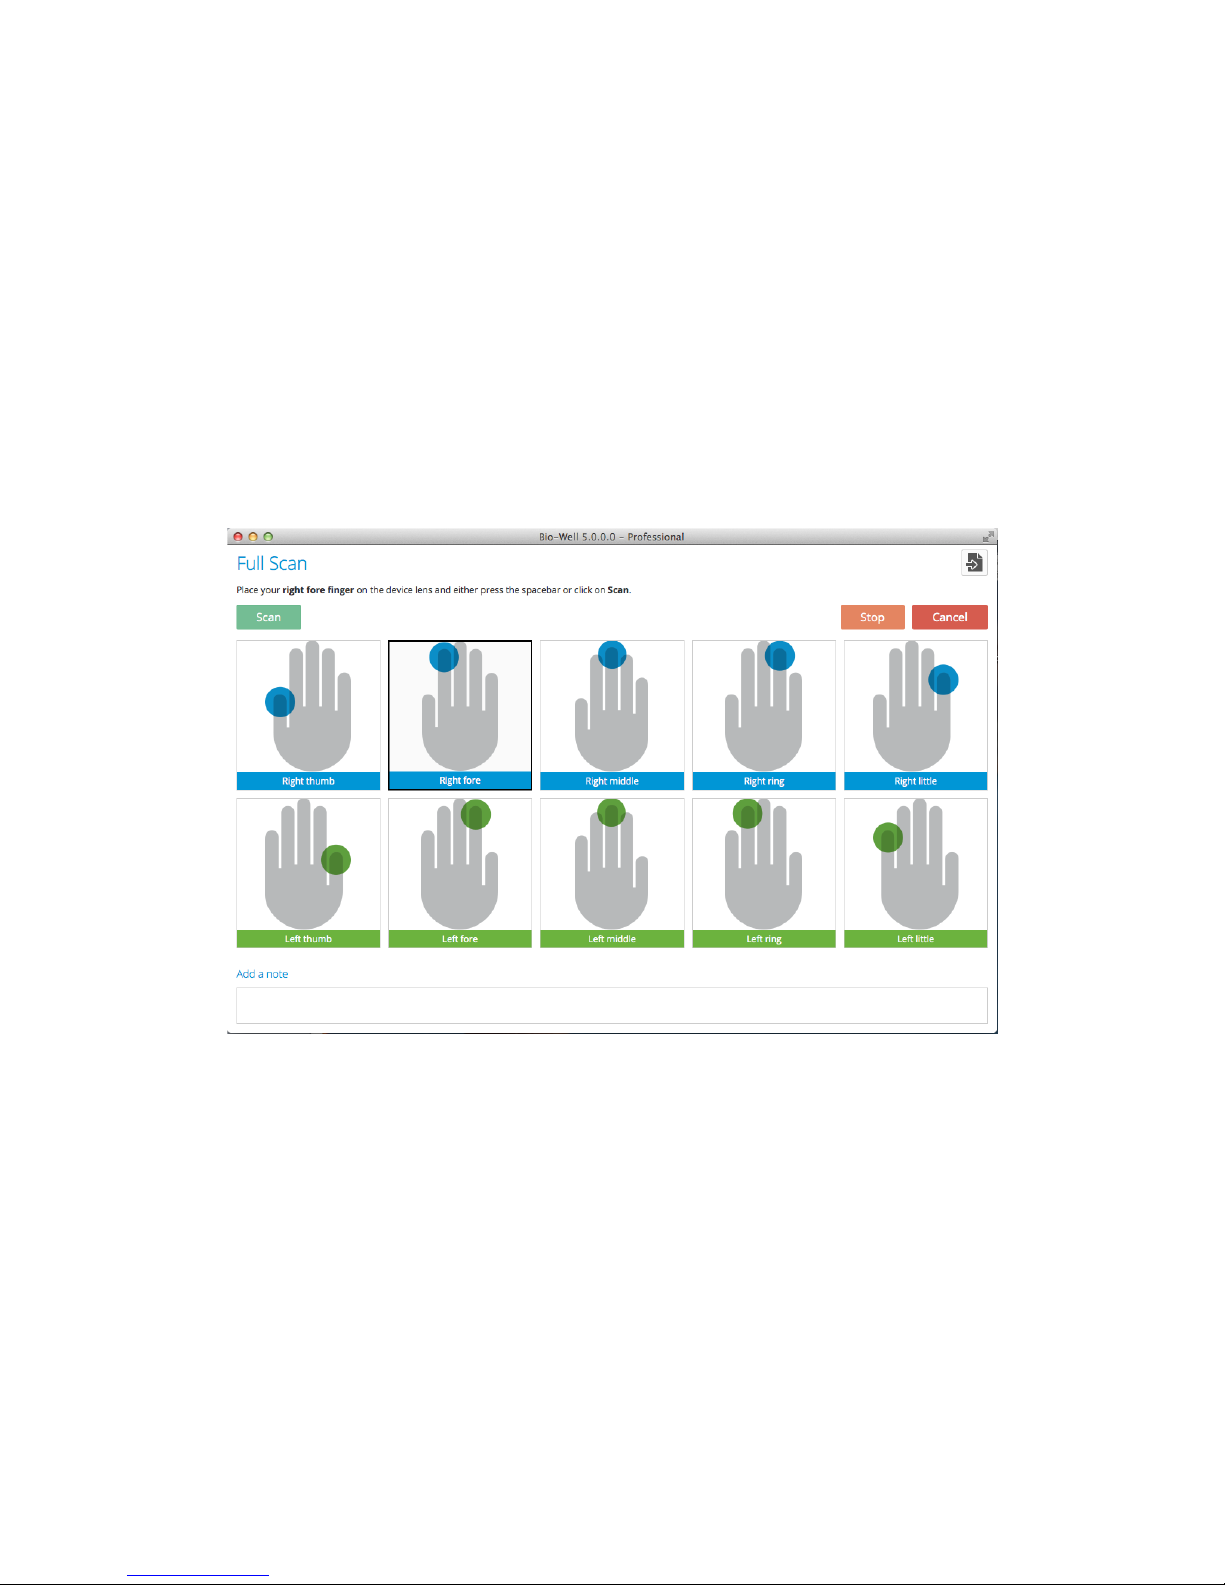
With the Bio-Well device connected to the computer, choose a Card and click Full
Scan to enable the 10-finger interface.
Fig.4
Click Scan (or press Spacebar) to initiate a capture of each finger, one-by-one, starting
with the Right Thumb.
A successful capture will provide a green checkmark. A red exclamation mark
indicates either an incomplete capture or excess light was present. While an
incomplete capture requires the finger to be repositioned for a second attempt, excess
light, presented as flares or particles outside the ring, may be “cleaned” by clicking on
the Finger’s Edit button (Fig.5-") to use the eraser tool to remove the surrounding
artifacts. Be sure to not interfere with the main image (ring).
Notes may be added now, or at a later time.Once all 10 finger captures have been
successfully completed, click Analysis to submit the images to the server for
processing. This stage will be confirmed as complete by the appearance of the Energy

5
Field window displaying 3 views of the HEF.
Fig.5
Scan Management
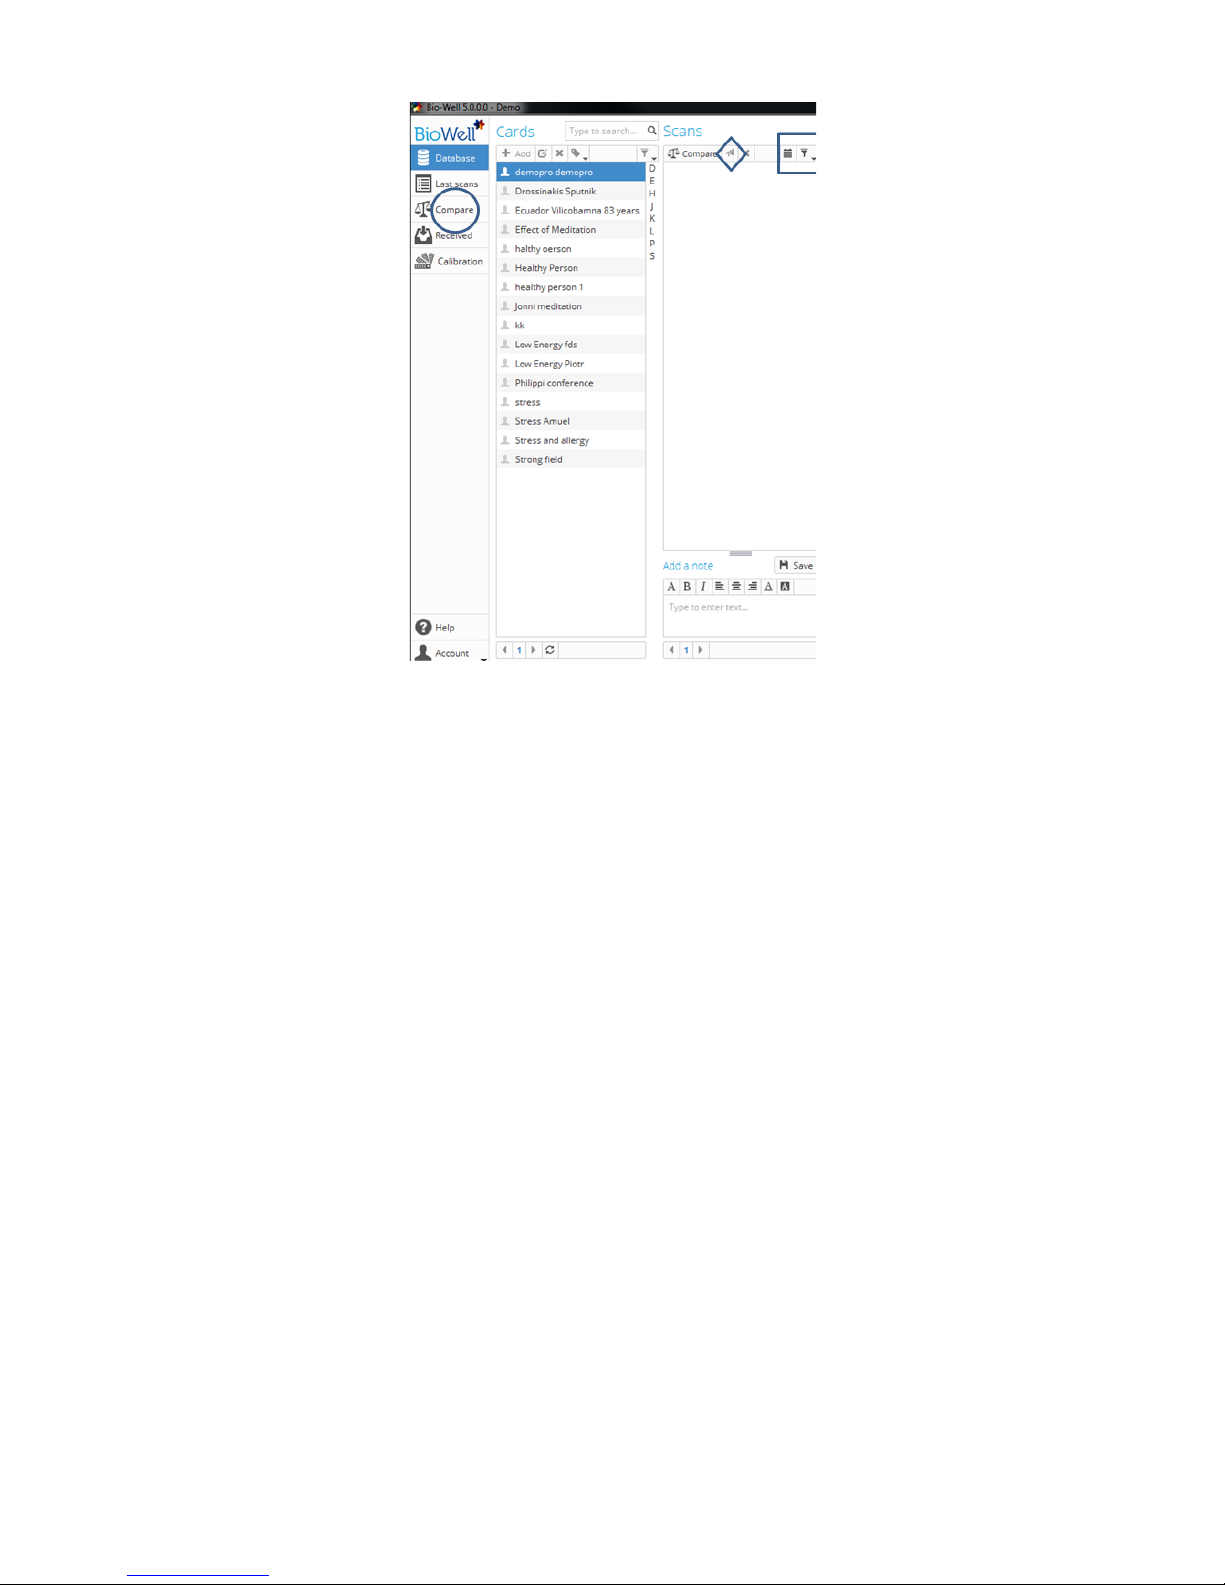
Within the main window, in the Scans column, you will see readings taken for the
chosen card with date and time of recording.
Each individual reading, listed in the Scanscolumn, may be opened for review,
deleted or sent (Fig.6-#) to another account. Sending scans between accounts
requires the exact spelling of the Login (username) of the destination account.
Scans are listed by date and time with types easily identified by the icon
corresponding to the scan modes listed at the top-right of the main window – Full,
Before-After, Stress Test, Environment, and BioClip.
There are Filters to select scans based on a specific date or type (Fig.6-").
The Compare button will send a chosen scan to the compare compartment (Fig.6-!).
A small, red number will appear to indicate how many cases are selected. Up to 50
scans, from the same or different Cards, may be compared at one time.
At the bottom of the Scans column, SCROLL arrows are available to navigate the
entire list of Scans.
Fig.6
6
Human Energy Windows
Full Screen mode may be accessed by clicking the button (Fig.7-").
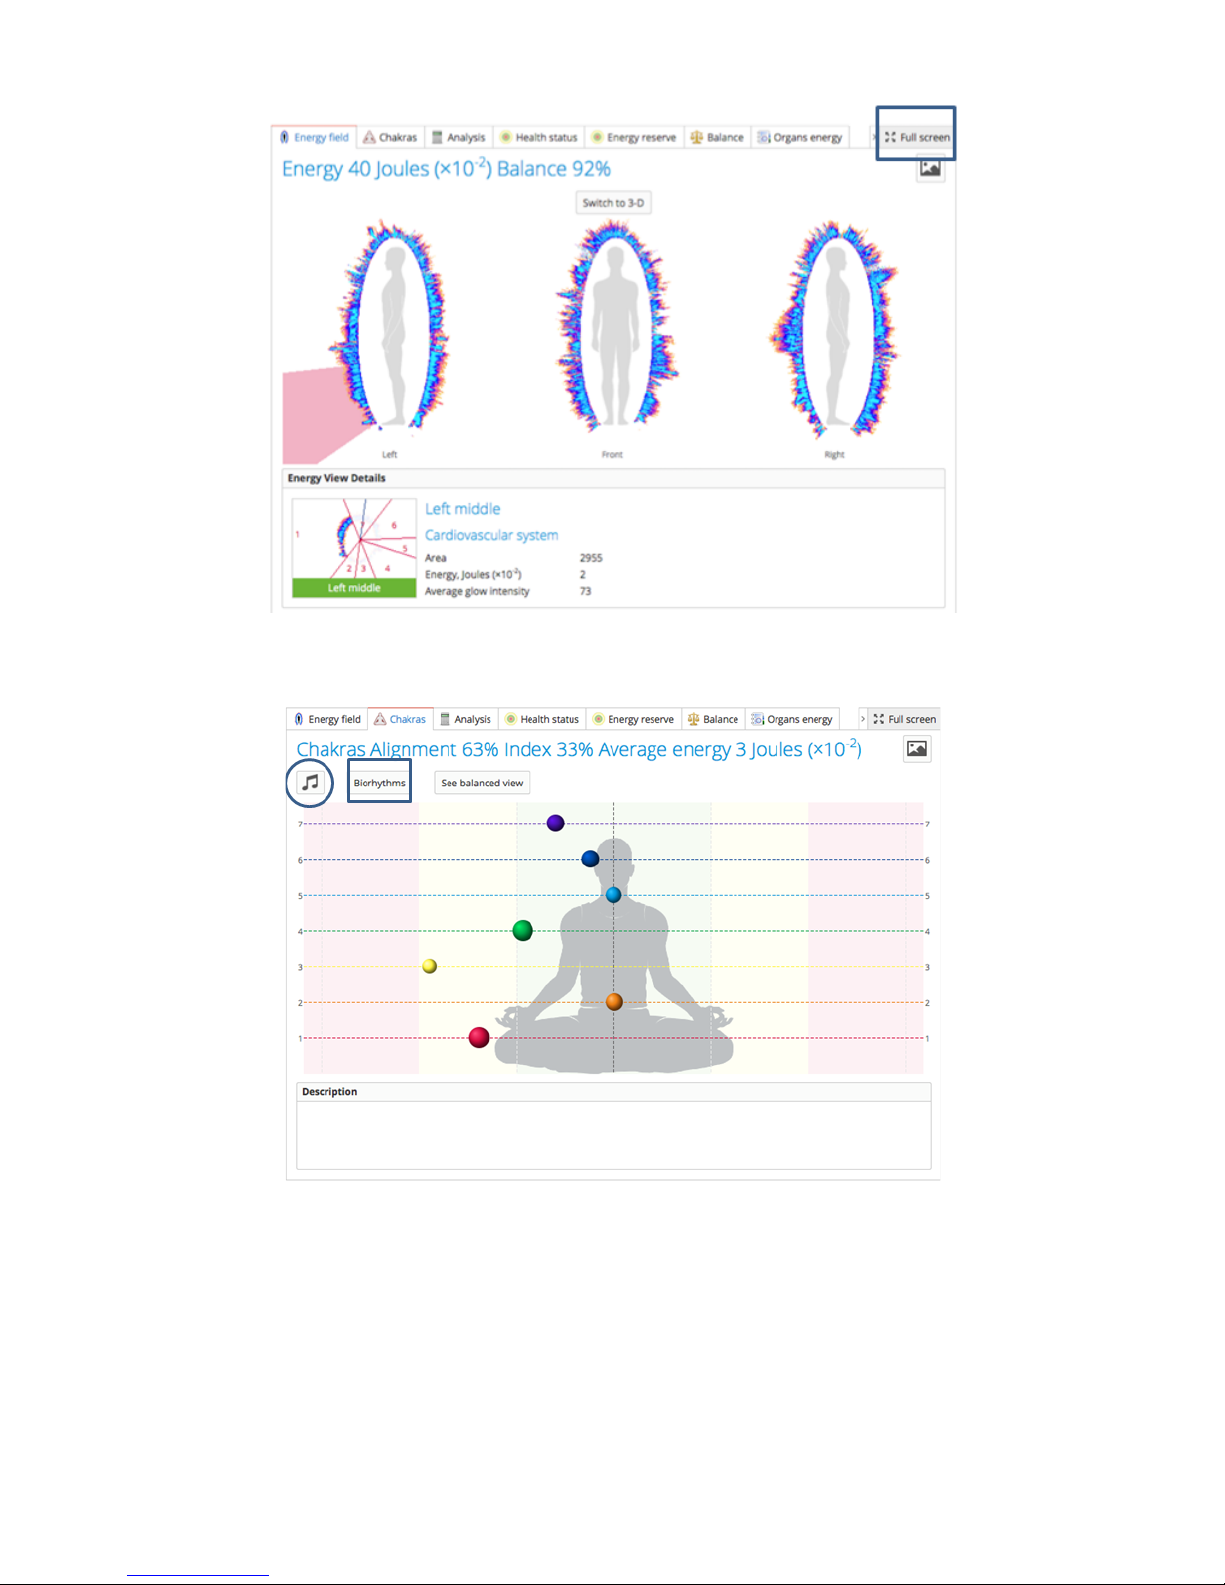
Energy Field: Presentation of front and side views of the entire HEF. Pointing the
cursor to the various areas of an image enables sector-views of the fingers as they
correspond to different parts of the body. Left-clicking an area will enlarge the view in
a separate window.
3D mode is available if the computer’s graphics resources (video card/memory) are
capable of rendering the image.
Fig.7
7
Chakras: Click on a particular Chakra to see the description.
Fig.8
The Create Music button (Fig.8-!) generates a unique music file which may be
saved to be used with a BioCor device (currently not available in the U.S.).
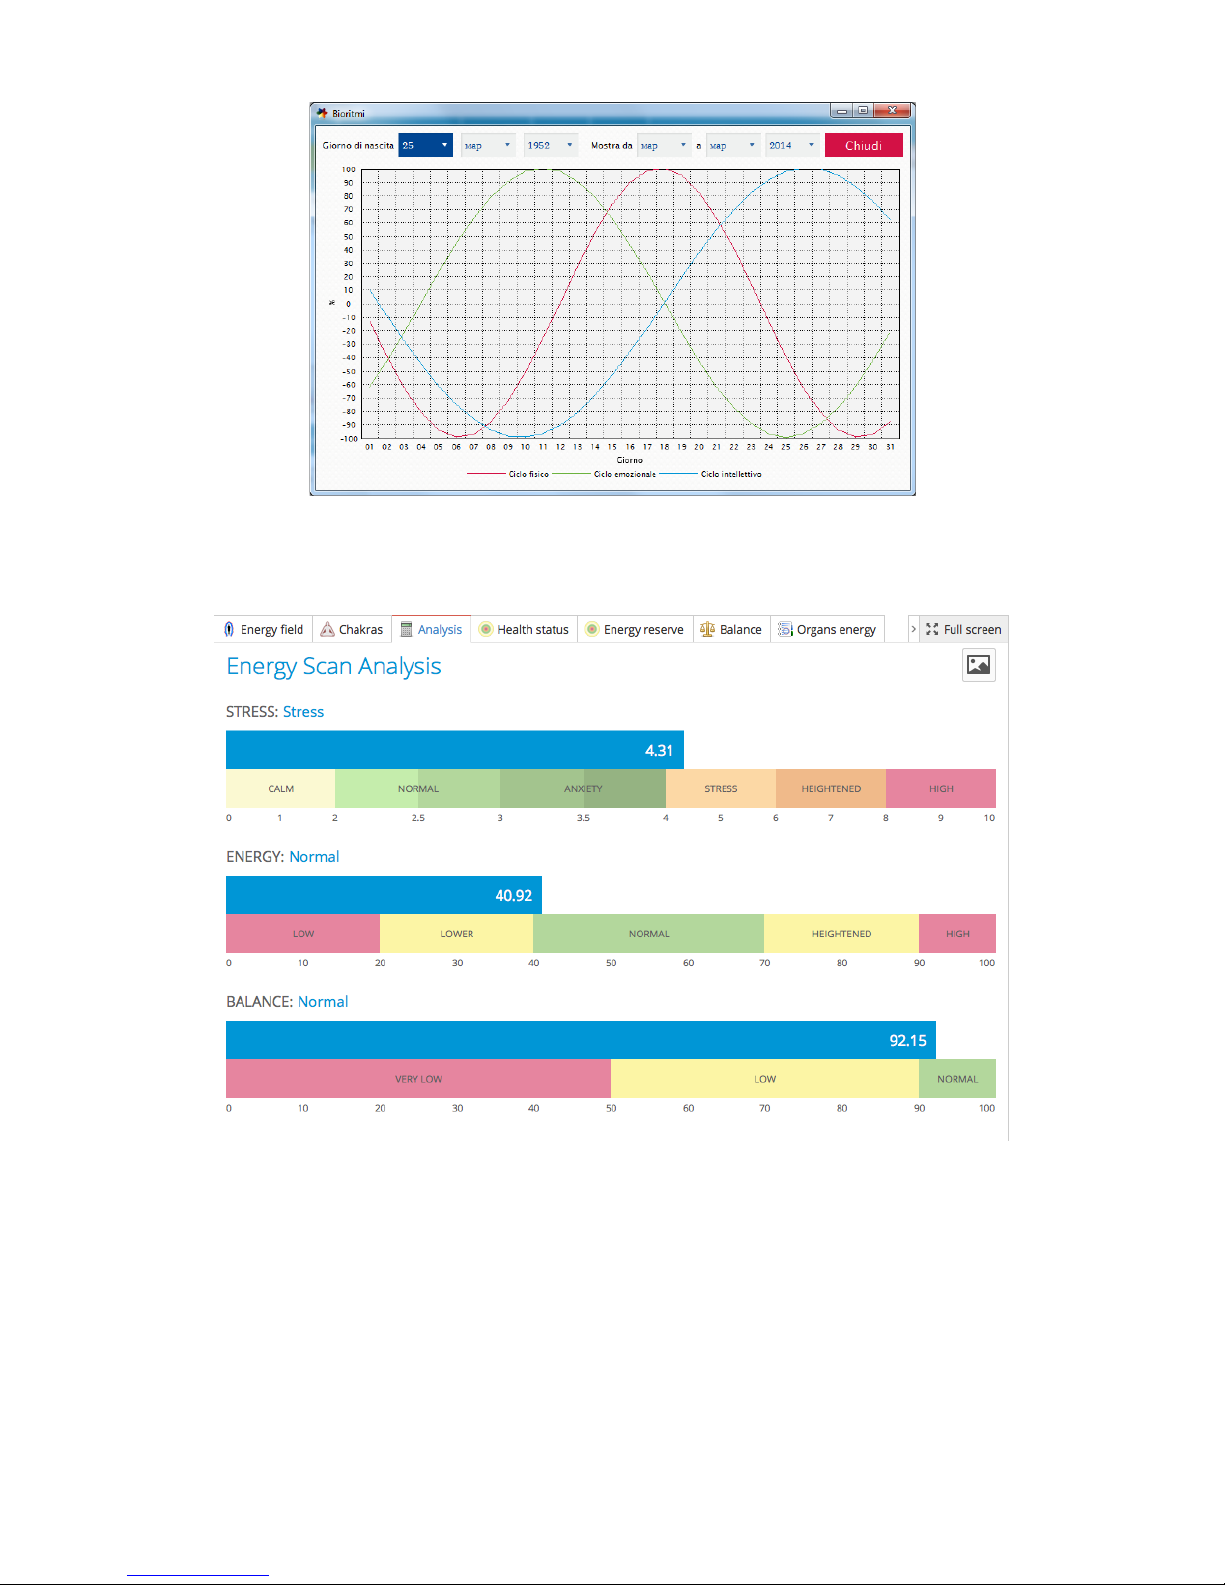
Biorhythms button (Fig.8-") presents the biorhythms for the chosen period of time
(Fig.9).
Fig.9
8
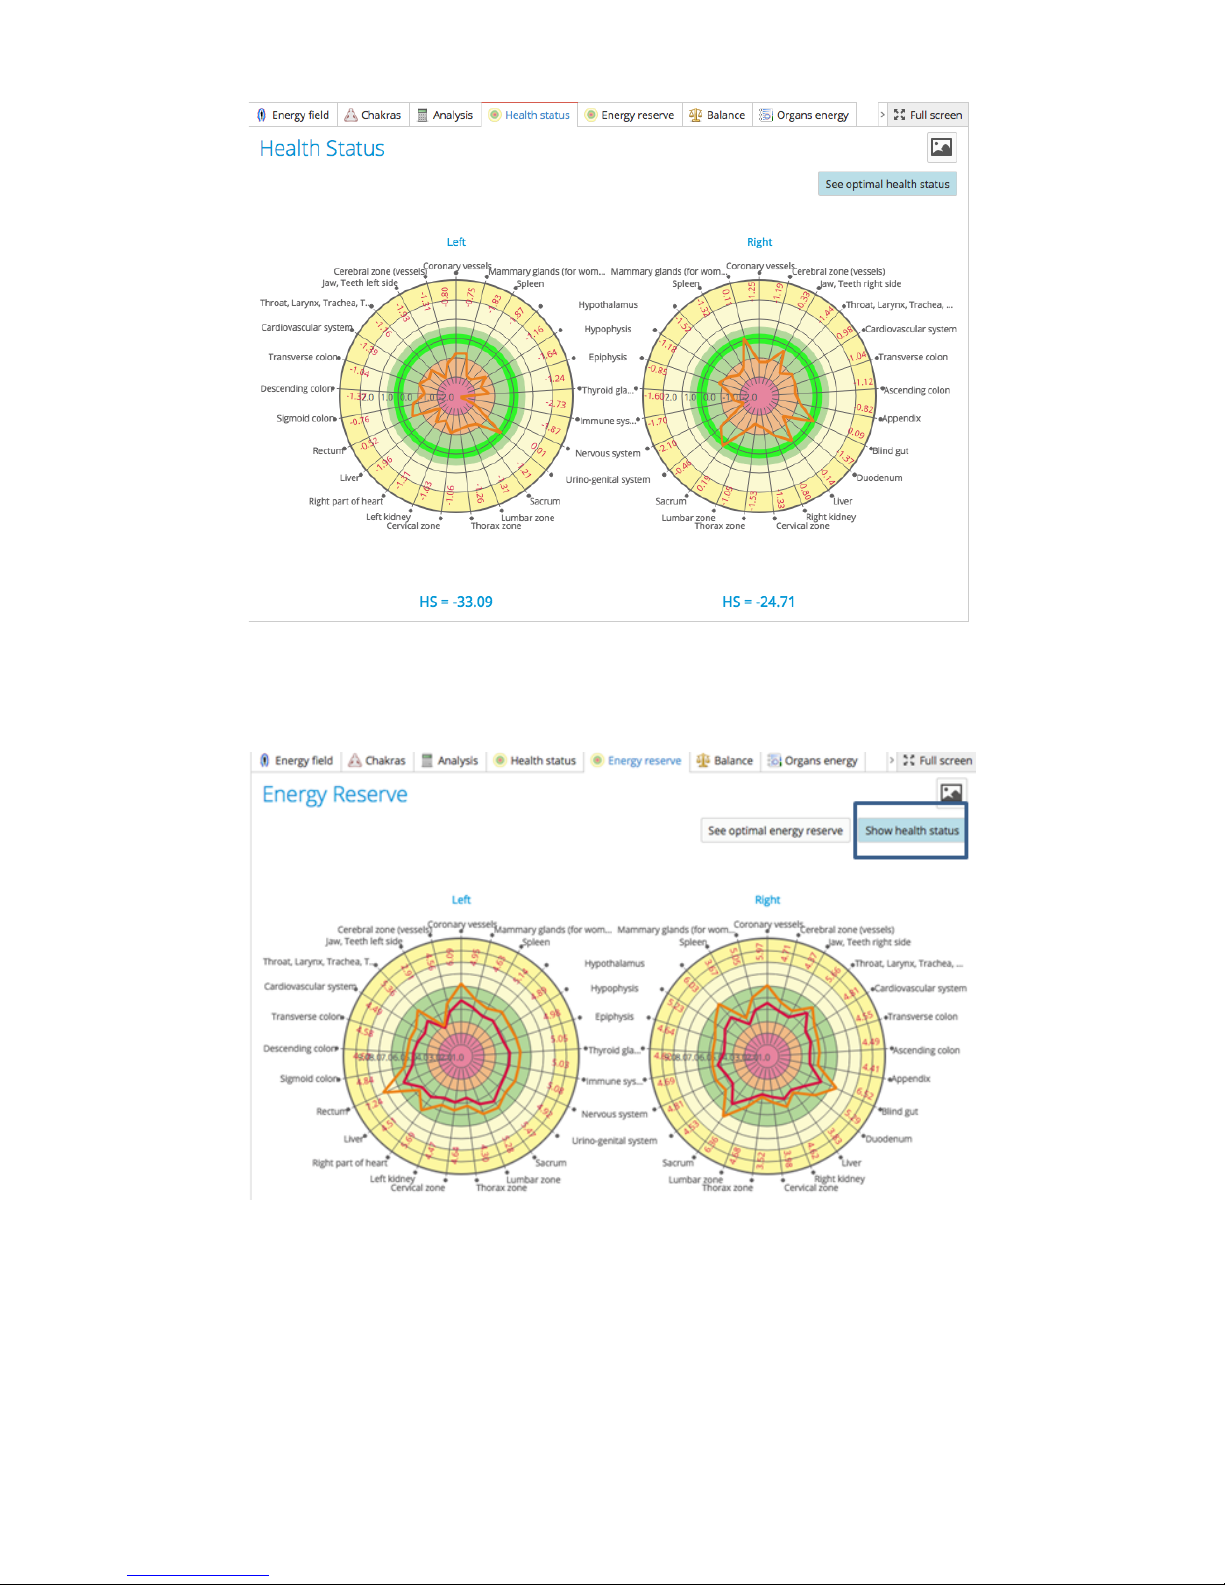
Analysis:The three main parameters – Stress, Energy and Balance – as numeric
results (Fig.10).
Fig.10
Health Status:Shows distribution of Area parameters for different organs and
systems (Fig.11).
Fig.11
9
Energy Reserve:Shows distribution of Energy parameters (Fig.12).
Fig.12
Show Health Status button (Fig.12-") displays a comparison of the Health Status and
Energy Reserve. It is beneficial when the Energy Reserve outline is wider/larger than
the Health Status outline.
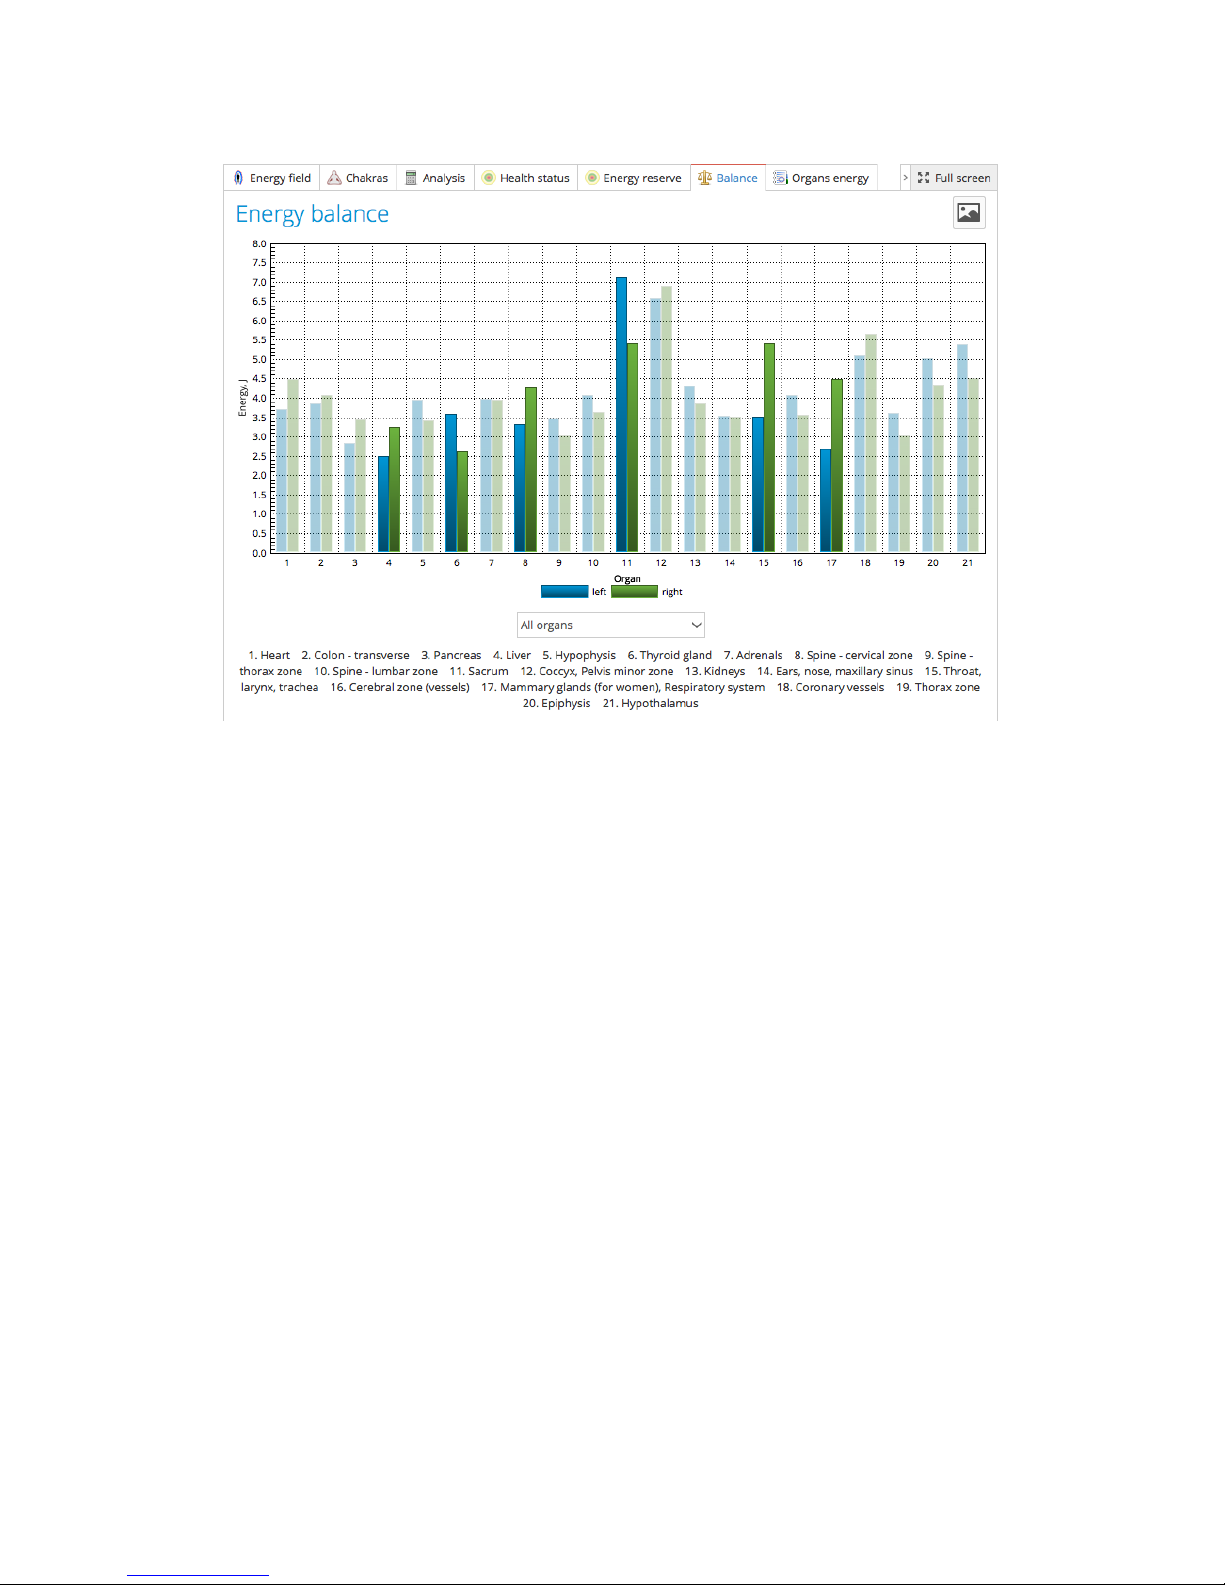
Balance:Shows the level of Energy for paired systems and organs. A significant mis-
balance will be presented as highlighted bars (Fig.13).
10
Fig.13
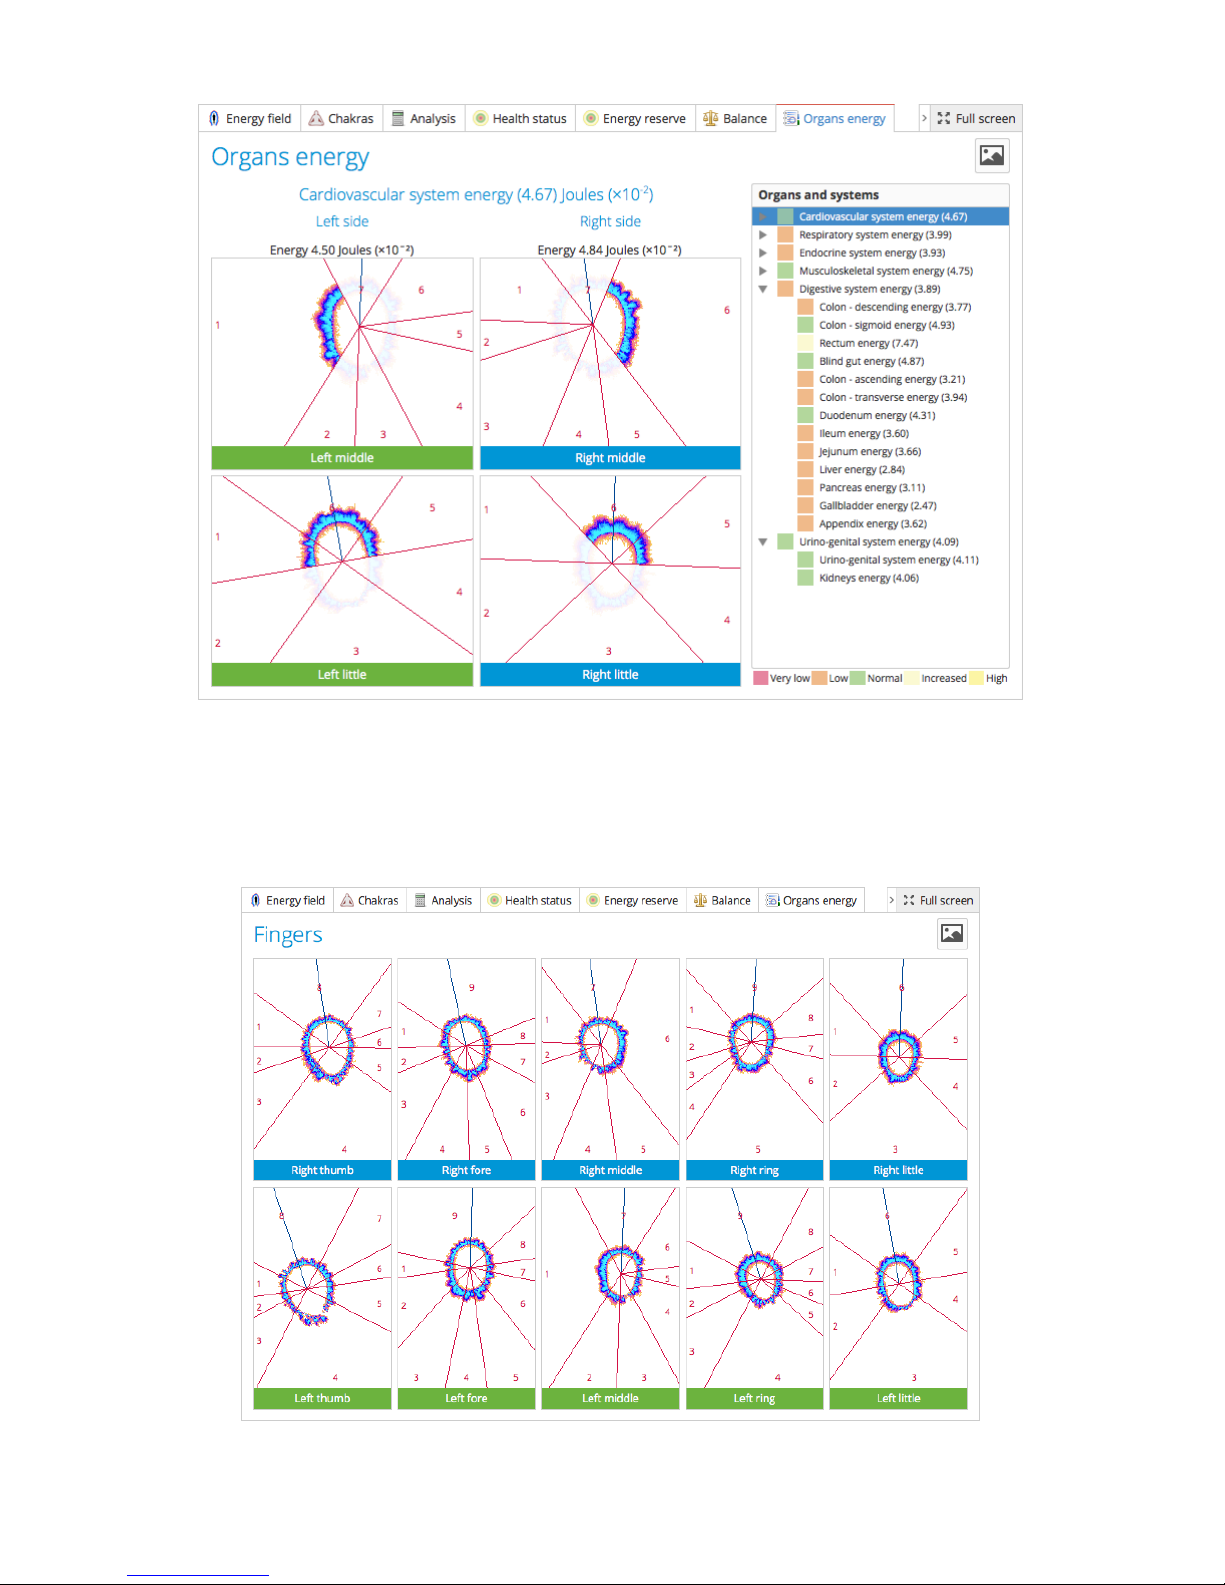
Organs Energy:Shows sectors corresponding to different systems and organs
(Fig.14).
Fig.14
11
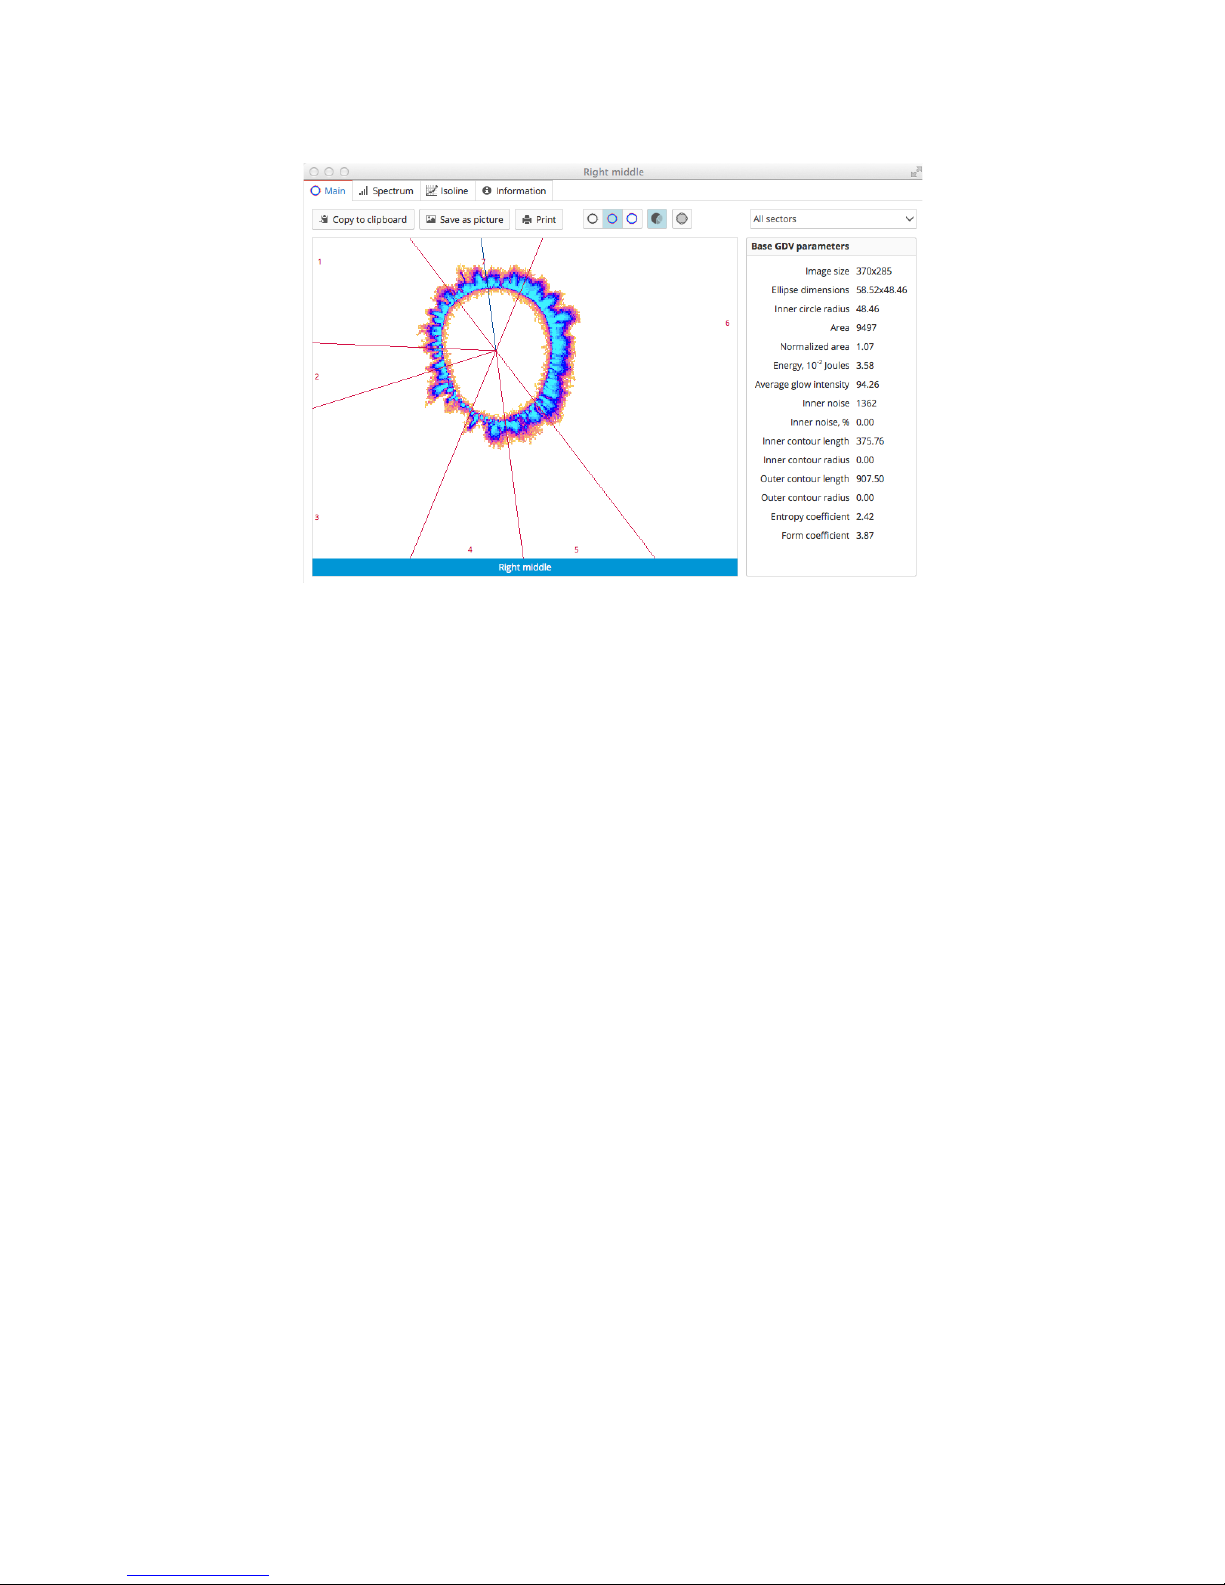
Fingers:Displays parameters for each finger in its own window (Fig.15). Clicking on
a finger window opens a larger view of the image and parameters. (Fig.16)
Fig.15
12
Fig.16
Report:Prepares a PDF file containing descriptions of the main parameters.
Comments and recommendations may be added, and all included information is
customizable for corrections and omissions.
Export to CSV:Allows for saving the main parameters in CSV format for further
processing in Excel, Statistics and other similar programs. Fractional numbers are
presented using the European style – with a comma separating the integer and decimal
portions of the number. It may be necessary to enable European settings within the
program to view the data correctly.
Back button takes you back to initial view.
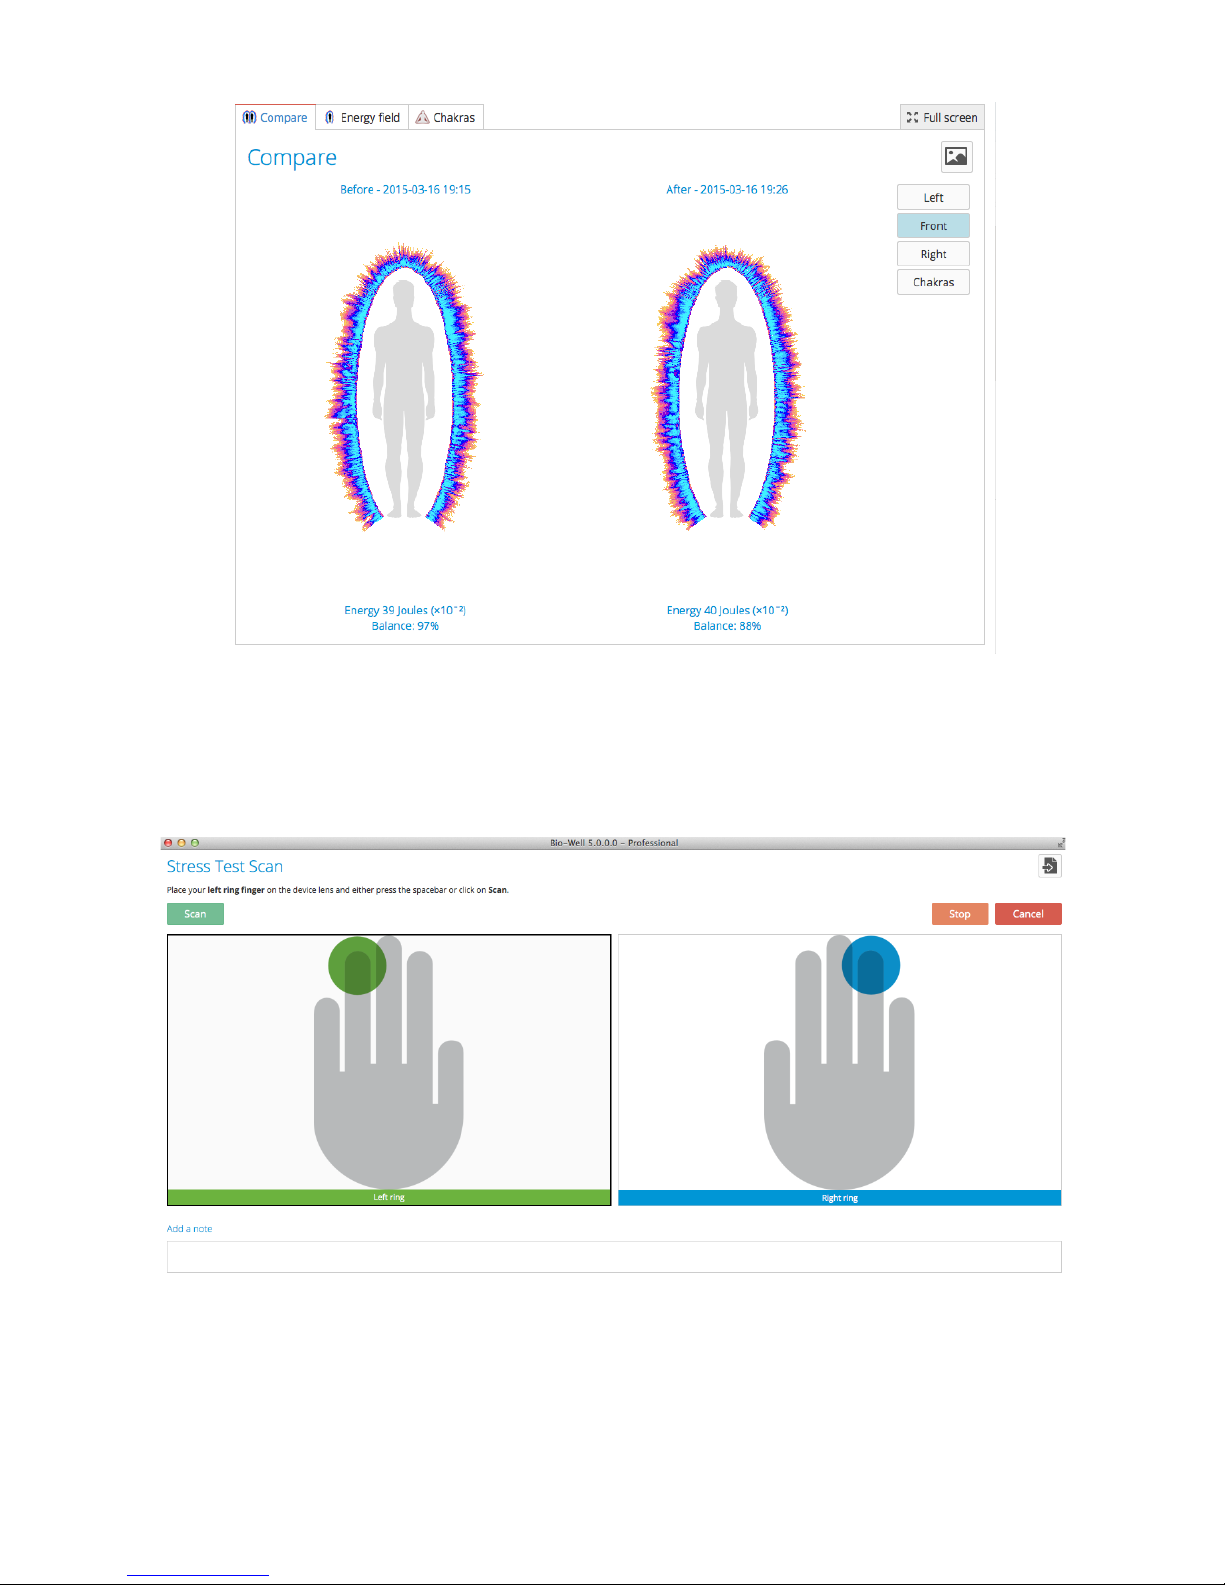
Before - After Scans
This mode allows simple comparing of two HEF readings. Choose the first scan, then
click the After scan button. The capture screen will appear to enable a Full Scan. The
Analysis button will present two sets of of Energy Field and Chakras for review
(Fig.17). This mode is a simpler version of Compare mode.
Fig.17
13
Stress Test Scan
This mode enables readings from two fingers to produce an analysis of the 3 main
parameters. Typically, the Ring fingers (4L and 4R) are used for this scan. However,
the use of other fingers is optional.
Fig.18
Environment (Sputnik or Water Electrode required)
This mode enables the measurement of dynamic processes.
It is recommended that readings are performed in offline mode and uploaded to the

14
server when online again following completion of the session.
Labels may be added during readings.
Clicking Stop will save the data on the computer if offline, or to the server if online.
View offers the list of available parameters to be displayed (Fig.19)
.
Fig.19
For every graph, the scale may be changed by a click on the vertical axis (Fig.20).
Fig.20
Increase/decrease Y and X scales.
Edit labels allows for adding and editing.
15
Right-click enables selection of part of the graph to Save Selected to the new file or
Cut Selected part.
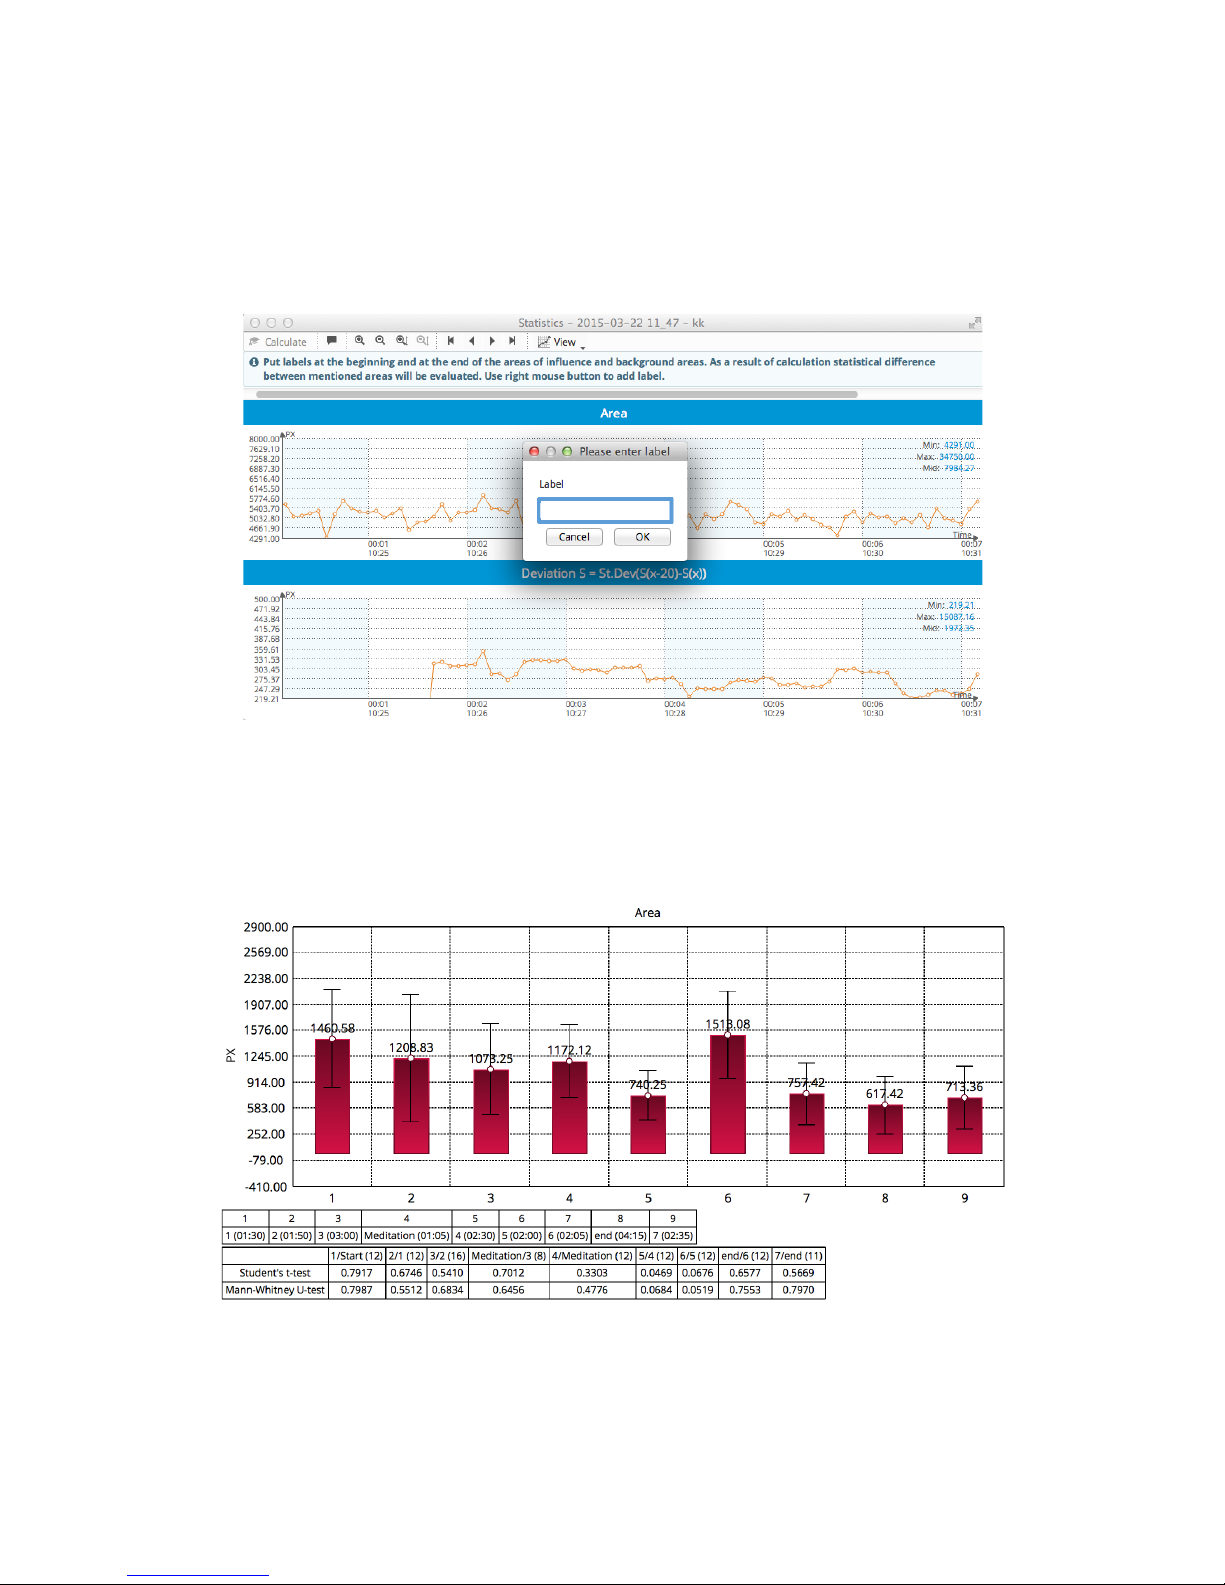
Statistics button opens the Statistics window.
Fig.21
Right-click to add labels and click Calculate. The software calculates parameters for
all labeled intervals and parametric / non-parametric statistics. Every interval is
compared with the prior interval.
Fig.22
16
BioClip
In this mode readings are taken using a grounding cable/wristband. During the first
three minutes, a baseline signal is recorded.
Left-side Panel
This is the location of the following options: DATABASE, RECENT, COMPARE,
RECEIVED, and CALIBRATION.
DATABASE: Returns to the main Database screen from any process.
RECENT: Displays recent scans.
RECEIVED:Shows scans received from other users.
COMPARE:This mode allows for comparison for up to 50 scans and saves the
parameters as a CSV file.
Fig.23
Calibration
This mode is necessary for utilization of the Calibration Pack to ensure stable device
operation following changes of location and/or environmental conditions. It is

17
recommended to calibrate when moving to various locations, or at least once per
month of operation. To calibrate:
1. Remove the Finger Insert by holding the unit firmly while gently pressing
downward and pulling outward.
2. Connect the grounding cable (included in the Calibration Pack) to the spring
knob on the top of the Calibration Unit (doing this after inserting the unit may
damage the glass inside).
3. Insert the Titanium Cylinder unit by raising and holding back the spring knob
while carefully pushing the unit in until it clicks into place. Then, gently lower
the spring knob until it rests on the glass. NOTE: Do not let the spring lower
quickly or abruptly, and be sure to not rotate the knob without first raising it.
Failure to follow these procedures may result in scratching the glass, which is
not covered by the warranty.
4. Connect the other end of the grounding cable to the port located at the rear of
the Bio-Well device.
5. Click Start and a test imagewill appear. It should display a full ring (similar to
the image of afinger scan). If the image is distorted, carefully check the
position of the spring knob to be sure the Titanium Cylinder is resting evenly on
the glass (raising before adjusting).
Calibration may take up to 30 minutes depending on the condition of the device,
and/or environmental factors (i.e., high humidity).
Calibration data will be saved for all your scans and used for data processing.
It is recommended to calibrate at least once per week or more frequently in the
following situations:
•Moving to a new location;
•Rapid change of weather conditions;
•Presence of many people in the room;
•New Moon phase.
A separate Calibration Pack User Manual can be found in the Resources section of
the Bio-Well website.
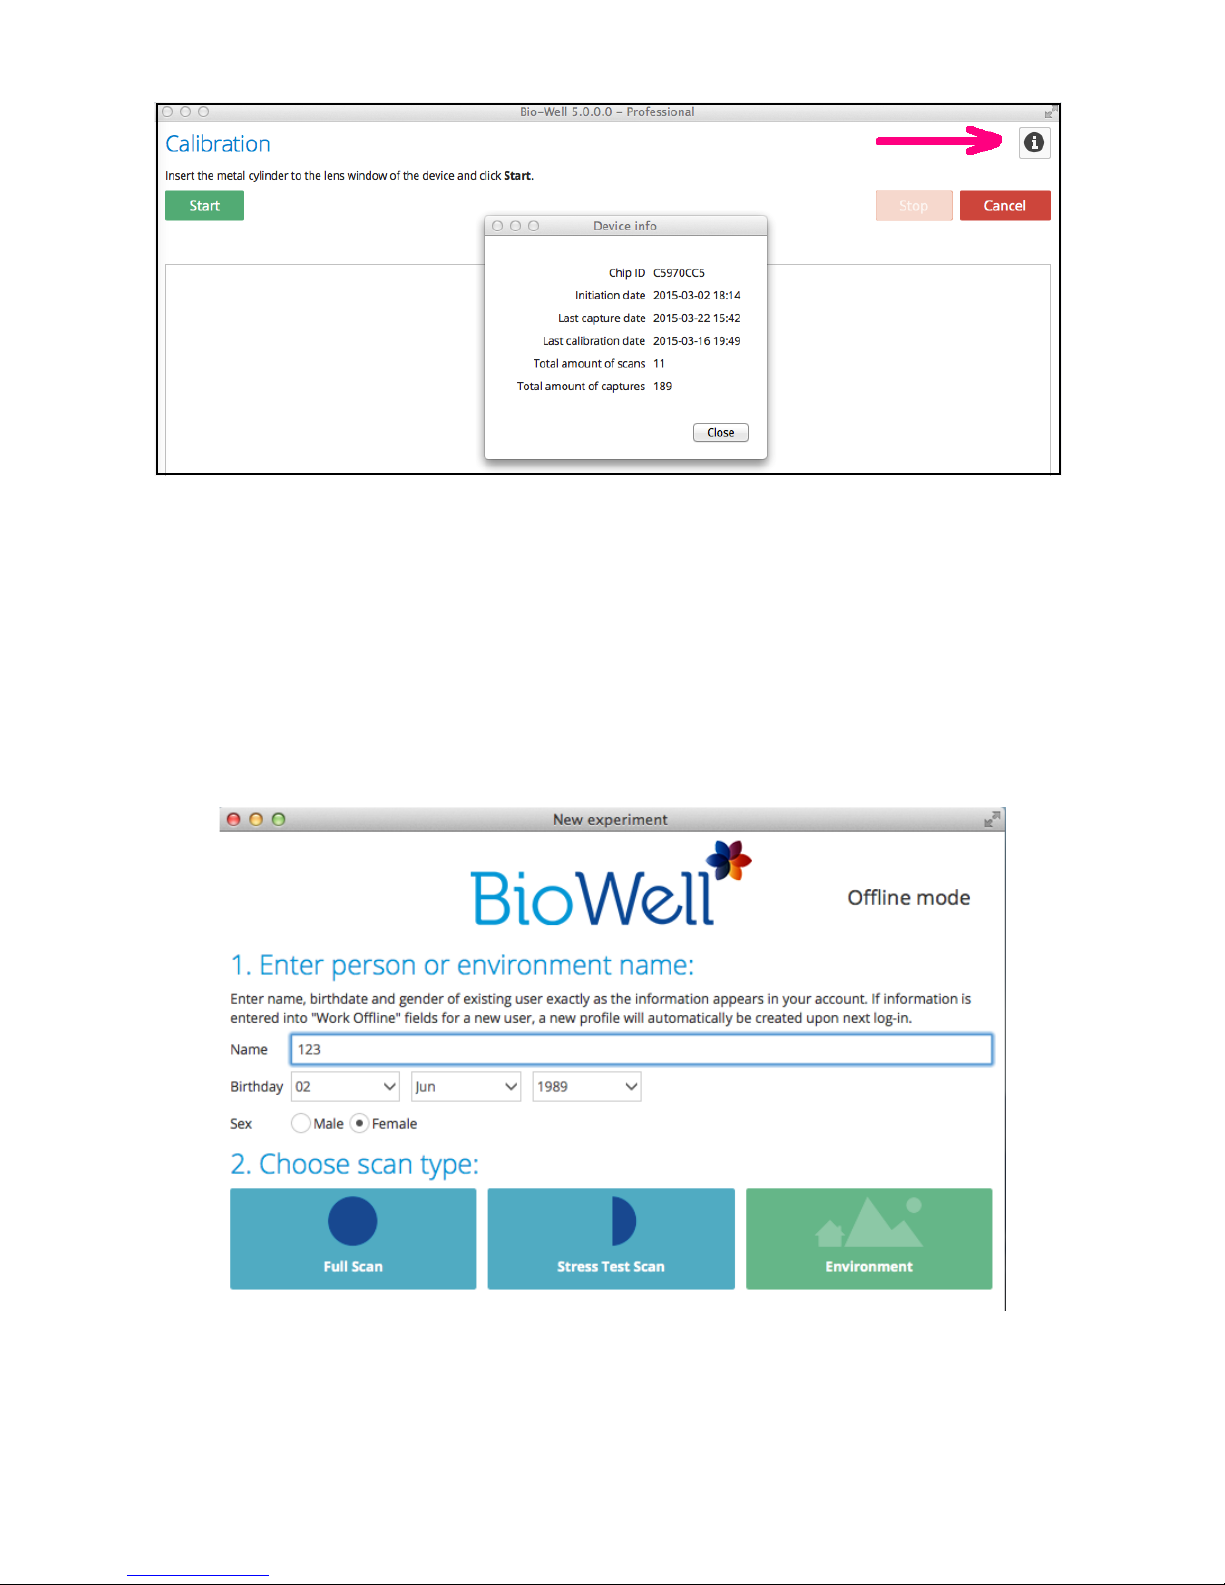
In the Calibration window, the Information button (Fig.24-#) displays identification
and usage data for the connected Bio-Well device.
Fig.24
18
Offline Mode
Readings may be taken when not connected to the Internet. Data will be saved in the
computer and processed when an Internet connection becomes available.
In Offline Mode it is necessary to add a Name (Gender and Birthdate for Full Scan)
and Select the mode of the Scan.
Fig.25
Readings will be saved in the computer. When next logged in online, an Upload
button will appear; click it to send the data to the server to be processed.
19
GDV readings saved in computer
In Full Scan mode, a previously saved data file may be opened with the Import button
(Fig.26-#). This allows users of other GDV instruments to use the Bio-Well
software. A Card must first be created to be associated with the data to be imported.
Fig.26

20
Important remarks
One should track environmental conditions during experiments:
- Shifts in relative humidity should not exceed 5%.
- Shifts in air temperature should not exceed 5 ºС.
- During experiments, do not turn on/off electrical devices within the room where the
Bio-Well device is operating.
- Do not use cell phones near the Bio-Well device or Sputnik.
- The number of people in the room should be the same during the entire experiment.
- Do not take measurements during strong atmospheric changes.
- Be aware of changes in geomagnetic background (e.g. Sun and Moon rise/recess).
For general finger scans:
-Clean the person's fingers with a soft cloth before taking the reading, especially
to at least wipe any hand lotion off the fingers.
-Clean the optical glass after every person using soft cloth.
-If light is preventing clean scans, reposition the fingers lower within the Bio-
Well device, especially the little finger (sometimes light comes in under the
finger).
•
•
•
Table of contents
Popular Health Care Product manuals by other brands


Bradley
Bradley S19-921H Installation

LiteCure Medical
LiteCure Medical LightForce FX user manual

Stryker
Stryker EOLE DC 32" Operation and maintenance manual

DrBrowns
DrBrowns Deluxe Bottle Sterilizer User instructions

Refit
Refit SHC-CM1 product manual

Medical Alarm
Medical Alarm MediPendant MED01 owner's manual