Bionizer Eco - Oxidizer User manual
INSTRUCTION BOOK
Chemical-Free Pool Oxidizing System
Please read before you call us for advice.
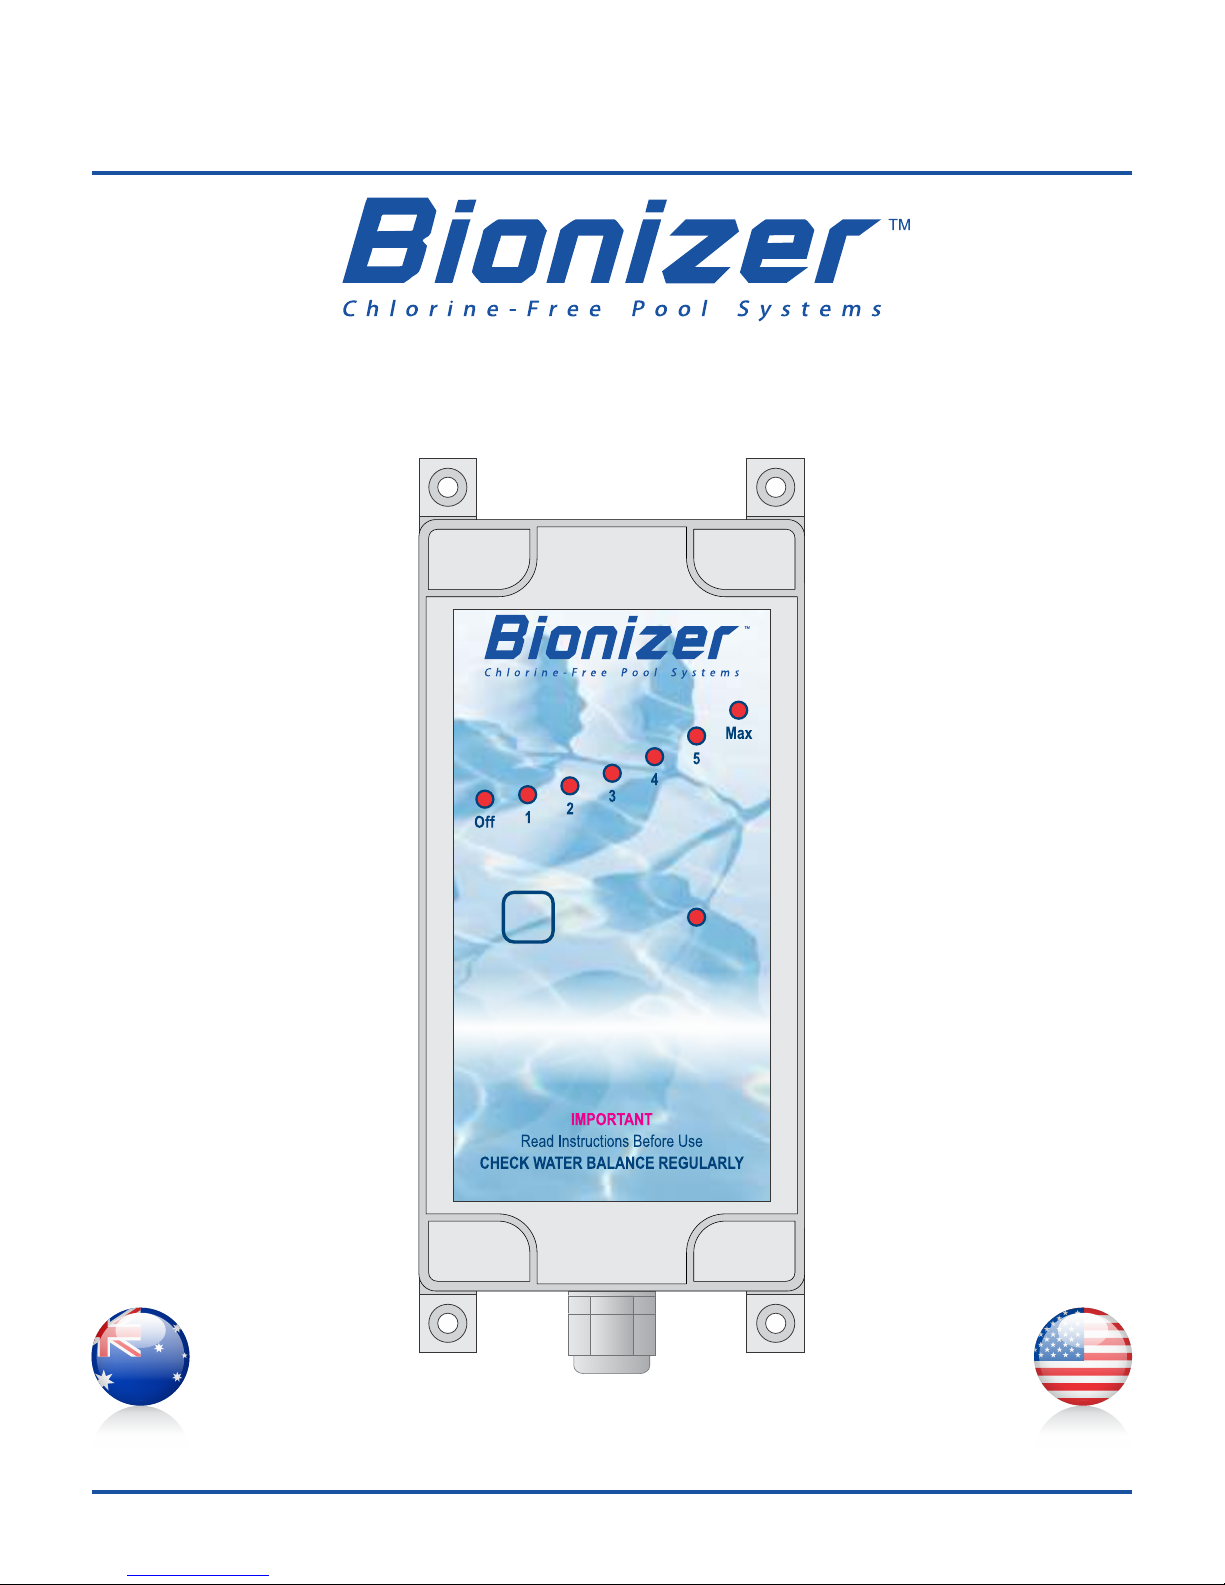
Eco - Oxidizer
Version 1.5, 16-Feb-2015
Oxidizing Output
Eco - Oxidizer
www.bioniser.com.au www.bionizer.com


TABLE OF CONTENTS
Page
INTRODUCTION . . . . . . . . . . . . . . . . . . . . . . . . . . . . . . . . . . . . . . . . . . . . . . . . . 4
ECO-OXIDIZER ILLUSTRATION . . . . . . . . . . . . . . . . . . . . . . . . . . . . . . . . . . . . . . 6
SAFETY INSTRUCTIONS . . . . . . . . . . . . . . . . . . . . . . . . . . . . . . . . . . . . . . . . . . . 7
ECO-OXIDIZER INSTALLATION . . . . . . . . . . . . . . . . . . . . . . . . . . . . . . . . . . . . . . 7
CONTROL BOX INSTALLATION . . . . . . . . . . . . . . . . . . . . . . . . . . . . . . . . . . . . . . . . . . . . . . . . . . . . . 7
INSTALLING THE OXIDIZING POD. . . . . . . . . . . . . . . . . . . . . . . . . . . . . . . . . . . . . . . . . . . . . . . . . . . 8
PROGRAMMING YOUR ECO-OXIDIZER . . . . . . . . . . . . . . . . . . . . . . . . . . . . . . 10
INITIAL START-UP OPERATION. . . . . . . . . . . . . . . . . . . . . . . . . . . . . . . . . . . . . 11
NORMAL OPERATION . . . . . . . . . . . . . . . . . . . . . . . . . . . . . . . . . . . . . . . . . . . . 11
MAINTENANCE . . . . . . . . . . . . . . . . . . . . . . . . . . . . . . . . . . . . . . . . . . . . . . . . . 12
TROUBLESHOOTING . . . . . . . . . . . . . . . . . . . . . . . . . . . . . . . . . . . . . . . . . . . . . 13
ECO-OXIDIZER AND CHLORINE . . . . . . . . . . . . . . . . . . . . . . . . . . . . . . . . . . . . 14
SNAP POOL BALANCE TABLE . . . . . . . . . . . . . . . . . . . . . . . . . . . . . . . . . . . . . . 15
CONTENTS
3

INTRODUCTION
PLEASE TAKE THE TIME TO READ THESE INSTRUCTIONS CAREFULLY AND NOTE HOW
THEY APPLY TO YOUR PARTICULAR POOL AND EQUIPMENT.
INTRODUCTION
Traditional pool maintenance has been to “shock” the water with chlorine... this process “oxidizes”
contaminants that cause cloudy or dull water. If an Eco-Oxidizer is attached to your pool system, the water
stays healthy, fresh and clear without any toxic substances polluting your swimming environment.
The Eco-Oxidizer goes to work whenever your pool pump and filter are running... it utilises a safe, low DC
current that passes between two specially coated, long life titanium electrodes. This process oxidizes
(eradicates) contaminants from your pool. As the unit consumes very little power it is a far better option than
continuing to use harsh chemicals to regularly oxidize or shock your pool water.
Chloramines and other nasty compounds that are created when chlorine combines with organic matter such
as skin or hair, are destroyed on contact.
So... Now there is no requirement to “shock” your pool because the powerful Eco-Oxidizer literally tells you
that your pool water is out of balance. You can then check and rectify your pool’s Calcium Hardness,
Phosphates or Total Alkalinity levels well before they reach critical imbalance levels because a cloudy pool that
has an Eco-Oxidizer is really saying “Hey ! Check my balance levels !”.
Wishing that your pool would look sparkling clear is now a wish come true. Installing an Eco-Oxidizer is a fitting
way to get your wish... a fresh, clear and healthy pool without the chemicals and the fuss.
Unbalanced water is cloudy water
The Eco-Oxidizer is not able to clarify pool water that has become cloudy or opaque due to the water being out
of balance. Leading causes of cloudiness in pools include high/low calcium, high/low total alkalinity, high
phosphates and high Total Dissolved Solids (TDS). Test and rectify water balance levels if required before using
the Eco-Oxidizer.
Ozone units operate in a quite similar way to the Eco-Oxidizer in that they are not designed to clear up pool
water that has become cloudy due to incorrect balance levels including water that has high levels of TDS. (TDS
should not be confused with salt levels which are sometimes expressed as TDS levels using pool shop tests that
do not distinguish between the two.) The answer is to maintain correct water balance at all times so your pool
remains free of that cloudy appearance due to unbalanced water.
Chlorine… A Sledge Hammer Approach
Chlorine is a man-made chemical and is not a natural solution to water control. It is a bleach and suppresses
everything under most conditions if used in great enough quantity. Heavy use of chlorine can overcome water
conditions such as high pH and even fairly high levels of phosphates. This gives the impression that pools work
well under chlorine however the levels of chlorine required to maintain badly balanced pools creates
unhealthy and hazardous swimming conditions. Not an optimum swimming environment. Please see the
section “Eco-Oxidizer and Chlorine” on page 11 for further information on how the Eco-Oxidizer will save you
and the planet if you plan to use a lower Hydrogen Peroxide or Chlorine level in your pool.
Optimum conditions are created when a Bionizer and Eco-Oxidizer are used in tandem and attention is paid to
the maintenance and balance of the pool. These pool owners reap the rewards of a healthy and safe
swimming environment. It saves them time, money, protects the environment and conserves water… after air,
water is our most precious resource and necessary to all life on Earth.
INSTRUCTION BOOK
4

As with all Bionizer products, ensure that the pool water is correctly balanced before installing the Eco-
Oxidizer. The Eco-Oxidizer can be safely used on new and existing pools.
Take note of the few “do’s and don’ts” and you will have a simple and trouble free start up.
Bionizer is committed to creating a more healthy environment… the Eco-Oxidizer is one integral component of
our ongoing journey in this direction.
Our other products were also created to advance us all along the path back to a toxic free world. They include
the fully digital Bionizer all natural pool and spa purifer, and also the amazing pH BOSS, totally automatic pool
pH controller.
If you use a pool care service you can reduce the time they visit… they are now almost redundant. Let them visit
once a month and sweep the pool, check the skimmer and you do no pool care whatsoever.
This is the Bionizer “Ultimate Solution” to Pool Care…
and your commitment to help us all return to a toxic free Planet for your children to enjoy. This is the Bionizer
promise to you.
Bionizer creates products that enhance our lives and protect us and the Planet. Our clients are our major focus
and we do not rest until each individual client is happy with their Bionizer product and understands the
Bionizer difference. The difference the Bionizer makes to pools is profound but the difference in operating
parameters between other pool systems and the Bionizer System is small. There is no mystery and no “extra
hassle” with our system…the real difference lays in the way your perspective around your pool and lifestyle will
change.
!Got a pool problem?… call us.
!Need advice about anything at all?… call us.
!Want advice re the latest pool equipment?... call us.
!Want the best pool system available?... CALL US.
Bionizer designs and manufactures our own products…that is your safeguard right there.
Our famous 90 day “no questions asked” money back guarantee means you simply can't lose…
Winning designs, superior knowledge and exceptional service have created satisfied, happy and pool savvy
clients who have all…
!reduced their power bills by an extra mile,
!reduced their maintenance time by hours per month,
!reduced their water waste by thousands of litres per year,
!reduced corrosion and rust of their pool equipment and pool surrounds to virtually zero,
!reduced their chemical and salt use by truckloads
The Pool owner who uses a Bionizer system does so because they have made a superior choice…for all the
reasons above…and for the health and enjoyment of their families.
Thank you for trying the Bionizer System for your swimming pool...
…the risk is ours, not yours.
INTRODUCTION
INTRODUCTION
5
Oxidizing Output
Eco - Oxidizer
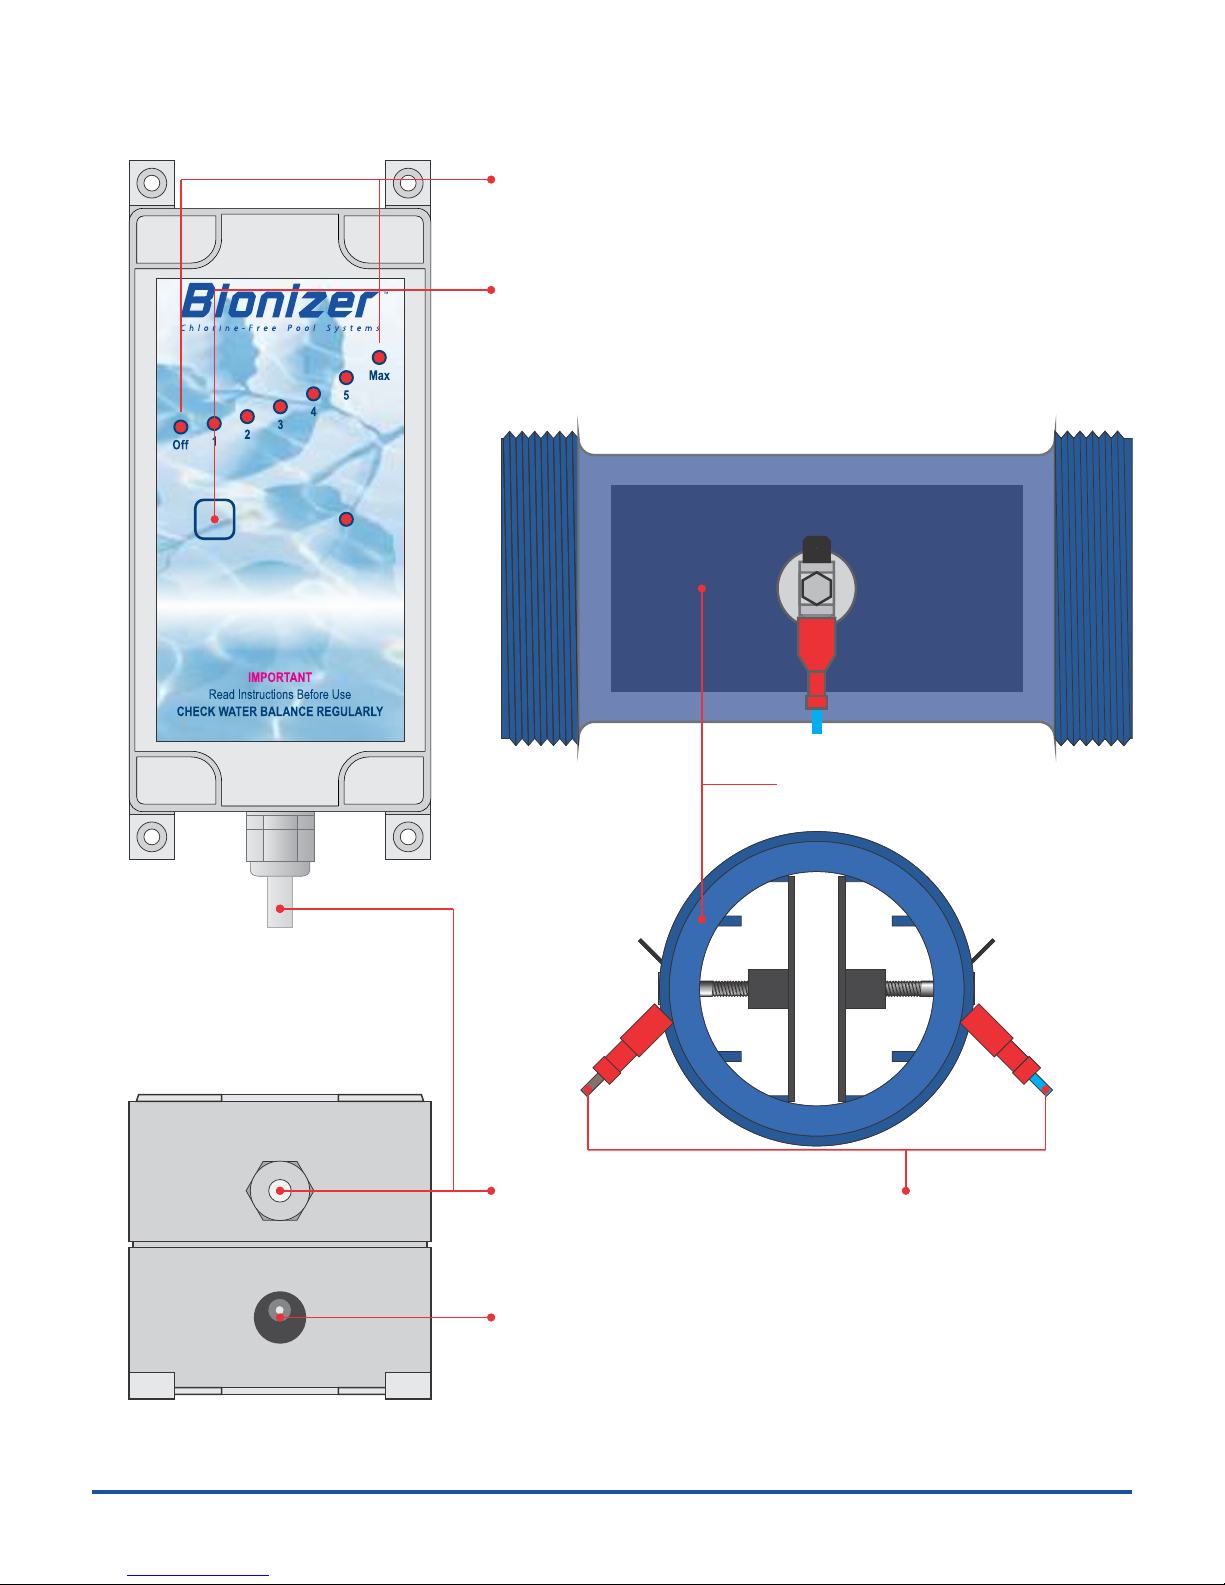
ECO-OXIDIZER ILLUSTRATION
ECO-OXIDIZER ILLUSTRATION
OUTPUT SETTING LEDs
OXIDIZING OUTPUT BUTTON
ELECTRODE OUTPUT CABLE CABLE CONNECTION
DC POWER SOCKET
Press to check and change the Oxidizing Output level.
See Page 8 for suggested output settings.
7 LEDs showing the output setting of the Eco-Oxidizer.
Connects the Eco-Oxidizer
control box to the
Oxidizing Pod.
Connections on either
side of the Oxidizing
Pod. (See Installation
Section)
Use only genuine power
adaptor supplied by
Bionizer to avoid damage
to your Eco-Oxidizer.
OXIDIZING POD
6
INSTRUCTION BOOK

SAFETY AND INSTALLATION
SAFETY INSTRUCTIONS - READ
IMPORTANT :
It is important to follow basic safety precautions
when installing and using this electrical equipment,
including the following :
1. Ensure you read and follow all instructions.
2. WARNING - Do not allow children to use this
product unless they are closely supervised at all
times. This is to prevent accidental injury.
3. Keep all cables visible and do not bury them.
Also, position them so that they do not get
damaged by lawn mowers, hedge trimmers and
other equipment.
4. WARNING - To prevent electrical shock, replace
damaged cords immediately.
5. Read these instructions and keep the instruction
manual in a safe place.
CAUTION :
Your warranty could become invalid should you fail
to observe the following :
1. The Eco-Oxidizer must be installed and operated
as specified.
2. The life of the unit will be extended (as with most
other pool equipment) if it is placed indoors or in
an enclosed structure.
3. Always power the Eco-Oxidizer from a genuine
Bionizer power adaptor. An incorrect adaptor
could damage the Eco-Oxidizer and will void your
warranty.
CONTROL BOX INSTALLATION
1. Choose a position that will allow you to see the
Eco-Oxidizer LED readout easily. Fix the control
box in position using screws at each corner of the
box. Ensure that the Eco-Oxidizer is positioned
near enough to a power outlet and to the
Oxidizing Pod so the cables reach without
straining.
2. Make sure that the unit is undercover to avoid
UV damage from long term exposure to sunlight.
3. Plug the power adaptor into a suitable power
outlet. The Eco-Oxidizer should only be powered
on when the pool pump is running. This can be
done in several ways :
1) For new version Bionizer with 12V DC
outputs sockets, use the adaptor cable to
connect the Eco-Oxidizer to the Bionizer.
2) For earlier Bionizer or other systems with a
pool pump power outlet, plug the power
adaptor into the outlet provided. Use a
double adaptor if necessary.
3) Use a separate timer switch, which has been
tuned to the same times as the timer
controlling the pool pump.
5. Connect the low voltage plug to the Eco-Oxidizer
DC Power Socket (see Page 5). Use only a
genuine Bionizer power adaptor. An incorrect
adaptor could damage your Eco-Oxidizer and
void your warranty.
DO NOT SWITCH THE POWER ON UNTIL
INSTALLATION HAS BEEN COMPLETED.
The Eco-Oxidizer can be installed onto a new pool or
an existing pool with minimal pool preparation.
Ensure that the pool is clean and correctly balanced.
See Initial Operation section on page 9.
1. Installing your Eco-Oxidizer takes around 30
minutes.
2. Alternatively engage a competent person to do
the job.
3. If installing it yourself you will need :
!PVC pressure glue and primer.
!A fine tooth saw.
!Philips Screwdriver
!For masonry walls : hammer drill with 6mm or
1/4" masonry bit.
!Sandpaper or small file.
ECO-OXIDIZER INSTALLATION
7
INSTALLATION
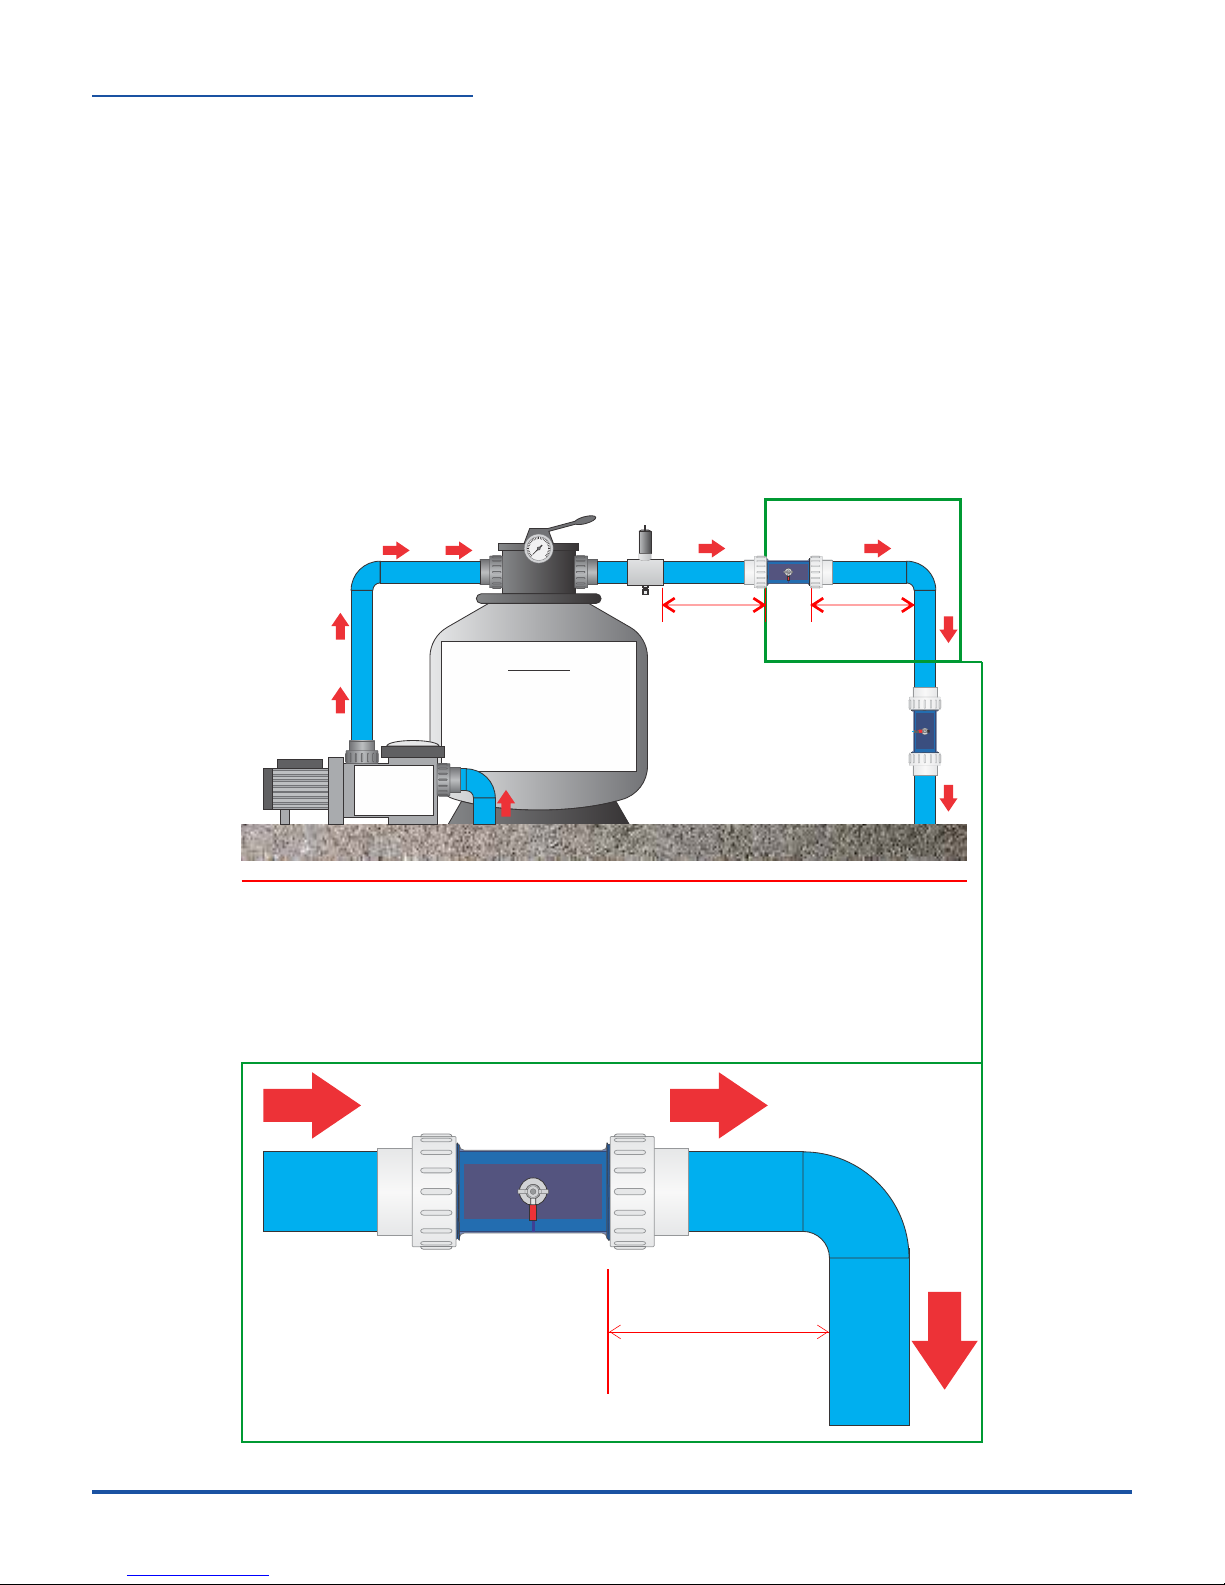
Filter
Pressure
Filter
For sand filters,
glass or silica sand
media provides
optimum results.
Pool
Pump
10cm
(minimum)
NOTE THAT THE 10cm SPACINGS SHOWN ABOVE ARE FROM THE
EDGES OF THE PODS, NOT THE CENTRE OF THE PODS.
Ionizing
Pod
pH Tee
Oxidizing
Pod
10cm
min 10cm
min
! Locate a section of pipe where the Pod can easily
fit. The Pods must be fitted on the pipe that
sends water back to the pool after it has been
filtered (the “Return Line”).
! The Pods can be fitted horizontally or vertically, so
it can be mounted anywhere installation is
convenient and easy.
! If you are also installing a Bionizer and/or pH BOSS
the fittings MUST be installed in this order :
1. pH BOSS Probe and Injection Tee
2. Bionizer Ionizing Pod
3. Oxidizing Pod
The Oxidizing Pod can be fitted horizontally or
vertically, as long as it is after the other two.
! HINT : Even if you are not installing a pH BOSS
now, you may want to leave a space for the pH
BOSS Tee-Piece Fitting. This requires 20cm of
HORIZONTAL pipe BEFORE the Ionizing Pod.
INSTALLING THE OXIDIZING POD
8
INSTRUCTION BOOK
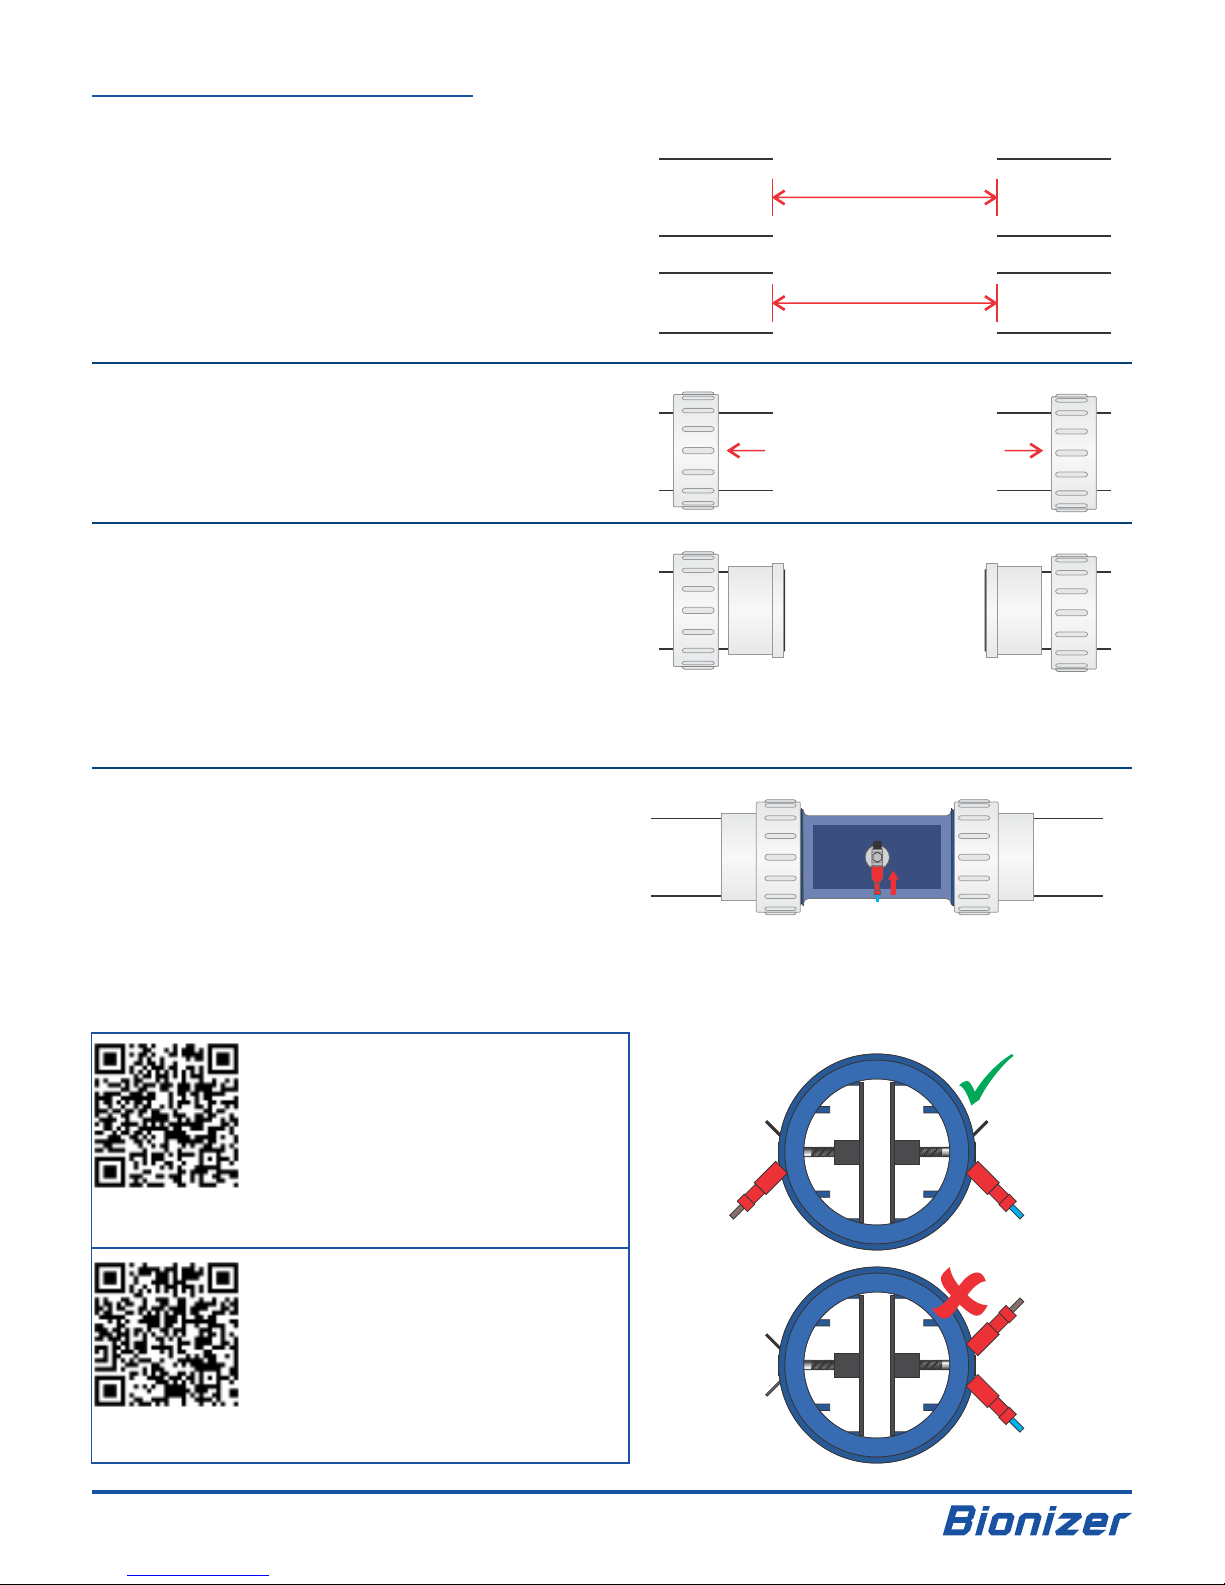
1. 50mm (2") Pipe : Cut out an 18cm (7") section of
pipe sufficient for the Oxidizing Pod and barrel
unions.
40mm (1 ⁄") Pipe : Cut out a 19cm (7.5")section
of pipe sufficient for the Oxidizing Pod and barrel
unions PLUS reducing bushes.
2. Slide the barrel union nuts onto the pipe. Ensure
that the threads are facing the correct way, so
that the nuts can be screwed onto the Pod at the
last stage of installation.
3. Glue the barrel union halves onto the pipe. If the
barrel union inner diameter is larger than the
pipe then use the reducing bushes provided by
glueing them in place into the barrel union halves
before fitting. Do not lose the O-rings from the
unions, and ensure that they are in place before
fitting the Oxidizing Pod in place.
4. Fit the Oxidizing Pod into place and secure the
barrel union nuts. Hand tighten only - do not use
a tool.
Push the cable connectors onto the spade
connections on each side of the Oxidizing Pod.
Spare spade connections are provided for
commercial installations with multiple Pods.
INSTALLING THE OXIDIZING POD
ALWAYS USE PVC PRIMER ON BOTH SURFACES BEFORE GLUEING ANY PVC PARTS.
50mm
(2") Pipe
40mm
(1 ⁄") Pipe
18cm (7")
19cm (7.5")
Cut pool return pipe
Cut pool return pipe
Slide barrel union nuts
onto the pipe, facing
the correct way.
Glue barrel union
halves onto pipe.
Use reduction
bushes if needed.
Fit Oxidizing Pod and
tighten barrel union nuts.
Push electrical connector onto
terminals on each side of Pod.
1. 50mm (2") Pipe : Cut out an 18cm (7") section of
pipe sufficient for the Oxidizing Pod and barrel
unions.
40mm (1 ⁄") Pipe : Cut out a 19cm (7.5")section
of pipe sufficient for the Oxidizing Pod and barrel
unions PLUS reducing bushes.
2. Slide the barrel union nuts onto the pipe. Ensure
that the threads are facing the correct way, so
that the nuts can be screwed onto the Pod at the
last stage of installation.
3. Glue the barrel union halves onto the pipe. If the
barrel union inner diameter is larger than the
pipe then use the reducing bushes provided by
glueing them in place into the barrel union halves
before fitting. Do not lose the O-rings from the
unions, and ensure that they are in place before
fitting the Oxidizing Pod in place.
4. Fit the Oxidizing Pod into place and secure the
barrel union nuts. Hand tighten only - do not use
a tool.
Push the cable connectors onto the spade
connections on each side of the Oxidizing Pod.
Spare spade connections are provided for
commercial installations with multiple Pods.
INSTALLATION
9
Scan this QR Code with your
smartphone or tablet to go to
the BioPod installation video on
the Bionizer USA web site.
(Ionizing Pod shown, but
procedure is the same)
Scan this QR Code with your
smartphone or tablet to go to
the BioPod installation video on
the Bioniser Australia web site.
(Ionizing Pod shown, but
procedure is the same)

PROGRAMMING YOUR ECO-OXIDIZER
PROGRAMMING YOUR ECO-OXIDIZER
The only setting on the Eco-Oxidizer that ever needs
to be changed is the Oxidizing Output level. This is a
setting of how much oxidizing power is applied
across the two electrodes.
To change the output setting :
! Press the button repeatedly until Oxidizing Power
the desired setting is shown with the LEDs.
! After 3 seconds, the Eco-Oxidizer will beep, save
the new setting, and return to normal operation.
Suggested output settings :
Off.......Oxidizing Output is switched off and will not
operate.
1 to 3....Ignore these settings unless the pump is
running for 16+ hours / day on a small pool.
4 ..........Suitable for up to 50,000 L (13,000 Gallons)
Pool Size
5 ..........Suitable for 50,000L to 75,000L (13,000 to
20,000 Gallons) Pool Size
Max .....Suitable for 75,000L to 100,000L (20,000 to
26,000 Gallons) Pool Size
For pools larger than 100,000L (26,000 Gallons), set
the output to Max, but use two Oxidizing Pods.
For pools larger than 250,000L (66,000 Gallons), use
two Eco-Oxidizers, each with two Oxidizing Pods.
Notes regarding output settings:
! The pool sizes listed are an approximate guide
only, and can vary with factors such as :
! Pool loading: The number of bathers in the
pool compared to pool size. For example, a
35,000L (10,000 Gallon) plunge pool with 10
bathers has a much higher load than a
100,000L ( 26,000 Gallon) pool with 1 bather.
! Water temperature: A heated pool would
require a higher setting than a pool with colder
water.
! Location: A pool in a cooler climate area will
require a lower output setting than a pool in a
tropical climate. High rainfall would also
require a higher output setting.
How to find the optimum setting for your pool:
When the Eco-Oxidizer is first installed, select the
setting as per the information in the “Suggested
output settings” section.
Visually check your pool daily. If the water becomes
dull or cloudy instead of crystal clear, increase the
setting by one level. Recheck a day or two later.
When a pool is over-oxidized the main visual effect is
the presence of too many tiny bubbles in the water,
which can look like cloudiness. If your pool has this
effect, reduce the setting by one level. Recheck a day
or two later.
INSTRUCTION BOOK
10

BEFORE OPERATING THE ECO-OXIDIZER :
1. Balance the Pool according to the Pool Balance
information below. This is also shown on the Snap
Pool Balance chart supplied with the Eco-Oxidizer.
Feel free to take that chart to your pool shop if you
prefer them to test your water.
2. It is not advised to use skimmer basket type
clarifying cubes that treat Total Dissolved Solids
(TDS) and Phosphates when operating the Eco-
Oxidizer.
3. Operate the Eco-Oxidizer on a low setting initially
(as per Suggested Output Settings on page 8). The
unit will condition the pool water correctly during
the next 3 to 7 days under normal filtering times of
4 to 8 hours per day, depending on pool size.
4. Backwash your filter if it is a sand filter, or wash
your filter if it is a cartridge type filter. Refer to your
filter’s handbook.
INITIAL START-UP OPERATION
PLEASE READ THIS IMPORTANT INFORMATION BEFORE OPERATING YOUR ECO-OXIDIZER.
NORMAL OPERATION
1. Set the Oxidizing Output level to Off 2 to 3 hours
before adding any phosphate removers,
flocculants, clarifiers or waterline scum detergents
or the like. (See Suggested Output Settings, page
8).
2. Leave the Eco-Oxidizer output setting in the Off
position for 72 hours after adding any of the
products listed above.
3. If the pool water becomes cloudy at any time we
suggest testing the various pool balance levels and
re-balancing the pool water according to the Pool
Balance information below. This is also shown on
the Snap Pool Balance chart supplied with the Eco-
Oxidizer. Feel free to take that chart to your pool
shop if you prefer them to test your water.
4. Check the pressure gauge attached to your filter
regularly. If the pressure is more than 50kPa above
the clean running pressure, then the filter must be
cleaned. Sand filters must be backwashed, and
cartridge filters must be disassembled, washed
with water, and reassembled. Refer to your filter’s
handbook.
5. To depend on the Eco-Oxidizer to remove the
cloudiness and restore clarity before testing the
water balance levels is asking the Oxidizing unit to
fix a problem that only has one solution. Correct
water balance and efficient filtering with a clean
filter will restore clarity…if this does not clarify the
pool water then it is most likely requiring more
oxidation.
To put it more simply… if the filter is operating
normally, with no heavy bather load upsetting the
water clarity, then any cloudy or hazy appearance
in the water is most likely due to the pool water
being unbalanced.
OPERATION
11

MAINTENANCE
A LITTLE MAINTENANCE WILL HELP YOU GET THE MOST FROM YOUR ECO-OXIDIZER
The Eco-Oxidizer features a self-cleaning system for
the electrodes. However, periodic cleaning in acid
may still be required, especially when used in marble
sheen pools with higher calcium hardness levels than
usual.
Cleaning is recommended every 12 months, or
earlier if excessive white calcium build-up can be
seen on the electrode surfaces.
If the LEDs on the Eco-Oxidizer’s front panel are
flashing, this could also indicate that cleaning is
required.
For installations where a pH BOSS is installed in the
same pipeline (as per INSTALLATION section), the
acid will often eliminate the need for cleaning
entirely.
Cleaning Procedure
!Always wear gloves, eye protection and
protective clothing when handling acid.
!Prepare a bucket of diluted pool acid. We
recommend to use a standard 10 Litre bucket. Fill
with around 4 Litres of water FIRST, then add
around 0.5 Litres of pool acid. ALWAYS ADD ACID
TO A LARGER VOLUME OF WATER. NEVER ADD
WATER TO ACID.
!Unscrew the two barrel union nuts. Hold the
Oxidizing Pod in place to ensure that it does not
drop onto the ground when removing the barrel
union nuts.
!Place the Oxidizing Pod into the diluted acid for 15
to 30 minutes, or until the deposits have been
visibly dissolved off.
!Remove the Oxidizing Pod from the cleaning
solution and RINSE ALL OUTSIDE SURFACES
WELL WITH FRESH WATER. The diluted acid will
not affect the electrical connections as long as the
Oxidizing Pod is rinsed well.
!To dispose of the used diluted acid cleaning
solution, simply tip the bucket into the pool. Rinse
the bucket well with fresh water.
!Re -install the Ox idizin g Po d as per the
INSTALLATION section.
MAINTENANCE
12
INSTRUCTION BOOK

TROUBLESHOOTING
CHECK THIS SECTION BEFORE CALLING OR SENDING YOUR ECO-OXIDIZER FOR SERVICE.
Symptom Possible Causes and Remedies
Some or all of the
LEDs on the front
panel are flashing
The Eco-Oxidizer cannot generate the full output Amps of the selected Oxidizing Output
setting. For example, if setting “5" is selected, and the LED numbers 3, 4 and 5 are
flashing, then the Eco-Oxidizer is only able to generate as much output as setting 2.
Check the following solutions :
Pool water Conductivity is too low, which prevents adequate electrical current to flow.
!Add one bag of pool salt per 50,000 Litre (13,000 Gallon) pool size.
Electrodes have accumulated a coating, which prevents adequate electrical current to
flow.
!Clean the electrodes, as per the MAINTENANCE section.
Faulty electrical connection to electrodes.
!Check the cable from the Eco-Oxidizer control box to the Oxidizing Pod. Ensure that
the connections at the Oxidizing Pod are clean, tight and without corrosion.
!Faulty connections can be repaired by persons with technical experience, or can be
returned to Bionizer for repair.
Unit does not
power up
“Off” LED flashes
and unit beeps
every 10 seconds.
Short circuit in the system
!Check that the Eco-Oxidizer output cable is attached to either side of the pod, not
both to the same side (see diagrams below).
!Electrodes inside Pod are touching. Replace Pod or return for Repair.
!Faulty Eco-Oxidizer main unit. Return to Bionizer for repair.
Faulty AC/DC power adaptor
!Replace power adaptor. Please contact your distributor or Bionizer.
!Faulty Eco-Oxidizer main unit. Return to Bionizer for repair.
TROUBLESHOOTING
Customers in the USA, go to:
http://eco-oxidizer.com/help.php
or scan the QR Code below with your smartphone or
tablet:
Customers in Australia and other countries outside
the USA, go to:
http://au.eco-oxidizer.com/help.php
or scan the QR Code below with your smartphone or
tablet:
13
The Eco-Oxidizer is a simple, reliable device. Should you have any problems or difficulties, please consult this
troubleshooting section before contacting Bioniser.
Bionizer also has a comprehensive HELP page on the Bionizer web site :

ECO-OXIDIZER AND CHLORINE
The advantage of the Eco-Oxidizer, when used in pool systems which also employ Chlorine sanitiser.
When Chlorine reacts with molecules that contain Ammonia and other nitrogen compounds (found in urine
and other pollutants), it can form compounds such as Chloramine. These undesirable compounds are the
cause of red eyes, itchy skin, and Chloramine is responsible for the “Chlorine smell” when people often
(incorrectly) assume there is too much Chlorine in the pool.
The formation of Chloramines happens even more readily at low Chlorine concentration, because the level of
"good" Chlorine (hyperchlorous acid) is too low to oxidize them away.
These compounds can be oxidized back to Hypochlorous acid (the desirable form of Chlorine) and gaseous
Ammonia by break point chlorination. This is simply the addition of enough Chlorine to achieve around 10ppM
Chlorine.
Whilst this method is effective, it has its own problems. Firstly, it can take some days for the Chlorine to return
to a concentration that is safe for swimming. It also adds to the hazards of large volumes of dangerous
chemicals being transported and used in and around swimming and spa pools. Thirdly, the high Chlorine
concentration can damage pool equipment such as pool cleaners, and stainless steel ladders and other
fittings.
The Eco-Oxidizer will oxidize Chloramines and other undesirable compounds using electrical current instead of
high Chlorine concentration. The Oxidizing output is active continuously when there is water flow through the
return-to-pool pipeline, after the filter. In this way, the undesirable compounds will be oxidized as they are
formed in the pool, so they are not able to increase to a concentration that is noticeable or harmful to humans.
When used in this way, the Eco-Oxidizer can be used not just as a Chlorine replacement device, but also as a
complimentary product to allow the pool operator to maintain very low chlorine levels (0.2 to 0.5ppM),
without causing undesirable Chloramine build-up.
Testing in swimming pools has shown safe, healthy water with no combined Chlorine during hot summer
conditions, whilst maintaining under 0.5 ppM of Chlorine. The tests showed a vastly reduced Chlorine usage.
Pool balance was easier to maintain, with buffer and acid usage also reduced.
The most important result, is that the bathers in the test pools were not subjected to unnecessarily high levels
of chemical while swimming.
ECO-OXIDIZER AND CHLORINE
14
INSTRUCTION BOOK
Note: Strengths of chemicals may vary from packet to packet.
Please check instructions on the label of each product and add the units required to match the volume of your pool.
Snap Pool Balance
Water Balance Tests
1. pH
2+
2. Copper Ions (Cu )
3. Total Alkalinity (TA)
4. Phosphates
5. Calcium Hardness
6. Total Dissolved Solids (TDS)
Period
Weekly
Weekly
Monthly
Monthly
Monthly
Quarterly
Treatment Product
Hydrochloric Acid
(50mL / 10,000L / pH 0.1)
(2.0 FL OZ (50mL) / 2,500 Ga /òpH 0.1)
Bionizer Program Settings
(Turn output % Up or Dn)
Buffer / Soda Bi-Carb
(200gm / 10,000L / 10ppM)
(7 OZ (200gm) / 2,500 Ga /ñ10ppM)
Starver / Phosphate Remover
(100mL / 10,000L / treatment)
(4.0 FL OZ (100mL) / 2,500 Ga / treatment)
Hardner / Calcium Chloride
(100gm / 10,000L / 10ppM)
(3.5OZ (100gm) / 2,500 Ga /ñ10ppM)
Clarify with Polysheen Plus
(or another Cationic based clarifier)
Required Range
7.0 to 7.4 pH
0.5 to 0.7 ppM
80 to 120 ppM
< 0.5 ppM
200 to 250 ppM
<1000 ppM
SNAP POOL BALANCE
15

SAVE THE ENVIRONMENT
SAVE TIME & MONEY
SAVE YOUR LONG-TERM HEALTH
www.bioniser.com.au www.bionizer.com
INSTRUCTION BOOK
Bioniser Pty Ltd
1/173 Bradman Ave
Maroochydore
QLD 4558
Australia
Phone...................1800 10 62 74
International .....+61 7 5479 6100
Fax....................+61 7 5443 6700
Email ...........relax@bioniser.com
Bionizer Ltd
16427 N Scottsdale Rd
Suite 410
Scottsdale, AZ 85254
USA.
Phone................1-480-696-2387
Toll Free.............1-855-8-IONIZE
Email ...........relax@bionizer.com
Table of contents
Popular Swimming Pool Cleaner manuals by other brands


Zodiac
Zodiac MX6 Elite Instructions for installation and use

Zodiac
Zodiac OC 3400 Instructions for installation & use

Zodiac Pool Systems
Zodiac Pool Systems MagnaPool Installation and operator's guide

Hayward
Hayward DV4000 owner's manual

Pentair
Pentair Lil Rebel Installation and user guide

Blue Wave
Blue Wave NBP6158 instruction manual


