Steinbach APPcontrol User manual

ES Steinbach limpiador para piscina APPcontrol
PL Steinbach przyrząd do czyszczenia basenów APPcontrol
TR Steinbach havuz temizleyicisi APPcontrol
BG Steinbach pобот за почистване на басейни APPcontrol
SK Steinbach bazénový čistič APPcontrol
HU Steinbach úszómedence-tisztító APPcontrol
HR Steinbach čistač bazena APPcontrol
CS Steinbach bazénový vysavač APPcontrol
RO Steinbach aparat de curățat piscina APPcontrol
SL Steinbach čistilec za bazen APPcontrol
IT Steinbach pulitore per piscina APPcontrol
FR Steinbach robot électrique APPcontrol
EN Steinbach swimming pool cleaner APPcontrol
Bedienungsanleitung / Instruction manual /
Mode d’emploi / Navodila za uporabo /
Istruzioni per l’uso / Manual de utilizare /
Návod k obsluze / Upute za uporabu /
Kezelési útmutató / Návod na použitie /
Ръководство за експлоатация / Kullanım kılavuzu /
Instrukcja obsługi / Manual de instrucciones
Steinbach Schwimmbadreiniger
APPcontrol

2
061023_v1901 ALL
Abbildung 2 /
Illustration 2
Abbildung 1 /
Illustration 1
Illustration 1
Abbildung 10 /
Illustration 10
Abbildung 9 /
Illustration 9
Abbildung 5 /
Illustration 5
Abbildung 6 /
Illustration 6
Abbildung 7 /
Illustration 7
Abbildung 8 /
Illustration 8
Abbildung 3 /
Illustration 3
Abbildung 4 /
Illustration 4

3
061023_v1901 ALL
Abbildung 13 /
Illustration 13
Abbildung 12 /
Illustration 12
Abbildung 11 /
Illustration 11
Abbildung 14 /
Illustration 14

4
061023_v1901
Nr. 061023
1061953
2061954
3061955
4 061956
5 061957
6061958
7 061959
8061960
9 061961
10 061962
11 061963
12 061964
14 061966
14/1 061974
15 061967
16 061968
17 061969
17
ALL
Ersatzteile (Abbildung E1 / L1) /
Spare Parts (Illustration E1 / L1)

5
061023_v1901 DE
Vorwort
Vielen Dank für den Kauf dieses Steinbach Produktes. Wir entwickeln
unsere Artikel laufend weiter. Falls dieses Produkt dennoch Fehler
aufweist, möchten wir uns entschuldigen und ersuchen Sie höfl ich mit
unserem Servicecenter in Kontakt zu treten.
Bedienungsanleitung lesen und aufbewahren
Bedienungsanleitung für Steinbach Schwimmbadreiniger
APPcontrol
Diese Bedienungsanleitung gehört zu oben angegebenem Produkt. Sie
enthält wichtige Informationen zur Inbetriebnahme und Handhabung.
Lesen Sie die Bedienungsanleitung, insbesondere die Sicherheitshin-
weise sorgfältig durch, bevor Sie dieses Produkt verwenden. Die Nicht-
beachtung dieser Bedienungsanleitung kann zu schweren Verletzungen
oder Schäden an Ihrem Produkt führen. Die Bedienungsanleitung
basiert auf den in der Europäischen Union gültigen Normen und Regeln.
Beachten Sie die im Ausland gültigen landesspezifi schen Richtlinien
und Gesetze. Bewahren Sie die Bedienungsanleitung für die weitere
Nutzung auf und geben Sie diese bei Bedarf auch an Dritte weiter.
Bestimmungsgemäßer Gebrauch
Das Produkt ist ausschließlich für den Privatgebrauch bestimmt und
nicht für den gewerblichen Bereich geeignet.
Unser Speedcleaner APPcontrol ist ein neuartiger, leistungsstarker
und automatischer Poolroboter zur Reinigung von Schwimmbädern.
Aufgrund seines fortschrittlichen computergesteuerten Programms, kann
er den Boden sowie die Wände des Schwimmbades reinigen, ohne
dass man das Bad vorher entleert. Gleichzeitig fi ltert er das Wasser und
entfernt Schwebestoffe und Ablagerungen darin. Da der Reiniger mit
24V Gleichstrom arbeitet, bietet er Ihnen während des Betriebes hohe
Sicherheit. Bitte lesen Sie diese Anleitung genau durch, um ihn richtig
zu bedienen. Verwenden Sie Ihr Produkt nur wie in dieser Bedienungs-
anleitung beschrieben. Jede andere Verwendung gilt als nicht bestim-
mungsgemäß und kann zu Sachschäden oder sogar zu Personenschä-
den führen. Dieser Artikel ist kein Kinderspielzeug. Der Hersteller oder
Händler übernimmt keine Haftung für Schäden, die durch nicht bestim-
mungsgemäßen oder falschen Gebrauch entstanden sind.
Warn- und Sicherheitshinweise
Alle Anweisungen lesen und befolgen. Bei Nichtbefolgen dieser
Warnhinweise müssen Sie mit Schäden am Eigentum, anderen
ernsthaften Verletzungen oder mit dem Tod rechnen. Diese Pro-
duktwarnungen, Anweisungen und Sicherheitsregeln umfassen
viele, aber bei Weitem nicht alle möglichen Risiken und Gefahren.
Bitte geben Sie Acht und beurteilen Sie mögliche Gefahren richtig.
Fehlerhafter Umgang mit dem Produkt kann zu lebensgefährlichen
Situationen führen.
Achtung! Überlassen Sie die Reparatur Fachkräften, um Gefährdun-
gen zu vermeiden. Wenden Sie sich dazu an eine Fachwerkstatt.
Bei eigenständig durchgeführten Reparaturen, unsachgemäßer
Montage oder falscher Bedienung sind Haftungs- und Garantie-
ansprüche ausgeschlossen. Bei Reparaturen dürfen nur Ersatzteile
verwendet werden, die den ursprünglichen Produktdaten entspre-
chen.
WARNUNG! Gefahren für Kinder und Personen mit verringerten
physischen, sensorischen oder mentalen Fähigkeiten (beispielswei-
se teilweise Behinderte, ältere Personen mit Einschränkung ihrer
physischen und mentalen Fähigkeiten) oder Mangel an Erfahrung
und Wissen. Kinder dürfen nicht mit diesem Produkt spielen. Die
Reinigung darf nicht von Kindern oder Personen mit verringerten
physischen, sensorischen oder mentalen Fähigkeiten durchgeführt
werden.
HINWEIS! Beschädigungsgefahr! Durch unsachgemäßen Umgang
kann dieses Produkt beschädigt werden.
Stromschlaggefahr! Fehlerhafte Elektroinstallation oder zu hohe
Netzspannung können zu Stromschlag führen. Schließen Sie das
Produkt nur an, wenn die Netzspannung der Steckdose mit der An-
gabe der technischen Daten übereinstimmen. Schließen Sie dieses
Produkt nur an eine gut zugängliche Steckdose an, damit Sie die-
ses bei einem Störfall schnell vom Stromnetz trennen können. Be-
treiben Sie das Produkt nicht, wenn es sichtbare Schäden aufweist
oder das Netzkabel bzw. der Netzstecker defekt ist. Als zusätzlicher
Schutz wird die Installation einer Fehlerstrom-Schutzeinrichtung
(FI/RCD) mit einem Bemessungsauslösestrom von nicht mehr als
30 mA empfohlen. Fragen Sie Ihren Elektrofachbetrieb um Rat.
Öffnen Sie das Produkt nur soweit, wie in dieser Anleitung be-
schrieben. Überlassen Sie die Reparatur Fachkräften, um Gefähr-
dungen zu vermeiden. Wenden Sie sich dazu an eine Fachwerkstatt.
Bei eigenständig durchgeführten Reparaturen, Veränderungen am
Produkt, unsachgemäßem Anschluss oder falscher Bedienung
sind Haftungs- und Garantieansprüche ausgeschlossen. In diesem
Produkt befi nden sich elektrische und mechanische Teile, die zum
Schutz gegen Gefahrenquellen unerlässlich sind.
Fassen Sie den Netzstecker niemals mit feuchten Händen an.
Ziehen Sie den Netzstecker nie am Netzkabel aus der Steckdose,
sondern fassen Sie immer den Netzstecker an. Halten Sie das
Produkt, den Netzstecker und alle Kabel von offenem Feuer und
heißen Flächen fern. Verlegen Sie das Netzkabel so, dass es nicht
zur Stolperfalle wird und graben Sie es nicht ein. Verlegen Sie alle
Kabel so, dass sie nicht durch Rasenmäher u. ä. Geräte beschädigt
werden können. Knicken Sie das Netzkabel nicht und legen Sie es
nicht über scharfe Kanten. Verwenden Sie keine Verlängerungska-
bel, Mehrfachsteckdosen oder sonstige Adapter.
Um schwere Schäden am Gerät zu vermeiden, lassen Sie dieses nie
außerhalb des Wassers laufen! Das Gerät darf nur an eine geerdete
230 VSchutzkontakt-Steckdose angeschlossen werden. Während
sich das Gerät im Wasser befi ndet, dürfen sich keine Personen im
Becken aufhalten. Der Reiniger ist kein Spielzeug. Fassen Sie das
Gerät nicht direkt am Kabel sondern am Haltebügel an, wenn Sie es
wieder aus dem Wasser ziehen. Für eine optimale Leistung, lassen
Sie die komplette Luft entweichen, bevor Sie das Gerät einschalten
(es kommen keine Luftblasen mehr aus dem Reiniger und dieser
bleibt vollständig auf dem Beckenboden). Versuchen Sie nicht, die
Schwimmer entlang des elektrischen Kabels zu bewegen. Lassen
Sie sie immer in der ursprünglichen Position. Vergewissern Sie sich
bitte vor dem Einschalten des Reinigers, dass das Schwimmkabel
ganz locker bleibt um Verwicklungen zu vermeiden. Verwicklungen
können im schlimmsten Fall zur Beschädigung des Reinigers füh-
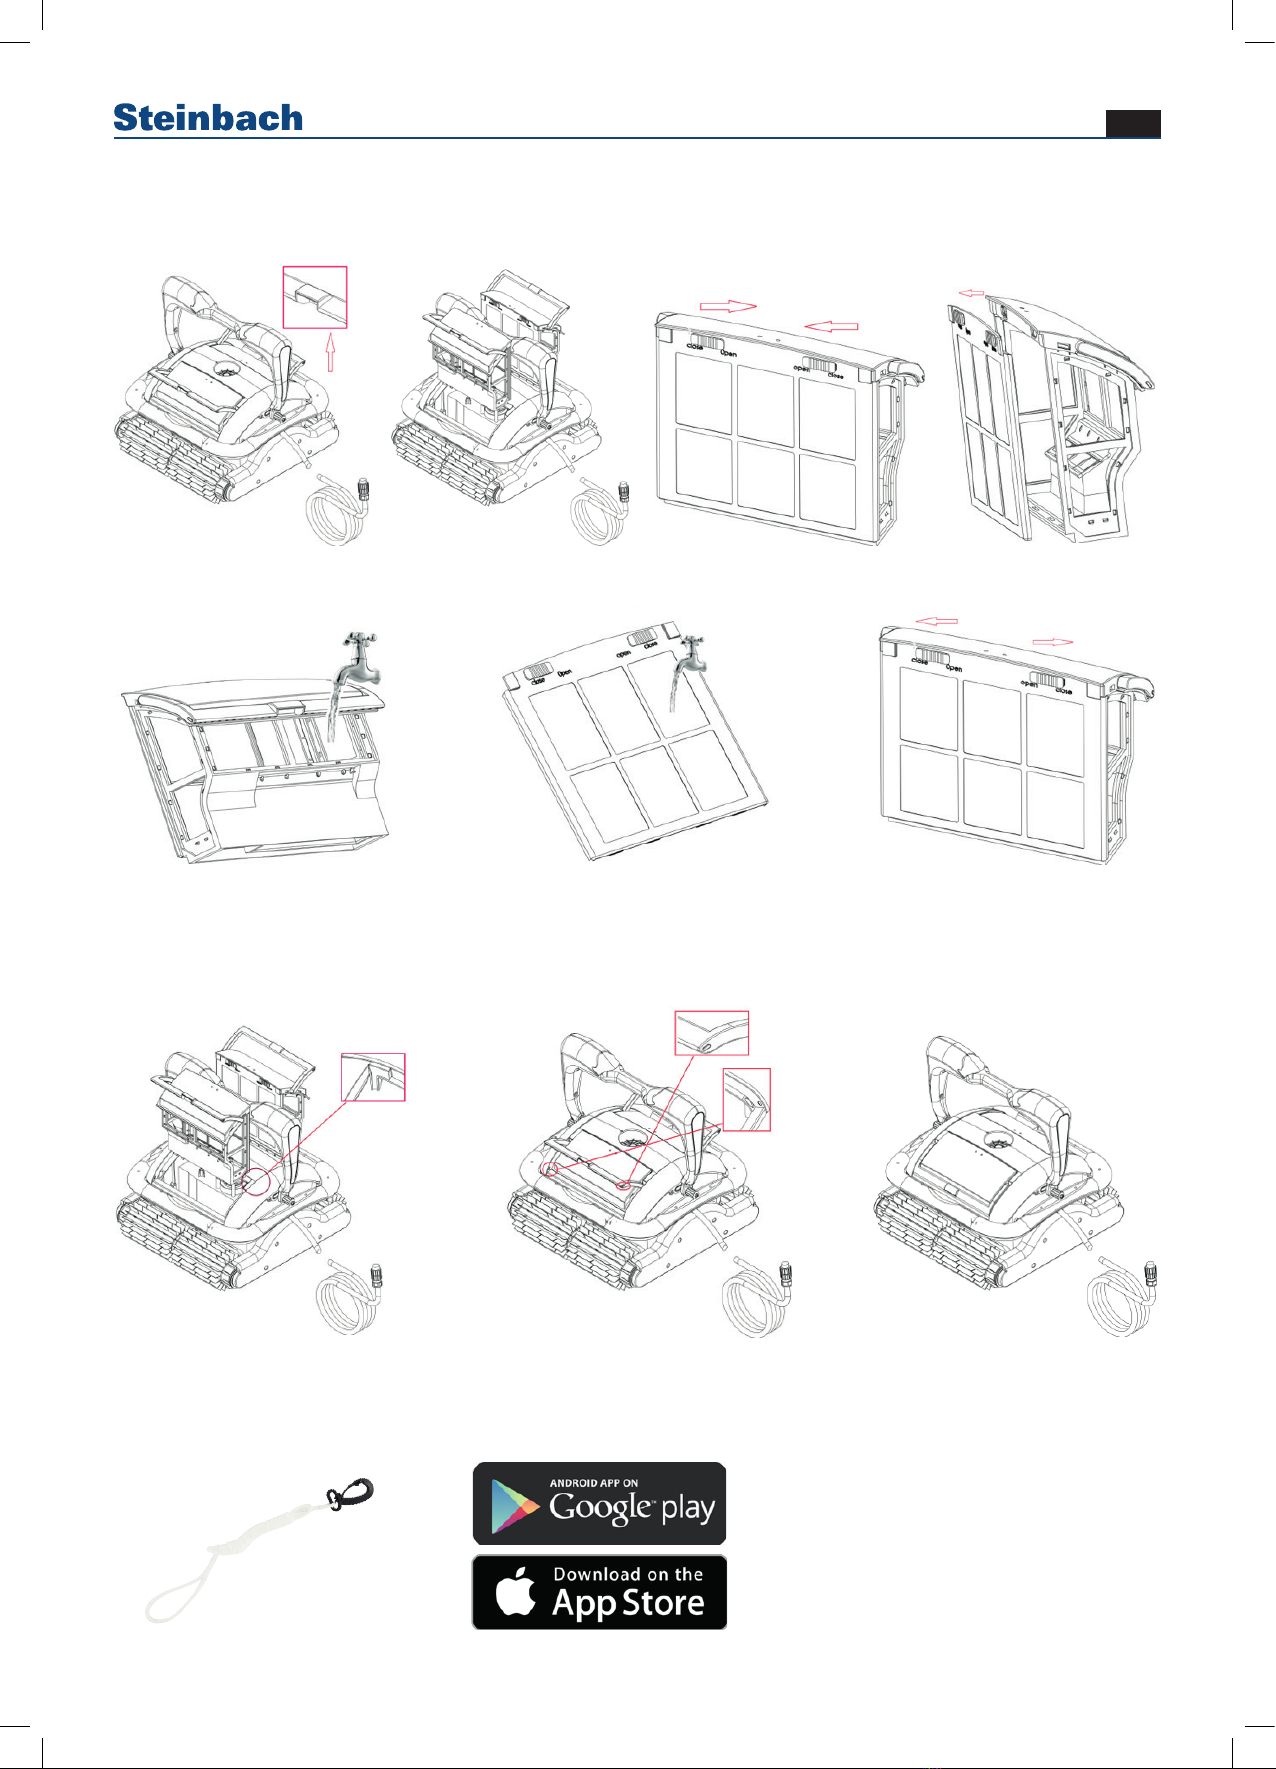
ren und die Reinigungswirkung beeinfl ussen. Nach jeder Benut-
zung muss der Filterbehälter inkl. Filterbeutel umgehend gereinigt
werden. Dadurch wird verhindert, dass die schmutzigen Filterbeutel
den normalen Betrieb des Reinigers beeinfl ussen. Solange der
Reiniger nicht benutzt wird, soll er in einem schattigen und gut
gelüfteten Raum aufbewahrt werden. Direkte Sonnenbestrahlung
ist zu vermeiden. Während des Betriebes muss der Steuerkasten/
das Netzgerät des Reinigers an einer schattigen Stelle stehen. Der
Steuerkasten/das Netzgerät darf nicht abgedeckt werden, um mögli-
che Schäden und/oder Überhitzung zu vermeiden. Motoren und
elektrische Teile dürfen nur von Fachleuten geöffnet und repariert
werden. Andernfalls führt dies zum sofortigen Verfall des Garantie-
anspruchs. Verwenden Sie den Reiniger nur für das in dieser Bedie-
nungsanleitung angeführte Arbeitsumfeld und den Bedingungen.
Achtung: Bevor Sie den Reiniger aus dem Becken holen, vergewis-
sern Sie sich, dass der Strom vollkommen abgeschaltet ist.
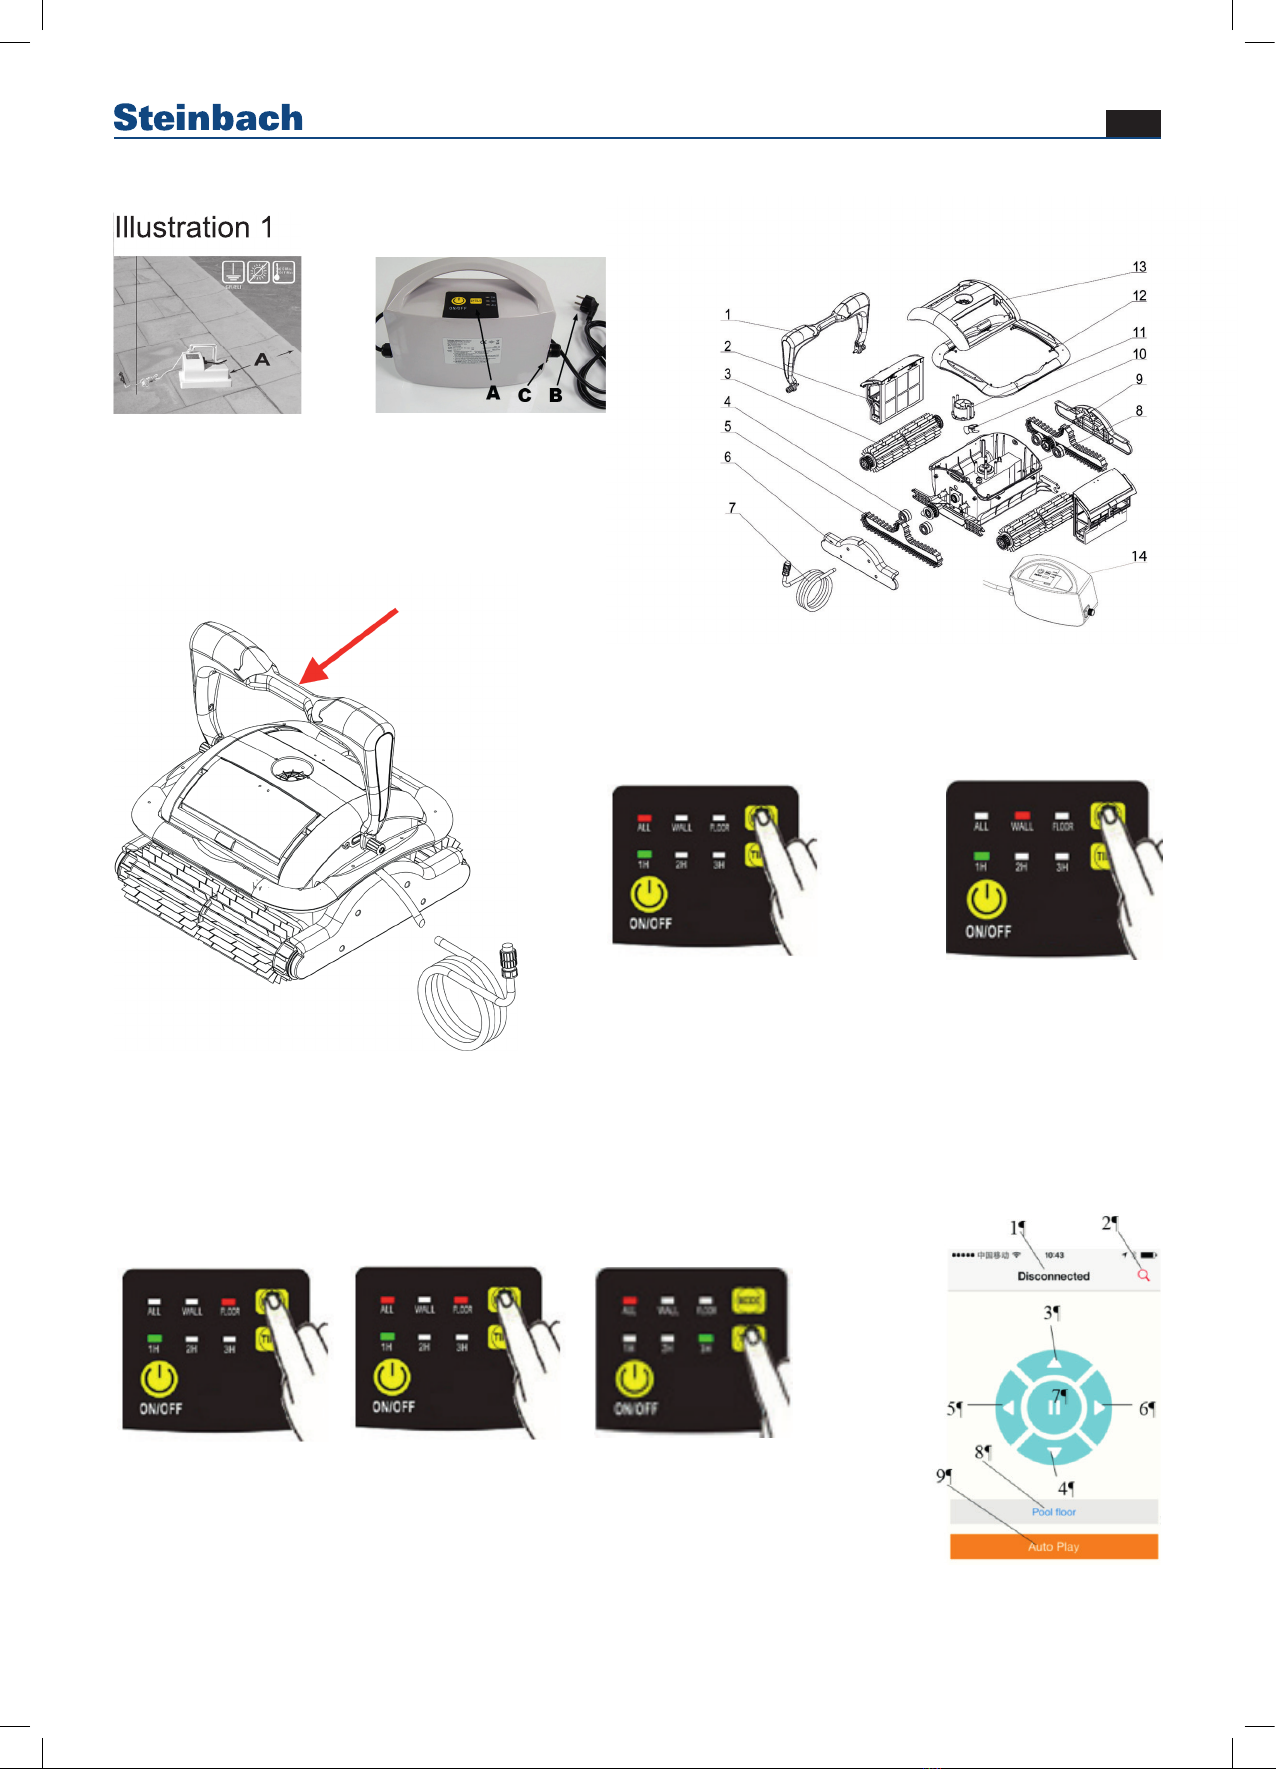
Position des Netzgerätes
Das Netzgerät des Reinigers soll geeignet positioniert werden,
damit dieser alle Ecken und Enden im Becken erreichen kann. Das
Netzgerät muss aus Sicherheitsgründen mindestens 3,5 m vom
Schwimmbeckenrand entfernt stehen. Siehe Abbildung 1
Befestigen Sie das Netzgerät mit der im Lieferumfang befi ndlichen
Sicherheitsschnur (Abbildung 13). Achtung: Das Netzteil sollte
während des Betriebes in einem schattigen Bereich stehen.
Lieferumfang prüfen
HINWEIS! Beschädigungsgefahr! Wenn Sie die Verpackung unvorsichtig
mit einem scharfen Messer oder anderen spitzen Gegenständen öffnen,
kann das Produkt beschädigt werden. Gehen Sie daher beim Öffnen
sehr vorsichtig vor.
■ Nehmen Sie das Produkt aus der Verpackung.
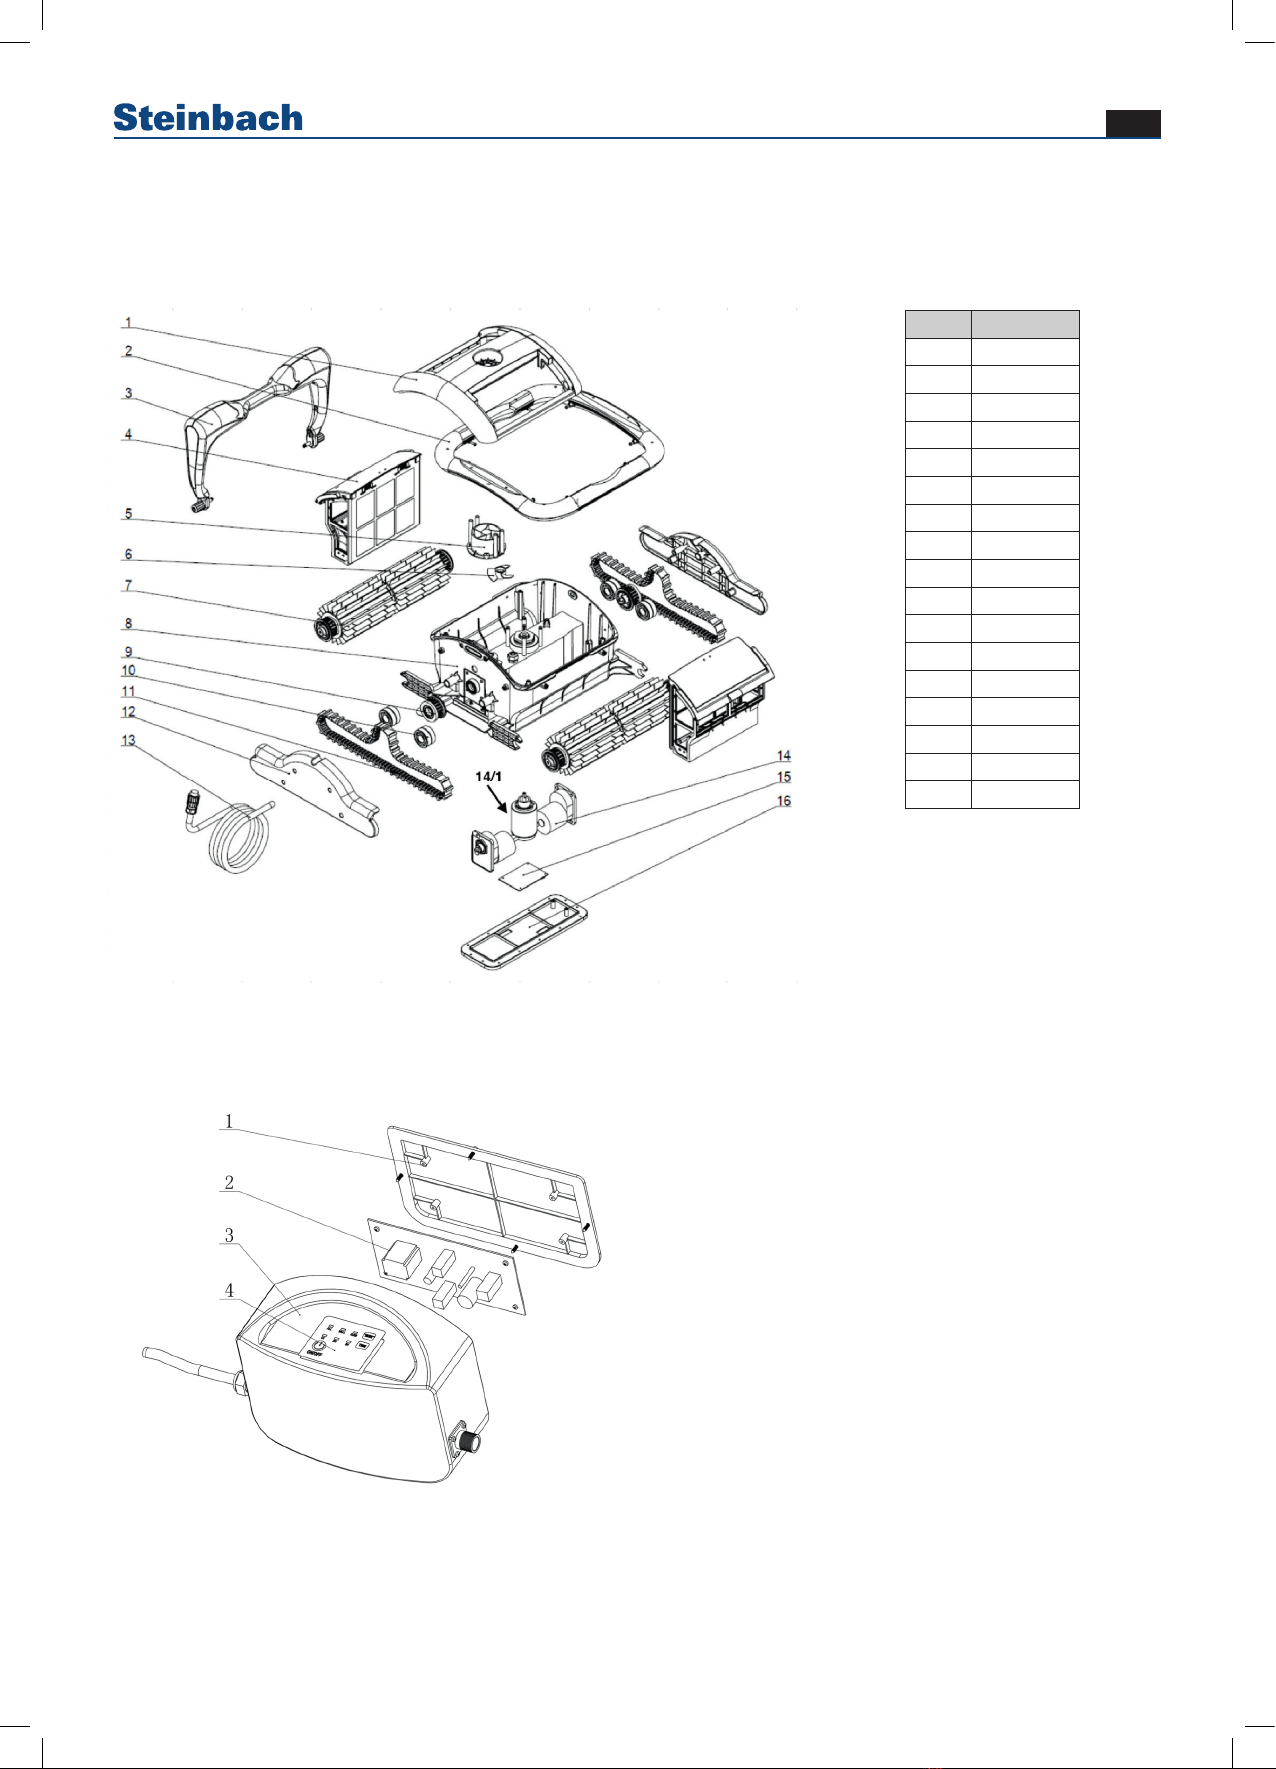
■ Prüfen Sie den Lieferumfang auf Vollständigkeit. Skizze/Foto L1.
■ Kontrollieren Sie, ob der Artikel oder die Einzelteile Schäden aufwei-
sen. Ist dies der Fall, benutzen Sie das Produkt nicht. Wenden Sie sich
an die am Ende der Anleitung angegebenen Serviceadresse.

6
061023_v1901 DE
Aufbau Poolreiniger
Der Speedcleaner APPcontrol besteht aus der Bedienungseinheit und
der Reinigungseinheit. Nachfolgend fi nden Sie die Komponenten des
Reinigers.
Abbildung 2:
A: Display
B: Anschluss 230 V
C: Anschluss Bodensauger
Bestandteile des Poolreinigers
Abbildung 3:
1) Haltegriff
2) Filtereinheit
3)Antriebswalze
4) Lager für Antriebswalze
5) Antriebsriemen
6) Seitenverkleidung
7) Schwimmkabel
8) Motoreinheit
9) Antriebsrad
10) Propeller
11) Düseneinsatz
12) Rahmen
13) Deckeloberteil
14) Netzgerät
Vorbereitung
Tauchen Sie den Reiniger, am Hängering haltend, ins Wasser (Abb.4).
Nachdem der Reiniger die Luft langsam verloren hat (der Reiniger muss
völlig luftleer sein, sonst wird die normale Arbeit gestört), taucht dieser
selbstständig nach unten.
Achtung: Für eine optimale Leistung, vergewissern Sie sich, dass sich
keine Luft mehr im Reiniger befi ndet (es kommen keine Luftblasen mehr
aus dem Reiniger und dieser bleibt vollständig auf dem Beckenboden).
Anschluss der Stromquelle
Wenn der Reiniger völlig am Poolboden aufl iegt, sollten Sie das Strom-
kabel nehmen, es ausbreiten und den Stecker in die Steckdose am
Netzgerät stecken. Weiter schließen Sie das Kabel an die Steckdose
(Bitte beachten Sie bei der Verbindung der Kabel zueinander, dass die
Stecker in der richtigen Richtung und Position miteinander verbunden
werden) und ziehen Sie die Muttern an beiden Seiten fest. Verbinden
Sie die Netzleitung mit der Stromquelle.
So ist der Schwimmbadreiniger betriebsbereit.
Bedienung
NR. Be-
zeich-
nung
Maßnahme Funktion
1ON/
OFF
Einschalten
oder aus-
schalten
■ Wenn Sie diesen Knopf drücken,
wird die Maschine eingeschaltet.
■ Wenn Sie diesen Knopf zwei Mal
drücken, wird die Maschine mit
dem ausgewählten Modus in Be-
trieb genommen.
■ Wenn Sie diesen Knopf drei Mal
drücken, wird die Maschine aus-
geschaltet.
Modi
Wählen Sie unterschiedliche
Modi für unterschiedliche
Zwecke aus
2 Mode
Abbildung 5
Mit dem Modus „ALL“ (Alle) reinigt
die Maschine die Wand und den Bo-
den des Pools mit der Wasserleitung
(einmal Wand, dann einmal Boden).
Abbildung 6 Mit dem Modus „WALL“ (Wand) wird
nur die Wand des Pools gereinigt.
Abbildung 7
Mit dem Modus „FLOOR“ (Boden)
wird nur der Boden des Pools
gereinigt.
Abbildung 8
Mit dem Modus „ALL + FLOOR“
(Alle + Boden) wird der Boden des
Pools drei Mal gereinigt, bevor die
Maschine ein Mal dieWand reinigt.
Arbeitsdauer Unterschiedliche Arbeitszeiten für
unterschiedliche Zwecke
3 Zeit Abbildung 9 1H 2H 3H Gibt die unterschiedliche
Arbeitszeit an.
Gibt den Maschinenstatus an
4 Anzeige Arbeitsstatus
Zwei oder drei
Anzeigen an Maschine hält an
1H blinkt langsam Maschine läuft für
1 Stunde
2H blinkt langsam Maschine läuft für
2 Stunden
3H blinkt langsam Maschine läuft für
3 Stunden
Licht „ALL“ (Alle)
an
Betrieb unter Mo-
dus „ALL“ (Alle)
Licht „WALL“
(Wand) an
Betrieb unter
Modus „WALL“
(Wand)
Licht „FLOOR“
(Boden) an
Betrieb unter
Modus „FLOOR“
(Boden)
Licht „ALL+
FLOOR“ (alle+Bo-
den) an
Betrieb un-
ter Modus
„ALL+FLOOR“
(alle+Boden) an
ALL>>WALL
>>FLOOR (Al-
le>Wand> Boden)
blinkt der Reihen-
folge nach
Manuell: vorwärts
FLOOR>>
WALL>>ALL (Bo-
den> Wand>Alle)
blinkt der Reihen-
folge nach
Manuell: zurück
3H>>2H>>1H
blinkt der Reihen-
folge nach
Manuell: Drehung
links
1H>>2H>>3H
blinkt der Reihen-
folge nach
Manuell: Drehung
rechts
Alle Lichter blinken
langsam
Automatischer
Durchlauf be-
endet
Es besteht auch die Möglichkeit den Speedcleaner APPcontrol mittels
APP zu steuern. Dies können Sie gerne unter folgendem Link nutzen
(Android + IOS): Siehe Abbildung 14.
Bluetooth für Smartphone
(wahlweise) Abbildung 10

7
061023_v1901 DE
NR. Anzeige Funktion
1Bluetooth-Status ■nicht verbunden
■verbunden
2Signal wird gesucht Drücken Sie Start, um das Bluetooth-
Signal zu suchen.
3▲ Manuelle Vorwärtsbewegung
4 ▼ Manuelle Rückwärtsbewegung
5◄Manuelle Linksdrehung
6► Manuelle Rechtsdrehung
7Stoppzeichen Manuelles Anhalten der Maschine
8Modus
■ Modus Pool-Boden
■ Modus Pool-Wand
■ Modus ein Mal Boden ein Mal Wand
■ Modus drei Mal Boden drei Mal Wand
9
Auto. Ausführen
oder
stoppen
■ Auto-Ausführen: Durchführen des
gewählten Modus
■ Stopp: wird automatisch durc geführt
Achtung: ► & ◄ müssen durchgehend gedrückt werden.
Pfl ege und Wartung
Der Reiniger schaltet sich automatisch nach einem Reinigungszyklus ab.
Stecken Sie das Netzkabel aus, ziehen Sie leicht am Kabel und heben
Sie den Reiniger am Ring auf der Spannmutter aus dem Wasser.
Achtung:
Beim Herausheben des Reinigers aus dem Becken müssen Sie darauf
achten, dass der Reiniger nicht gegen die Beckenwand stößt, ansonsten
könnten Sie sowohl den Reiniger als auch die Folie zerkratzen.
Bevor der Reiniger die Wasseroberfl äche verlässt, muss er dort 10 bis
15 Sekunden gehalten werden, damit das Wasser im Reiniger durch den
Wasseraustritt zum größten Teil ins Bad fl ießt. Erst dann können Sie den
Reiniger an den Rand des Schwimmbades stellen.
Reinigung des Filters Abbildung 11
■ Heben Sie den Filtergriff hoch.
■ Nehmen Sie den Filter heraus.
■ Schieben Sie den Clip zur Seite, um das Sieb zu öffnen.
■ Nehmen Sie die Schieber herunter.
■ Reinigen Sie das Sieb.
Zusammenbau des Filters Abbildung 12
Der Filter kann über einen Schiebmechanismus in den Reiniger zurück-
geschoben werden, wo er mit einem Einrasten des Griffs eingesetzt
werden kann.
Tipps und Hinweise
Jedes Mal, wenn der Reiniger aus dem Wasser geholt wird, muss der
Filtereinsatz gereinigt werden.
Versichern Sie einen PH-Wert des Wassers zwischen 7.0 - 7.2.
Versichern Sie, dass die Wassertemperatur zwischen 10°C und 32°C
liegt.
Nach jeder Reinigung muss die Antriebsraupe gründlich gereinigt wer-
den, um bei der nächsten Reinigung die gleiche Wandhaftung zu haben.
Nach dem Betätigen der „Power off“ Taste kann für 30 Sekunden die
„Power on“ Taste nicht gedrückt werden.
Wir empfehlen, den Reiniger zwischen 10°C und 32°C an einem schatti-
gen und gut gelüfteten Platz aufzubewahren. Direkte Sonnenbestrahlung
ist stets zu vermeiden!
Wir empfehlen, die Bedienungseinheit mit einem Sicherungsseil zu
befestigen, um zu vermeiden, dass das Netzteil durch den Reiniger in
den Pool gezogen wird.
Lesen Sie bitte vor dem Benutzen die Hinweise auf Störungsbeseitigung
gründlich durch.
Problembehandlung
Diagnose
Anzeige Bedeutung Vorschlag
1H blinkt schnell
mit Alarm
Maschine ist
nicht mehr im
Wasser.
Setzen Sie die Maschine
wieder in das Wasser
oder warten Sie, bis die
Maschine automatisch
neustartet.
Alle Lichter blin-
ken schnell mit
einem Alarm
Netzgerät über-
laden.
Stoppen Sie die Maschine
und wenden Sie sich an
den Kundendienst.
1H+2H+3H
blinken schnell
mit Alarm
Kastendichtung
ist undicht
Stoppen Sie die Maschine
und wenden Sie sich an
den Kundendienst
ALL+1H blinken
schnell mit Alarm
Pumpe über-
laden
Halten Sie die Pumpe an
und überprüfen Sie das
Mischerlaufrad und die
Pumpe.
WALL+2H blin-
ken schnell mit
Alarm
Antriebsmotor 1
überladen
Halten Sie die Maschine
an und überprüfen Sie
den Riemen und das
Übertragungssystem
FLOOR+3H
blinken schnell
mit Alarm
Antriebsmotor 2
überladen
Halten Sie die Maschine
an und überprüfen Sie
den Riemen und das
Übertragungssystem.
ALL+WALL+1H
+2H blinken
schnell mit Alarm
Im Reiniger
liegt abnormale
Spannung vor
Stoppen Sie die Maschine
und wenden Sie sich an
den Kundendienst.
ALL+WALL
+FLOOR blinken
schnell mit Alarm
Abnormale
Kommunikation
Überprüfen Sie das
Kabel zwischen Reiniger
und der Netzgerät oder
wenden Sie sich an den
Kundendienst
WALL+FLOOR
+2H+3H blinken
schnell mit Alarm
Maschine ist
nicht mehr im
Wasser und
konnte nicht
erneut starten.
Halten Sie die Maschi-
ne an und nehmen Sie
sie erneut in Betrieb,
nachdem der Reiniger in
Wasser getaucht wurde.
WALL blinkt
schnell mit Alarm
Maschine hat
sich umgelegt.
Drehen Sie die Maschine
manuell wieder um.
Wichtige Hinweise
Technische Daten
■ Eingangsspannung: 220(230) VAC
■ Frequenz: 50 Hz
■ Ausgangsspannung: DC (Gleichstrom) 24 V
■ Nennleistung: 200 W
■ Kabellänge: 18 m
■ Breite der Reinigungstrommel: 465 mm
■ max. Reinigungsfl äche im Schwimmbad: 270 m²
■ Filterleistung: 20m³/h
■ Filterfeinheit: 180 μm
■ Betriebstemperatur (Wasser): 10°C - 32°C
■ Kriechgeschwindigkeit: 12m/min
■ Wasserbeständigkeitsklasse: Reiniger: IPX8; Netzgerät: IPX5
■ Umgebungstemperatur: 10°C - 32°C
■ Gewicht des Reinigers: 12,5 kg (ohne Kabel)
Serviceabwicklung
Bitte senden Sie das Gerät nicht eigenmächtig zu uns, sondern wenden
Sie sich zuerst an unser Servicecenter! Sollte das Gerät abgeholt
werden müssen, so ist es notwendig dies sicher zu verpacken und die
Rechnung (Kopie) beizulegen. Sobald das Gerät bei uns eingetroffen
ist, wird es von unserer Reklamationsabteilung auf Mängel überprüft
und repariert. Nach Abschluss dieser Arbeiten wird Ihr Gerät so schnell
als möglich an Sie retourniert. Wenn die Einsendung auf Garantie nicht

8
061023_v1901 DE
gerechtfertigt ist, dann werden die entstandenen Kosten verrechnet.
Die Garantieabwicklung/Gewährleistung läuft über die Fa. Steinbach
VertriebsgmbH. Der Artikel wird von der Fa. Steinbach VertriebsgmbH
repariert, da jedoch kein Rückgaberecht besteht, wird er nicht zurückge-
nommen.
Reinigung
Verwenden Sie zur Reinigung handelsübliche Pfl egemittel. Verwenden
Sie keine lösungsmittelhaltige sowie scheuernde Reinigungsmittel, bzw.
harte Schwämme, Bürsten etc.
Lagerung
Nach Abschluss der Reinigung muss das Produkt ausreichend ge-
trocknet werden. Anschließend lagern Sie es an einem trockenen und
frostfreien Ort.
Entsorgung
Verpackung entsorgen: Die Verpackungsmaterialien sind nach umwelt-
verträglichen und entsorgungstechnischen Gesichtspunkten ausgewählt
und deshalb recyclebar. Geben Sie Pappe und Karton zum Altpapier,
Folien in die Wertstoff-Sammlung.
Produkt entsorgen: Anwendbar in der Europäischen Union und an-
deren europäischen Staaten mit Systemen zur getrennten Sammlung
von Wertstoffen. Entsorgen Sie das Produkt entsprechend den in Ihrem
Wohnort geltenden Bestimmungen und Gesetzen.
Garantiebedingungen
Es gelten die in den jeweiligen Ländern gültigen gesetzlichen Bestim-
mungen für die Gewährleistung. Diese entsprechen für Österreich und
Deutschland 2 Jahre ab Rechnungsdatum.
Gewährleistung in Bezug auf Betriebssicherheit und Zuverlässigkeit wird
vom Hersteller nur unter folgenden Bedingungen ü bernommen:
■ Der Bodensauger wird entsprechend den Ausfü hrungen der Bedie-
nungsanleitung betrieben.
■ Bei Reparaturen werden nur Original-Ersatzteile verwendet (Ver-
schleißteile unterliegen keiner Gewährleistung).

9
061023_v1901
Preface
Many thanks for purchasing this Steinbach product. We continually de-
velop and enhance our items, however, should this product be faulty, we
apologise for any inconvenience and politely ask you to get in contact
with our service centre.
Read operating manual and store safely
Instruction manual for Steinbach swimming pool cleaner APPcon-
trol
This instruction manual relates to the product stated above. It contains
important information on starting your product for the fi rst time and how
to operate it. Carefully read through the instruction manual - particularly
the safety instructions - before using this product. Non-compliance with
this instruction manual may lead to major injuries or damage to your
product. The instruction manual is based on standards and regulations
applicable within the European Union. If the product is being used ab-
road, please follow any country-specifi c guidelines and laws. Store the
instruction manual in a safe location for later consultation and submissi-
on to third parties, where applicable.
Intended use
This product is solely intended for private use and is not suitable for
commercial use.
Our Speedcleaner APPcontrol is an innovative, powerful, automatic
pool robot for cleaning swimming pools. Due to its advanced computer
controlled programming, it can clean both the fl oor and the walls of your
swimming pool, without having to empty the pool beforehand. At the
same time, it fi lters the water and removes particles and deposits. As
the cleaner operates with 24 V direct current. it is very safe during ope-
ration. Please read these instructions through thoroughly in order to use
it correctly. Only use the product as described in this instruction manual.
Any other use is considered improper use and may lead to personal
injury or damage to property. This item is not a toy. The manufacturer
or retailer assumes no liability for damage resulting from improper or
incorrect use.
Warnings and safety instructions
Read and observe all instructions. Non-compliance with these
warnings and instructions may result in damage to property,
severe personal injury or even death. These product warnings,
instructions and safety regulations are extensive but cannot cover
all potential risks and dangers and are thus not to be considered
exhaustive. Please be cautious and assess potential dangers
appropriately. Incorrect use/handling of the product can lead to
life-threatening situations.
Caution! Leave repairs to experts in order to prevent hazards.
Consult a specialist workshop. Liability is waived and warranty
claims expire if repairs are carried out independently of if the pro-
duct is improperly installed or used incorrectly. Only original parts
corresponding to the original product specifi cations may be used
during repairs.
WARNING! Hazardous for children and persons with reduced phy-
sical, sensory or mental abilities (such as the handicapped, elderly
individuals with impaired physical and mental abilities), or those
with a lack of experience and knowledge. Children must not be
allowed to play with this product. Cleaning may not be performed
by children and persons with reduced physical, sensory or mental
abilities.
NOTE! Risk of damage! This product may be damaged through
improper use.
Danger of electrocution! Faulty electrical installation or too high
mains voltage can lead to electrocution. Only connect the product
if the mains voltage on the socket corresponds to the technical
specifi cations. Only connect this product using an easily accessib-
le socket to ensure it can be rapidly disconnected from the mains
in the event of a fault. Do not operate the product if it exhibits
visible damage or the mains cable/plug is defective. As additional
protection, it is recommended to install a residual current device
(FI/RCD) with a tripping current of no more than 30 mA. Consult
with an electrician for advice.
Only open the product as described in this manual. Leave repairs
to experts in order to prevent hazards. Consult a specialist work-
shop. Liability is waived and warranty claims expire if repairs or
changes to the product are carried out independently of if the pro-
duct is improperly connected or operated incorrectly. This product
features electrical and mechanical parts which are indispensable
for protecting against potential hazards.
Never touch the plug with wet hands. Never pull out the plug from
the socket using the cable - always pull on the plug. Keep the pro-
duct, plug and all cables away from open fi res and hot surfaces.
Lay the cable so that it does not pose a tripping risk and do not
place it under the ground. Lay cables in such a way that they will
not be damaged by lawn mowers and other similar devices. Do not
kink the cable and do not lay it over sharp edges. Do not use an
extension cable, multiple socket adapters or other adapters.
To avoid serious damage to the device, never allow it to operate
outside the water! The device should only be connected to an
earthed 230 V protective contact socket. Nobody may stay in the
pool when the device is in the water. This cleaner is not a toy. For
optimal performance, allow all the air to escape from the device be-
fore turning it on (air bubbles stop coming out of the cleaner, and
it stays on the pool fl oor properly). Do not try to move the fl oats
along the cable. Always leave them in the original position. Before
turning on the cleaner, please ensure the fl oat cable can move
freely to avoid any entanglement. In the worst case, entangle-
ment may lead to damage of the cleaner, and affect the cleaning
effi ciency. After every use, the fi lter holder incl. fi lter bag must be
cleaned immediately. This stops soiled fi lter bags affecting normal
operation of the cleaner. If the cleaner is not being used, it should
be kept in a well ventilated, dark room. Avoid direct sunlight.
During operation, the control box/power supply should be kept
in the shade. The control box/power supply must not be covered,
in order to avoid possible damage and / or overheating. Motors
and other electrical parts must only be opened and repaired by
an expert. Otherwise any claims under guarantee will be rendered
invalid immediately. Only use the cleaner in the operational areas
and under the conditions specifi ed in these instructions.
Caution: Before removing the cleaner from the pool, make sure
that the electricity is fully switched off.
Placement of the power pack
The cleaner’s power pack should be place in an appropriate posi-
tion, so that it can reach all the corners and both ends of the pool.
For safety reasons, the power pack should be placed at least 3.5m
from the swimming pool edge. See Fig. 1
Attach the power supply with the included safety line (fi g. 13).
Caution: The power pack should be kept in a shaded are during
operation.
Check scope of delivery
NOTE! Risk of damage! The product may be damaged if you open the
packaging with a sharp knife or other sharp objects without due care
and attention. Please open the packaging very carefully.
■ Remove the product from the packaging.
■ Check that all included items have been delivered in full. Sketch/photo
L1.
■ Check whether the item, or parts thereof, exhibit damage. If there is
damage, do not use the product. Get in contact with the service ad-
dress stated at the end of the manual.
Pool cleaner construction
The Speedcleaner APPcontrol consists of the operating unit and the
cleaning unit. The components of the cleaner are listed below.
A: Display
B: Connection 230 V
C: Floor vacuum connector
EN

10
061023_v1901
Pool cleaner components
Fig. 3:
1) Handle
2) Filter unit
3) Drive roller
4) Bearing for drivel roller
5) Drive belts
6) Side cover
7) Floating cable
8) Engine unit
9) Drive wheel
10) Propeller
11) Nozzle insert
12) Frame
13) Top cover
14) Power supply
Preparation
Place the cleaner into the water, while holding onto the hanging ring
(Fig, 4). Once all the air has escaped from the cleaner, (the cleaner
must be completely free of air, otherwise normal operation will be affect-
ed), it will sink to the bottom on its own.
Caution: For optimal performance, make sure that there is no more air
in the cleaner (air bubbles stop coming out of the cleaner, and it stays
on the pool fl oor properly).
Connecting the power source
When the cleaner is completely on the pool fl oor, take the power cable,
roll it out fully and push the plug into the socket on the power supply.
Then connect the cable to the socket (Please note when connecting
cables that the plugs are in the right direction and position in relation
to each other), and tighten the nuts on both sides. Connect the mains
cable to the power source. The swimming pool cleaner is now ready for
use.
Panel
NO. Sign Indicate Function
1ON/OFF Switch on
or off
■ Press this button machine will be
switched on.
■ Press this button twice machine
will work under selected mode.
■ Press this button third time ma-
chine will be switched off.
Mode op-
tions
Choose different mode for differ-
ent purpose.
2 Mode
Fig. 5
“ALL”mode is let machine
clean swimming pool fl oor
wall and water line together.
(once wall then once fl oor)
Fig. 6
“WALL” mode is let machine
clean swimming pool
wall only.
Fig. 7
“FLOOR” mode is let machine
clean swimming pool
fl oor only.
Fig. 8
“ALL + FLOOR” mode is let
machine clean the swimming
pool fl oor three times
then climb wall once.
Working
duration
option
Different working duration for
different purpose
3 Time Fig. 9 1H 2H 3H
Indicate different working duration
Indicate the machine status
4Indicator Working
status
Two or three indica-
tors on Machine stopped
1H fl ash slowly Machine running
for 1 hour
2H fl ash slowly Machine running
for 2 hour
3H fl ash slowly Machine running
for 3 hour
ALL light on Working under
mode ALL
WALL light on Working under
mode WALL
FLOOR light on Working under
mode FLOOR
ALL + FLOOR light on
Working
under mode ALL-
FLOOR
ALL>>WALL>>FLOOR
fl ash in order Manual: forward
FLOOR>>WALL>>ALL
fl ash in order
Manual: back-
ward
3H>>2H>>1H fl ash in
order Manual: left turn
1H>>2H>>3H fl ash in
order
Manual: right
turn
All lights fl ash slowly Auto run
fi nish
You can also control the Speedcleaner APPcontrol using the APP.
Please use the following link (Android + IOS): Fig 14.
Bluetooth for smart phone
(optional) (Fig. 10)
NO. Indicator Function
1 Bluetooth status ■disconnected
■connected
2Searching signal Press to start searching Bluetooth
signal.
3▲ Manual walking forward
4 ▼ Manual walking backward
5◄Manual left turn
6► Manual right turn
7 Stop sign Manual stop machine
8Mode
■ Pool fl oor mode
■ Pool wall mode
■ One fl oor one wall mode
■ Three fl oor one wall mode
9 Auto play or stop ■ Auto Play: working as selected mode
■ STOP: stop working automatically
Attention: “►”&“◄”need to be pressed constantly.
Care and maintenance
The cleaner turns itself off automatically after a cleaning cycle. Unplug
the mains cable, gently pull the cable, and lift the cleaner out of the
water using the ring on the clamp nut.
Caution:
When lifting the cleaner out of the water, you must ensure that the
cleaner does not hit the side of the pool wall, otherwise you may dam-
age both the cleaner and the liner.
EN

11
061023_v1901
Before the cleaner clears the surface of the water, it must be held there
for 10 to 15 seconds, so that most of the water can fl ow out of the water
outlet into the pool. Only then should you put the cleaner on the edge of
the swimming pool.
Clean the fi lter tray Fig. 11
■ Lift the tray handle up
■ Take out the fi lter tray
■Slide the clip to open the tray
■ Take the slides off
■Clean the tray
Put the fi lter tray back Fig.12
Machine have a slide way to lead fi lter tray back into the cleaner, and
clip the handle in position perfectly.
Hints and tips
Every time the cleaner is taken out of the water, the fi lter cleaner must
be cleaned.
Make sure the pH value of the water is between 7.0 and 7.2.
Make sure the water temperature is between 10°C and 32°C.
After every clean, the drive train must be thoroughly cleaned to ensure
the same level of grip on the next clean.
After pressing the “Power Off” button, the “Power On” button cannot be
pressed for 30 seconds.
We recommend keeping the cleaner between 10°C and 32°C in a shad-
ed, well ventilated place. Avoid direct sunlight at all times.
We recommend attaching the operating unit with a safety rope, to avoid
any risk of the power pack being pulled into the pool.
Before use, please read the instructions relating to trouble-shooting
thoroughly.
Trouble shooting
Diagnose
Indicator Meaning Suggestion
1H fl ash quickly
with buzz
Machine out of
water
Put machine back into
water or wait until ma-
chine restart automat-
ically
All lights fl ash
quickly with buzz
Power supply
over load
Stop machine contact
after sale service person
1H+2H+3H fl ash
quick with buzz
Seal box
leaking
Stop machine contact
after sale service person
ALL+1H fl ash
quick with buzz
Pump over load Stop machine check the
impeller and pump
WALL+2H quick
with buzz
Walking motor 1
over load
Stop machine check belt
and transmission system
FLOOR+3H fl ash
quick with buzz
Walking moter 2
over load
Stop machine check belt
and transmission system
ALL+WALL
+1H+2H fl ash
quick with buzz
Cleaner present
abnormalvolt-
age
Stop machine contact
after sale service person
ALL+WALL
+FLOOR fl ash
quick with buzz
Abnormal com-
munication
Check the cable between
cleaner and power sup-
ply or contact the after
sale service person
WALL+FLOOR
+2H+3H fl ash
quick with buzz
Machine out of
water and could
not restart
Stop machine restart
machine manually after
cleaner sink
WALL fl ash quick
with buzz
Machine turned
over
Turn over machine
manually
Important Note
Technical data
■ Input voltage: 220(230) VAC
■ Frequency: 50 Hz
■ Output voltage: DC (direct current) 24 V
■ Rated power: 200 W
■ Cable length: 18 m
■ Width of cleaning drum: 465 mm
■ max. Cleaning area in swimming pool: 270 mÇ
■ Filter performance: 20mÑ/h
■ Filter grade 180 μm
■ Operating temperature (water): 10°C - 32°C
■ Crawl speed: 12m/min
■ Hydrolytic resistance class: Cleaner: IPX8; Power supply: IPX5
■ Surrounding temperature: 10°C - 32°C
■ Weight of the cleaner: 12.5 kg (without cable)
Service
Please do not send the equipment to us without authorisation, but
please contact our service centre initially! If the equipment has to be
collected, it must be packed securely and the invoice (copy) must the
enclosed. As soon as the unit reaches us, it will be checked for faults by
our claims department, and repaired. On conclusion of this work, your
equipment will be returned to you as quickly as possible. If this return
is not covered by the guarantee, the costs incurred will be calculat-
ed. Guarantee processing / guarantees are handled by the company
Steinbach VertriebsgmbH. The item will be repaired by the company
Steinbach VertriebsgmbH, however where no right of return exists it will
not be taken back.
Cleaning
Use conventional cleaning products. Do not use solvent-based or abra-
sive cleaning agents/tools, i.e. no hard sponges, brushes etc.
Storage
The product must be thoroughly dried after cleaning. After which, it is to
be stored in a dry location protected from frost.
Disposal
Disposing of packaging: The packaging material has been selected
in view of environmental concerns and disposability and is therefore
recyclable. The paper and cardboard can be recycled, as can the plastic
coverings.
Disposing of the product: Applicable in the European Union and other
European states with systems in place for collecting and sorting recycla-
ble materials. Dispose of the product in accordance with any laws and
regulations applicable at your place of residence.
Warranty conditions
The respective country’s legal provisions for warranty conditions shall
apply accordingly. For Austria and Germany, these apply for 2 years
after the date of invoice.
A guarantee will only be undertaken by the manufacturer with regard to
safety and reliability under the following circumstances:
■ The fl oor vacuum cleaner is used in accordance with the guidance in
the instruction manual.
■ Only original replacement parts were used in any repairs (Parts liable
to wear and tear are not covered by guarantee).
EN

12
061023_v1901
Préface
Nous tenons à vous remercier d‘avoir acheté ce produit de la marque
Steinbach. Nous veillons à développer nos produits de manière continue.
Nous tenons à nous excuser si le présent produit devait toutefois présen-
ter des défauts, et vous invitons, dans ce cas, à vous mettre en relation
avec notre centre de services.
Lire attentivement le mode d’emploi et conser-
ver ce dernier soigneusement.
Mode d’emploi pour Steinbach robot électrique APPcontrol
Le présent mode d’emploi est valable pour le produit mentionné ci-des-
sus. Celui-ci rassemble un certain nombre d’informations essentielles,
notamment pour la mise en service et l’utilisation dudit produit. Veillez
à lire attentivement ce mode d’emploi, et en particulier les consignes
de sécurité qu’il contient, avant d’utiliser le produit. Le non-respect des
préconisations fi gurant dans le présent mode d’emploi peut entraîner
des blessures graves, voire des dommages sur votre produit. Ce mode
d’emploi repose sur un ensemble de normes et de règles valables au
sein de l’Union européenne. Veillez à également respecter les directives
et législations particulières en vigueur à l’étranger. Veillez à conserver
ce mode d’emploi pour consultation ultérieure et, en cas de besoin, à
remettre celui-ci à des tiers.
Utilisation conforme du produit
Ce produit est exclusivement destiné à un usage privé et non commer-
cial. Notre Speedcleaner APPcontrol est un robot de piscine puissant
pour le nettoyage automatique de piscines. En raison de son programme
avancé, commandé par ordinateur , il peut nettoyer le fond et les parois
de la piscine sans que vous deviez la vider au préalable. En même
temps, il fi ltre l‘eau, élimine les particules solides en suspension et les
sédiments. Puisque le nettoyeur fonctionne en 24V DC, il offre une
grande sécurité pendant le fonctionnement. Veuillez lire attentivement
les instructions de service afi n de l‘utiliser correctement. Veillez à ce que
votre utilisation du produit soit conforme aux préconisations contenues
dans ce mode d’emploi. Toute autre utilisation est réputée non-conforme
et peut entraîner des dommages matériels voire corporels. Cet article
n’est pas un jouet. Le fabricant ou le distributeur décline toute respons-
abilité en cas de dommages causés par une utilisation non-conforme ou
inadéquate du produit.
Avertissements et consignes de sécurité
Il convient de lire et de respecter l’ensemble des présentes instruc-
tions. Le non-respect des présents avertissements vous expose au
risque de survenance de dommages sur votre propriété, à d’autres
blessures graves, voire à un danger de mort. Les présents avertis-
sements relatifs aux produits, instructions et règles de sécurité ras-
semblent un nombre important de risques et de dangers potentiels,
mais ne sauraient pour autant être exhaustifs. Restez, en tous les
cas, vigilant et essayez d’évaluer au mieux les dangers potentiels.
Toute manipulation non-conforme du produit peut conduire à des
situations de danger de mort.
Attention ! Confi ez la réparation de votre appareil à des techniciens
spécialisés afi n d’éviter tout danger. Dans ce cadre, veillez à vous
adresser à un atelier spécialisé. Dans le cas où vous auriez procédé
vous-même aux réparations, en cas de montage non-conforme ou
de maniement inapproprié de l’appareil, tous recours en responsa-
bilité et en garantie deviennent caducs. En cas de réparation, seules
des pièces de rechange conformes aux données des produits d’ori-
gine peuvent être utilisées.
ATTENTION ! Il y a risque de danger pour les enfants ou les per-
sonnes dont les capacités physiques, sensorielles ou mentales
sont réduites (par exemple, personnes partiellement handicapées,
personnes âgées n‘étant pas en pleine possession de leurs capa-
cités physiques et mentales) ou qui manquent d‘expérience et de
connaissances. Il est interdit aux enfants de jouer avec ce produit.
En aucun cas, le nettoyage du produit ne doit être effectué par des
enfants ou des personnes dont les capacités physiques, sensoriel-
les ou mentales sont réduites.
REMARQUE ! Risque d’endommagement ! Ce produit est susceptib-
le d’être endommagé en cas de manipulation inadéquate.
Risque d‘électrocution ! Toute installation électrique défectueuse ou
toute tension d‘alimentation trop élevée peut engendrer un risque
d’électrocution. Ainsi, veuillez ne brancher l’appareil que lorsque
la tension d‘alimentation de la prise secteur correspond à la valeur
mentionnée dans les spécifi cations techniques. Veuillez ne raccor-
der l’appareil qu’à une prise secteur bien accessible, afi n de pouvoir
le débrancher rapidement en cas de dysfonctionnement. Ne mettez
en aucun cas le produit en service si celui-ci présente des dom-
mages visibles, ou si le câble d‘alimentation ou la fi che secteur sont
défectueux. À titre de protection complémentaire, il est recommandé
d’installer un disjoncteur différentiel (FI/RCD) dont le courant de
déclenchement ne dépasse pas 30 mA. Le cas échéant, demandez
conseil à votre électricien spécialisé.
N’ouvrez le produit que dans les cas et conditions prévus par le
présent mode d’emploi. Confi ez la réparation de votre appareil
à des techniciens spécialisés afi n d’éviter tout danger. Dans ce
cadre, veillez à vous adresser à un atelier spécialisé. Dans le cas où
vous auriez procédé vous-même à des réparations ou toute autre
modifi cation sur l’appareil, en cas de défaut de raccordement ou de
maniement inapproprié de l’appareil, tous recours en responsabilité
et en garantie deviennent caducs. Ce produit est composé de pièces
électriques et mécaniques indispensables à la protection contre les
sources potentielles de danger.
Veillez à ne jamais toucher la fi che secteur avec les mains
mouillées. Ne débranchez jamais la fi che de la prise secteur en
tirant sur le câble d’alimentation, mais tenez plutôt la fi che ferme-
ment afi n de la retirer. Veillez à tenir le produit, la fi che secteur ainsi
que l’intégralité des câbles à l‘écart de toute source de fl ammes ou
de toute surface chaude. Placez le câble d’alimentation de manière
à éviter tout risque de trébuchement et n’enterrez celui-ci en aucun
cas. Disposez l’intégralité des câbles de manière à éviter tout risque
d’endommagement par une tondeuse à gazon, ou tout autre appareil
assimilable. Ne pliez en aucun cas le câble d’alimentation et ne
placez pas celui-ci au-dessus d‘arêtes vives. N’utilisez pas de rallon-
ges, de multiprises ou d’adaptateurs.
Pour éviter de graves dommages à l‘appareil, ne le laissez jamais
fonctionner hors de l‘eau! L‘appareil doit être branché uniquement
à l‘aide d‘une prise électrique monophasée protégée sur le réseau
230V. Alors que l’appareil se trouve dans l‘eau, personne ne doit
se trouver dans la piscine. Ce n‘est pas un jouet. Pour des perfor-
mances optimales, laissez s’échapper l‘air complètement avant
d‘allumer l‘appareil (il n‘y a plus de bulles qui s’échappent du fi ltre
et celui-ci reste entièrement au fond de la piscine). Ne tentez pas
de déplacer le fl otteur le long du cordon d’alimentation. Laissez-le
toujours dans sa position initiale. Avant d’allumer le nettoyeur,
assurez- vous que le câble fl ottant ne puisse pas s’enrouler quelque
part pour éviter les enchevêtrements. Dans le pire des cas, les
enchevêtrements peuvent causer des dommages au nettoyeur
et amoindrir l‘effi cacité du nettoyage. Après chaque utilisation,
le conteneur du fi ltre, y compris les sacs fi ltrants doivent être
immédiatement nettoyés. Ceci permet d‘éviter que les sacs fi ltrants
sales affectent le fonctionnement normal du nettoyeur. Tant que le
nettoyeur n‘est pas en cours d‘utilisation, il doit être conservé dans
une pièce ombragée et bien aérée. La lumière directe du soleil dev-
rait être évitée. Pendant le fonctionnement, le boîtier de commande/
le bloc d‘alimentation du nettoyeur doit se trouver dans un endroit
ombragé. Le boîtier de commande/le bloc d‘alimentation ne doit pas
être couvert pour éviter les dommages et/ou une surchauffe possib-
le. Les moteurs et composants électriques doivent être uniquement
ouverts et réparés par des professionnels. Dans le cas contraire, la
garantie s’éteint immédiatement. Utilisez le nettoyeur que pour le
champ d’application et les conditions défi nies dans les instructions
de service.
Attention ! Avant d’enlever le nettoyeur de la piscine, assurez-vous
que l‘appareil soit complètement hors tension.
Position du bloc d’alimentation
Le bloc d’alimentation du nettoyeur doit être placé de telle sorte
qu‘il puisse atteindre toutes les parties et recoins dans la piscine.
Pour des raisons de sécurité, le bloc d’alimentation doit être positi-
onné au moins à 3,5 m du bord de la piscine. Voir l’image 1
Fixez le bloc d‘alimentation avec le cordon de sécurité fourni (fi gure
13). Attention! Pendant le fonctionnement, le bloc d’alimentation
doit être positionné à un endroit ombragé.
FR

13
061023_v1901
Vérifi er le contenu de la livraison
REMARQUE ! Risque d’endommagement ! Le produit est susceptible
d’être endommagé si vous ouvrez son emballage sans précaution, à
l’aide d’un couteau tranchant ou tout autre objet pointu. Soyez donc
particulièrement vigilant lors de l‘ouverture de l’emballage.
■ Retirez le produit de l’emballage.
■ Veuillez vérifi er que le contenu de la livraison est complet. Croquis/
photo L1.
■ Vérifi ez l‘absence de dommages sur l’article et ses différents compo-
sants. Si vous veniez à constater la présence d’un dommage, n’utilisez
le produit en aucun cas. Reportez-vous alors à l’adresse du service
compétent indiqué à la fi n du mode d’emploi.
Structure du nettoyeur de piscine
Le Speedcleaner APPcontrol se compose de l’unité de commande et de
l’unité de nettoyage. Ci-dessous fi gurent les composants du nettoyeur.
I’image 2 :
A : Écran
B : Connexion 230 V
C : Connexion de l’aspirateur de fond
Composants du nettoyeur de piscine
I’image 3 :
1) Poignée
2) Unité de fi ltrage
3) Cylindre d’entraînement
4) Roulement du cylindre d’entraînement
5) Courroie d’entraînement
6) Garniture latérale
7) Câble fl ottant
8) Bloc moteur
9) Roue d’entraînement
10) Hélice
11) Insert de buse
12) Cadre
13) Couvercle supérieur
14) Le bloc d’alimentation
Préparation
Immergez le fi ltre dans l’eau en le tenant par l’anneau de suspension
(I’image 4). Après que le nettoyeur ait perdu l’air lentement, le robot doit
être complètement vide d’air, sinon le travail normal est perturbé.
Il plonge alors indépendamment vers le fond.
Attention ! Pour des performances optimales, laissez s’échapper l’air
complètement du nettoyeur avant d’allumer l’appareil (il n’y a plus de
bulles qui s’échappent du nettoyeur et celui-ci repose complètement au
fond de la piscine).
Branchement au secteur
Si le nettoyeur repose complètement au fond de la piscine, prenez le
câble d’alimentation, étalez-le et insérez la fi che dans la prise du bloc
d’alimentation. Ensuite, connectez le câble à la prise (veuillez faire at-
tention que les fi ches sont connectés dans le bon sens et dans la bonne
position) et serrez les écrous sur les deux extrémités. Branchez le cordon
d’alimentation au secteur. Le nettoyeur de piscines est prêt à l’emploi.
Maniement
NO Signifi ca-
tion
Commande Fonction
1Marche/
Arrêt
Bouton
Marche ou
Arrêt
■ Si vous appuyez sur ce bouton,
la machine est mise en marche.
■ Si vous appuyez deux fois sur
ce bouton, la machine fonction-
nera dans le mode sélectionné.
■Si vous appuyez sur ce bouton
une troisième fois, la machine
s’arrête
Modes Choisissez un mode différent
pour des fi ns différentes.
2 Mode
l‘image 5
Le mode « All » fait la machine
nettoyer la paroi de la piscine et la
ligne d’eau (une fois le mur, une
fois le fond)
l‘image 6
Le mode « WALL » permet de
nettoyer seulement la paroi de la
piscine.
l‘image 7
Le mode « FLOOR » permet de
nettoyer seulement le fond de la
piscine.
l‘image 8
Le mode « ALL + FLOOR » fait
la machine nettoyer le fond de la
piscine trois fois puis la paroi une
fois.
Durée d’ac-
tivité
Unterschiedliche Arbeitszeiten
für unterschiedliche Zwecke
3 Durée l‘image 9
1H 2H 3H indiquent
des durées d’activité
différentes
Indique le statut de la machine
4Voyant Statut de
l’activité
Deux ou
trois voyants
allumés
La machine est
arrêtée
1H clignote
lentement
Machine en
marche pendant 1
heure
2H clignote
lentement
Machine en
marche pendant 2
heures
3H clignote
lentement
Machine en
marche pendant 3
heures
Tous les
voyants sont
allumés
Mode ALL actif
Voyant WALL
allumé Mode WALL actif
Voyant
FLOOR
allumé
Mode FLOOR
actif
Voyants
ALL+ FLOOR
allumés
Mode ALLFLOOR
actif
ALL>>
WALL>>
FLOOR
clignotent
Manuel : en avant
FLOOR>>
WALL>>
ALL clignotent
Manuel : en
arrière
3H>>2H>>1H
clignotent
Manuel : tourner à
gauche
1H>>2H>>3H
fl ash
clignotent
Manuel : tourner à
droite
Tous les voy-
ants clignotent
lentement
Auto run pour ter-
miner la course
Vous pouvez aussi commander le Speedcleaner APPcontrol via une
application en utilisant le lien suivant (Android + IOS) : I’image 14
FR

14
061023_v1901
Bluetooth pour smartphone
(en option) I’image 10
NO Voyant Fonction
1 Statut Bluetooth ■Déconnecté
■Connecté
2Recherche d’un
signal
Appuyez pour commencer à rechercher
le signal Bluetooth
3▲Marche manuelle en avant
4 ▼ Marche manuelle en arrière
5◄Tourner manuel à gauche
6► Tourner manuel à droite
7 Arrêt Arrêt manuel de la machine
8Mode
■ Mode fond de la piscine
■Mode paroi de la piscine
■ Mode une fois fond, une fois paroi de
la piscine
■ Mode trois fois fond, une fois paroi de
la piscine
9Démarrage ou
arrêt automatiques
■ Démarrage automatique ; travaille
dans le mode sélectionné
■ ARRÊT : arrêt de l’activité automatique
Attention: ► & ◄ doivent être appuyés constamment.
Soins et maintenance
Le nettoyeur s’éteindra automatiquement après un cycle de nettoyage.
Débranchez le cordon d’alimentation, tirez légèrement sur le câble et
levez le nettoyeur hors de l’eau par l’anneau sur l’écrou de serrage.
Attention !
Lorsque vous enlevez le nettoyeur de la piscine, vous devez vous assur-
er que le fi ltre ne se cogne pas contre la paroi de la piscine, sinon vous
risquez de rayer à la fois le nettoyeur et le liner.
Avant le nettoyeur quitte la surface de l’eau, tenez-le également pendant
10 à 15 secondes pour permettre à l’eau dans le fi ltre de s’écouler à
travers la sortie d’eau dans la piscine. Seulement ensuite vous pouvez
poser le nettoyeur au bord de la piscine.
Nettoyer le plateau du fi ltre I’image 11
■ Soulevez la poignée du bac
■ Retirez le bac du fi ltre
■ Faites glisser le clip pour ouvrir le bac
■ Sortez les glissières
■ Nettoyez le bac
Remettez le plateau de fi ltre en place I’image 12
La machine est équipée d’une glissière pour guider le fi ltre dans le
nettoyeur et le fi xer fermement avec le clip.
Conseils et astuces
Chaque fois que le nettoyeur est mis hors de l’eau, l’insert du fi ltre doit
être nettoyé.
La valeur PH de l’eau doit être comprise entre 7,0 et 7,2. Assurez-vous
que la température de l’eau soit située entre 10° C et 32° C.
Après chaque nettoyage, la chenille d’entraînement doit être nettoyée
à fond pour qu’elle ait la même adhérence sur la paroi lors du prochain
nettoyage.
Après avoir appuyé sur le bouton « Power off », le bouton « Power on »
ne peut pas être actionné pendant 30 secondes.
Nous vous recommandons de conserver le nettoyeur entre 10°C et 32°C
dans un endroit ombragé et bien ventilé. La lumière directe du soleil doit
toujours être évitée ! Nous vous recommandons d’installer l’unité de com-
mande avec une corde de sécurité pour empêcher que le bloc d’alimen-
tation ne soit entraîné dans la piscine par le nettoyeur.
Avant d’utiliser l’appareil, lisez attentivement les instructions de dépan-
nage.
Diagnostic
Diagnostic
Voyant Signifi cation Suggestion
1H clignote
rapidement, un
signal sonore
retentit
La machine est
hors de l’eau
Remettez la machine
dans l’eau ou attendez
qu’elle redémarre au-
tomatiquement
Tous les voyants
clignotent rapide-
ment, un signal
sonore retentit
Surcharge du
bloc d’alimen-
tation
Arrêtez la machine et
contactez de service de
vente
1H+2H+3H
clignotent rapide-
ment, un signal
sonore retentit
De l’eau
est entrée
dans la boîte
d’étanchéité
Arrêtez la machine et
contactez de service de
vente
ALL+1H
clignotent rapide-
ment, un signal
sonore retentit
Surcharge de la
pompe
Arrêtez la machine et
vérifi ez la roue et la
pompe
WALL+2H
clignotent rapide-
ment, un signal
sonore retentit
Surcharge du
moteur 1
Arrêtez la machine et
vérifi ez la courroie et le
système de transmission
FLOOR+3H
clignotent rapide-
ment, un signal
sonore retentit
Surcharge du
moteur 2
Arrêtez la machine et
vérifi ez la courroie et le
système de transmission
ALL+WALL+1H
+2H clignotent
rapidement, un
signal sonore
retentit
Erreur de
voltage
Arrêtez la machine et
contactez de service de
vente
ALL+WALL
+FLOOR
clignotent rapide-
ment, un signal
sonore retentit
Erreur de com-
munication
Vérifi ez le câble entre le
nettoyeur et le bloc d’ali-
mentation ou contactez le
service de vente
WALL+FLOOR+
2 H+3H
clignotent rapide-
ment, un signal
sonore retentit
La machine est
hors de l’eau et
ne démarre pas
Arrêtez le redémar-
rage automatique de la
machine et démarrez-la
manuellement après avoir
effectué un nettoyage
WALL clignote
rapidement, un
signal sonore
retentit
La machine
s’est retournée
Remettez la machine
debout manuellement
Informations importantes
Caractéristiques techniques
■ Tension d’entrée : 220(230) VAC
■ Fréquence : 50 Hz
■ Tension de sortie : DC (courant continu) 24 V
■ Puissance nominale : 200 W
■ Longueur du câble : 18 m
■ Largeur du tambour de nettoyage : 465 mm
■ Surface à nettoyer max. dans la piscine : 270 mÇ
■ Performance de fi ltrage : 20mÑ/h
■ Finesse du fi ltre : 180 μm
■ Température de service (eau) : 10°C - 32°C
■ Vitesse de glissement : 12m/min
■ Classe de résistance hydrolytique : Nettoyant : IPX8 ; Bloc d’alimen-
tation : IPX5
■ Température ambiante : 10°C - 32°C
■ Poids du nettoyeur : 12,5 kg (sans câbles)
FR

15
061023_v1901
Service
Ne renvoyez pas l’appareil sans en être invité, mais adressez-vous au
préalable à notre centre de service ! Si le produit doit être envoyé, il est
nécessaire de l’emballer soigneusement et d’y joindre la facture (copie).
Une fois que nous avons reçu l’appareil, il est vérifi é par notre départe-
ment des contentieux et réparé. Après avoir terminé, votre appareil vous
sera retourné aussi rapidement que possible. Si la garantie ne s’applique
pas à votre cas, les frais encourus seront facturés. Les demandes en ga-
rantie sont traitées par la société Steinbach VertriebsgmbH. Les produits
seront réparés par la société Steinbach VertriebsgmbH. Puisque aucun
droit de retour n’existe, ils ne seront pas repris.
Nettoyage
Pour procéder au nettoyage de l’appareil, veillez à utiliser des produits
d‘entretien usuels. N’utilisez en aucun cas des produits de nettoyage à
base de solvants ou abrasifs, voire des éponges, brosses dures, etc.
Stockage
Une fois le nettoyage terminé, il convient de sécher le produit convenab-
lement. Stockez ensuite le produit dans un endroit sec et à l’abri du gel.
Élimination
Mise au rebut de l’emballage : Les matériaux qui composent nos
emballages ont été sélectionnés en fonction de critères écologiques, de
même que pour leur facilité d’élimination, et sont, de fait, recyclables.
Veillez à bien jeter les éléments en papier et carton dans le bac de collec-
te de papier usagé, et les fi lms plastiques dans le bac de recyclage.
Mise au rebut du produit : Les dispositions en vigueur au sein de l’Uni-
on européenne et dans les autres États européens dotés de systèmes de
tri sélectif des matières recyclables sont applicables. Veillez à mettre le
produit au rebut conformément aux dispositions et législations en vigueur
dans votre lieu de résidence.
Conditions d’application de la garantie
Les dispositions légales en matière de garantie en vigueur dans le pays
concerné sont applicables. Pour l’Autriche et l’Allemagne, le délai de
garantie correspond à 2 ans à compter de la date de facturation.
La garantie quant à la sécurité de fonctionnement et la fi abilité par le
fabricant est assurée uniquement sous les conditions suivantes :
■ Le nettoyeur de fond est utilisé conformément aux instructions de ser-
vice.
■ Pour les réparations, uniquement des pièces de rechange d‘origine
doivent être utilisées (les pièces d‘usure ne sont pas couvertes par la
garantie).
FR

16
061023_v1901
Premessa
Grazie per aver acquistato questo prodotto Steinbach. Ci dedichiamo
costantemente all’ulteriore sviluppo dei nostri prodotti. Se nonostante
ciò questo prodotto dovesse presentare dei difetti, vi porgiamo le nostre
scuse e vi preghiamo cortesemente di contattare il nostro servizio di
assistenza.
Leggere e conservare le istruzioni per l’uso
Istruzioni per l’uso per Steinbach pulitore per piscina APPcontrol
Queste istruzioni per l’uso appartengono al prodotto indicato. Conten-
gono informazioni importanti per la messa in funzione e l’utilizzo. Prima
di utilizzare questo prodotto leggere attentamente le istruzioni per l’uso,
in particolar modo le indicazioni per la sicurezza. La mancata osserva-
nza di queste istruzioni per l’uso può avere come conseguenza gravi
lesioni o danni al prodotto. Le istruzioni per l’uso si basano sulle norme
e sulle regole dell’Unione europea. Osservare le disposizioni e le leggi
specifi che per i paesi esteri. Conservare le istruzioni per l’uso la futura
consultazione e all’occorrenza consegnarle anche a terzi.
Utilizzo conforme all’uso
Il prodotto è stato concepito esclusivamente per l’uso privato e non per
l’uso commerciale.
Il nostro Speedcleaner APPcontrol è un robot nuovissimo, potente e
automatico progettato per la pulizia delle piscine. Grazie al suo avanz-
ato programma computerizzato pulisce il fondo e le pareti della piscina
senza che questa venga precedentemente svuotata. Filtra contempora-
neamente l’acqua e ne elimina i residui e i sedimenti. Poiché il pulitore
funziona con corrente continua 24V garantisce la massima sicurezza
durante il funzionamento. Leggere attentamente queste istruzioni per
poterlo utilizzare correttamente. Utilizzare questo prodotto solo secondo
le modalità descritte nelle presenti istruzioni per l’uso. Qualsiasi altro
utilizzo viene considerato come non conforme all’uso e può provocare
danni materiali e addirittura lesioni a persone. Questo articolo non è un
giocattolo. Il produttore o il rivenditore non si assume alcuna responsa-
bilità per danni derivanti dall’utilizzo non conforme o scorretto.
Avvertenze e indicazioni di sicurezza
Leggere e seguire tutte le istruzioni. In caso di mancata osserva-
nza di queste avvertenze bisogna attendersi danni alla proprietà,
gravi lesioni o la morte. Le avvertenze sul prodotto, le istruzioni
e le norme di sicurezza comprendono molti rischi e pericoli, ma
non tutti quelli possibili. Si prega di fare attenzione e di valutare i
possibili pericoli. L’utilizzo scorretto del prodotto può provocare
situazioni che mettono a rischio la vita.
Attenzione! Al fi ne di evitare pericoli, lasciare che siano i profes-
sionisti qualifi cati a occuparsi delle riparazioni. Rivolgersi a un
centro specializzato. I diritti di garanzia decadono nel caso di ripa-
razioni eseguite autonomamente, montaggio improprio o utilizzo
scorretto. Per le riparazioni possono essere utilizzati solo pezzi di
ricambio che corrispondono ai dati di prodotto originali
AVVERTENZA! Pericoli per bambini e persone con ridotte capacità
psichiche,sensoriali o mentali (per esempio persone parzialmente
disabili, persone anziane con ridotte capacità psichiche e mentali)
o ridotta esperienza e conoscenza. I bambini non possono giocare
con questo prodotto. La pulizia non deve essere effettuata da bam-
bini o persone con ridotte capacità psichiche, sensoriali o mentali.
AVVERTENZA! Pericolo di danneggiamento! L’uso improprio di
questo prodotto lo può danneggiarlo.
Pericolo di scosse elettriche! La scorretta installazione elettrica
o l’eccessiva tensione di rete possono provocare scosse elettri-
che. Collegare il prodotto solo se la tensione di rete della presa di
corrente corrisponde ai dati tecnici indicati. Collegare il prodotto
solo a una presa di corrente accessibile, in modo da poter staccare
velocemente il prodotto dalla rete in caso di anomalie. Non usare
il prodotto se presenta danni visibili o se il cavo di alimentazione
o la spina sono difettosi. Come protezione aggiuntiva si consiglia
l’installazione di un interruttore differenziale (FI/RCD) con una cor-
rente applicata di misurazione non superiore a 30 mA. Consultare
il proprio installatore di impianti elettrici specializzato.
Aprire il prodotto soltanto solo in base a quanto indicato nelle
presenti istruzioni. Al fi ne di evitare situazioni di pericolo far
effettuare le riparazioni solo da personale specializzato. Rivolgersi
a un centro specializzato. I diritti di garanzia decadono nel caso di
riparazioni eseguite autonomamente, modifi che del prodotto, col-
legamento scorretto o utilizzo improprio. Questo prodotto contiene
parti elettriche e meccaniche indispensabili per proteggersi contro
le fonti di pericolo.
Non afferrate mai la spina con le mani umide. Non tirare mai la spi-
na dalla presa afferrando il cavo di alimentazione, bensì afferrate
sempre la spina di alimentazione. Tenere il prodotto, la spina e tutti
i cavi al di fuori dalla portata da fi amme libere e superfi ci roventi.
Posare il cavo di alimentazione in modo da non inciampare e non
interrarlo. Posare il cavo in modo che non venga danneggiato da
rasaerba e apparecchi simili. Non piegare il cavo di alimentazione
e non farlo passare su spigoli vivi. Non utilizzare prolunghe, prese
multiple o altri adattatori.
Per prevenire gravi danni al dispositivo non azionarlo mai fuori
dall’acqua! Il dispositivo deve essere collegato solo a una presa
a terra da 230 V. Quando il dispositivo si trova in acqua non ci
devono essere persone all’interno della piscina. Il pulitore non è
un giocattolo. Per una prestazione ottimale, lasciare fuoriuscire
tutta l’aria prima di accendere il dispositivo (in questo modo non
usciranno più bolle d’aria dal pulitore e questo resterà ben anco-
rato al fondo della piscina). Non tentare di muovere i galleggianti
lungo il cavo elettrico. Lasciarli nella posizione iniziale. Prima di
attivare il dispositivo assicurarsi che il cavo galleggiante rimanga
morbido per evitare eventuali attorcigliamenti. Gli attorcigliamenti
del cavo possono nel caso peggiore causare danni al pulitore e
compromettere l’effi cacia di pulizia. Al termine di ogni utilizzo il
contenitore dei fi ltri comprese le bustine fi ltro devono essere im-
mediatamente puliti. In questo modo si eviterà che le bustine fi ltro
sporche compromettano il normale funzionamento del pulitore.
Quando il pulitore non viene utilizzato deve essere riposto in un
luogo ombroso e ben areato. Evitare la luce solare diretta. Durante
il funzionamento la centralina di controllo/l‘alimentatore del pu-
litore deve trovarsi in un posto ombroso. Per prevenire probabili
danni e/o il surriscaldamento non coprire la centralina di control-
lo/l‘alimentatore. I motori e le parti elettriche devono essere aperti
e riparati solo da personale esperto. In caso contrario la garanzia
decade immediatamente. Utilizzare il pulitore solo in conformità
all’ambito di lavoro e alle condizioni riportati in questo manuale di
istruzioni.
Attenzione: Prima di estrarre il pulitore dalla piscina, assicurarsi
che la corrente sia completamente disattivata.
Posizione dell’alimentatore
L’alimentatore del pulitore deve essere posizionato in maniera che
questo possa raggiungere tutti gli angoli e i lati della piscina. Per
motivi di sicurezza l’alimentatore deve trovarsi ad una distanza
minima di 3,5 m dal bordo della piscina. Vedi fi gura 1
Fissare l‘alimentatore al cavo di sicurezza fornito in dotazione (fi -
gura 13). Attenzione: Durante il funzionamento l’alimentatore deve
trovarsi in una zona ombreggiata.
Controllare il volume di fornitura
AVVISO! Pericolo di danneggiamento! Se si apre incautamente la con-
fezione con un coltello affi lato o altri oggetti appuntiti, il prodotto potreb-
be danneggiarsi. Fare quindi molta attenzione nell’aprire la confezione.
■ Estrarre il prodotto dall’imballaggio.
■ Controllare che la fornitura sia completa. Schizzo/foto L1.
■ Controllare se l’articolo o le singole parti presentano danni. In tale
eventualità non utilizzare il prodotto. Rivolgersi all’indirizzo del servi-
zio assistenza clienti indicato nelle istruzioni.
Montaggio del pulitore per piscine
Lo Speedcleaner APPcontrol è costituito dal pannello di controllo e
dall’unità di pulizia. Di seguito sono elencati i componenti del pulitore.
Figura 2:
A: Display
B: Attacco 230V
C: Attacco dell’aspiratore
IT

17
061023_v1901
Componenti del pulitore per piscina
Figura 3:
1) Maniglia
2) Unità fi ltrante
3) Rullo di trasmissione
4) Cuscinetto per rullo di trasmissione
5) Cinghia di trasmissione
6) Rivestimento laterale
7) Cavo galleggiante
8) Unità motore
9) Ruota motrice
10) Propulsore
11) Inserto per ugello
12) Telaio
13) Parte superiore del coperchio
14) L’alimentatore
Preparazione
Immergere in acqua il pulitore appeso all’anello di fi ssaggio (fi gura 4).
Dopo che il pulitore ha eliminato pian piano tutta l’aria (il pulitore deve
essere totalmente privo di aria per non comprometterne il normale
funzionamento) si immerge da solo in profondità.
Attenzione: Per una prestazione ottimale, assicurarsi che il pulitore
abbia eliminato tutta l’aria (non fuoriescono più bolle d’aria dal pulitore e
questo resterà ben ancorato al fondo della piscina).
Collegamento della fonte di alimentazione
Una volta posizionato completamente il pulitore sul fondo della piscina,
prendere il cavo di alimentazione, distenderlo e collegare la spina alla
presa sulla l’alimentatore. Quindi collegare il cavo alla presa (duran-
te il collegamento del cavo fare attenzione che la spina si trovi nella
direzione e posizione esatta) e serrare i dadi su entrambe le estremità.
Collegare il cavo alla fonte di alimentazione.
Ora il pulitore per piscine è pronto all’uso.
Utilizzo
NR. Simbolo Signifi cato Funzione
1ON/OFF Accensione o
spegnimento
■Premendo questo pulsante la
macchina si accenderà.
■Premendo questo pulsante la
macchina lavorerà alla modalità
selezionata.
■Premendo questo pulsante la
macchina si spegnerà.
Opzioni
relative alle
modalità
Scegliere una modalità differ-
ente per scopi diversi.
2 Mode
Figura 5
Con la modalità “ALL” (TUTTO),
la macchina pulisce il pavimento,
le pareti e la linea dell’acqua della
piscina (una volta le pareti e poi
una volta il pavimento).
Figura 6
Con la modalità “WALL” (PARETI),
la macchina pulisce solo le pareti
della piscina.
Figura 7
Con la modalità “FLOOR” (PAVI-
MENTO), la macchina pulisce solo
il pavimento della piscina.
Figura 8
Con la modalità “ALL + FLOOR”,
la macchina pulisce il pavimento
della piscina per tre volte e poi
sale una volta sulle pareti.
Opzione
relativa alla
durata di
lavoro
Durate di lavoro diverse per
scopi differenti.
3 Time Figura 9 1H / 2H / 3H stanno a indicare le
varie durate di lavoro.
Indicare lo stato della macchina
4Indica-
tore
Stato di
lavoro
Due o tre indi-
catori inseriti
Macchina ar-
restata
1H lampeggia
lentamente
Macchina in funzi-
one per 1 ora
2H lampeggia
lentamente
Macchina in funzi-
one per 2 ore
3H lampeggia
lentamente
Macchina in funzi-
one per 3 ore
ALL acceso In funzione in
modalità ALL
WALL acceso In funzione in
modalità WALL
FLOOR
acceso
In funzione in
modalità FLOOR
ALL+ FLOOR
acceso
In funzione in
modalità ALL+-
FLOOR
ALL>>
WALL>>
FLOOR
lampeggiano
in sequenza
Manuale: avanti
FLOOR >>
WALL>> ALL
lampeggiano
in sequenza
Manuale: indietro
3H>>2H>>1H
lampeggiano
in sequenza
Manuale: svolta a
sinistra
1H>>2H>>3H
lampeggiano
in sequenza
Manuale: svolta a
destra
Tutte le luci
lampeggiano
lentamente
Funzionamento
automatico termi-
nato
Vi è anche la possibilità di comandare Speedcleaner APP control tra-
mite APP. Se ne può usufruire al seguente link (Android + IOS): Figura
14.
Bluetooth per smartphone
(opzionale) Figura 10
NR. Indicatore Funzione
1 Stato del Bluetooth ■ scollegato
■ collegato
2Ricerca del segnale Premere per la ricerca del segnale
Bluetooth
3▲Avanzamento manuale
4 ▼ Retromarcia manuale
5◄Svolta a sinistra manuale
6►Svolta a destra manuale
7Simbolo di stop Arresto manuale della macchina
8 Modalità
■ Modalità per la pulizia del pavimento
■ Modalità per la pulizia delle pareti
■ Modalità per la pulizia una volta del
pavimento e una volta delle pareti
■ Modalità per la pulizia tre volte del
pavimento e una volta delle pareti
9 Auto play o stop
■ Auto play: in funzione con la modalità
selezionata
■ STOP: arresto del funzionamento au-
tomatico
Attenzione: ► e ◄ devono essere tenuti premuti costantemente.
IT

18
061023_v1901
Cura e manutenzione
Il pulitore si spegne automaticamente dopo un ciclo di pulitura. Scol-
legare il cavo di alimentazione, tirare leggermente il cavo e sollevare il
pulitore dall’anello sul dado di serraggio per estrarlo dall’acqua.
Attenzione:
Durante l’estrazione del pulitore dalla piscina bisogna fare attenzione
che questo non sbatti contro le pareti della vasca altrimenti potreste
graffi are sia il pulitore che il rivestimento.
Prima che il pulitore lasci totalmente la superfi cie dell’acqua, tenerlo
sospeso 10-15 secondi affi nché tutta l’acqua rimasta all’interno possa
fuoriuscire e defl uire in piscina. Ora potete appoggiare il pulitore sul
bordo della piscina.
Pulizia del vassoio del fi ltro Figura 11
■ Sollevare la maniglia del vassoio
■ Estrarre il vassoio del fi ltro
■ Far scorrere la clip e aprire il vassoio
■ Rimuovere le guide
■Pulire il vassoio
Riposizionare il vassoio del fi ltro Figura 12
La macchina ha una guida per riposizionare il vassoio del fi ltro nel
pulitore e riagganciare la maniglia perfettamente in posizione.
Suggerimenti e consigli
Ogni volta che il pulitore viene tolto dall’acqua il set di fi ltri deve essere
pulito.
Assicurarsi che il pH dell’acqua sia di 7.0 - 7.2.
Assicurarsi che la temperatura dell’acqua sia tra i 10°C e i 32°C.
Dopo ogni ciclo di pulizia il cingolo deve essere pulito accuratamente
per potere ottenere la stessa aderenza alla parete durante il ciclo
seguente.
Dopo avere premuto il tasto “Power Off”, il tasto “Power On” non può
essere premuto per i successivi 30 secondi.
Si consiglia di conservare il pulitore in un luogo ombreggiato e ben are-
ato ad una temperatura compresa tra i 10°C e i 32°C. Evitare sempre
la luce solare diretta!
Si consiglia di fi ssare l’unità di controllo con una corda di sicurezza per
evitare che l’adattatore CA venga trascinato in acqua dal pulitore.
Prima dell’utilizzo leggere attentamente le avvertenze circa la risoluzi-
one dei problemi.
Risoluzione dei problemi
Diagnosi
Indicatore Signifi cato Suggerimento
1H lampeggia
velocemente con
segnale sonoro
Macchina fuori
dall’acqua
Rimettere la macchina
nell’acqua o aspettare
fi no a quando la macchi-
na riparte automatica-
mente
Tutte le luci
lampeggiano
velocemente con
segnale sonoro
Sovraccarico
della l’alimen-
tatore
Arrestare la macchina e
contattare l’assistenza
1H+2H+3H
lampeggiano
velocemente con
segnale sonoro
Perdita della
scatola a tenuta
Arrestare la macchina e
contattare l’assistenza
ALL+1H
lampeggiano
velocemente con
segnale sonoro
Sovraccarico
della pompa
Arrestare la macchina
e controllare girante e
pompa
WALL+2H
lampeggiano
velocemente con
segnale sonoro
Sovraccarico
del motore di
movimento 1
Arrestare la macchina
e controllare cinghia e
sistema di trasmissione
FLOOR+3H
lampeggiano
velocemente con
segnale sonoro
Sovraccarico
del motore di
movimento 2
Arrestare la macchina
e controllare cinghia e
sistema di trasmissione
ALL+WALL+
1H+2H
lampeggiano
velocemente con
segnale sonoro
Il pulitore pre-
senta una tensi-
one anomala
Arrestare la macchina e
contattare l’assistenza
ALL+WALL+
FLOOR
lampeggiano
velocemente con
segnale sonoro
Comunicazione
anomala
Controllare il cavo tra il
pulitore e l’alimentatore o
contattare l’assistenza
WALL+FLOOR
+2H+3H
lampeggiano
velocemente con
segnale sonoro
Macchina fuori
dall’acqua che
non è stata in
grado di riav-
viarsi
Arrestare la macchina e
riavviarla manualmente
dopo l’immersione del
pulitore
WALL lampeggia
velocemente con
segnale sonoro
Macchina
ribaltata
Rigirare la macchina
manualmente
Informazioni importanti
Specifi che tecniche
■ Tensione in ingresso: 220(230) VAC
■ Frequenza: 50 Hz
■ Tensione in uscita: DC (corrente continua) 24V
■ Potenza nominale: 200 W
■ Lunghezza del cavo: 18 m
■ Larghezza del tamburo autopulente: 465 mm
■ max. Superfi cie di pulizia della piscina: 270 mÇ
■ Potenza del fi ltro: 20mÑ/h
■ Finezza del fi ltro: 180 μm
■ Temperatura di esercizio (acqua): 10°C - 32°C
■ Velocità di scorrimento: 12m/min
■ Classe di tenuta all’acqua: Pulitore: IPX8; Alimentatore: IPX5
■ Temperatura ambiente: 10°C - 32°C
■ Peso del pulitore: 12,5 kg (senza cavo)
IT

19
061023_v1901
Gestione dei servizi
Si prega di non inviare a noi l’apparecchio di propria iniziativa, ma
di rivolgersi prima al nostro servizio assistenza! Qualora l’apparec-
chio debba essere ritirato è necessario imballarlo in modo sicuro e di
allegare la fattura (copia). Non appena l’apparecchio giungerà in sede
verrà controllato e i danni riparati dal nostro reparto reclami. Una volta
completata la riparazione l’apparecchio verrà rispedito immediatamente
al mittente. Se la spedizione non rientra nella garanzia i costi che ne
derivano verranno addebitati al cliente. La garanzia è materia dell’azien-
da Steinbach VertriebsgmbH. L’articolo verrà riparato dall’azienda Stein-
bach VertriebsgmbH, ma poiché non sussiste il diritto di restituzione non
verrà preso indietro.
Pulizia
Per la pulizia utilizzare detergenti disponibili in commercio. Non utiliz-
zare detergenti a base di solvente o strumenti di pulizia abrasivi come
spugne dure spazzole, ecc.
Deposito
Al termine della pulizia il prodotto deve essere asciugato adeguatamen-
te. Infi ne conservare il prodotto in un posto asciutto e al riparo dal gelo.
Smaltimento
Smaltimento dell’imballaggio I materiali dell’imballaggio sono stati
selezionati in base a criteri di ecocompatibilità e di smaltimento e per
questo motivo sono riciclabili. Gettare il cartone con la carta stracca e la
plastica da imballaggio nella raccolta per il riciclaggio.
Smaltimento del prodotto: Applicabile nell’Unione europea e altri stati
con sistemi di raccolta differenziata. Smaltire il prodotto in conformità
con le disposizioni e le leggi in vigore nel vostro luogo di residenza.
Condizioni di garanzia
Per la garanzia valgono le disposizioni di legge in vigore nei rispettivi
paesi. Nel caso dell’Austria e della Germania la garanzia è di 2 anni a
partire dalla data della fattura.
Il produttore si assume la garanzia relativa alla sicurezza operativa e
all’affi dabilità solo alle seguenti condizioni:
■ L’aspiratore viene utilizzato secondo le istruzioni riportate nel manua-
le.
■ Per le riparazioni vengono usati solo pezzi di ricambio originali (i pezzi
di usura non sono soggetti a garanzia).
IT

20
061023_v1901
Predgovor
Zahvaljujemo se vam za nakup izdelka Steinbach. Naše izdelke ves
čas razvijamo. Če bi se na izdelku vendarle pokazala napaka, se za
to opravičujemo in vas prijazno prosimo, da stopite v stik z našim servis-
nim centrom.
Navodila za uporabo preberite in shranite
Navodila za uporabo za Steinbach čistilec za bazen APPcontrol
Navodila za uporabo sodijo k zgoraj navedenemu izdelku. Vsebujejo po-
membne informacije o uporabi in ravnanju. Navodila, posebej varnostna
opozorila, skrbno preberite pred uporabo izdelka. Neupoštevanje na-
vodil lahko vodi do hudih poškodb ali okvar na vašem izdelku. Navodila
za uporabo temeljijo na standardih in predpisih, ki veljajo v Evropski
uniji. V tujini upoštevajte smernice in zakone, ki veljajo v vaši državi. Na-
vodila shranite za kasnejšo uporabo in jih po potrebi posredujte drugim
uporabnikom.
Predvideni pogoji uporabe
Izdelek je namenjen izključno za osebno uporabo in ni primeren za
komercialno uporabo.
Naš čistilec Speedcleaner APPcontrol je napreden, zmogljiv avtomatski
bazenski robot za čiščenje plavalnih bazenov. Zaradi svojega napred-
nega računalniškega programa, lahko očisti dno in stene bazena, brez
predhodnega izpraznjevanja bazena. Hkrati fi ltrira vodo in odstranjuje
plavajoče snovi in usedline. Ker čistilec deluje z 24 V enosmernim
tokom, zagotavlja v času obratovanja visoko stopnjo varnosti. Prosimo,
da skrbno preberete ta navodila za uporabo, da boste čistilec lahko
pravilno upravljali. Izdelek uporabljajte izključno v skladu z opisom v
navodilih. Kakršnakoli druga uporaba ni predvidena in lahko povzroči
materialno škodo ali celo telesne poškodbe. Izdelek ni otroška igrača.
Proizvajalec ali trgovec ne prevzema odgovornosti za škodo, ki nastane
zaradi nepredvidene ali nepravilne uporabe.
Opozorila in varnostni napotki
Vse napotke preberite in jih upoštevajte. Ob neupoštevanju
varnostnih napotkov je treba računati na škodo na lastnini, druge
resne poškodbe ali smrt. Opozorila, navodila in varnostna pravila
zajemajo veliko tveganj, vendar pa ne vključujejo vseh možnih
tveganj in nevarnosti. Prosimo, bodite pozorni in pravilno ocenite
možna tveganja. Napačno rokovanje z izdelkom lahko vodi do
smrtno nevarnih situacij.
Pozor! Popravila prepustite strokovnjakom, zato da se izognete
nevarnostim. Pri tem sem obrnite na pooblaščeni servis. V primeru
samostojno izvedenih popravil, neustrezne montaže ali nepravil-
ne uporabe bodo jamstveni in garancijski zahtevki zavrnjeni. Pri
popravilih se smejo uporabljati le nadomestni deli, ki ustrezajo
prvotnim podatkom o napravi.
OPOZORILO! Nevarnosti za otroke in osebe z zmanjšanimi fi zič-
nimi, senzoričnimi ali mentalnimi sposobnostmi (na primer delnih
invalidih, starejših osebah z omejenimi fi zičnimi in mentalnimi
sposobnostmi) ali pomanjkanju izkušenj in znanj. Otroci se z izdel-
kom ne smejo igrati. Čiščenja ne smejo izvajati otroci ali osebe z
zmanjšanimi fi zičnimi, senzoričnimi ali mentalnimi sposobnostmi.
NAPOTEK! Možnost okvare! Zaradi nepravilnega ravnanja lahko
pride do okvare izdelka.
Nevarnost električnega udara! Nepravilna električna instalacija
ali previsoka omrežna napetost lahko povzročita električni udar.
Izdelek priključite le v primeru, da je omrežna napetost v vtičnici
skladna z navedenimi tehničnimi podatki. Izdelek priključite le
v dobro dostopno vtičnico, zato da ga lahko v primeru motenj
hitro izključite iz električnega omrežja. Izdelka ne uporabljajte, če
izkazuje vidne poškodbe ali če je kabel ali vtikač poškodovan. Kot
dodatna zaščita je priporočljiva instalacija zaščitnega stikala (FI/
RCD) z največjim prožilnim tokom 30mA. Za nasvet povprašajte
strokovnjaka.
Izdelek odprite samo skladno z navodili. Popravila prepustite
strokovnjakom, zato da se izognete nevarnostim. Za to se obrnite
na pooblaščeni servis. V primeru samostojno izvedenih popravil,
neustrezne montaže ali nepravilne uporabe bodo jamstveni in
garancijski zahtevki zavrnjeni. V izdelku so električni in mehanični
deli, ki so nujno potrebni za zaščito pred viri nevarnosti.
Vtikača nikoli ne prijemajte z vlažnimi rokami. Vtikača iz vtičnice
nikoli ne povlecite za kabel, ampak vedno primite vtikač. Izdelek,
vtikač in vsi kabli naj bodo zavarovani pred odprtim ognjem
in vročimi površinami. Kabel položite tako, da ne bo prišlo do
spotikanja, in ga ne zakopavajte. Vse kable položite tako, da jih
kosilnica in druge naprave ne bodo mogle poškodovati. Kabla ne
prepogibajte in ga ne polagajte okoli ostrih vogalov. Ne uporabljaj-
te podaljškov, razdelilcev ali drugih adapterjev.
Da bi preprečili večjo škodo na napravi, nikoli ne dovolite, da bi
delovala izven vode. Napravo je dovoljeno priklopiti samo v ozem-
ljeno vtičnico z zaščitnim vodnikom 230 V. Ko se naprava nahaja
v vodi, se v bazenu ne smejo nahajati osebe. Čistilec ni igrača. Za
optimalno zmogljivost zagotovite pred vklopom naprave izpust
vsega zraka (iz čistilca ne prihajajo več mehurčki in le-ta ostane
popolnoma na dnu bazena). Plovcev Plavalcev ne poskušajte
premikati vzdolž električnega kabla. Vedno jih pustite v prvotnem
položaju. Pred vklopom čistilca se prepričajte, da je plavalni kabel
povsem zrahljan, da preprečite zapletanje kabla. V najslabšem
primeru lahko zapletanje kabla pripelje do poškodbe čistilca in
lahko vpliva na učinek čiščenja. Po vsaki uporabi je potrebno po-
sodo s fi ltrirno vrečko nemudoma očistiti. S tem preprečite, da bi
umazane fi ltrirne vrečke vplivale na običajno obratovanje čistilca.
Dokler čistilca ne uporabljate, naj bo shranjen v senčnem in dobro
prezračenem prostoru. Preprečite neposredno sončno svetlobo. V
času obratovanja mora krmilna enota/napajalna enota čistilca stati
na senčnem mestu. Krmilne enote/napajalno enoto ne pokrivajte,
da tako preprečite možne poškodbe in/ali pregretje. Motorje in
električne dele lahko odpirajo in popravljajo samo strokovno uspo-
sobljene osebe. V nasprotnem primeru to pripelje do neveljavnosti
garancijske pravice. Čistilce uporabljajte samo za delovno okolje
in pogoje dela, ki so navedeni v teh navodilih za uporabo.
Pozor: Preden vzamete čistilec iz bazena se prepričajte, da je po-
polnoma izklopljen iz elektrike.
Položaj napajalnika
Napajalnik čistilca je potrebno primerno namestiti, da lahko le-ta
doseže vse kote in konce bazena. Napajalnik mora biti zaradi
varnostnih razlogov oddaljen najmanj 3,5 m od roba bazena. Glej
sliko 1
Napajalno enoto pritrdite s priloženo varovalno vrvico (slika 13).
Pozor: Napajalnik naj v času obratovanja stoji na senčnem področ-
ju.
Preverite vsebino kompleta
NAPOTEK! Možnost okvare! Če boste embalažo neprevidno odprli z
ostrim nožem ali drugim ostrim predmetom, lahko pride do okvare izdel-
ka. Zato morate biti pri odpiranju previdni.
■ Izdelek vzemite iz embalaže.
■ Preverite, ali je vsebina popolna. Skica/Slika L1.
■ Preverite, ali je izdelek ali posamezni deli poškodovani. V primeru
poškodbe izdelka ne uporabljajte. Obrnite se na naslov servisnega
centra, ki je naveden na koncu navodil.
Sestava bazenskega čistilca
Čistilec Speedcleaner APPcontrol je sestavljen iz krmilne enote in
čistilne enote. V nadaljevanju so predstavljeni deli čistilca.
Slika 2:
A: Zaslon
B: Priključek 230 V
C: Priključek talnega sesalca
SL
Other manuals for APPcontrol
1
Table of contents
Languages:
Other Steinbach Swimming Pool Cleaner manuals

Steinbach
Steinbach Poolrunner Battery Pro User manual

Steinbach
Steinbach sunfun 061014BH User manual

Steinbach
Steinbach POOLRUNNER 00-61010 User manual

Steinbach
Steinbach Poolrunner User manual

Steinbach
Steinbach Twin User manual

Steinbach
Steinbach RX 5 User manual

Steinbach
Steinbach Speedcleaner Poolrunner S63 User manual