Bioquell ProteQ User manual

©Bioquell UK Ltd (2020). All rights reserved.
BIOQUELL PROTEQ USER MANUAL -EN
TD092-O&M-001
REVISION 5 DRAFT
Bioquell UK Ltd
52 Royce Close
West Portway
Andover
Hampshire SP10 3TS
T:
F:
E:
W:
+44 (0)1264 835 835
+44 (0)1264 835 836
info@bioquell.com
www.bioquell.com
Hydrogen Peroxide Vapour Decontamination
Suite
USER MANUAL

BIOQUELL PROTEQ USER MANUAL -EN
TD092-O&M-001
REVISION 5 DRAFT
Page 2 of 58
REV
Description
Date
C.R.No
Orig
Chkd
Apprd
3
Update to spec, US distance measurer & user
access
8th May 2019
CR3852
ORC
PM
REP
4
Addition of Flexi adaptor and Active directory
20 Feb 2020
CR4063
ORC
PM
REP
5
Addition of FDA requirement and new DoC
29 Oct 20
XXXXX
ORC
XX
XX
Bioquell designs, manufactures and supplies as a service a broad range of bio-
decontamination solutions for:
•rooms
•systems and processes
•laboratory equipment
•biomedical equipment
For further information and contact details refer to website www.bioquell.com
Hydrogen peroxide vapour is potentially dangerous if used incorrectly. It is essential that
the safety and operating instructions described in this manual are observed.
These are the Original Instructions
The Bioquell ProteQ is only to be used by personnel who have been trained by
Bioquell or their agents on its safe use. If the equipment is used in a manner not
specified by the manufacturer, the protection provided by the equipment may be
impaired.
United States of America only:
•The Bioquell Technology system hasbeen authorized by the United States Food
Drug and Administration (FDA) todecontaminate compatible N95 respirators
under an Emergency Use Authorization (EUA).
•The Bioquell Technology System has neither been cleared or approved by FDA, but
has been authorized for emergency use by FDA under an EUA for the
decontamination of compatible N95 respirators for single-user reuse by HCP to
prevent exposure to SARS-CoV-2 and other pathogenic biological airborne
particulates;
•The emergency use of the Bioquell Technology System is authorized only for the
duration of the declaration that circumstances exist justifying the authorization of
the emergency use of medical devices during the COVID-19 outbreak, under
Section 564(b)(1) of the Federal Food, Drug, and Cosmetic Act, 21 U.S.C. §
360bbb-3(b)(1), unless the declaration is terminated or authorization is revoked
sooner.
Report Adverse events, including problems with test performance or results, to MedWatch by submitting the
online FDA Form 3500 (https://www.accessdata.fda.gov/scripts/medwatch/index.cfm?action=reporting.home) or
by calling 1-800-FDA-1088
This equipment has been tested and found to comply with the limits for a Class A digital device,
pursuant to part 15 of the FCC Rules. These limits are designed to provide reasonable protection
against harmful interference when the equipment is operated in a commercial environment. This
equipment generates, uses, and can radiate radio frequency energy and, if not installed and used in
accordance with the instruction manual, may cause harmful interference to radio communications.
Operation of this equipment in a residential area is likely to cause harmful interference in which case
the user will be required to correct the interference at his own expense.

BIOQUELL PROTEQ USER MANUAL -EN
TD092-O&M-001
REVISION 5 DRAFT
Page 3 of 58
CONTENTS
1 SAFETY .................................................................................................. 4
1.1 Warning Labels .................................................................................. 7
2 UNPACKING INSTRUCTIONS ................................................................. 8
3 VAPOUR BIO-DECONTAMINATION PROCESS .........................................9
3.1 Process Sequence............................................................................... 9
3.1.1 Conditioning Phase ...................................................................................9
3.1.2 Gassing Phase ..........................................................................................9
3.1.3 Dwell Phase .............................................................................................9
3.1.4 Aeration Phase .........................................................................................9
4 PROTEQ DESCRIPTION ........................................................................ 11
4.1 Main Module Features & Connections .................................................. 11
4.1.1 Base Unit...............................................................................................11
4.1.2 Lectern.................................................................................................. 12
4.1.3 Aeration Unit (Optional)...........................................................................12
4.2 Hydrogen Peroxide Supply................................................................. 13
5 MOVING THE PROTEQ.......................................................................... 13
6 EQUIPMENT SET-UP ............................................................................ 14
6.1 Setting-up the ProteQ ....................................................................... 14
6.2 Measuring the room.......................................................................... 15
7 LOADING HYDROGEN PEROXIDE BOTTLES .......................................... 16
7.1 Bottle Indicators............................................................................... 16
7.2 Installing Hydrogen Peroxide Bottles................................................... 17
7.3 Fitting Insert for 950ml Bottle ............................................................ 19
7.4 Flexi Adaptor ................................................................................... 19
8 OPERATION ......................................................................................... 20
8.1 Running a Cycle ............................................................................... 20
8.2 Viewing Cycle Variables (Sensor units only) ......................................... 23
8.3 Aeration Only Cycle .......................................................................... 24
8.4 Printed Report.................................................................................. 24
8.5 Log OFF .......................................................................................... 25
8.6 Process Stop.................................................................................... 25
9 LOADING AN EXISTING PRE-PROGRAMMED CYCLE ............................. 26
10 CREATING A NEW CYCLE ................................................................... 27
11 SYSTEM ADMINISTRATION ............................................................... 29
11.1 System Information ........................................................................ 29
11.2 Time Zone, Daylight Saving and Region ............................................ 29
11.3 Date and Time ............................................................................... 29
11.4 Manage Users and Passwords........................................................... 29
11.4.1 Adding New Users .................................................................................30
11.4.2 Changing Access Level...........................................................................31
11.4.3 Deleting Users ...................................................................................... 31
11.4.4 Changing Password ...............................................................................31
11.4.5 Backing-up User and password data........................................................31
11.5 Network Administrator Functions ...................................................... 32
11.6 Audit Trail (Option) ......................................................................... 32
11.7 Data logging out of Cycle................................................................. 32
12 PACKING-UP...................................................................................... 33
13 OPERATING THE WIRELESS NETWORK (PAIRING)............................ 34
13.1 Changing the Wireless Network Colour .............................................. 34
13.2 Pairing a Lectern to a ProteQ Base Unit ............................................. 34
13.3 Joining Aeration units to the network ................................................ 35
13.4 Using the Wireless Repeater............................................................. 36
14 ROUTINE MAINTENANCE ................................................................... 37
14.1 User Routine Maintenance ............................................................... 37
14.1.1 Changing the Printer Paper ....................................................................37
BIOQUELL PROTEQ USER MANUAL -EN
TD092-O&M-001
REVISION 5 DRAFT
Page 4 of 58
14.1.2 Cleaning ..............................................................................................37
14.1.3 Hydrogen Peroxide Liquid.......................................................................38
14.2 Scheduled Maintenance ................................................................... 38
15 TROUBLE SHOOTING ......................................................................... 39
15.1 Software Cycle Interlocks ................................................................ 39
15.2 Warnings & Alarms ......................................................................... 40
15.3 Fault Finding .................................................................................. 47
16 SPECIFICATION................................................................................. 48
17 HAND HELD LOW LEVEL HYDROGEN PEROXIDE SENSOR ................... 50
18 DISTANCE MEASUREMENT DEVICE (OPTIONAL)................................ 51
19 PARTS LIST ....................................................................................... 52
19.1 Consumables ................................................................................. 52
19.2 Replacement Parts .......................................................................... 52
20 SCREEN NAVIGATION........................................................................ 53
21 DECLARATION OF CONFORMITY........................................................ 55
22 DEFAULT PASSWORDS ...................................................................... 56
1SAFETY
Safety instructions that must be observed when operating the Bioquell ProteQ
hydrogen peroxide system or handling the hydrogen peroxide bottles are listed
below.
Danger and Warning signs are used where there is potential hazard to
personnel.
The mandatory symbol is used to describe other safety precautions that
must be followed before operating the equipment.
HANDLING HYDROGEN PEROXIDE
Always wear gloves, long sleeves and eye protection when handling
Hydrogen Peroxide.
Exposure to HYDROGEN PEROXIDE LIQUID can cause burns and
blistering to the skin and tissue damage to the eyes. HYDROGEN
PEROXIDE VAPOUR can cause irritation to eyes, nose, throat, lungs and
skin, breathing difficulties and coughing.
IN ALL CASES SEEK MEDICAL ADVICE.
ACTION TO BE TAKEN ON EXPOSURE TO HYDROGEN PEROXIDE
EYES
Irrigate with sterile water for at least 10 minutes.
LUNGS
Remove casualty immediately to fresh air, rest and keep warm.
SKIN
Drench with water, remove clothing.
MOUTH
Rinse thoroughly with water and give plenty to drink.
SAFETY OBSERVANCE IS ESSENTIAL WHEN USING THIS EQUIPMENT.
READ THIS SECTION CAREFULLY BEFORE USING THE EQUIPMENT.
Only personnel who have been trained by Bioquell or their agents on the
safe use of the ProteQ should operate it.
BIOQUELL PROTEQ USER MANUAL -EN
TD092-O&M-001
REVISION 5 DRAFT
Page 5 of 58
HYDROGEN PEROXIDE VAPOUR IS HAZARDOUS
-Ensure that the enclosure to be gassed is sealed to prevent hydrogen
peroxide vapour escaping.
-Ensure that any possible points of entry are sealed, locked where
possible and warning signs displayed if appropriate.
-Ensure area to be gassed is free of any humans, animals and plants.
SPILLAGES
Mop up with plenty of water and run to waste, diluting at least 20:1.
POWER CONNECTION OF THE EQUIPMENT
Ensure the Bioquell ProteQ system modules are connected to
appropriately rated circuits which have an earth.
COMMUNICATION CONNECTIONS
If more than one system is in operation on a site, ensure each system is
on a separate network. This can be identified by the colour of the
wireless indicator, otherwise operational interference may occur
DURING A CYCLE
-Do not enter the area being bio-decontaminated
-A suitable portable H2O2detector should be used throughout the
cycle to monitor concentrations outside the area.
-If leak is detected, leak sealing and evacuation procedures should be
followed.
AT THE END OF AERATION
Before re-entering the area check that the vapour concentration is at, or
below, the countries Occupational Exposure Limit (OEL) (Long-term
exposure limit is 1ppm and short-term is 2ppm in the UK). In USA: the
Permitted Exposure Limit (PEL) has a Threshold Limit Value (TLV) of
1ppm for eight hours exposure a day.
IF THE CYCLE ABORTS DURING GASSING OR AERATION
-Check that the vapour concentration is at, or below, the OEL before
entering the enclosure
-If above the OEL, run further aeration cycles in accordance with
these instructions until the safe concentration level is reached.
EXTERNAL DISCHARGE OF VAPOUR
If a fixed ventilation system is used to exhaust, it must not allow
leakage of hydrogen peroxide vapours within the building. When the
HVAC is started, check that the room does not become heavily
pressurised, as this could cause the room sealing to become
compromised.
BIOQUELL PROTEQ USER MANUAL -EN
TD092-O&M-001
REVISION 5 DRAFT
Page 6 of 58
WARNING – EQUIPMENT DAMAGE
Operate only when located on a flat surface, and engage the brakes on
the ProteQ unit. Always remove Aeration units from the ProteQ base
unit, if present, before running a cycle.
Place the aeration units onto the floor in the correct position, do not drop
or throw to the ground. Carry units, do not move by kicking or dragging
along the floor
Do not use the aeration units as a step this will damage the equipment
BEFORE MOVING EQUIPMENT after cycle is complete always disconnect
power cables. Put away all equipment in the ProteQ base unit.
Repairs, maintenance or adjustments to the Bioquell ProteQ generator
must only be made by trained Bioquell personnel or their agents.
The equipment must be serviced in accordance with the Maintenance
Schedule to maintain safe performance.
DANGER – PERSONAL INJURY HAZARD
The ProteQ can weigh up to 86Kg (190 lbs), the lectern alone 9Kg (20 lbs)
and the aeration units weigh 10Kg (22 lbs). Appropriate lifting procedures
should be followed. Do not lift multiple aeration units.
When moving the ProteQ use the handles on either side of the bottle
module. Two aeration units can be transported in the ProteQ, any further
units should be transported using a suitable trolley and securing method.
The user should not open access panels. This should only be for Bioquell
trained service engineers.
When moving the ProteQ with bottles containing liquid ensure the bottle
engagement plunger is locked in its down position.
BIOQUELL PROTEQ USER MANUAL -EN
TD092-O&M-001
REVISION 5 DRAFT
Page 7 of 58
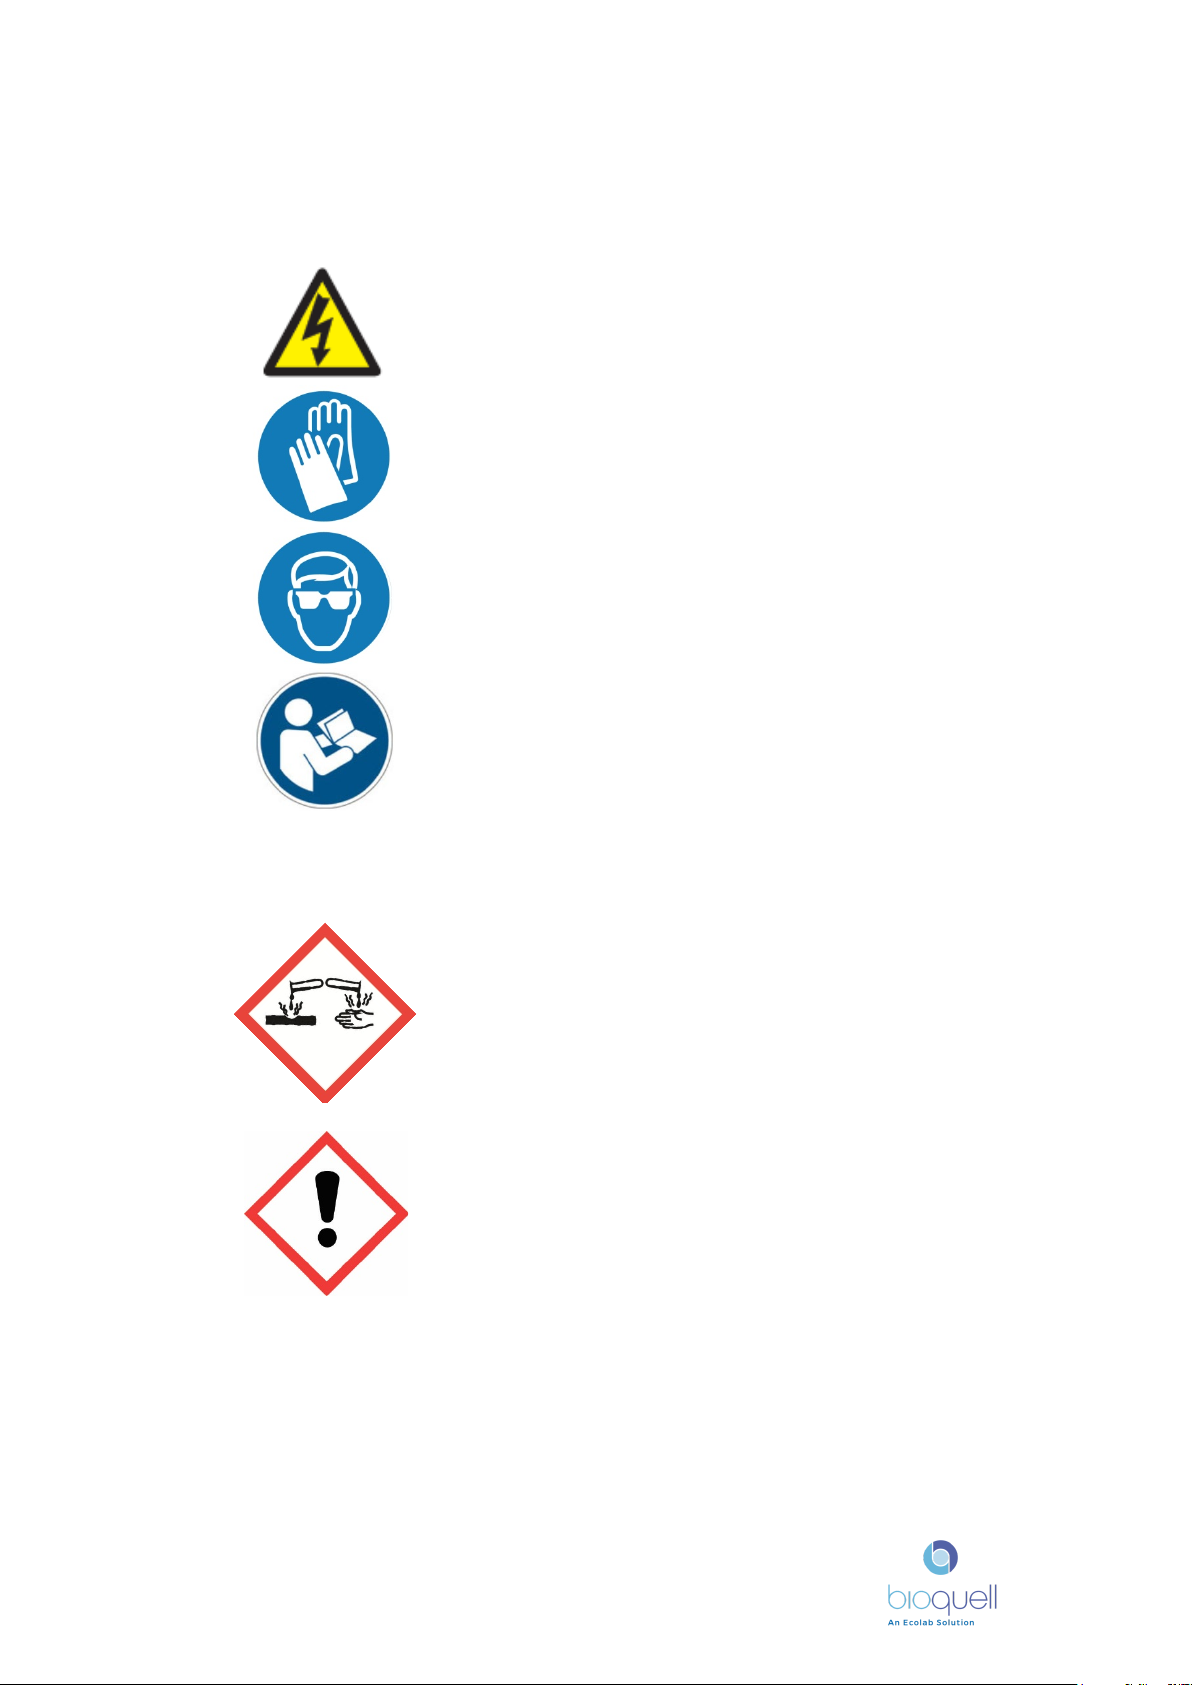
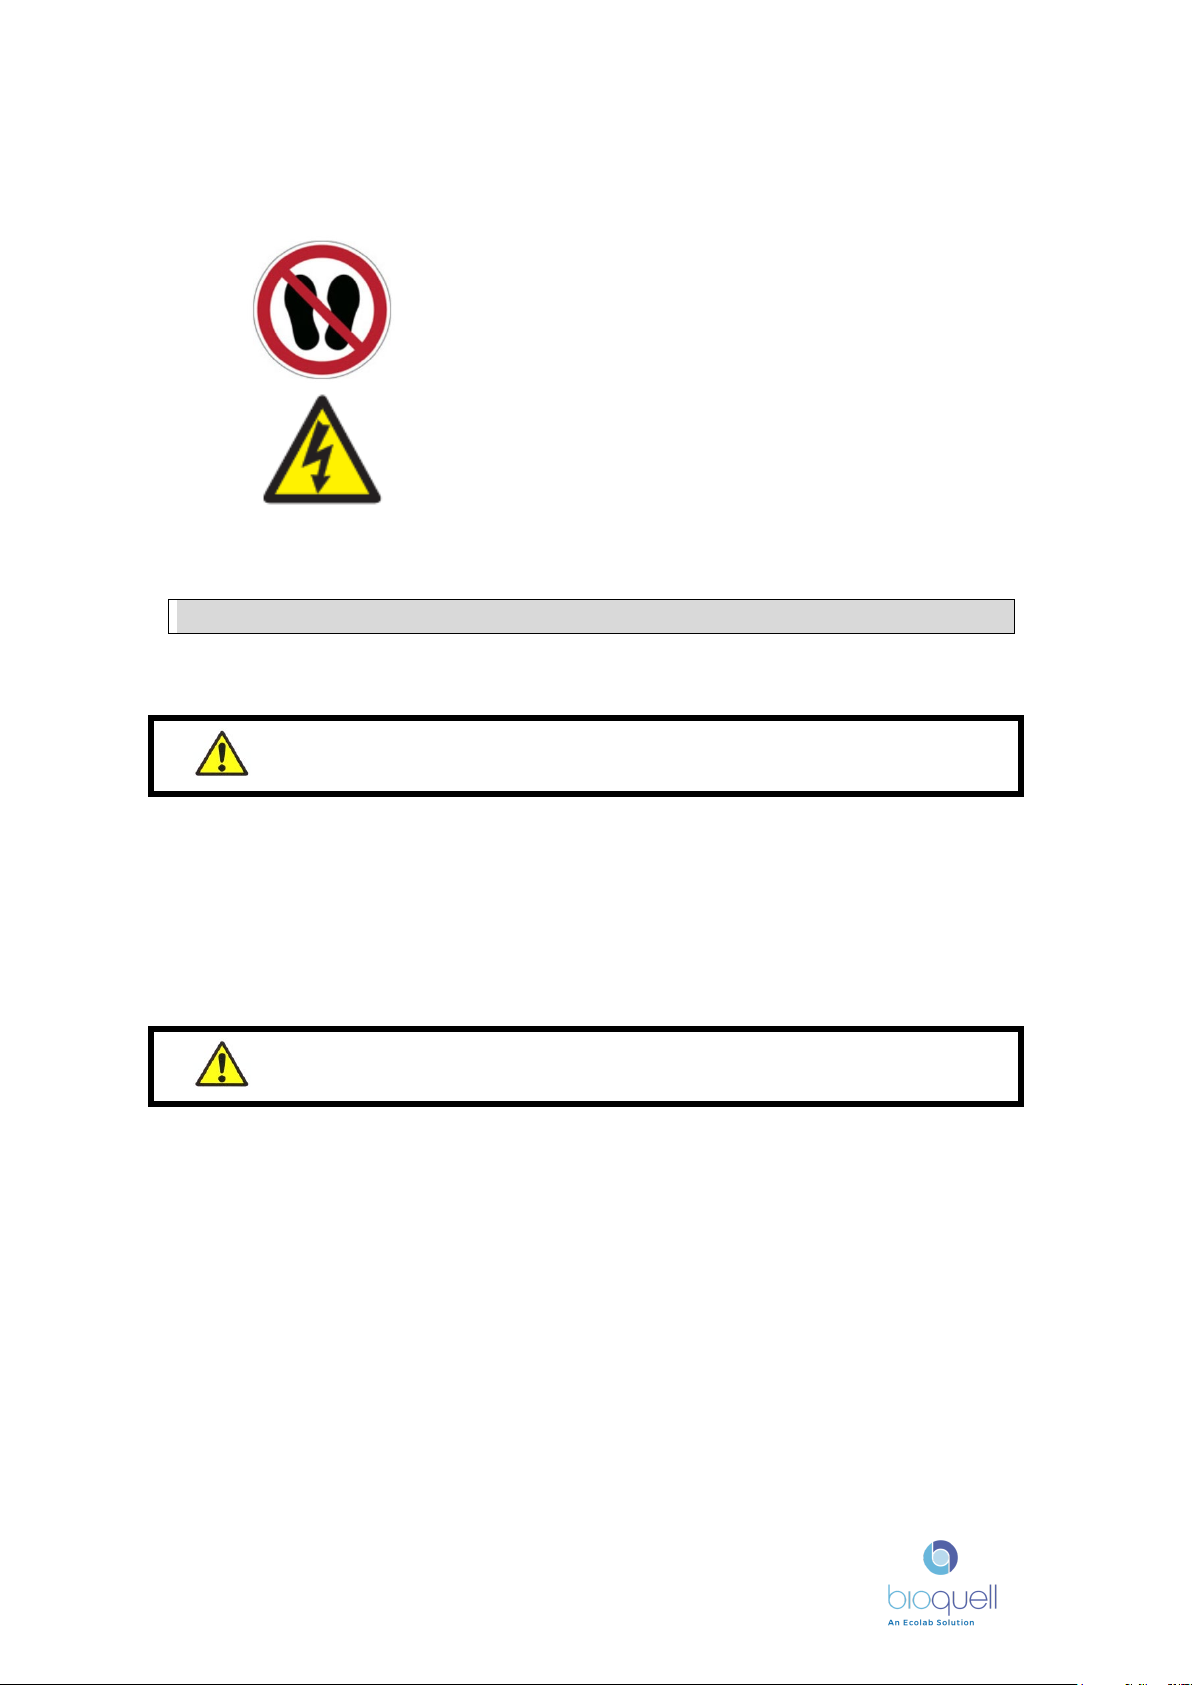
1.1 Warning Labels
ProteQ warning labels and their meaning
ELECTRICAL INJURY
HAZARD
Only trained personnel
should be accessing the
internal PCB area.
WEAR PROTECTIVE
GLOVES
Wear protective clothing
when handling hydrogen
peroxide bottles.
WEAR EYE
PROTECTION
Wear protective eye
protection when handling
hydrogen peroxide bottles.
READ MANUAL
Read manual prior to
operation of the
equipment
Consumable H2O2warning label and its meaning
CHEMICAL INJURY
HAZARD
Contents harmful.
CHEMICAL INJURY
HAZARD
Hydrogen peroxide liquid
is harmful and is an
oxidizing agent
BIOQUELL PROTEQ USER MANUAL -EN
TD092-O&M-001
REVISION 5 DRAFT
Page 8 of 58
Aeration unit warning label and its meanings
DO NOT STAND HERE Do not stand on the
aeration unit
ELECTRICAL INJURY
HAZARD
Only trained personnel
should be accessing the
internal PCB/power supply
area.
2UNPACKING INSTRUCTIONS
This ProteQ is supplied in one large box on a pallet:
1. Cut the retaining straps and remove the lid from the box.
2. Remove the small boxes containing the hand held instruments.
3. Remove the large outer sleeve by lifting it up and over the unit.
4. Lower the ramp.
5. Carefully cut open the silver bag.
6. Carefully, with two people, wheel out the ProteQ down the ramp.
Charge the hand held low level H2O2sensor as soon as it is unpacked, if
supplied. The sensor, charger and information booklet are contained in
separate small white boxes; see Section 17 of the manual on sensor
charging.
WARNING: Two people are required to safely remove the system
from the pallet.
WARNING: The ProteQ module weighs 87kg (192lbs). Appropriate
lifting procedures should be followed.

BIOQUELL PROTEQ USER MANUAL -EN
TD092-O&M-001
REVISION 5 DRAFT
Page 9 of 58
3VAPOUR BIO-DECONTAMINATION PROCESS
3.1 Process Sequence
The room bio-decontamination process consists of the following stages:
The ProteQ is designed to carry out the conditioning, gassing and dwell phases of
the bio-decontamination cycle. The aeration phase is performed by the lower
aeration part of the Base unit and optional aeration unit(s). Control and
monitoring of the process is performed outside the area using the lectern. The
Base unit, optional aeration units and lectern communicate with each other
wirelessly.
3.1.1 Conditioning Phase
When the system starts conditioning, the air and vaporizer heaters warm-up and
control to their set points ready for the next stage of the cycle.
During conditioning both the vaporizer and distribution fans operate, ensuring
that the hydrogen peroxide outlets reach a stable operating temperature.
Immediately after conditioning, the dosing pump is primed with hydrogen
peroxide liquid.
3.1.2 Gassing Phase
Liquid from a bottle is pumped onto the vaporizer heaters. Air then passes around
the heaters where it picks up the H2O2vapour for distribution.
The air circulation system has been designed to distribute the hot vapour evenly
throughout the room being bio-decontaminated. This system consists of fans,
which draw air from the top of the unit and blow it out of the four vents at high
velocity. An additional, internal flow path, from the distribution head down to the
base of the unit, ensures the inside of the unit is also bio-decontaminated.
There are two types of cycle parameters that can be programmed by the
operator. The first is a parametric cycle where the amount of H2O2to be used is
automatically calculated from the room volume and by the unit’s internal
instrumentation and control algorithm. The alternative is a fixed pre-validated
timed cycle.
3.1.3 Dwell Phase
The dwell phase allows the vapour to evenly distribute within the room and for
the condensation contact time to be prolonged.
3.1.4 Aeration Phase
CONDITIONING
GASSING
DWELL
AERATION

BIOQUELL PROTEQ USER MANUAL -EN
TD092-O&M-001
REVISION 5 DRAFT
Page 10 of 58
The Base unit has an aerator on the lower half. In addition up to 6 optional
aeration units can be used, two of which can be transported in the ProteQ. The
building’s HVAC system can also be used to aerate. The aerators contain a
catalyst, which converts the hydrogen peroxide (H2O2) vapour to water vapour
and oxygen. This phase continues until the hydrogen peroxide concentration
reaches 1ppm, when it should be checked with the hand held low level sensor.
Note: It is against US federal law to use a biocide in a manner inconsistent
with its labelling. Refer to and comply with Bioquell Hydrogen Peroxide
sterilant labelling.

BIOQUELL PROTEQ USER MANUAL -EN
TD092-O&M-001
REVISION 5 DRAFT
Page 11 of 58
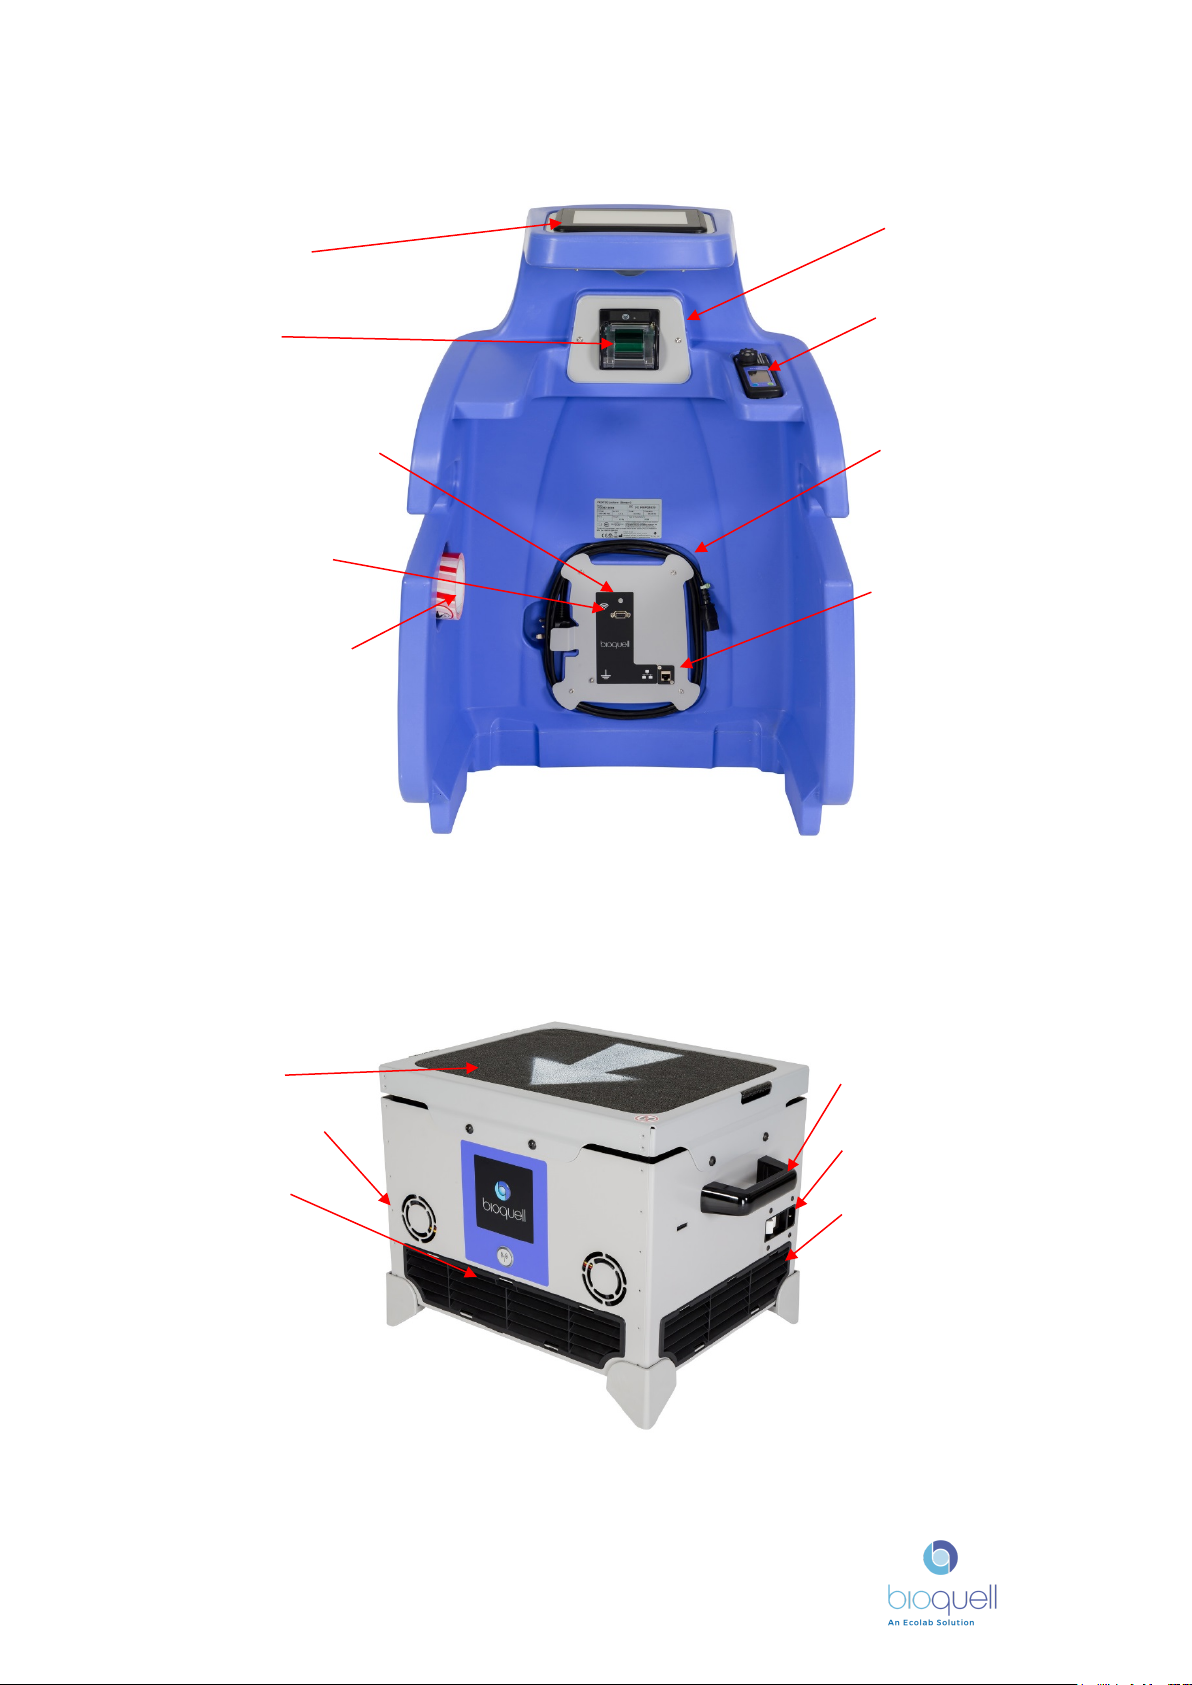
4PROTEQ DESCRIPTION
4.1 Main Module Features & Connections
4.1.1 Base Unit
Emergency
Process stop
Moulded
Handles
lectern –
Optional
Aeration units
stored behind.
Light ring
Aeration Unit
Braked Wheels
(2)
Top air inlet
filter
Air outlets (4)
Bottle
engagement
plunger
Wireless status
indicator
Bottle status
indication lights
Bottle
compartment
Safety
equipment
storage (Gloves
& goggles)
Air inlet must be kept
clear of obstructions
Power Switch
Power cable connection
Cycle stage volt free
signal
Remote start/stop
BACK PANEL
NOTE: The power cables supplied with the equipment must not be replaced with inadequately rated cables
BIOQUELL PROTEQ USER MANUAL -EN
TD092-O&M-001
REVISION 5 DRAFT
Page 12 of 58
4.1.2 Lectern
NOTE: The power cables supplied with the equipment must not be replaced with
inadequately rated cables
4.1.3 Aeration Unit (Optional)
Air inlet filter
Distribution fans
Wireless status
indicator
Handles
Power input and main
switch
Air outlet grille
Colour touch
screen
Printer
Wireless
network colour
Wireless
extension
module
connection
Sealing tape
Light ring
Hand held low
level hydrogen
peroxide sensor
Power cable
(Power input at
the rear)
Network socket
BIOQUELL PROTEQ USER MANUAL -EN
TD092-O&M-001
REVISION 5 DRAFT
Page 13 of 58
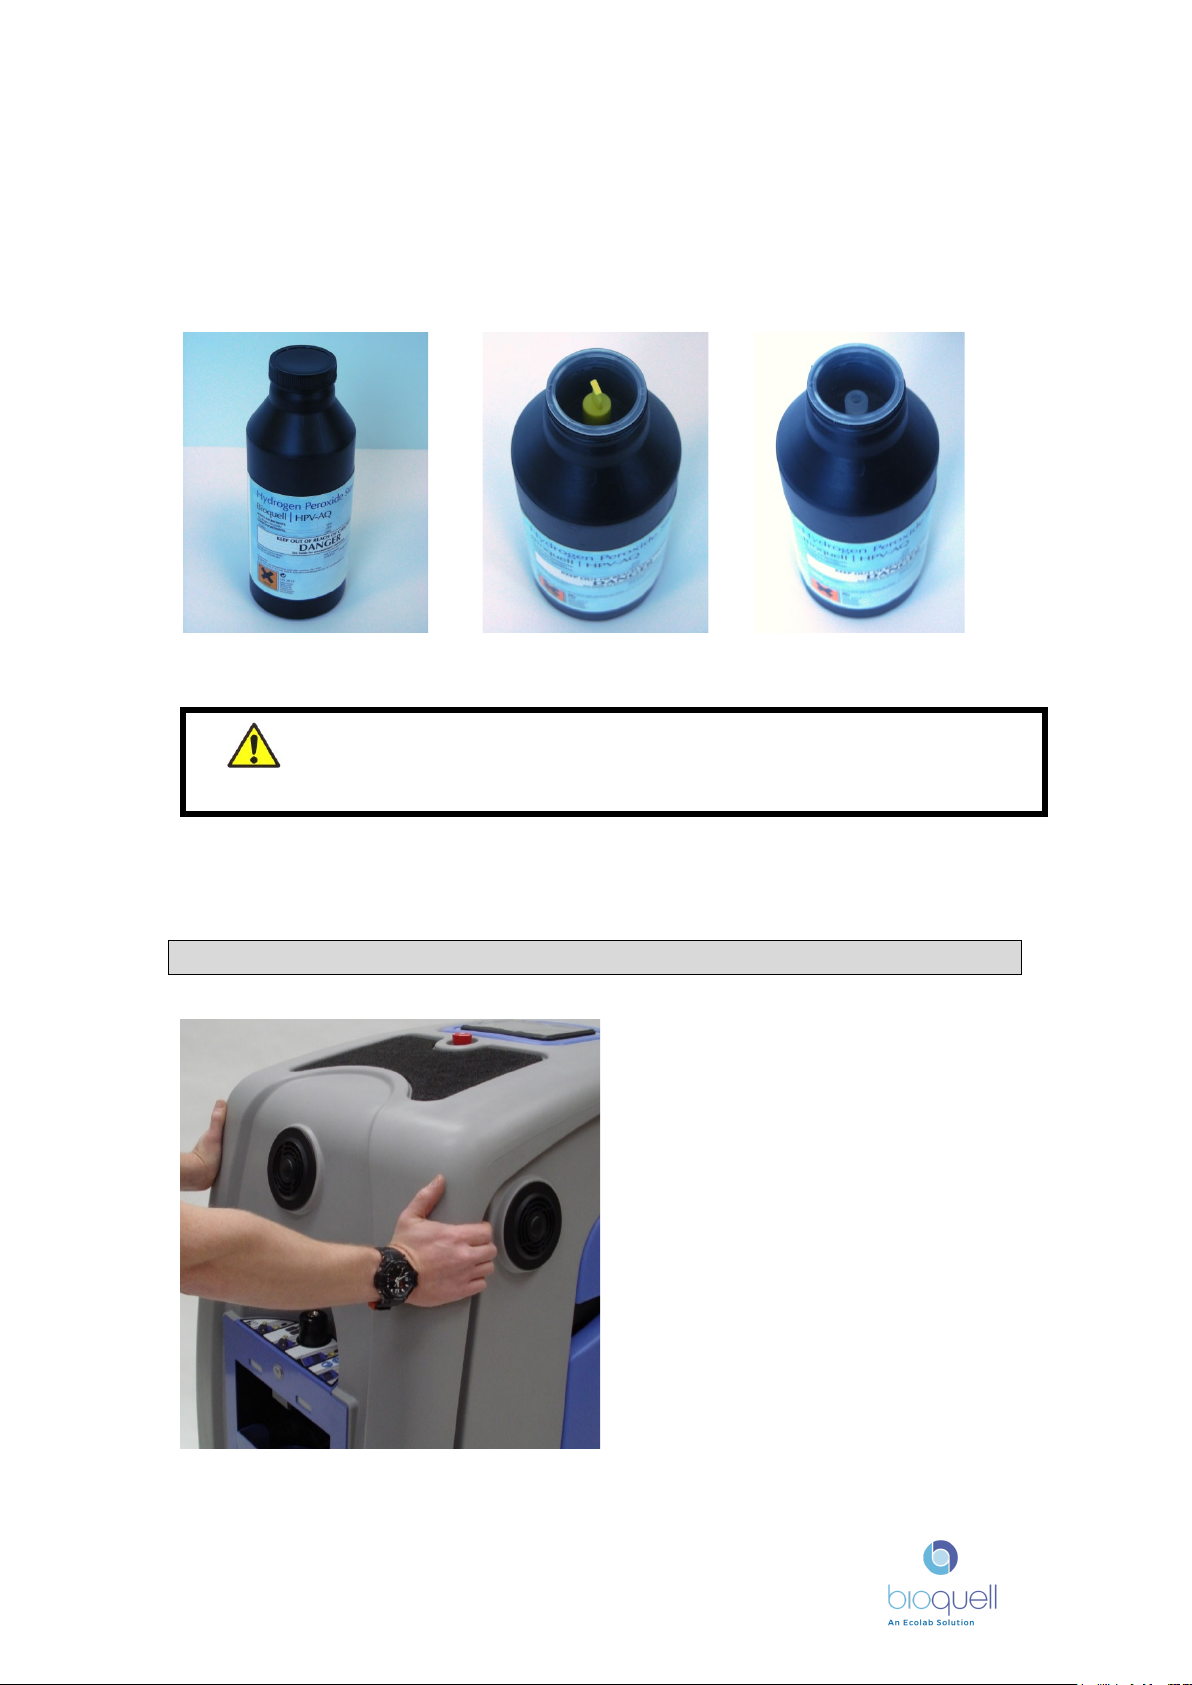
4.2 Hydrogen Peroxide Supply
The ProteQ HPV generator uses only Bioquell branded 35% wt/wt hydrogen
peroxide in either 2 litre or 950ml bottles. Each bottle label contains a Radio
Frequency Identification (RFID) tag which enables the amount of liquid in the
bottle to be read along with the expiry date.
If a Flexi Adaptor is being used fill only with approved Hydrogen Peroxide. Ensure
eye protection and gloves are worn as a minimum, and filling takes place in a
suitably ventilated area.
5MOVING THE PROTEQ
WARNING – Personal Protective Equipment must be used when
handling the bottles, which contain hydrogen peroxide. As a minimum
Bioquell recommend wearing suitable gloves and eye protection.
Unpacked bottle
Screw cap removed
Yellow inner cap
removed – ready for use
Hold the moulded handles on either
side with both hands when moving
the ProteQ, as shown.
The optional aeration units and the
lectern along with the cables and
accessories are all stored in the Base
unit.
BIOQUELL PROTEQ USER MANUAL -EN
TD092-O&M-001
REVISION 5 DRAFT
Page 14 of 58
6EQUIPMENT SET-UP
The ProteQ system can decontaminate a maximum total room(s) volume
of 250m3(8,800ft3), for larger rooms contact Bioquell.
6.1 Setting-up the ProteQ
Do not tread on aeration units, or use them as a step. Always place on
the floor
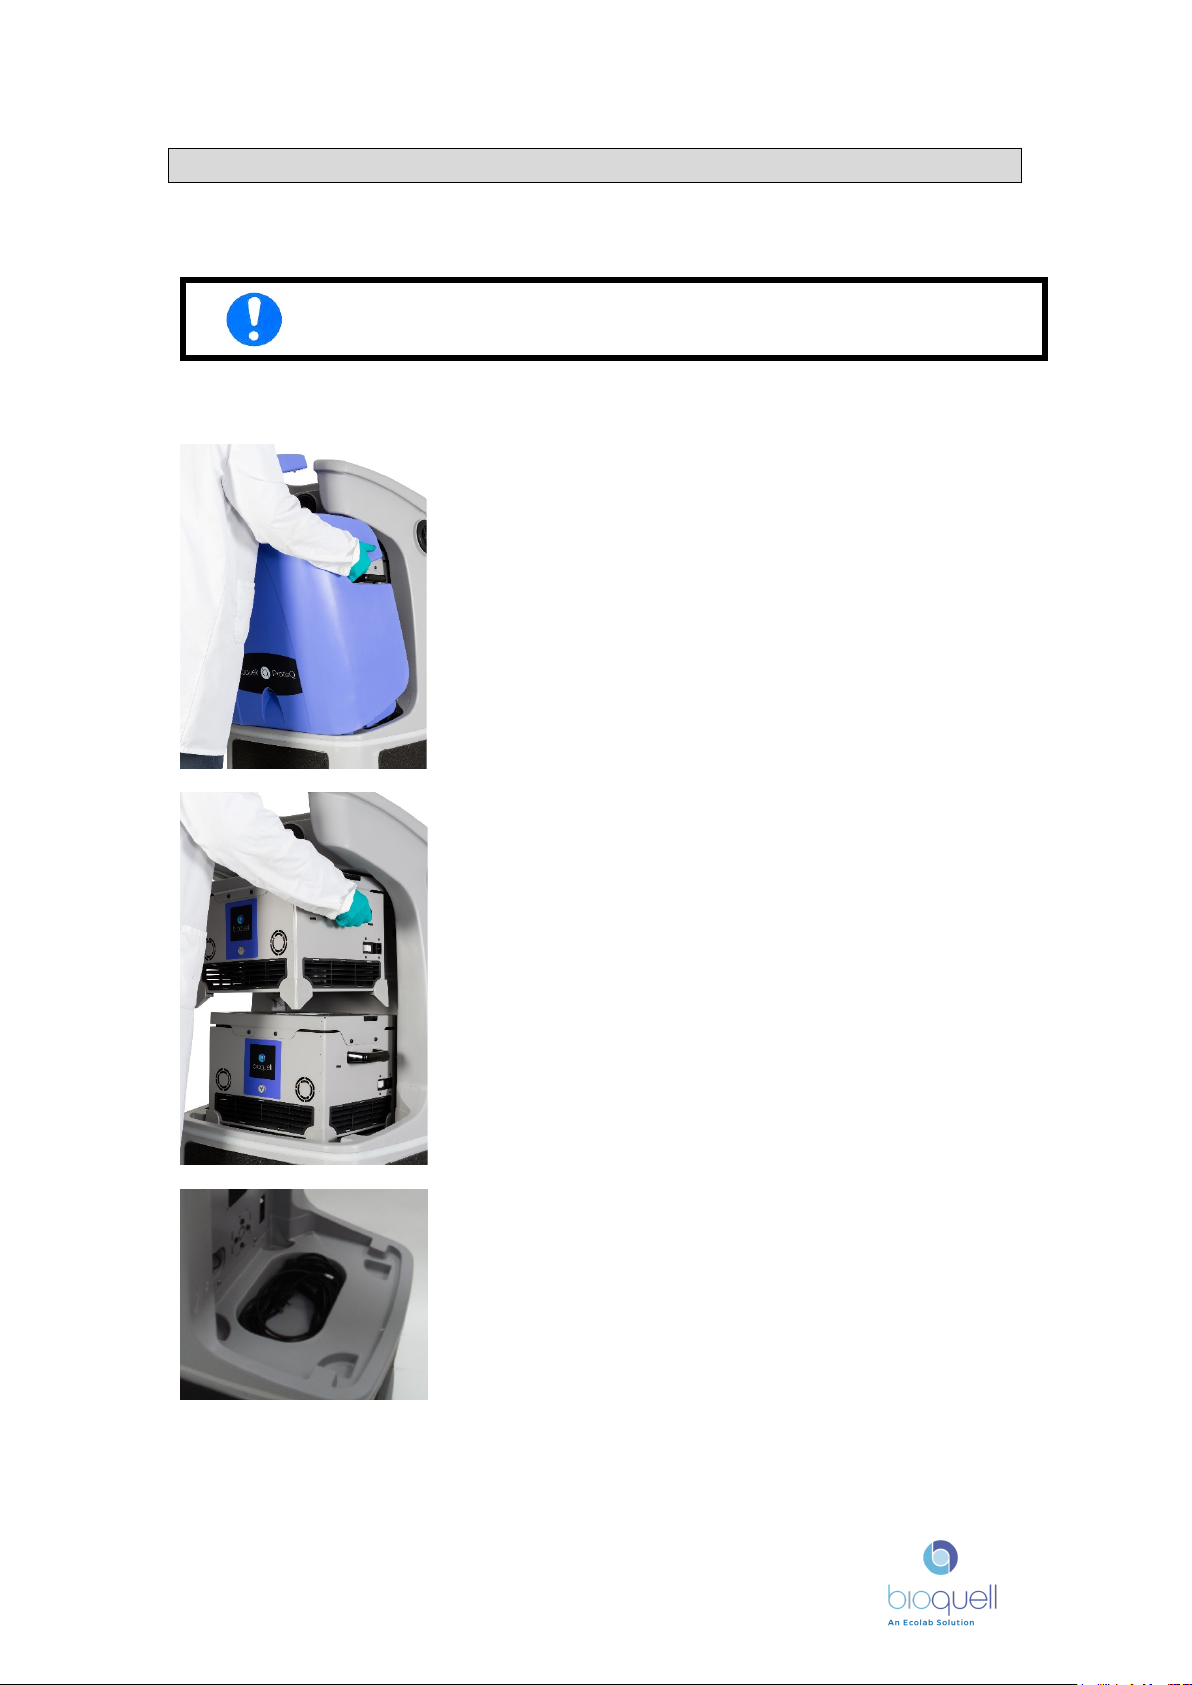
Outside the room to be decontaminated, remove
the lectern by holding the handles of the lectern
and leaning the top back.
Place the lectern by the door.
Wheel the Base unit into the room, to its validated
position.
If there are aeration units they must be placed in
to their validated positions in the room. NOTE the
arrows on the top of the aeration units must be
pointing in their validated direction, usually away
from the main unit. If the aeration units are not to
be used place them outside the room.
The cables for the Base unit and the aeration units
are in the bottom of the unit, under where the
aeration units are stored.
DO NOT USE ANY DAMAGED CABLES, replace
with adequately rated alternatives
BIOQUELL PROTEQ USER MANUAL -EN
TD092-O&M-001
REVISION 5 DRAFT
Page 15 of 58
6.2 Measuring the room
If a ‘Parametric’ cycle is to be run then the room volume must be known. If this is
not already known it is recommended to use the optional device available which
will accurately measure the volume of a room, see section 18. For rooms or suites
which are more complicated than a rectangular room it may be necessary to
measure several volumes and add them together.
Ensure no objects (including paper) that might cause blockage of the
air inlet to the left and above the power switch are in the cable
storage area. See section 4.1.1.
Plug the longer power cable into the base unit, and the
other end into an earthed socket, and turn the power
on. Turn on the white switch on the Base unit above the
power connection. The light ring will illuminate. Ensure
the white switch is not obstructed, as it is the main
disconnect device.
If the ProteQ is to communicate with the building’s
systems then it may be necessary to connect the
interface cables to the voltfree / remote start stop
connectors, see Section 4.1.1.
Plug the shorter cables into the side of the aeration
units, and plug the other end into an earthed electrical
socket. Note - up to three aeration units can be
plugged into the same socket. Do not plug them into
the same socket as the Base unit if supply is 100V or
120V.
Turn on the power at the back of the aeration unit
using the white switch and after a short time the fan
will start, and the wireless indicator will illuminate.
Ensure the white switch is not obstructed, as it is the
main disconnect device.
Remove the wound power cable from the lectern, and
plug the cable into the socket at the lower rear of the
lectern. Plug into an earthed electrical socket, and turn
the power on. The screen will illuminate.
BIOQUELL PROTEQ USER MANUAL -EN
TD092-O&M-001
REVISION 5 DRAFT
Page 16 of 58
7LOADING HYDROGEN PEROXIDE BOTTLES
7.1 Bottle Indicators
The ProteQ calculates the amount of peroxide required for the cycle. If it is loaded
with an insufficient amount it will not allow the cycle to start.
The unit will always take hydrogen peroxide from a part full bottle first, until it is
empty. Either 2 litre or 950ml bottles can be used.
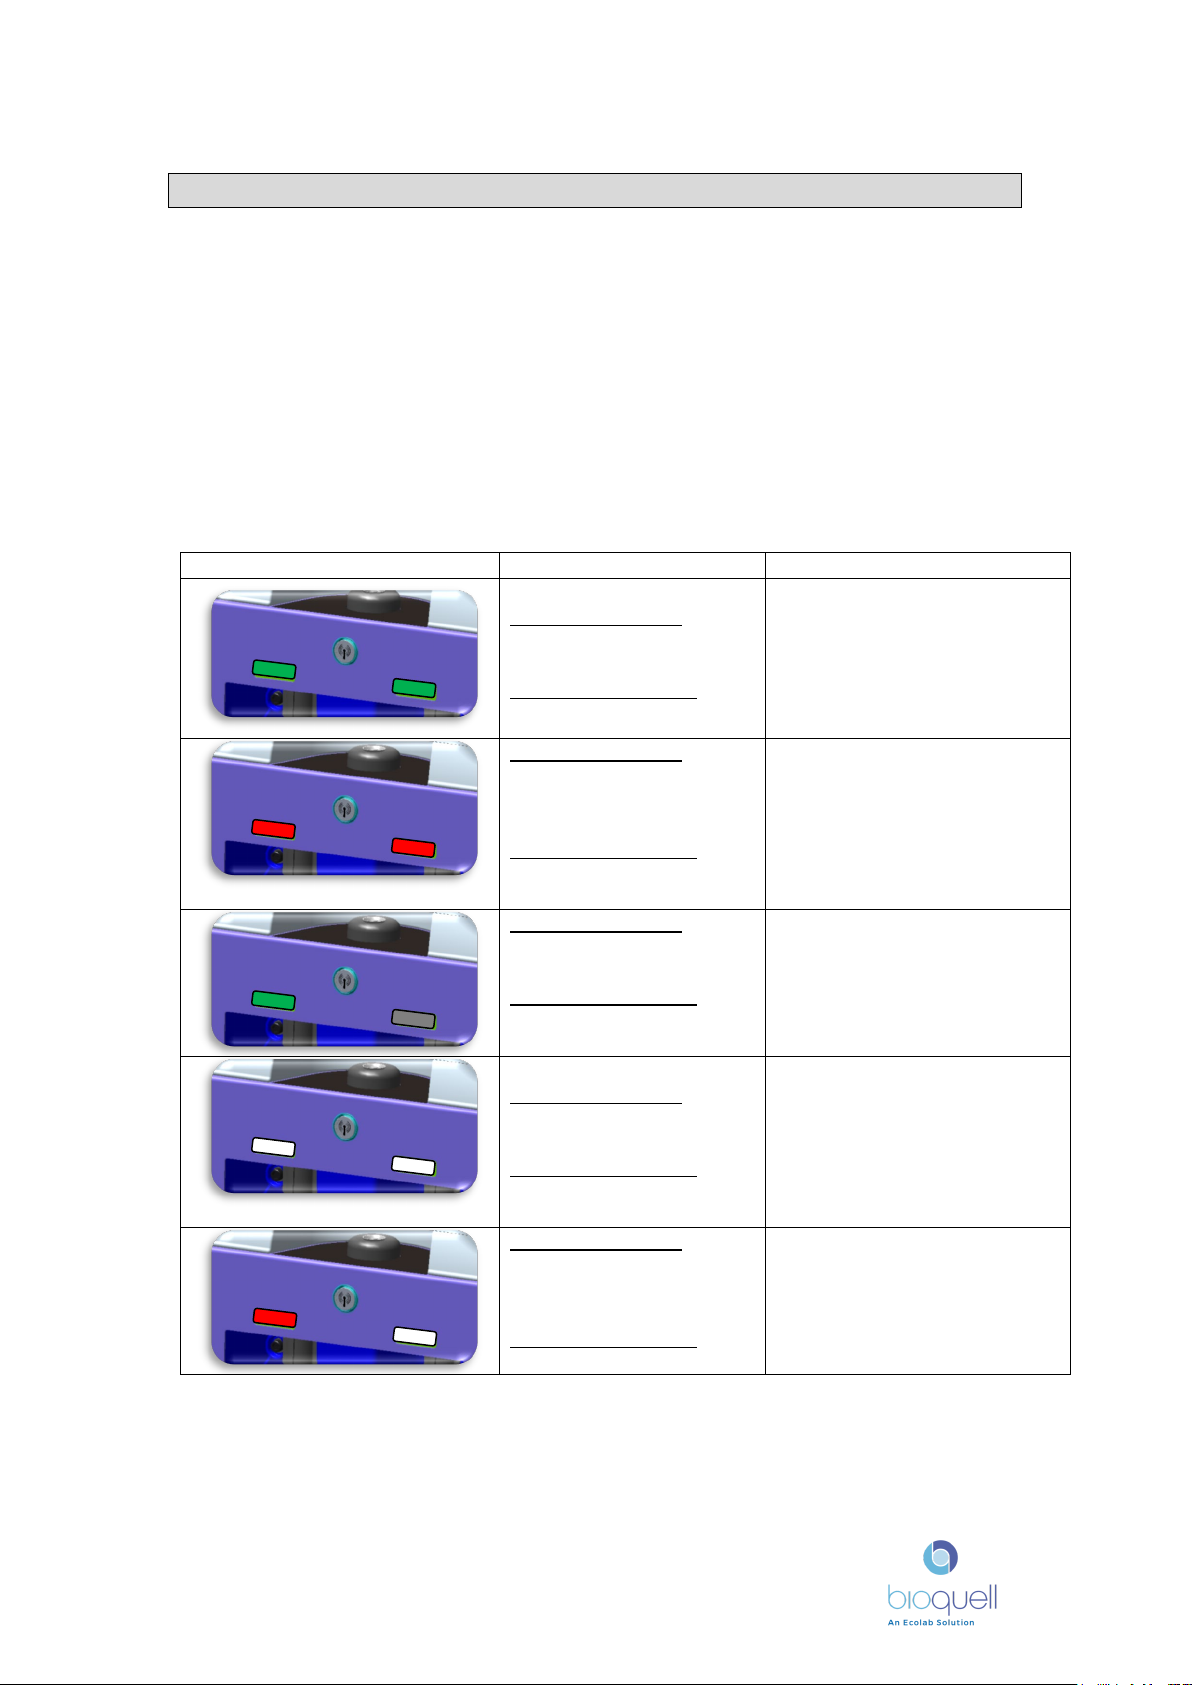
The table below explains the actions required for the different combinations of
bottle indicators; note - these lights only operate when the bottle holder is closed
and the plunger is down. If the lights are reversed to those shown, the action is
the same as that stated, but for the other side.
Light colour above bottle
Bottle Status
Action
Left Hand Bottle:
Enough for a cycle
Right Hand Bottle:
Enough for a cycle
There is sufficient liquid to
run the cycle, no action
required.
Left Hand Bottle:
Empty, expired or no
bottle present
Right Hand Bottle:
Empty, expired or no
bottle present
Both bottles are empty,
expired or no bottle in
place. Replace the bottles
with new ones
Left Hand Bottle:
Full
Right Hand Bottle:
No bottle present, or
empty or expired
There is one full bottle with
sufficient liquid to run the
cycle.
Left Hand Bottle:
Part used
Right Hand Bottle:
Part used
Both bottles have liquid but
the total is insufficient to
run the cycle. One of the
bottles requires replacing
with a full bottle or one
which has a sufficient
amount of liquid.
Left Hand Bottle:
Empty, expired or no
bottle
Right Hand Bottle:
Part used
Place a new bottle in the
left hand side (a part used
bottle may also be tried). If
sufficient liquid both lights
will go green.
If the indicator light is red, the bottle could be empty or expired and should be
disposed of according to local regulations. If empty, it could still contain up to
80ml of hydrogen peroxide.
BIOQUELL PROTEQ USER MANUAL -EN
TD092-O&M-001
REVISION 5 DRAFT
Page 17 of 58
If a Flexi Adaptor is fitted the left hand light will illuminate green and the right
hand will be unlit. No other colours will be seen.
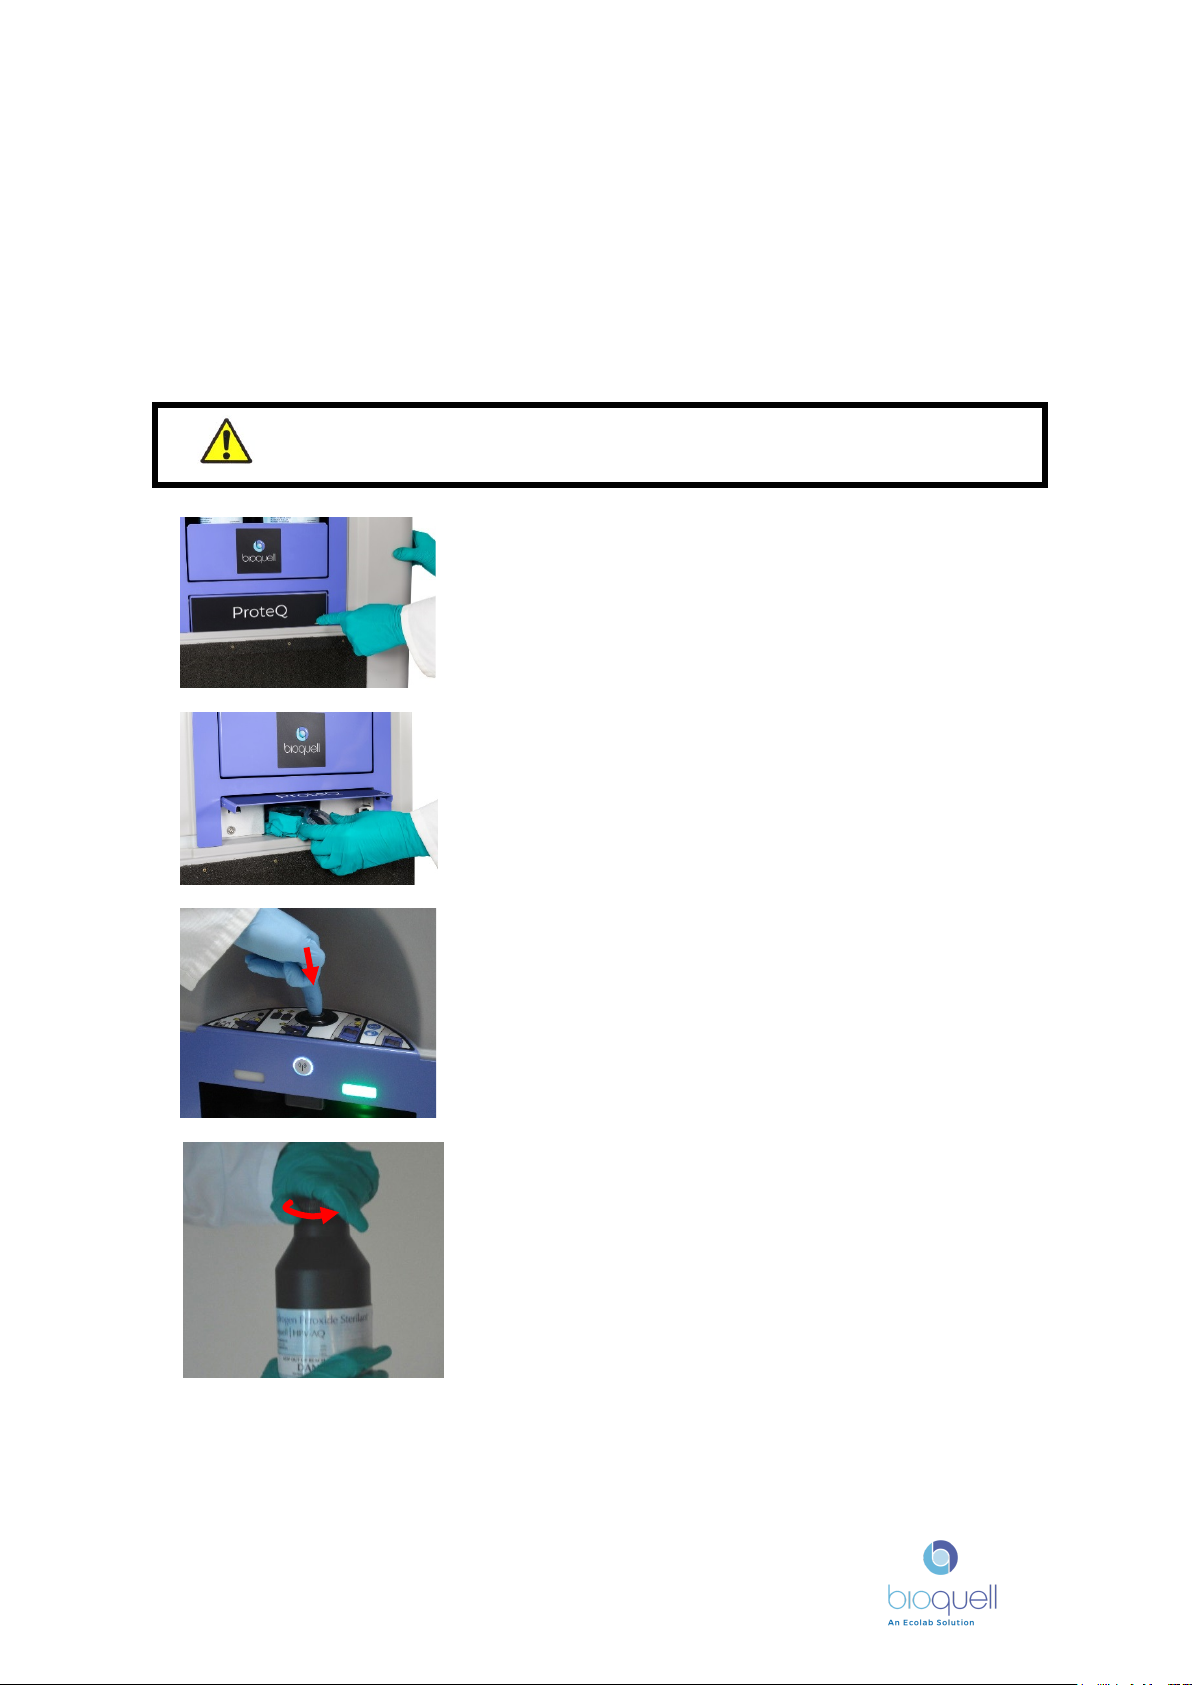
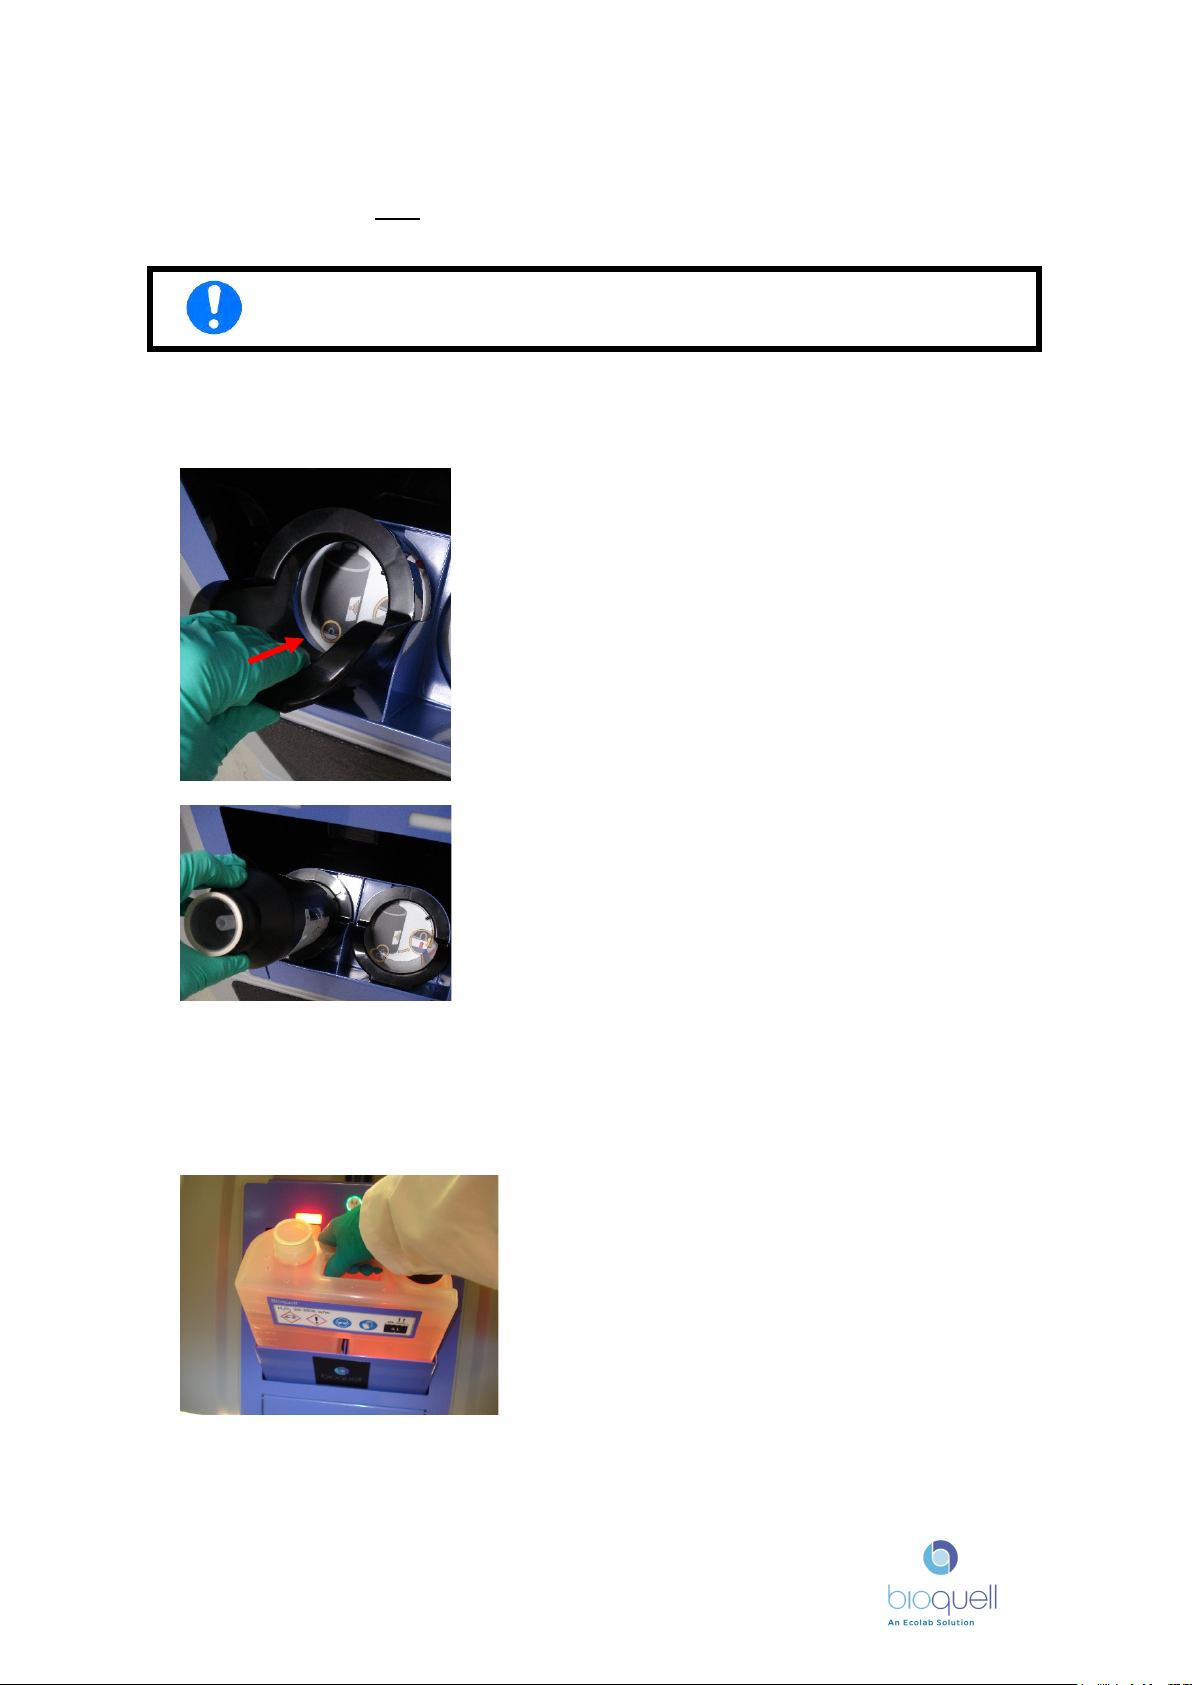
7.2 Installing Hydrogen Peroxide Bottles
The following instructions explaining how to install bottles must be followed; in
addition, there is an illustration of the procedure on the vaporizer module above
the bottle enclosure. Before loading a 950ml bottle ensure the insert is present,
see section 7.3.
WARNING: Use Personal Protective Equipment when handling hydrogen
peroxide bottles. As a minimum, wear suitable gloves and goggles.
Press the bottom right hand side of the flap
under the bottle storage compartment.
The flap will spring-up.
Remove a pair of gloves and goggles. Put them
on before handling the bottle of hydrogen
peroxide.
Loading new bottles:
STEP 1:
To access the bottles push the silver button at
the centre of the black plunger. The plunger will
be released and will move up.
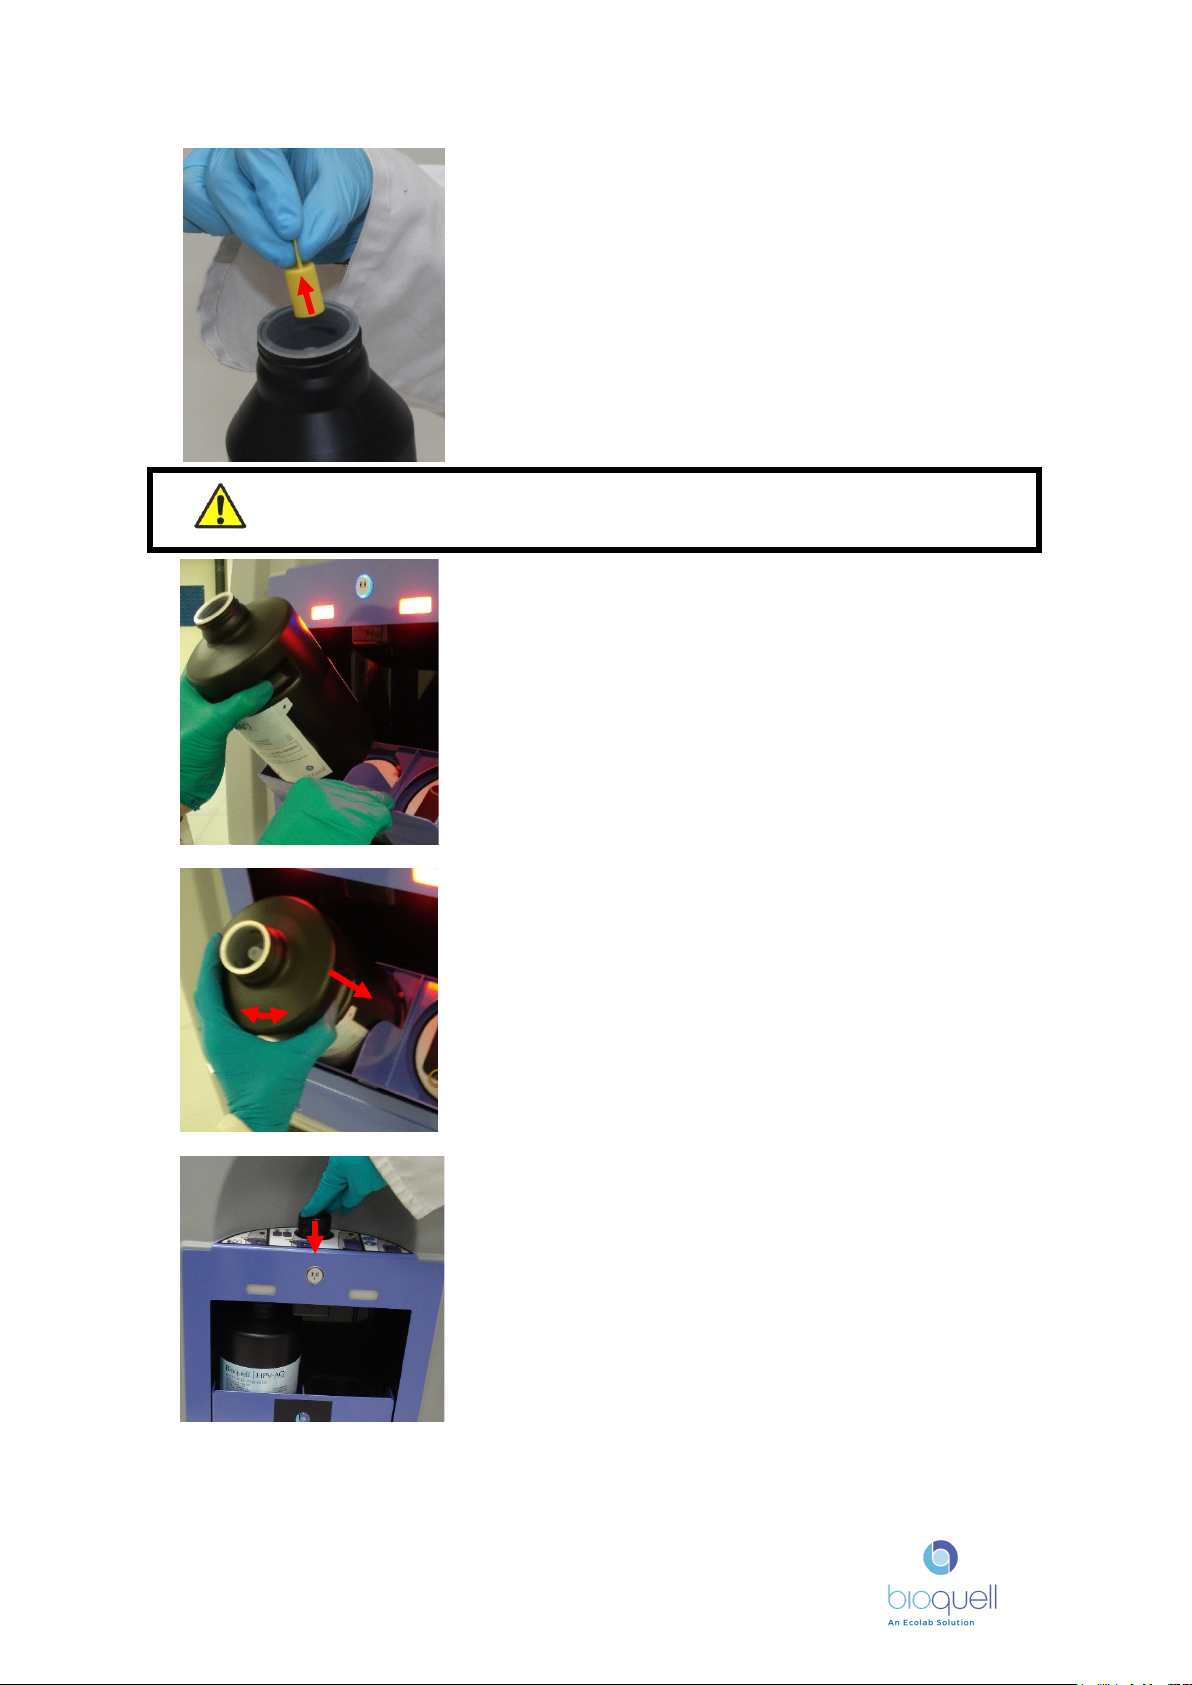
STEP 2:
Obtain a new bottle and check the outer bag for
any signs of liquid. If liquid is present, do not
use the bottle. Treat the liquid as hydrogen
peroxide and take the necessary precautions. If
no liquid is present, remove the bottle from the
bag, and remove the lid carefully by turning
counter clockwise. Retain the lid.
BIOQUELL PROTEQ USER MANUAL -EN
TD092-O&M-001
REVISION 5 DRAFT
Page 18 of 58
Bottles may be left in the vaporizer between decontamination cycles. Discard part
used bottles if left for more than a month.
STEP 3:
Carefully remove the internal rubber yellow cap
by pulling it off. Retain the cap.
WARNING: Use the finger grips in the 2 litre bottle to hold the bottles
securely and safely. If using a 950ml bottle the insert must be fitted.
STEP 4:
For 2 litre bottle:
Pull the bottle tray open with one hand while
holding the bottle with the other using the
finger grips. These should be facing forward for
correct alignment. Then slide the bottle in.
For 950ml bottles:
Pull the bottle tray open with one hand while
placing the bottle in the insert in the bottle
carrier with the other. An insert must be
present, see section 7.3
Ensure that the stud at the bottom of the holder
lines-up with the indent on the bottom of the
bottle. It may be necessary to rotate the bottle
until it drops down into its correct position.
The label in the bottom of the bottle holder also
illustrates this.
STEP 5:
Push the black plunger down until it clicks and
stays down.
Note – avoid pressing the silver button during
this step, as the silver button releases the
mechanism.
BIOQUELL PROTEQ USER MANUAL -EN
TD092-O&M-001
REVISION 5 DRAFT
Page 19 of 58
To remove bottles: Release the plunger as shown in STEP 1 and remove the
bottle. Ensure that both the yellow cap and the bottle’s screw cap are put back
on, even if the bottle is empty.
7.3 Fitting Insert for 950ml Bottle
When a 950ml bottle is required an insert must be placed in the bottle holder.
7.4 Flexi Adaptor
Fill the flexi adaptor with Bioquell approved Hydrogen Peroxide and place lids on
both left and right hand sides and wear eye protection and gloves as a minimum
when carrying it.
WARNING: Always replace the yellow cap, otherwise hydrogen peroxide
liquid may build up in the top of the bottle.
Place the insert into the bottle holder, ensuring it
is all the way down. It is possible to have a mix
of size of bottles if required.
Remove cap on left hand side and place into
the bottle carrier in the orientation shown,
shut and push plunger down as described in
section 7.2.
BIOQUELL PROTEQ USER MANUAL -EN
TD092-O&M-001
REVISION 5 DRAFT
Page 20 of 58
8OPERATION
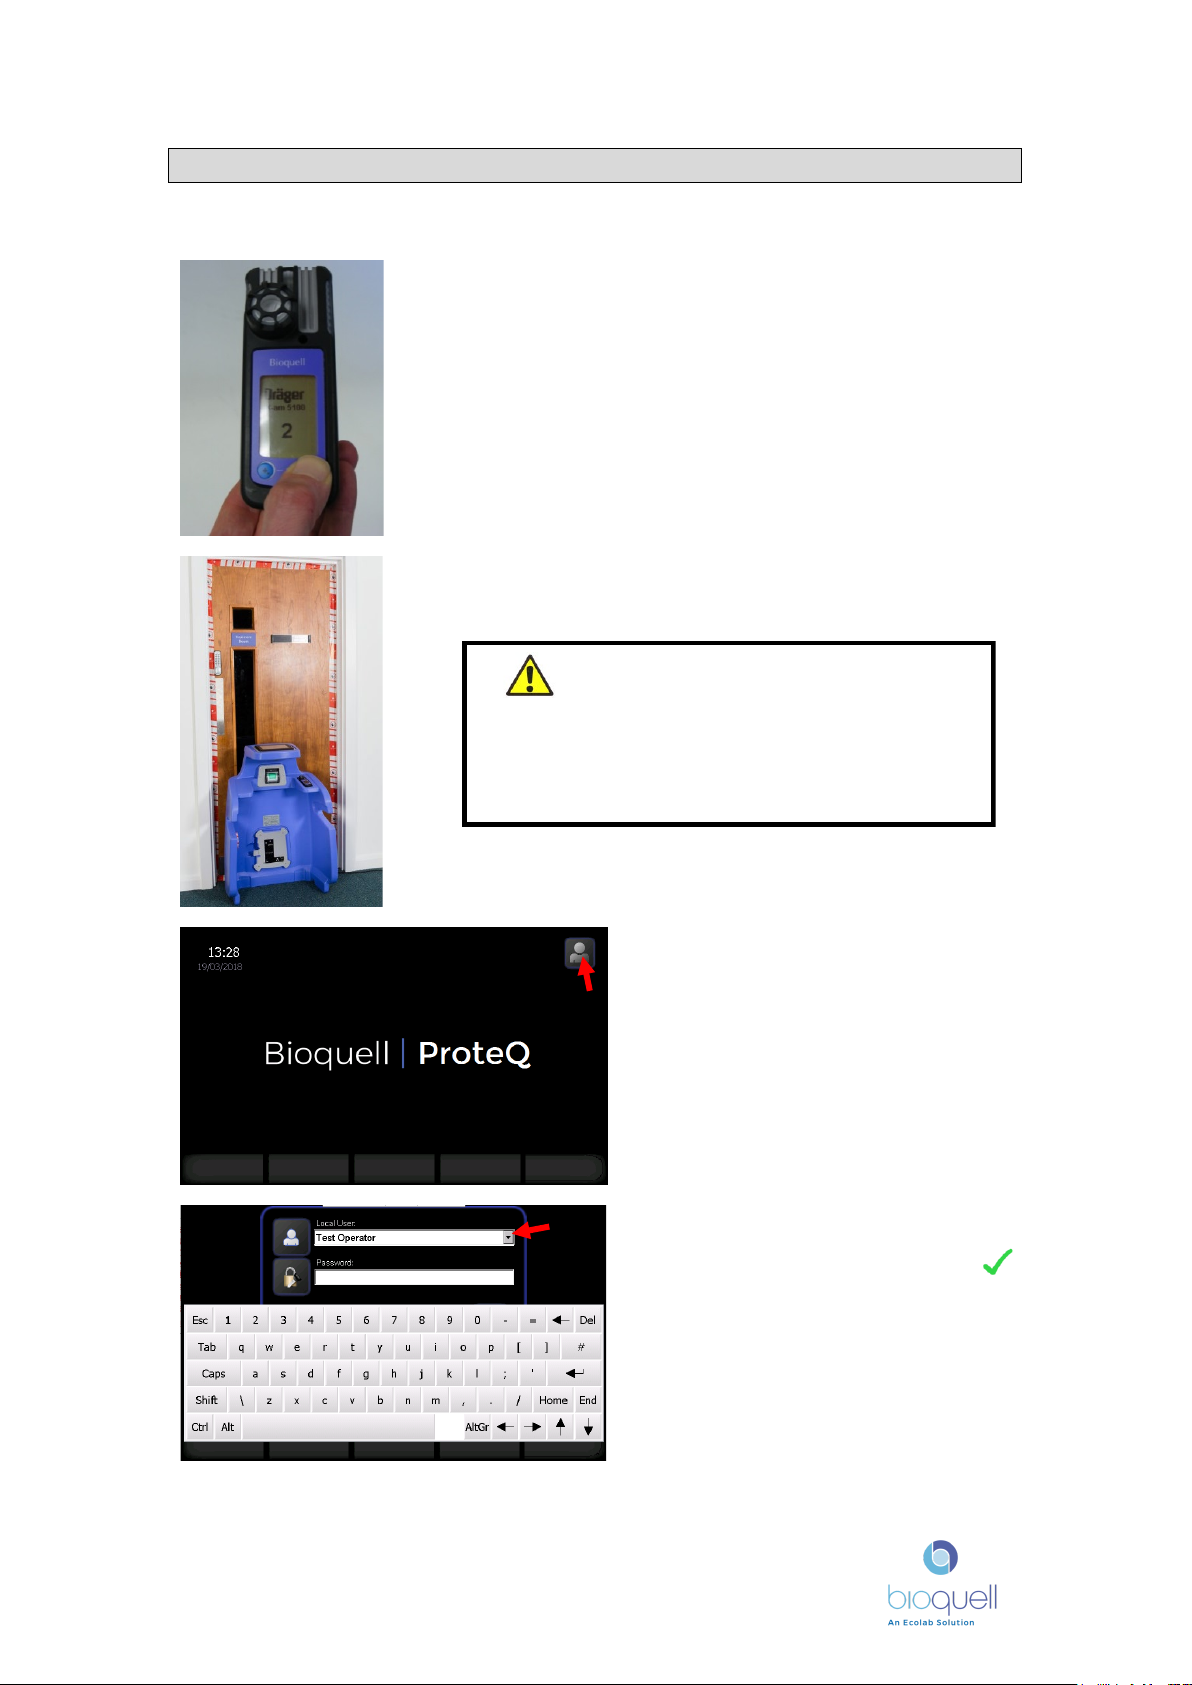
8.1 Running a Cycle
Check that the low level hydrogen peroxide sensor is
working. To start remove the cap over the sensor if
present and then hold down the green button. The
display will count down from 3 and then start. Place
the sensor in the recess on the lectern. If the sensor
is not working, do not run a cycle. The sensor may
be stored on the lectern, see section 4.1.2
Ensure the door is sealed, this is likely to require
taping. A roll of tape is supplied on the lectern.
WARNING – Ensure all possible openings
and conduits into the enclosure are
properly sealed. If large leaks occur and
high concentration Hydrogen Peroxide
escapes into areas where people are
present it can cause serious harm. Use
tape provided to seal door.
Press icon in top right of screen to
login, if using local logins use the
down arrow to select user name
from the list and enter password –
touching the data entry box a
keyboard will appear.
If using network login (Windows)
then ensure that an ethernet cable
is connected between the lectern
and the local network, and enter
user name and password using the
keyboard which appears when the
data entry box is touched. Press .
When logged IN the User Name will
be displayed in the top right of the
screen. The Login period will expire
after 5 minutes of inactivity if not in
cycle, after which it will be
necessary to log on again.
Table of contents
Popular Medical Equipment manuals by other brands


Getinge
Getinge Arjohuntleigh Nimbus 3 Professional Instructions for use

Mettler Electronics
Mettler Electronics Sonicator 730 Maintenance manual

Pressalit Care
Pressalit Care R1100 Mounting instruction

Denas MS
Denas MS DENAS-T operating manual

bort medical
bort medical ActiveColor quick guide

AccuVein
AccuVein AV400 user manual


