Bird-X MEGABLASTER User manual

PRIOR TO INSTALLATION
Your complete Bird-X
Mega-Blaster kit includes
a control unit, 40 watt solar
panel, battery cable with
clips and a 20 speaker
tower. Open the control unit
by lifting the two latches on
the side of the enclosure.
Prior to operation, route the
speaker and power cables
from their respective jacks
on the control panel down
through the cable strain
relief in the lower part of the
enclosure.
IMPORTANT: Be certain that
the power switch is in the OFF
position and the volume control is
set to the minimum (LOW) volume
level (counterclockwise) as
shown in Fig. 1 when powering up
the unit.
SETUP AND INSTALLATION
1) Use the mounting hard-
ware (included) to mount
the control unit box to a
wall, post, pole or other
vertical surface.
2) Attach the battery cable
assembly to a 12V battery
(not included) matching
the positive and negative
terminals. The other end
of the cable comes prein-
stalled into the power ter-
minal block. Attach the
Digital Bird Repeller
selected recordings in a sequential order. The
Random Mode is recommended to keep birds from
adapting to a preset pattern of sounds. To operate
the unit in Random mode, set switch 5in Mode
settings as follows:
Switch 5 Mode
ON Random mode ON
OFF Random mode OFF
PROGRAMMING EXAMPLE
Recording Switches: Results
1, 3, 5 and 6 to “ON” position Plays Bird 1, 3, 5 & 6
Mode Switches
1 = “OFF” position
2 = “ON” position (Medium), every 1 to 4 minutes
3 = “ON” position
4 = “OFF” position Operates during daylight hours only
5 = “ON” position In random, non-sequential order
VOLUME CONTROL
The unit has a volume control dial on the front panel
of the unit. Turning the dial toward low will result in
reduced sound output and rotating the dial toward
high will result in an increase in sound output.
CAUTION: Take care when turning the dial since the unit may
be in an inactive state when the dial is rotated. It could then
reactivate at a very high level of sound which could be painful
to your ears.
POWER SWITCH
The power switch enables the unit to operate.
Slide the switch to the ON position to start the
unit. If you turn the unit OFF, be sure to leave it off
for about 30 seconds before turning it back on to
allow the electronics to properly reset.
TROUBLESHOOTING
PROBLEM
Unit is on,
but no sound is heard
Unit is on, but plays the
same bird over and over,
regardless of settings
Unit is not operating
properly in the
DAY or NIGHT mode
Unit does not function
properly when connected
to a 12 volt battery
• Check volume settings.
• Check time of operation settings.
• Check that at least one bird is
selected to play.
Reset the unit by turning it off
for 30 seconds and then back on.
• Double check Mode
switch settings.
• Make sure photocell
is not obstructed.
• Make sure the photocell is
not affected by bright lights
in either the front or the
back of the unit.
• Check battery condition.
• Turn power switch on unit
to the OFF position.
Reconnect the battery,
wait 30 seconds, then
switch the unit back on.
SOLUTION
Fig. 1
Bird-X MEGABLASTER
Cable Strain Relief
Complete system shown
mounted on a pipe
with solar panel.
EPA Establishment Number 62617-OR-001
LIMITED WARRANTY
IF YOU ARE NOT COMPLETELY SATISFIED, CONTACT THE PLACE
OF PURCHASE OR OUR CUSTOMER SERVICE DEPARTMENT
WITHIN 1 YEAR OF YOUR DATE OF PURCHASE FOR PROMPT AND
COURTEOUS REPLACEMENT, REPAIR OR REFUND.
BIRD-X INC'S LIABILITY HEREUNDER SHALL BE LIMITED TO
REFUNDING THE PURCHASE PRICE PAID BY CUSTOMER OR
REPLACING THE PRODUCT, IN BIRD-X'S SOLE DISCRETION,
AND UNDER NO CIRCUMSTANCES SHALL BIRD-X INC BE LIABLE
FOR ANY CONSEQUENTIAL OR INCIDENTAL DAMAGES, OF ANY
NATURE WHATSOEVER, ARISING FROM THE CUSTOMER'S USE OR
OPERATION OF THE PRODUCT; PROVIDED, HOWEVER, THAT THIS
LIMITATION MAY BE LIMITED BY STATE LAW.
EXCEPT FOR THE EXPRESS ONE-YEAR LIMITED WARRANTY
SPECIFICALLY DESCRIBED HEREIN, BIRD-X INC DISCLAIMS ALL
OTHER WARRANTIES, EXPRESS OR IMPLIED, RELATING TO THE
PRODUCT, INCLUDING, BUT NOT LIMITED TO, ANY IMPLIED
WARRANTY OF MERCHANTABILITY OR IMPLIED WARRANTY OF
FITNESS; AND THE EXPRESS WARRANTIES ARE IN LIEU OF ALL
OBLIGATIONS OR LIABILITIES ON THE PART OF BIRD-X INC
ARISING OUT OF OR IN CONNECTION WITH THE SALE, USE, OR
OPERATION OF THE PRODUCT.
300 N. ELIZABETH ST
CHICAGO, IL 60607
1-800-662-5021 • Fax 312 226-2480
BIRD-X MEGABLASTER
BIRD-X, INC

two speaker wires from the 20 speaker tower to
the speaker terminals on the generating unit.
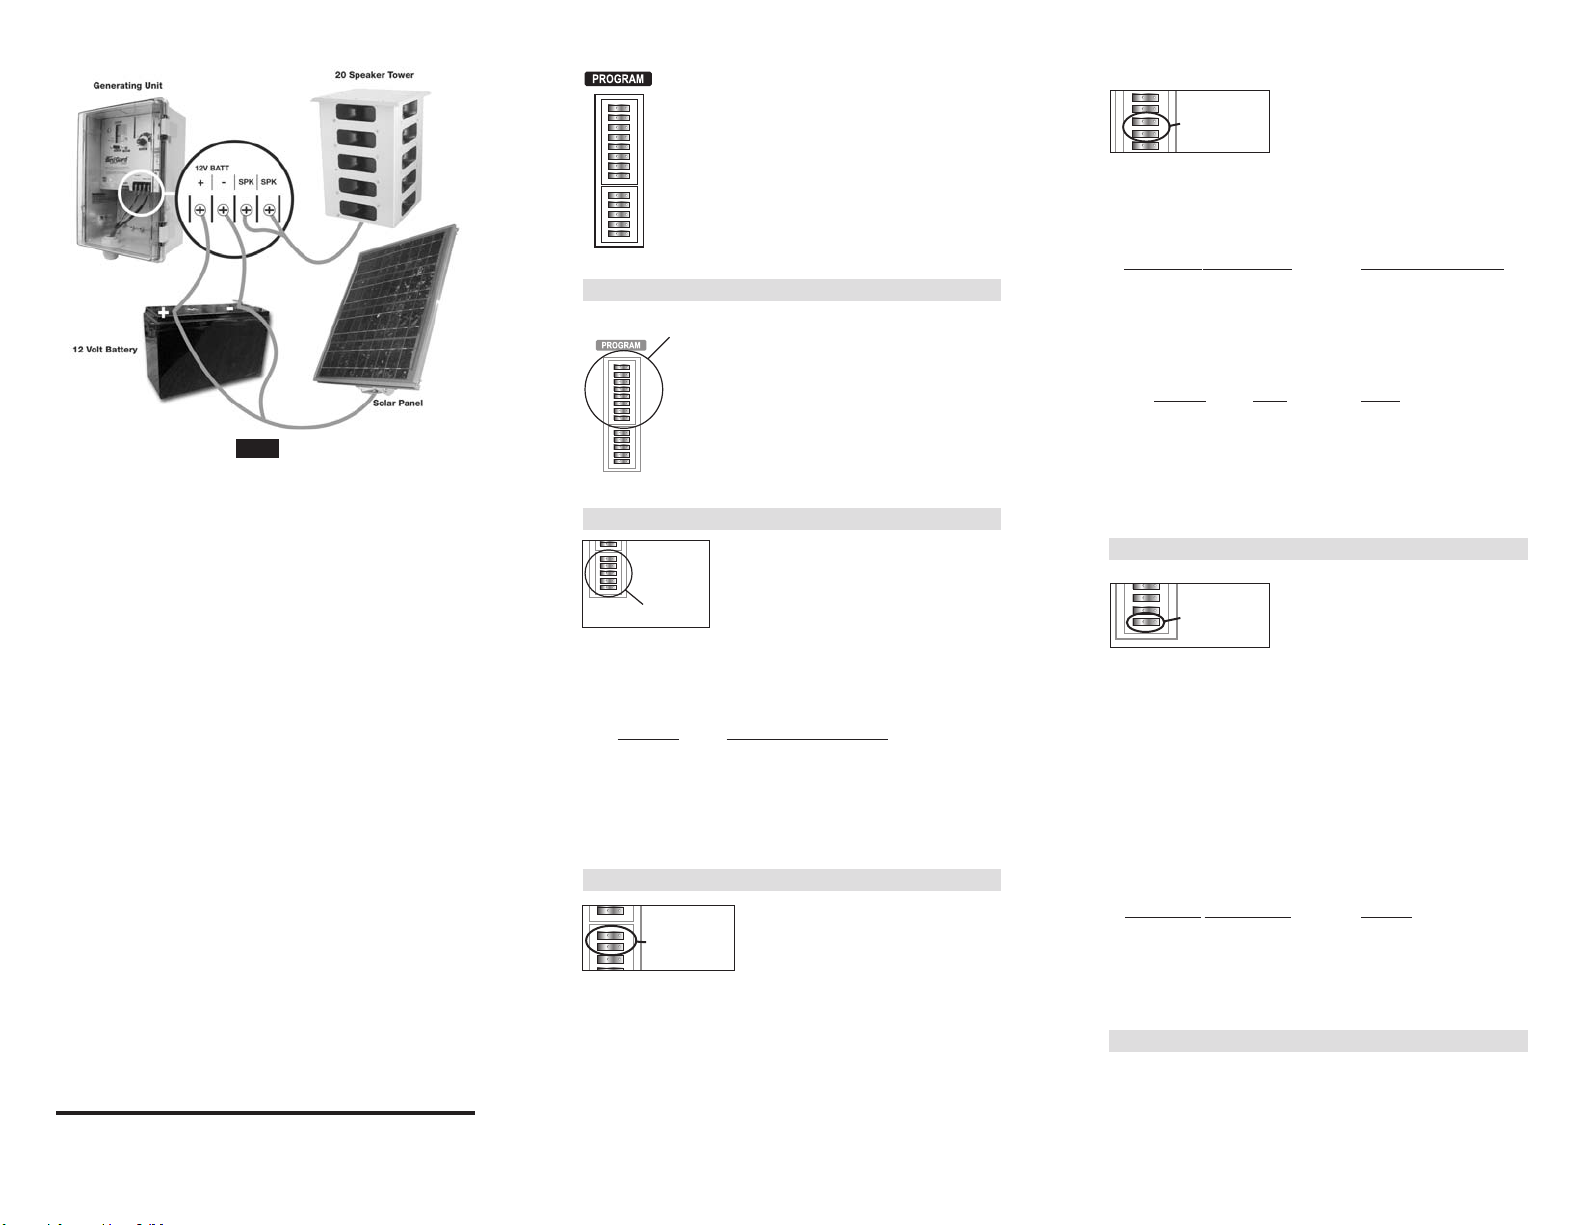
Connect the solar panel to the battery matching
the positive and negative terminals on both ends.
(Fig. 2)
3) It is recommended to mount the 20 speaker
tower on a pole or surface that is aimed directly
and at the same level as the infected area.
4) Set the Recording switches, Mode Setting
switches, Time-Off switches, Time of Operation
switches and Random Operation switches to
the desired settings. (See PROGRAMMING
YOUR MEGABLASTER for complete details
on how to program your bird repeller).
5) Make sure the volume setting is set to LOW (all
the way counterclockwise).
6) Slide the power switch to the ON position. The
unit may take a few seconds before starting.
7) Adjust the volume to the desired level.
8) Close the cover and latch shut.
PROGRAMMING YOUR MEGABLASTER
To program your Megablaster unit you will need
a small screwdriver, toothpick, or other small, rigid
object to toggle the switches in
the switch array. The switch
array is the switch bank located
in the top left corner of the unit
(under “PROGRAM”) . A switch
is ON if the switch is pressed
down on the right-hand side.
The switch is OFF if the left
side is pressed down.
RECORDING SETTING SWITCHES
The Recording switches are the
first eight switches in the switch
array. Each switch has a
recording number to the right of
it that corresponds with the bird
descriptions listed on the foil
label inside the unit.
MODE SETTING SWITCHES
The Mode Setting switches set
the various modes of operation:
such as the amount of time
between playing bird distress
calls, when the unit will operate (day only, night
only, or 24 hours), and whether the unit will
operate in the Random Mode or Normal Mode.
Switch Mode or Function
1Sets the Time-Off Period
2Sets the Time-Off Period
3Sets the Time the unit plays
4Sets the Time the unit plays
5Turns Random Mode On or Off
TIME-OFF SWITCHES
The two Time-Off switches
are located just below the
Recording switches in the
switch array.When the unit is
set to one of the various Time-Off modes, the unit
will delay a number of seconds or minutes
between recorded sounds. Please note that the
unit will play all of the selected recordings (either
sequentially or non-sequentially, depending on the
Random Mode) then it will go into a delay. The time
the unit stays off depends on the Time-Off and the
Random Mode settings. If the unit is operating in
Random Mode, the unit will delay anywhere from
the minimum value to the
maximum value for that
time-off setting. If the unit is
not in Random Mode, it will
delay only the minimum value. To set the Time-Off
period (or delay interval), use the following settings
on switches 1 and 2 in the mode function settings.
Switch 1 Switch 2 Time Off Period
ON OFF Short
OFF ON Medium
ON ON Long
OFF OFF Extra Long
Mode Min Max
Short 17 sec 50 sec
Medium 1 min 4:15 min
Long 5:00 min 10:00 min
XLong 10 min 30 min
TIME OF OPERATION SWITCHES
The two “Day/24hour/Night”
switches are located just
under the Time-Off
switches in the switch array.
‘Night Mode’ operates the unit at night and ‘Day
Mode’ operates the unit during the day. However,
the photocell that senses the sunlight is susceptible
to bright lights. Take care not to have bright lights
shining towards the unit since this can prevent the
unit from operating properly. In 24-hour mode, the
unit will operate continuously, regardless of the time
of day. To set the time period for the unit to oper-
ate set switches 3and 4in the Mode Function set-
tings to the following:
Switch 3 Switch 4 Mode
ON OFF Day Only
OFF ON 24-Hour
ON ON Night Only
OFF OFF also Night Only
RANDOM OPERATION SWITCH
The “Random” switch is the bottom switch in the
switch array. When operating in Random Mode, the
unit will randomly play the selected recordings in
non-sequential order. When the unit is not operat-
ing in the Random Mode, the unit will play the
RECORDING #1
RECORDING #2
RECORDING #3
RECORDING #4
RECORDING #5
RECORDING #6
RECORDING #7
RECORDING #8
TIME OFF
DAY/24HR/NIGHT
RANDOM
12345678 12345
RECORDING
Switches (1-8)
HARASSMENT #8
TIME OFF
DAY/24HR/NIGHT
RANDOM
8 12345
Mode Setting
Switches (1-5)
RECORDING #8
TIME OFF
DAY/24HR/NIGHT
8123
TIME OFF
DAY/24HR/NIGHT
RANDOM
12345
TIME
OFF
DAY/24HR/NIGHT
RANDOM
2345
RECORDING #1
RECORDING #2
RECORDING #3
RECORDING #4
RECORDING #5
RECORDING #6
RECORDING #7
RECORDING #8
TIME OFF
DAY/24HR/NIGHT
RANDOM
12345678 12345
Wiring Setup Diagram
Fig. 2
(Not Included)
Other Bird-X Lawn And Garden Equipment manuals

Bird-X
Bird-X SOLAR YARD GARD Programming manual

Bird-X
Bird-X SOLAR YARD GARD Programming manual

Bird-X
Bird-X BALCONY GARD User manual

Bird-X
Bird-X Super BirdXPeller Pro User manual

Bird-X
Bird-X STS-24 User manual

Bird-X
Bird-X Critter Blaster Pro User manual

Bird-X
Bird-X LASER BIRD REPELLER (OUTDOOR) User manual

Bird-X
Bird-X Mega Blaster PRO User manual

Bird-X
Bird-X Bird BLazer User manual

Bird-X
Bird-X YARDGARD User manual