Birth Alarm Premium Plus User manual
Thank you for purchasing the Birth Alarm Premium Plus. This is an extremely reliable
reporting system for foal births. We advise you to read this manual carefully before
commissioning; proper assembly and operation are essential for correct operation.

Inhoud
1. Introduction..................................................................................................................................... 3
2. Contents of the packaging............................................................................................................... 4
3. Preparing for use............................................................................................................................. 5
3.1 The first time .......................................................................................................................... 5
3.2 Switching on/off...................................................................................................................... 6
4 De binnenkant van de Birth Alarm Premium Plus........................................................................... 7
4.1 Installing/replacing batteries ................................................................................................... 7
4.2 Housing of the Birth Alarm Premium Plus.............................................................................. 8
4.3 SIM-kaart plaatsen ................................................................................................................. 9
5 The lights (Leds) of the Birth Alarm Premium Plus ....................................................................... 10
5.1 The status lights..................................................................................................................... 10
5.2 De LTE lamps ......................................................................................................................... 11
6 The Birth Alarm Premium Plus and Telegram............................................................................... 12
6.1 Download Telegram .............................................................................................................. 12
6.1.1 IPhone:........................................................................................................................... 12
6.1.2 Android.......................................................................................................................... 12
6.2 Connect with the BirthAlarmBot........................................................................................... 13
6.3 The features of the BirthAlarmBot........................................................................................ 14
6.3.1 Get Started .................................................................................................................... 14
6.3.2 Select Language............................................................................................................. 14
6.3.3 Registering your Birth Alarm Premium Plus.................................................................. 15
6.3.4 The BirthAlarmBot custom keyboard............................................................................ 16
6.4 Notifications in a group-chat................................................................................................. 17
6.4.1 Creating a Telegram chatgroup..................................................................................... 17
6.4.2 Adding group members................................................................................................. 18
6.4.3 Applying administrator rights to the BirthAlarmBot..................................................... 20
6.4.4 Registering your Birth Alarm Premium Plus from a groupchat..................................... 22
6.5 Modify soundsettings............................................................................................................ 23
6.5.1 Modify soundsettings on Android................................................................................. 23
6.5.2 Change soundsettings on Iphone.................................................................................. 25
6.6 Change settings on your Birth Alarm Premium Plus ............................................................. 27
6.6.1 Changing activation angle ............................................................................................. 27
6.6.2 Sleep mode.................................................................................................................... 28
6.7 Acknowledge an incoming alarm .......................................................................................... 29
6.8 Status information................................................................................................................. 30
6.8.1 Battery level................................................................................................................... 30
6.8.2 Signal level..................................................................................................................... 30
6.8.3 Angle.............................................................................................................................. 30
6.8.4 Sleep Mode.................................................................................................................... 30
7 The Birth Alarm Premium Plus and Telegram............................................................................... 31
8 Fitting the Birth Alarm onto the mare........................................................................................... 32
8.1 Fitting the Birth Alarm beneath the halter............................................................................ 33
8.2 Fitting the Birth Alarm into an anti‐roll girth ......................................................................... 33
9 Summary and modes of use.......................................................................................................... 34
10 Technical data................................................................................................................................ 35

1. Introduction
When your mare is giving birth you would like to be present so that you can intervene in case
of any complications or warn a veterinarian. Horses and ponies have the tendency of lying
stretched out on their left or right side during delivery. This gives them more space during
contractions. The Birth Alarm Premium Plus makes good use of this feature. By simply fitting
the Birth Alarm Premium Plus beneath the halter of your mare (or into an anti‐roll girth), it will
warn you when the delivery starts.

2. Contents of the packaging
1. The Birth Alarm Premium Plus birth detector.
2. The special holder (This is where the Birth Alarm Premium Plus is inserted) This holder can
be fitted beneath the halter of your mare or in the ring of the anti‐rolling girth.
3. Cable ties. To get started, we have already supplied a number of cable ties (also called "Tie‐
wraps"). These cable ties are for single use, but they are simply available at any DIYstore.
4. The special screwdriver. On the one hand, you can use this to unscrew your Birth Alarm
Premium Plus (e.g. when the batteries need to be replaced or when you need to remove the
SIM card). But there is also a strong magnet on the back of this screwdriver. It allows you to
operate the Birth Alarm Premium Plus.
5. USB cable. You will need this ‐ or a similar cable ‐ if you want to update the systemsoftware.
1
2
3
4
5
3. Preparing for use
3.1 The first time
If you wish to use Birth Alarm Premium Plus for the first time, you must perform these
steps once:
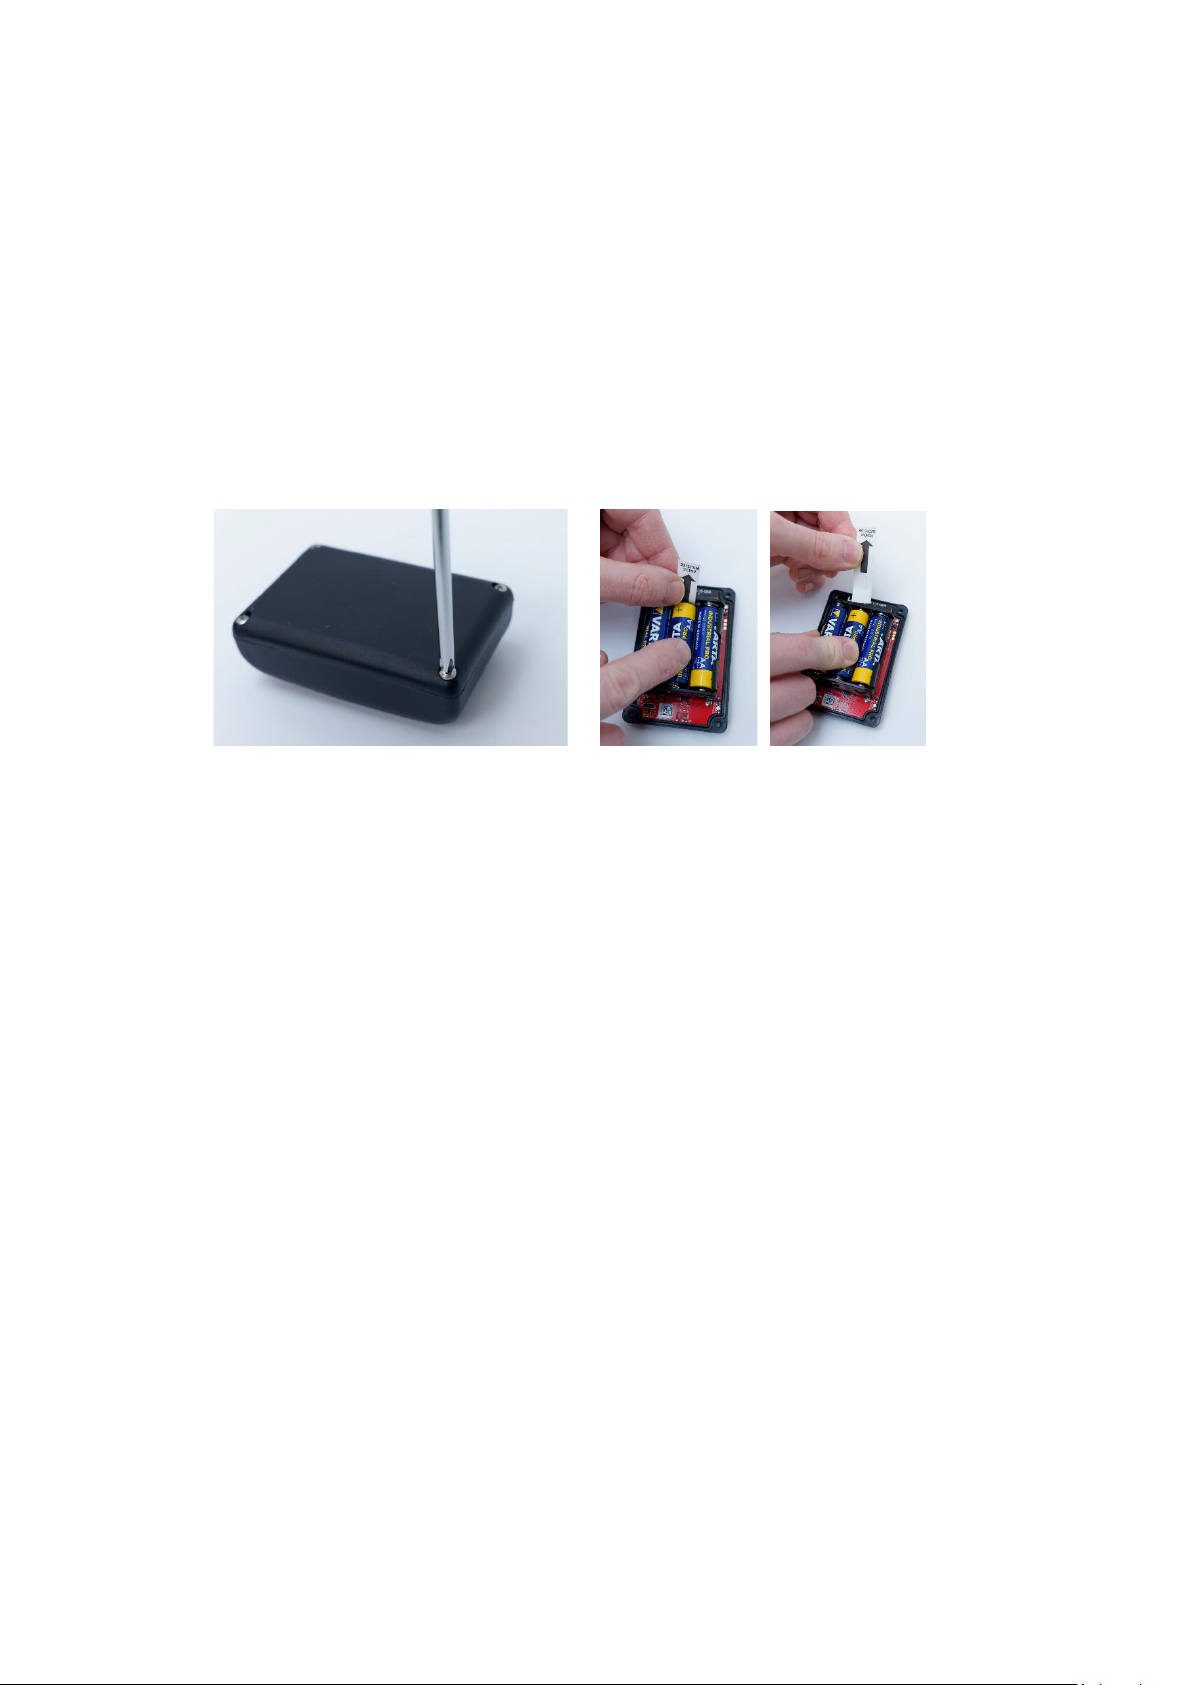
•Unscrew the Birth Alarm Premium Plus and remove the red label which is placed against
the pole of one of the batteries. The batteries now make contact with the Birth Alarm
Premium Plus.
•Once you have completed these steps with your Birth Alarm Premium Plus, you can close
it again and continue with the settings. When screwing in, ensure that the light
conductors are placed above the status lights (see 4.2)
Unscrewing
Removing the Label
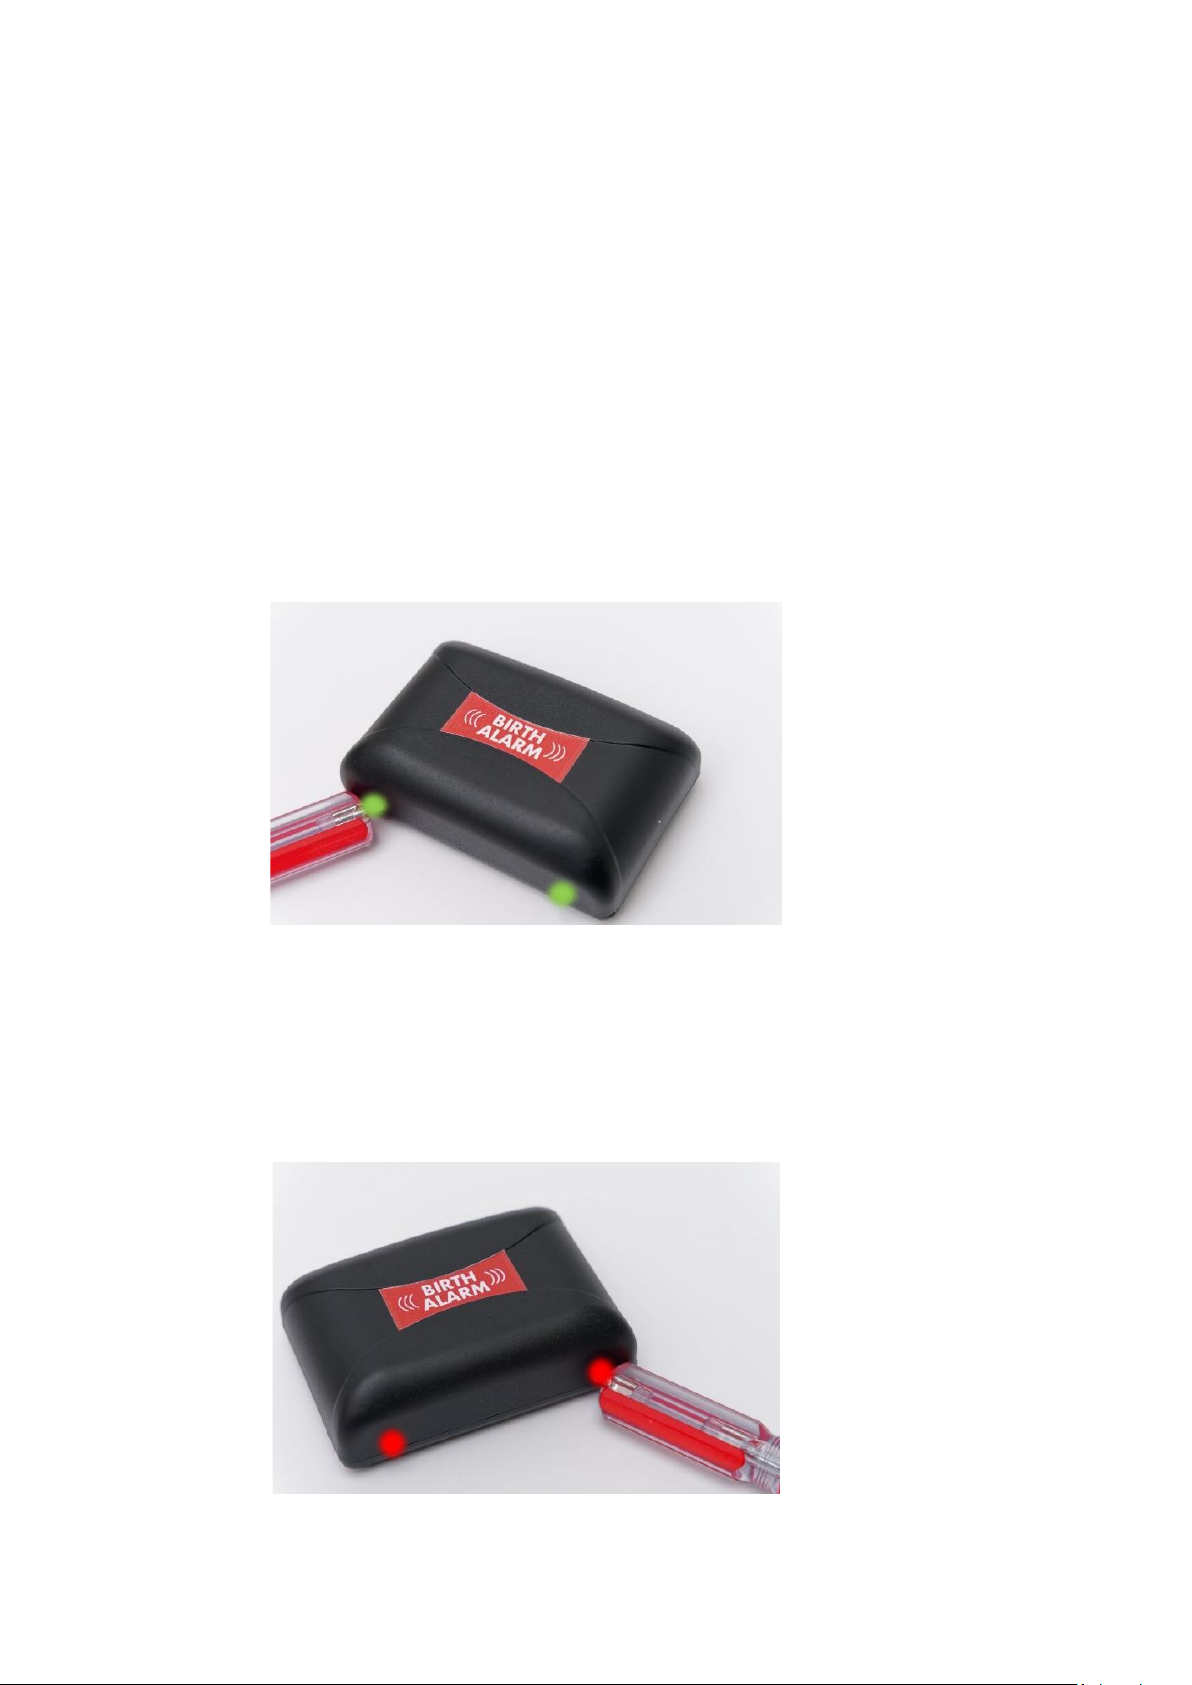
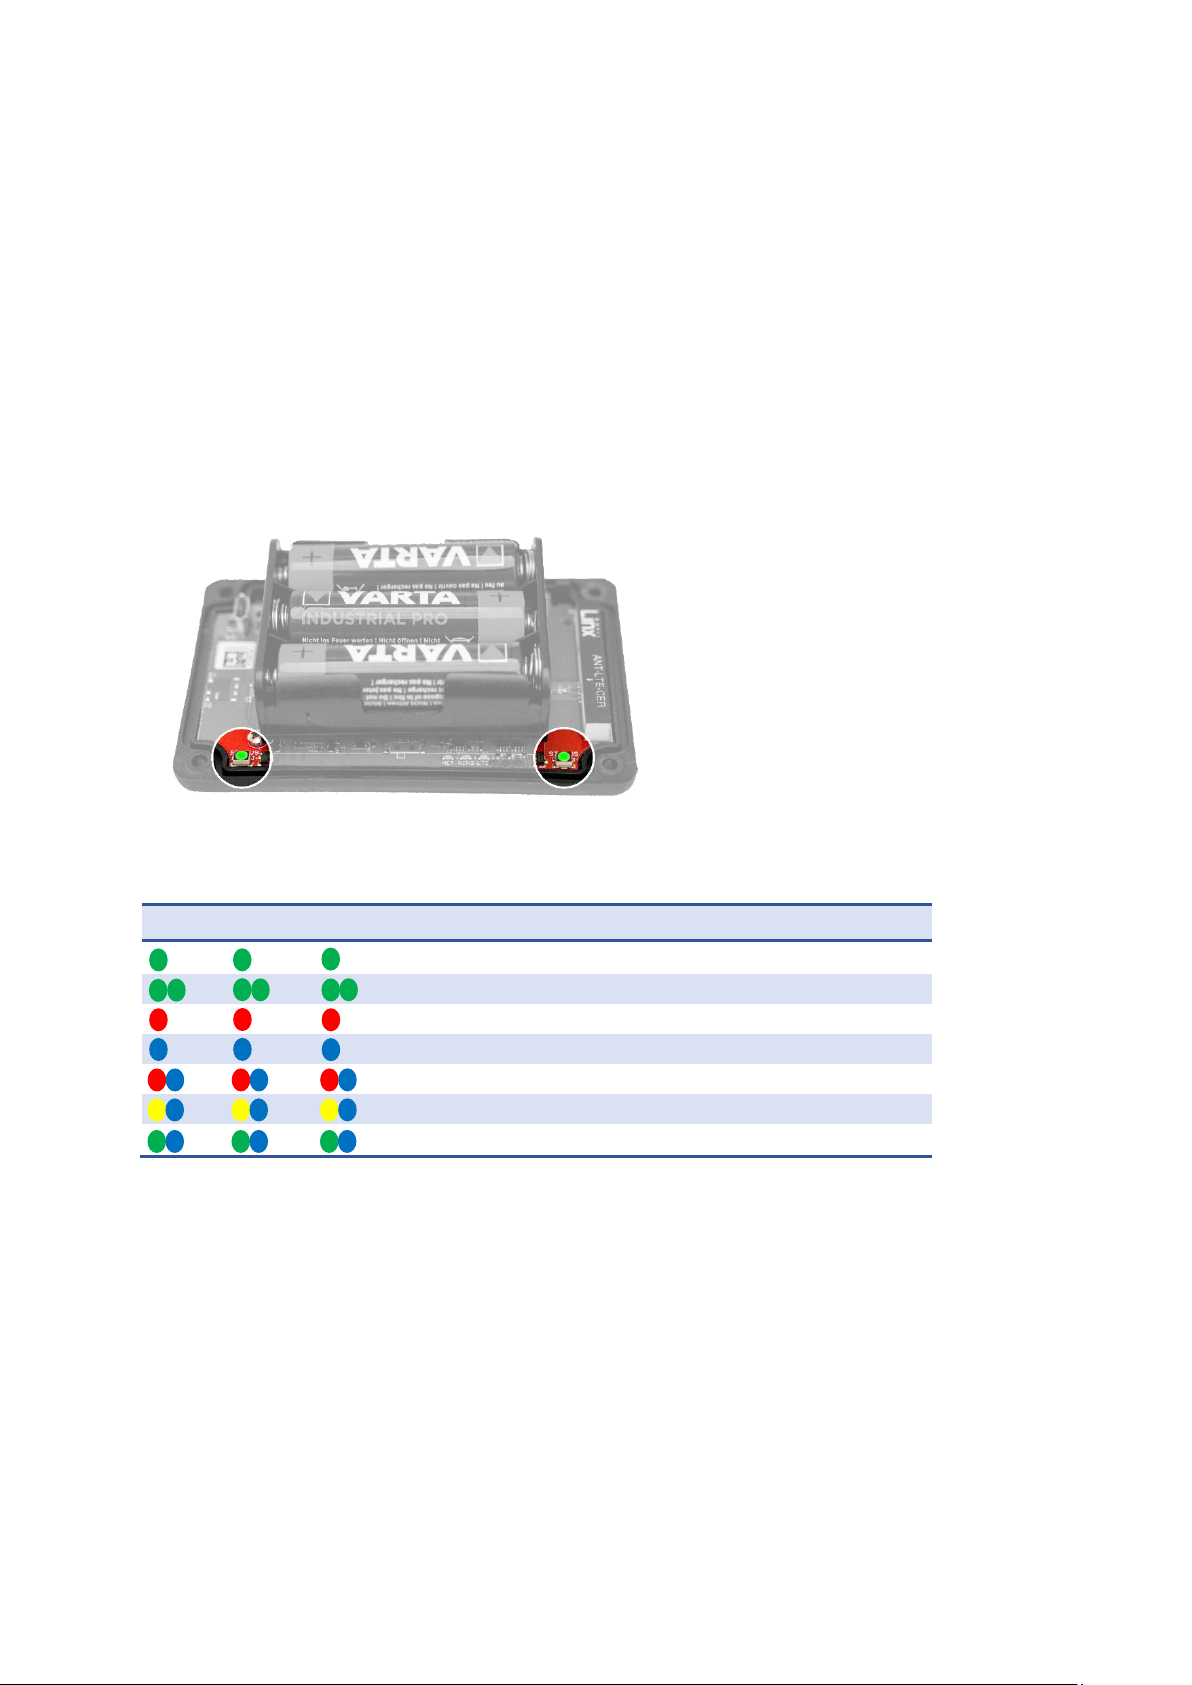
3.2 Switching on/off
You can switch the Birth Alarm Premium Plus on/off and operate it with the
back of the special screwdriver supplied. On one of the long sides of the casing
you will find 2 status lights.
To switch the Birth Alarm Premium Plus ON , proceed as follows:
•
Place the back of the special screwdriver against one of the status lights. (it does
not matter which of the two)
•
The Birth Alarm Premium Plus will now switch on. Switching on can be
recognized by the green illumination of both status lights.
•
You can now remove the back of the screwdriver.
•
Your Birth Alarm Premium Plus is now switched on. The status lights will briefly
illuminate green every ~5 seconds to indicate that the Birth Alarm Premium Plus is
switched on and that the status is correct.
To switch the Birth Alarm Premium Plus OFF, proceed as follows:
•
Place the back of the special screwdriver against one of the status lights. (it does
not matter which of the two)
•
The Birth Alarm Premium Plus will now switch off.
•
You can now remove the back of the screwdriver.
•
Your Birth Alarm Premium Plus is now switched of. The status lights will stay off.

4 De binnenkant van de Birth Alarm Premium Plus
Below is an overview of the system components.
1. Batteries.
2. The 2 statuslights
3. Simcard slot
4. USB-connector (for software update)
5. LTE status ledjes
5.1 “NET” – led
5.2 “RING” – led
5.3 “LTE” – led
4.1 Installing/replacing batteries
When replacing the batteries of your Birth Alarm Premium Plus you should always use Alkaline
batteries (preferably "Duracell", "Panasonic", or "Varta"). The use of rechargeable batteries is
not recommended. Always replace a set of batteries by 3 at a time. If you cannot remove the
batteries with your fingers, you can also use a small screwdriver, as long as it is done with
care.
The batteries must always be placed with their negative pole on the spring.
Always use new batteries at the beginning of the foaling season!
If you will not be using Birth Alarm Premium Plus for a longer period of time, such as after the
foaling season, you should remove the batteries to prevent them from leaking and causing
damage to your Birth Alarm Premium Plus.
2
3
4
5
2
1
5.1
5.2
5.3
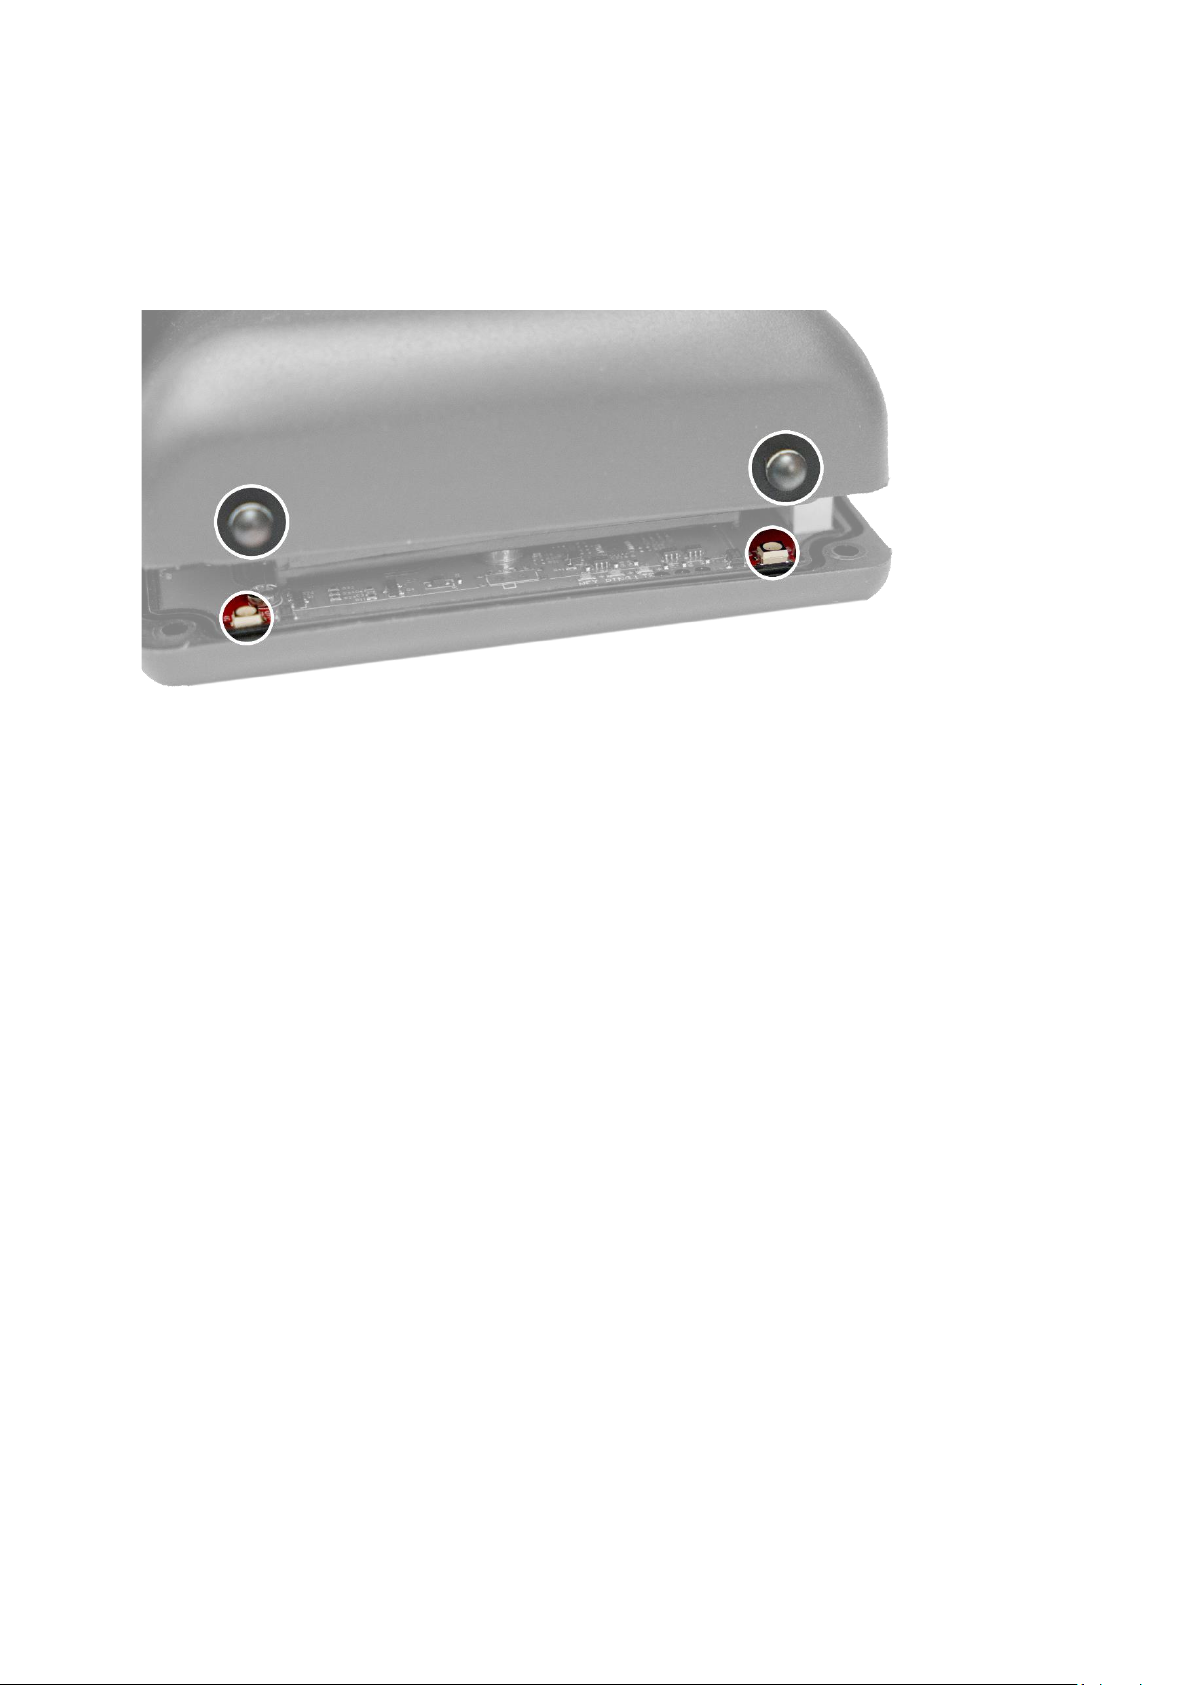
4.2 Housing of the Birth Alarm Premium Plus
The housing of the Birth Alarm Premium Plus can only be screwed down in one way. The light
guides on the long side of the lid must be on top of the status lights when the lid is screwed
down.

4.3 SIM-kaart plaatsen
Your Birth Alarm Premium Plus works with a
Nano‐sim. Modern SIM cards come in a break‐
out frame from which you can click out the
nanosim format. Please note that the nano‐sim
format is usually the smallest format at . (12.3 x
8.8 mm).
The provided simcard is already installed and tested. You don’t need to do anything more.
When for some reason you want to use your own simcard, that is possible. Your Birth Alarm Premium
Plus will act as a standard Birth Alarm Premium without Telegram functionality. We advise to
download and use the manual from the standards Birth Alarm Premium.
5 The lights (Leds) of the Birth Alarm Premium Plus
To view the status of your Birth Alarm Premium Plus, there are 2 status lights on your Birth Alarm
Premium Plus and 3 small lights on the inside that only relate to the internal LTE module.
5.1 The status lights
The status lights are on the long side of the casing. These lights both behave exactly the same. The
double version is only meant to be able to read the status of your mare both left and right at all
times.
In the table below you will find the possible colour patterns that the Birth Alarm Premium Plus can
display.
Kleur / patroon
Betekenis
Stand-by, battery okay
Stand-by, battery okay, sleepmode enabled
Stand-by, battery weak
LTE/GSM active, connecting
LTE/GSM active, network reception insufficient
LTE/GSM active, network reception moderate
LTE/GSM active, network reception good

5.2 De LTE lamps
The LTE lamps are only visible when opening the Birth Alarm Premium Plus. Normally, you don't need
to read these lamps, but it may come in handy if you are experiencing problems with the mobile
connection and contact customer service for this.
In the table below you will find the possible flashing patterns and their meaning:
Naam
Patroon
Betekenis
NET
Module connects to the network
NET
Module is connected to the network
NET
Module is calling
RING
Module receives a call
LTE
Module is switched on

6 The Birth Alarm Premium Plus and Telegram.
6.1 Download Telegram
To receive alarms on you phone, you need to download and install the Telegram Messenger app first.
6.1.1 IPhone:
Navigate to the Appstore app on your IOS device, and search for “Telegram messenger”.
You will find the Telegram messenger app with the blue paper-plane logo.
You can also scan the QR code below to get started.
6.1.2 Android
Navigate on your Android device to “PlayStore” and search for “Telegram Messenger”. You can
recognize the right app at the small paper-plane symbol.
You can also scan the QR code below to get started.
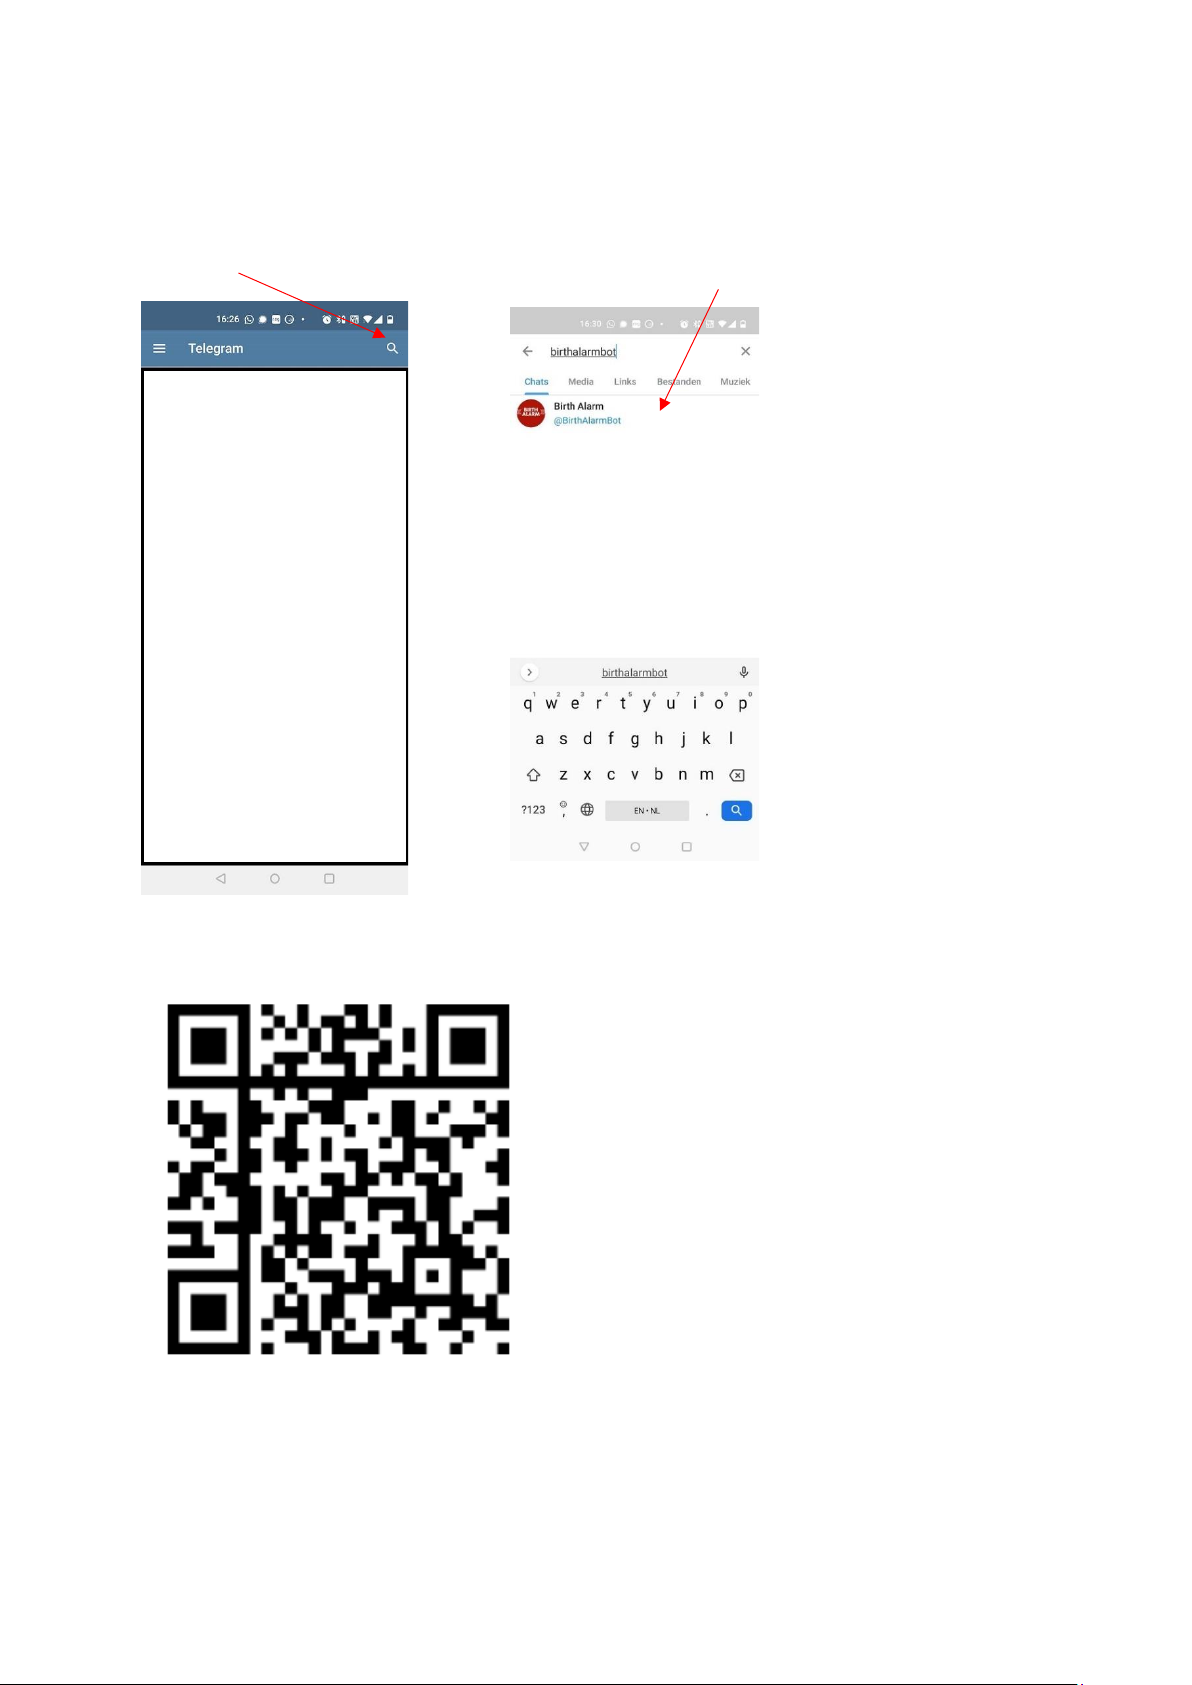
6.2 Connect with the BirthAlarmBot
When you have successfully installed the Telegram App, please start it up and push the Magnifying
glass symbol in the upper right corner. Next you type “BirthAlarmBot”.
Alternatively you can also scan the code below to connect with the BirthAlarmBot.
Once completed you are now connected with the BirthAlarmBot.

6.3 The features of the BirthAlarmBot
6.3.1 Get Started
Click on “BEGIN” at the bottom of the screen. If this button is not visible you can send “/start”
alternatively. Next you see some special buttons in the lower part of the screen.
6.3.2 Select Language
Completely at the bottom of the screen you see some country-flags. In case you wish to change the
language spoken by the Bot. By selecting the flag of your preferred language, the language will
change accordingly.
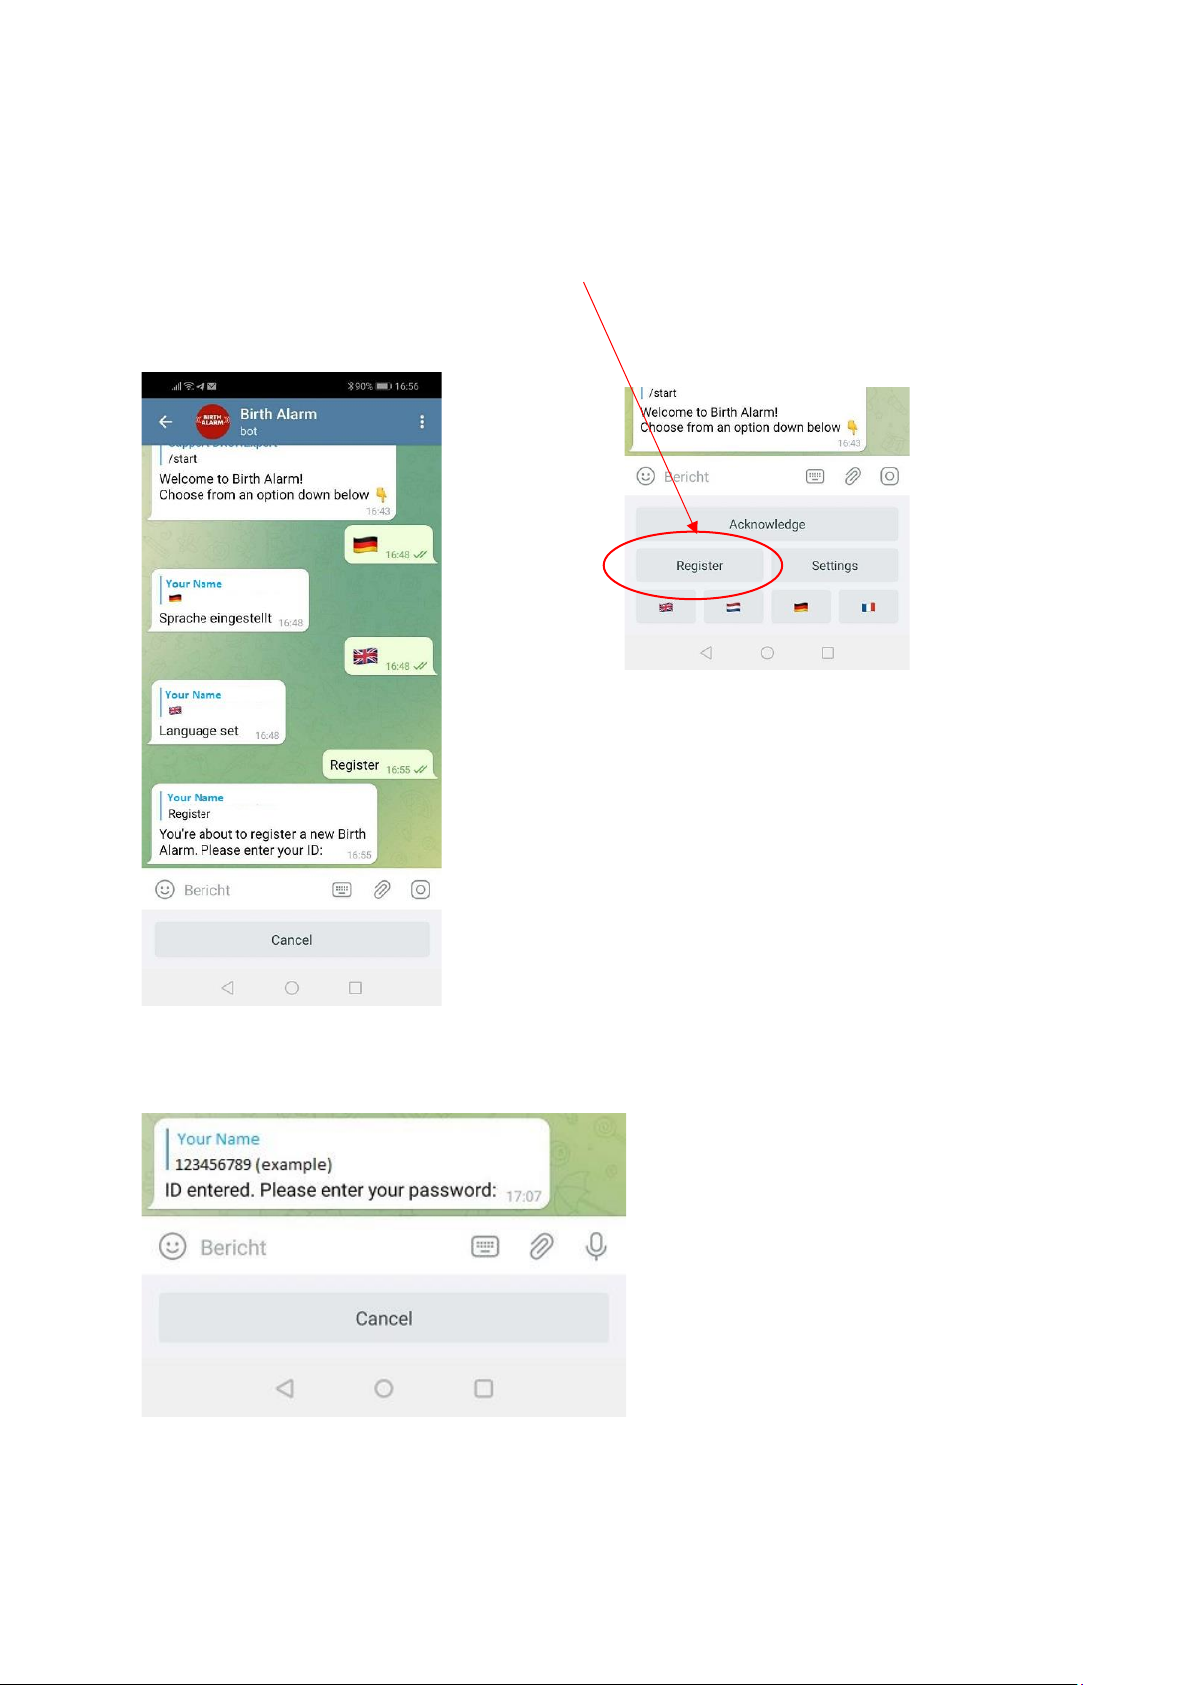
6.3.3 Registering your Birth Alarm Premium Plus
You are now ready to register your Birth Alarm Premium Plus to your telegram app.
Click on “Register/Registrieren/Enrigistrer/Registreren”.
Next, fill in your ID. You can find this information on your Birth Alarm Premium Plus Activation data
sheet.
Next you fill in your password from the same activation datasheet.
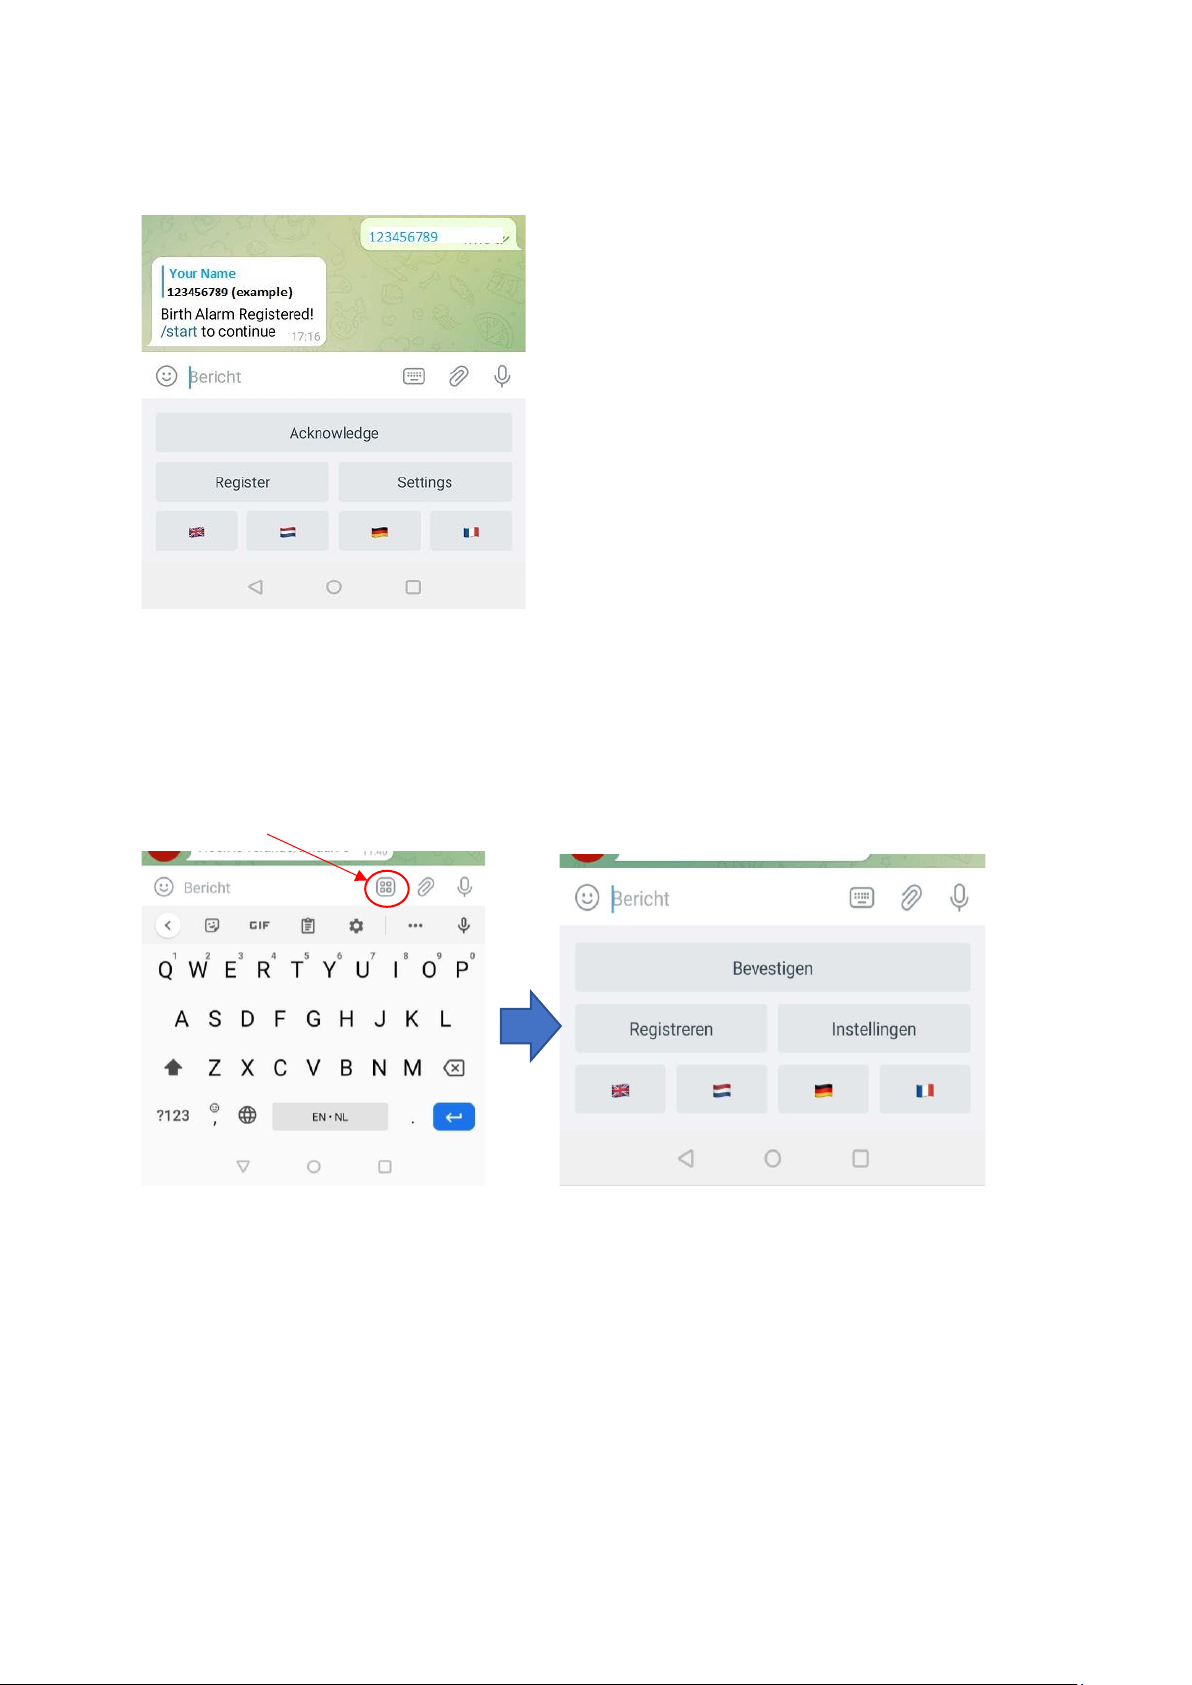
After you have entered your ID and password the BirthAlarmBot will confirm when the registration is
completed.
6.3.4 The BirthAlarmBot custom keyboard.
The BirthAlarmBot has a special keyboard containing all knobs needed to control the Birth Alarm
Premium Plus. In case you can’t see the keyboard, you can always switch to this keyboard by the
button below.

6.4 Notifications in a group-chat
You can add the BirthAlarmBot to a Telegram chat-group. The advantage is that more people will be
alarmed when a mare gets contractions. All people in this chat-group will get a notification at the
same time.
6.4.1 Creating a Telegram chatgroup
To start a new chatgroup click on the blue pencil symbol at the right bottom corner.
Next you see 3 options. Select “New Group”
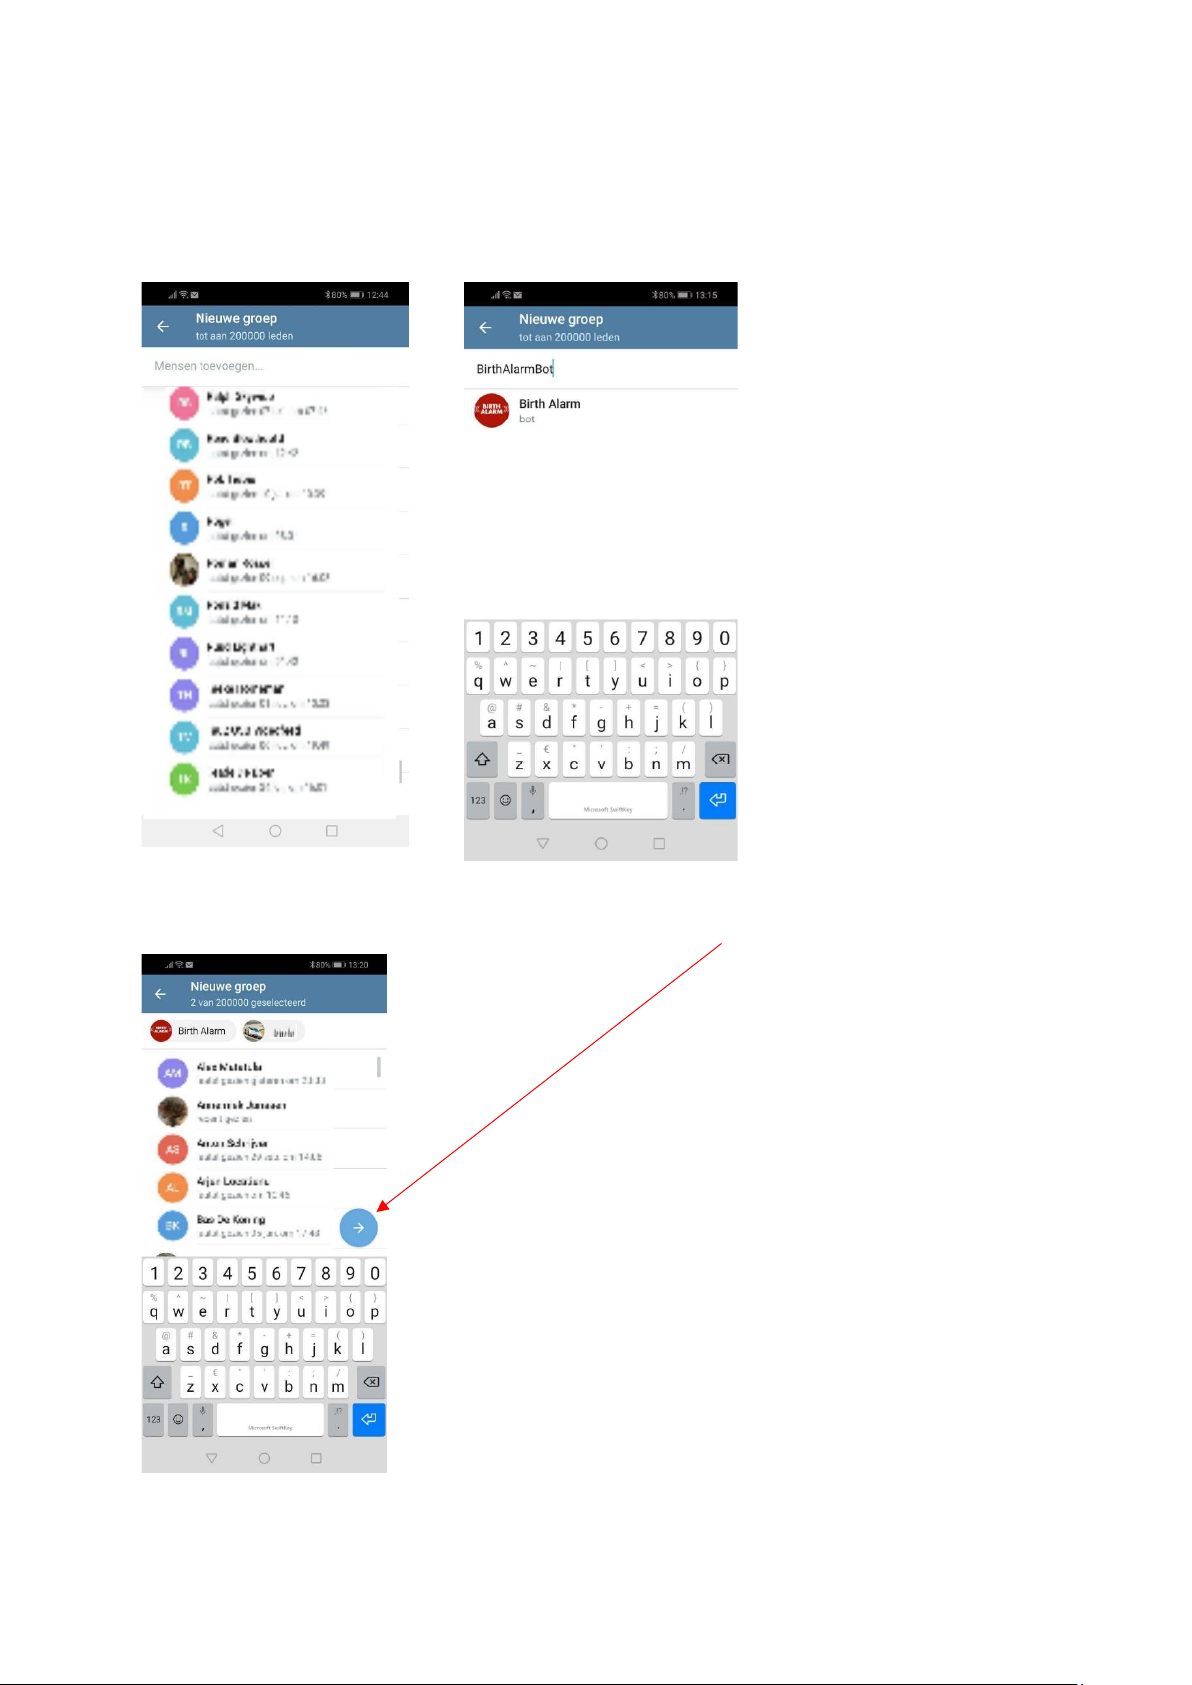
6.4.2 Adding group members
In the searchbox you can now search the names of the groupmembers, and add them to the chat.
Also type in “BirthAlarmBot” and add this Bot to the chat.
When all members and the BirthAlarmBot are added klik the blue arrow.

In the next field you can give the new group a name. (f.e. “BirhtAlarmGroup”). Next click the blue
checkmark.
The group is now created and the BirthAlarmBot will help you with further steps.
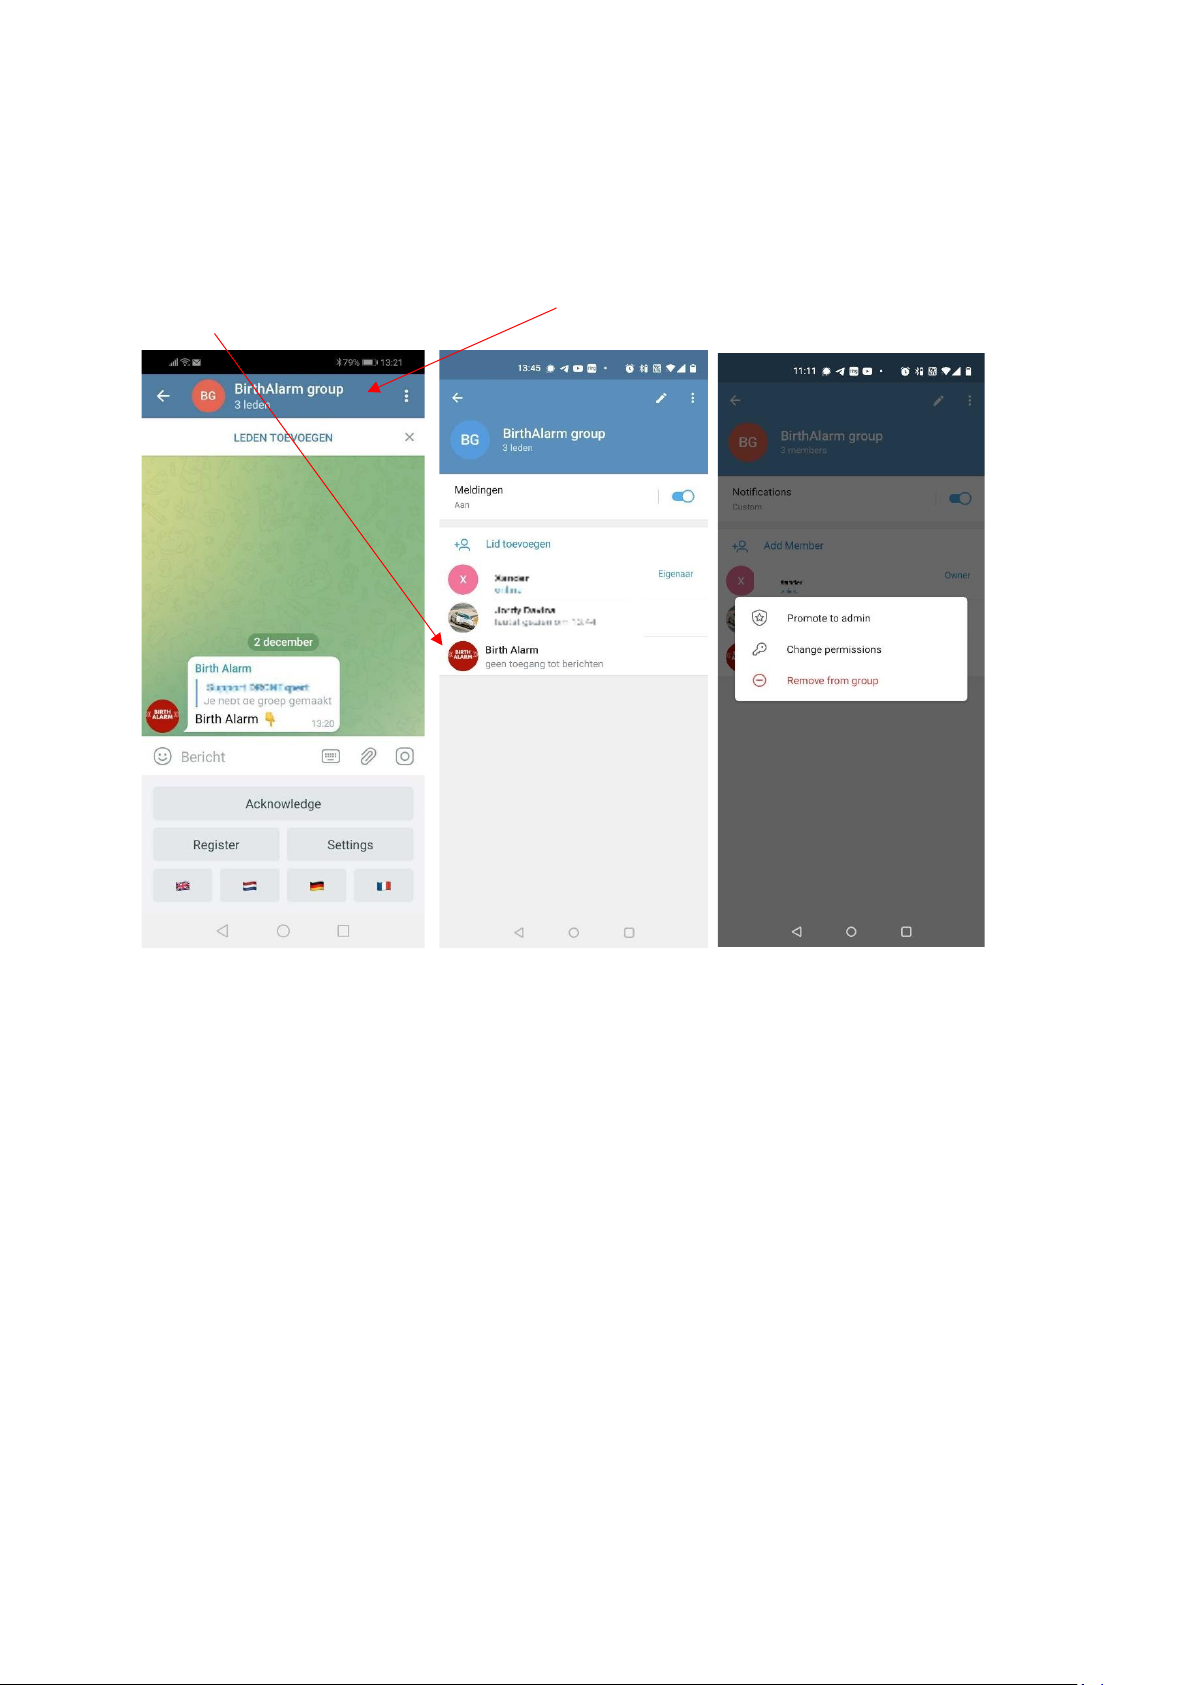
6.4.3 Applying administrator rights to the BirthAlarmBot
It is important to give administrator permissions to the BirthAlarmBot. If the Bot has no rights it will
not be able to act on commands and create alarms.
6.4.3.1 Changing rights on Android
Click on the blue bar at the top, where the groupname is displayed. Next click and hold the
“BirthAlarmBot”.
Now a new window appears, click on “Promote to Admin”.
The BirthAlarmBot will now be able to function properly.
Table of contents
Other Birth Alarm Security System manuals


Popular Security System manuals by other brands


Honeywell
Honeywell 4219 installation instructions

Sercomm
Sercomm SD-SRN09 Quick installation guide

Mobilarm
Mobilarm Crewsafe IRC-001 user manual

Honeywell
Honeywell LYNX Touch Security System user guide

DMP Electronics
DMP Electronics XR150 series user guide

Honeywell
Honeywell nfs2-3030 Programming and operations manual