Black & Decker LGC120 User manual

1
20VMAX*LIT IUMGARDENCULTIVATOR
INSTRUCTION MANUAL
Model Number LGC120
*Maximum initial battery pack voltage
(measured without a workload) is 20
volts. Measured under a workload,
nominal voltage is 18.
Model Number LGC120
EY INFORMATION YOU SHOULD NOW:
• Inspect and thoroughly clean your cultivator at the start of each use.
• The blades on this tool are not intended to be sharp. Do not sharpen.
• Make sure area is clear of other persons or pets prior to starting operation.
• Make sure work area is clear of underground wires and pipes.
SAVE T IS MANUAL FOR FUTURE REFERENCE.
VEA EL ESPAÑOL EN LA CONTRAPORTADA.
POUR LE FRANÇAIS, VOIR LA COUVERTURE ARRIÈRE.
INSTRUCTIVO D OP RACIÓN, C NTROS D S RVICIO Y
PÓLIZA D GARANTÍA. ADV RT NCIA: LÉAS ST
INSTRUCTIVO ANT S D USAR L PRODUCTO.
Thank you for choosing Black & Decker! Go
to www.BlackandDecker.com/NewOwner
to register your new product.
PLEASE READ BEFORE RETURNING
T IS PRODUCT FOR ANY REASON:
If you have a question or experience a problem with your
Black & Decker purchase, go to
WWW.BLACKANDDECKER.COM/INSTANTANSWERS
for instant answers 24 hours a day.
If you canʼt find the answer or do not have access to the internet,
call 1-800-544-6986 from 8 a.m. to 5 p.m. ST Mon. - Fri
to speak with an agent.
Please have the catalog number available when you call.

2
TABLE OF CONTENTS
Safety Guidelines - Definitions.................................................2
General Safety For All Tools ....................................................2
Components.............................................................................4
Important Safety Instructions for Battery Chargers..................4
Important Safety Instructions for Battery Packs.......................6
Charging Procedure.................................................................6
Installing/Removing Battery Pack ............................................8
Assembly .................................................................................8
Operation .................................................................................9
Accessories..............................................................................10
Maintenance ............................................................................10
Troubleshooting .......................................................................11
Service Information ..................................................................11
Full Two-Year Home Use Warranty..........................................11
GENERAL SAFETY FOR ALL TOOLS
WARNING: TO REDUCE RISK OF INJURY:
• Before any use, be sure everyone using this tool reads and
understands all safety instructions and other information contained
in this manual.
• Save these instructions and review frequently prior to use and in
instructing others.
READ ALL INSTRUCTIONS
WARNING: When using electric gardening appliances, basic
safety precautions should always be followed to reduce risk of
fire, electric shock, and personal injury:
•ALWAYS WEAR EYE PROTECTION – Wear safety glasses or
goggles at all times when this unit is in use. Safety glasses are
available at extra cost at your local Black & Decker Service Center
or authorized service facility. Always use face or dust mask if
operation is dusty.
•DRESS PROPERLY – Do not wear loose clothing or jewelry. They
can be caught in moving parts. Rubber gloves and substantial
rubber soled footwear are recommended when working outdoors.
Donʼt operate the unit when barefoot or wearing open sandals.
Wear long pants to protect your legs. Wear protective hair covering
to contain long hair.
•DO NOT allow children to operate this unit.
• MAKE SURE that other persons and pets are at least 20 ft. away.
• AVOID ACCIDENTALLY STARTING – Donʼt carry unit with finger
on trigger.
• DONʼT OVERREAC – Keep proper footing and balance at all times.
• AVOID DANGEROUS ENVIRONMENTAL CONDITIONS – Do not
use electric units in damp or wet locations. Donʼt use the unit in the rain.
• DO NOT OPERATE unit in gaseous or explosive atmospheres. Motors
in these units normally spark, and the sparks might ignite fumes.
• STORE IDLE APPLIANCES INDOORS – When not in use, units
should be stored indoors in a dry locked-up place out of reach of
children.
SAFETY GUIDELINES - DEFINITIONS
It is important for you to read and understand this manual. The
information it contains relates to protecting YOUR SAF TY and
PR V NTING PROBL MS. The symbols below are used to help
you recognize this information.
DANGER: Indicates an imminently hazardous situation which,
if not avoided, will result in death or serious injury.
WARNING: Indicates a potentially hazardous situation which,
if not avoided, could result in death or serious injury.
CAUTION: Indicates a potentially hazardous situation which, if
not avoided, may result in minor or moderate injury.
CAUTION: Used without the safety alert symbol indicates a
potentially hazardous situation which, if not avoided, may result in
property damage.

3
• STAY ALERT– Watch what you are doing. Use common sense. Do
not operate unit when you are tired or under the influence of
alcohol, drugs, or medications.
• KEEP ANDS AND FEET AWAY FROM WORK AREA.
• DO NOT C ARGE APPLIANCE IN RAIN OR IN WET
LOCATIONS.
• T IS POWER UNIT is intended to be correctly orientated in a
vertical or floor mount position.
ADDITIONAL WARNINGS FOR CULTIVATORS
• DO NOT use unit if switch does not turn it on or off. A unit that
cannot be controlled with the switch is dangerous and must be
repaired.
• DISCONNECT battery pack from unit before making any
adjustments, changing accessories, or storing the unit. Such
preventative safety measures reduce the risk of starting the unit
accidentally.
• DO NOT FORCE T E APPLIANCE – It will do the job better and
with less likelihood of a risk of injury at the rate for which it was
designed. Clutch will activate if overpowered.
• USE T E RIG T APPLIANCE – Do not use this unit for any job
except that for which it is intended.
WARNING: Some dust created by this product contains
chemicals known to the State of California to cause cancer,
birth defects or other reproductive harm. Some examples of
these chemicals are:
• compounds in fertilizers
• compounds in insecticides, herbicides and pesticides
• arsenic and chromium from chemically treated lumber
To reduce your exposure to these chemicals, wear approved
safety equipment such as dust masks that are specially designed
to filter out microscopic particles.
• DAMAGE TO APPLIANCE – If you strike or become entangled
with a foreign object, stop tool immediately, check for damage and
have any damage repaired before further operation is attempted.
Do not operate with a broken tine.
• MAINTAIN APPLIANCES WIT CARE – Keep cutting edge clean
for best performance and to reduce the risk of injury. Follow
instructions for lubricating and changing accessories. Keep handles
dry, clean, and free from oil and grease.
• C ECK DAMAGED PARTS – Before further use of the unit, a
shroud or other part that is damaged should be carefully checked to
determine that it will operate properly and perform its intended
function. Check for alignment of moving parts, binding of moving
parts, breakage of parts, mounting, and any other condition that
may affect its operation. Any part that is damaged should be
properly repaired or replaced by an authorized service center
unless otherwise indicated elsewhere in this manual.
• KEEP S ROUD IN PLACE AND IN WORKING ORDER.
• BEFORE STARTING GARDEN CULTIVATOR, check the soil and
remove any large stones, twigs and so forth. Keep checking to
make sure the area is clear as you work.
• IF YOU ENCOUNTER AN OBSTRUCTION during work despite all
of these precautions, turn off the Cultivator. Remove battery prior
to attempting to remove the obstruction.
• Keep tine area clean.
WARNING: Oscillating tines. Keep at a safe distance.
BATTERY RELATED WARNINGS
• A BATTERY OPERATED UNIT with integral batteries or a
separate battery pack must be recharged only with the specified
charger for the battery. A charger that may be suitable for one type
of battery may create a risk of fire when used with another battery.
• USE BATTERY OPERATED UNIT ONLY with specifically
designated battery pack. Use of any other batteries may create a
risk of fire.
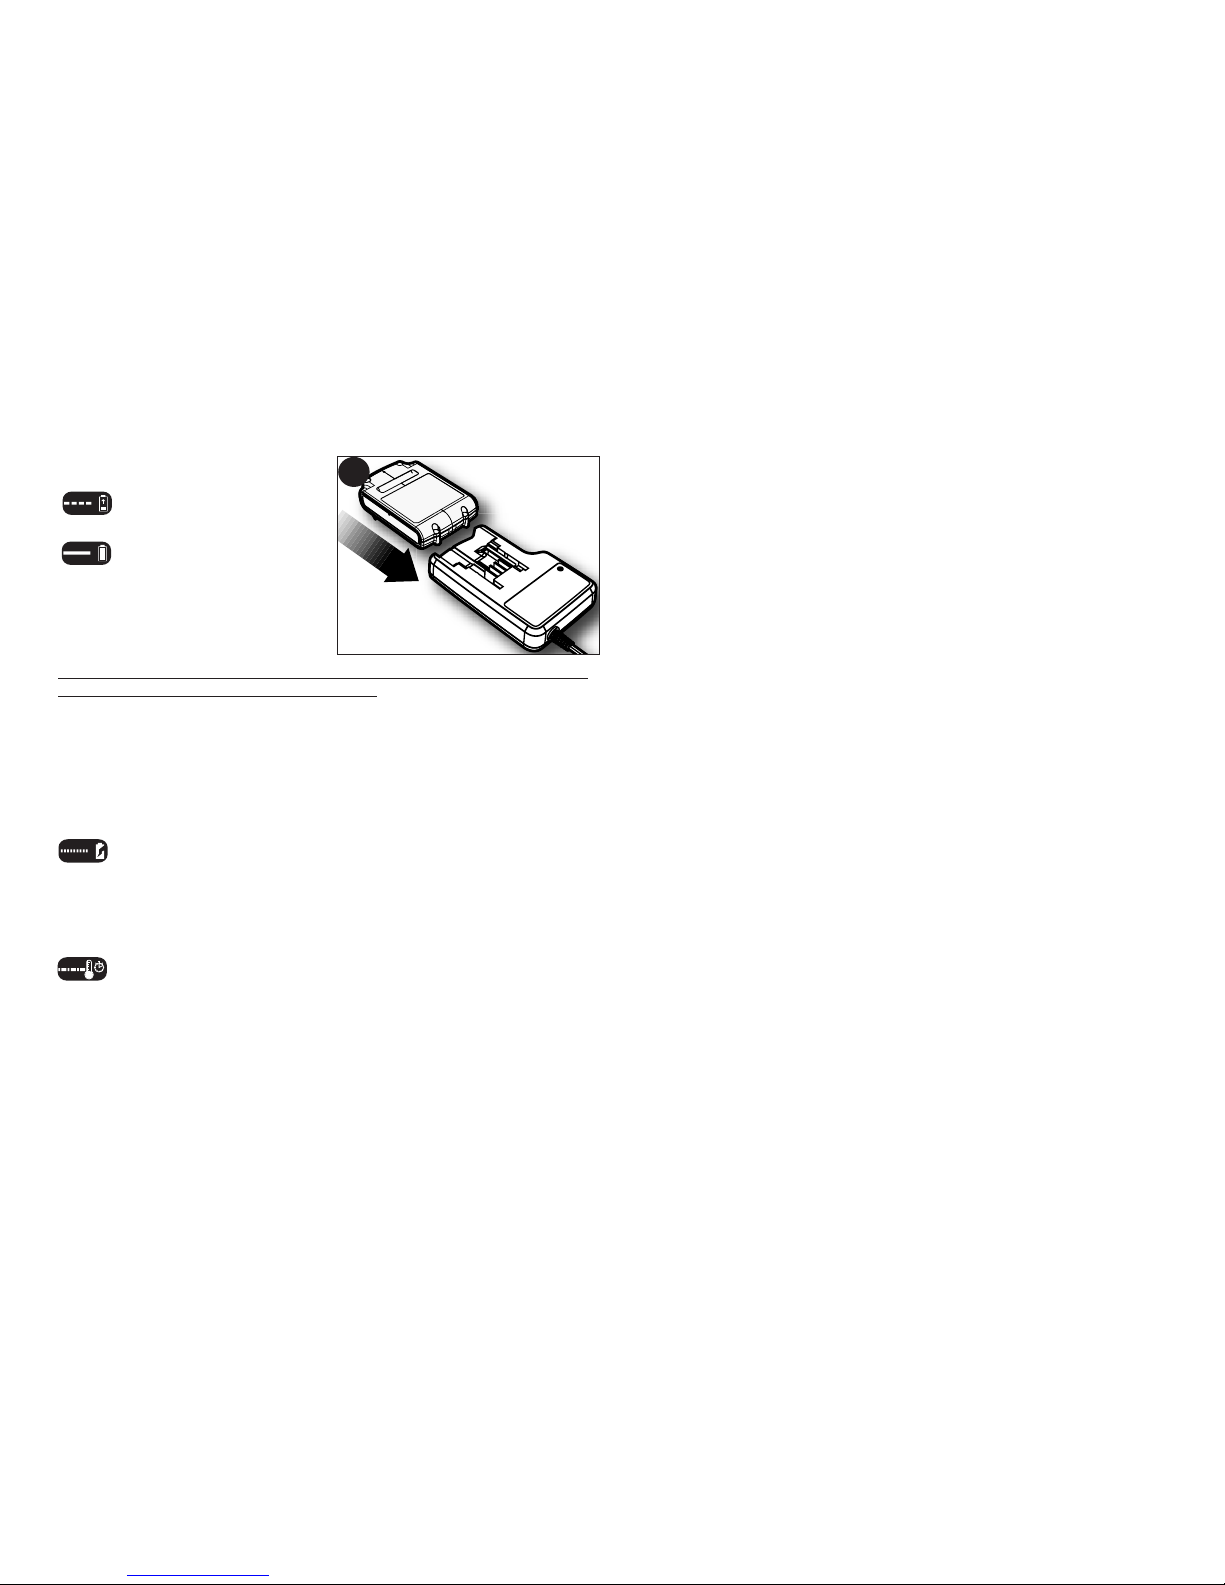
•DO NOT USE OR C ARGE battery in rain.
•USE ONLY the supplied charger.
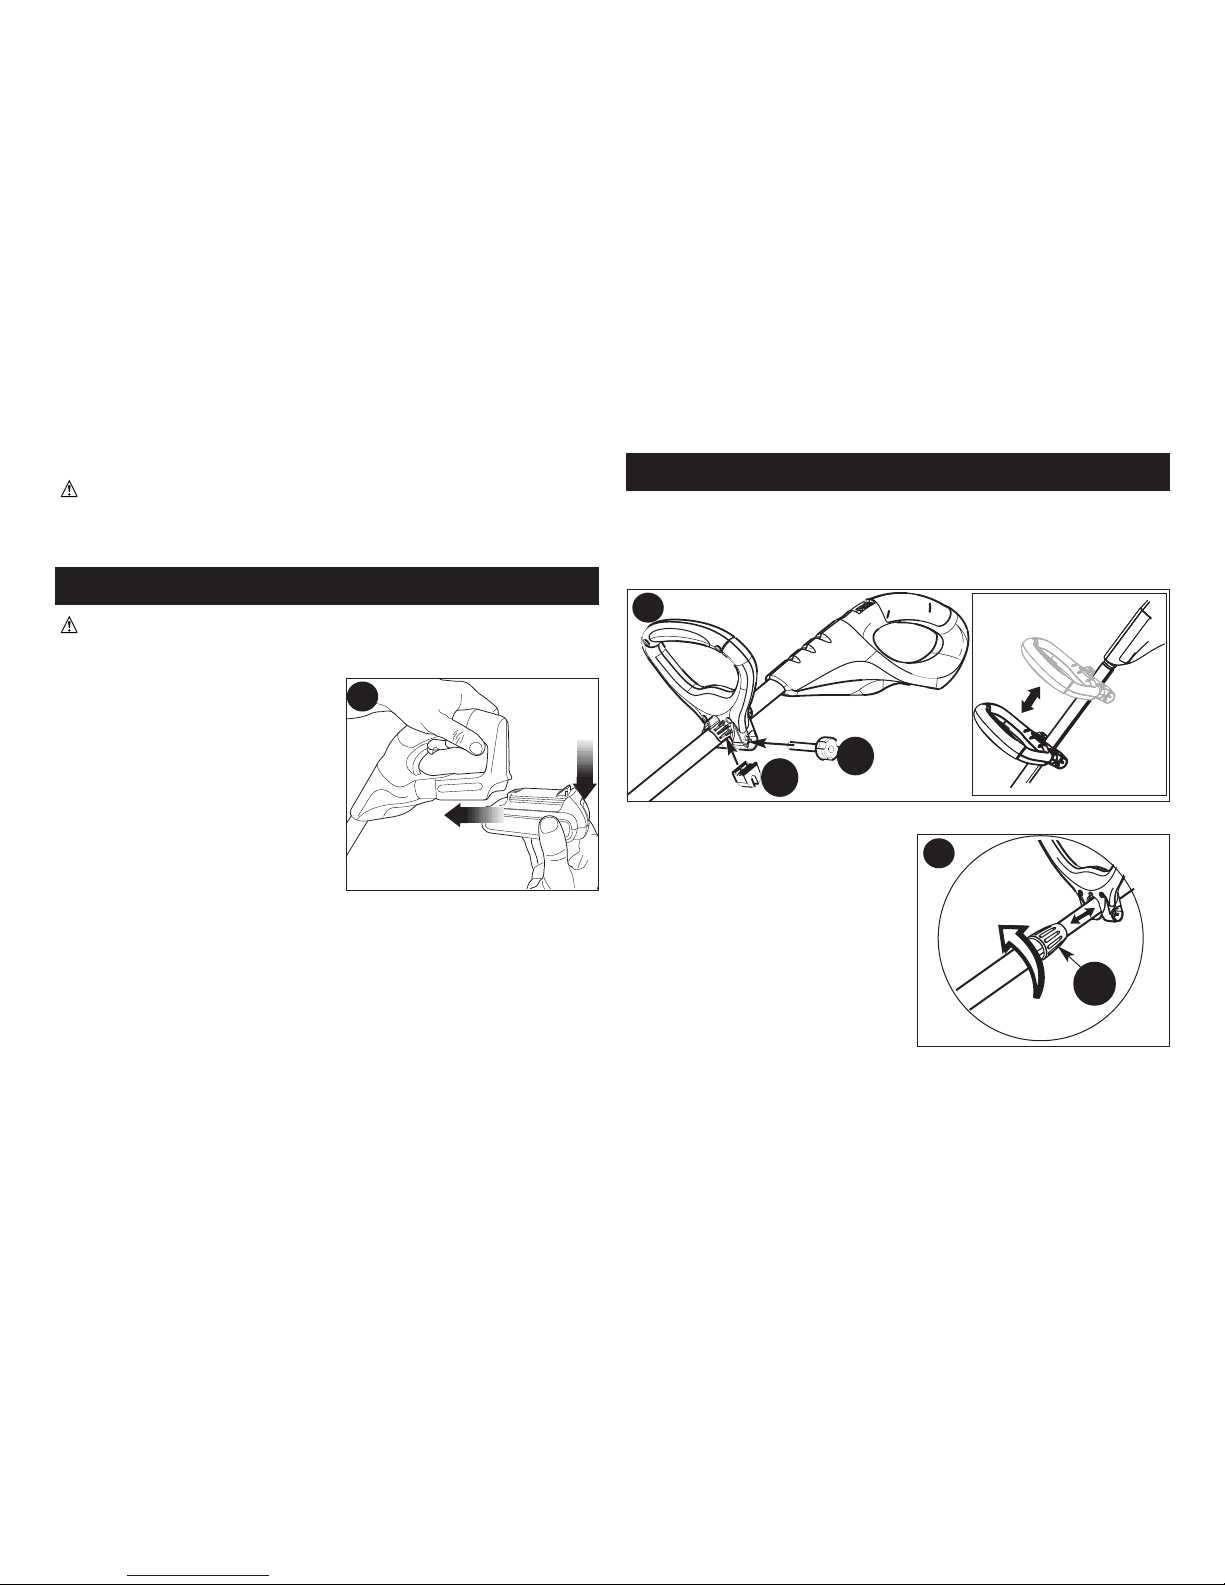
•REMOVE BATTERY before servicing, cleaning or removing
material from the cultivator. Remove battery from your cultivator
and carry by the front handle when not in use.
• EXERCISE CARE in handling batteries in order not to short the
battery with conducting materials such as rings, bracelets and
keys. The battery or conductor may overheat and cause burns.

4
This manual contains important safety instructions for battery
chargers.
• Before using charger, read all instructions and cautionary markings
on charger, battery pack, and product using battery pack.
WARNING: Shock hazard. Do not allow any liquid to get
inside charger.
CAUTION: Burn hazard. To reduce the risk of injury, charge
only designated Black & Decker batteries. Other types of batteries
may burst causing personal injury and damage.
• DO NOT OPEN OR MUTILATE the batteries. Released
electrolyte is corrosive and may cause damage to the eyes or skin.
It may be toxic if swallowed.
This device complies with Part 15 of the FCC Rules. Operation is
subject to the following two conditions: (1) this device may not
cause harmful interference, and (2) this device mustaccept any
interference received, including interference that may cause
undesired operation.
NOTE: This equipment has been tested and found to comply with
the limits for Class B digital device, pursuant to part 15 of the FCC
Rules. These limits are designed to provide reasonable protection
against harmful interference in a residential installation. This
equipment generates, uses and can radiate radio frequency
energy and, if not installed and used in accordance with the
instructions, may cause harmful interference to radio
communications. However, there is no guarantee that interference
will not occur in a particular installation. If this equipment does
cause harmful interference to radio or television reception, which
can be determined by turning the equipment off and on, the user is
encouraged to try to correct the interference by one or more of the
following measures:
. Reorient or relocate the receiving antenna. . Increase the
separation between the equipment and the receiver. Connect the
equipment into an outlet on a circuit different from that to which the
receiver is connected.
. Consult the dealer or an experienced radio/TV technician for help.
The label on your tool may include the following symbols.
V................volts A ....................amperes
Hz..............hertz ..................watts
min ............minutes ..................alternating current
..........direct current no ..................no load speed
..............Class II Construction ....................earthing terminal
............safety alert symbol .../min ............strokes
per minute
COMPONENTS
1
2
3
4
5
7
6
1. LGC120 Cultivator
2. Shroud
3. Tine assembly (x 2)
4. Auxiliary handle
5. Battery pack
6. Lock-off button
7. Switch trigger
Charger (not shown)
IMPORTANT SAFETY INSTRUCTIONS
FOR BATTERY C ARGERS

5
•Do not expose charger to rain or snow.
•Pull by plug rather than cord when disconnecting charger. This
will reduce risk of damage to electric plug and cord.
•Make sure that cord is located so that it will not be stepped on,
tripped over, or otherwise subjected to damage or stress.
•Do not use an extension cord unless it is absolutely necessary.
Use of improper extension cord could result in risk of fire, electric
shock, or electrocution.
•Do not place any object on top of charger or place the charger
on a soft surface that might block the ventilation slots and
result in excessive internal heat. Place the charger in a position
away from any heat source. The charger is ventilated through
slots in the top and the bottom of the housing.
•Do not mount charger on wall or permanently affix charger to
any surface. The charger is intended to use on a flat, stable surface
(i.e., table top, bench top).
•Do not operate charger with damaged cord or plug — have
them replaced immediately.
•Do not operate charger if it has received a sharp blow, been
dropped, or otherwise damaged in any way. Take it to an
authorized service center.
•Do not disassemble charger; take it to an authorized service
center when service or repair is required. Incorrect reassembly may
result in a risk of electric shock, electrocution or fire.
•Disconnect the charger from the outlet before attempting any
cleaning. This will reduce the risk of electric shock. Removing the
battery pack will not reduce this risk.
•NEVER attempt to connect 2 chargers together.
•The charger is designed to operate on standard household
electrical power (120 Volts). Do not attempt to use it on any
other voltage.
SAVE THESE INSTRUCTIONS
CAUTION: Under certain conditions, with the charger
plugged in to the power supply, the charger can be shorted by
foreign material. Foreign materials of a conductive nature such as,
but not limited to, steel wool, aluminum foil, or any buildup of
metallic particles should be kept away from charger cavities. Always
unplug the charger from the power supply when there is no battery
pack in the cavity. Unplug charger before attempting to clean.
•The charger supplied with this product is intended to be plugged
in such that it is correctly orientated in a vertical or floor
mount position.
•DO NOT attempt to charge the battery pack with any chargers
other than the ones in this manual. The charger and battery
pack are specifically designed to work together.
•These chargers are not intended for any uses other than
charging designated Black & Decker rechargeable batteries.
Any other uses may result in risk of fire, electric shock or
electrocution.
•An extension cord must have adequate wire size (AWG or
American Wire Gauge) for safety. The smaller the gauge
number of the wire, the greater the capacity of the cable, that is 16
gauge has more capacity than 18 gauge. hen using more than
one extension to make up the total length, be sure each individual
extension contains at least the minimum wire size
Recommended Minimum Wire Size for Extension Cords
Minimum Gauge for Cord Sets
Volts Total Length of Cord in Feet
120V 0-25 26-50 51-100 101-150
240V 0-50 51-100 101-200 201-300
Ampere Rating
More Not more American Wire Gauge
Than Than
0-6 18 16 16 14
6-10 18 16 14 12
10 - 12 16 16 14 12
12 - 16 14 12 Not Recommended

6
WARNING: Never attempt to open the battery pack for any
reason. If battery pack case is cracked or damaged, do not insert into
charger. Do not crush, drop or damage battery pack. Do not use a
battery pack or charger that has received a sharp blow, been
dropped, run over or damaged in any way (i.e., pierced with a nail,
hit with a hammer, stepped on). Damaged battery packs should be
returned to service center for recycling.
WARNING: Fire hazard. Do not store or carry battery so
that metal objects can contact exposed battery terminals. For
example, do not place battery in aprons, pockets, tool boxes, product
kit boxes, drawers, etc., with loose nails, screws, keys, etc.
Transporting batteries can possibly cause fires if the battery
terminals inadvertently come in contact with conductive
materials such as keys, coins, hand tools and the like. The US
Department of Transportation Hazardous Material Regulations (HMR)
actually prohibit transporting batteries in commerce or on airplanes
(i.e., packed in suitcases and carry-on luggage) UNLESS they are
properly protected from short circuits. So when transporting individual
batteries, make sure that the battery terminals are protected and well
insulated from materials that could contact them and cause a short
circuit. NOTE: LI-ION batteries should not be put in checked
baggage.
STORAGE RECOMMENDATIONS
1. The best storage place is one that is cool and dry away from
direct sunlight and excess heat or cold.
2. Long storage will not harm the battery pack or charger.
C ARGING PROCEDURE
The standard charger provided will charge a fully depeleted battery
in about 8 hours.
1. Plug the charger into an appropriate outlet before inserting the
battery pack.
IMPORTANT SAFETY INSTRUCTIONS
FOR BATTERY PACKS
WARNING: For safe operation, read this manual and manuals
originally supplied with tool before using the charger.
The battery pack is not fully charged out of the carton. Before using
the battery pack and charger, read the safety instructions below.
Then follow charging procedures outlined.
READ ALL INSTRUCTIONS
•Do not incinerate the battery pack even if it is severely
damaged or is completely worn out. The battery pack can
explode in a fire. Toxic fumes and materials are created when
battery packs are burned.
•Do not charge or use battery in explosive atmospheres, such
as in the presence of flammable liquids, gases or dust. Inserting
or removing the battery from the charger may ignite the dust or fumes.
•If battery contents come into contact with the skin, immediately
wash area with mild soap and water. If battery liquid gets into the
eye, rinse water over the open eye for 15 minutes or until irritation
ceases. If medical attention is needed, the battery electrolyte for Li-
ion batteries is composed of a mixture of liquid organic carbonates
and lithium salts.
•Contents of opened battery cells may cause respiratory
irritation. Provide fresh air. If symptoms persist, seek medical
attention.
WARNING: Burn hazard. Battery liquid may be flammable if
exposed to spark or flame.
•Charge the battery packs only in Black & Decker chargers.
•DO NOT splash or immerse in water or other liquids. This may
cause premature cell failure.
•Do not store or use the tool and battery pack in locations
where the temperature may reach or exceed 105°F (40˚C) (such
as outside sheds or metal buildings in summer).

7
2. Insert the battery pack into the
charger as shown in figure A.
3. The green L D will flash
indicating that the battery is
being charged.
4. The completion of
charge is indicated by the
green L D remaining on
continuously. The pack is
fully charged and may be
used at this time or left on
the charger.
Recharge discharged batteries as soon as possible after use or
battery life may be greatly diminished. It is recommended that the
batteries be recharged after each use.
C ARGER DIAGNOSTICS
This charger is designed to detect certain problems that can arise
with the battery packs or the power source. Problems are indicated
by one L D flashing in different patterns.
BAD BATTERY
The charger can detect a weak or damaged battery. The red
L D flashes in the pattern indicated on the label. If you see
this bad battery blink pattern, do not continue to charge the
battery. Return it to a service center or a collection site for
recycling.
OT/COLD PACK DELAY
When the charger detects a battery that is excessively hot or
excessively cold, it automatically starts a Hot/Cold Pack
Delay, suspending charging until the battery has normalized.
After this happens, the charger automatically switches to the
Pack Charging mode. This feature ensures maximum battery
life. The red L D flashes in the pattern indicated on the label
when the hot / cold pack delay is detected.
LEAVING T E BATTERY IN T E C ARGER
The charger and battery pack can be left connected with the green
L D glowing indefinitely. The charger will keep the battery pack
fresh and fully charged.
IMPORTANT C ARGING NOTES
1. Longest life and best performance can be obtained if the battery
pack is charged when the air temperature is between 60°F and
80°F (16°- 27°C). DO NOT charge the battery pack in an air
temperature below +40°F (+4.5°C), or above +105°F (+40.5°C).
This is important and will prevent serious damage to the battery
pack.
2. The charger and battery pack may become warm to touch while
charging. This is a normal condition, and does not indicate a
problem. To facilitate the cooling of the battery pack after use, avoid
placing the charger or battery pack in a warm environment such as
in a metal shed, or an uninsulated trailer.
3. If the battery pack does not charge properly:
a. Check current at receptacle by plugging in a lamp or other
appliance
b. Check to see if receptacle is connected to a light switch
which turns power off when you turn out the lights.
c. Move charger and battery pack to a location where the
surrounding air temperature is approximately 60°F and 80°F
(16°- 27°C)
d. If charging problems persist, take the tool, battery pack and
charger to your local service center.
4. The battery pack should be recharged when it fails to produce
sufficient power on jobs which were easily done previously. DO
NOT CONTINU to use under these conditions. Follow the
charging procedure. You may also charge a partially used pack
whenever you desire with no adverse affect on the battery pack.
5. Foreign materials of a conductive nature such as, but not limited
to, steel wool, aluminum foil, or any buildup of metallic particles
should be kept away from charger cavities. Always unplug the
charger from the power supply when there is no battery pack in the
cavity. Unplug charger before attempting to clean.
A

8
ASSEMBLY
AUXILIARY ANDLE ASSEMBLY (FIG. C)
•Position handle on upper tube to desired height.
•nsure locking block (8) is aligned with groove in tube.
•Assemble and tighten bolt (9).
POLE EXTENSION (FIG. D)
•Loosen collar (10).
•xtend poles to desired length.
•Tighten collar.
6. Do not freeze or immerse charger in water or any other liquid.
WARNING: Shock hazard. Do not allow any liquid to get
inside charger. Never attempt to open the battery pack for any
reason. If the plastic housing of the battery pack breaks or cracks,
return to a service center for recycling.
INSTALLING / REMOVING BATTERY PACK
WARNING: Make certain the lock-off button is engaged to
prevent switch actuation before removing or installing battery.
TO INSTALL BATTERY PACK:
Insert battery pack into tool until an
audible click is heard (figure B).
TO REMOVE BATTERY PACK:
Depress the battery release button
in the back of the battery pack and
pull battery pack out of tool
(figure B).
B
9
8
10
C
D

9
S ROUD ASSEMBLY (FIG. E)
•Position the open center of the
shroud (11) over the lower
housing from the bottom (near
output shaft).
•Align snap tabs to housing. Apply
even pressure to shroud until
snap sound is heard.
•nsure all snap features are
engaged correctly.
WARNING: NEVER OPERATE TOOL WIT OUT S ROUD
FIRMLY IN PLACE.
TINE ASSEMBLY (FIG. F)
WARNING: Release trigger, allow tines to come to a
complete stop, and remove
battery.
•Place tine (12) on shaft (13),
making sure flat in hole of tine is
aligned with flat on shaft. Be sure
to push tine completely onto
shaft.
•Insert straight end of pin (14) into
shaft hole. Push in pin
completely until the looped end
bottoms out against the shaft.
•Repeat for other tine. For tine
removal reverse the process.
OPERATION (FIG. G, )
WARNING: Make sure that other persons and pets are at
least 20 feet away.
•Hold tool as shown in figure G.
•Lift unit out of soil.
•Slide lock off button (15) (Fig. ).
•Pull switch trigger (16). (Fig. )
For the first cultivating each season,
it is best to move slowly because dirt
is packed down. Subsequent
cultivating will be completed more
rapidly. Do not attempt to cultivate
when the soil is wet - for electrical
safety and to prevent clogging of the
tines. If you must cultivate under
conditions that cause the tines to
become clogged, release trigger,
wait for tines to come to complete
stop! R MOV BATT RY!
Remove clogged material with a
stick or screwdriver. To continue to
operate the tool in a clogged condition
will seriously overload the motor.
NOTE: This unit is equipped with a
built in clutching mechanism used to
prevent permanent damage to the
unit due to an obstruction in the tines
or overloaded working conditions. If
the clutch is engaged, the unit will
make a loud clicking sound. This
noise will persist until the obstruction
or overload condition is removed.
Remove battery prior to attempting
to remove obstructions from tines.
The clutch mechanism is not adjustable by the user.
E
11
F
13
12
14
G
H
16
15

10
CAUTION: Do not attempt to unclog the tines by dropping or
tapping the tool on the ground. This can damage the unit.
STORAGE
Remove and clean any debris from the outside of the cultivator and
inside of shroud before storage. See MAINTENANCE section.
CAUTION: DO NOT ANG ON T E SWITC TRIGGER
Note: Do not store the tool on or adjacent to fertilizers or chemicals.
Such storage can cause rapid corrosion.
PREVENTING CORROSION
WARNING: Wear proper gloves and eye protection when
cleaning tool.
Fertilizers and other garden chemicals contain agents that greatly
accelerate the corrosion of metals. If you use the tool in areas where
fertilizers or chemicals have been used, the tool should be cleaned
immediately afterwards.
Wipe all exposed parts with a damp cloth. You may lubricate only
metal parts with a light petroleum based oil. When cleaning, DO NOT
immerse tool in water or spray it with a hose.
ACCESSORIES
Replacement tines (RT400) for use with your tool are available from
your local dealer or authorized service center. If you need assistance
regarding accessories, please call: 1-800-544-6986.
WARNING: The use of any accessory not recommended for use
with this tool could be hazardous.
T E RBRC™ SEAL
The RBRC™ (Rechargeable Battery Recycling
Corporation) Seal on the LI-ION battery (or battery
pack) indicates that the costs to recycle the battery (or
battery pack) at the end of its useful life have already
been paid by Black & Decker.
RBRC™ in cooperation with Black & Decker and other battery
users, has established programs in the United States to facilitate the
collection of spent LI-ION batteries. Help protect our environment and
conserve natural resources by returning the spent LI-ION battery to
an authorized Black & Decker service center or to your local retailer
for recycling. You may also contact your local recycling center for
information on where to drop off the spent battery. RBRC™ is a
registered trademark of the Rechargeable Battery Recycling Corporation.
MAINTENANCE
The cutting blades are made from high quality, hardened steel and
with normal usage, they will not require resharpening. However, if
you accidentally hit a wire fence, stones, glass or other hard objects,
you may put a nick in the blade. There is no need to remove this nick
as long as it does not interfere with the movement of the blade. If it
does interfere, remove the battery from the unit and use a fine
toothed file or sharpening stone to remove the nick.
If you drop the trimmer, carefully inspect it for damage. If the blade is
bent, housing cracked, or if you see any other condition that may
affect the trimmerʼs operation contact your local Black & Decker
Service Center for repairs before putting it back into use.
Fertilizers and other garden chemicals contain agents which greatly
accelerate the corrosion of metals. Do not store the tool on or
adjacent to fertilizers or chemicals.
With the battery removed, use only mild soap and a damp cloth to
clean the tool. Never let any liquid get inside the tool; never immerse
any part of the tool into a liquid.

11
For assistance with your product, visit our website
www.blackanddecker.com for the location of the service center
nearest you or call the BLACK & D CK R help line at 1-800-544-6986.
SERVICE INFORMATION
All Black & Decker Service Centers are staffed with trained personnel
to provide customers with efficient and reliable power tool service.
Whether you need technical advice, repair, or genuine factory
replacement parts, contact the Black & Decker location nearest you.
To find your local service location, refer to the yellow page directory
under "Tools— lectric" or call: 1-800-544-6986 or visit
www.blackanddecker.com.
FULL TWO-YEAR OME USE WARRANTY
Black & Decker (U.S.) Inc. warrants this product for two years against
any defects in material or workmanship. The defective product will be
replaced or repaired at no charge in either of two ways.
The first is to return the product to the retailer from whom it was
purchased (provided that the store is a participating retailer). Returns
See ʻTools-Electricʼ
– Yellow Pages –
for Service & Sales
Imported by
Black & Decker (U.S.) Inc.,
701 . Joppa Rd.
Towson, MD 21286 U.S.A.
should be made within the time period of the retailerʼs policy for
exchanges (usually 30 to 90 days after the sale). Proof of purchase
may be required. Please check with the retailer for their specific
return policy regarding returns that are beyond the time set for
exchanges.
The second option is to take or send the product (prepaid) to a
Black & Decker owned or authorized Service Center for repair or
replacement at our option. Proof of purchase may be required.
Black & Decker owned and authorized Service Centers are listed
under "Tools- lectric" in the yellow pages of the phone directory.
This warranty does not apply to accessories. This warranty gives you
specific legal rights and you may have other rights which vary from
state to state or province to province. Should you have any
questions, contact the manager of your nearest Black & Decker
Service Center. This product is not intended for commercial use.
LATIN AMERICA: This warranty does not apply to products sold in
Latin America. For products sold in Latin America, check country
specific warranty information contained in the packaging, call the
local company or see the website for warranty information.
FREE WARNING LABEL REPLACEMENT: If your warning labels
become illegible or are missing, call 1-800-544-6986 for a free
replacement.
TROUBLES OOTING
Problem Possible Cause Possible Solution
• Tool will not
start.
• Battery will not
charge.
• Battery not
installed properly.
• Battery not
charged.
• Lock-out button not
actuated.
• Battery not
inserted into
charger.
• Check battery installation.
• Check battery charging
requirements.
• Pull back on lock
button/actuate trigger.
• Insert battery into charger
until green L D appears.
Charge up to 8 hours if
battery totally drained.

CULTIVATEUR DE JARDIN
A PILE AU LIT IUM DE 20 V MAX.*
MODE DʼEMPLOI
12
Numéro de catalogue LGC120
ALIRE AVANT DE RETOURNER CE PRODUIT
POUR QUELQUE RAISON QUE CE SOIT :
Si des questions ou des problèmes surgissent après lʼachat dʼun produit
Black & Decker, consulter le site Web
TTP://WWW.BLACKANDDECKER.COM/INSTANTANSWERS
Si la réponse est introuvable ou en lʼabsence dʼaccès à lʼInternet,
composer le 1 800 544-6986 de 8 h à 17 h HN , du lundi au vendredi,
pour parler avec un agent.
Prière dʼavoir le numéro de catalogue sous la main lors de lʼappel.
pour obtenir des réponses instantanément 24 heures par jour.
CONSERVER CE MANUEL POUR UN USAGE ULTERIEUR.
Merci dʼavoir choisi Black & Decker!
Consulter le site Web
www.BlackandDecker.com/NewOwner
pour enregistrer votre nouveau produit.
*La tension initiale maximale du bloc-piles (mesurée sans charge de
travail) est de 20 volts. La tension nominale, mesurée avec une
charge de travail, est de 18 volts.
Numéro de modèle
LGC120
VOICI DES RENSEIGNEMENTS IMPORTANTS
QUʼIL VOUS FAUT CONNAÎTRE :
• Inspecter et nettoyer soigneusement le cultivateur au début de
chaque utilisation.
• Les lames de lʼoutil ne sont pas affûtées et sont prévues pour une
utilisation telle quelle. N'affilez pas.
• Avant le démarrage de lʼoutil, sʼassurer que la zone soit dégagée,
exempte de personnes ou dʼanimaux.
• Sʼassurer que la zone de travail est exempte de câbles et de
conduites souterrains.

13
TABLE DES MATIÈRES
Directives de sécurité - Définitions...........................................13
Sécurité générale pour tous les outils......................................14
Composantes...........................................................................16
Importantes directives de sécurité pour
les chargeurs de piles ..............................................................16
Importantes directives de sécurité pour les blocs-piles ...........18
Procédure de charge ...............................................................19
Installation/dépose du bloc-piles..............................................20
Assemblage .............................................................................21
Fonctionnement .......................................................................22
Accessoires..............................................................................23
ntretien...................................................................................23
Dépannage ..............................................................................23
Information sur les réparations ................................................24
Garantie complète de deux ans pour une
utilisation domestique ..............................................................24
LIGNES DIRECTRICES EN MATIERE DE
SECURITE - DEFINITIONS
Il est important que vous lisiez et compreniez ce mode dʼemploi.
Les informations quʼil contient concernent VOTR SÉCURITÉ et
visent à ÉVIT R TOUT PROBLÈM . Les symboles ci-dessous
servent à vous aider à reconnaître cette information.
DANGER : Indique une situation dangereuse imminente
qui, si elle nʼest pas évitée, causera la mort ou des graves
blessures.
AVERTISSEMENT : Indique une situation potentiellement
dangereuse qui, si elle nʼest pas évitée, pourrait causer la
mort ou de graves blessures.
MISE EN GARDE : Indique une situation potentiellement
dangereuse qui, si elle nʼest pas évitée, pourrait causer des
blessures mineures ou modérées.
MISE EN GARDE : Utilisé sans le symbole dʼalerte à la
sécurité, indique une situation potentiellement dangereuse
qui, si elle nʼest pas évitée, peut résulter en des dommages à
la propriété.

14
• NE PAS TROP TENDRE LES BRAS – Conserver son équilibre en
tout temps.
• ÉVITER LES CONDITIONS ENVIRONNEMENTALES
DANGEREUSES – Ne pas utiliser dʼappareils électriques dans
des lieux humides ou mouillés. Ne pas utiliser lʼappareil sous la pluie.
• NE PAS UTILISER lʼappareil dans un milieu gazeux ou déflagrant.
Les moteurs de ces appareils produisent normalement des
étincelles qui pourraient enflammer des vapeurs.
• RANGER LES APPAREILS INUTILISÉS À LʼINTÉRIEUR –
Lorsquʼils ne sont pas utilisés, les appareils doivent être rangés à
lʼintérieur, dans un endroit sec et verrouillé, hors de portée des
enfants.
• ÊTRE VIGILANT – Surveiller le travail effectué. Faire preuve de
jugement. Ne pas utiliser lʼappareil en cas de fatigue ou sous
lʼinfluence dʼalcool, de drogues ou de médicaments.
• TENIR LES MAINS ET LES PIEDS ÉLOIGNÉS DE LA ZONE DE
TRAVAIL.
• NE PAS C ARGER LʼAPPAREIL SOUS LA PLUIE OU DANS
DES ENDROITS UMIDES.
• CE BLOC D'ALIMENTATION est correctement orienté supporté
dans une position verticale ou au plancher.
AVERTISSEMENTS SUPPLÉMENTAIRES POUR
LES CULTIVATEURS
• NE PAS utiliser lʼappareil si lʼinterrupteur ne fonctionne pas. Un
appareil dont lʼinterrupteur ne fonctionne pas est dangereux et doit
être réparé.
•DEBRANC ER le bloc-piles de lʼunité avant tout réglage,
changement dʼaccessoires ou rangement. De telles mesures de
sécurité préventives réduisent le risque de mettre lʼunité en
marche accidentellement.
•NE PAS FORCER LʼAPPAREIL – le travail sera mieux fait à la
vitesse pour lequel il a été conçu et sans risque de blessure.
Lʼembrayage sʼactionnera sʼil est surmotorisé.
•UTILISER LE BON APPAREIL – Ne pas utiliser cet appareil pour
tout autre type de travail sauf pour celui pour lequel il est prévu.
SÉCURITÉ GÉNÉRALE POUR TOUS LES OUTILS
AVERTISSEMENT : POUR REDUIRE LE RISQUE DE
BLESSURES :
• Avant tout usage, sʼassurer que tout utilisateur de cet outil lise et
comprenne toutes les directives de sécurité ainsi que lʼinformation
comprise dans le présent manuel.
• Conserver ces directives et les examiner fréquemment avant
dʼutiliser lʼappareil ou de donner des directives aux autres.
LIRE TOUTES CES DIRECTIVES.
AVERTISSEMENT : Lorsque des outils de jardinage
électriques sont utilisés, des précautions de base en matière de
sécurité doivent toujours être suivies afin de réduire le risque
dʼincendie, de choc électrique et de blessure corporelle.
•TOUJOURS PORTER UNE PROTECTION OCULAIRE – Porter
des lunettes de sécurité ou des lunettes protectrices en tout temps
lors de lʼutilisation de lʼappareil. Des lunettes protectrices sont
vendues séparément au centre de réparation Black & Decker ou à
un centre de réparation autorisé. Utiliser toujours un masque facial
ou anti-poussière si lʼopération génère de la poussière.
• Sʼ ABILLER DE MANIÈRE APPROPRIÉE – Ne pas porter de
vêtements amples ni de bijoux. Ils peuvent sʼenchevêtrer dans les
pièces mobiles. Des gants en caoutchouc et des chaussures
adéquates à semelles en caoutchouc sont recommandés lors de
travaux à lʼextérieur. Ne pas utiliser lʼappareil si vous êtes pieds
nus ou si vous portez des sandales ouvertes. Porter des pantalons
longs pour protéger vos jambes. Se couvrir les cheveux sʼils sont
longs.
• NE PAS permettre lʼutilisation de lʼappareil par des enfants.
•Sʼassurer que les personnes et animaux sont éloignés dʼau moins
6,1 m (20 pi).
• ÉVITER LES DÉMARRAGES ACCIDENTELS – Ne pas
transporter lʼoutil avec le doigt sur la détente.

15
AVERTISSEMENT : Certaines poussières produites par
cet appareil contiennent des produits chimiques reconnus par
lʼÉtat de la Californie comme étant cancérigènes et pouvant
entraîner des anomalies congénitales et dʼautres dangers
relatifs à la reproduction. Ils comprennent notamment :
• composés présents dans les engrais,
• composés présents dans les insecticides, herbicides et pesticides
• arsenic et chrome provenant de bois traité chimiquement
Pour réduire votre exposition à ces produits chimiques, porter un
équipement de sécurité approuvé comme un masque anti-
poussières conçu spécialement pour filtrer les particules microscopiques.
•APPAREIL ENDOMMAGÉ – Si lʼappareil frappe quelque chose ou
devient enchevêtré avec un objet, il faut lʼarrêter immédiatement, le
débrancher, puis lʼinspecter à la recherche de dommages qui
devront être réparés avant une autre utilisation. Ne pas utiliser si
lʼappareil présente une dent brisée.
•ENTRETENIR LʼAPPAREIL AVEC SOIN – Garder le bord des
dents propre afin dʼassurer une performance maximale et pour
réduire le risque de blessure. Suivre les consignes de graissage et
de changement dʼaccessoires. Maintenir les poignées sèches,
propres et exemptes dʼhuile et de graisse.
•VÉRIFIER LES PIÈCES ENDOMMAGÉES – Avant toute utilisation
ultérieure de lʼappareil, un flasque endommagé, ou toute autre
pièce endommagée, doit être examiné soigneusement afin
dʼassurer un fonctionnement adéquat selon sa fonction prévue.
Vérifier lʼalignement des pièces mobiles, la présence de grippage
des pièces mobiles, de rupture de pièces, la fixation et tout autre
problème pouvant nuire au fonctionnement de lʼoutil. Toute pièce
endommagée, doit être réparée ou remplacée adéquatement par
un centre de réparation autorisé à moins dʼun avis contraire
indiqué dans le présent mode dʼemploi.
•MAINTENIR LE FLASQUE EN PLACE ET EN BON ÉTAT DE
FONCTIONNEMENT.
• AVANT DE DÉMARRER LE CULTIVATEUR DE JARDIN, vérifier
le sol et retirer toutes grandes pierres, brindilles et débris
similaires. Poursuivre lʼinspection en cours de travail.
•SI MALGRE TOUTES CES PRECAUTIONS, un objet obstrue le
travail, mettre dʼabord le cultivateur hors tension. Retirer le bloc-
piles avant dʼessayer de retirer lʼobjet qui obstrue.
•Maintenir propre la zone qui comporte les dents.
AVERTISSEMENT : dents mobiles. Maintenir une
distance sécuritaire.
AVERTISSEMENTS RELATIFS AUX PILES ET
BLOCS-PILES
•UN APPAREIL A PILES intégrées ou fonctionnant sur un bloc-
piles externe doit être rechargé uniquement au moyen du
chargeur prévu pour les piles utilisées. Lʼutilisation dʼun chargeur
destiné à un type de bloc-piles risque de provoquer un incendie sʼil
est utilisé avec un autre type de bloc-piles.
•UTILISER LʼAPPAREIL FONCTIONNANT SUR PILES
UNIQUEMENT avec le bloc-piles spécialement conçu à cet effet.
Lʼutilisation de toute autre pile peut provoquer un incendie.
•NE PAS UTILISER OU C ARGER le bloc-piles sous la pluie.
•UTILISER SEULEMENT le chargeur fourni.
•RETIRER LE BLOC-PILES avant toute réparation, nettoyage ou
retrait de matière du cultivateur. Lorsque le cultivateur est inutilisé,
retirer le bloc-piles et le transporter par la poignée avant.
•PRENDRE GARDE en manipulant les blocs-piles afin de ne pas
provoquer de court-circuit entre les piles et des objets conducteurs
comme des bagues, des bracelets et des clés. La pile ou le
conducteur peut surchauffer et causer des brûlures.
•NE PAS OUVRIR NI ALTERER LE BLOC-PILES. Lʼélectrolyte
libéré est corrosif et peut endommager les yeux et la peau. Il peut
être toxique si avalé.
Cet appareil est conforme aux dispositions du paragraphe 15 des
règlements de la FCC. Son utilisation est sous réserve des deux
conditions suivantes : (1) lʼappareil ne doit provoquer aucun
brouillage nuisible; (2) lʼappareil doit accepter tout brouillage reçu, y
compris un brouillage susceptible dʼentraîner un fonctionnement
indésirable.

REMARQUE : ce matériel a été testé et a été déclaré conforme aux
limites en vigueur concernant les dispositifs numériques de classe
B, en vertu de la partie 15 de la réglementation FCC. Ces limites
visent à assurer une protection raisonnable contre tout brouillage
nuisible dans une installation résidentielle. Ce matériel produit,
consomme et peut émettre une énergie de radiofréquence et, sʼil
nʼest pas installé et utilisé conformément aux directives qui
lʼaccompagnent, il peut entraîner un brouillage nuisible des
communications radio. Cependant, nous ne garantissons pas
lʼabsence de brouillage dans tous les types dʼenvironnement. Si,
après avoir effectué une vérification en mettant lʼappareil hors
tension puis sous tension, lʼutilisateur sʼaperçoit que ce matériel
provoque un brouillage nuisible à la réception des signaux de radio
ou de télévision, il lui faudra essayer de corriger ce brouillage en
prenant une ou plusieurs des mesures ci-dessous :
. Réorienter ou repositionner lʼantenne de réception.
. Éloigner le plus possible le matériel du récepteur.
. Brancher le matériel dans une prise électrique située sur un circuit
différent de celui du récepteur.
. Consulter le distributeur ou un technicien radio/télévision
expérimenté pour obtenir de lʼaide.
Lʼétiquette apposée sur votre outil pourrait comprendre les symboles
suivants.
V ..............volts A ................ampères
Hz ............hertz ................watts
min............minutes ..............courant alternatif
..........courant continue non ............régime à vide
..............Construction classe II ............borne de terre
............symbole dʼalerte à la .../min ........révolutions ou
sécurité alternance par minute
16
COMPOSANTES
1
2
4
5
7
6
1. Cultivateur modèle LGC120
2. Flasque
3. (2) Jeux de dents
4. Poignée auxiliaire
5. Bloc-piles
6. Bouton de verrouillage
7. Détente
Chargeur (non illustré)
IMPORTANTES DIRECTIVES DE SÉCURITÉ POUR
LES C ARGEURS DE PILES
Ce mode dʼemploi comprend dʼimportantes directives de sécurité pour
les chargeurs de piles.
• Avant dʼutiliser le chargeur, lire toutes les directives et tous les
avertissements figurant sur le chargeur, le bloc-piles et le produit
utilisé avec le bloc-piles.
AVERTISSEMENT : risque de choc électrique. Éviter la
pénétration de tout liquide dans le chargeur.

17
Calibre de fil minimum recommandé pour les rallonges
•Protéger le chargeur de la pluie et de la neige.
•Tirer la fiche plutôt que le cordon pour débrancher le chargeur
ou pour débrancher les cordons à l’aide de la fonction de
guirlande. Cela permet de réduire le risque dʼendommager la fiche
ou le cordon dʼalimentation.
•S’assurer que le cordon est situé en lieu sûr de manière à ce
que personne ne marche ni ne trébuche dessus ou à ce qu’il ne
soit pas endommagé ni soumis à une tension.
•Ne pas utiliser de rallonge à moins que cela ne soit absolument
nécessaire. Lʼutilisation dʼune rallonge inadéquate risque
dʼentraîner un incendie, un choc électrique ou une électrocution.
•Ne pas mettre d’objet sur le chargeur ni mettre ce dernier sur
une surface souple, ce qui pourrait causer l’obstruction des
fentes de ventilation et, du fait, provoquer une chaleur interne
excessive. Éloigner le chargeur de toute source de chaleur. La
ventilation du chargeur se fait par les fentes pratiquées dans les
parties supérieures et inférieures du boîtier.
•Ne pas installer le chargeur sur un mur ni le fixer de manière
permanente sur toute surface. Le chargeur est destiné à une
utilisation sur une surface plane et stable (c.-à-d. un dessus de
table ou dʼétabli).
MISE EN GARDE : risque de brûlure. Pour réduire le risque de
blessures, charger uniquement des piles Black & Decker
conseillées. Dʼautres types de piles peuvent exploser et provoquer
des blessures corporelles et des dommages.
MISE EN GARDE : dans certaines circonstances, lorsque le
chargeur est branché au bloc dʼalimentation, le chargeur peut être
court-circuité par des corps étrangers conducteurs tels que, mais
sans sʼy limiter, la laine dʼacier, le papier dʼaluminium ou toute
accumulation de particules métalliques. Ils doivent être maintenus à
distance des ouvertures du chargeur. Débrancher systématiquement
celui-ci si aucun bloc-piles nʼy est inséré. Débrancher le chargeur
avant tout nettoyage.
•Le chargeur fourni avec ce produit est correctement branché
s’il est orienté en position verticale ou au plancher.
•NE PAS tenter de charger le bloc-piles avec autre chose qu’un
chargeur de marque. Les chargeurs et blocs-piles sont conçus
spécialement pour fonctionner ensemble.
•Ces chargeurs ne sont pas destinés à être utilisés à dʼautres
fins que celles de charger les piles rechargeables conseillées
Black & Decker. Toute autre utilisation risque de provoquer un
incendie, un choc électrique ou une électrocution.
•Pour la sécurité de l’utilisateur, utiliser une rallonge de calibre
adéquat (AWG, American Wire Gauge [calibrage américain
normalisé des fils]). Plus le numéro de calibre de fil est petit et plus
sa capacité est grande, par exemple un calibre 16 a plus de
capacité quʼun calibre 18. Si plus dʼune rallonge est utilisée pour
obtenir la longueur totale, sʼassurer que chaque rallonge présente
au moins le calibre de fil minimum.
Calibre minimal des cordons de rallonge
Tension Longueur totale du cordon en pieds
120V 0-25 26-50 51-100 101-150
(0-7,6m) (7,6-15,2m) (15,2-30,4m) (30,4-45,7m)
240V 0-50 51-100 101-200 201-300
(0-15,2m) (15,2-30,4m) (30,4-60,9m) (60,9-91,4m)
Intensité (A)
Au Au Calibre moyen des fils (AWG)
moins plus
0-6 18 16 16 14
6-10 18 16 14 12
10 - 12 16 16 14 12
12 - 16 14 12 Non recommandé

18
•Ne pas faire fonctionner le chargeur si la fiche ou le cordon est
endommagé; les remplacer immédiatement.
•Ne jamais se servir d’un chargeur qui a subi un choc violent,
qui est tombé par terre ou qui est endommagé de quelque
manière que ce soit. Le faire vérifier dans un centre de réparation
autorisé.
•Ne pas démonter le chargeur; confier lʼentretien ou la réparation
de lʼappareil à un centre de réparation autorisé. Le remontage non
conforme du chargeur comporte des risques de choc électrique,
dʼélectrocution ou dʼincendie.
•Débrancher le chargeur avant de le nettoyer. Cela réduira le
risque de choc électrique. Le risque ne sera pas éliminé en enlevant
simplement le bloc-piles.
•NE JAMAIS relier deux chargeurs ensemble.
•Le chargeur est conçu pour être alimenté en courant
domestique standard (120 V). Ne pas utiliser une tension
supérieure pour le chargeur.
CONSERVER CES DIRECTIVES
DIRECTIVES DE SÉCURITÉ IMPORTANTES POUR
LES BLOCS-PILES
AVERTISSEMENT : pour un fonctionnement sûr, lire le présent
mode dʼemploi et les manuels fournis avec lʼoutil avant dʼutiliser le
chargeur.
Le bloc-piles nʼest pas complètement chargé à la sortie de
lʼemballage. Avant dʼutiliser le bloc-piles et le chargeur, lire les
directives de sécurité ci-après. Respecter ensuite les consignes de
chargement décrites.
LIRE TOUTES LES DIRECTIVES.
•Ne pas incinérer le bloc-piles, même s’il est très endommagé
ou complètement usé, car il peut exploser au contact de
flammes. Des vapeurs et des matières toxiques sont dégagées
lorsque les blocs-piles au LI-ION sont incinérés.
•Ne pas charger ou utiliser un bloc-piles dans un milieu
déflagrant, en présence de liquides, de gaz ou de poussière
inflammables. Insérer ou retirer un bloc-piles du chargeur peut
enflammer de la poussière ou des émanations.
•Si le contenu de la pile entre en contact avec la peau, laver
immédiatement la zone touchée au savon doux et à l’eau. Si le
liquide de la pile entre en contact avec les yeux, rincer lʼoeil ouvert à
lʼeau pendant 15 minutes ou jusquʼà ce que lʼirritation cesse. Si des
soins médicaux sont nécessaires, lʼélectrolyte des piles au LI-ION
est composé dʼun mélange de carbonates organiques liquides et de
sels de lithium.
•Le contenu des cellules de pile ouvertes peut provoquer une
irritation respiratoire. Exposer la personne à de lʼair frais. Si les
symptômes persistent, obtenir des soins médicaux.
AVERTISSEMENT : risque de brûlure. Le liquide du bloc-piles
peut sʼenflammer sʼil est exposé à des étincelles ou à une flamme.
•Charger les blocs-piles uniquement au moyen de chargeurs
Black & Decker.
•NE PAS éclabousser le bloc-piles ou l’immerger dans l’eau ou
tout autre liquide. Cela peut entraîner une défaillance prématurée
de lʼélément.
•Ne pas ranger ni utiliser l’outil et le bloc-piles dans un endroit
où la température peut atteindre ou dépasser les 40 °C (105 °F)
(comme dans les remises extérieures ou les bâtiments
métalliques en été).
AVERTISSEMENT : ne jamais ouvrir le bloc-piles pour quelque
raison que ce soit. Si le boîtier du bloc-piles est fissuré ou
endommagé, ne pas lʼinsérer dans un chargeur. Ne pas écraser, faire
tomber ou endommager le bloc-piles. Ne pas utiliser un bloc-piles ou
un chargeur qui a reçu un choc violent, qui est tombé, a été écrasé
ou est endommagé de quelque manière que ce soit (p. ex. percé par
un clou, frappé dʼun coup de marteau, piétiné). Les blocs-piles
endommagés doivent être envoyés au centre de réparation pour être
recyclés.

PROCEDURE DE C ARGE
Le chargeur standard fourni
chargera une pile entièrement
épuisée en 8 heures environ.
1. Brancher le chargeur dans une
prise appropriée avant dʼinsérer le
bloc-piles.
2. Insérer le bloc-piles dans le
chargeur (Fig. A)
3. Le voyant D L vert
clignotera indiquant ainsi
que le bloc-piles est en
cours de charge.
4. La fin de la charge est indiquée par le voyant D L vert qui
demeure allumé. Le bloc-piles est chargé à plein et peut être
utilisé à ce moment-ci ou laissé sur le chargeur.
Recharger les piles épuisées aussitôt que possible après leur
utilisation pour prolonger leur durée de vie. Pour préserver le
plus possible la durée de vie du bloc-piles, ne pas le décharger
tout à fait. Il est recommandé de recharger le bloc-piles après
chaque utilisation.
FONCTIONS DE DIAGNOSTIC DU C ARGEUR
Le chargeur est conçu pour détecter certains problèmes du bloc-
piles ou de la source dʼalimentation. Le type de clignotement du
voyant de charge indique les problèmes.
PILE EN MAUVAIS ETAT
Le chargeur est en mesure de détecter une pile faible ou
endommagée. Le voyant D L rouge clignote selon la
séquence indiquée sur lʼétiquette. Si la séquence code
correspondant à une pile en mauvais état est en
clignotement, cesser de recharger la pile. Il faut la retourner à
un centre de réparation ou à un site de collecte pour le
recyclage.
19
AVERTISSEMENT : risque d’incendie. Ne pas ranger ou
transporter les piles de manière à ce que des objets métalliques
puissent entrer en contact avec les bornes exposées des piles.
Par exemple, ne pas mettre un bloc-piles dans un tablier, une poche,
une boîte à outils, une boîte de nécessaire de produit ou un tiroir
contenant des objets tels que des clous, des vis ou des clés, car tout
contact accidentel entre les bornes à découvert et un objet métallique
conducteur comme une clé, une pièce de monnaie, un outil à main,
etc. risque de provoquer un incendie. La Hazardous Material
Regulations (réglementation sur les produits dangereux) du
département américain des transports interdit en fait le transport des
blocs-piles pour le commerce et dans les avions (c.-à-d. dans des
valises et les bagages à main) À MOINS quʼils ne soient bien
protégés contre les courts-circuits. Pour le transport de piles
individuelles, on doit donc sʼassurer que les bornes sont protégées et
bien isolées contre toute matière pouvant entrer en contact avec elles
et provoquer un court-circuit. REMARQUE : il ne faut pas laisser de
piles au LI-ION dans les bagages enregistrés.
RECOMMANDATIONS EN MATIERE DE RANGEMENT
1. Le meilleur endroit de rangement est celui qui est frais et sec, loin
de toute lumière directe du soleil et protégé dʼune température
extrême (chaleur ou froid).
2. Un entreposage prolongé ne nuira pas au bloc-piles ou au chargeur.
A

20
FONCTION DE SUSPENSION DU BLOC-PILES C AUD/FROID
Lorsque le chargeur détecte un bloc-piles trop chaud ou trop
froid, il suspend automatiquement la recharge jusquʼau retour
à la normale de la température de celui-ci. Une fois la
température du bloc-piles revenue à la normale, le chargeur
passe automatiquement au mode de recharge du bloc-piles.
Cette fonction assure une durée de vie maximale des blocs-
piles. La D L rouge clignote selon la séquence indiquée sur
lʼétiquette lorsque le délai du bloc-piles chaud/froid est détecté.
PILE LAISSEE DANS LE C ARGEUR
Le chargeur et le bloc-piles peuvent être laissés branchés, le voyant
D L vert demeurant allumé. Le chargeur maintiendra le bloc-piles
en bon état et complètement chargé.
REMARQUES IMPORTANTES POUR LE C ARGEMENT
1. Pour augmenter la durée de vie du bloc-piles et optimiser son
rendement, le charger à une température entre 16 et 27 °C
(60 et 80 °F). N PAS charger le bloc-piles à des températures
inférieures à 4,5 °C (40 °F) ou supérieures à 40,5 °C (105 °F). Ces
consignes sont importantes et permettent dʼéviter dʼendommager
gravement le bloc-piles.
2. Le chargeur et le bloc-piles peuvent devenir chauds au toucher
pendant la charge. Il sʼagit dʼun état normal et cela nʼindique pas un
problème. Pour faciliter le refroidissement du bloc-piles après son
utilisation, éviter de mettre le chargeur ou le bloc piles dans un endroit
chaud comme dans une remise métallique ou une remorque non isolée.
3. Si le bloc-piles ne se charge pas adéquatement, on doit :
a. vérifier le courant à la prise en branchant une lampe ou un autre
appareil électrique;
b. vérifier si la prise est reliée à un interrupteur mural qui la met
hors tension lorsque la lumière sont éteinte;
c. déplacer le chargeur et le bloc-piles dans un endroit où la
température ambiante est entre 16 et 27 °C (60 et 80 °F);
d. si le problème persiste, apporter ou envoyer lʼoutil, le bloc-piles
et le chargeur au centre de réparation de votre région.
4. Le bloc-piles doit être rechargé lorsquʼil nʼarrive pas à produire
suffisamment de puissance pour des travaux qui étaient facilement
réalisés auparavant. N PAS CONTINU R à utiliser le bloc-piles dans
ces conditions. Suivre les procédures de charge. On peut également
recharger à tout moment un bloc-piles partiellement déchargé sans
nuire à son fonctionnement.
5. Tout corps étranger conducteur, tel que notamment la laine dʼacier,
le papier dʼaluminium, ou toute accumulation de particules
métalliques, doit être maintenu à distance des ouvertures du
chargeur. Débrancher systématiquement celui-ci si aucun bloc-piles
nʼy est inséré. Débrancher le chargeur avant tout nettoyage.
6. Ne pas congeler le chargeur, lʼimmerger ans lʼeau ou dans tout
autre liquide.
AVERTISSEMENT : risque de choc électrique. ne jamais ouvrir
le bloc-piles pour quelque raison que ce soit. Si le boîtier en plastique
du bloc-piles est brisé ou fissuré, le retourner à un centre de
réparation pour quʼil soit recyclé.
INSERTION ET RETRAIT DU BLOC-PILES DE
LʼOUTIL
MISE EN GARDE : Sʼassurer que le bouton de verrouillage est
bien engagé pour empêcher lʼutilisation de lʼinterrupteur lors de la
pose et du retrait du bloc-piles.
INSTALLATION DU BLOC-PILES : Insérer le bloc-piles dans lʼoutil
de manière à entendre un déclic
(figure B).
RETRAIT DU BLOC-PILES :
nfoncer le bouton de dégagement
du bloc-piles situé au dos du bloc-
piles, puis retirer le bloc-piles de
lʼoutil (figure B).
B
Other manuals for LGC120
1
Table of contents
Languages:
Other Black & Decker Tiller manuals

Black & Decker
Black & Decker LGC120 User manual

Black & Decker
Black & Decker GC818 User manual

Black & Decker
Black & Decker GXC1000L User manual

Black & Decker
Black & Decker BETL18 User manual

Black & Decker
Black & Decker GC818 User manual

Black & Decker
Black & Decker GC818 User manual

Black & Decker
Black & Decker GC818 User manual

Black & Decker
Black & Decker GC818 User manual

Black & Decker
Black & Decker GXC1000 User manual

Black & Decker
Black & Decker CTL36 User manual