9
1
2
3
4
5
6
7
8
10
1
2
3
4
9
5
6
7
8
10
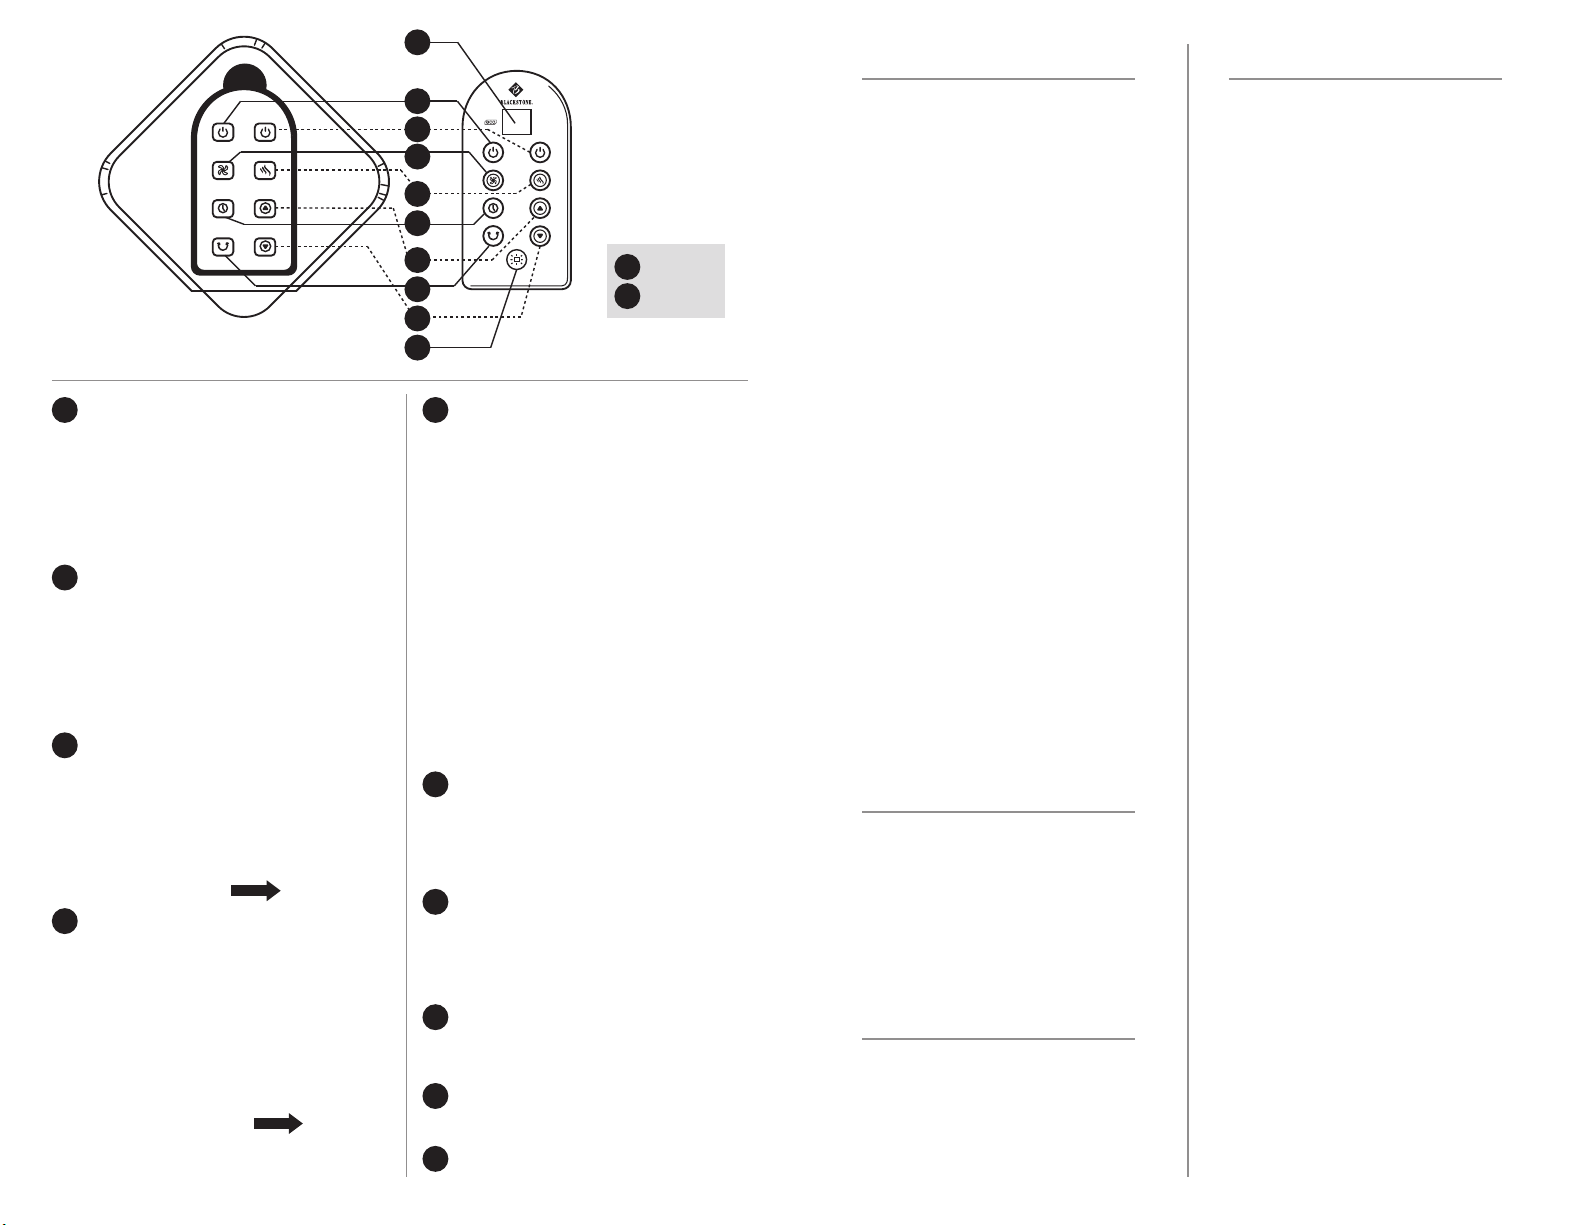
Tower Fan ON/OFF Control
a. Press once to turn the tower fan ON. Unit will
beep once to indicate that the tower fan is now
powered ON. Tower fan will start on its lowest F1
speed (see below).
b. Press and hold the power button to turn the
tower fan OFF. The unit will beep once to indicate
that the tower fan is powering OFF.
Heater ON/OFF Control
a. Press once to turn the heater fan ON. Unit will
beep once to indicate that the ceramic heater is
now powered ON. Heater will start on its lowest
H1 speed (see below).
b. Press and hold the button to turn the heater
OFF. The unit will beep once to indicate that the
ceramic heater is powering OFF.
Tower Fan Speed Control
a. After turning the tower fan ON using button 1,
press the tower fan speed button to increase the
speed from F1-F4 (F1, F2, F3, F4). If the speed
button is pressed when the tower fan is already
running at speed F4, it will reset the speed to F1.
b. Fan Speeds: F1 • F2 • F3 • F4
Heater Fan Speed Control
a. After turning the heater fan ON using button 2,
press the tower fan speed button to increase the
speed from H1-HF (H1, H2, H3, HF). If the speed
button is pressed when the tower fan is already
running at speed HF, it will reset the speed to H1.
The HF setting turns the fan to the F1 setting and
the heater to the H3 setting and they run
simultaneously.
b. Heater Speeds: H1 • H2 • H3 • HF
FasterSlower
Timer
a. Timer can be used for either the tower fan or
heater. The unit will shut OFF after the timed
interval has completed. Press button repeatedly
to select the desired hour count down.
b. Hour settings 1-15 hours. The remote screen
and the screen on the front of the unit will
indicate the number of countdown hours.
Pressing the timer button consecutively will
increase the number of hours until it reaches 15
after which pressing the time button will reset the
timer back to 0 hours.
c. The automated temperature is used only for
the heater. Fahrenheit temperatures from 39-90
degrees can be chosen and the unit will
automatically utilize the ceramic heater to
maintain the chosen ambient temperature.
Temperatures will be displayed on the remote
screen and the screen on the front of the unit.
Temperature Up: increases the ambient
Fahrenheit temperature – highest setting is 90
degrees Fahrenheit. The remote screen and the
screen on the front of the unit will display the
Fahrenheit selection when automated
temperature control is being utilized.
Temperature Down: decreases the ambient
Fahrenheit temperature – lowest setting is 39
degrees Fahrenheit. The remote screen and the
screen on the front of the unit will display the
Fahrenheit selection when automated
temperature control is being utilized.
Oscillation: press for ON/OFF – when ON, the
unit will oscillate from side to side. Can be used
for either the tower fan function or heater
function.
Remote Display: shows whether tower fan or
heater is selected, fan speeds, timer hours, and
Fahrenheit temperature selection.
Light Control: will turn the unit lights ON/OFF.
Only the remote can turn the unit lights ON/OFF.
FasterSlower
6
7
Automated
Temperature
Control
Reset Unit:
Unplug the unit and allow it to cool for 15 minutes.
After cooling, plug the unit back in the resume
operation.
If Unit Shuts O Unexpectedly:
Be sure that the timer function was not turned ON.
If timer was used, the unit will automatically shut
o after the selected hour runtime concludes.
Unit may have shut o because the selected
ambient Fahrenheit temperature was achieved. Unit
will turn back on again if the ambient temperature
drops below the selected Fahrenheit temperature.
Unit screen will still be illuminated if unit is on
automated temperature control mode unless the
lights have been turned o by the remote. To check
if unit has turned o and needs to be reset, press
any button on the control panel, if the unit beeps, it
does not need to be reset.
Unit may have overheated and utilized the thermal
protection automatic shut o. Reset the unit using
the instructions above to reset the thermal protect-
ion automatic shuto and begin operation again.
If unit continues to shut o after a few minutes of
operation, this may indicate that the heater intake
needs to be cleaned. Follow cleaning instructions
listed in this manual.
If Remote Will Not Operate Unit:
The remote communicates with unit using infra-red
light. Be sure that the remote is aimed directly at
the top of the front of the unit and that there is
nothing impeding the line of sight between the
remote and the unit.
Replace remote batteries with 2 new AAA batteries.
To clean, first unplug the unit and allow the heater
to cool o before cleaning.
Once the unit has been unplugged and the heater
has cooled o, wipe the exterior vents with a soft
cloth.
Clean the heater intake with a vacuum with a brush
head attachment.
Do not use flammable sprays or liquids to clean.
CONTROLS
TROUBLESHOOTING
CLEANING
The remote utilizes two AAA batteries which are
included. Use only two batteries of the same type.
Do not combine new and used batteries to operate
the remote.
Never dispose of batteries in fire, batteries may
explode or leak.
REMOTE
Safety:
Use only with 120V electrical outlets.
Do not plug into extension cords, power strips, or
surge protectors or multioutlet extensions of any
type.
Unit includes tip over protection – this protection
will shut the unit o if it tips over to reduce the risk
of fire. If unit shuts o due to tip over, unplug the
unit and stand it upright, allow to cool for 15
minutes, and plug it back into a 120V wall outlet to
reset the unit and begin operation again.
Unit is equipped with thermal overload protection.
If the unit overheats, it will automatically turn o to
reduce the risk of fire.
A thermal overload protector is installed in this unit
to prevent overheating.
Unplug the unit before cleaning and moving.
Never leave the unit unattended when the ceramic
heater is operating.
Place the unit on a hard, level surface when
operating. Do not operate the unit on soft or
uneven surfaces.
Do not attempt to take the unit apart.
Do not block or tamper with the unit when it is
turned on. When operating, be sure there are no
objects surrounding the unit that could block or
restrict the intakes and vents.
Store in a dry place away from excessive heat and
direct sunlight.
This unit is designed to operate in dry environments
only. Do not immerse the unit in water or operate in
a damp environment (examples: laundry rooms and
bathrooms) or near water.
For indoor use only.
Do not operate the unit near flammable items or in
environments where flammable fumes may be
present.
Do not block the air intakes or exhaust vents.
Do not kink the power cord when storing or while in
use.
Do not use this product with any solid-state speed
control and do not insert a finger or any object into
the vents.
Do not run the power cord under carpets or rugs.
WARNINGS


