Blagdon Minipond 9000 User manual

9000/12000
www.blagdonwatergardening.co.uk
www.interpetcentral.com
www.pondaquariumproblemsolver.co.uk/blagdon
Minipond
UV pond filter
system
17.562 Blagdon_Minipond filter instructions_9000/12000 AW3.indd 2 14/07/2017 17:00

9000
/
12000
Minipond UV pond
filter system
Congratulations on buying a Blagdon Minipond
Water Garden Filtration System. Manufactured
with advanced technology to create a clean and
healthy pond for your fish.
IMPORTANT
Please attach proof of purchase to this manual and file in a safe place.
17.562 Blagdon_Minipond filter instructions_9000/12000 AW3.indd 3 14/07/2017 17:00

1
IMPORTANT
Please attach proof of purchase to this manual and file in a safe place.
CONTENTS
Getting to know your Minipond Filter ........................................................................................................... 2
Parts description .................................................................................................................................................... 2
Spares codes ......................................................................................................................................................... 2
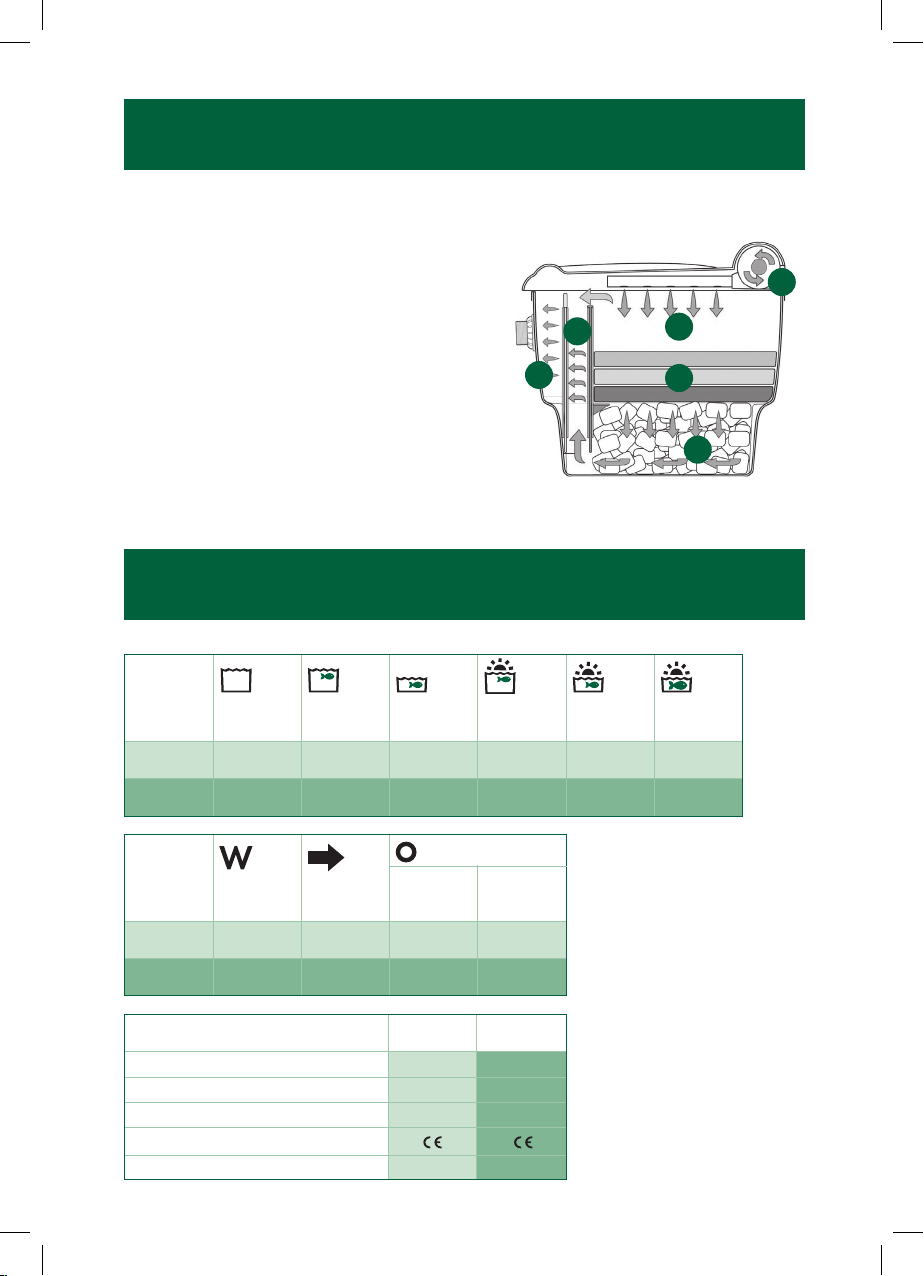
How it works .......................................................................................................................................................... 3
Technical specification ......................................................................................................................................... 3
Installation ....................................................................................................................................................... 4 - 7
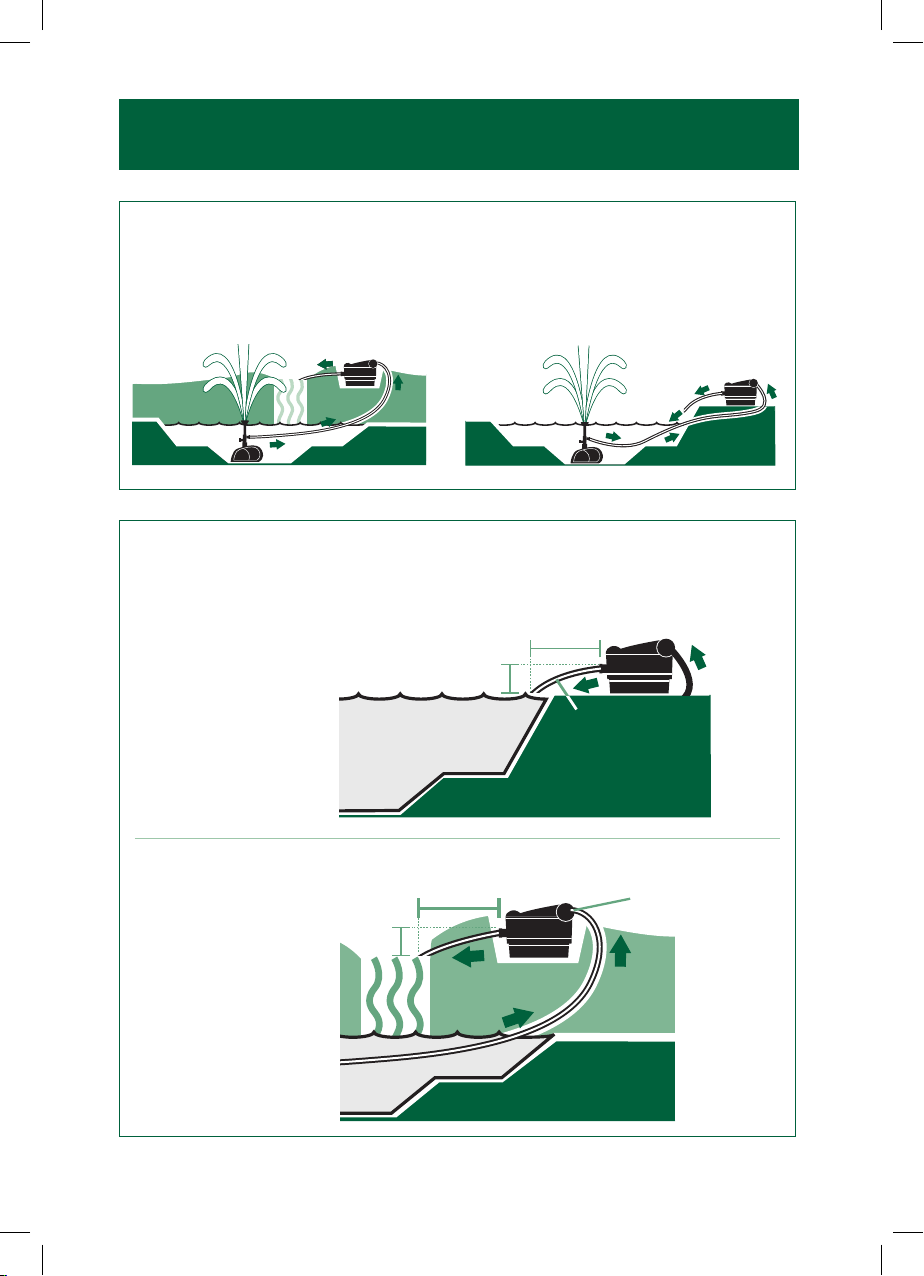
Convenient installation ......................................................................................................................................... 4
Filter outlet hose installation ................................................................................................................................ 4
Connecting hoses ................................................................................................................................................. 5
Connecting to your pump ................................................................................................................................... 6
UVC bulbs and Quartz sleeve maintenance ................................................................................................. 6
Wet testing the filter .............................................................................................................................................. 6
Testing/installing/replacing the UVC lamp .................................................................................................... 7
Electrical installation ....................................................................................................................................... 7 - 8
Maintenance ......................................................................................................................................................... 8
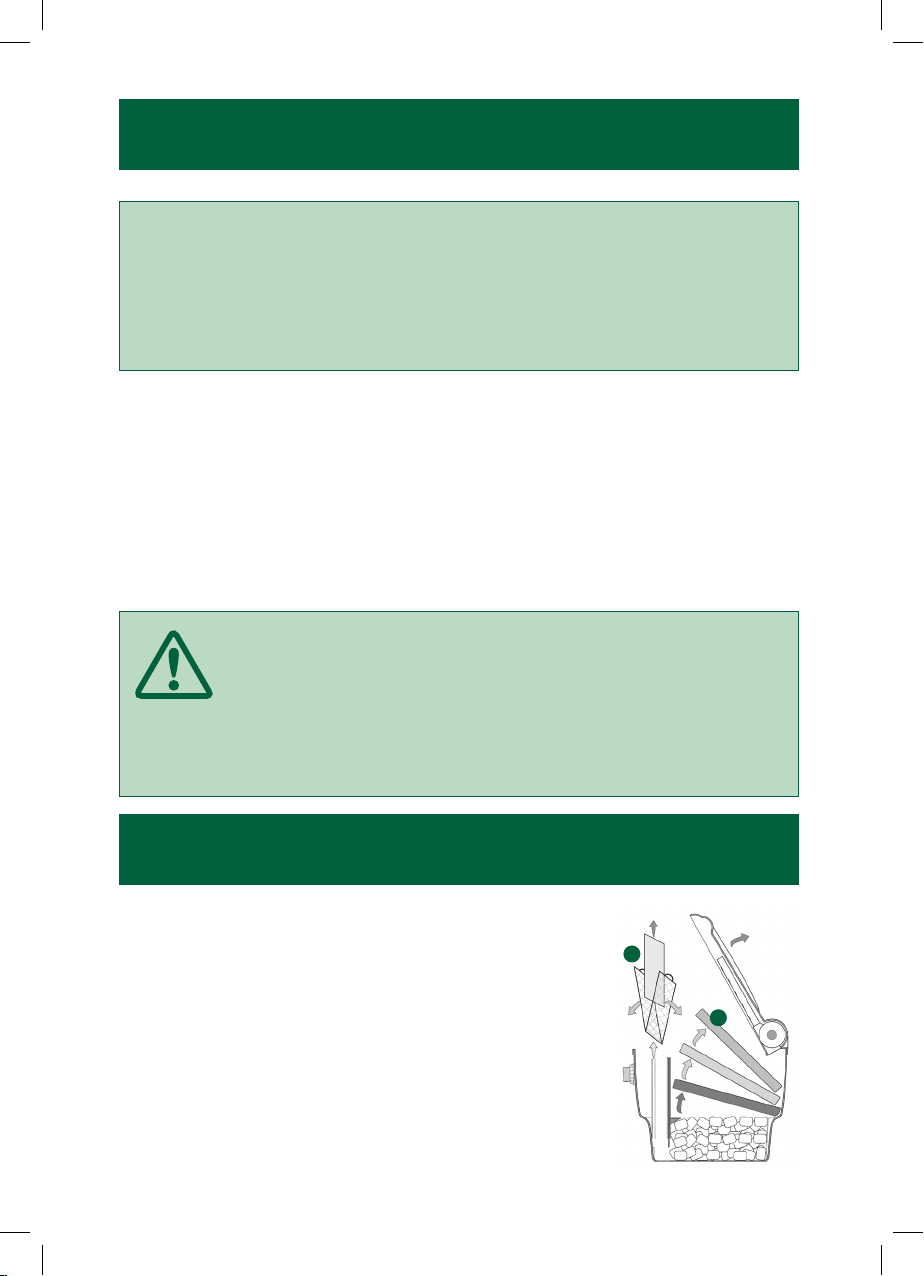
Dismantling the filter ............................................................................................................................................. 8
Routine maintenance ............................................................................................................................................ 9
How it works - flow detail ................................................................................................................................... 9
Annual maintenance .......................................................................................................................................... 10
Winter storage ..................................................................................................................................................... 10
Troubleshooting .................................................................................................................................................. 11
Filter leaks ............................................................................................................................................................. 11
Cloudy/brown water ......................................................................................................................................... 11
Green water ..........................................................................................................................................................12
UVC light not illuminated ................................................................................................................................... 12
Poor flow into the filter or out of the filter ...................................................................................................... 12
Faults problem procedure .............................................................................................................................. 13
Consumer advice contact details .................................................................................................................... 13
Guarantee ............................................................................................................................................................ 13
17.562 Blagdon_Minipond filter instructions_9000/12000 AW3.indd 4 14/07/2017 17:00

2
Part Description Spare Code
1 Filter body 1040570
2 Ceramic biomedia 1040587
3 Medium grade
foam pad
4 Fine grade foam pad 1040594
5 Coarse grade
foam pad
6 1
1/2" outlet hose tail
7 Outlet O ring gasket 1040600
8 Outlet nut
9 Filter partition divider
10 Polymer wool pad
11 Carbon foam pad
(2 wool & 2 carbon) 1010887
(6 wool & 6 carbon) 1010894
28
27
26
25
24
23
22 21
20
19
17 18
16 15 14
13
12
11
10
2
46
5
7
9
8
3
1
29
Part Description Spare Code
12 Cartridge clip
13 Filter pad cartridge 1040617
14 Spray bar cap
15 Spray bar
16 spray bar nut 1040624
17 Spray bar O ring gasket
18 UVC feet/hinge
locating screws 1040631
19 Filter lid 1040648
20 UVC electronics & cap
21 9w bulb
(9W) 1040655
22 UVC O ring gasket 1040723
Part Description Spare Code
23 Quartz sleeve 9w/5w 1040730
24 UVC contact chamber 1040662
25 UVC feet/hinge 1040679
26 Inlet hose tail O ring
gasket 1040686
27 Inlet 1" 3/4" 1/2" hosetial 1040693
28 Inlet cap
29 Optional 1" 25mm
flow control valve 1040563
(not included)
GETTING TO KNOW YOUR MINIPOND FILTER
17.562 Blagdon_Minipond filter instructions_9000/12000 AW3.indd 5 14/07/2017 17:00

How It Works
Blagdon Minipond filters create a clean and healthy
environment for your fish. A minimum of maintenance
is needed due to the unique six stage filter design.
1. High performance UVC clears green water algae.
2. Spray bar oxygenates water creating the ideal
environment for friendly bacteria.
3. Graded foam filter pads remove dirt and waste.
4. Ceramic biological filter media prevents the build
up of harmful toxins in the pond.
5. Replaceable polymer wool pad removes
fine waste particles and polishes the water.
6. Carbon impregnated pad removes chemical polutents.
GETTING TO KNOW YOUR MINIPOND FILTER
TECHNICAL SPECIFICATION CHART
Model
Over 75cm
deep without
fish in shade
Over 75cm
deep with
fish in shade
Under 75cm
deep with
fish in shade
Over 75cm
deep with
fish in full sun
Under 75cm
deep with
fish in full sun
Under 75cm
deep with
Koi in full sun
MINIPOND
9,000
9,000 ltrs
1,980 gals
4,500 ltrs
990 gals
3,375 ltrs
742 gals
3,375 ltrs
742 gals
2,530 ltrs
557 gals
1,265 ltrs
278 gals
MINIPOND
12,000
12,000 ltrs
2,640 gals
6,000 ltrs
1,320 gals
4,500 ltrs
990 gals
4,500 ltrs
990 gals
3,375 ltrs
742 gals
1,685 ltrs
371 gals
Model
Green water
clarifier lamp
wattage
Max flow rate
through UVC
from pump
Filter inlet
hose from
pump
Filter outlet
hose to
pump
MINIPOND
9,000
5 watts 2,550 ltrs
557 gals
25mm
1”
40mm
11/2”
MINIPOND
12,000
9 watts 3,000 ltrs
660 gals
25mm
1”
40mm
11/2”
Recommended hose size
4
5
6
1
2
3
MINIPOND FILTER 9000 12000
Watts 5W 9W
Voltage 230V 230V
Hertz 50Hz 50Hz
Safety rating IP56 IP56
Cable 5 metres 5 metres 3
17.562 Blagdon_Minipond filter instructions_9000/12000 AW3.indd 6 14/07/2017 17:00

Filter outlet
to Waterfall
Hose to Pond
or Waterfall
Hose from
Pump
MINIMUM DROP
15cm
MAXIMUM
LENGTH
1 metre
WATER LEVEL
HOSE
1 metre
15cm
UVC electronics/access
must not be below
ground level
WATERFALL
Filter outlet
to Waterfall
Hose to Pond
or Waterfall
Hose from
Pump
MINIMUM DROP
15cm
MAXIMUM
LENGTH
1 metre
WATER LEVEL
HOSE
1 metre
15cm
UVC electronics/access
must not be below
ground level
WATERFALL
ABOVE
GROUND
BELOW
GROUND
Filter Outlet Hose Installation
PUMP
MINIPOND
FILTER
(above ground)
Filter outlet
to Pond
FOUNTAIN
HOSE
Filter outlet
to Waterfall
FOUNTAIN
PUMP
HOSE
WATERFALL
(below ground)
MINIPOND
FILTER
MINIPOND
FILTER
Convenient Installation
Can be installed below or above ground with water returned direct to the pond
or via a waterfall. e.g:
BELOW ABOVE
INSTALLATION
4
17.562 Blagdon_Minipond filter instructions_9000/12000 AW3.indd 7 14/07/2017 17:00

Connecting Inlet Hoses
The recommended hose size for
your Minipond filter is stated in the filter
performance and specification chart.
Always secure hose with a jubilee clip.
Warming the hose in a bucket of
boiling water can aid fitting.
Always ensure that the smaller diameter
hosetail is cut off and removed to
prevent reduced filter performance.
Use the shortest possible hose lengths to
minimise flow restrictions.
Avoid folds and kinks in the hose, which will reduce flow and filter performance.
FILTER
INLET TO UVC
LOCKING NUT JUBILEE CLIP
CUT & REMOVE
UNWANTED
HOSETAILS
25mm/1”
HOSE
RECOMMENDED
CUT
25mm
19mm
12.5mm
CUT CUT
Important
The outlet hose should be smooth bore (not corrugated) pipe installed over as short a distance
as possible with no kinks or bends.
We recommend that heavy duty smooth bore black hose is used.
The water level in the filter outlet chamber after the carbon wool cartridge should not be higher
than the outlet fitting when in use.
See Flow detail diagram maximum outlet chamber level. (page 9)
INSTALLATION
WARNING: If there is insufficient drop in height from the outlet pipe or excessive bends or kinks
this will cause the filter to drain poorly allowing the outlet chamber to fill above the maximum
recommended level. This will increase filter maintenance and may cause the filter to overflow.
5
17.562 Blagdon_Minipond filter instructions_9000/12000 AW3.indd 8 14/07/2017 17:00

Connecting To Your Pump
The pump supplying the Minipond filter must not have a pumping head exceeding 4m - 0.4 Bar.
The maximum flow rate recommended is stated in the filter performance and specification chart.
This flow should not be exceeded.
The ideal flow rate for your pond is to pump the volume of the pond water through the filter
every 2-4 hours. To calculate your pond volume: average length (m) x average width (m)
x average depth (m) x 1000 = Litres Pond Volume.
To calculate your pump’s flow rate, fill a container from the outlet hose of the filter at the pond side.
Time how long this takes in seconds e.g. a 10 ltr bucket takes 12 seconds to fill. Divide 3600
(the number of seconds in an hour) by the time it takes to fill the bucket e.g. 12 seconds.
Then multiply by the volume of the container. e.g. 10 ltr. Therefore - 3600 ÷ 12 = 300 seconds
300 x 10 ltr = 3000 ltrs per hour flow rate.
To increase flow you may need to get a larger pump. If flow is too high use an inline valve
to reduce it.
The purpose of the pump is to transfer dirty water from the pond to the Minipond filter.
Placing the pump at the opposite end of the pond to the filter will give the best results.
Foam-free pump designs will give optimum Minipond filtration.
We recommend Blagdon Pond Pumps for fountains, filters and waterfalls.
UVC Bulbs & Quartz Sleeve Maintenance
The UVC bulb must be replaced yearly. It is recommended that the bulb is replaced and
reconnected in the spring.
The Quartz sleeve can become coated in lime scale build up in hard water areas.
This should be carefully removed from the quartz sleeve with a soft cloth.
Remove the quartz sleeve from the unit and soak for 3 hours in Pump Cleaner,
ensuring that all O-rings are checked and replaced, if necessary.
A wet test must be carried out after maintenance to ensure there are no leaks before the UVC is
reconnected.
Wet Testing The Filter
INSTALLATION
IMPORTANT: A wet test of the filter under operating conditions must be carried out before
the UVC or electrical supply is installed. Connect the filter to the pump following all installation
instructions. After running for 24 hours check for leaks.
6
17.562 Blagdon_Minipond filter instructions_9000/12000 AW3.indd 9 14/07/2017 17:00

2
1
2
3
Electrical installation - UVC Models
The power supply must meet the specifications on the product.
The UVC is intended to be used with either a weatherproof cable connector or
permanently connected to the fixed wiring in the main system other than by means
of a plug and socket.
The cores in the supply cable are coloured in accordance with the following code:
Brown = Live, Blue = Neutral.
Do not use the supply cable to lift the UVC as this may cause damage.
Testing/installing the UVC lamp
1. Unscrew the UVC electronics cover cap.
2. Inspect the UVC cap and Quartz sleeve for water leaks.
3. If there are no signs of leakage reverse the procedure ensuring that the Cover o ring is in place.
If there has been any damage to the unit please return to the point of purchase for
inspection. This test should be repeated whenever the the bulb or quartz is changed.
Warning direct exposure to UVC light can damage your eyes or skin.
This unit is protected by a micro switch that prevents the UVC light
from illuminating when the cover is removed even if the power is on.
In order to check that the UVC lamp is operating remove
the spay bar and hold a piece of plain paper up to
the the UVC outlet a faint blue reflection should
be seen.This operation may be needed to be
carried out at dusk as UVC lamps emit a
dim blue light under normal operation.
INSTALLATION
ELECTRICAL INSTALLATION
WARNING: A Residual Current Device (RCD), also known as the Residual Current
Circuit Breaker (RCCB), with a tripping current not exceeding 30mA must be installed
in the supply circuit. A means of disconnection from the supply having a contact
separation of at least 3mm in all poles must be incorporated in the fixed wiring.
IMPORTANT: Ensure that the mains supply is switched off and the power isolated before
removing the UVC cover.
7
17.562 Blagdon_Minipond filter instructions_9000/12000 AW3.indd 10 14/07/2017 17:00

For permanent installations to the mains supply, it is necessary to conform to the regulations of the local
electricity authority and this would include the use of a metal or plastic conduit to protect the cable.
Attention has been drawn to the fact that special rules may exist concerning the installation of your
pond UVC (i.e. local building regulations).
This UVC must not be used in swimming pools, or areas where people are in contact with the water.
Always disconnect the mains electricity supply whilst the equipment is being installed, repaired,
maintained or handled. Consult a qualified electrician if in any doubt about wiring this product
to the mains supply.
Your Minipond filter has been designed to need a minimum of
maintenance.
When the filter system is first installed filter cleaning may be increased
for a period until the back log of accumulated pond waste is removed.
IMPORTANT: Please note all electrical work on garden lighting and power installations must
comply with part P of the building regulations. Failure to comply is a criminal offence. If the
installation of this product is not carried out by a competent electrician who is registered under
the Part P self-certification scheme then you must notify the local building control department
before work begins. For further information and guidance on this matter and other electrical
installations in your home that might be covered by the relevant legislation, contact your local
authorities building control department.
Electrical/Safety
UVC Warning: Caution: Dangerous Ultra Violet Radiation. The rays from the
UVC lamp are harmful to eyes and skin.
Always turn off UVC electrical supply before any maintenance.
To protect unit from flooding, leave a minimum 5cm showing above ground level
to protect UVC electrics.
Never immerse unit in water.
Locate unit 1m minimum from pond edge to ensure the filter cannot fall in.
ELECTRICAL INSTALLATION
MAINTENANCE & CLEANING
Filter Cleaning
A. Large hinged lid allows easy access for viewing and removal of
filter media for cleaning.
B. Polymer wool and carbon pads can be removed and replaced
by pulling out cartridge.
B
A
8
17.562 Blagdon_Minipond filter instructions_9000/12000 AW3.indd 11 14/07/2017 17:00

Routine Maintenance
Graded foams
The filter foams only need cleaning when the foam chamber is full with water and the water layer
above the foams starts to significantly overflow the partition into the cartridge chamber.
25% of the pumps input from the spray bar may be allowed to overflow the partition into the
cartridge chamber, prior to cleaning.
Cleaning the foams before the foam chamber overflows will result in decreased filter efficiency as the
foams work most effectively when partially blocked.
Foams may be cleaned vigorously under a running tap or hose.
Adding Blagdon Bio Start after filter maintenance will help replenish these beneficial bacterial
populations, and is highly recommended during the first two months of operation when the filter is
slowly being colonised.
Ceramic bio media
These will only need very occasional cleaning (once per year), but must be rinsed in pond water to
prevent damaging the beneficial bacteria which help maintain a healthy pond.
How It Works - Flow Detail
COARSE
FOAM
MEDIUM
CERAMIC
BIO MEDIA
FOAM
CHAMBER
UVC
FINE
MAXIMUM
OUTLET
CHAMBER
WATER LEVEL
OUTLET
CHAMBER
CARTRIDGE
CHAMBER
SPRAY
BAR
PARTITION
OVERFLOW
WOOL
CARBON
CARTRIDGE
OUTLET
HOSE
DIRTY
WATER IN
MAINTENANCE & CLEANING
9
17.562 Blagdon_Minipond filter instructions_9000/12000 AW3.indd 12 14/07/2017 17:00

Polymer wool and carbon cartridge
When the cartridge chamber fills with water and starts to overflow into the outlet chamber the
cartridge should be cleaned or replaced.
The Polymer wool pad may be washed a limited number of times before it starts to lose efficiency
and blocks rapidly.
The Carbon Foam pad contains activated carbon particles that remove colorants and chemical
pollutants from your pond water. After six weeks the activated carbon pad must be replaced as
the carbon becomes full with pollutants and will be unable to absorb more from the pond water.
Blagdon Polymer wool and carbon foam packs are the correct replacement media for your
Minipond Filter and are quick and easy to replace. see Blagdon section in store (see diagram on
page 8 and codes/descriptions on page 2).
Annual Maintenance
Check for wear
Once a year you should dismantle your Minipond filter. Dismantle the filter examining all the parts for
wear or damage, replacing any parts show obvious signs of wear or damage. (see getting to know
your Minipond filter for replacement codes and parts descriptions on page 2).
Replacing foams
After prolonged use and cleaning the filter foams will become damaged. This can be identified by
their inability to return quickly into shape after cleaning.
Replacement of the foams is recommended.
Winter Storage
The filter can be run year round if the pump flow is maintained, this is the best option. Alternatively in
winter the filter may be switched off. Follow annual maintenance procedure and store frost-free in the
house or garage until spring.
MAINTENANCE & CLEANING
10
17.562 Blagdon_Minipond filter instructions_9000/12000 AW3.indd 13 14/07/2017 17:00

Filter Leaks
• Check that the filter outlet nut and O ring have been correctly assembled and that they are hand tight.
• Check the hosetail connecter O ring seal is fitted and aligned correctly on the end of the hosetail
fitting and that the inlet cover is hand tight.
• PTFE tape may be needed to give a water tight seal and should be applied to the inlet or outlet
hosetails.
• Always secure the filter inlet hose and outlet hose with a jubilee clip.
• Insure that the filter is installed on a flat and level base.
Cloudy/Brown Water
• The flow rate / pond turnover is to high or to low. Check that you have correctly calculated the
pond volume and that pump flow rate is within limits. (see connecting your pump page 6)
• The filter is not being supplied with water 24 hours a day. Do not turn off your pump or UVC.
Continuous running is needed to maintain a clean and healthy pond.
• The filter foam pads are insufficiently blocked to trap the fine waste. Treat with Blagdon Clear
Pond treatment.
• Do not clean the foams until the filter foam chamber starts to overflow into the carbon wool
chamber.
• The water is extremely dirty, remove pond waste and leaves - carry out a partial water change.
• Filter is incorrectly sized - refer to filter performance and specification chart. Calculate the pond
volume - see connecting to your pump page 6.
• The filter foams have not been positioned or replaced correctly,ensure that the foams fit tightly
within the filter chamber.
TROUBLESHOOTING
In order to correctly identify if you have green water or cloudy/brown water, a settlement test
should be carried out.
Take a glass of pond water and allow to settle for a few hours. When the glass is stirred a small
layer of settled waste can be seen at the base of the glass. This indicates that you have brown
or cloudy water and that if you have a UVC model it is working correctly. If there is no settlement
it indicates that you have green water and the UVC is not working correctly.
11
17.562 Blagdon_Minipond filter instructions_9000/12000 AW3.indd 14 14/07/2017 17:00

Green Water
• Settlement test the water to ensure that there is no sediment suspended in the water. If there is
follow the brown cloudy water trouble shooting guide.
• At dusk check that the UVC light is illuminated by removing the spray bar and holding a piece of
paper up to the UVC and looking for the reflected pale blue UVC light. Turning the lamp on and
off may aid visual identification. (Ensure the UVC lamp is not more than 6 months old).
• The UVC may be working effectively but the foams are too clean and are unable to remove the
fine coagulated waste. Treat the pond with Blagdon Clear Pond and do not clean the foams until
the foam chamber starts to overflow into the carbon wool chamber.
• The flow rate of the pump exceeds the maximum flow rate that the UVC is able to handle. Check
the filter specification chart and reduce the pump flow rate if needed. It is possible to purchase a
optional Blagdon 1" flow control valve that may be fitted inline between the pump and the filter to
control the flow rate. See getting to know your filter diagram and parts codes.
• The filter is too small for the pond, check the filter selection chart.
• The UVC quartz sleeve is dirty or coated in lime scale. Gently remove the quartz sleeve and clean
in Blagdon pond pump cleaner.
• Follow all cloudy water trouble shooting points.
UVC Light Not Illuminated
• Check all fuses / RCD and electrical connections follow electrical installation (pages 7-8).
Poor flow into the filter or out of the filter
• Inspect and clean your pond pump, check that it is in good working order.
• Check foams and filter pads, clean as per routine maintenance if blocked.
• Always use the minimum length of inlet or outlet hose needed as this will reduce back pressure
due to friction.
• Ensure that the inlet hose connecter has been cut correctly to size, if not this will restrict the flow
from the pump into the filter see diagram page 5.
• Ensure that the inlet hose is not kinked or crushed.
• Ensure that the outlet hose is under 1m in length at that there is a drop of 15cm over this distance,
ensure that it is not kinked crushed or has a sharp bend as this will stop the filter draining correctly.
TROUBLESHOOTING
12
17.562 Blagdon_Minipond filter instructions_9000/12000 AW3.indd 15 14/07/2017 17:00

FAULTS - PROBLEMS PROCEDURE
Before returning your Minipond Filter to your dealer or contacting our Consumer Advice Department,
please carry out the following steps. This will solve most problems quickly and easily.
1. Ensure electrical procedures have been followed fully. Check fuses and any cable connectors/
switch boxes.
2. (a) Follow routine maintenance procedure fully. (b) Check location and connecting your pump
details including flow rates. (c) Ensure that your pond volume and pump flow rate meet the
maximum pond size recommended for the filter model on the filter performance and specification
chart. (d) Follow troubleshooting guide.
3. If there is a mechanical breakdown of the filter or UVC, return to the point of purchase for
inspection and advice (You will need proof of purchase).
CLEARWATER GUARANTEE
The Clearwater guarantee will be honoured for 1 year after proof of purchase. Clearwater is
guaranteed to a depth of 1m, so that fish are clearly visible.
Clearwater is guaranteed provided:
• You follow all instructions as above.
• Your filter is within the performance guidelines stated.
• You consult the Consumer Advice Line and follow any advice to correct the situation. See details below.
Refunds can only be authorised by Interpet Blagdon.
CONSUMER ADVICE CONTACT DETAILS
Interpet (Blagdon) Consumer Advice Department Vincent Lane, Dorking, Surrey RH4 3YX
Fax: 01306 876712 E-mail: customer[email protected]
www.pondaquariumproblemsolver.co.uk/blagdon
IMPORTANT
GUARANTEE
This product is guaranteed against defects in material and workmanship for 3 years from the date
of purchase, under normal usage. The guarantee DOES NOT APPLY in case of improper use,
negligence, lack of maintenance or accidental damage to either the filter or UVC. If the filter or
UVC fails due to a manufacturing fault within this period it will be either repaired or replaced free of
charge. Liability is limited to replacement of the faulty product only; no other costs will be reimbursed.
This guarantee is not transferable and does not affect your statutory rights. This guarantee does
not confer any rights other than those expressly set out above. This guarantee does not cover the
filter foams or UVC bulb, which will need replacing when worn or every 6 months. If any parts are
needed, spares are available from your retailer. 13
17.562 Blagdon_Minipond filter instructions_9000/12000 AW3.indd 16 14/07/2017 17:00

Established over 50 years ago, Blagdon are
committed to producing a comprehensive range
of high quality and easy to use water gardening
equipment. We have an on-going programme
of research and development that ensures
excellent product performance and value for
money for our customers. Our products are
brought together with half a century of expertise
and knowledge so you can be assured of a
successful and creative water garden.
Interpet, Vincent Lane,
Dorking, Surrey, RH4 3YX
www.blagdonwatergardening.co.uk
www.interpetcentral.com
www.pondaquariumproblemsolver.co.uk/blagdon
Leaflet Code: 7/7/17
DESIGN
INNOVATIVE
17.562 Blagdon_Minipond filter instructions_9000/12000 AW3.indd 1 14/07/2017 17:00
This manual suits for next models
1
Table of contents
Other Blagdon Water Filtration System manuals
Popular Water Filtration System manuals by other brands

FILTRON
FILTRON K 1200A-2x Installation instruction

GE
GE PNRV12ZBL01 owner's manual

SuperFish
SuperFish TopClear Pro 36000 user manual

Wrekin Water
Wrekin Water SS15 Installation and operating instructions

Ecosoft
Ecosoft LUNA User manual and product specifications

Worcester
Worcester GREENSTAR SYSTEM FILTER Installation & servicing instructions