Blagdon 7000 User manual

www.blagdonwatergardening.co.uk
Clean Pond
Machine
7000 • 10000
13000 • 16000
Blagdon Water Gardening

Congratulations on buying a Blagdon Clean
Pond Machine filtration system. Manufactured
with advanced filtration technology to create a
clean and healthy pond for you fish.
When used in combination with Blagdon Clean Pond
Pods, this filter has been designed to minimise
maintenance, and make necessary maintenance easier.
IMPORTANT: PLEASE ATTACH PROOF OF PURCHASE
TO THIS MANUAL AND KEEP IN A SAFE PLACE.
Clean Pond
Machine
7000 • 10000
13000 • 16000

1
GETTING YOU KNOW YOUR FILTER
Parts diagram............................................................................................................2
Parts table..................................................................................................................3
Technical specifications............................................................................................4
INSTALLATION
Electrical installation.................................................................................................5
Locating the filter ......................................................................................................6
Connecting to your pump .......................................................................................7
Connecting the inlet/outlet hoses ..........................................................................7
UVC Maintenance....................................................................................................8
Replacing the UVC bulb ..........................................................................................9
CLEANING AND MAINTENANCE
Normal running ......................................................................................................10
Routine maintenance..............................................................................................10
Cleaning your filter.................................................................................................11
Winter storage........................................................................................................12
Annual maintenance ..............................................................................................12
Replacing Filter Media...........................................................................................12
Disassembling/reassembling your Clean Pond Machine ..................................13
TROUBLESHOOTING
Filter leaks................................................................................................................14
Cloudy/brown water .............................................................................................14
UVC leaks................................................................................................................14
Low/no flow from filter...........................................................................................14
Green water............................................................................................................15
Faults - problems procedure ..................................................................................16
Guarantee...............................................................................................................16
Environment friendly disposal................................................................................16

GETTING TO KNOW YOUR FILTER
5
4
6
1
2
3
7
8
9
14
12
11
10
15
16
17
18
19
20
2
9
13

Part Description Spares code
1Filter Lid Clasp 1057660
2Dosing Chamber Cap -
3Cleaning Handle 1057677
4Filter Head Unit -
5Flow Diverter Valve -
6UVC Unit See below
7Dosing Chamber -
8Head Unit Filter Grill -
9Filter Cleaning Blades -
10 Downpipe Locking Nut -
11 Downpipe -
12 Cannister Filter Grill -
13 Filter Head Unit Gasket 1057684
14 Filter Cannister -
15 UVC End Cap and Electrics 7000: 1057691
10000: 1057707
13000: 1057714
16000: 1057721
16 UVC End Cap O-rings (2) 7000: 1057691
10000: 1057707
13000: 1057714
16000: 1057721
17 UVC Bulb 7000: (9w): 1040655
10000: (11w): 1057738
13000: (13w): 1051347
16000: (18w): 1057745
18 UVC Quartz Sleeve O-rings (2) 7000: 1057752
10000: 1057752
13000: 1057752
16000: 1057752
19 UVC Quartz Sleeve Locking Nut 7000: 1057691
10000: 1057707
13000: 1057714
16000: 1057721
20 UVC Quartz Sleeve 7000: 1057752
10000: 1057752
13000: 1057752
16000: 1057752
GETTING TO KNOW YOUR FILTER
3

Model
Wattage &
Power supply
Max flow rate
through UVC
from pump
Recommended
hose size
Dimensions
w x d x h
Safety rating
Cable
length
7000 9w (UVC)
230v
50Hz
3,500 ltrs
770 gals
25mm
1”
40 x 42
x 42cm
Outdoor
weatherproof
Approved
3 metres
10000 11w (UVC)
230v
50Hz
5,000 ltrs
1,100 gals
25mm
1”
40 x 42
x 42cm
Outdoor
weatherproof
Approved
3 metres
13000 13w (UVC)
230v
50Hz
6,500 ltrs
1,430 gals
32mm
11/4”
40 x 42
x 50cm
Outdoor
weatherproof
Approved
3 metres
16000 18w (UVC)
230v
50Hz
8,000 ltrs
1,760 gals
40mm
11/2”
40 x 42
x 50cm
Outdoor
weatherproof
Approved
3 metres
Model
Over 75cm
deep without
fish in shade
Over 75cm
deep with
fish in shade
Under 75cm
deep with
fish in shade
Over 75cm
deep with
fish in full sun
Under 75cm
deep with
fish in full sun
Under 75cm
deep with
Koi in full sun
7000 7,000 ltrs
1,540 gals
3,500 ltrs
770 gals
2,625 ltrs
577 gals
2,625 ltrs
577 gals
1,900 ltrs
418 gals
984 ltrs
216 gals
10000 10,000 ltrs
2,200 gals
5,000 ltrs
1,100 gals
3,750 ltrs
825 gals
3,750 ltrs
825 gals
2,800 ltrs
616 gals
1,406 ltrs
309 gals
13000 13,000 ltrs
2,860 gals
6,500 ltrs
1,430 gals
4,875 ltrs
1,072 gals
4,875 ltrs
1,072 gals
3,600 ltrs
792 gals
1,828 ltrs
402 gals
16000 16,000 ltrs
3,520 gals
8,000 ltrs
1,760 gals
6,000 ltrs
1,320 gals
6,000 ltrs
1,320 gals
4,500 ltrs
990 gals
2,250 ltrs
495 gals
GETTING TO KNOW YOUR FILTER
4

Electrical installation
The power supply must meet the specifications on the product.
This appliance is designed to be used with either a weather-proof cable connector or connected
to the mains by means of a plug and socket.
The cores in the supply cable are coloured in accordance with the following code:
Brown = Live, Blue = Neutral, Green/Yellow = Earth
The electrical cable is permanently connected and sealed inside the appliance
If the supply cable is damaged the appliance must not be used.
Do not use the supply cable to lift the appliance, as this may cause damage.
For permanent installations to the mains supply, it is necessary to conform to the regulations of the
local electricity authority and this would include the use of a metal or plastic conduit to protect
the cable.
Attention has been drawn to the fact that the special rules may exist concerning the installation of
your pond filter (i.e. local building regulations). These filters must not be used in swimming pools,
or areas where people are in contact with the water.
Always disconnect and isolate the product from the mains electricity supply whilst the equipment
is being installed, repaired, maintained or handled. Consult a qualified electrician if you are in
any doubt about wiring this product to the mains supply.
Important: This appliance can be used by children aged 8 and
above and persons with reduced physical, sensory or mental
capabilities or lack of experience and knowledge if they have
been given supervision or instruction concerning the use of the
appliance in a safe way and understand the hazards involved.
Children shall not play with the appliance. Cleaning and user
maintenance shall not be made by children without supervision.
WARNING:
A Residual Current Device (RCD), also known as the Residual
Current Circuit Breaker (RCCB), with a tripping current not exceeding 30mA
must be installed in the supply circuit. A means of disconnection from the
supply having a contact separation of at least 3mm in all poles must be
incorporated in the fixed wiring.
5

HOSE
PUMP
(sold separately)
WATERFALL
CLEAN WATER RETURNED DIRECT
TO POND OR VIA WATERFALL
WASTE & DIRT RELEASED
TO THE GARDEN
(ONLY WHEN CLEANING)
CLEAN
POND
MACHINE
Installation guide:
The filter can be installed above or in the ground with water returning directly to the pond,
or via a waterfall, e.g:
PUMP
FILTER OUTLET
TO WATERFALL
WATERFALL
FILTER OUTLET
TO POND
FILTER ABOVE
GROUND
PUMP
FILTER IN
THE GROUND
Location of the filter
The Blagdon Clean Pond Machine should be located on a firm and level base on the ground,
at least 1.2m (4’) from the pond. The filter can be buried up to the bottom rim of the head unit,
leaving just the UVC access, inlets & outlets, and cleaning handle exposed about the ground level.
Ensure the filter outlet is at no more than a maximum of 4m head height above the lid of the filter.
INSTALLATION
3x multi hose tails, (inlet,
outlet & waste) to fit the
following hose diameters:
•1½” •1¼” •1” •¾”
ACCESSORIES SUPPLIED
6

INSTALLATION
Connecting to your pump
The ideal flow rate for your pond is to pump the volume of the pond water through the filter
every 2 hours. To calculate your pond volume: average length (m) x average width (m) x
average depth (m) x 1000 = pond volume in Litres.
To calculate your pump’s flow rate, fill a container from the filter outlet hose at the pond
side. Time how long this takes in seconds, e.g. a 10 Litre bucket takes 12 seconds to fill.
Divide 3600 (the number of seconds in an hour) by the time taken to fill the bucket,
e.g. 12 seconds. Then multiply by the volume of the container, e.g. 10 Litres.
Therefore: 3600/12 = 300, 300 x 10 = 3000L/H flow rate.
To increase flow, you may require a larger pump. If the flow rate is too high, use an inline valve
to reduce it (or use the digital control of a Blagdon Amphibious IQ pump).
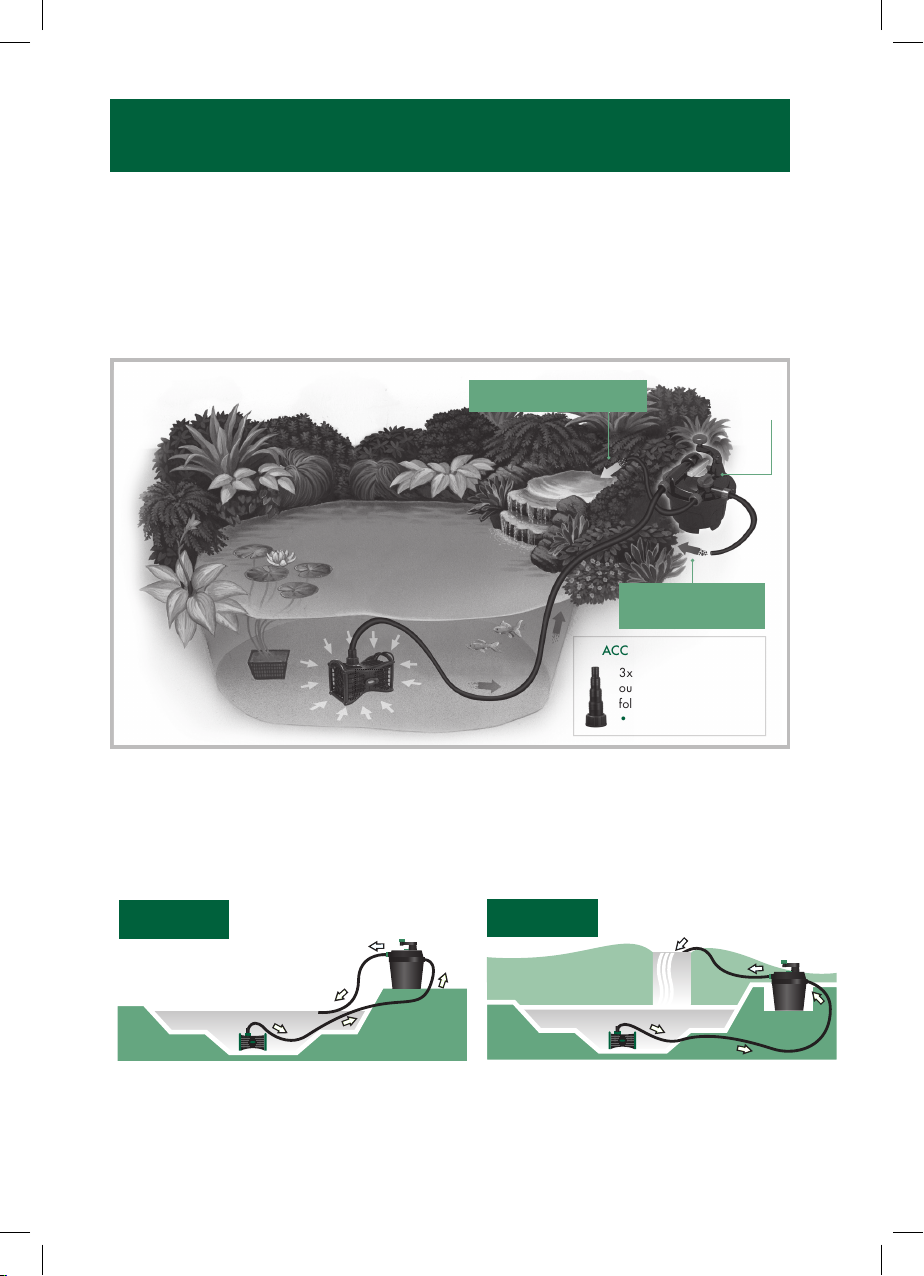
The purpose of the pump is to transfer dirty water from the pond to the filter cannister.
Placing the pump at the opposite end to the filter outlet will provide the best results.
Pumps without foam pre-filters will allow for optimum filter performance.
Connecting the inlet/outlet hoses
•Always secure the hose with a jubilee clip.
•Warming the hose in a bucket of warm water can aid fitting.
•Always ensure the smaller diameter hose tails are cut off and removed to prevent
poor UVC performance and flow rate from the outlet.
•Use the shortest possible lengths of hose, in order to minimise flow restrictions.
•Avoid folds and kinks in the hose, which will reduce flow and UVC performance.
LOCKING NUT
CUTCUT
FILTER
INLET TO UVC
JUBILEE CLIP
CUT & REMOVE
UNWANTED
HOSETAILS
38mm
32mm
25mm
CUT
IMPORTANT:
The outlet hose should be
smooth bore (not corrugated)
pipe installed over as short a
distance as possible, with no
kinks or bends. We recommend
that a smooth bore clear hose,
or smooth bore heavy duty
black hose are used.
7
IMPORTANT:
Do not exceed the maximum stated flow rate through the UVC filter –
see technical specifications table on page 4 for reference.

UVC bulbs & quartz sleeve maintenance
The UVC bulb must be replaced yearly – it is recommended that the bulb is replaced in
the spring or early summer, in order to provide the maximum performance during the most
problematic period of the year for green water.
The quartz sleeve can become coated in lime scale build up in hard water areas.
This should be carefully removed from the quartz sleeve with a soft cloth.
A wet test must be carried out after maintenance to ensure there are no leaks before the UVC
is reconnected.
1. Undo the four screws on the UVC electronics cover cap
2. Unscrew the UVC electronics cover cap.
3. Inspect the UVC cap and quartz sleeve for water leaks.
4. If there are no signs of leakage reverse the procedure ensuring that the cover O-ring is in place.
INSTALLATION
IMPORTANT:
A wet test of the filter under operating conditions must be carried
out before the UVC or power supply are installed.
Connect the filter to the pump following all installation instructions,
check for leaks after 24 hours.
8
The unit is protected by a micro-switch, which prevents the UVC light from illuminating when the
cover is removed.
In order to check that the UVC lamp is operating correctly, check the indicator window above
the cable inlet gland on the UVC electronics cover cap whilst the UVC is installed into the filter.
This operation is best carried out at dusk, as UVC lamps emit a dim blue light which can be
difficult to see in daylight.
UVC illumination
viewing window

INSTALLATION
Testing/replacing the UVC lamp
IMPORTANT:
Ensure the mains power supply is switched off and the power isolated
before removing the UVC cover.
1. Undo the four screws on the UVC electronics cover cap
2. Pull out the UVC electronics cover cap.
3. Unscrew the Quartz sleeve lock nut.
4. Remove the old bulb, and replace for new.
5. Complete steps 1-4 in the reverse order to reconstruct the unit – ensuring all O-rings
are correctly positioned.
IMPORTANT:
If there has been any damage to the unit, please return to the point of purchase for inspection.
This check should be performed whenever the UVC bulb or quartz sleeve is changed.
WARNING:
Dangerous Ultra Violet radiation. The rays from the UVC lamp are harmful to eyes
and skin. ALWAYS turn off the UVC electrical supply before any maintenance.
9
12
43

MAINTENANCE & CLEANING
Your Blagdon Clean Pond Machine has been designed to need a minimum of maintenance.
It will work at it’s best with some simple, monthly routine maintenance.
If the filter is installed on an established pond, the regularity of cleaning may be increased
for a period until any back log of accumulated pond waste has been removed.
Normal Running
For excellent filtration, the filter should be
operated 24 hours a day, all year round.
1. Check that all seals and
connections are not leaking.
2. Ensure the valve is turned to the outlet
returning to your pond or waterfall.
Routine Maintenance
Once established, it is recommended that
your filter should be backwashed and
cleaned once a month.
It may require more frequent cleaning when:
•The flow has visibly reduced.
•The water in the pond appears dirty.
NOTE:
The cleaning procedure uses water pumped from the pond, meaning during cleaning
the water level in your pond will drop. After cleaning you should refill the pond using water
which has been dechlorinated with a product such as Blagdon ‘Clean Pond Pods’ or
Blagdon ‘Fresh Start’.
10
IMPORTANT:
If the filter has not been cleaned for more than a month, or if the flow rate
from the outlet has dropped by 50% or more - after turning the flow diverter valve to
waste, turn the pump off before attempting to turn the cleaning handle.
After one full rotation the pump can be turned back on to flush out the waste released,
and the filter can be cleaned as per the usual instructions.

MAINTENANCE & CLEANING
Rotate Pod dosing
chamber cap & remove.
Insert Clean Pond Pod.
3
Turn outlet valve
to pond.
4Replace and rotate
dosing chamber cap.
5
Rotate handle
to clean.
2
Turn outlet valve
to waste.
1
INLET & OULET &
WASTE CLOSED
INLET & OULET &
WASTE CLOSED
IN
FROM
POND
OUT TO
POND
IN
FROM
POND
IN
FROM
POND
WASTE
OUT TO
GARDEN
WASTE
OUT TO
GARDEN
11
To clean your Blagdon Clean Pond Machine, follow these simple steps:
NOTE:
A maximum of 10 Clean Pond Pods can be fitted into the dosing chamber at any one
time, this is sufficient for a pond with a volume of 5000L. If a higher amount is needed, the
dose should be split in half and dosed over subsequent days to allow the pods time to dissolve.
If Clean Pond Pods are being dosed at the same time as a filter clean, return the flow back
to the pond before closing the dosing chamber lid – else the action of cleaning will wash the
contents of the pod away as waste.
NOTE:
If you are not dosing Clean Pond Pods or you are cleaning the filter as part of a
water change you do not need to remove the dosing chamber cap, simply return the flow
diverter valve back to the filter outlet once the water runs clear or you have drained the
desired amount of water from the pond.

Annual Maintenance
Check for wear
Once a year it is recommended to dismantle your Blagdon Clean Pond Machine and examine
the parts for wear or damage – replacing parts showing any signs of wear or damage.
Replacing filter media
Due to the material and method used in cleaning the filter media contained in the Blagdon Clean
Pond Machine, it should never need replacing, as even if it is clogged solid, and unable to be
cleaned using the handle, it is possible to clean it by removing it from the filter into a bucket of
water taken from the pond.
IMPORTANT:
If the head unit is removed, keep it upright. This will prevent any of the filtration media stuck on
the cleaning blades and plate from falling and getting stuck in the cleaning mechanism.
When returning the head unit to the filter be sure to carefully remove some water from the
cannister to lower the level of the media below that of the central downpipe – retrieve any
media which has entered this pipe and return it to the main filter body.
Winter Storage
The filter can be run year round as long as the pump flow is maintained, this is the best option.
Alternatively, in winter, the filter can be switched off. If the filter is to be switched off during the
winter it should be fully drained of water prior to being stored in a frost-free location, such as a
shed or garage, until spring.
MAINTENANCE & CLEANING
12

MAINTENANCE & CLEANING
13
Annual Maintenance
Disassembling/reassembling your Clean Pond Machine
We would recommend to clean the bottom grill annually
to maintain the performance of the filter, to clean this the
following instructions should be followed:
1. Turn off the pump.
2. Undo and remove the lid clasp,
lift off the filter head unit.
3. Carefully remove all of the CHI media
to a clean bucket and drain the filter
cannister of water.
4. Unscrew the central locking nut and
remove the downpipe.
5. Lift the bottom grill out from the
bottom of the filter and rinse in
clean, fresh water.
6. Return the grill to its position
in the bottom of the cannister
(note the locating notches and fins),
reinstall the downpipe and locking
nut to lock it in position.
7. Cover the hole of the downpipe
and carefully return the CHI media
to the filter cannister, once it’s all
in uncover the downpipe.
8. Reinstall the filter head unit and lid clasp
– reattach any hosetails and turn the
pump back on. (ensure the flow diverter
valve is initially positioned to waste to flush
out any fish waste which has been
dislodged from the media in the process.)
2
4
5

TROUBLESHOOTING
Filter Leaks
•Check that the inlet and outlet nuts and O-rings have been correctly assembled and that
they are hand tight.
•PTFE tape may be needed to give a water tight seal, and should be applied to the thread
of the inlet and outlet hose tails.
•Ensure the filter head gasket is in the correct position, and is free from any detritus.
•Ensure that the hoses are secured to the inlet and outlet hose tails with a Jubilee Clip.
•Ensure that the filter is installed on a flat level base.
Cloudy/Brown Water
•Check that you have correctly calculated the pond volume, pond depth and the ponds level
of direct sunlight. Check this information against the pond sizing table on page 4. You may
require a larger Clean Pond Machine model.
•Adding shade to the pond by introducing lilies or floating plants to the water surface will help
to reduce pond sludge. Planting the pond with marginal plants will also help create a
balance. New ponds may require some time to establish and create a healthy balance.
•The filter is not being supplied with water 24 hours a day. Do not turn off the pump feeding
the filter with water – continuous running is required for the beneficial bacteria within the filter
to break down fish waste.
•The filter media is insufficiently blocked – allow the Clean Pond Machine media time to clog,
as the media clogs it will trap finer and finer waste.
•The water is extremely dirty – physically remove pond waste and leaves, carry out a partial
water change.
UVC Leaks
•Check that the UVC O-rings are all in the correct position.
•Check for damage to the Quartz sleeve.
•Ensure the UVC electronics cap is tightened sufficiently to make the watertight seal.
Low/No flow from filter
•Check that the pump is running. Check the mains power supply.
•Ensure all pipework is fully connected to the pump and filter.
•Check for blockages in the pipework.
•Clean the filter – the Clean Pond Machine media may have become too blocked by
pond waste.
14

Green Water
•Perform a settlement test to ensure that the is no sediment suspended in the water – if there is
follow the brown/cloudy water troubleshooting guide.
TROUBLESHOOTING
PERFORMING A SETTLEMENT TEST:
Take a glass of water from the pond and allow to settle for a few hours. If when the glass
is stirred a small layer of settled waste can be seen at the base. This indicates that you
have brown/cloudy water and that, if you have a UVC, it is working correctly. If there is no
settlement it indicates that you have green water and that the UVC is not working correctly.
•At dusk check the UVC light is illuminated using the viewing window on the UVC electronics cap.
UVC illumination
viewing window
•Check the age of the UVC bulb. As UVC bulbs age the light output deteriorates, if the bulb
is over 6 months old, the output may not be strong enough to have an effect on the algae
causing green water – change the bulb.
•The UVC may be working effectively, but the filter media is too clean so is unable to remove
the fine coagulated waste – treat the pond with a clearing product, such as Blagdon Clear
Pond, this will clump the particles together to make them larger, and therefore easier to
remove from the water passing through the filter.
15

FAULTS - PROBLEMS PROCEDURE
Before returning your Blagdon air filter to your dealer or contacting our Consumer Advice
Department, please carry out the following steps. These will solve most problems quickly and
easily:
1. Ensure electrical procedure has been followed fully. Check fuses and any cable connectors
or switchboxes.
2. Follow the maintenance steps from pages 10-13, follow the troubleshooting options from
pages 14-15.
3. Return filter to point of purchase for inspection and advice (proof of purchase may be required)
CONSUMER ADVICE CONTACT DETAILS:
Interpet (Blagdon) Consumer Advice Department Vincent Lane, Dorking, Surrey, RH4 3YX
This product is guaranteed against defects in material and workmanship for 3 years from the date
of purchase, under normal usage. The guarantee DOES NOT APPLY in case of improper use,
negligence, lack of maintenance or accidental damage to the filter.
If the filter fails due to a manufacturing fault within this period it will be either repaired or replaced
free of charge. Liability is limited to replacement of the faulty product only, no other costs will be
reimbursed.
This guarantee is not transferable and does not affect your statutory rights. This guarantee does
not confer any rights other than those expressly set out above. Excludes the UVC which may need
annual replacement, which may become worn over time. If any parts need replacing, spares are
available from your local retailer.
You can help to protect the environment, please remember to respect local regulations, hand in
non-working electrical equipment to an appropriate waste disposal centre.
16


Established over 50 years ago, Blagdon are
committed to producing a comprehensive
range of high quality and easy to use
water gardening equipment. We have
an on-going programme of research and
development that ensures excellent product
performance and value for money for
our customers. Our products are brought
together with half a century of expertise
and knowledge so you can be assured of a
successful and creative water garden.
DESIGN
INNOVATIVE Interpet, Vincent Lane,
Dorking, Surrey, RH4 3YX
www.interpet.co.uk
www.blagdonwatergardening.co.uk
Leaflet Code: MB 9/12/19
This manual suits for next models
3
Table of contents
Other Blagdon Water Filtration System manuals
Popular Water Filtration System manuals by other brands

Lutz
Lutz Jesco Easychlorgen 4250 Installation, operation & maintenance instructions

WilTec
WilTec 51792 Operation manual

Krausen
Krausen NEW LINE Series Installation and user manual

SpectraPure
SpectraPure The Eliminator Operator's manual

Schaffner
Schaffner FN5420 User and installation manual

SATA
SATA filter 400 Series operating instructions

Parker Hiross
Parker Hiross Hyperfilter NFF380 user manual

bora
bora UUE 3 Mounting and installation instructions

Propur
Propur ProMax PMC-4000 instructions

BIOLAN
BIOLAN GREYWATER FILTER LIGHT user manual

Watts
Watts Pure H2O Series Installation, operation and maintenance manual

Schier
Schier PP2 installation guide