Blaupunkt SAFEDRIVE SDC 2.0 User manual

1
REMOTE CONTROLLER
SAFEDRIVE SDC 2.0

2
Herzlichen Glückwunsch
Wir gratulieren Ihnen zum auf Ihres neuen Blaupunkt Produktes. Wir möchten, dass Sie lange Freude daran haben und den vollen
Funktionsumfang genießen können, daher bitten wir Sie, diese Bedienungsanleitung sorgfältig durch zu lesen.
Sollten wider Erwarten Probleme auftreten, prüfen Sie bitte anhand der Bedienungsanleitung, ob Sie das Problem selbst lösen können.
Ihr Händler und der Blaupunkt-Service helfen Ihnen gerne weiter, wenn Sie das Problem nicht selbst lösen können. ontaktdaten finden
Sie unter www.blaupunkt.com .
Inhalt
Herzlichen Glückwunsch | Inhalt | Lieferumfang 2
Sicherheitshinweise | Einbauhinweise | Allgemeine Informationen 3
Anschlüsse Interface/ Fernbedienung | Bedienelemente Fernbedienung | Zubehör 4
Anschluss | Programmierung/ Anlernen | Verwendung 5
Garantie | Service | Batteriewechsel | Technische Daten | Fehlersuche 6
Lieferumfang
Lieferumfang
Im Lieferumfang sind enthalten:
• SafeDrive SDC 2.0 Controller
• SafeDrive SDC 2.0 Interface
• Adapter linke auf offene abelenden
• Adapter für 12V- Spannungsversorgung des Controllers
• Flaschenhalteruntersatz
• Flache Halteplatte
• lebepad für Halteplatte
• Batterie CR 2032 (optional)
• Bedienungsanleitung

3
Sicherheitshinweise | Einbauhinweise | Allgemeine Informationen
Sicherheitshinweise
Das Gerät wurde nach dem Stand der Technik und
festgelegten Sicherheitsrichtlinien hergestellt. Trotzdem
können Gefahren auftreten, wenn Sie die Sicherheitshinweise
in dieser Anleitung nicht beachten. Diese Anleitung soll Sie
mit den wichtigsten Funktionen vertraut machen. Ausführliche
Informationen zur Navigation finden Sie im Internet unter
www.blaupunkt.com.
• Lesen Sie diese Anleitung sorgfältig und vollständig durch,
bevor Sie das Gerät benutzen.
• Bewahren Sie die Anleitung so auf, dass sie jederzeit für alle
Benutzer zugänglich ist.
• Geben Sie das Gerät stets zusammen mit dieser Anleitung an
Dritte weiter.
• Beachten Sie - wenn nötig - die Anleitungen der Geräte, die
Sie im Zusammenhang mit diesem Gerät verwenden.
Verwendete S mbole
In dieser Anleitung werden folgende Symbole verwendet:
GEFAHR! Warnt vor Verletzungen
Das CE- ennzeichen bestätigt die Einhaltung der
EU-Richtlinien
Hinweis
Auflistung
Verkehrssicherheit
Beachten Sie folgende Hinweise zur Verkehrssicherheit
GEFAHR! Benutzen Sie das Gerät so, dass Sie Ihr
Fahrzeug jederzeit sicher steuern können.
Die Verwendung von Gerätefunktionen während der Fahrt
kann Ihre Aufmerksamkeit von der Verkehrssituation ablenken
und zu schweren Unfällen führen!
Verzichten Sie auf diese sowie auf alle zusätzlichen
Funktionen, die Ihre Aufmerksamkeit vom Verkehrsgeschehen
und von der Bedienung des Fahrzeugs während der Fahrt
ablenken.
Im Zweifelsfall stoppen Sie Ihr Fahrzeug an geeigneter Stelle
und bedienen das Gerät bei stehendem Fahrzeug. Sind Sie der
Fahrer, dürfen Sie keine Anwendungen verwenden, die Sie
vom Verkehrsgeschehen ablenken.
Allgemeine Sicherheitshinweise
Beachten Sie folgenden Hinweis, um sich selbst vor
Verletzungen zu schützen: Verändern oder öffnen
Sie das Gerät nicht.
Bestimmungsgemäßer Gebrauch: Dieses Gerät ist für den
Einbau und Betrieb in einem Fahrzeug mit 12 Volt
Bordnetzspannung vorgesehen. Beachten Sie die
Leistungsgrenzen des Gerätes. Lassen Sie Reparaturen und
ggf. auch den Einbau von einem Fachmann durchführen.
Einbauhinweise
Sie dürfen das Gerät nur dann einbauen, wenn Sie
Erfahrung mit dem Einbau von Autoradios bzw.
deren Zubehör haben und Ihnen die Elektrik des
Fahrzeugs vertraut ist. Beachten Sie dazu das
Anschlussschema am Ende dieser Anleitung.
Das Gerät darf nur mit geeigneten Adaptern angeschlossen
werden, es muss sichergestellt sein, dass alle Leitungen die
korrekten Signale bzw. Spannungen führen.
Die Installation des Geräts darf die Funktion von Airbags,
anderen Sicherheitsvorrichtungen und/ oder
Bedienelementen nicht behindern oder blockieren.
Die Fahrzeugbatterie muss vor dem Einbau des Gerätes
getrennt werden, andernfalls können Fehler oder auch
Schäden an Gerät oder Fahrzeugelektronik auftreten.
Blaupunkt übernimmt keine Haftung oder Gewährleistung für
durch unfachmännischen Einbau verursachte Schäden oder
deren Folgen.
Konformitätserklärung
Hiermit erklärt Blaupunkt Competence Center Car Multimedia-
Evo Sales GmbH, dass sich das Gerät in Übereinstimmung mit
den grundlegenden Anforderungen und den anderen
relevanten Vorschriften der Richtlinie 2014/53/EU befindet.
Die onformitätserklärung finden Sie im Internet unter
www.blaupunkt.com.
Reinigungshinweise
Löse-, Reinigungs- und Scheuermittel sowie Cockpit-Spray,
Lufterfrischer und unststoff- Pflegemittel können Stoffe
enthalten, welche die Oberfläche des Gerätes angreifen.
Verwenden Sie zur Reinigung nur ein trockenes oder leicht
feuchtes Tuch.
Entsorgungshinweise
Entsorgen Sie Ihr Altgerät nicht in den Hausmüll!
Nutzen Sie zur Entsorgung des Altgerätes, des
Zubehörs und verbrauchter Batterien die zur
Verfügung stehenden Rückgabe- und Sammelsysteme.

4
Anschlüsse- Interface
① SWC- Anschluss für Autoradio (3,5 mm linkenstecker)
② Anschluss Betriebsspannung (1. ACC , 2. GND)
③ Eingänge (aktuell keine Funktion)
④ Anschlussadapter für Radios ohne linkenstecker
Anschlüsse- Fernbedienung (Controller)
⑤ Anschlusskabel 12 Volt (12V- rot/ Masse- schwarz)
⑥ 12 Volt Anschluss für abel ⑤
⑦ Batteriefach (Batterie: CR2032, 3V)
Bedienelemente- Fernbedienung (Controller)
⑧ Tasten
⑨ Drehgeber mit mittiger Taste
Zubehör- Fernbedienung
⑩ Becherhalteradapter
⑪ Halteplatte lebepad
⑬ lebepad für Halteplatte ⑪

5
Anschluss | Programmierung | Verwendung des SafeDrive SDC 2.0
Anschluss & Einbau
Lassen Sie die Arbeiten von einem Fachmann
ausführen. Für den Einbau des Interface müssen Sie
das Autoradio ausbauen und die nötigen
Anschlüsse unter Zuhilfenahme der Anleitung des Radios
lokalisieren. Trennen Sie vor jeglichen Umbauten die
Fahrzeugbatterie ab!
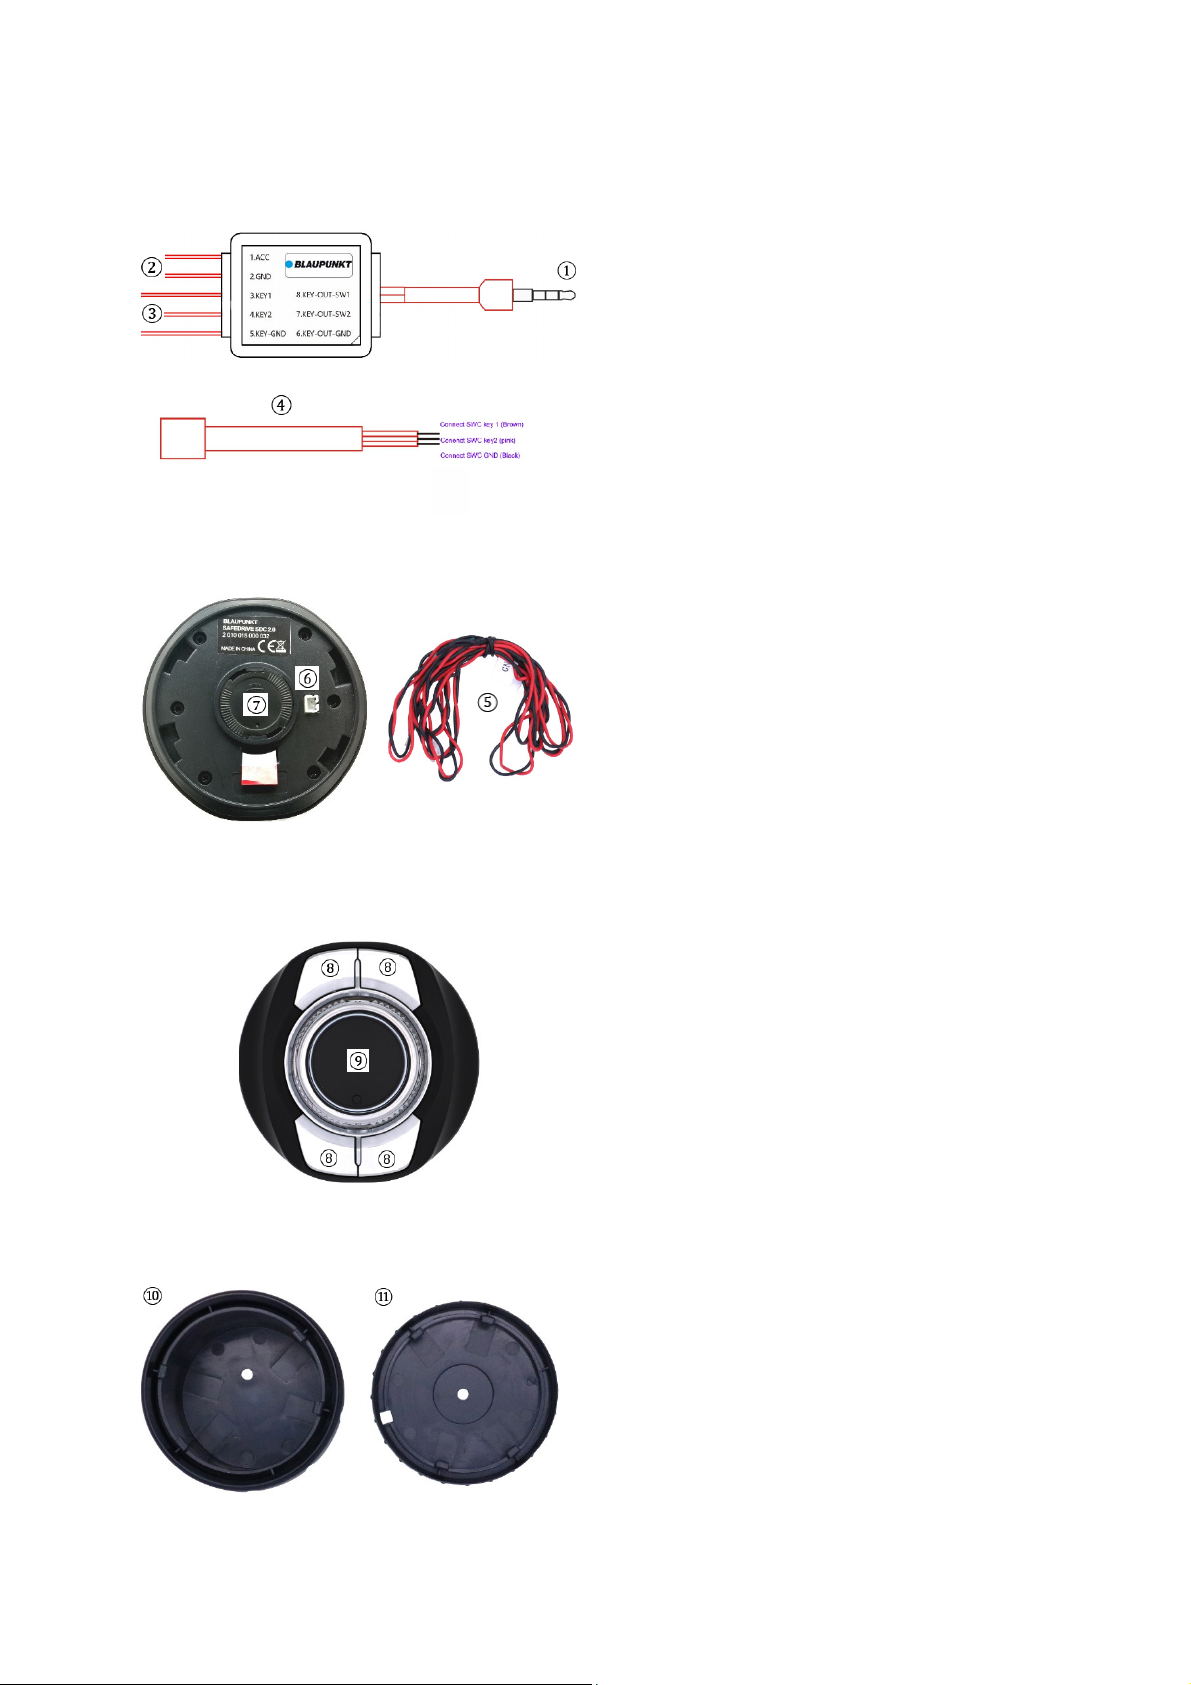
Anschluss Interface:
Schließen Sie die Anschlüsse ② des Interface an
Versorgungsspannung (12 Volt) und Masse an, Sie können
hierfür z.B. den Verstärker- Schaltausgang des Autoradios oder
den Zündplus (ACC) verwenden um sicherzustellen, dass das
Interface bei abgeschaltetem Radio keinen Strom verbraucht.
Hinweis: Wenn Ihr Radio die Option bietet, dass es über
den SWC- Eingang ein- bzw. ausgeschaltet werden kann und
Sie diese Funktion nutzen möchten, schließen Sie das Interface
an Dauerplus an.
Verbinden Sie den linkenstecker ① am Interface mit dem
SWC- Anschluss an Ihrem Autoradio. Wenn an Ihrem Radio
offene abelenden für SWC vorhanden sind, verwenden Sie
den zusätzlichen Adapter ④ und verbinden die
Steuerleitungen SWC1, SWC2 und die Masse (SWC GND).
Anschluss Controller:
Entfernen Sie die Batterie- Sicherung auf der Rückseite des
Controllers durch vorsichtiges Ziehen, der Controller ist nun
Betriebsbereit.
Optional schließen Sie den Controller mit dem beiliegenden
Anschlusskabel ⑤ an die gleiche Spannungsquelle an, wenn
Sie einen festen Verbau des Controllers vorsehen.
Ziehen Sie niemals am abel, wenn Sie den Stecker des
Anschlusskabels wieder lösen wollen, greifen Sie immer den
kleinen weißen Stecker.
Montieren Sie die beiliegende Halteplatte ⑪ am
gewünschten Ort oder verwenden Becherhalteradapter ⑩
Verwenden Sie auf keinen Fall den 12 Volt-
Anschluss für den Controller, wenn Sie vorsehen
den Einsatzort des Controllers öfters zu wechseln.
Der Anschluss ist nur zur festen Montage vorgesehen. Für den
mobilen Betrieb ist der Controller mit einer CR2032 zu
bestücken.
Hinweis: Entfernen Sie die Batterie aus dem Controller,
wenn Sie ihn an 12 Volt anschließen oder länger nicht
benutzen, um ein Auslaufen/ Entladen der Batterie zu
vermeiden.
Programmierung/ Anlernen
Verwenden Sie zum Programmieren der Funktionen die
entsprechende SWC- Option Ihres Autoradios- beachten Sie
hierzu bitte die Anleitung Ihres Autoradios.
Der Controller sendet bei jeder Taste ein bestimmtes Signal,
dieses müssen Sie auf die gewünschte Funktion Ihres Radios
anlernen.
Anlernmodus:
Wenn das Radio die Signale des Drehknopfes beim Anlernen
nicht erkennt oder nach dem Anlernen nicht wie gewünscht
reagiert, kann das Signal des Drehknopfes für den
Anlernvorgang umgeschaltet werden:
1. Drücken Sie die Taste links unten (die Taste über dem blauen
Punkt des Blaupunkt-Logos) 10 Sekunden lang um den
Lernmodus zu aktivieren.
2. Wählen Sie am Radio die gewünschte Funktion drehen Sie den
Drehgeber in die gewünschte Richtung. Das Autoradio sollte den
Erfolg bestätigen.
3. Drücken Sie kurz die untere linke Taste.
4. Führen Sie Schritt 2. erneut für die andere Drehrichtung aus.
5. Beenden Sie den Modus nachdem Sie beide Richtungen
vollständig angelernt haben indem Sie kurz eine andere Taste
drücken.
Hinweis: Die Verfügbarkeit von Funktionen wird von Ihrem
Autoradio vorgegeben.
Hinweis: Sie können alle Tasten beliebig frei verwenden,
beachten Sie jedoch, dass abhängig vom verwendeten
Radiogerät die Signale des Drehgebers ⑨ verzögert
verarbeitet werden können.
Hinweis: Die Tastenfunktionen können nicht
Quellspezifisch gewechselt werden, wenn das Radiogerät dies
nicht vorsieht.
Verwendung
Nach erfolgreicher Programmierung der Tasten (siehe
vorheriger Abschnitt der Anleitung) können Sie den SafeDrive
SDC 2.0 wie gewünscht verwenden.
Drücken Sie immer nur eine Taste, drücken Sie niemals
mehrere Tasten gleichzeitig.
Hinweis: Je nach verwendetem Gerät wird die
Tastenfunktion wiederholend bis Sie die Tasten wieder
loslassen oder einmalig pro Tastendruck ausgeführt (dieses
Verhalten lässt sich je nach zu steuerndem Gerät beim
Anlernen der Tasten durch längeren oder kürzeren Druck
beeinflussen).
Hinweis: Lösen des Controllers von der Halteplatte/ des
Becherhalteradapters: Drehen Sie den Controller wenige
Millimeter entgegen dem Uhrzeigersinn. Aufsetzen des
Controllers auf die Halteplatte/ den Becherhalteradapter:
Setzen Sie den Controller auf und drehen Sie ihn im
Uhrzeigersinn.

6
Garantie | Service | Batteriewechsel | Technische Daten | Fehlersuche
Garantie
Für innerhalb der Europäischen Union gekaufte Produkte
geben wir eine Herstellergarantie. Für außerhalb der
Europäischen Union gekaufte Geräte gelten die von unserer
jeweils zuständigen Landesvertretung herausgegebenen
Garantiebedingungen.
Die Garantiebedingungen können Sie unter
www.blaupunkt.com einsehen, wenn hier keine weiteren
Informationen angegeben sind, gelten die landesüblichen,
gesetzlichen Bestimmungen.
Service
Sollten Sie einmal einen Reparaturservice in Anspruch nehmen
müssen, wenden Sie sich bitte an Ihren Blaupunkt Händler,
weiterhin finden Sie unter www.blaupunkt.com Informationen
über Servicepartner in Ihrem Land.
Batteriewechsel
Wenn Sie den Controller mit einer Batterie betreiben, muss
diese alle 2- 12 Monate (je nach Nutzung) ausgetauscht
werden. Verwenden Sie nur den Batterietyp CR2032/ 3V:
Drehen Sie den Batteriefachdeckel auf der Rückseite des
Controllers in Richtung des sichtbaren Pfeils „OPEN“, greifen
Sie dazu mit einer aufgebogenen Büroklammer oder Nadel in
das kleine Loch des Deckels und heben diesen anschließend
vorsichtig und ohne Gewalt ab.
Hebeln Sie die Batterie vorsichtig heraus, berühren Sie dabei
nicht die ontakte oder Haltenasen.
Die neue Batterie setzen Sie zuerst auf der Seite mit den
ontakten ein (+ muss auf der eingelegten Batterie sichtbar
sein) und drücken sie dann auf der gegenüberliegenden Seite
vorsichtig herunter bis sie einrastet.
Setzen Sie nun den Batteriefachdeckel wieder auf und
schließen ihn.
Technische Daten
Reichweite
(Abstand zwischen
Sender und Empfänger,
abhängig von d. Umgebung): ca. 5- 10m
Spannungsversorgung
Fernbedienung: 3V, CR2032/ 10.5 -14.4 V
Interface: 10.5 -14.4 V
Ruhestromaufnahme : < 1mA
Fehlersuche
Nachfolgend finden Sie einige Fehlerbilder und deren
mögliche Lösung. Wenn Sie weiterhin Probleme mit dem
Gerät haben, kontaktieren Sie Ihren Fachhändler oder den
Blaupunkt Service. Bitte lassen Sie die Installation bei
Problemen von einem Fachmann prüfen bzw. durchführen.
Ein Großteil der möglicherweise auftretenden Probleme lässt
sich auf Anschluss- und Bedienfehler zurückführen.
• Keine Funktion beim Drücken einer Taste:
Bitte prüfen Sie die Batterie/ Spannungsversorgung des
Controllers
Bitte prüfen Sie die Spannungsversorgung des Interface.
Bitte prüfen Sie die Verkabelung/ Steckverbindungen
• Keine oder falsche Funktion beim Drücken einzelner oder aller
Tasten:
Bitte lernen Sie die entsprechenden bzw. alle Tasten über das
Menü in Ihrem Autoradio neu an, beachten Sie hierzu bitte die
Anleitung Ihres Autoradios.
• Drehgeber arbeitet nicht wie gewünscht/ lässt sich nicht
anlernen:
Bewegen Sie den Drehgeber ⑨ beim Anlernvorgang nur
einen Schritt/ lick oder gezielt eine bestimmte Anzahl von
Schritten, prüfen Sie anschließend die Funktion. Abhängig
vom Radiogerät kann es nötig sein, die Lautstärke auf die
Tasten ⑧ zu programmieren, wenn die Signale des
Drehgebers nicht korrekt verarbeitet werden. Nutzen Sie den
Drehgeber dann für andere Funktionen wie Titelsprung/
Senderwechsel etc..
Schalten Sie den Safe Drive ggf. in den Anlernmodus (siehe
apitel „Programmierung/ Anlernen“).
• Fernbedienung funktioniert nach erneutem Einschalten des
Autoradios nicht mehr und muss immer wieder neu
programmiert werden:
Bitte prüfen Sie, ob das Radio korrekt an Dauerplus
angeschlossen ist.

7
Congratulations
We congratulate you on the purchase of your new Blaupunkt product.
We want you to enjoy it for a long time and use the full functionality, so please read this manual carefully.
Should problems arise contrary to expectations, please check the operating instructions to see if you can solve the problem yourself.
Your dealer and the Blaupunkt service will gladly help you if you cannot solve the problem yourself. Contact details can be found at
www.blaupunkt.com.
Content
Congratulations | Content | Scope of delivery 7
Safety instructions | Installation instructions | General information 8
Connections interface / remote control | Controls Remote Control | Accessories 9
Connection | Programming | Usage 10
Warranty | Service | Battery change | Technical data | Troubleshooting 11
Scope of deliver
The delivery includes:
• SafeDrive SDC 2.0 Controller
• SafeDrive SDC 2.0 Interface
• Adapter with open leads
• Adapter for 12V power supply of the controller
• Bottle holder pedestal
• Flat retaining plate
• Adhesive pad for retaining plate
• Battery CR 2032 (optional)
• This operation manual

8
Safet instructions | Installation instructions | General information
Safet instructions
The device has been manufactured according to the state of
the art and defined safety guidelines. Nevertheless, hazards
can occur if you do not observe the safety instructions in this
manual. This guide is designed to familiarize you with the key
features. Detailed information on navigation can be found on
the Internet at www.blaupunkt.com.
• Read this manual carefully and completely before using the
device.
• eep the instructions in a way that is accessible to all users at
all times.
• Always hand the device to a third party with this manual.
• When necessary, follow the instructions of the equipment
you use with this equipment.
Used s mbols
The following symbols are used in this manual:
DANGER! Warns of injury
The CE mark confirms compliance with EU
directives
Note
Listing
Traffic safet
Observe the following notes on traffic safety
DANGER! Use the device so that ou can safel
control our vehicle at an time.
The use of device functions while driving can divert your
attention from the traffic situation and lead to serious
accidents!
Avoid these as well as all additional features that distract your
attention from the traffic and the operation of the vehicle
while driving.
If in doubt, stop your vehicle at a suitable location and operate
the device when the vehicle is stationary. If you are the driver,
you must not use any applications that distract you from the
traffic.
General safet instructions
Observe the following note to protect yourself from
injury: Do not modify or open the device.
Intended use: This device is intended for installation and
operation in a vehicle with 12 volt vehicle electrical system
voltage. Observe the performance limits of the device. Have
repairs and, if necessary, the installation carried out by a
specialist.
Installation instructions
You may only install the device if you have
experience with the installation of car radios or
their accessories and you are familiar with the
vehicle's electrical system. Please observe the connection
diagram at the end of this manual.
The device may only be connected with suitable adapters, it
must be ensured that all lines carry the correct signals or
voltages.
Installation of the device must not obstruct or block the
operation of airbags, other safety devices and / or controls.
The vehicle battery must be disconnected before installing the
device, otherwise errors or damage to the device or vehicle
electronics may occur. Blaupunkt assumes no liability or
warranty for damage caused by improper installation or its
consequences.
Declaration of conformit
Hereby, Blaupunkt Competence Center Car Multimedia Evo
Sales GmbH declares that the device is in compliance with the
essential requirements and other relevant provisions of
Directive 2014/53 / EU.
The Declaration of Conformity can be found on the Internet at
www.blaupunkt.com .
Cleaning instructions
Solvent, cleaning and scouring agents as well as cockpit spray,
air freshener and plastic care products may contain substances
which attack the surface of the device. Use only a dry or
slightly damp cloth for cleaning.
Disposal note
Do not dispose of your old appliance in the trash!
To dispose of the old device, the accessories and
used batteries, use the available return and
collection systems.

9
Connections- Interface
① SWC- connector for car radio device
(3,5 mm headphone jack)
② Power supply connection (1. ACC , 2. GND)
③ Inputs (not connected)
④ Adaptor for car radio devices without headphone jack
Connections- Remote Controller
⑤ Power connection cord 12 Volt (12V- red/ ground- black)
⑥ 12 Volt power connection for ⑤
⑦ Battery compartment (Battery: CR2032, 3V)
Controls- Remote Controller
⑧ eys
⑨ Rotary knob with central key
Accessor - Remote controller
⑩ Cup holder adaptor
⑪ Retaining plate
⑬ Adhesive pad for retaining plate ⑪

10
Installation | Programming | Usage
Installation
Have the work done by a specialist. For the
installation of the interface, you must remove the
car radio and locate the necessary connections
using the instructions of the radio. Disconnect the vehicle
battery before any modifications!
Connecting interface:
Connect the terminals ② of the interface to the supply
voltage (12 volts) and ground. use the amplifier switching
output of the car radio or the ignition plus (ACC) to ensure that
the interface consumes no power when the radio is switched
off.
Note: If your radio offers the option that it can be switched
on or off via the SWC input and you want to use this function,
connect the interface to permanent plus.
Connect the jack ① on the interface to the SWC connector on
your car radio. If there are open cable ends for SWC on your
radio, use the additional adapter ④ and connect the control
cables SWC1, SWC2 and ground (SWC GND).
Connecting controller:
Carefully remove the battery fuse on the back of the controller,
the controller is now ready for use.
Optionally, connect the controller to the same voltage source
with the enclosed connecting cable ⑤ if you intend to install
the controller firmly.
Never pull on the cable, if you want to disconnect the plug of
the connection cable again, always grab the small white plug.
Mount the enclosed retaining plate ⑪ in the desired location
or use cup holder adapter ⑩
Under no circumstances should you use the 12 Volt
connector for the controller if you intend to change
the location of the controller more often. The
connection is intended for fixed installation only. For mobile
operation, the controller must be equipped with a CR2032.
Note: Remove the battery from the controller if you
connect it to 12 volts or do not use it for a long time to prevent
it from leaking / discharging.
Programming
Use the appropriate SWC option of your car radio to program
the functions. Please refer to the manual of your car radio how
to program SWC function.
The controller sends a specific signal for each key, which you
must train to the desired function of your radio.
Teach-in mode:
If the radio does not recognize the signals of the rotary knob
during learning process or if it does not respond as requested
after learning, the signal of the rotary knob for the teach-in
process can be switched:
1. Press the button on the bottom left (the button above the blue
dot of the Blaupunkt logo) for 10 seconds to activate the teach-in
mode.
2. Select the desired function on the radio turn the rotary encoder
in the desired direction. The car radio has to confirm the success.
3. Briefly press the lower left button.
4. Repeat step 2 for the other direction of rotation.
5. Exit the mode after fully teach-in both directions by briefly
pressing another button.
Note: The availability of functions is specified by your car
radio.
Note: You can freely use all buttons, but please note that
depending on the radio used, the signals of the rotary encoder
⑨ can be processed with a delay.
Note: The key functions cannot be changed source-
specifically if the radio does not provide this.
Usage
After successfully programming the buttons (see previous
section of the manual), you can use the SafeDrive SDC 2.0 as
desired.
Press only one key at a time, never press multiple keys at the
same time.
Note: Depending on the device used, the button function
will repeat until you release the buttons or once per key press
(this behavior may be affected by longer or shorter pressure
depending on the device being controlled).
Note: To release the controller from the mounting plate /
cup holder adapter: Turn the controller a few millimeters
counterclockwise. Attaching the Controller to the Bracket /
Cup Holder Adapter: Install the controller and turn it clockwise.

11
Warrant | Service | Replace Batter | Technical data | Troubleshooting
Warrant
For products purchased within the European Union, we
provide a manufacturer's warranty. For devices purchased
outside the European Union, the warranty conditions issued
by our respective national representative apply.
The warranty conditions can be viewed at
www.blaupunkt.com, if no further information is given here,
the customary national legal provisions apply.
Service
Should you ever need a repair service, please contact your
Blaupunkt dealer. Further information on service partners in
your country can be found at www.blaupunkt.com.
Replace Batter
If you operate the controller with a battery, it must be replaced
every 2-12 months (depending on usage). Only use the battery
type CR2032 / 3V:
Turn the battery compartment cover on the back of the
controller in the direction of the visible "OPEN" arrow, using a
straightened paper clip or needle to insert it into the small
hole in the lid, then carefully lift it off without force.
Gently pry out the battery, avoid touching the contacts or
tabs.
Insert the new battery first on the side with the contacts (+
must be visible on the inserted battery) and then gently push
down on the opposite side until it clicks into place.
Now replace the battery compartment cover and close it.
Technical Data
Range
(Distance between
transmitter and receiver,
depends on environment): about 5- 10m
Power supply
Remote controller: 3V, CR2032/ 10.5 -14.4 V
Interface: 10.5 -14.4 V
Quiescent current: < 1mA
Troubleshooting
Below you will find some error pictures and their possible
solution. If you still have problems with the device, contact
your dealer or Blaupunkt Service. Please have the installation
checked or carried out by a specialist in case of problems.
Much of the problems that may arise can be attributed to
connection and operator errors.
• No function when pressing a key:
Please check the battery / power supply of the controller.
Please check the power supply of the interface.
Please check the cabling / connections.
• No or wrong function when pressing button(s):
Please re-learn the corresponding button(s) via the menu in
your car radio, please refer to the instructions of your car radio.
• Rotary encoder does not work as desired/ programming not
possible at all:
Move the rotary encoder ⑨ during the teach-in process only a
step / click or a specific number of steps, then check the
function. Depending on the radio, it may be necessary to
program the volume to the ⑧ keys if the encoder signals are
not processed correctly. Then use the rotary encoder for other
functions such as title jump / station change, etc..
Please try to change controller to the teach-in mode (see
chapter “Programming”)
• Remote control does not work after switching on the car radio
again and must always be reprogrammed:
Please check whether the radio is properly connected to
permanent power (battery).

12
Translations
FR, IT, NL, DA, PL, CS
insert here.

13
Blaupunkt SafeDrive SDC 2.0
2 010 018 000 032
EAN 4 260 499 851 446
Technische Änderungen, Irrtümer und Druckfehler vorbehalten.
Evo-Sales GmbH
Hastenbecker Weg 33
31785 Hameln/ Deutschland
© 2019 Blaupunkt – alle Rechte vorbehalten.
Dieses Material darf nur für den persönlichen Gebrauch reproduziert, kopiert oder verteilt werden.
Table of contents
Languages:
Other Blaupunkt Remote Control manuals
Popular Remote Control manuals by other brands

Carson
Carson Reflex Stick II 6 Channel 2.4 GHz instruction manual

Flipper LC
Flipper LC Two Device Universal instruction manual

Panasonic
Panasonic FV-SWGR1 Installation and operating instructions

beautyrest
beautyrest JLDK.33.01.02 user guide

CAME
CAME TWIN Series quick start guide

Ecox
Ecox EIH4WC owner's manual