Blu Stream HEX18GARC-KIT User manual

HEX18GARC-KIT QUICK REFERENCE GUIDE
www.blustream.com.au |www.blustream-us.com |www.blustream.co.uk
HEX18GARC-KIT
Quick Reference Guide
The HEX18GARC-KIT extender set is an industry leading uncompressed,
unconverted HDMI 2.0 4K 60Hz 4:4:4 HDCP 2.3/2.2 solution utilising the latest in
HDBaseT™ technology. The HEX18GARC-KIT supports uncompressed distribution
of the latest HDR resolutions including HDR10/10+ and Dolby Vision resulting in the
ultimate in picture quality for your critical viewing areas.
The HEX18GARC-KIT supports bi-directional IR, RS-232 and PoC up to lengths of
100m over a single CAT6A cable. The HEX18GARC-KIT also provides enhanced
features including KVM, ARC via HDMI or optical (S/PDIF) and Ethernet pass through.
Introduction
FEATURES:
• Advanced uncompressed, unconverted, HDMI over HDBaseT™ technology oering distribution of bit for bit 4K HDMI
video and audio over a single CAT6A cable
• Supports HDMI2.0 18Gbps specification including 4K 60Hz 4:4:4 UHD video
• Supports uncompressed distribution of the latest HDR resolutions including HDR10/10+ and Dolby Vision
• Supports HDMI video distribution up to 100m*
• Features 1x HDMI loop-out on HEX18GARC-TX for integrating local displays or cascading to multiple devices
• Supports all industry standard video resolutions including VGA-WUXGA and 480i-4K
• HDMI re-clocking on the HDBaseT™ Receiver to help solve HDMI HDCP, compatibility and handshaking issues
• Supports eARC (Enhanced Audio Return Channel) from display via HDMI and ARC via optical digital inputs
• Supports audio return to HDMI, optical digital and analogue L/R audio outputs (analogue output supports 2ch PCM
only)
• Supports all known HDMI audio formats including Dolby Atmos, Dolby TrueHD, Dolby Digital Plus and DTS-HD
Master Audio transmission
• Features USB2.0 KVM with speeds up to 350Mbps
• Bi-directional Ethernet (1Gb), IR & RS-232 pass through
• Supplied with Blustream IR receiver and emitter
• Bi-directional PoC (Power over Cable) to power extenders from either transmitter or receiver end
• Support for HDCP 2.3, HDCP 2.2 and HDCP 1.4
*Transmission distance is subject to video format, cable type and installation environment. It is recommended to use a minimum of CAT6A cabling

HEX18GARC-KIT QUICK REFERENCE GUIDE
Contact: support@blustream.com.au |support@blustream-us.com |support@blustream.co.uk
TX Panel Descriptions
1Power Status Indicator
2HDMI Input Status Indicator
3HDMI Output Status Indicator
4Power over Cable (PoC) Switch (ON / OFF) - to enable /
disable PoC being sent from the Transmitter
5Config DIP Switch Selection - see Configuration
settings on the underside of the Transmitter
6USB 2.0 Type A Connections - Connect to USB
peripheral devices
7USB 2.0 Type B Connection - Connect to USB host
device
8Ethernet Connection - Connect to network / device
for 1Gb LAN pass-through to / from Receiver
1Power Status Indicator
2HDMI Input Status Indicator
3HDMI Output Status Indicator
4Power over Cable (PoC) Switch (A / B / OFF) - see
settings on underside of the HEX18GARC-RX
Receiver
5Config DIP Switch Selection - see Configuration
settings on the underside of the Receiver
6USB 2.0 Type A Connections - Connect to USB
peripheral devices
7USB 2.0 Type B Connection - Connect to USB host
device
8Ethernet Connection - Connect to network / device
for 1Gb LAN pass-through to / from Transmitter
4
RX Panel Descriptions
21 3 5 6 7 8 9 10 11 12 13 14 15 16
421 3 5 6 7 8 9 10 11 12 13 14 15 16
9HDBaseT™ Output - Connect to HEX18GARC-RX receiver
via CAT6A cable
qHDMI Input - Connect to HDMI source device / AVR for
eARC connectivity from HDBaseT™ Receiver
wHDMI Output - Connect to local HDMI display
eOptical (S/PDIF) Output - Connect to local audio
amplification or distribution device
rL/R Output - audio breakout from receiver ARC signal
(2ch PCM only)
tIR Output - Connect to Blustream 5V 3.5mm IR emitter
yIR Input - Connect to Blustream 5V 3.5mm IR receiver
uRS-232 Port - 3-Pin Phoenix connector to pass bi-
directional IR to / from the receiver
i24V/1.25A DC Power Input 4-Pin DIN connector
17
9HDBaseT™ Input - Connect to HEX18GARC-TX
transmitter via CAT6A cable
qHDMI Input - Reserved for future use
wHDMI Output - Connect to local HDMI display*
eOptical (S/PDIF) Input - Connect to display for optical
audio return to the HEX18GARC-TX
rIR Input - Connect to Blustream 5V 3.5mm IR receiver
tIR Output - Connect to Blustream 5V 3.5mm IR emitter
yRS-232 Port - 3-Pin Phoenix connector to pass bi-
directional IR to / from the transmitter
u24V/1.25A DC Power Input 4-Pin DIN connector
*Note: HDMI output may not support Active HDMI cables

HEX18GARC-KIT QUICK REFERENCE GUIDE
www.blustream.com.au |www.blustream-us.com |www.blustream.co.uk
The Transmitter features and 8-pin DIP switch on the front panel.
The switches allow you to configure various functions of the Transmitter as follows:
DIP switch 1: Specify between 5V IR or 12V IR equipment in use. Blustream IR equipment supplied is 5V. DIP switch
pointing UP for 5V IR equipment. DIP switch pointing DOWN for 12V IR equipment.
DIP switch 2: This switch allows you to specify between USB Host or USB Device mode. DIP switch pointing UP if the
unit is connected to the HOST. DIP switch pointing DOWN if connected to DEVICES.
DIP switch 3-4: This switch allows you to select the RS-232 port configuration.
See adjacent image:
DIP switch 5-8:This switch allows you to specify an EDID to handshake
with the source device. See adjacent image. The EDID Soware
Management setting will allow for an EDID setting to be chosen via an
RS-232 API command (see full manual for API commands - download
from the Blustream website).
TX Config Switches
RX Config Switches
The Receiver features and 8-pin DIP switch on the front panel.
The switches allow you to configure various functions of the Receiver as follows:
DIP switch 1: Specify between 5V IR or 12V IR equipment in use. Blustream IR equipment supplied is 5V. DIP switch
pointing UP for 5V IR equipment. DIP switch pointing DOWN for 12V IR equipment.
DIP switch 2: This switch allows you to specify between USB Host or USB Device mode. DIP switch pointing UP if the
unit is connected to the HOST. DIP switch pointing DOWN if connected to DEVICES.
DIP switch 3-4: This switch allows you to select the RS-232 port configuration.
See adjacent image:
DIP switch 5: This switch allows you to enable or disable bi-directional CEC pass-through from a display device to a
source device. DIP switch pointing UP for CEC Pass-through. DIP switch pointing DOWN for CEC blocking.
DIP switch 6: This switch allows you to select eARC audio via the HDMI connection or ARC audio via the Optical S/PDIF
connection of the Receiver. DIP switch pointing UP for HDMI eARC (HDMI ARC on TV to HDMI on TX). DIP switch pointing
DOWN for Optical S/PDIF (Optical in from TV to Optical on TX).
DIP switch 7-8: reserved for future use.

HEX18GARC-KIT QUICK REFERENCE GUIDE
Contact: support@blustream.com.au |support@blustream-us.com |support@blustream.co.uk
The HEX18GARC-KIT allows for a variety of ways to transfer Audio Return from the Receiver back to the Transmitter
unit.
By definition, ARC (Audio Return Channel) and Optical Audio Return, will support up to a maximum of 5.1ch HD
audio pass-through. For ARC via HDMI, CEC will need to be enabled on both the display and the AVR/processor for
the required communication to instigate the ARC channel to be opened. The HEX18GARC-KIT is transparent to this
communication.
eARC (Enhanced Audio Return Channel), allows for high resolution audio codecs (including Dolby Atmos and DTS:X) to
travel back from an eARC display to an eARC AVR/processor. Both pieces of equipment connected to either side of the
HEX18GARC-KIT must be eARC capable for this function to work, and have CEC enabled.
The HEX18GARC-KIT will also allow for Optical Audio Return to be sent across the HDBaseT™link. Please ensure the
correct DIP switch settings on both Transmitter and Receiver are selected for the required audio transmission method.
The HEX18GARC-TX features an anlogue 2ch L/R audio breakout for a 2ch audio return feed from the display connected
at the Receiver. Please note: this output port is not audio breakout of the HDMI audio being fed to the HDMI input of
the Transmitter, nor does the Transmitter down mix multi-channel audio codecs.
ARC, eARC, and Optical Audio Return
The HEX18GARC-KIT features a 1Gbps LAN pass-through for bi-directional communication and distribution of data.
The connections are transparent to the HDBaseT™link, and the HEX18GARC-KIT does not act as router or DHCP server
for the equipment connected either side.
Ethernet / LAN Pass-through
The HDBaseT™chipset used in this HEX18GARC-KIT allows for USB2.0 pass-through, to speeds of up to 350Mbps for
connectivity of a USB Host device to USB peripheral devices on the other side of the HDBaseT™link. The USB link is
designed for connection of KVM devices, and as such, may not support all USB2.0 equipment dependng on the type
of USB data transfer. Please ensure that the relevant DIP switches have been set to select whether the Transmitter or
Receiver is acting as the ‘Host’ and ‘Device’ connection.
Where the TX or RX unit is selected as the ‘Host’, the other end of the link must be set to ‘Device’ using the DIP switches
on the individual units. It is not required to download any drivers or soware for the HDBaseT equipment to allow for
USB data transfer.
Please note: it is not possible to have both Host AND peripheral Devices connected at both ends of the HDBaseT™link
running simultaneously.
USB Pass-through
The HDBaseT™VS3000 chipset used in this HEX18GARC-KIT features ‘Port Duality’ for a 1080p return stream (RX to TX)
to run simultaneously with the 4K stream from TX to RX. At the point of the release of this product to market, the Port
Duality function is still undergoing development by HDBaseT™, and will be released at a later date. Blustream expects
to release a firmware update to the HEX18GARC-KIT in the future to implement this feature into the product.
HDMI Input on HEX18GARC Receiver

HEX18GARC-KIT QUICK REFERENCE GUIDE
www.blustream.com.au |www.blustream-us.com |www.blustream.co.uk
Understanding the HDBaseT™ Signal Status Lights
Blustream HDBaseT™ extender solutions include status LED indicators on both the Transmitter and Receiver products to show all
connections are active and to help diagnose possible problems with the HDBaseT™ link.
Understanding the Status Lights:
Receiver:
• The HDMI status indicator light will be o when there is no connection with a display / sink
• The HDMI status indicator light will be on when there is an active connection with a display
• The orange HDBaseT™ link light will be o when there is no CAT cable / active HDBaseT™ connection on the RJ45 HDBaseT™ output
• The orange HDBaseT™ link light will blink if there is an unstable connection between the Transmitter and Receiver
• The orange HDBaseT™ link light will be lit when a CAT cable is connected to the HDBaseT™ RJ45 output on the Transmitter
and an active connection is achieved with the Receiver
• The green HDBaseT™ HDCP light will be o when no video signal is received
• The green HDBaseT™ HDCP light will flash when there is video signal without HDCP being received
• The green HDBaseT™ HDCP light will be on when there is video signal with HDCP being received
• The power link light will be o when no power is connected to the receiver, or to the connected Transmitter unit
• The power link light will be on when power is connected directly to the receiver or is being received from the Transmitter unit
Transmitter:
• The HDMI status indicator light will be o when there is no connection with a source device
• The HDMI status indicator will be on when there is an active connection with a source device
• The orange HDBaseT™ link light will be o when there is no CAT cable / active HDBaseT™ connection on the RJ45 HDBaseT™ output
• The orange HDBaseT™ link light will blink if there is an unstable connection between the Transmitter and Receiver
• The orange HDBaseT™ link light will be lit when a CAT cable is connected to the HDBaseT™ RJ45 output on the Transmitter
and an active connection is achieved with the Receiver
• The green HDBaseT™ HDCP light will be o when no video signal is transmitted
• The green HDBaseT™ HDCP light will flash when there is video signal without HDCP being transmitted
• The green HDBaseT™ HDCP light will be on when there is video signal with HDCP being transmitted
• The power link light will be o when no power is connected to the Transmitter, or to the connected Receiver unit
• The power link light will be on when power is connected directly to the Transmitter or is being received from the Receiver unit
RJ45 Wiring - T568B
It is important that the interconnecting CAT cable between the
Blustream HDBaseT™products is terminated using the correct
RJ45 pin configuration. The link CAT6A cable MUST be a ‘straight’
(pin-to-pin) cable and it is advised that this is wired to the T568B
wiring standard as this format is less prone to EMI (Electro-Magnetic
Interference).
When installing CAT cable for HDBaseT™it is advised that the best
possible CAT cable quality is used without ANY connections in the
cable between the RJ45 plugs.
HDMI distribution over the new HDBaseT™VS3000 chipset will ONLY
work if used with CAT6A standard cable, or above, for extended
distances due to the 16Gbps HDBaseT™link required. The distance
capabilities of this technology is significantly reduced over CAT5e or
CAT6 cabling because of the increase in data being sent.
Blustream recommends using U/FTP cable for HDBaseT™VS3000
installations, especially when running over longer distances, in areas
of high EMI, or for 4K signal distribution.
Terminating the Interconnecting HDBaseT™ CAT Cable

HEX18GARC-KIT QUICK REFERENCE GUIDE
Contact: support@blustream.com.au |support@blustream-us.com |support@blustream.co.uk
Example Schematic
eARC
CAT6A or above
IR Cable
RS232
HDMI
Example Schematic
HEX18GARC-KIT
MULTIPLE 4K SOURCES
Up to 100m at 4K
18G Uncompressed
A
C
D
E
F
G
B
RS-232
IR
PoC
E
F
G
HDMI
ARC
LAN
USB
A
B
C
D
USB DEVICES
TouchscreensKeyboard / Mouse
Games Controller Smart Boards
Control Processor
Network
USB
Local Display
Network Switch
1G Managed Network Switch
eARC
18Gbps AVR
4K DISPLAY

HEX18GARC-KIT QUICK REFERENCE GUIDE
www.blustream.com.au |www.blustream-us.com |www.blustream.co.uk
Package Contents
Specifications
HEX18GARC-KIT
• 1 x HEX18GARC-TX Transmitter
• 1 x HEX18GARC-RX Receiver
• 1 x 24V/1.25A DC Power Supply
• 1 x USB-A to USB-B cable (1m)
• 1 x IRE1 Emitter
• 1 x IRR Receiver
• 2 x Mounting Bracket Sets
• 1 x Quick Reference Guide
NOTE: Specifications are subject to change without notice. Weights and
dimensions are approximate.
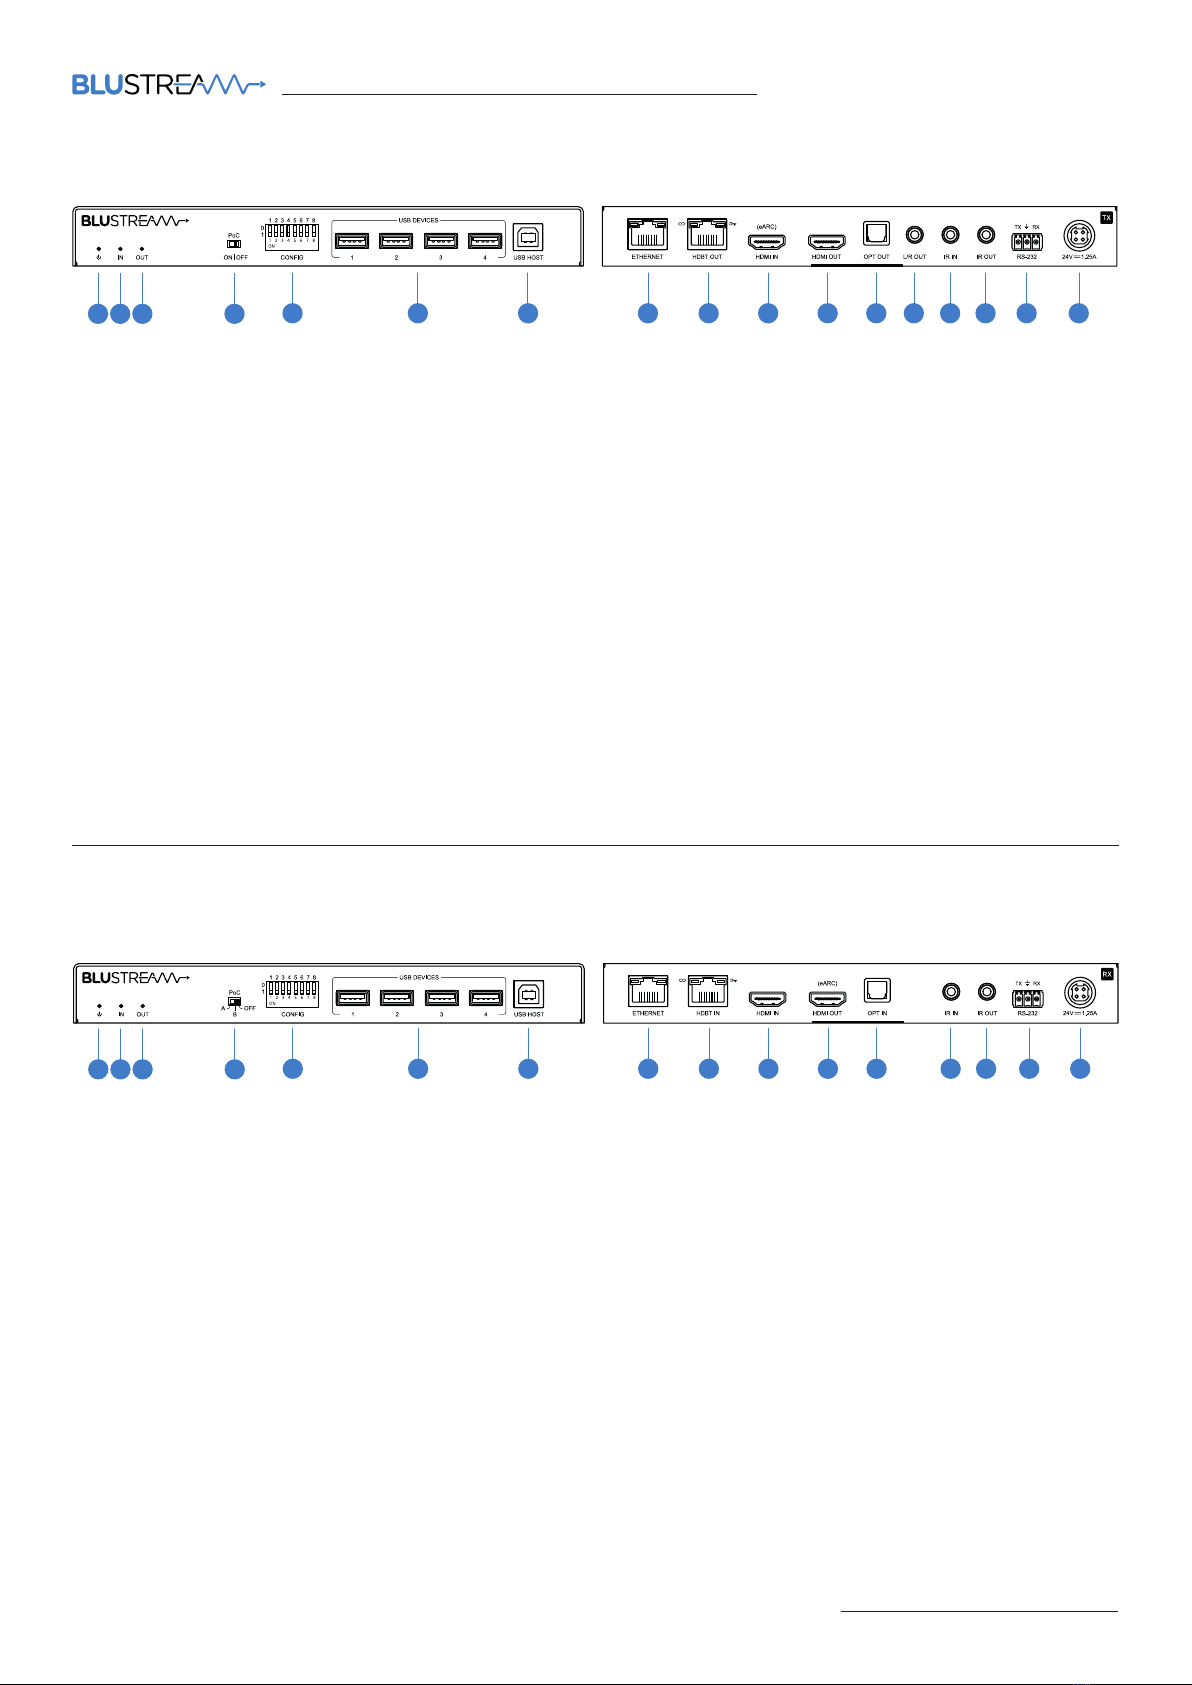
HEX18GARC-TX
• Video Input Connectors: 1x HDMI Type A, female
• Video Output Connectors: 1x HDBaseT™ RJ45 connector, 1x
HDMI Type A, female
• Audio Output Connectors: 1x Analogue audio L/R (3.5mm
stereo jack), 1x Optical (S/PDIF)
• Ethernet Port: 1x RJ45 connector
• USB / KVM Port: 1x USB-Type B, 4x USB-Type A
• IR Input Port: 1x 3.5mm stereo jack
• IR Output Port: 1x 3.5mm stereo jack
• RS-232 Port: 1x 3-pin Phoenix connector
• Control: 8-pin DIP switch
• Power Supply: 24V/1.25A DC, 4-pin DIN connector
HEX18GARC-KIT
• Casing Dimensions (W x D x H): 220mm x 100mm x 25mm
(TX / RX)
• Box Dimensions (W x D x H): TBC
• Shipping Weight: 1.8kg (TBC)
• Operating Temperature: 32°F to 104°F (-5°C to +55°C)
• Storage Temperature: -4°F to 140°F (-25°C to +70°C)
HEX18GARC-RX
• Video Input Connectors: 1x HDBaseT™ RJ45
connector, 1x HDMI Type A, female (reserved)
• Video Output Connectors: 1x HDMI Type A, female
• Audio Input Connectors: 1x Optical (S/PDIF)
• Ethernet Port: 1x RJ45 connector
• USB / KVM Port: 1x USB-Type B, 4x USB-Type A
• IR Input Port: 1x 3.5mm stereo jack
• IR Output Port: 1x 3.5mm stereo jack
• RS-232 Port: 1x 3-pin Phoenix connector
• Control: 8-pin DIP switch
• Power Supply: 24V/1.25A DC, 4-pin DIN connector
Certifications
FCC Notice - This equipment has been tested and found to comply with the limits for a Class B digital device, pursuant to part
15 of the FCC Rules. These limits are designed to provide reasonable protection against harmful interference in a residential
installation. This equipment generates, uses, and can radiate radio frequency energy and, if not installed and used in accordance
with the instructions, may cause harmful interference to radio communications. However, there is no guarantee that interference
will not occur in a particular installation. If this equipment does cause harmful interference to radio or television reception, which
can be determined by turning the equipment o and on, the user is encouraged to try to correct the interference by one or more
of the following measures:
• Reorient or relocate the receiving antenna.
• Increase the separation between the equipment and receiver.
• Connect the equipment into an outlet on a circuit dierent from that to which the receiver is connected.
• Consult the dealer or an experienced radio/TV technician for help.
CAUTION - changes or modifications not expressly approved by the party responsible for compliance could void the user’s
authority to operate the equipment.
CANADA, INDUSTRY CANADA (IC) NOTICES - This Class B digital apparatus complies with Canadian ICES-003. Operation
is subject to the following two conditions: (1) this device may not cause interference, and (2) this device must accept any
interference, including interference that may cause undesired operation of the device.
CANADA, AVIS D’INDUSTRY CANADA (IC) - Cet appareil numérique de classe B est conforme aux normes canadiennes
ICES-003. Son fonctionnement est soumis aux deux conditions suivantes : (1) cet appareil ne doit pas causer d’interférence
et (2) cet appareil doit accepter toute interférence, notamment les interférences qui peuvent aecter son
fonctionnement.
CORRECT DISPOSAL OF THIS PRODUCT -This marking indicates that this product should not be disposed with
other household wastes. To prevent possible harm to the environment or human health from uncontrolled
waste disposal, recycle it responsibly to promote the sustainable reuse of material resources. To return your
used device, please use the return and collection systems or contact the retailer where the product was
purchased. They can take this product for environmentally safe recycling.
Table of contents
Other Blu Stream Extender manuals

Blu Stream
Blu Stream CEX120B-KIT User manual

Blu Stream
Blu Stream CAT100AU User manual

Blu Stream
Blu Stream HEX100ARC-KIT V2 User manual

Blu Stream
Blu Stream HEX100HDVGA - RX User manual

Blu Stream
Blu Stream HEX100ARC User manual

Blu Stream
Blu Stream EX40B-KIT User manual

Blu Stream
Blu Stream CEX4K-KIT User manual

Blu Stream
Blu Stream HEX70CS-KIT User manual

Blu Stream
Blu Stream HEX100HDVGA-KIT User manual

Blu Stream
Blu Stream HEX70B-RX User manual