Blue Mark DroneBeacon MAVLink 110 Series User manual

DroneBeacon MAVLink Transponder Manual - version 1.1 September 2022 - © BlueMark
Innovations BV 2022
1/11
DroneBeacon MAVLink-
Transponder Manual 110-series
July 2022 - version 1.0
The latest version of this manual is located here:
https://download.bluemark.io/dronebeacon_mavlink_transponder_manual_110.pdf

DroneBeacon MAVLink Transponder Manual - version 1.1 September 2022 - © BlueMark
Innovations BV 2022
2/11
Intended audience: users of the MAVLink transponder
Disclaimer: we are not responsible or liable for errors or incomplete information in this
document.
Version history
version
date
description
1.0
July 2022
Initial release
1.1
September 2022
Added FCC information

DroneBeacon MAVLink Transponder Manual - version 1.1 September 2022 - © BlueMark Innovations BV
2022
3/11
QUICK START
1. Attach the DroneBeacon MAVLink transponder to your drone. For optimal coverage install the
transponder
horizontally
with the antenna facing up.
a) Using the 3M dual lock stickers (included)
b) Using two M5 screws
2. Connect UART interface to the autopilot system for both power and control using the 4-port
screw terminal. Optional the USB-C connector can be used for power. Note the on-off power
switch is only used for the USB-C connection. The UART settings can be configured in step 3.
a) + (+5V)
b) RX
c) TX
d) - (GND)
3.
Optional step:
Configure the DroneBeacon MAVLink transponder
a) Press the configuration button, the
red
configuration LED is turned on.
b) Connect to the
dronebeacon
WLAN network (no password needed)
c) Point your browser to http://192.168.50.1 to configure the transponder.
d) Press the configuration button again to exit configuration mode
If you attach the transponder on the bottom of the drone (upside down), use M5-screws!
4. Control the transponder using your autopilot system. See section 1.4.
Flying a drone could create risks for people, air traffic and other assets.
Before flying, the drone operator has to make sure to know the local rules
regarding drone flights and obtain the necessary authorization to fly the
drone(s).

DroneBeacon MAVLink Transponder Manual - version 1.1 September 2022 - © BlueMark Innovations BV
2022
4/11
Contents
Quick start......................................................................................................................................................................................3
1 Introduction .............................................................................................................................................................................. 5
1.1 Audience.......................................................................................................................................................................5
1.2 Specifications ..............................................................................................................................................................5
1.3 Installation....................................................................................................................................................................6
1.4 Using the transponder............................................................................................................................................7
1.5 Android app .................................................................................................................................................................7
1.6 Open Drone ID............................................................................................................................................................7
2 Configuration ........................................................................................................................................................................... 8
2.1 General...........................................................................................................................................................................8
2.2 UART.............................................................................................................................................................................10
2.3 Firmware.....................................................................................................................................................................10
3 Warranty ...................................................................................................................................................................................11
4 More information ................................................................................................................................................................. 11

DroneBeacon MAVLink Transponder Manual - version 1.1 September 2022 - © BlueMark Innovations BV
2022
5/11
1 INTRODUCTION
Thank you for purchasing and using DroneBeacon products!
The latest version of this user manual may be downloaded at the following link, where the most
up-to-date version will be found:
https://download.bluemark.io/dronebeacon_mavlink_transponder_manual_110.pdf
(Direct/Broadcast) Remote Identification (Remote ID) adds “beacon” capability to drones to
broadcast basic information of airborne drones, such as the operator's registration number, drone
serial number and current position. The EU and USA are planning new rules that make Remote ID
mandatory for drones over 250 grams weight. The beacon information can be used by general
public, law enforcement and drones to give better situation awareness of the airspace around them.
BlueMark Innovations BV offers Remote ID transponders and receivers. DroneBeacon is an add-on
(transponder) for drones which broadcasts Remote ID beacon signals. DroneScout is a receiver that
detects Remote ID signals of nearby drones up to several km distance (in open space). See
https://dronescout.co for more information about our products.
1.1 Audience
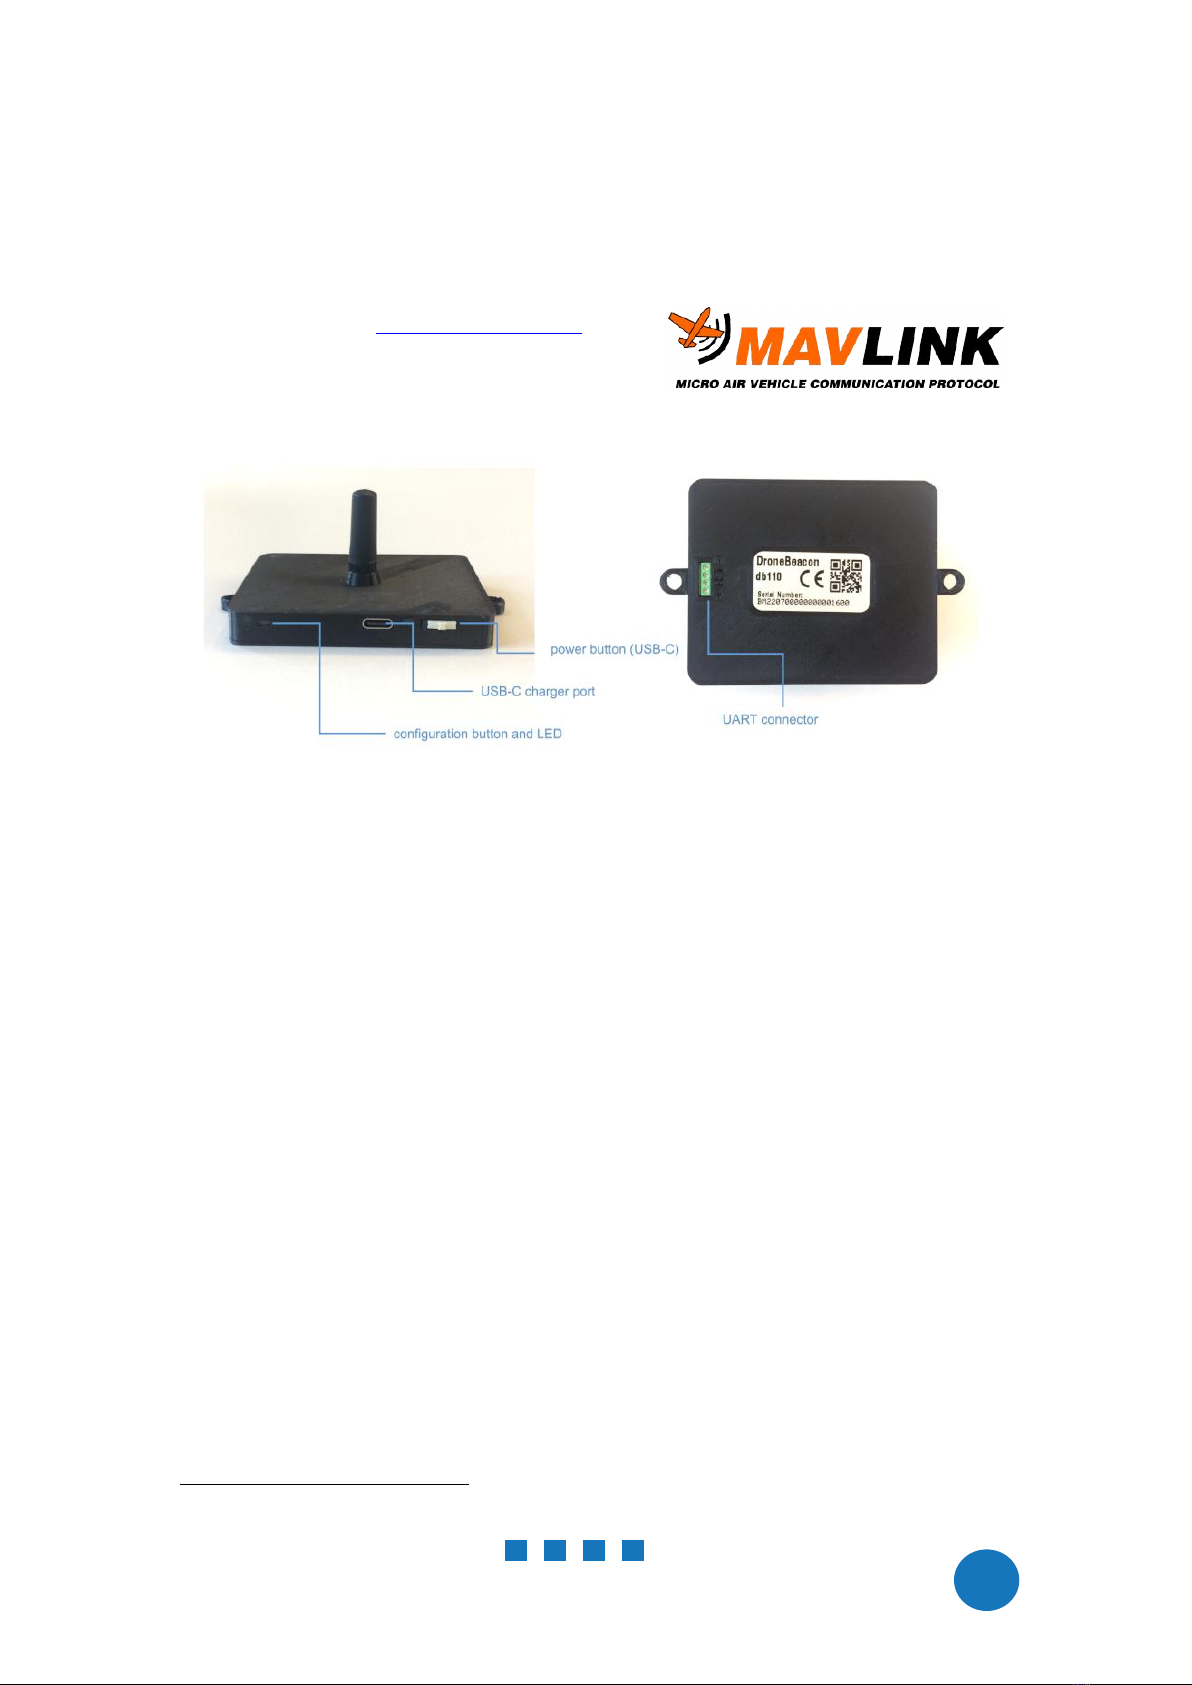
This document is intended for users that want to use the
DroneBeacon MAVLink db110
transponder
that can be integrated into drone products. It is designed for drone manufacturers / system
integrators. For the
DroneBeacon
transponder -a standalone transponder- there is a separate
manual.
1.2 Specifications
The transponder consists of an embedded system and several radio-interfaces to broadcast Remote
ID signals.
Key specifications:
Compliant with international regulations
EU ASD-STAN DIN EN 4709-002
USA ASTM Remote ID Standard ASTM F3411-22a-RID-B
Supports all Remote ID transmission protocols:
BLE legacy
BLE long range
WLAN NaN 2.4 GHz
WLAN Beacon 2.4 GHz
Long range > 5 km detection range1
Omni-directional antenna with 3 dBi gain
Transmit power: + 20 dBm (WLAN and Bluetooth)
IP rating:
none, (it is more or less waterproof if the UART connector is sealed.)
Suited for medium and larger drones. “
DJI Mavic
” is the minimum size.
1The detection range depends on several factors such as the receiver antenna gain, transmission protocol,
weather conditions, flying height, receiver height line of sight etc. With professional receivers a range of 5 km
and more is possible. See the DroneScout manual for more details.

DroneBeacon MAVLink Transponder Manual - version 1.1 September 2022 - © BlueMark Innovations BV
2022
6/11
Power:
5V (UART connector or USB-C, current: 50 to 100 mA (depends on transmission mode))
UART
4-port screw terminal, settings configurable (baud rate, stop bits, parity, data bits )
Size: 99 x 66.5 x 42 mm
without screw noses and antenna: 81 x 66.5 x 11.5 mm
MAVLink v2 compliant
Supports the OpenDrone ID messages
Operating temperature
-5°C to +40°C
Weight: 33 g (PCB-only version: 20 g)
Figure 1 - DroneBeacon 100-serie transponder
1.3 Installation
Attach the DroneBeacon MAVLink transponder to your drone. For optimal coverage install the
transponder horizontally with the antenna facing up2. The detection range will be severely limited
when it is installed under an angle of 15 degrees or more.
semi-permanent/temporarily installation
Use the (included) 3M dual-lock stickers (type 3M SJ4570). One sticker on the bottom of the
transponder and the other on the drone where you want to install the transponder. If you attach the
transponder on the bottom of the drone (upside down), use M5-screws!
Note: for a good adhesion/grip, place the dual-lock sticker and apply firm consistent pressure to
assure good contact with the substrate you are adhering. Also, it needs 1 hour to 72 hours
(preferred) to build a (full) adhesion to the surface. In addition, it is important that the adhesive base
for the tape is free of grease and dry, and that it is not covered with a removable lacquer or a layer
of paper.
permanent installation
The transponder can be attached to the drone using two M5 screws.
The distance between the screw noses is 90 mm.
M5 holes
For the PCB-only version there are two M2 screw holes (distance is 60 mm (x) and 50 mm (y)).
2For high flying drones > 75 m, install the transponder facing down, on the bottom of the drone for maximum
range. The antenna pattern is similar to a
dipole antenna
, radiating remote ID signals in a donut-shape.

DroneBeacon MAVLink Transponder Manual - version 1.1 September 2022 - © BlueMark Innovations BV
2022
7/11
UART connector
Connect UART interface to the autopilot system for both power and control using the 4-port screw
terminal. Optional the USB-C connector can be used for power. Note the on-off power switch is only
used for the USB-C connection. The UART settings can be configured in the configuration mode (see
Chapter 2).
The UART screw terminal has 4-ports:
a) + (+5V)
b) RX
c) TX
d) - (GND)
1.4 Using the transponder
The MAVLink transponder is controlled by the autopilot system. For normal operation, make sure
the transponder is powered on and make sure the UART interface is configured correctly.
Ardupilot
For integration, we work together with Ardupilot to get support for Remote ID in version 4.3.0. See
this link for more informattion.
C source code
For other implementations, we provide C source code how to send MAVLink messages to the
transponder.
Flying a drone could create risks for people, air traffic and other assets. Before flying,
the drone operator has to make sure to know the local rules regarding drone flights
and obtain the necessary authorization to fly the drone(s).
1.5 Android app
You can use the free
OpenDroneID OSM
Android app to view the DroneBeacon Remote ID signals:
https://play.google.com/store/apps/details?id=org.opendroneid.android_osm
Note: only few Android smartphones support reception of Bluetooth Long Range and/or WLAN NaN
signals. A list of supported smartphones is presented, in the link below.
https://github.com/opendroneid/receiver-android/blob/master/supported-smartphones.md
1.6 Open Drone ID
DroneBeacon uses the Open Drone ID framework to broadcast Remote ID signals. The framework
can be found on this page:
https://www.opendroneid.org/

DroneBeacon MAVLink Transponder Manual - version 1.1 September 2022 - © BlueMark Innovations BV
2022
8/11
2 CONFIGURATION
The transponder can be configured via a web-interface. To active the configuration mode follow
these steps:
Make sure the transponder is powered up via the UART interface or USB-C. (Make sure the
power switch is switched to
on
if USB-C is used.)
Press the configuration button, the
red
configuration LED is turned on.
Connect to the
dronebeacon
WLAN network (no password needed)
Point your browser to http://192.168.50.1
New settings will only be applied if the Save & Apply button is pressed!
Configuration mode will be quit, by pressing the configuration button again. The
red
configuration
LED is now turned off. The transponder is now in normal operation mode.
2.1 General
The main configuration can be found on the general tab.
Figure 2 - General configuration page

DroneBeacon MAVLink Transponder Manual - version 1.1 September 2022 - © BlueMark Innovations BV
2022
9/11
Fill in the drone type, the transmission mode and transmission period.
There are seven transmission modes:
BLE legacy
BLE long range
BLE dual mode: legacy + long range
WLAN NAN
WLAN Beacon
WLAN dual mode: NAN + beacon
All modes: BLE + WLAN
There are also specific MAVLink settings:
dual-link - transmit both the transponder ID and the one configured by MAVLink (enabled), or
only the latter (disabled)
MAVLink system ID and component ID

DroneBeacon MAVLink Transponder Manual - version 1.1 September 2022 - © BlueMark Innovations BV
2022
10/11
2.2 UART
In the uart tab, you can configure the UART-settings.
Figure 3 - Uart configuration page
The baud rate can be set from 2400 up to 230400. Data bits can be set from 5 to 8 bit.
2.3 Firmware
In the firmware tab, you can upgrade the firmware of the transponder.
Firmware files can be found here: https://dronescout.co/downloads/
Upload the file and press Flash image to upload new firmware. Upgrading firmware has been tested
with Chrome and Firefox. If upgrade fails, please try again or try another browser.

DroneBeacon MAVLink Transponder Manual - version 1.1 September 2022 - © BlueMark Innovations BV
2022
11/11
Figure 4 - Firmware upgrade page
3 WARRANTY
The product has a two-year warranty period, starting at the date of receiving the product. Outside
warranty are issues like crash damage, improper use, (extreme) weather conditions that damages
the product. Also, the battery is excluded from warranty. The product is eligible for future firmware
updates as described in the section 2.4 firmware.
4 MORE INFORMATION
If you need more information, please contact us at info@bluemark.io or by phone: +31 53 711 2104.
All contact information can be found at the
DroneScout
contact page:
https://dronescout.co/contact/
Table of contents
Other Blue Mark Drone manuals
Popular Drone manuals by other brands

Craig
Craig CRT721CW owner's manual

Hangzhou Qifei Intelligence Technology
Hangzhou Qifei Intelligence Technology 3WD4-QF-10B user manual

RUKO
RUKO U11 PRO quick start guide

ZT Model
ZT Model Sky Eye operating instructions

Propel Trampolines
Propel Trampolines X09 Instruction booklet

SYMA
SYMA X600W Instructions for use