Blue Robotics BlueROV2 User manual

5/20/2019 BlueROV2 Heavy Configuration Retrofit Kit Installation - Blue Robotics
https://www.bluerobotics.com/learn/bluerov2-heavy-configuration-retrofit-kit-installation/ 1/28
Home (https://www.bluerobotics.com)/Guide (https://www.bluerobotics.com/learn/)/BlueROV2 Heavy Conguration Retrot Kit
Installation
BlueROV2 Heavy Conguration Retrot Kit Installation
Introduction
The BlueROV2 Heavy Conguration Retrot Kit provides the components needed to upgrade your ROV to have four
vertical thrusters, external thruster guards, and additional buoyancy. With that upgrade, you’ll gain 6 degree-of-
freedom control and active stabilization in roll and pitch making the BlueROV2 Heavy the most stable but
maneuverable mini ROV on the market.
Parts and Tools
You Will Need
BlueROV2 Heavy Conguration Retrot Kit
$599.00
(https://www.bluerobotics.com/store/rov/bluerov2-
upgrade-kits/brov2-heavy-retrot-r1-rp/)
Add to Cart (/learn/bluerov2-heavy-
conguration-retrot-kit-installation/?add-to-
cart=19948)
Privacy - Terms

5/20/2019 BlueROV2 Heavy Configuration Retrofit Kit Installation - Blue Robotics
https://www.bluerobotics.com/learn/bluerov2-heavy-configuration-retrofit-kit-installation/ 2/28
You will also need:
1 x #1 Phillips head screwdriver (
BlueROV2
kit)
1 x #2 Phillips head screwdriver (not included)
1 x Bottle of Threadlocker (not included)
BlueROV2 Partial Disassembly
To partially disassemble your BlueROV2, you will need the following tools:
1 x 2.5 mm hex driver
1 x #1 Phillips head screwdriver
1 x Wire cutters or scissors
1 x Penetrator wrench
Optional: 1x Roll of masking tape and marker
1. To ensure your ROV is completely powered o, please remove the battery completely from the 3” enclosure and
place to the side.
BlueROV2
$2,784.00 – $4,563.00
(https://www.bluerobotics.com/store/rov/bluerov2/bluerov2/)
Add to Cart
(https://www.bluerobotics.com/store/rov/bluerov2/bluerov2/)
BlueROV2 Heavy
Conguration Retrot Kit
$599.00
(https://www.bluerobotics.com/store/rov/bluerov2-
upgrade-kits/brov2-heavy-
retrot-r1-rp/)
Add to Cart
(/learn/bluerov2-
heavy-conguration-
retrot-kit-
installation/?add-to-
cart=19948)
Hex Key Set
$6.00
(https://www.bluerobotics.com/store/watertight-
enclosures/enclosure-tools-
supplies/tool-hex-set-r1/)
Add to Cart
(/learn/bluerov2-
heavy-conguration-
retrot-kit-
installation/?add-to-
cart=1098)
Penetrator Wrench
$12.00
(https://www.bluerobotics.com/store
connectors/tools/tool-
penetrator-wrench-r1/)
Add to Cart
(/learn/bluerov2-
heavy-conguration-
retrot-kit-
installation/?add-to-
cart=9971)
Privacy - Terms

5/20/2019 BlueROV2 Heavy Configuration Retrofit Kit Installation - Blue Robotics
https://www.bluerobotics.com/learn/bluerov2-heavy-configuration-retrofit-kit-installation/ 3/28
(https://www.bluerobotics.com/wp-content/uploads/2019/03/heavy-tutorial-1.jpg?x62571)
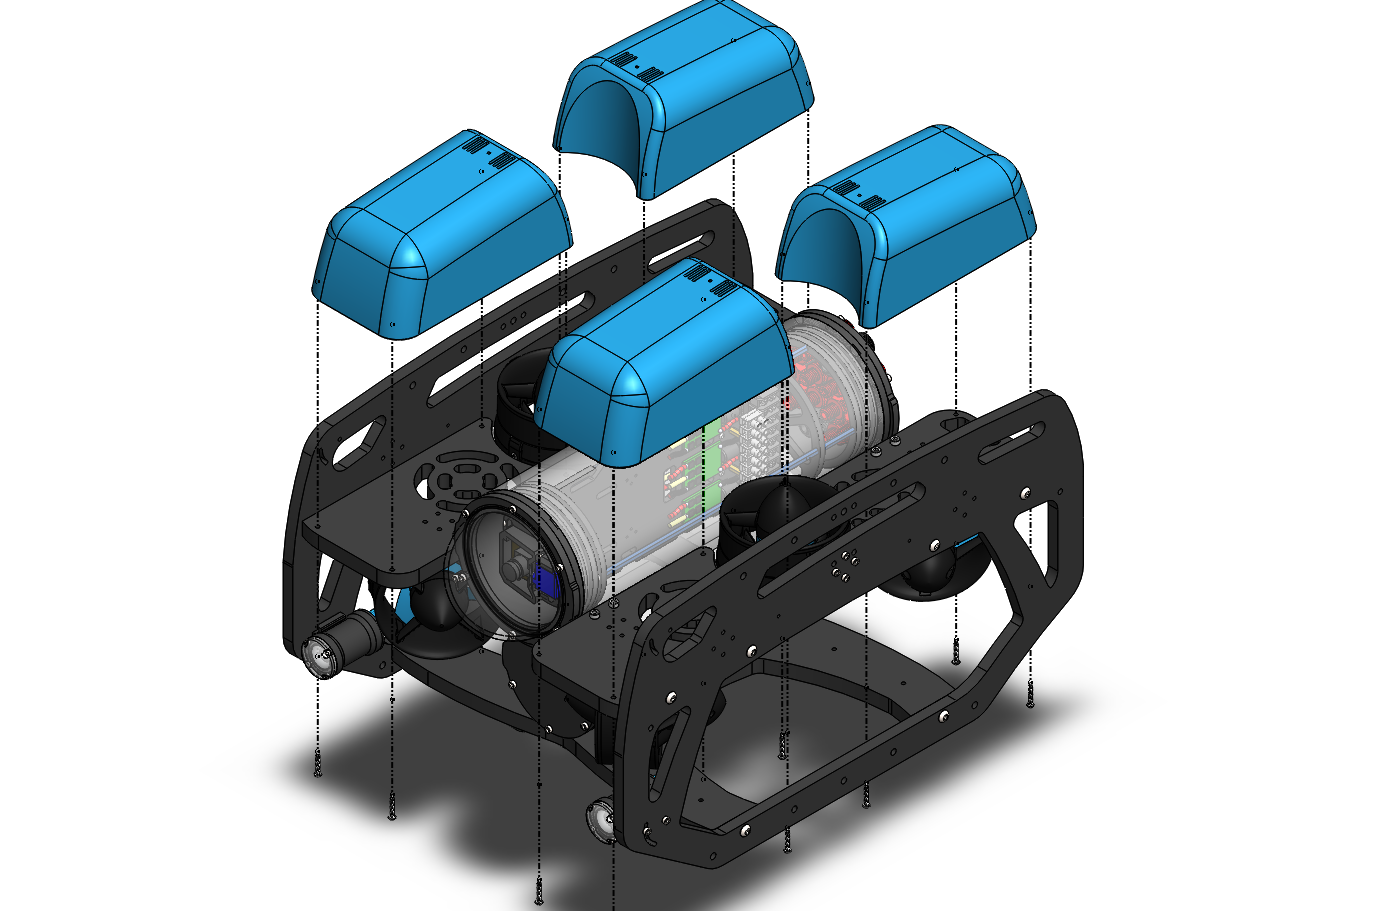
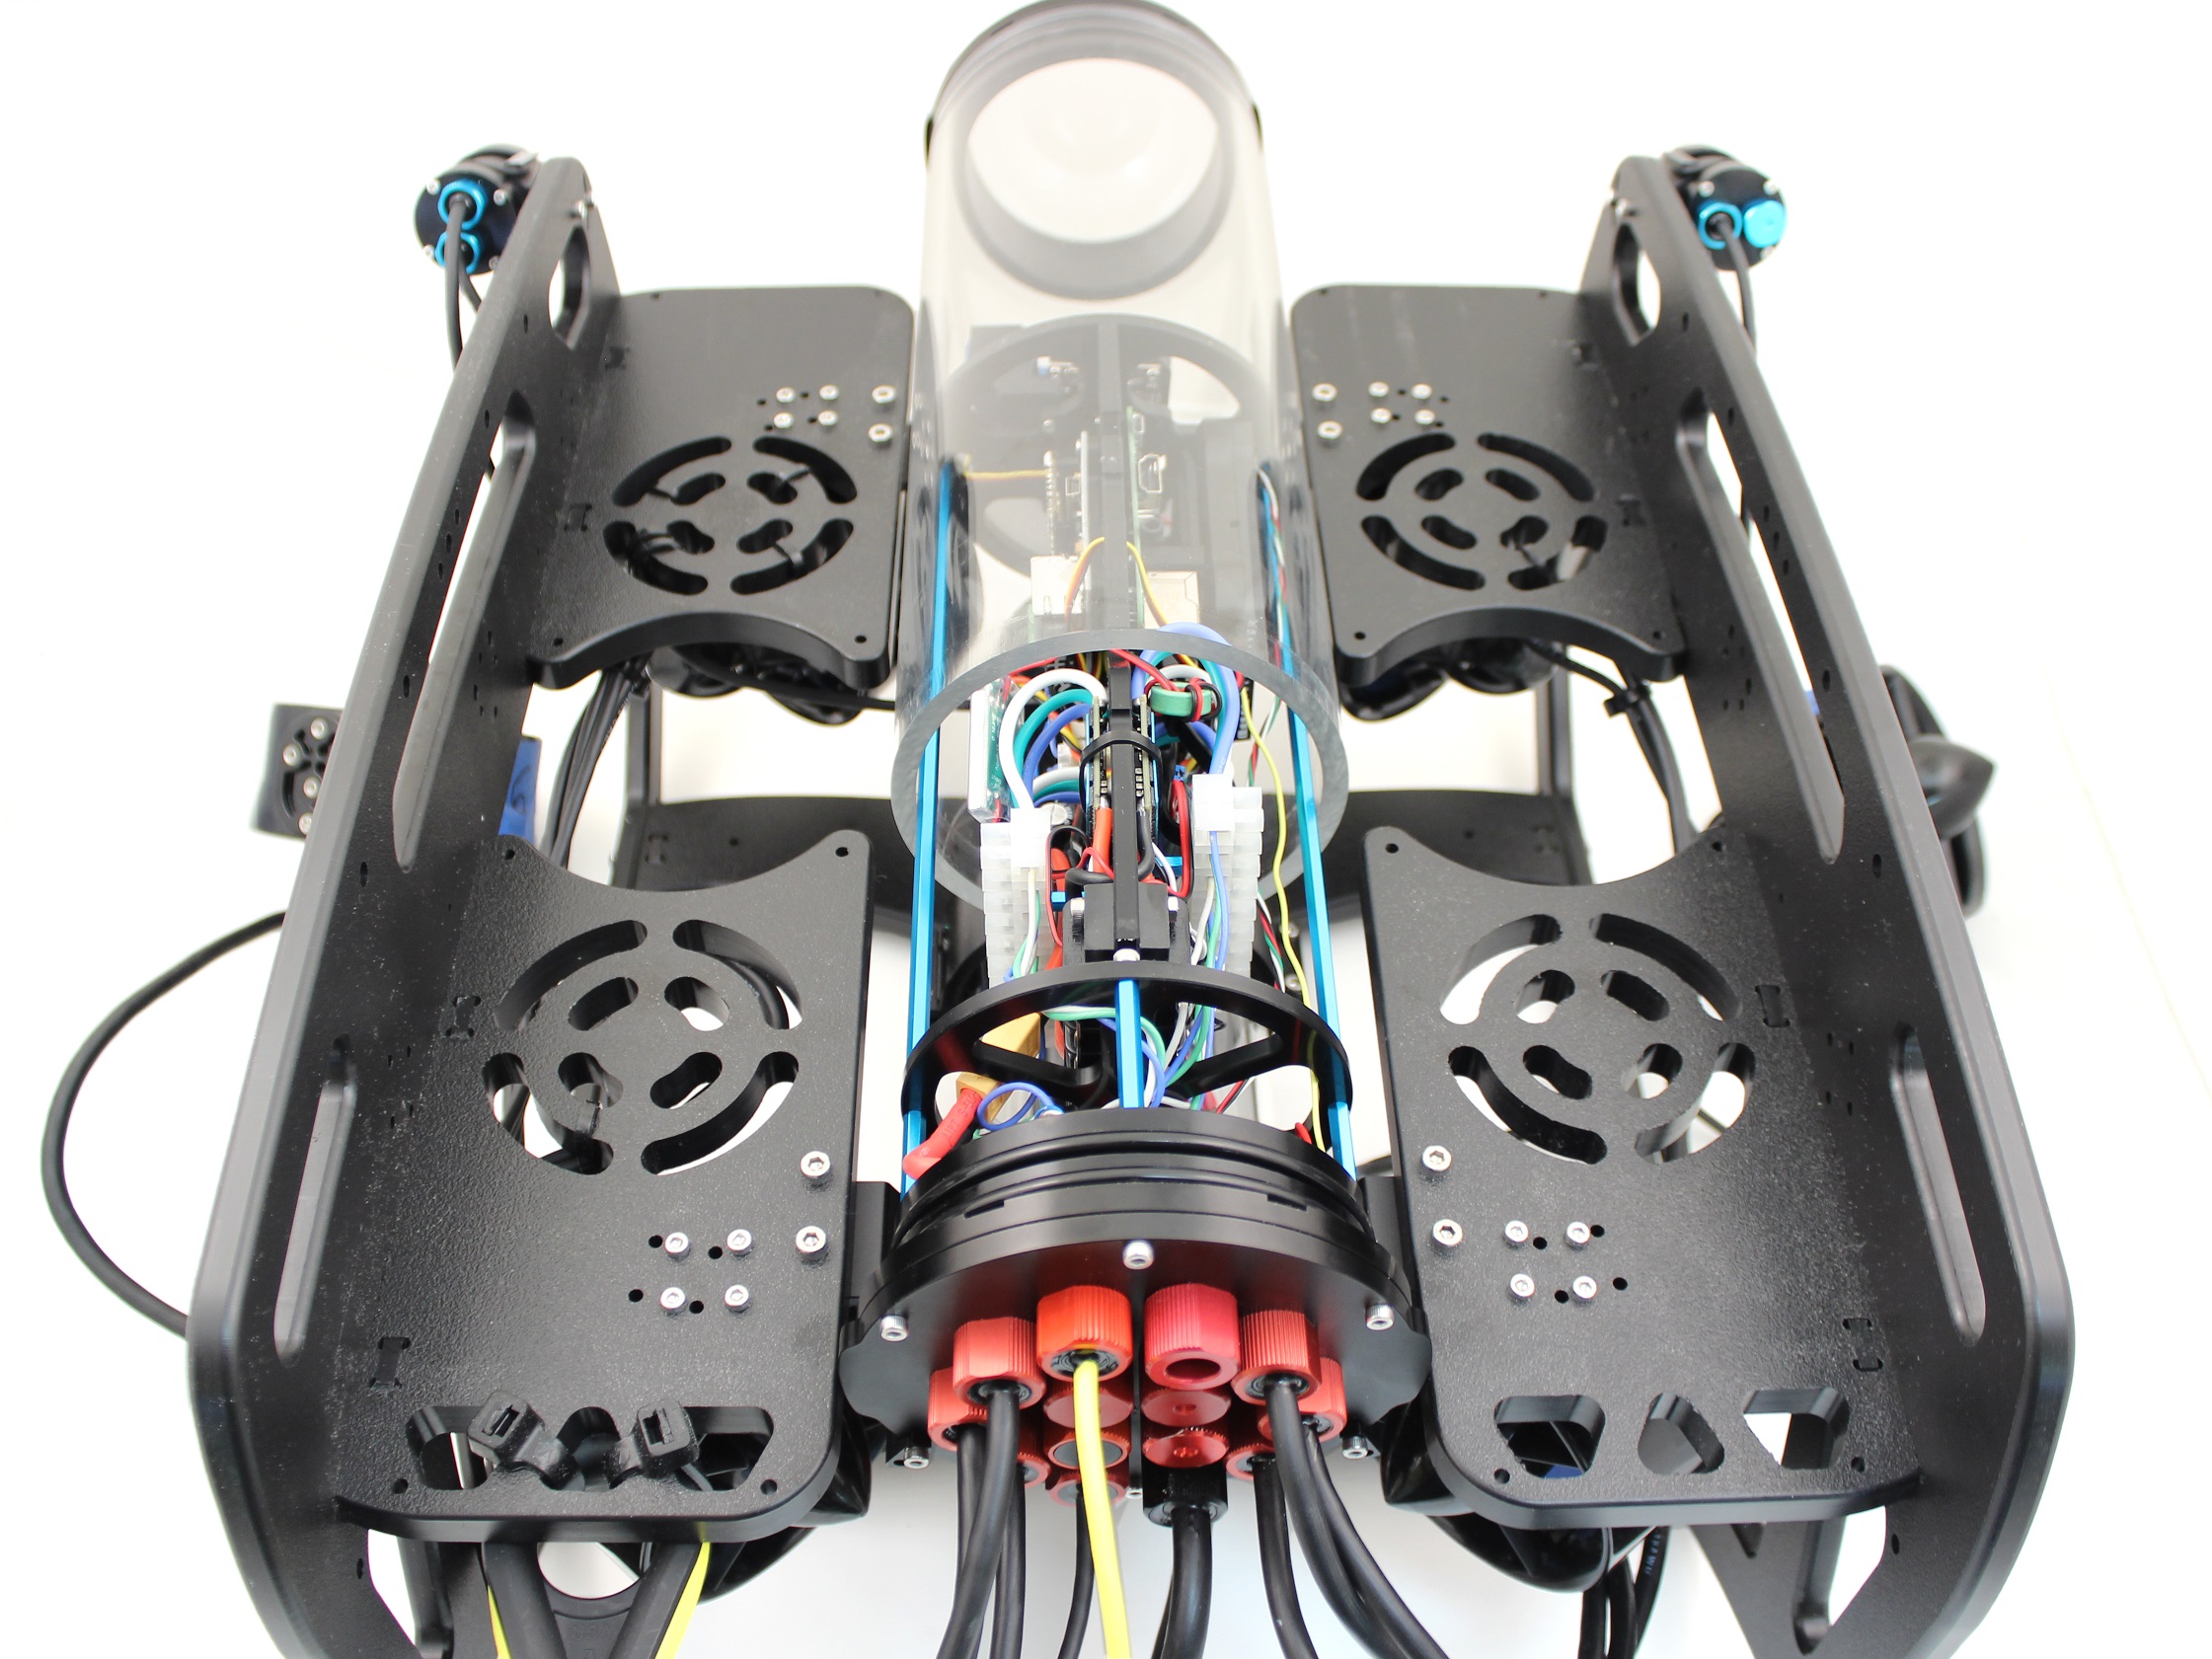
2. Remove the fairings and buoyancy blocks by removing the self-tapping screws that hold the fairings to the frame.
(https://www.bluerobotics.com/wp-content/uploads/2019/03/heavy-step-3.png?x62571)
Privacy - Terms

5/20/2019 BlueROV2 Heavy Configuration Retrofit Kit Installation - Blue Robotics
https://www.bluerobotics.com/learn/bluerov2-heavy-configuration-retrofit-kit-installation/ 4/28
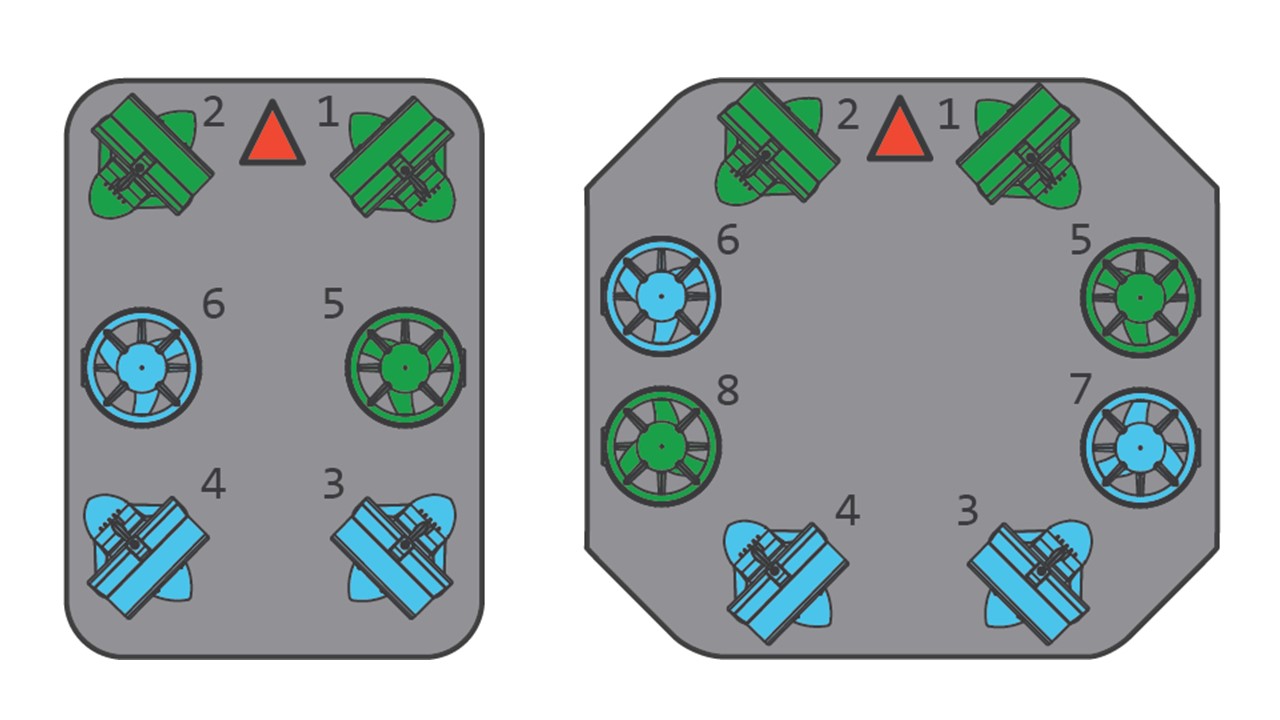
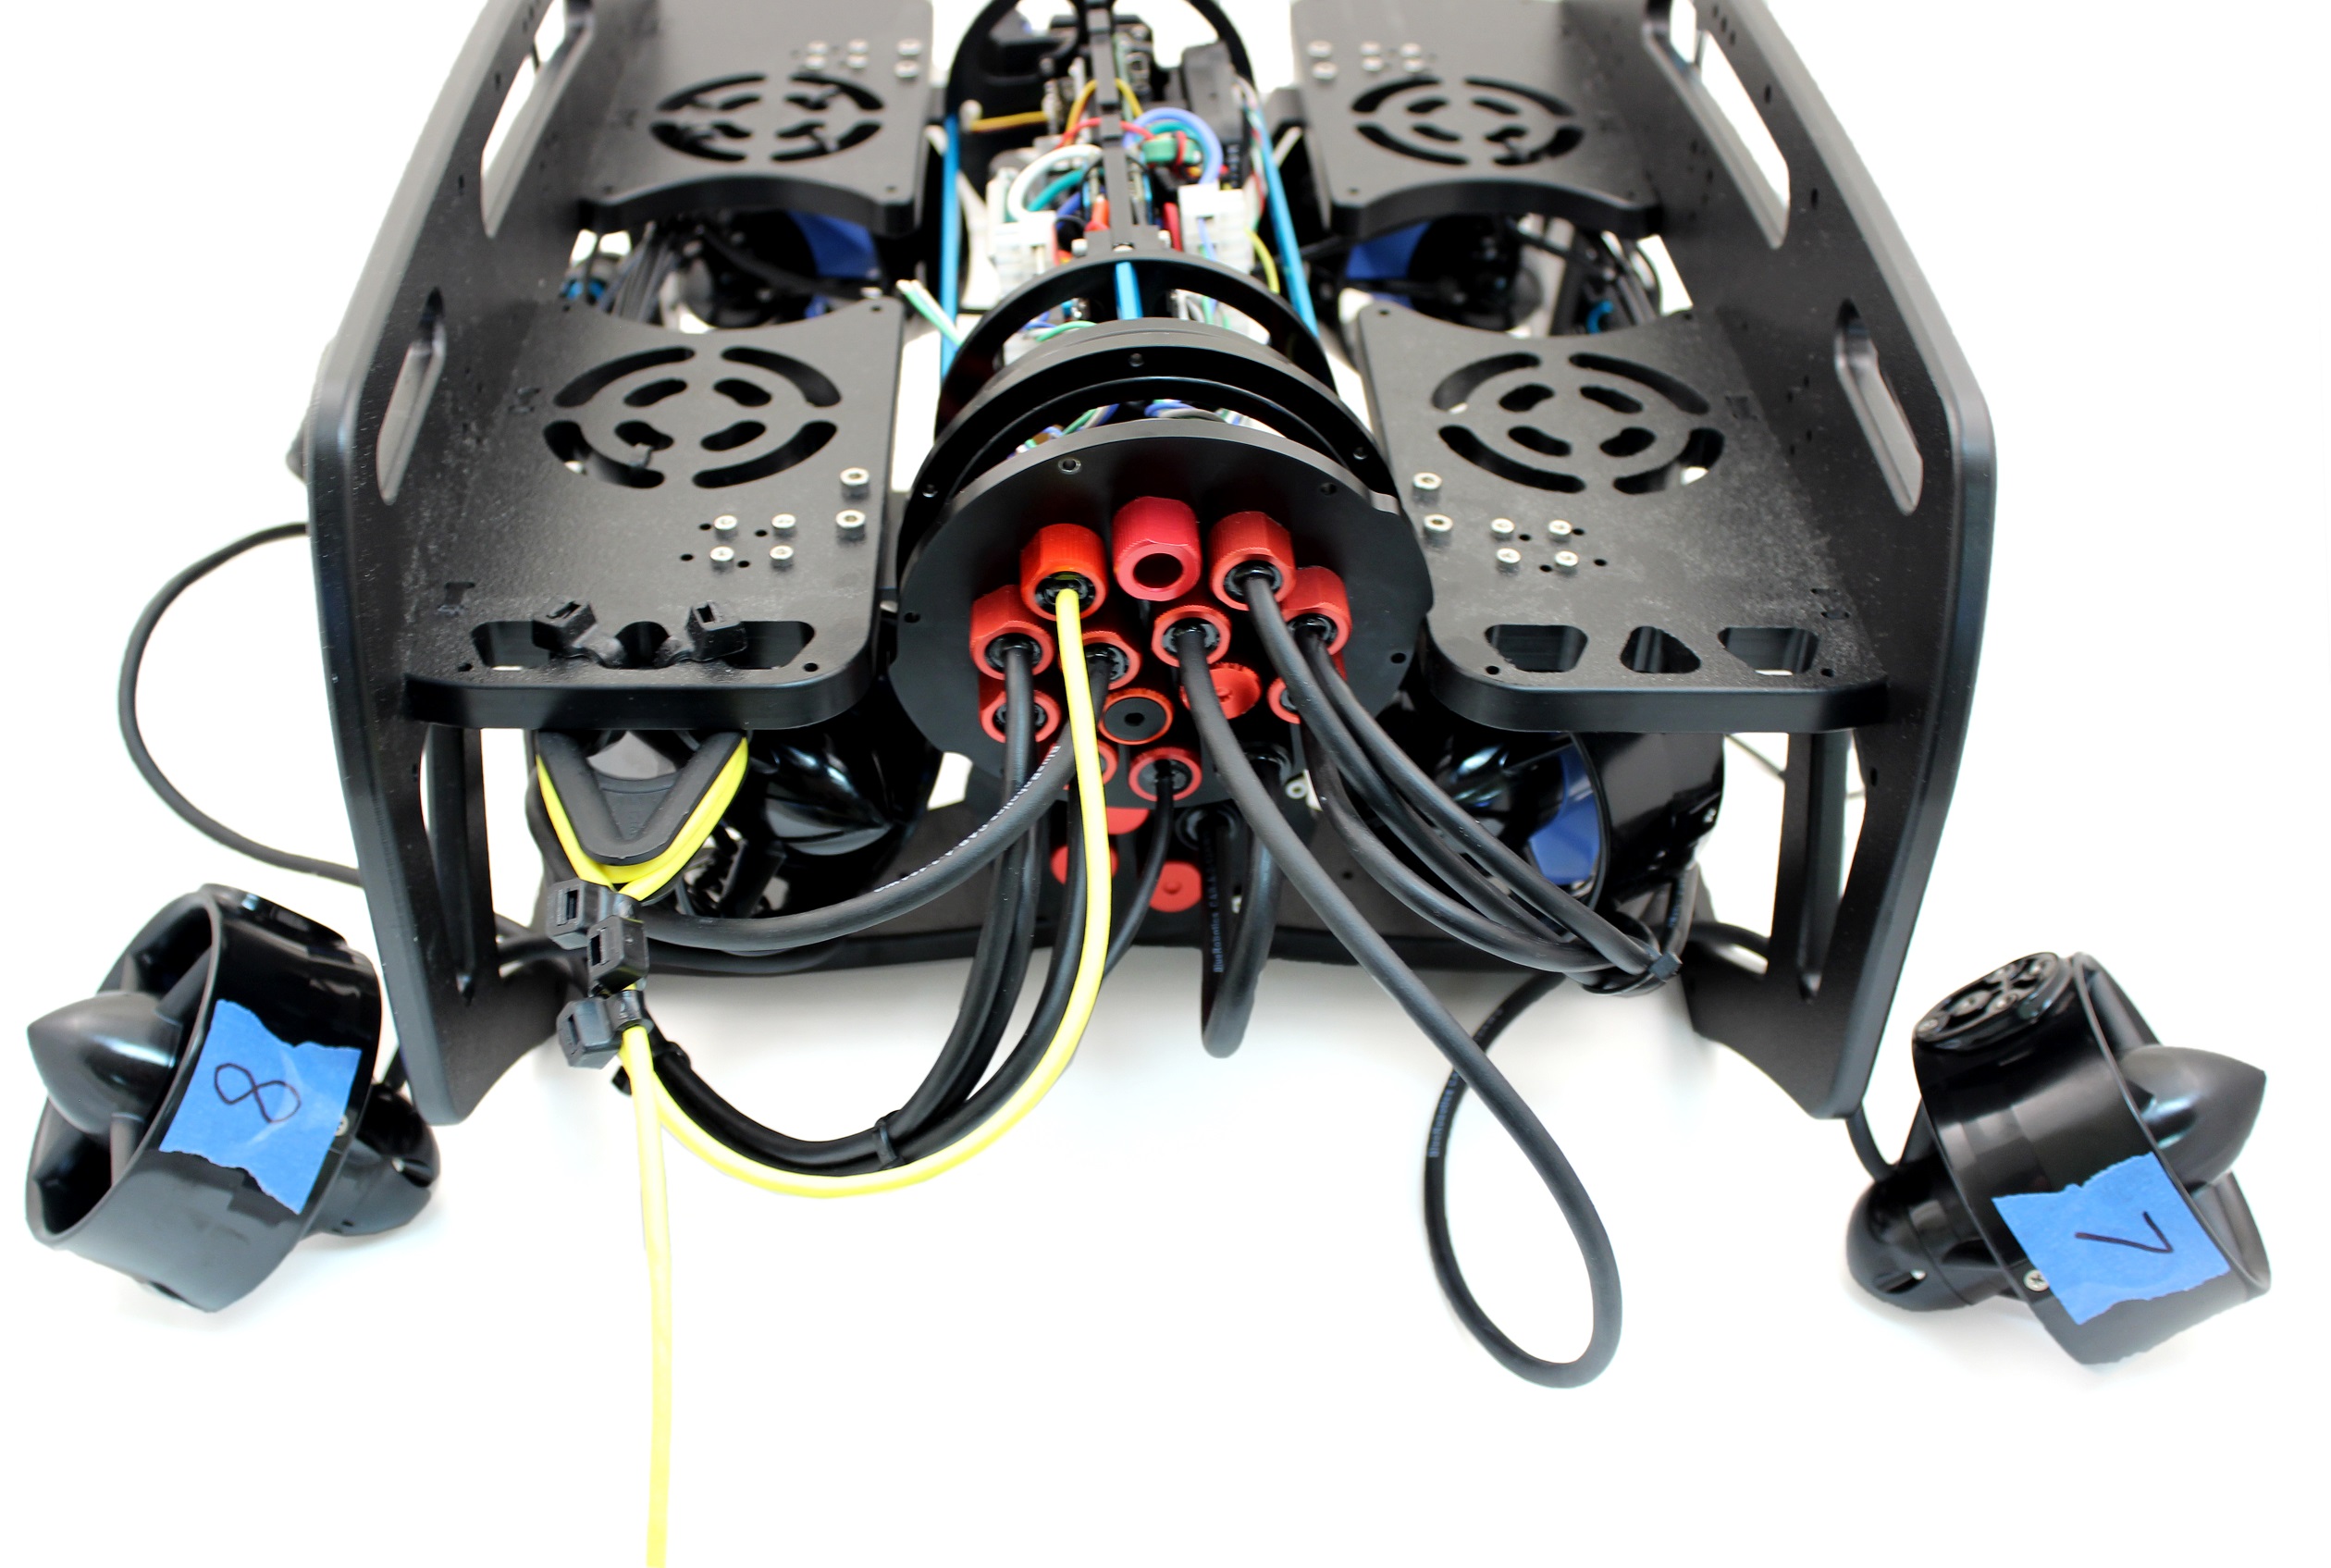
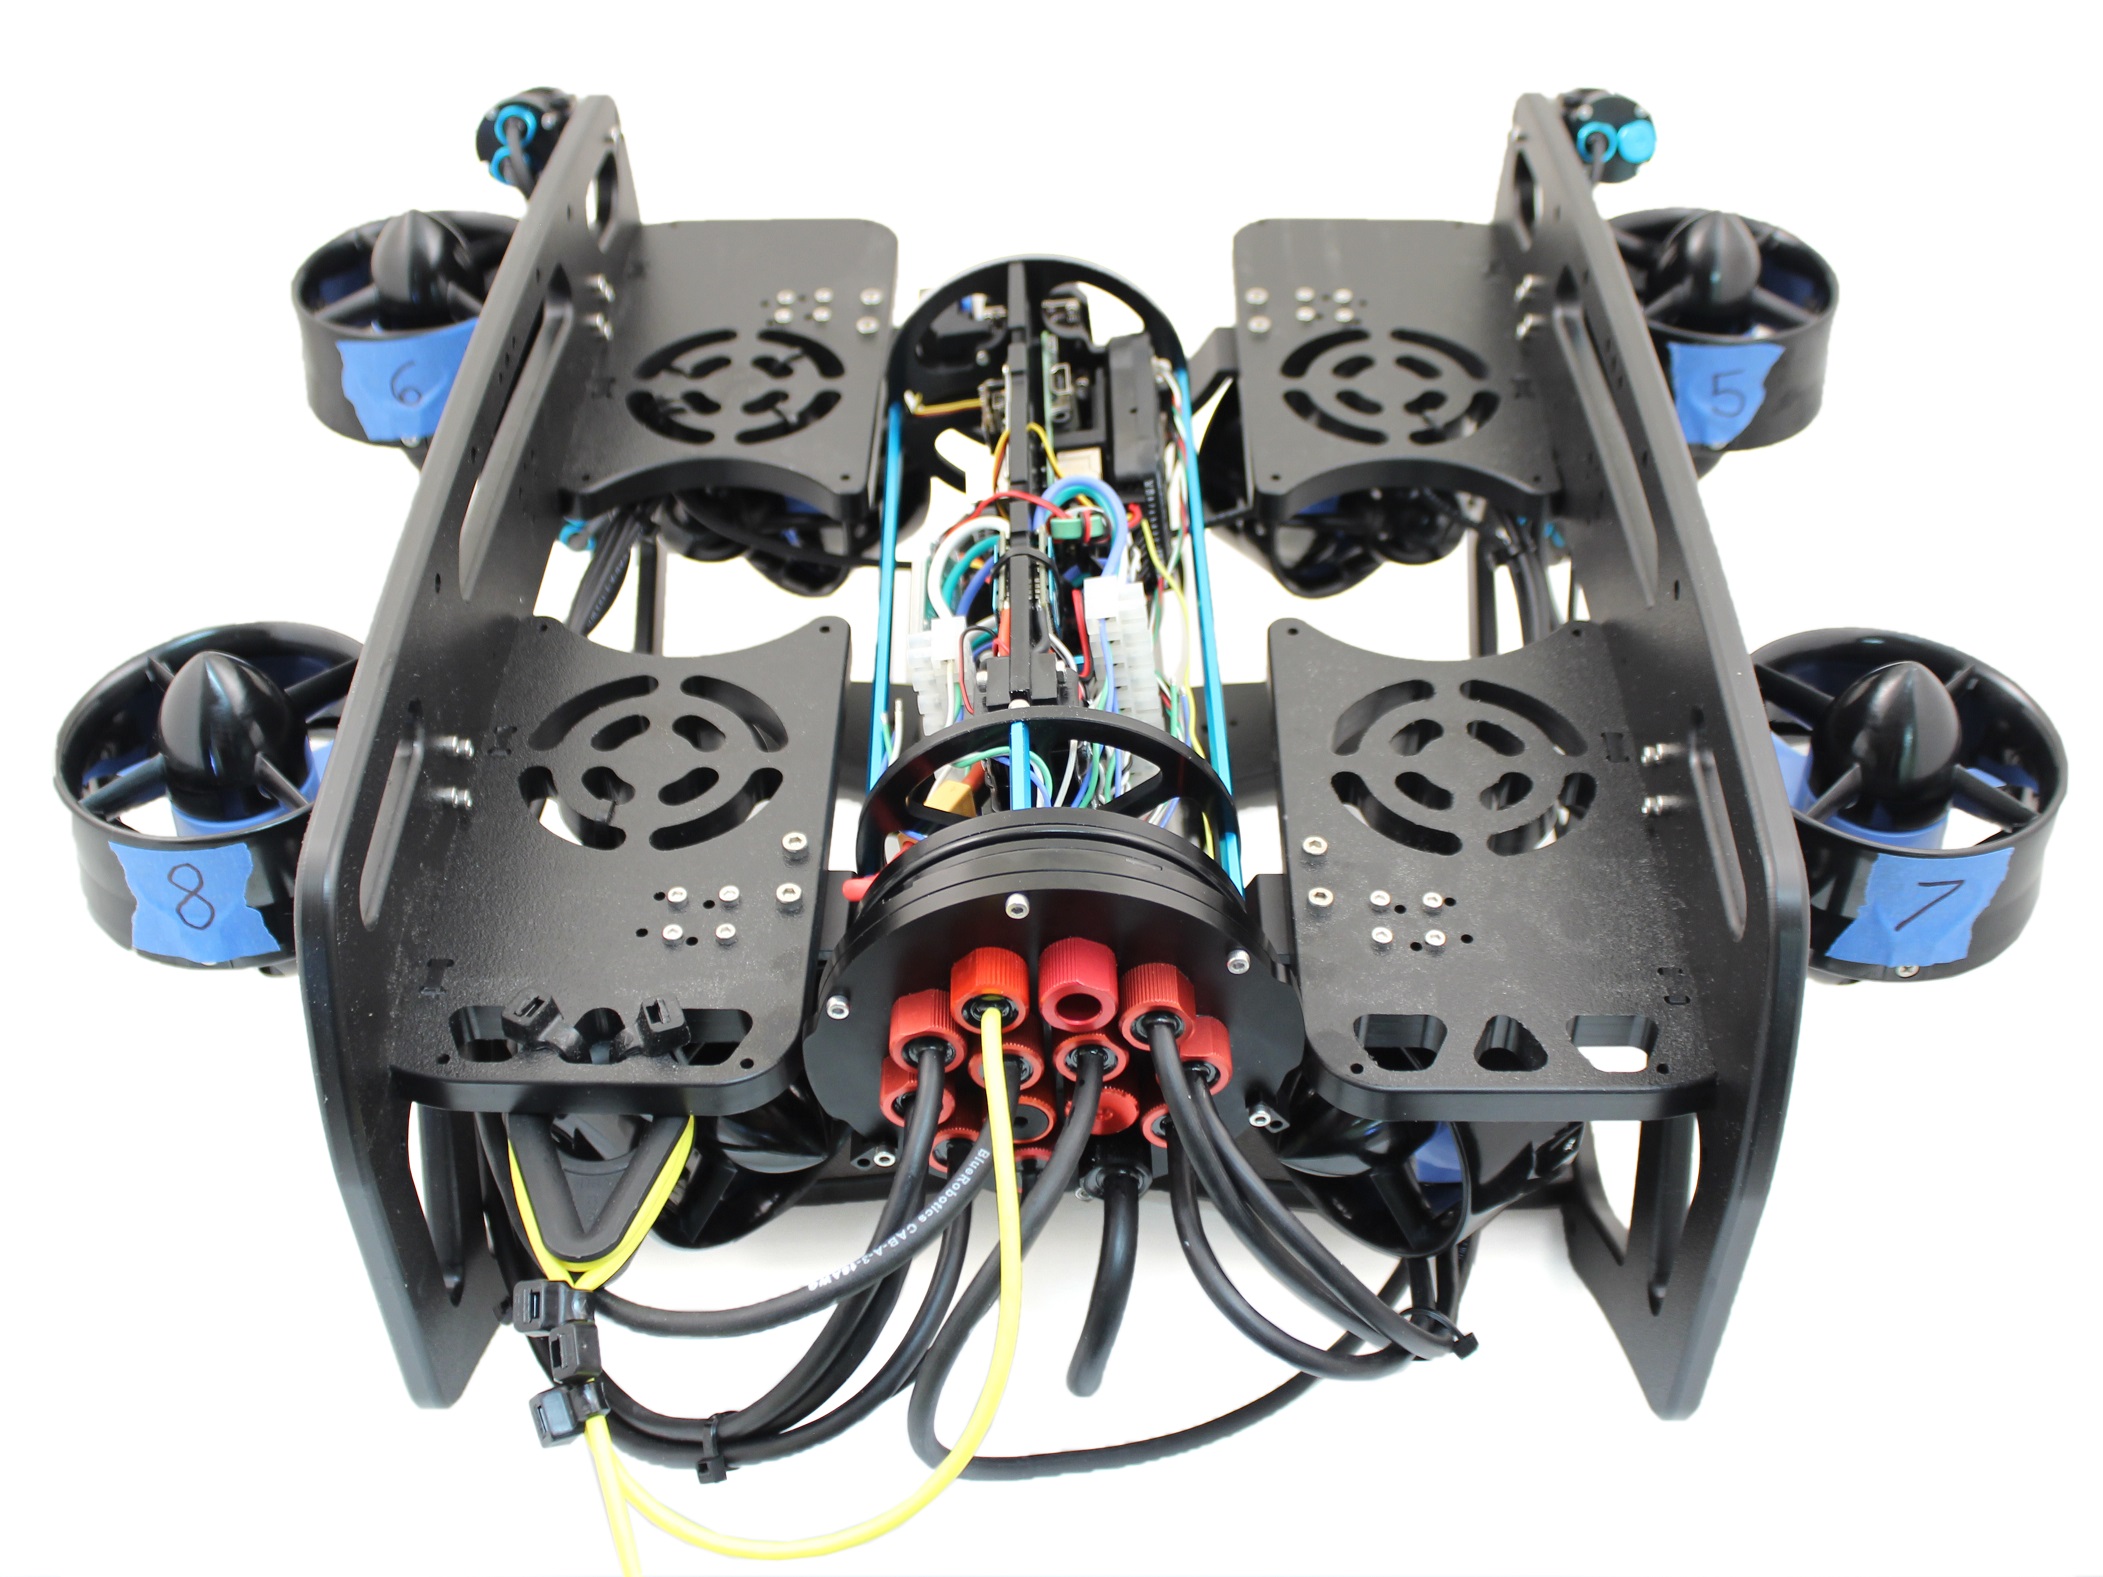
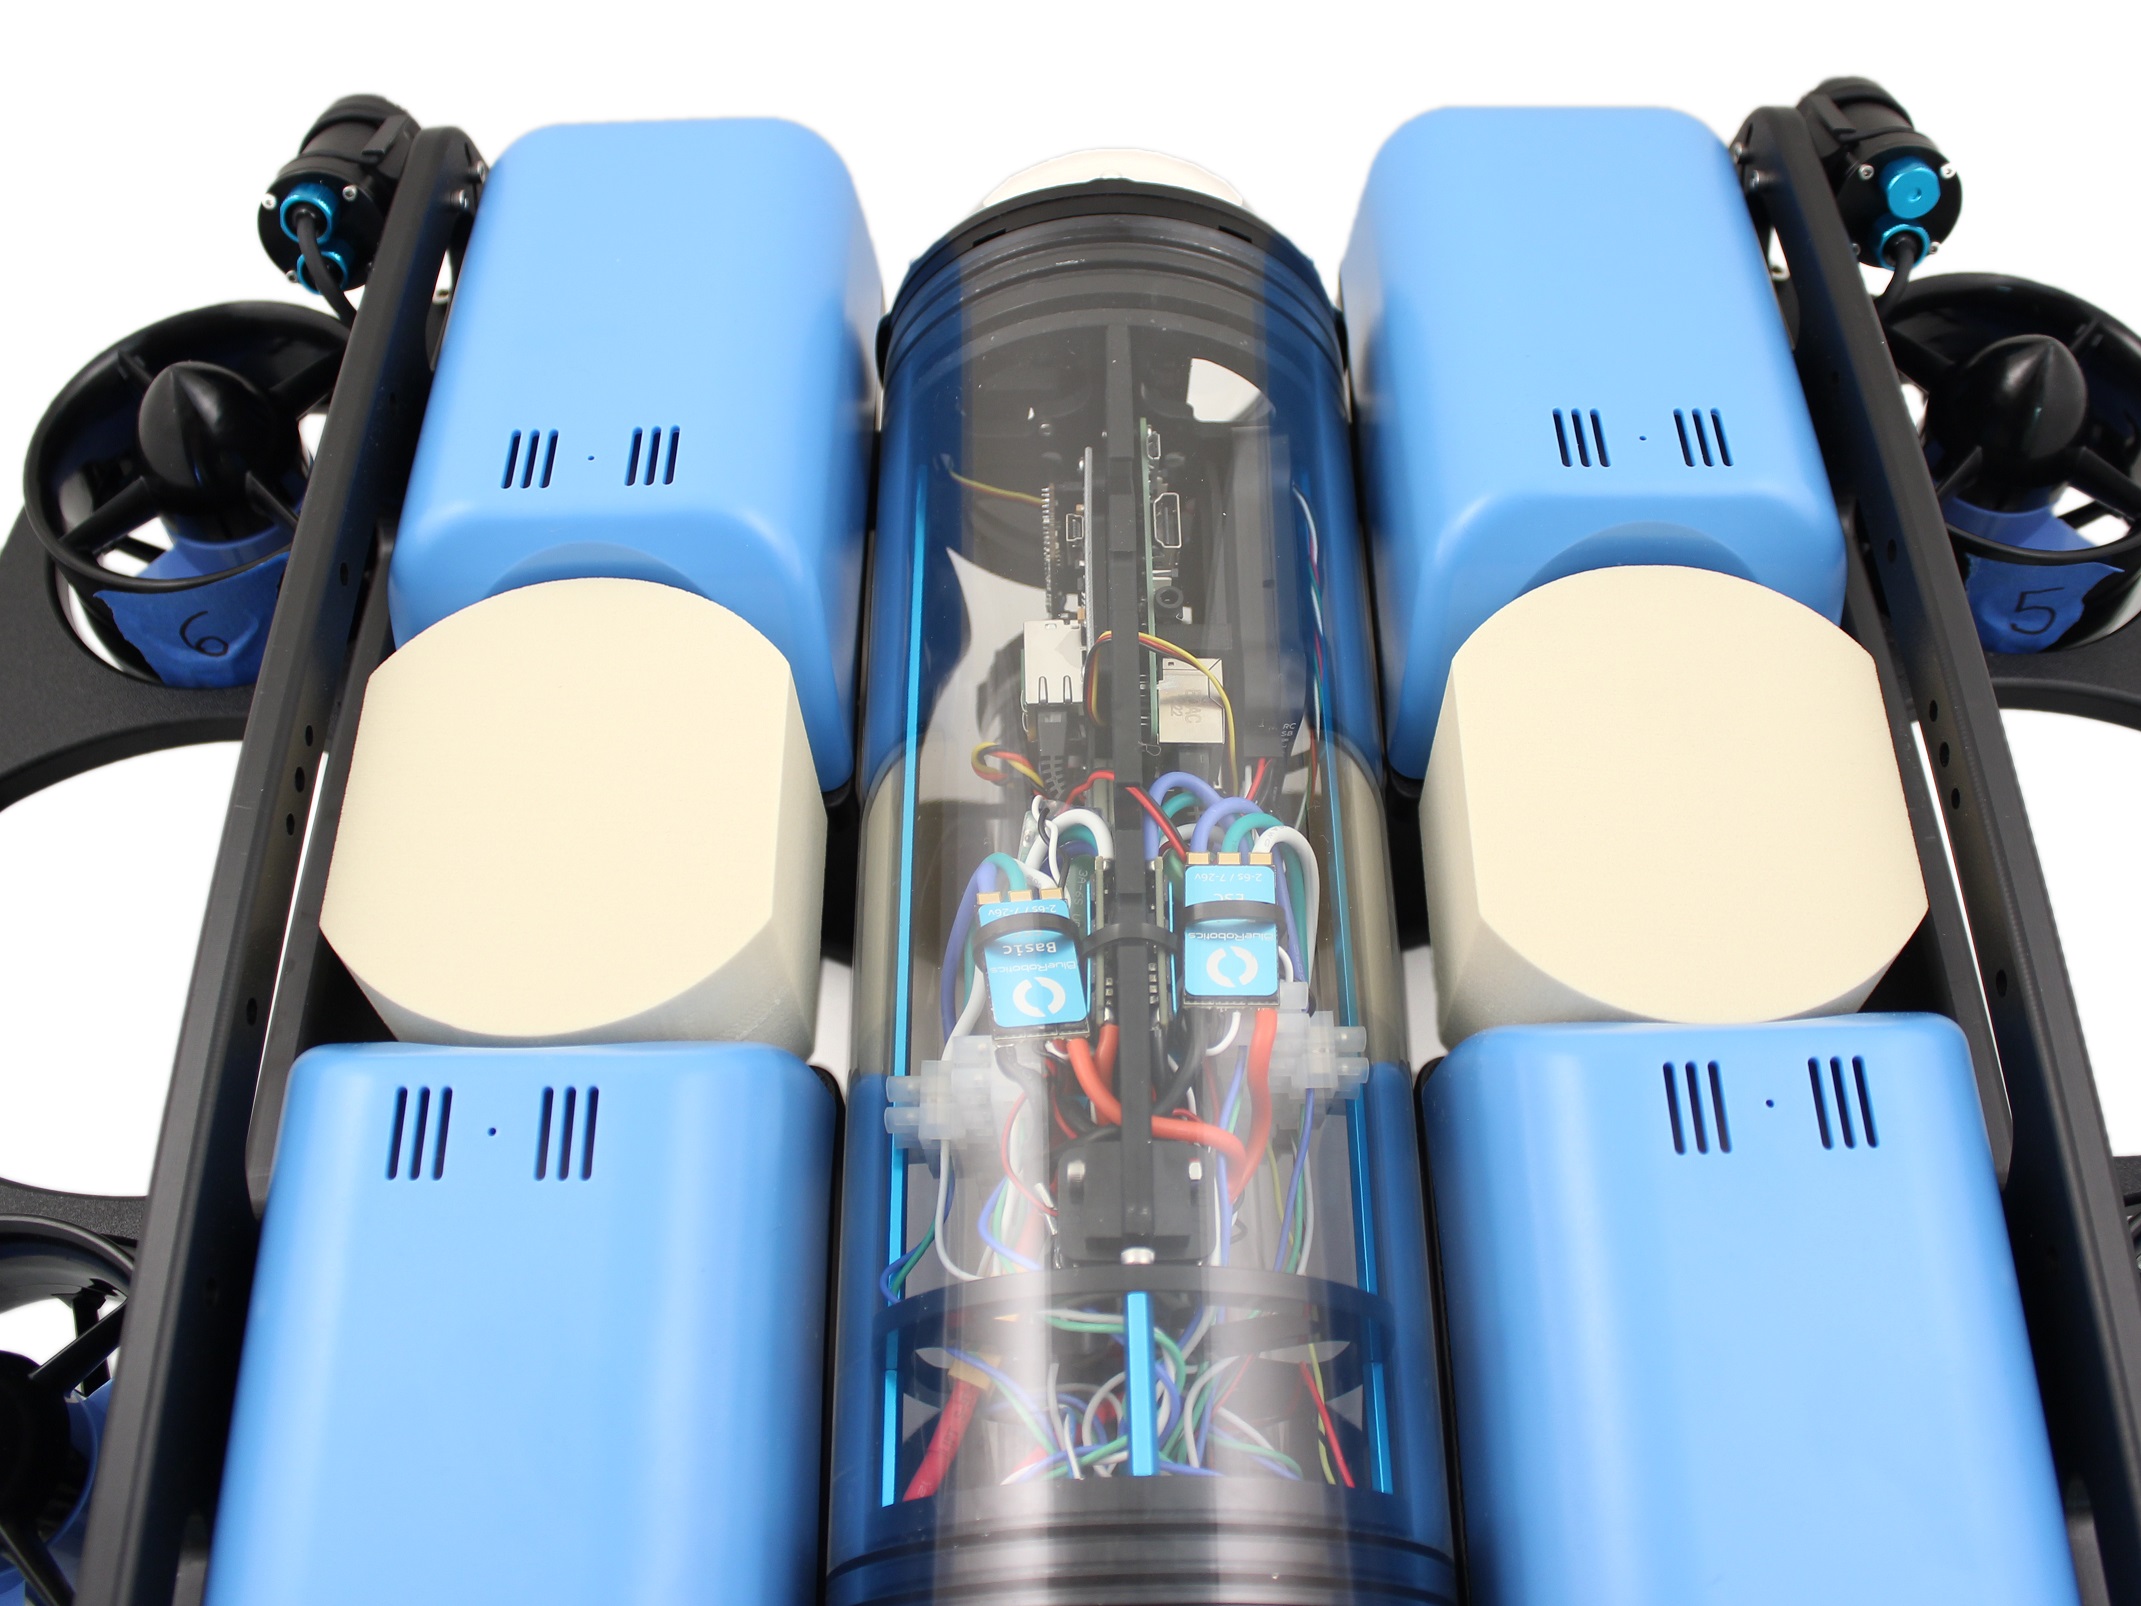
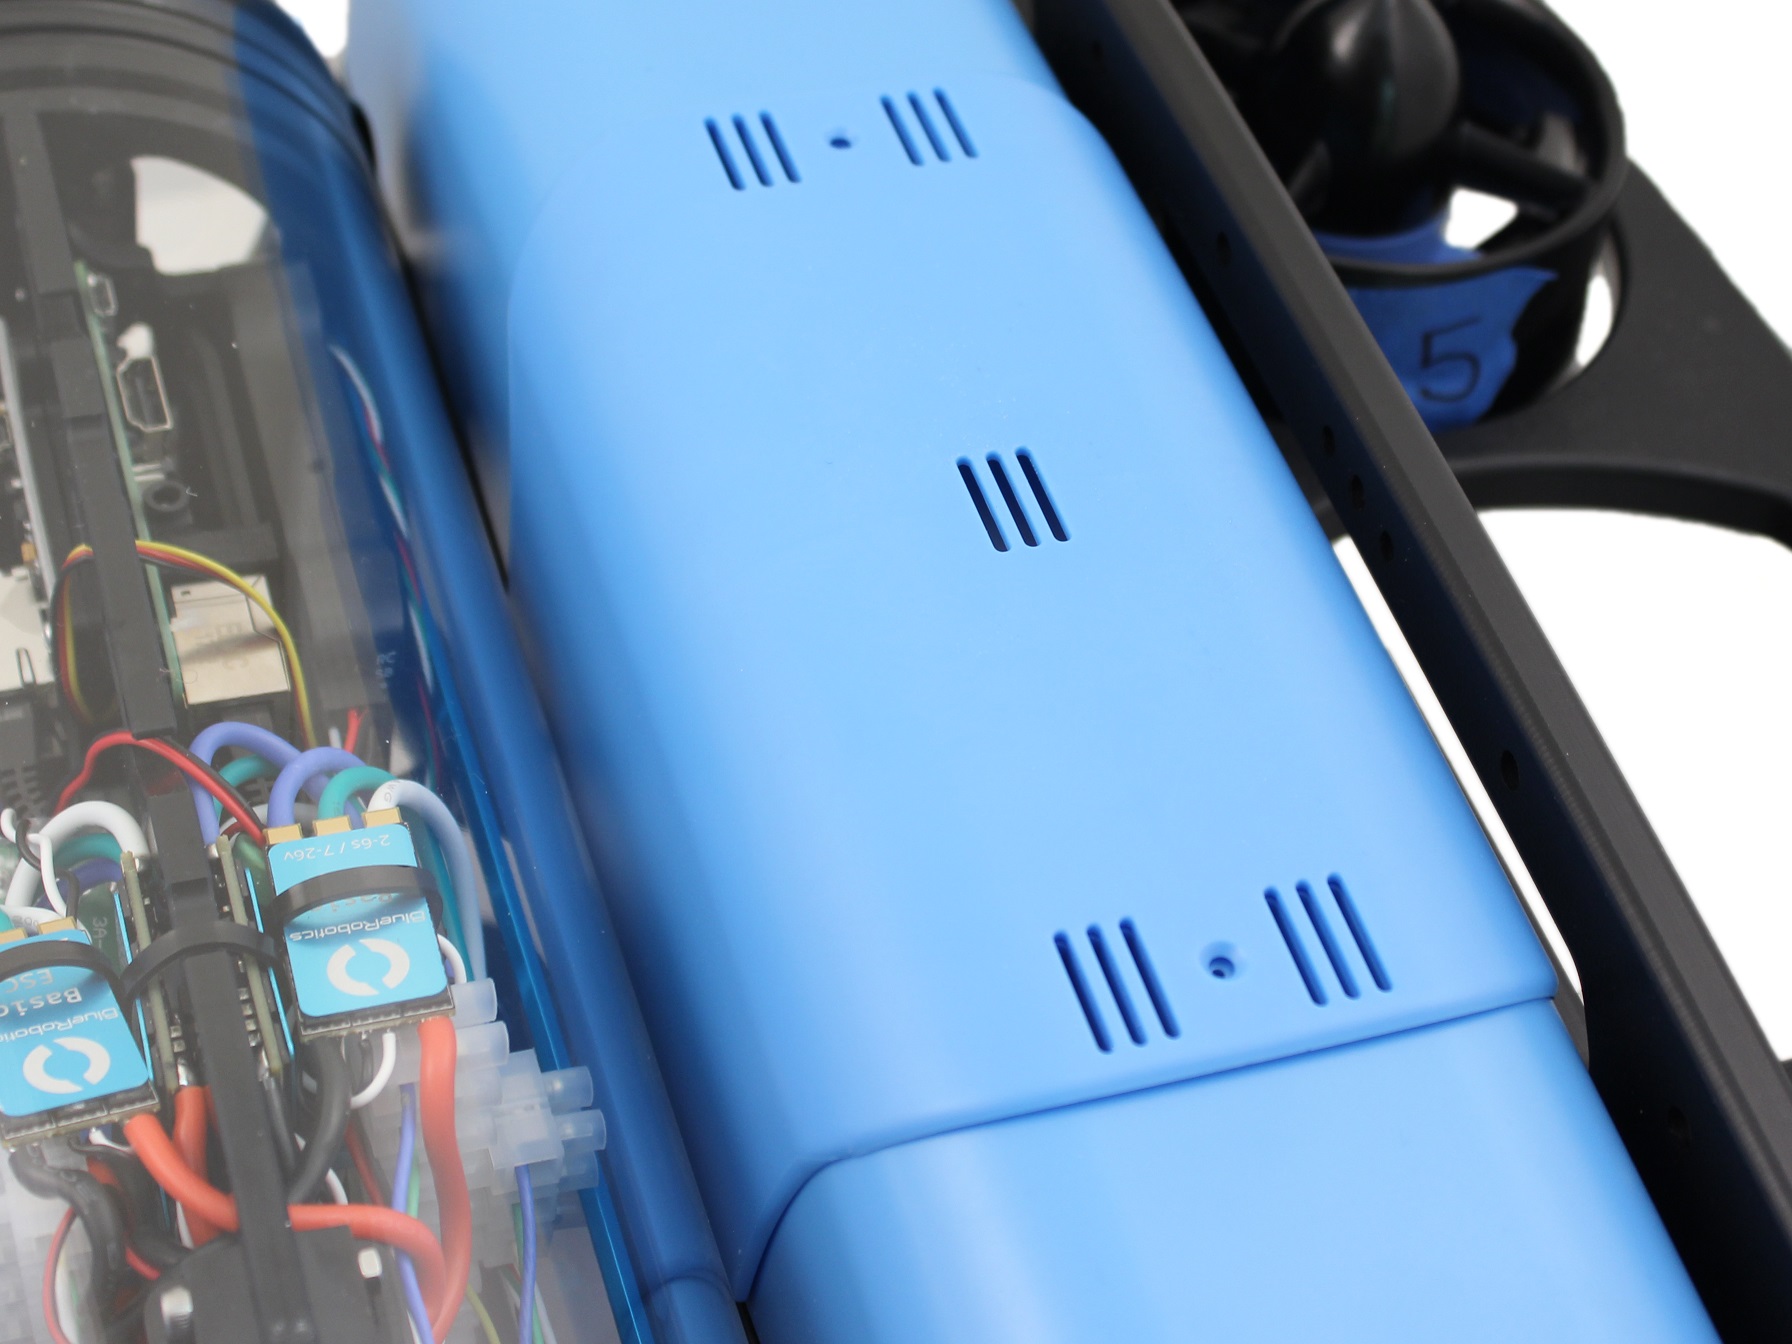
3. Optional: In order to ensure thruster mounting is not mixed up, it is recommended to apply short strips of masking
tape to the outside of the thruster ducts and labeling them 5,6,7 and 8 respectively according to the thruster
diagrams.
Thruster 5 (CCW propeller) with red penetrator nut.
Thruster 6 (CW propeller) with red penetrator nut.
Thruster 7 (CW propeller) with red penetrator nut.
Thruster 8 (CCW propeller) with red penetrator nut.
(https://www.bluerobotics.com/wp-content/uploads/2019/03/frame-numberings.jpg?x62571)
Privacy - Terms

5/20/2019 BlueROV2 Heavy Configuration Retrofit Kit Installation - Blue Robotics
https://www.bluerobotics.com/learn/bluerov2-heavy-configuration-retrofit-kit-installation/ 5/28
(https://www.bluerobotics.com/wp-content/uploads/2019/03/heavy-tutorial-2.jpg?x62571)
4. Remove the M3x12 screws holding Thrusters 5 and 6 to the side panels and place the screws to the side.
(https://www.bluerobotics.com/wp-content/uploads/2019/03/heavy-tutorial-3.jpg?x62571)
Privacy - Terms

5/20/2019 BlueROV2 Heavy Configuration Retrofit Kit Installation - Blue Robotics
https://www.bluerobotics.com/learn/bluerov2-heavy-configuration-retrofit-kit-installation/ 6/28
5. Cut and remove any zipties holding the motor wires for Thrusters 5 and 6 to the frame.
(https://www.bluerobotics.com/wp-content/uploads/2019/03/heavy-tutorial-4.jpg?x62571)
6. Remove the 4” Electronics enclosure from the ROV by removing the M3x16 screws that mount the enclosure to the
ROV cradle.
Privacy - Terms

5/20/2019 BlueROV2 Heavy Configuration Retrofit Kit Installation - Blue Robotics
https://www.bluerobotics.com/learn/bluerov2-heavy-configuration-retrofit-kit-installation/ 7/28
(https://www.bluerobotics.com/wp-content/uploads/2019/03/heavy-tutorial-5.jpg?x62571)
7. Remove the Vent Plug from the Vent Penetrator Bolt on the electronics enclosure.
8. Remove the Aluminum End Cap with 14 Holes by removing the six M3x12 screws using the M2.5 hex driver. Place
the M3x12 screws, clips (small L-shaped parts) in a safe place.
Privacy - Terms

5/20/2019 BlueROV2 Heavy Configuration Retrofit Kit Installation - Blue Robotics
https://www.bluerobotics.com/learn/bluerov2-heavy-configuration-retrofit-kit-installation/ 8/28
(https://www.bluerobotics.com/wp-content/uploads/2019/03/heavy-tutorial-6.jpg?x62571)
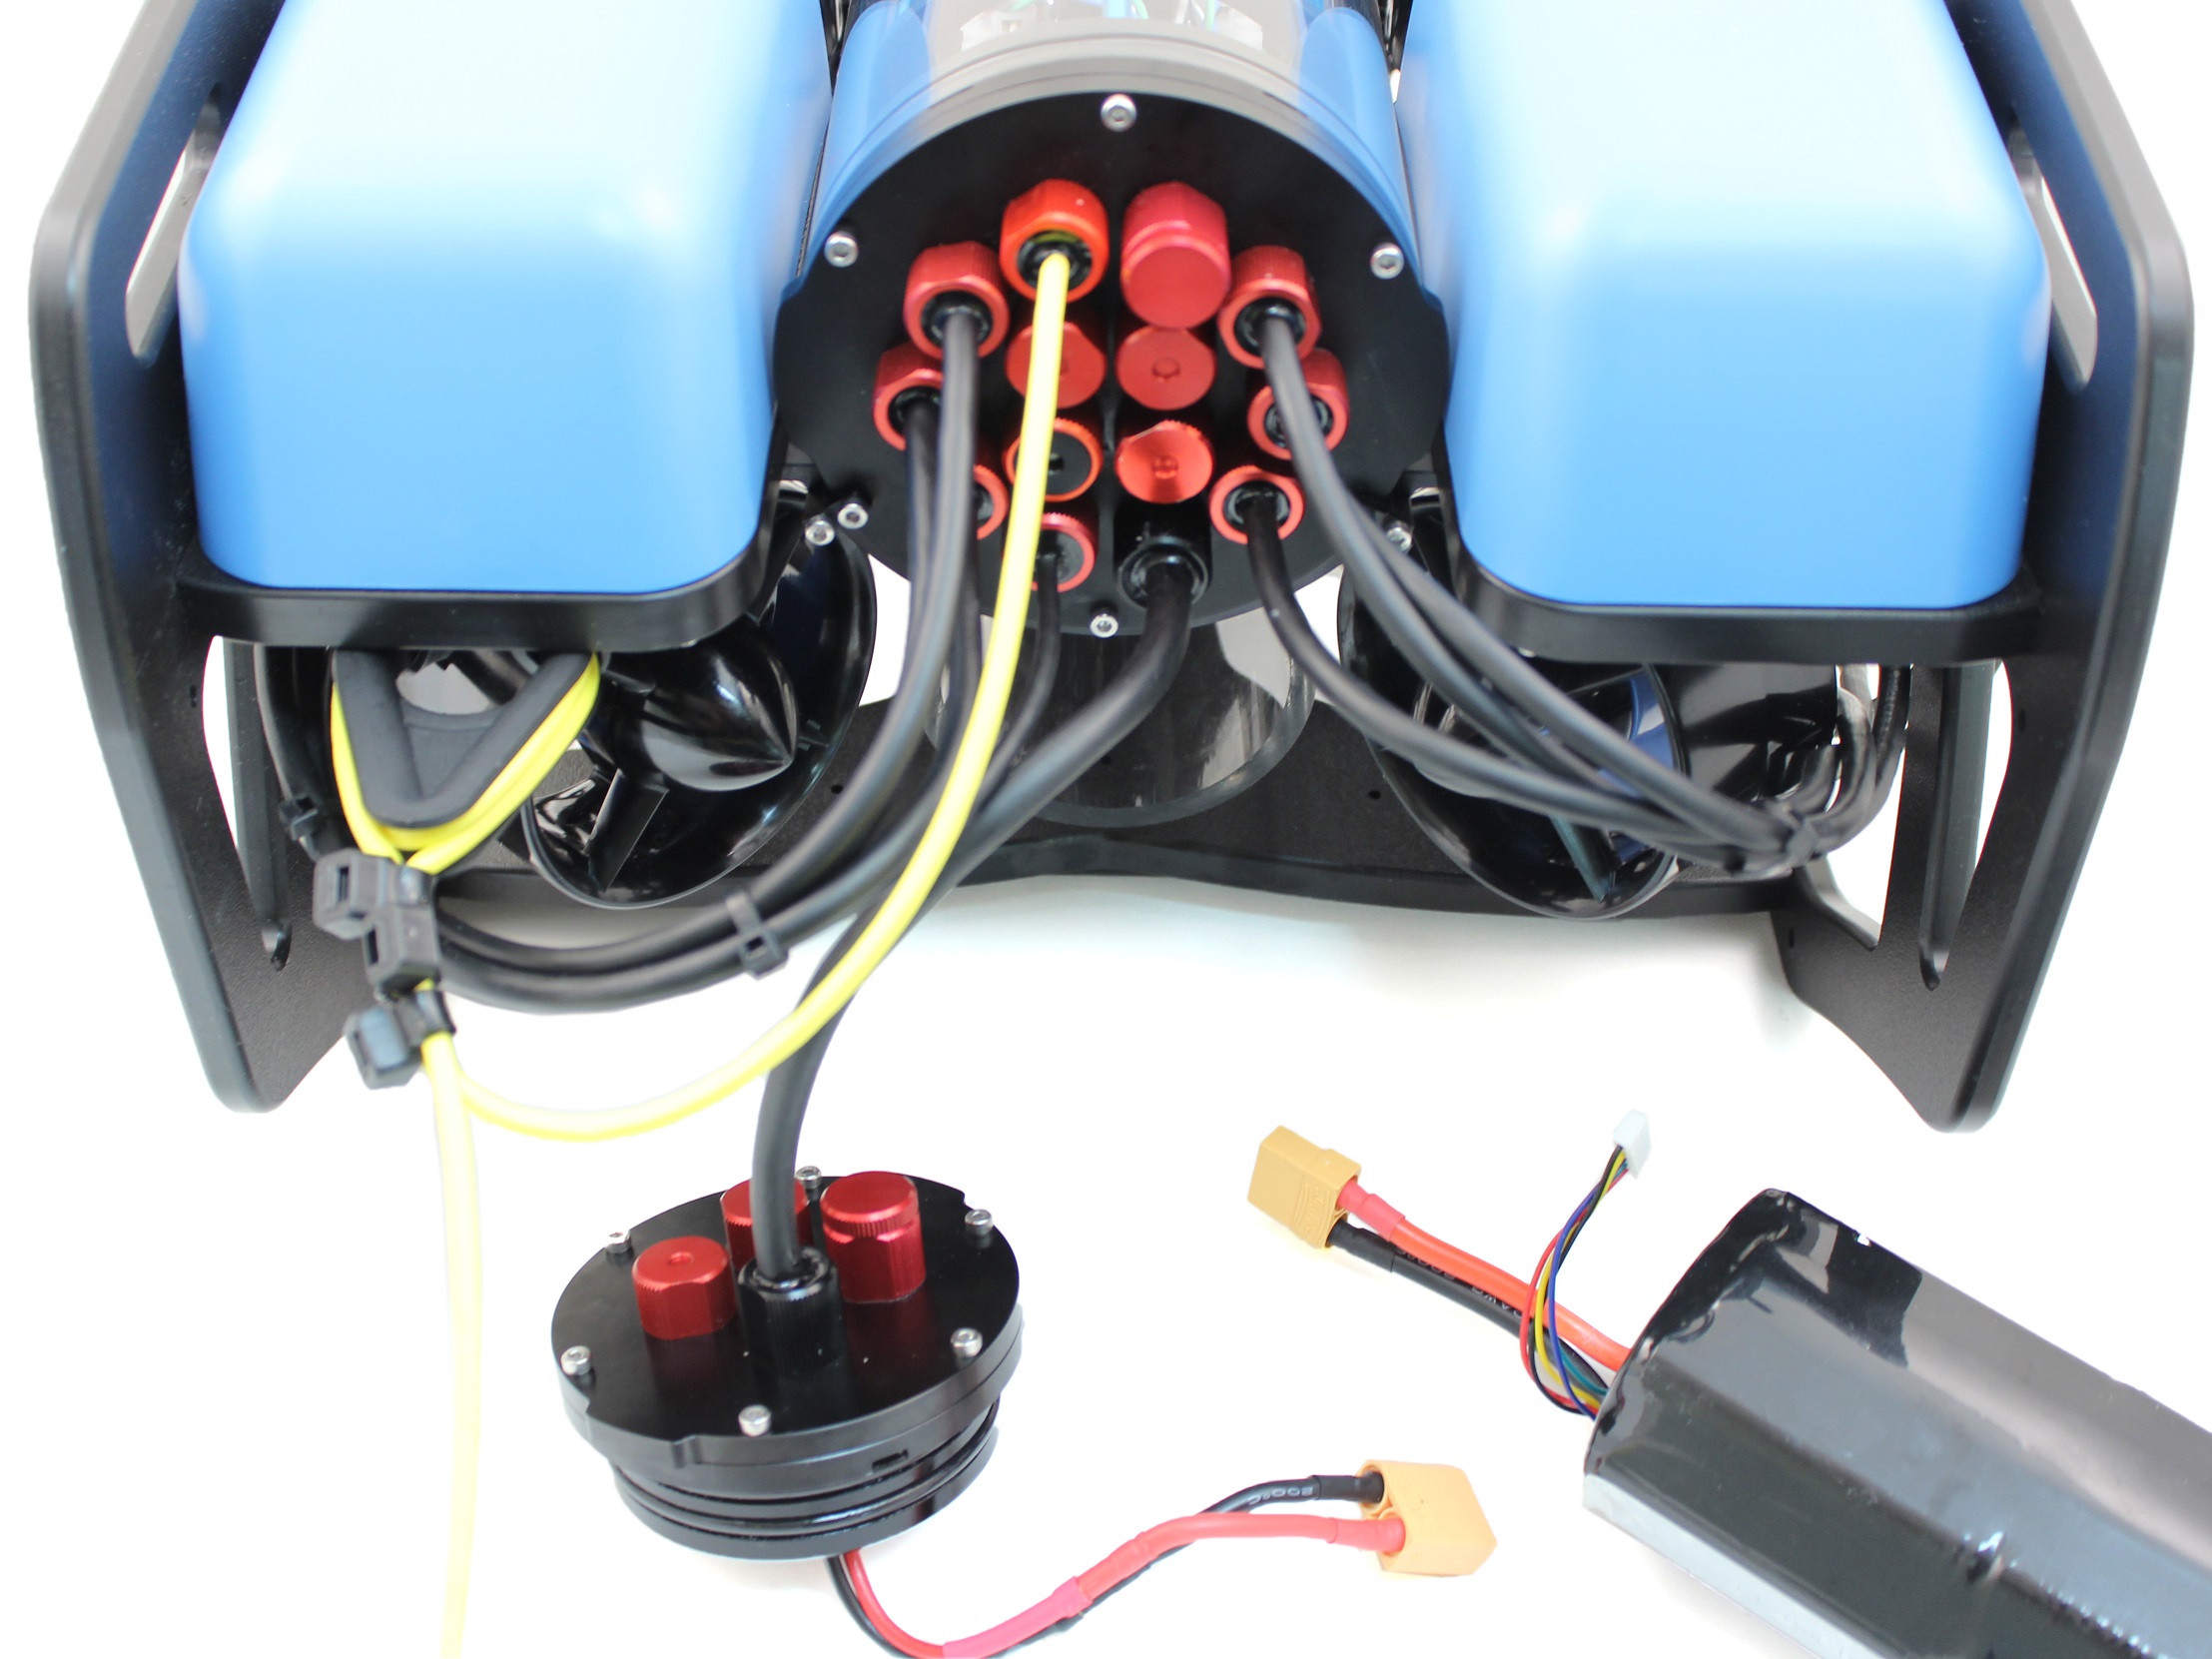
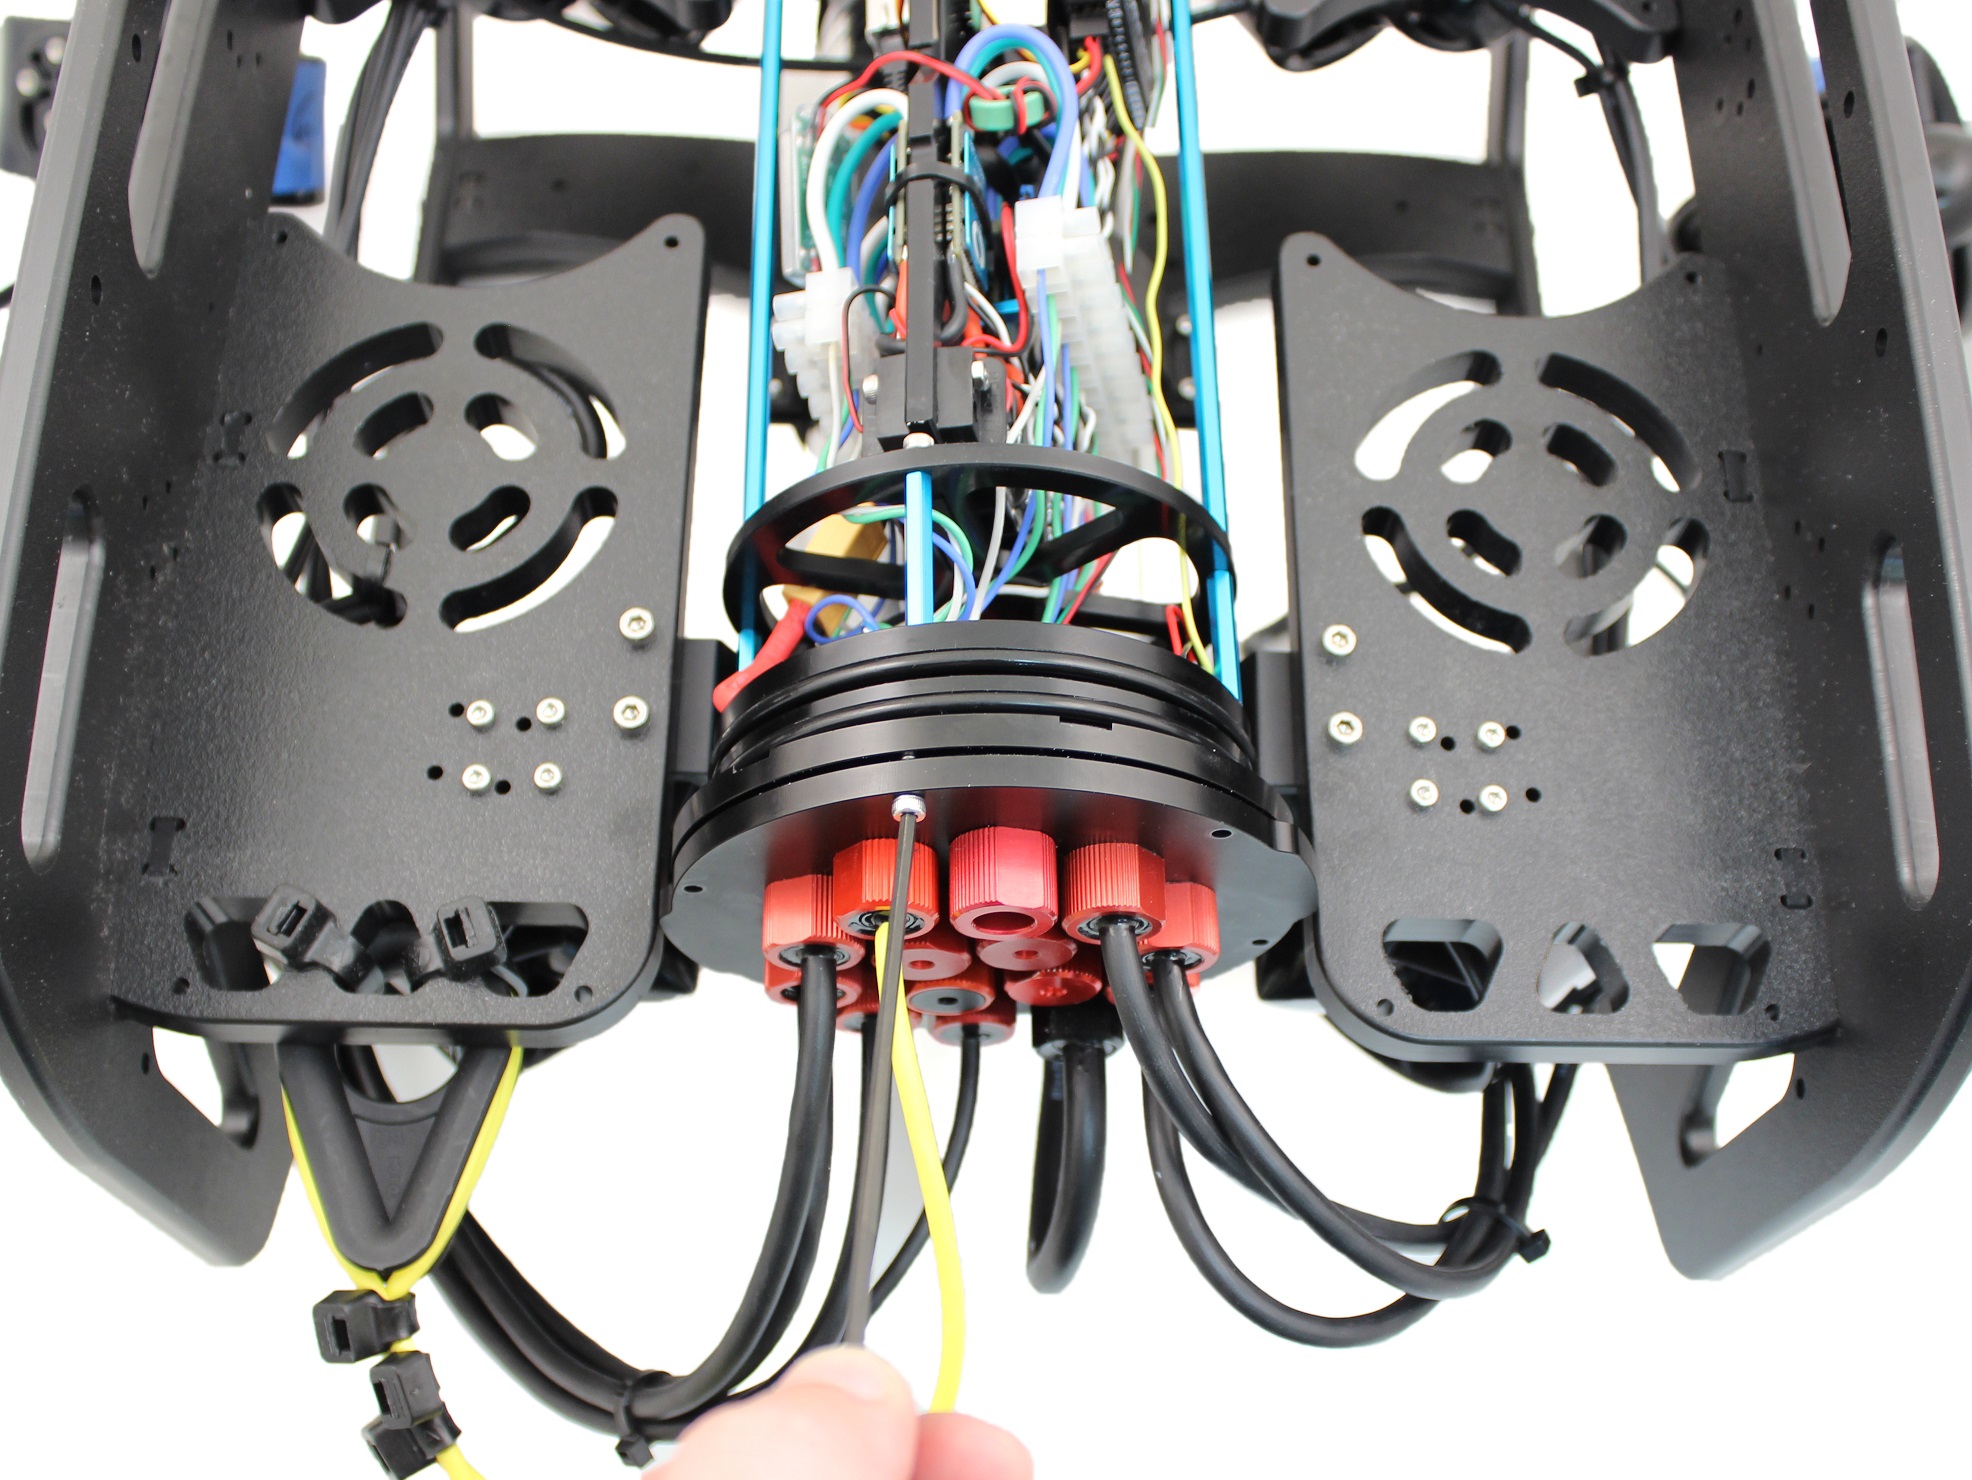
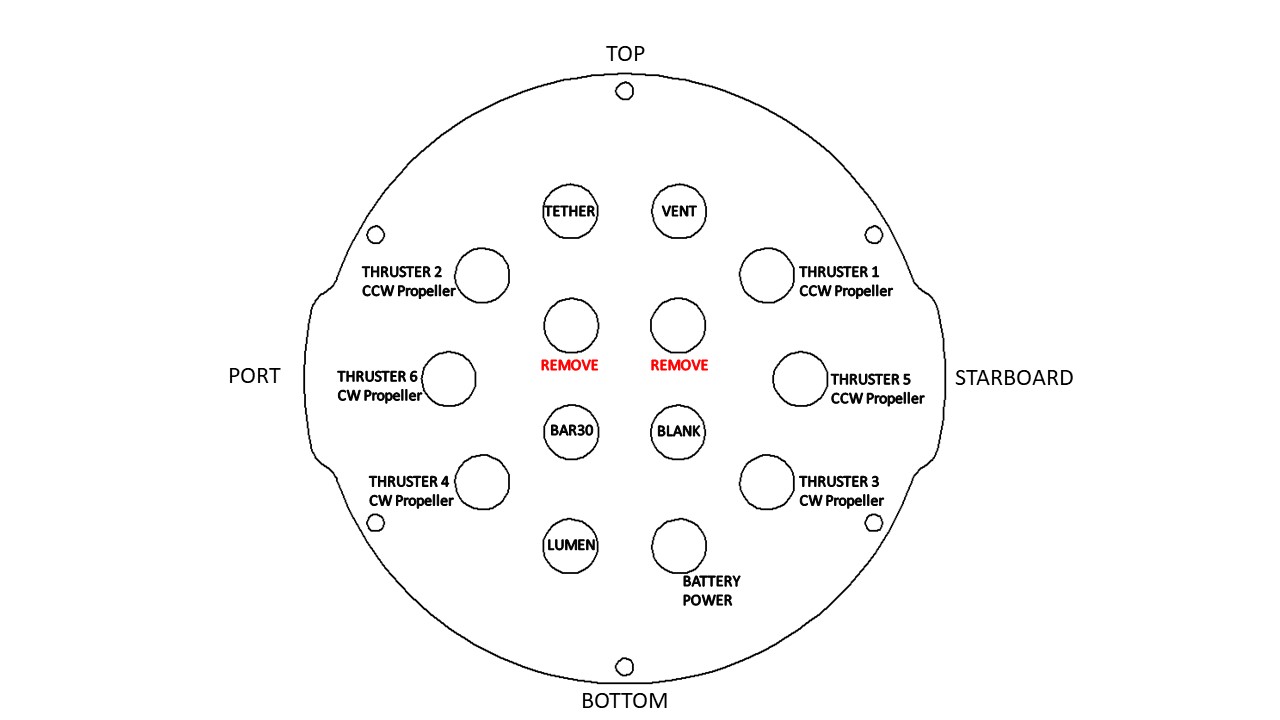
9. Remove the two blank penetrators as pictured from the 4” End Cap with the penetrator wrench that came with the
BlueROV2 kit.
(https://www.bluerobotics.com/wp-content/uploads/2019/03/end-cap-remove.jpg?x62571)
Privacy - Terms

5/20/2019 BlueROV2 Heavy Configuration Retrofit Kit Installation - Blue Robotics
https://www.bluerobotics.com/learn/bluerov2-heavy-configuration-retrofit-kit-installation/ 9/28
Install New Thrusters
To Install the new thrusters, you will need the following parts and tools:
1 x T200 with counter-clockwise propeller
1 x T200 with clockwise propeller
1 x Bag with 8 M3x12 screws
8 x M3x12 screws you had set aside from removing Thrusters 5 and 6
1 x Silicone Grease – 10g Tube
1 x Threadlocker
1 x Penetrator wrench
1 x 2.5 mm hex driver
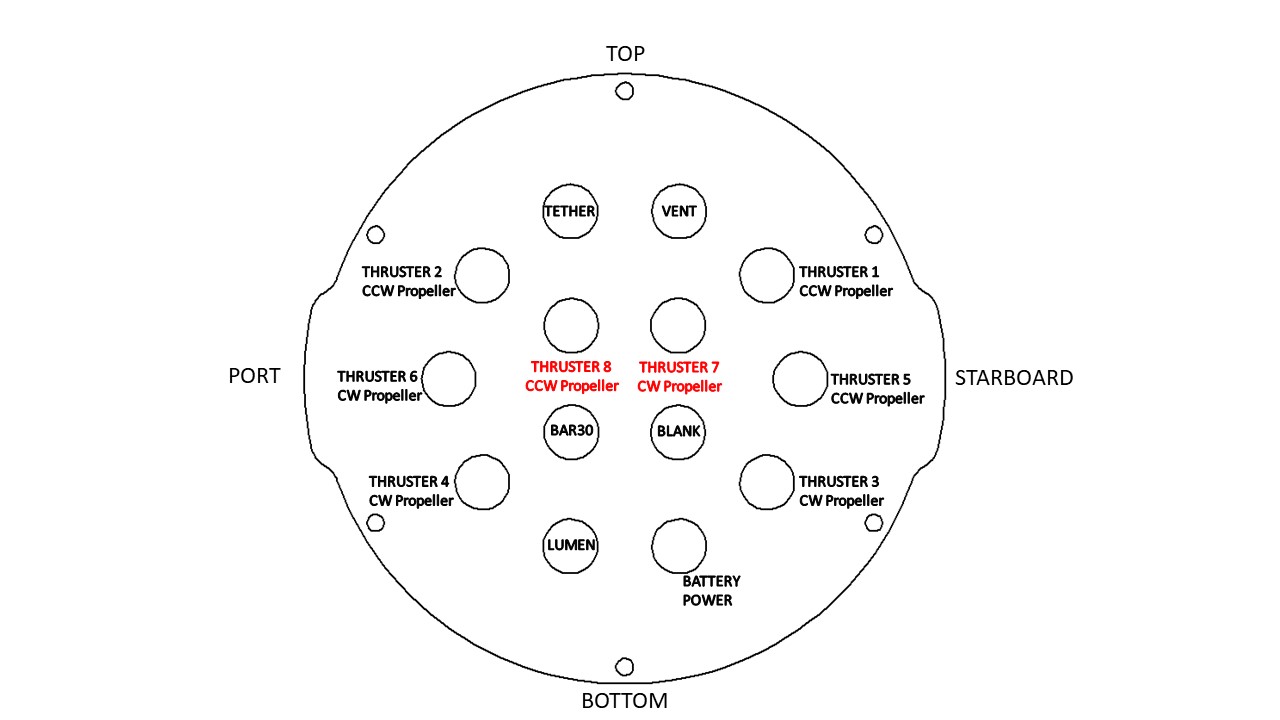
1. Install Thrusters 7 and 8 into the respective empty penetrator holes. Tighten to nger tight, then use the provided
wrench to tighten them an additional ~1/16 of a turn. If you can’t loosen them with your ngers, they are tight
enough.
Thruster 7 (CW propeller) with red penetrator nut.
Thruster 8 (CCW propeller) with red penetrator nut.
(https://www.bluerobotics.com/wp-content/uploads/2019/03/end-cap-new-thrusters.jpg?x62571)
Privacy - Terms

5/20/2019 BlueROV2 Heavy Configuration Retrofit Kit Installation - Blue Robotics
https://www.bluerobotics.com/learn/bluerov2-heavy-configuration-retrofit-kit-installation/ 10/28
(https://www.bluerobotics.com/wp-content/uploads/2019/03/heavy-tutorial-7.jpg?x62571)
2. Reinstall the 4” Aluminum End Cap with the following steps:
Clean the O-ring and make sure that it is free of any debris or damage.
Clean the O-Ring Flange (4” Series) and make sure that the O-ring groove is free of any debris or damage.
Apply Silicone grease to the O-ring.
Install face seal O-ring onto the O-Ring Flange (4” Series).
Apply one drop of threadlocker to each of the M3x12 screws. Roll the screws around on a paper towel to evenly spread
the threadlocker and to remove excess threadlocker.
Install Aluminum End Cap with 14 Holes with all Cable Penetrators and Blank Penetrators installed onto the O-Ring
Flange (4” Series). Do not fully tighten any screws when rst installing them; it may cause the O-ring to slip out of its
groove. The end cap’s orientation when installed should match the image below. Make sure that the clips are oriented
correctly. One should be just right of the Thruster 3 penetrator, and the other should be just left of the Thruster 4
penetrator.
3. Install thrusters 5, 6, 7 and 8, using the M3x12 screws on the outside of the side panels. Tighten the screws so that
they indent the frame slightly.
DO NOT use threadlocker unless you have threadlocker rated for use with polycarbonate.
Privacy - Terms

5/20/2019 BlueROV2 Heavy Configuration Retrofit Kit Installation - Blue Robotics
https://www.bluerobotics.com/learn/bluerov2-heavy-configuration-retrofit-kit-installation/ 11/28
(https://www.bluerobotics.com/wp-content/uploads/2019/03/heavy-tutorial-9.jpg?x62571)
Install New Electronics
To install the new electronics, you will need the following parts and tools:
2 x Basic ESC
2 x 3 Pole Euro Terminal Block
1 x Small (~2 mm) at head screw driver
1 x Large (~#2) Phillips head screw driver
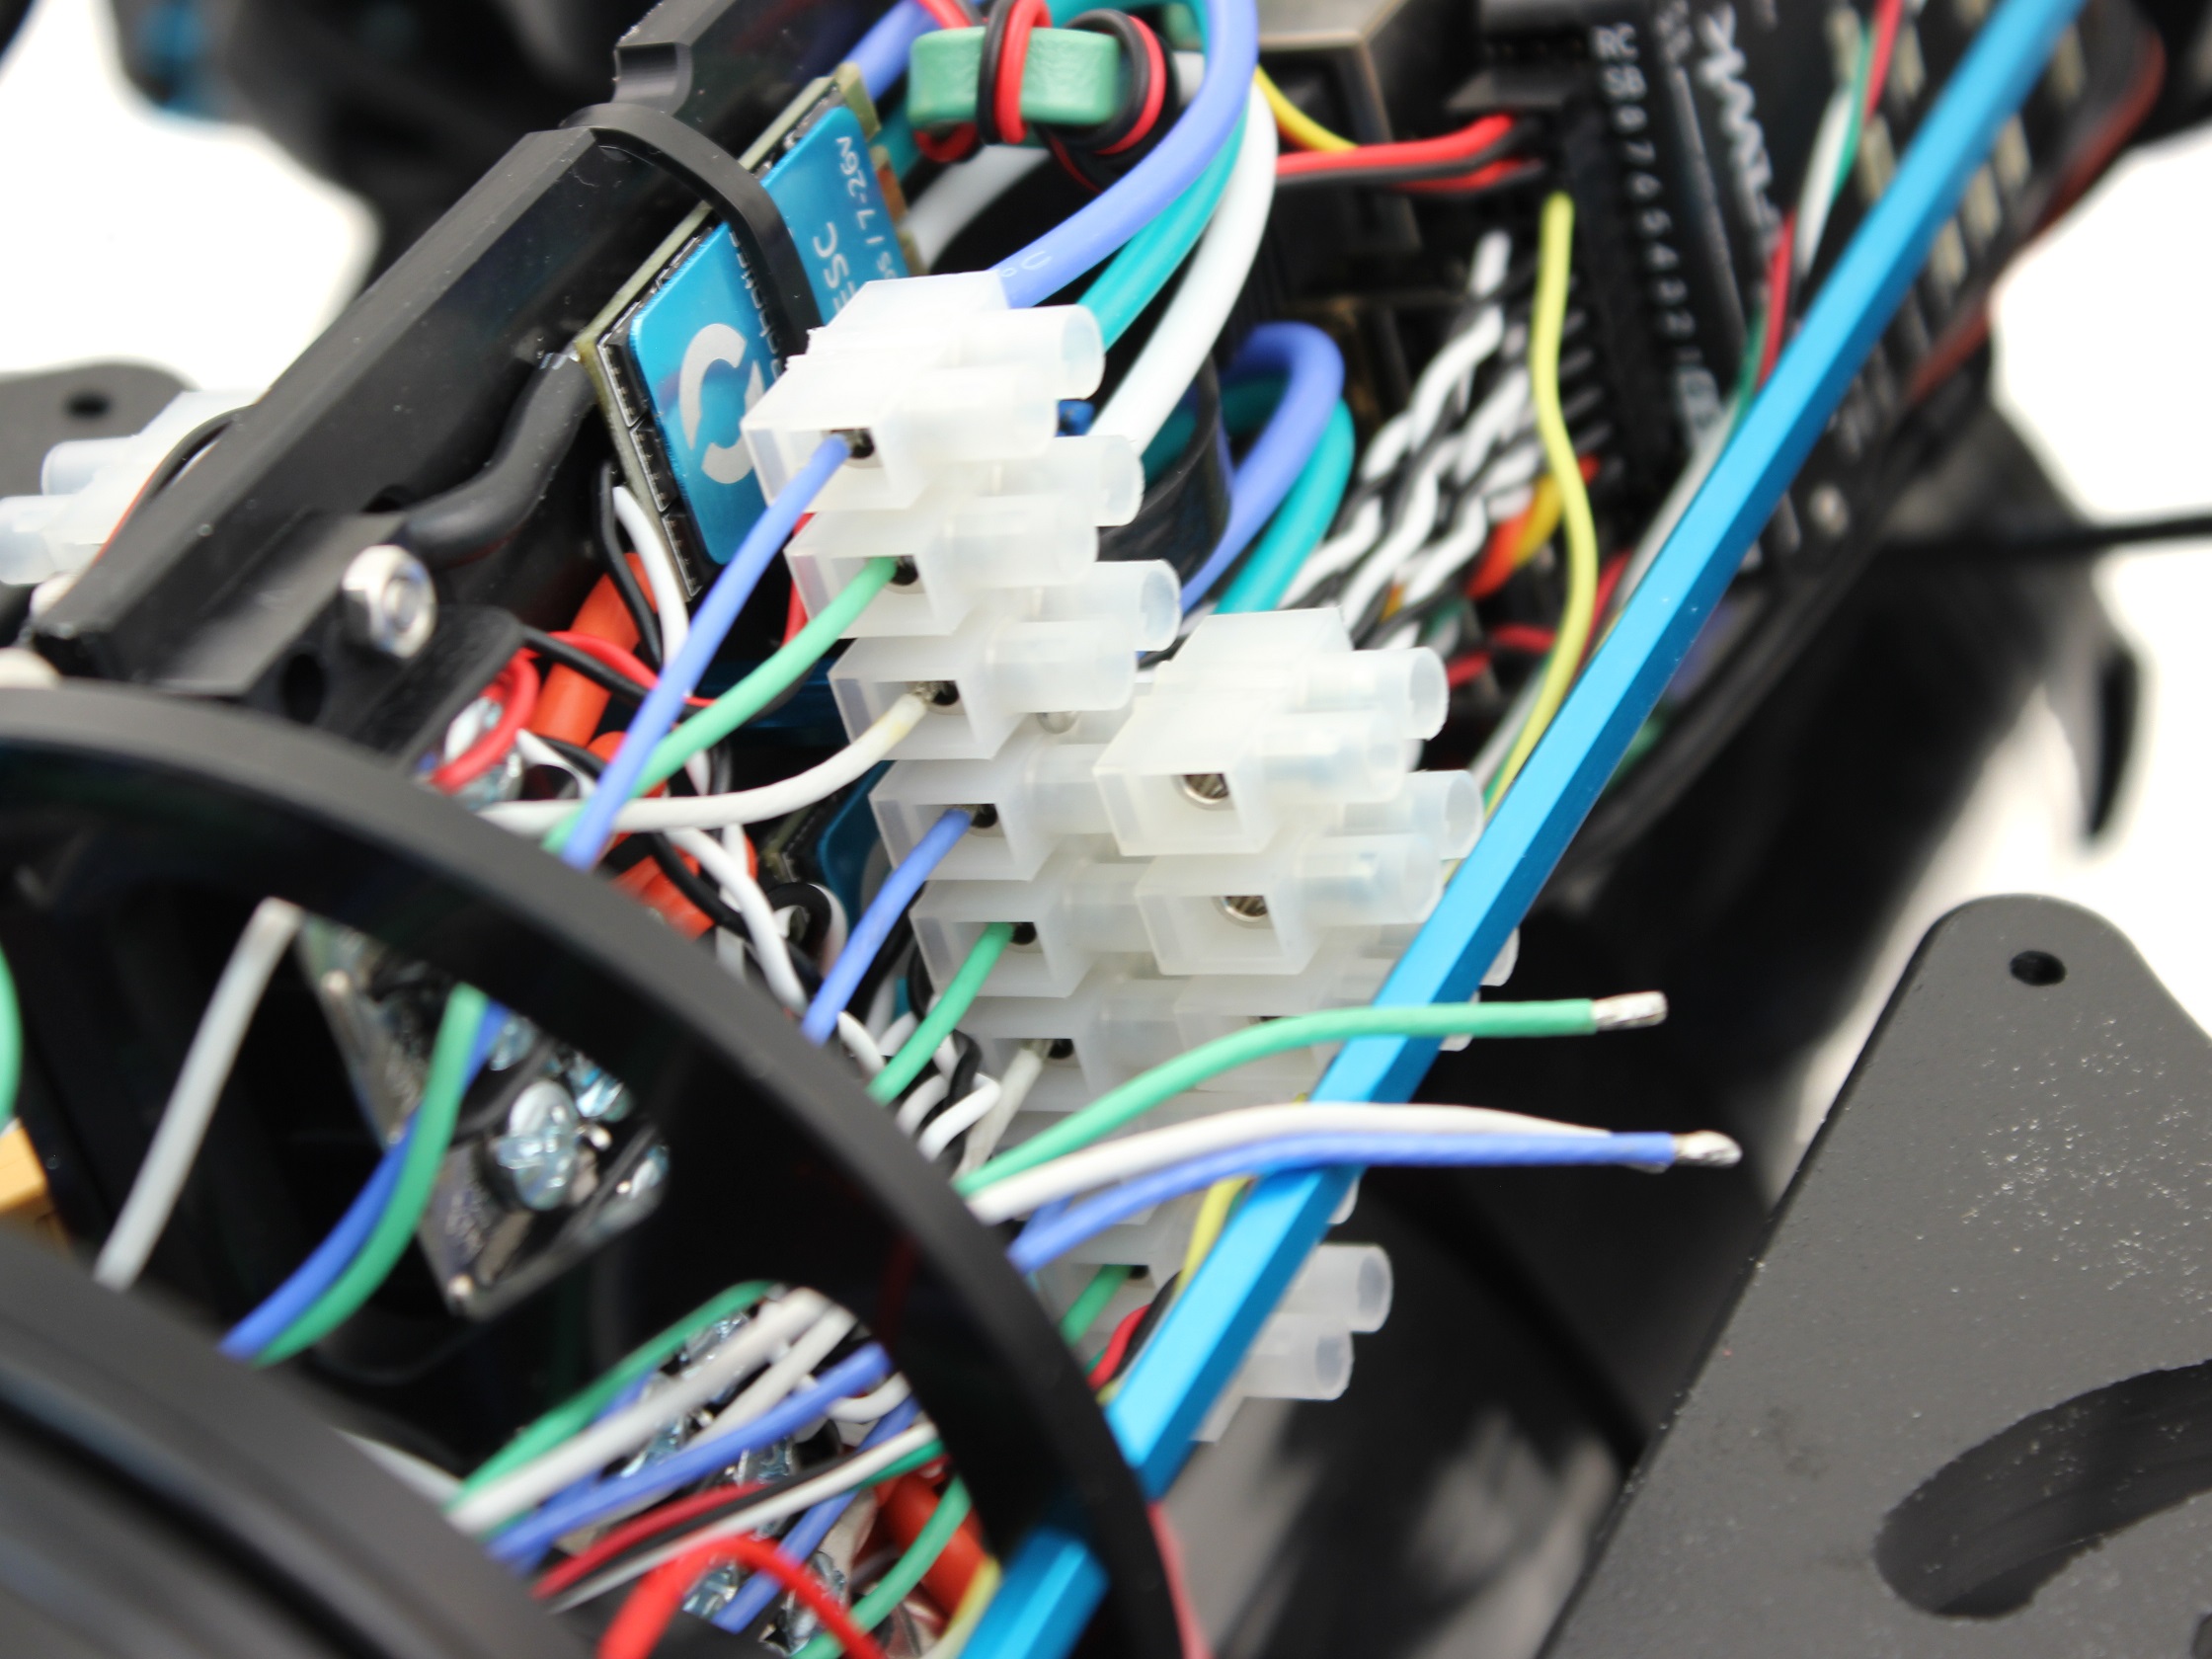
1. Slide the new 3 pole Euro terminal blocks into their mounting location on top of the 9 pole Euro terminal blocks
and one of the poles is between the aluminum stando.
Privacy - Terms

5/20/2019 BlueROV2 Heavy Configuration Retrofit Kit Installation - Blue Robotics
https://www.bluerobotics.com/learn/bluerov2-heavy-configuration-retrofit-kit-installation/ 12/28
(/wp-content/uploads/2019/03/heavy-tutorial-10.jpg?x62571)
2. Connect the motor power wires from the thrusters 7 and 8 to the motor terminal blocks as shown, using your 2
mm at head screw driver.
Privacy - Terms

5/20/2019 BlueROV2 Heavy Configuration Retrofit Kit Installation - Blue Robotics
https://www.bluerobotics.com/learn/bluerov2-heavy-configuration-retrofit-kit-installation/ 13/28
(/wp-content/uploads/2019/03/heavy-tutorial-23.jpg?x62571)
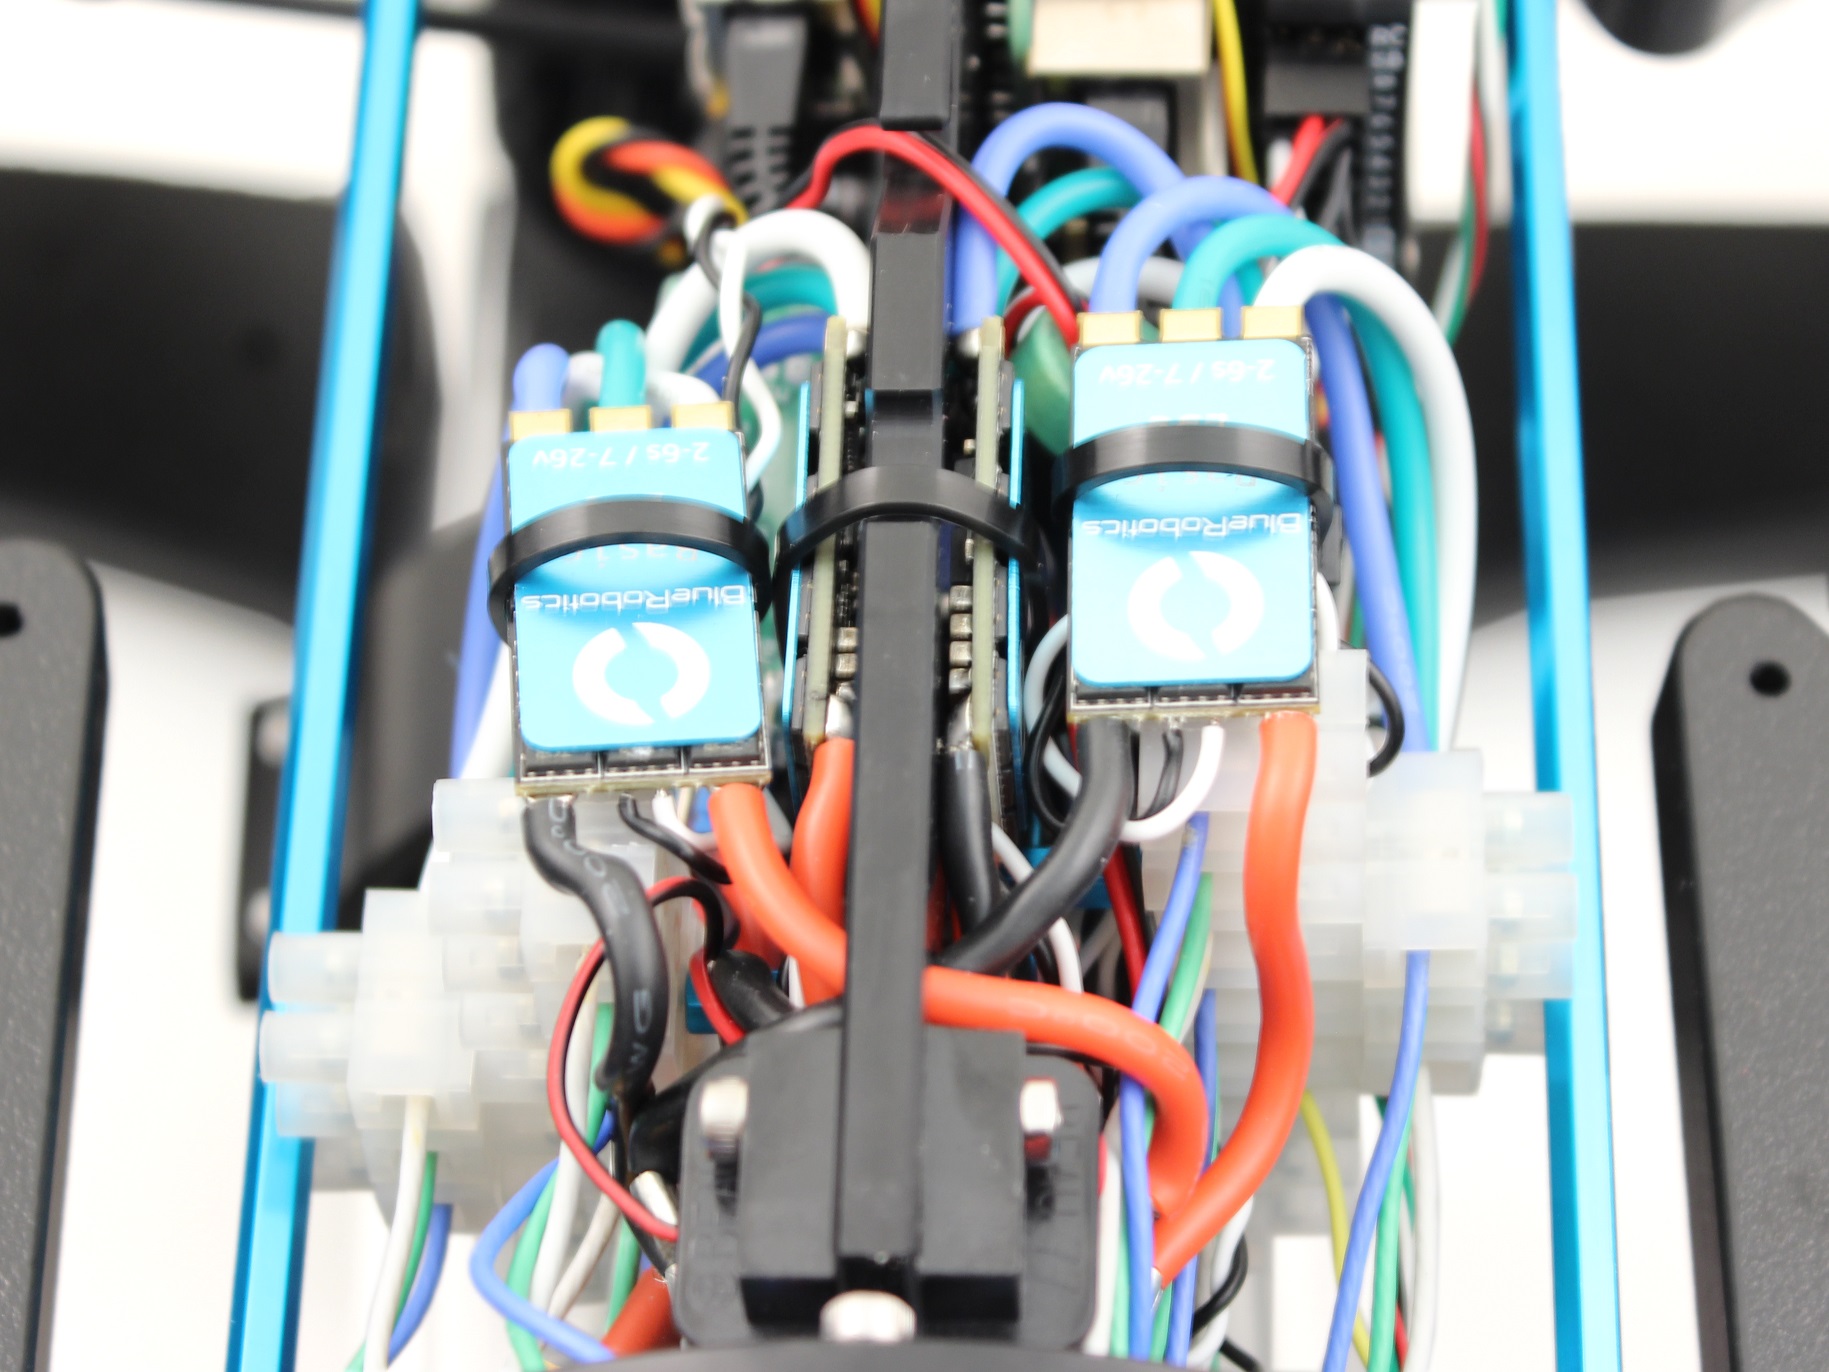
3. Connect the motor power wires from the new ESCs to the motor terminal blocks as shown below, using your 2 mm
at head screw driver.
(/wp-content/uploads/2019/03/heavy-tutorial-11.jpg?x62571)
4. Plug ESC Signal Wires into Pixhawk with the following steps:
Unplug the Lumen light signal wire from the Pixhawk Channel 7 port and replug it into Aux Channel 1 with the yellow
wire oriented toward the bottom of the Pixhawk.
Unplug the camera tilt servo from Pixhawk Channel 8 and replug it into Aux Channel 2 with the yellow signal wire
oriented toward the bottom of the Pixhawk.
Plug the servo signal wire for Thruster 7 into Channel 7 on the Pixhawk with the white signal wire oriented toward the
bottom of the Pixhawk.
Plug the servo signal wire for Thruster 8 into Channel 8 on the Pixhawk with the white signal wire oriented toward the
bottom of the Pixhawk.
5. Connect the ESC Power Wires into open screw terminals on the respective positive and negative terminal blocks.
Privacy - Terms

5/20/2019 BlueROV2 Heavy Configuration Retrofit Kit Installation - Blue Robotics
https://www.bluerobotics.com/learn/bluerov2-heavy-configuration-retrofit-kit-installation/ 14/28
(/wp-content/uploads/2019/03/heavy-tutorial-12.jpg?x62571)
6. Secure the ESCs to the tray using one ziptie each and lightly wrapping them around the other ESC motor power
wires.
Privacy - Terms

5/20/2019 BlueROV2 Heavy Configuration Retrofit Kit Installation - Blue Robotics
https://www.bluerobotics.com/learn/bluerov2-heavy-configuration-retrofit-kit-installation/ 15/28
(/wp-content/uploads/2019/03/heavy-tutorial-13.jpg?x62571)
Install New Thruster Guards
To install the new thruster guards, you will need the following parts and tools:
1 Bag of 12 M4x16mm screws
1 Bag of #4×0.5” Thread forming screws
8 x Heavy Guard Mounting Brackets
2 x Heavy Guards
1 x Threadlocker
1 x #1 Phillips head screwdriver
1. Apply one drop of threadlocker to each of the M4x16mm screws. Roll the screws around on a paper towel to evenly
spread the threadlocker and to remove excess threadlocker.
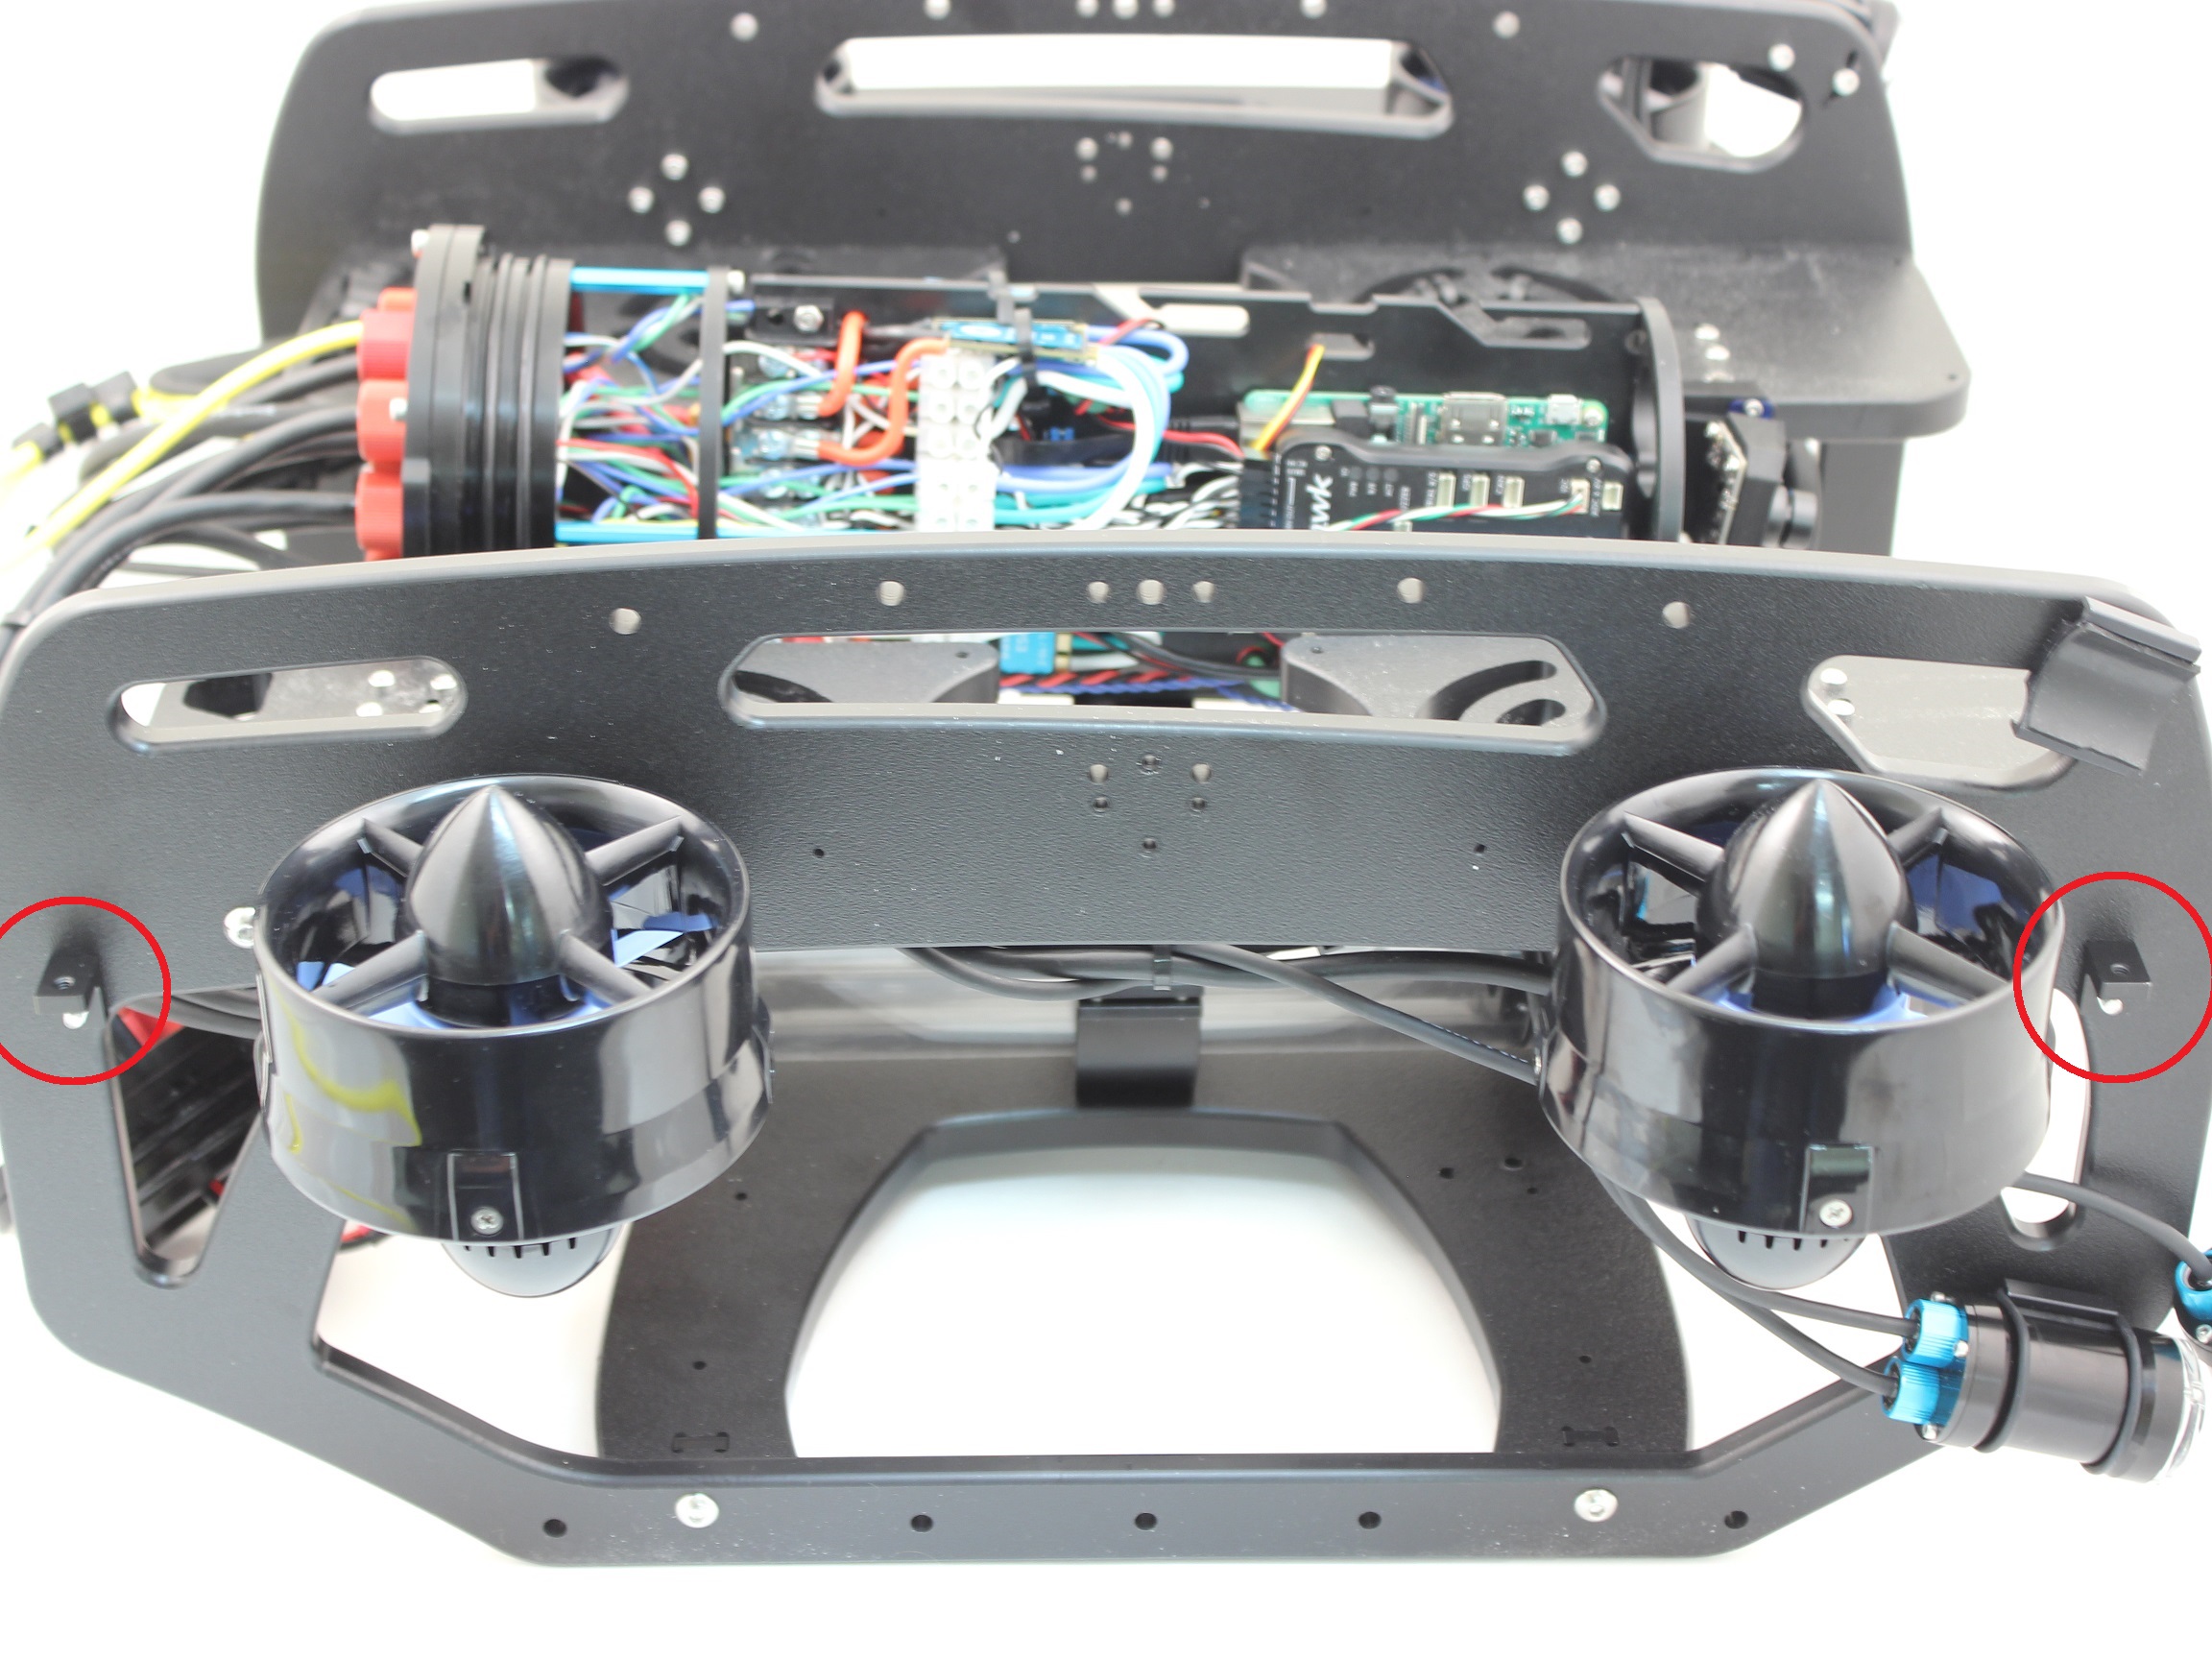
2. Install 4 of the thruster guard mounting brackets on the outside of the frame using 4 M4x16 screws as shown
below.
(/wp-content/uploads/2019/03/heavy-tutorial-24.jpg?x62571)
3. Place the new thruster guards on the brackets you had previously installed and make sure the holes align. The
thruster guards only install in one direction with the shorter leading edge of the guard oriented towards the front end
of the vehicle. If you have Lumen lights mounted in the top mounts, make sure to arrange the wire so it is inside the
guard, near the thruster duct. Secure the guards to the brackets using 4 M4x16 screws.
Privacy - Terms

5/20/2019 BlueROV2 Heavy Configuration Retrofit Kit Installation - Blue Robotics
https://www.bluerobotics.com/learn/bluerov2-heavy-configuration-retrofit-kit-installation/ 16/28
(/wp-content/uploads/2019/03/heavy-tutorial-15.jpg?x62571)
4. Install four more thruster guard mounting brackets (two on each side) in the holes near the middle of the ROV
using one M4x16 screw and one #4×0.5” thread forming screw per bracket.
Privacy - Terms

5/20/2019 BlueROV2 Heavy Configuration Retrofit Kit Installation - Blue Robotics
https://www.bluerobotics.com/learn/bluerov2-heavy-configuration-retrofit-kit-installation/ 17/28
(/wp-content/uploads/2019/03/heavy-tutorial-22.jpg?x62571)
5. Tighten all the screws evenly until they are tight enough to properly secure the thruster guard to the frame and
there is no excess freedom of movement.
Reassemble BlueROV2 Electronics Enclosure
To reassemble your BlueROV2 electronics Enclosure, you will need the following parts and tools:
4 x M3x16 screws that were placed o to the side during disassembly
1 x Silicone Grease – 10g Tube
1 x 2.5 mm hex driver
Reinstall 4” Watertight Enclosure onto ROV with the following steps:
1. Apply silicone grease to the two radial O-rings on the O-Ring Flange (4” Series) that is attached to the Electronics
Tray then install the Watertight Enclosure (4” Series) with installed Dome End Cap to the O-Ring Flange (4” Series).
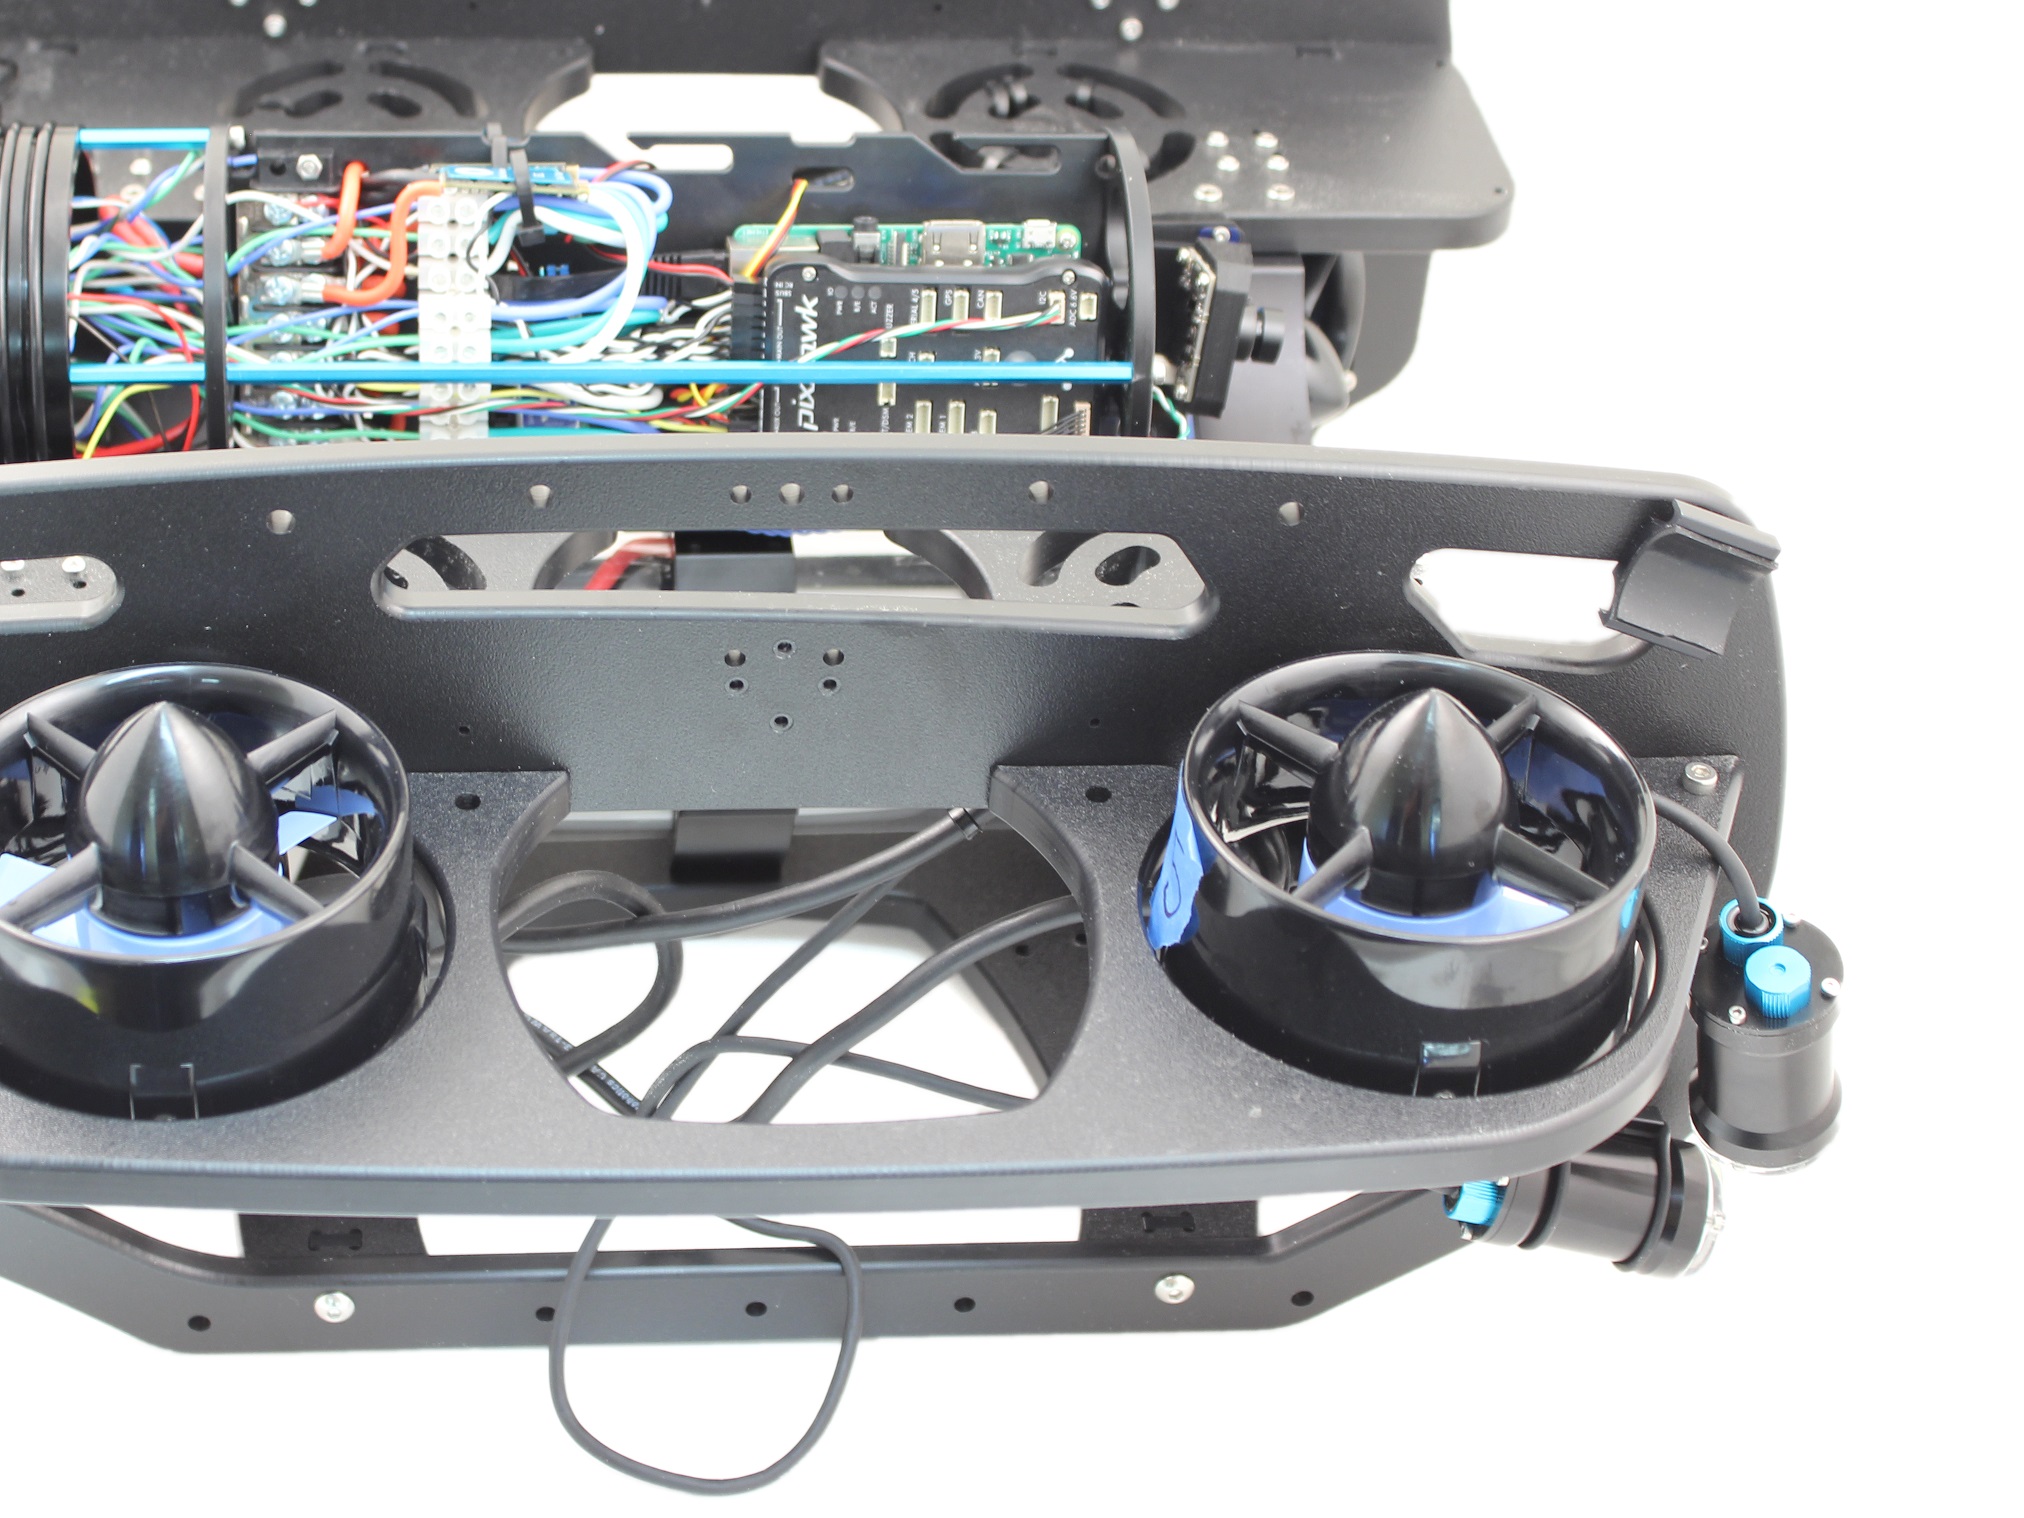
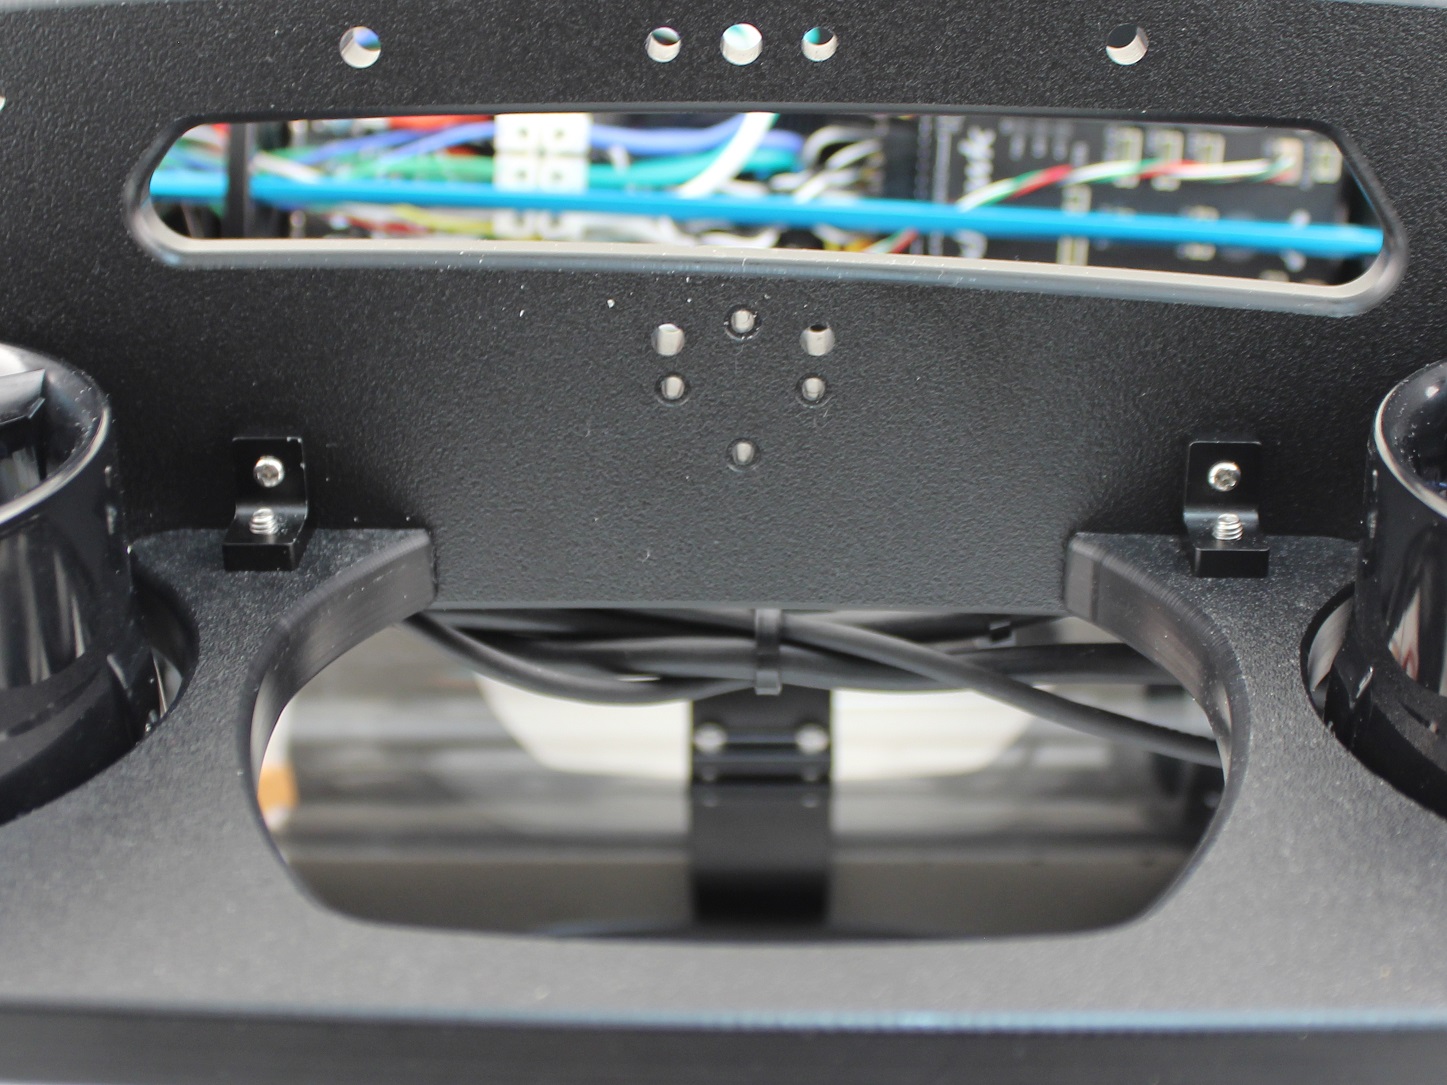
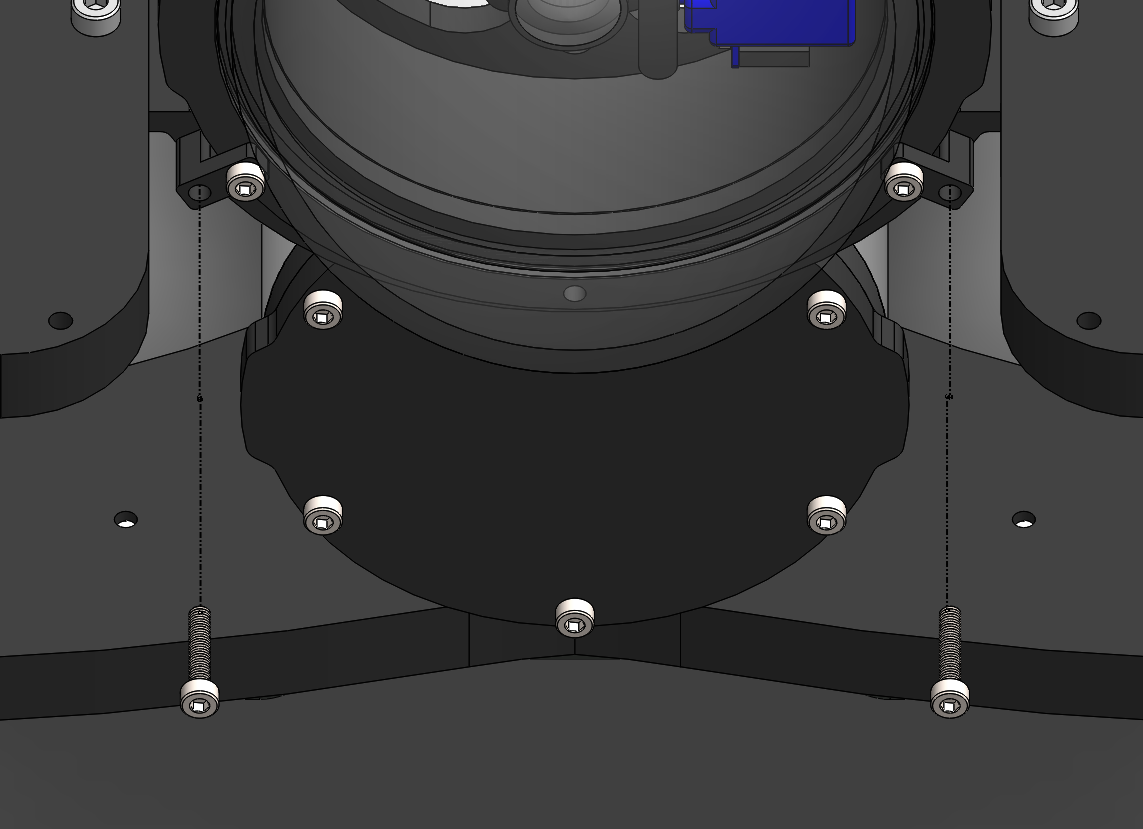
2. Mount the Electronics Enclosure to the frame using the M3x16 screws so that the dome is on the same side as the
front center panels (the center panels without the 3 large holes). Install the M3x16 screws through the clips and into
the Enclosure Cradle (4” Series). It is easier to install these screws if the clips are not fully tightened until all screws are
through the clips and threading into the Enclosure Cradle (4” Series). This allows to clips to rotate so you can nd the
threaded hole in the Enclosure Cradle (4” Series) easily.
(https://www.bluerobotics.com/wp-content/uploads/2019/01/clip-installation.png?x62571)
Cable Management
To clean up the thruster and lumen wires, you will need the bag of 30 zip ties and your scissors/wire cutters.
Privacy - Terms

5/20/2019 BlueROV2 Heavy Configuration Retrofit Kit Installation - Blue Robotics
https://www.bluerobotics.com/learn/bluerov2-heavy-configuration-retrofit-kit-installation/ 18/28
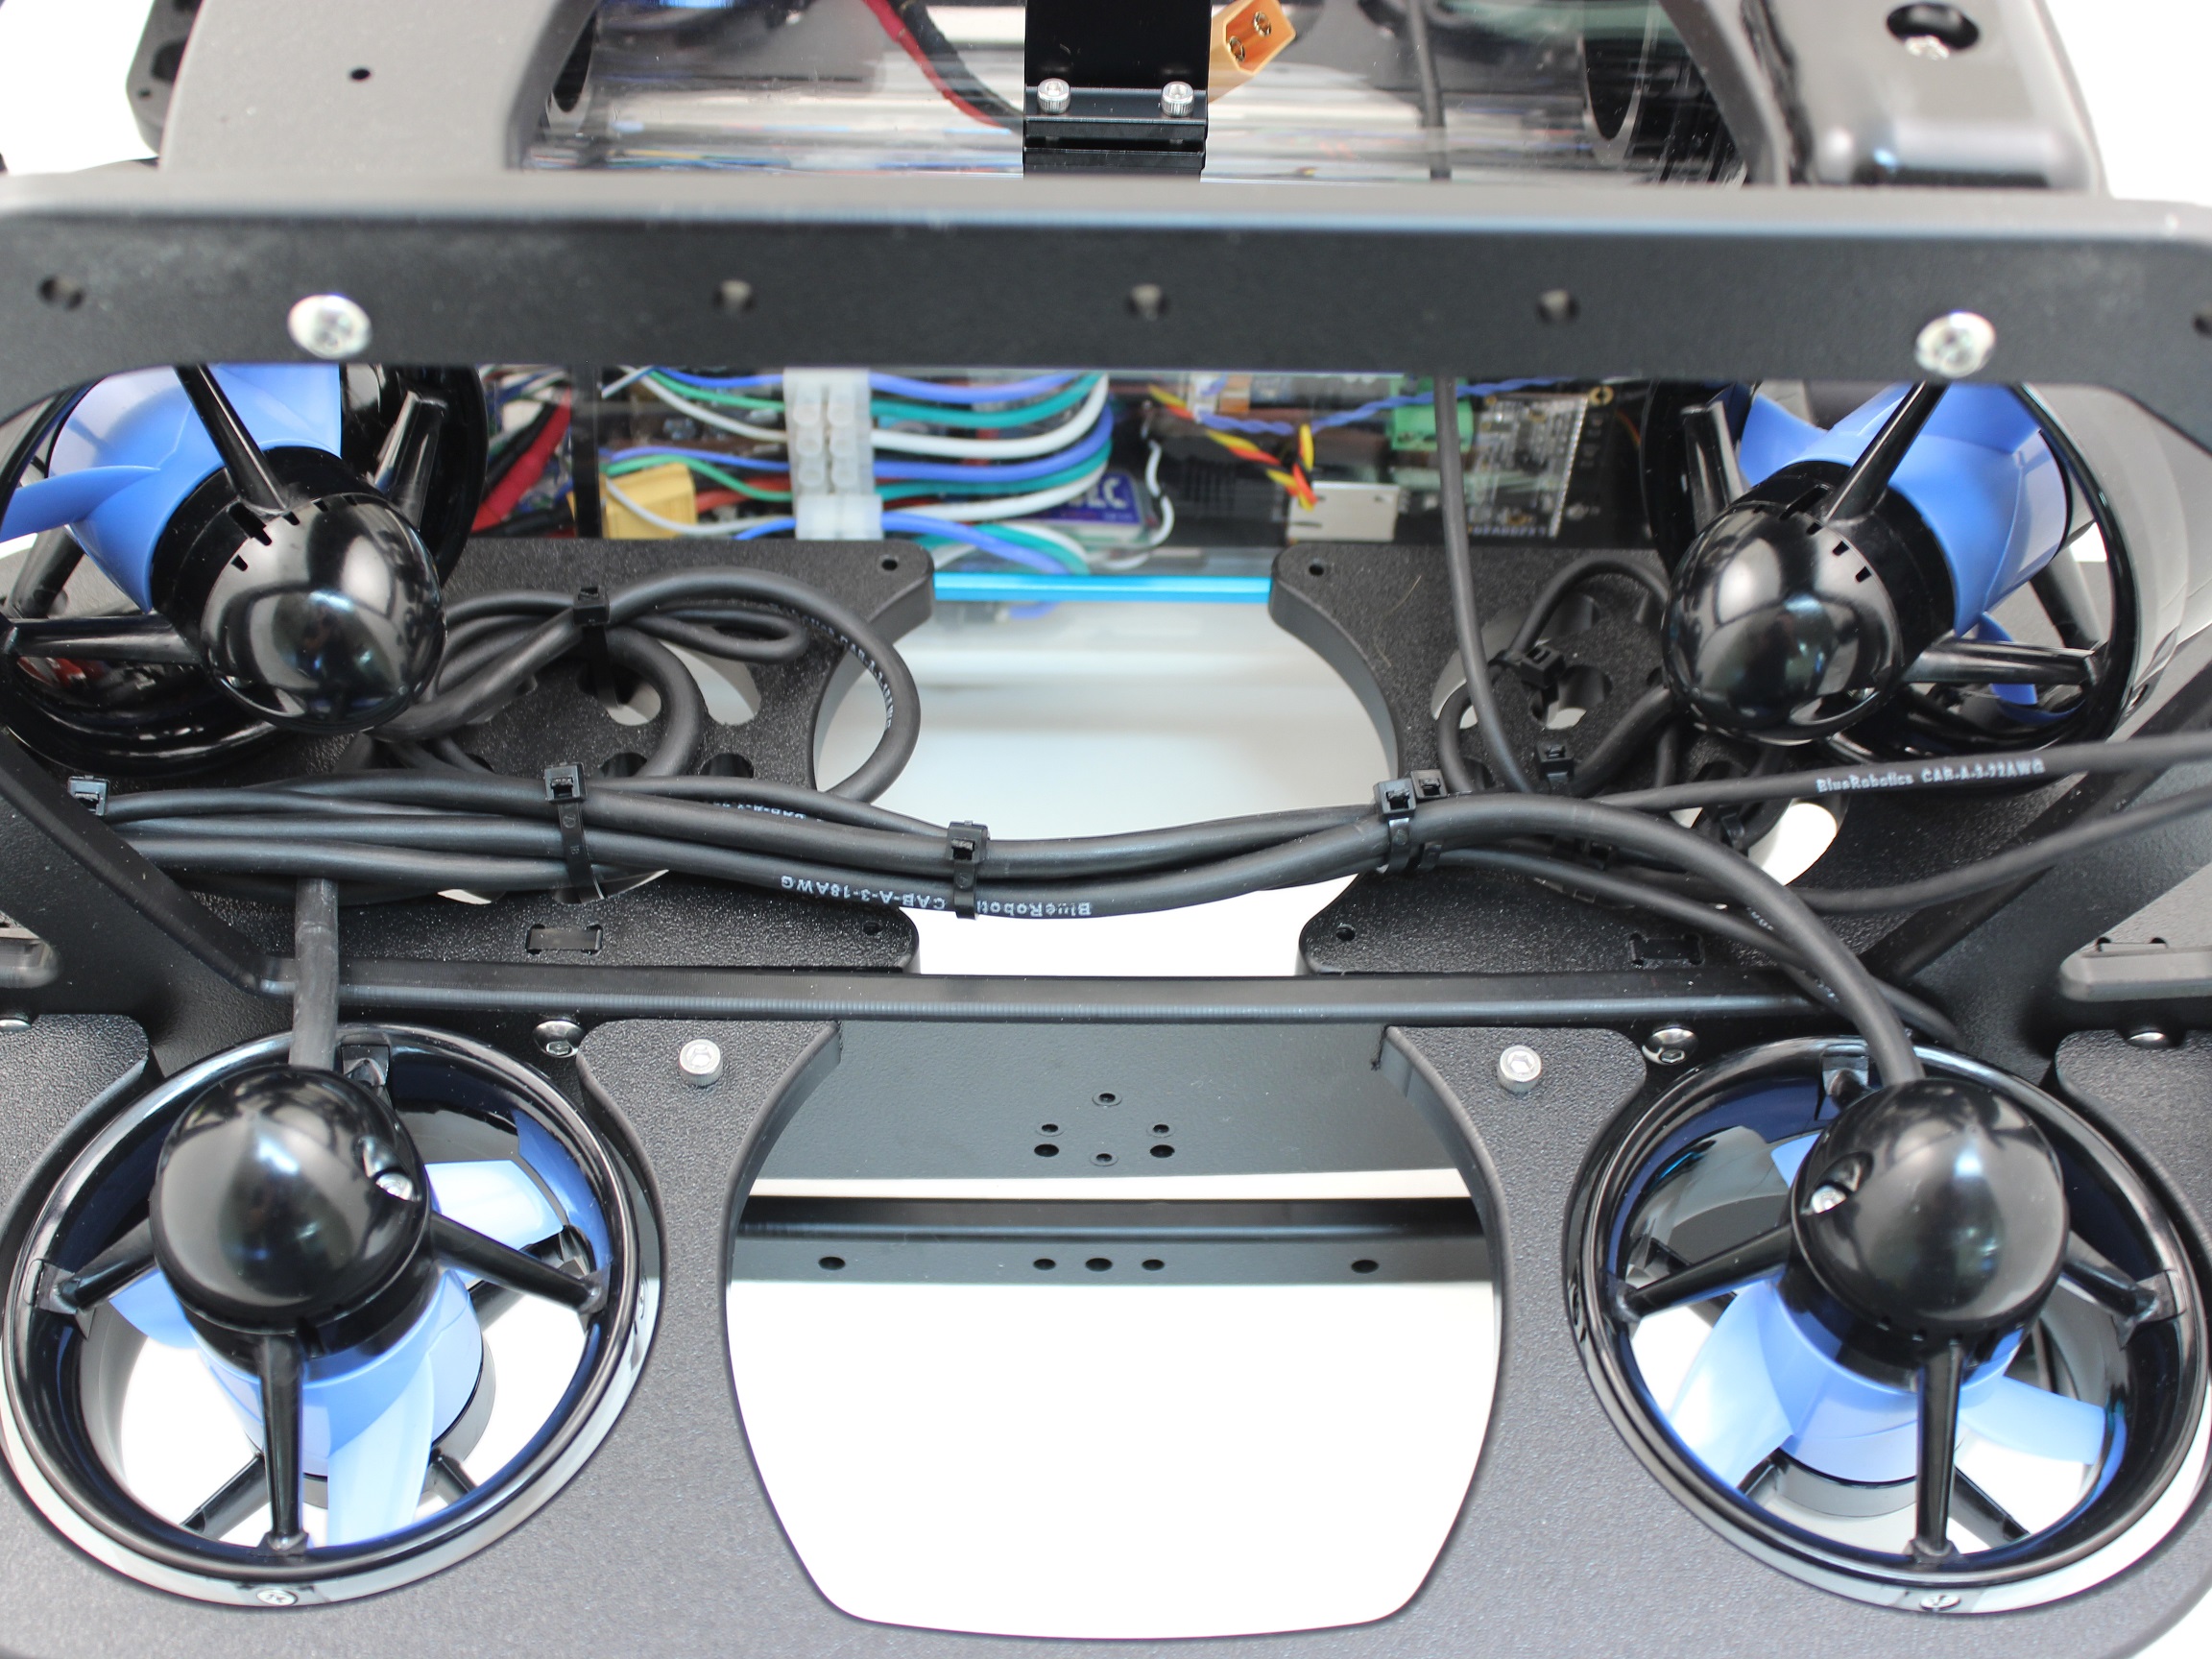
The primary goal of Thruster and Lumen cable management is to prevent the wires from getting cut by the propellers.
Make sure to check that no wire can reach a propeller after you have nished routing the cables. Below are some
examples of what the cable routing should look like.
(/wp-content/uploads/2019/03/heavy-tutorial-20.jpg?x62571)
Install New Buoyancy Blocks and Fairings
To install the new buoyancy blocks and fairings, you will need the following parts and tools:
16 x Fairing screws that were placed o to the side during disassembly
4 x Fairings with buoyancy installed that were placed o to the side during disassembly
2 x Heavy additional buoyancy blocks
2 x Heavy fairings
1 x Bag of 4 fairing screws
1 x #1 Phillips head screwdriver
1 x #2 Phillips head screwdriver
1. Reinstall Original Fairing Blocks onto ROV by installing the screws through the center panels and into the fairings.
Privacy - Terms

5/20/2019 BlueROV2 Heavy Configuration Retrofit Kit Installation - Blue Robotics
https://www.bluerobotics.com/learn/bluerov2-heavy-configuration-retrofit-kit-installation/ 19/28
(https://www.bluerobotics.com/wp-content/uploads/2019/03/heavy-step-3.png?x62571)
2. Place the new round Heavy buoyancy blocks into the open space where Thrusters 5 and 6 used to be. Ensure the
at sides of the blocks are parallel to the sides of the ROV.
Privacy - Terms

5/20/2019 BlueROV2 Heavy Configuration Retrofit Kit Installation - Blue Robotics
https://www.bluerobotics.com/learn/bluerov2-heavy-configuration-retrofit-kit-installation/ 20/28
(/wp-content/uploads/2019/03/heavy-tutorial-16.jpg?x62571)
3. Place the new plastic Heavy fairings on top of the buoyancy blocks and secure them to the old fairing blocks using
the included self-tapping fairing screws.
(/wp-content/uploads/2019/03/heavy-tutorial-18.jpg?x62571)
Privacy - Terms
Other manuals for BlueROV2
2
Table of contents
Other Blue Robotics Robotics manuals


Popular Robotics manuals by other brands

SuperDroid Robots
SuperDroid Robots HK1000-DM4-E Assembly and operation

Mindsets
Mindsets Solar Power Project Pack manual

iRobot
iRobot Roomba ADG-N1 manual

JOOLA
JOOLA TT BUDDY PRO Operation manual

Tiger Electronics
Tiger Electronics WonderBorg 70709 instruction manual

fischertechnik
fischertechnik COMPUTING ROBO MOBILE SET Assembly instructions


