Blue Square Labs BSLOLSK6514T20UAG User manual
User's Manual for LCD Electronic Whiteboard
Note
: Please read this Manual carefully before using the product!
Do not attempt to disassemble the product.
If the product does not work, please contact us or our dealer in your area.

Contents
Special Functions ....................................................................................................................................................................... 1
Safety Warnings and Precautions .............................................................................................................................1-3
Installation and Connection ....................................................................................................................................................3-7
Packing List ................................................................................................................................................................... 3
Interfaces................................................................................................................................................................................... 4
Connection Diagram ...............................................................................................................................................................5-6
Keys on the Control Panel ............................................................................................................................................. 7
Remote Control ......................................................................................................................................................................... 8
Basic Operations...................................................................................................................................................................9-13
Power On/Standby ....................................................................................................................................................... 9
SignalSourceSelection .................................................................................................................................................. 9
Menu Operations ..................................................................................................................................................................... 10
Setting List..............................................................................................................................................................11-12
Instructions forIntelligent Platform ...................................................................................................................................13-16
Basic Operations.......................................................................................................................................................... 13
QuickStart ...........................................................................................................................................................................13-14
Intelligent Application............................................................................................................................................14-16
Settings ...............................................................................................................................................................................16-17
ImportantStatement aboutNetwork Service.......................................................................................................................... 18
Troubleshooting....................................................................................................................................................................... 19
Technical Specifications ......................................................................................................................................................20-21
Contents of Hazardous Substances.......................................................................................................................................... 22
1
Special Features
1. Android 5.0.1 operating system with a unique UI design, providing an easy to use, and
convenient means of operation and an enhanced visual experience.
2. High Precision Touch and Smooth Writing
Safety Warning and Precautions
Thank you for purchasing our performance grade, multifunctional interactive LED display panel. This
product has undergone personal safety factors in the design process and has been tested strictly
prior to shipment. However, improper installation and use, may cause harm, which may include, but
is not limited to; electrical shock or fire hazards. To ensure safe use, service life, and full
performance, please read and understand the operating instruction and observe the following safety
precautions carefully before using this product. Keep this manual for future reference, and to ensure
proper use by all users.
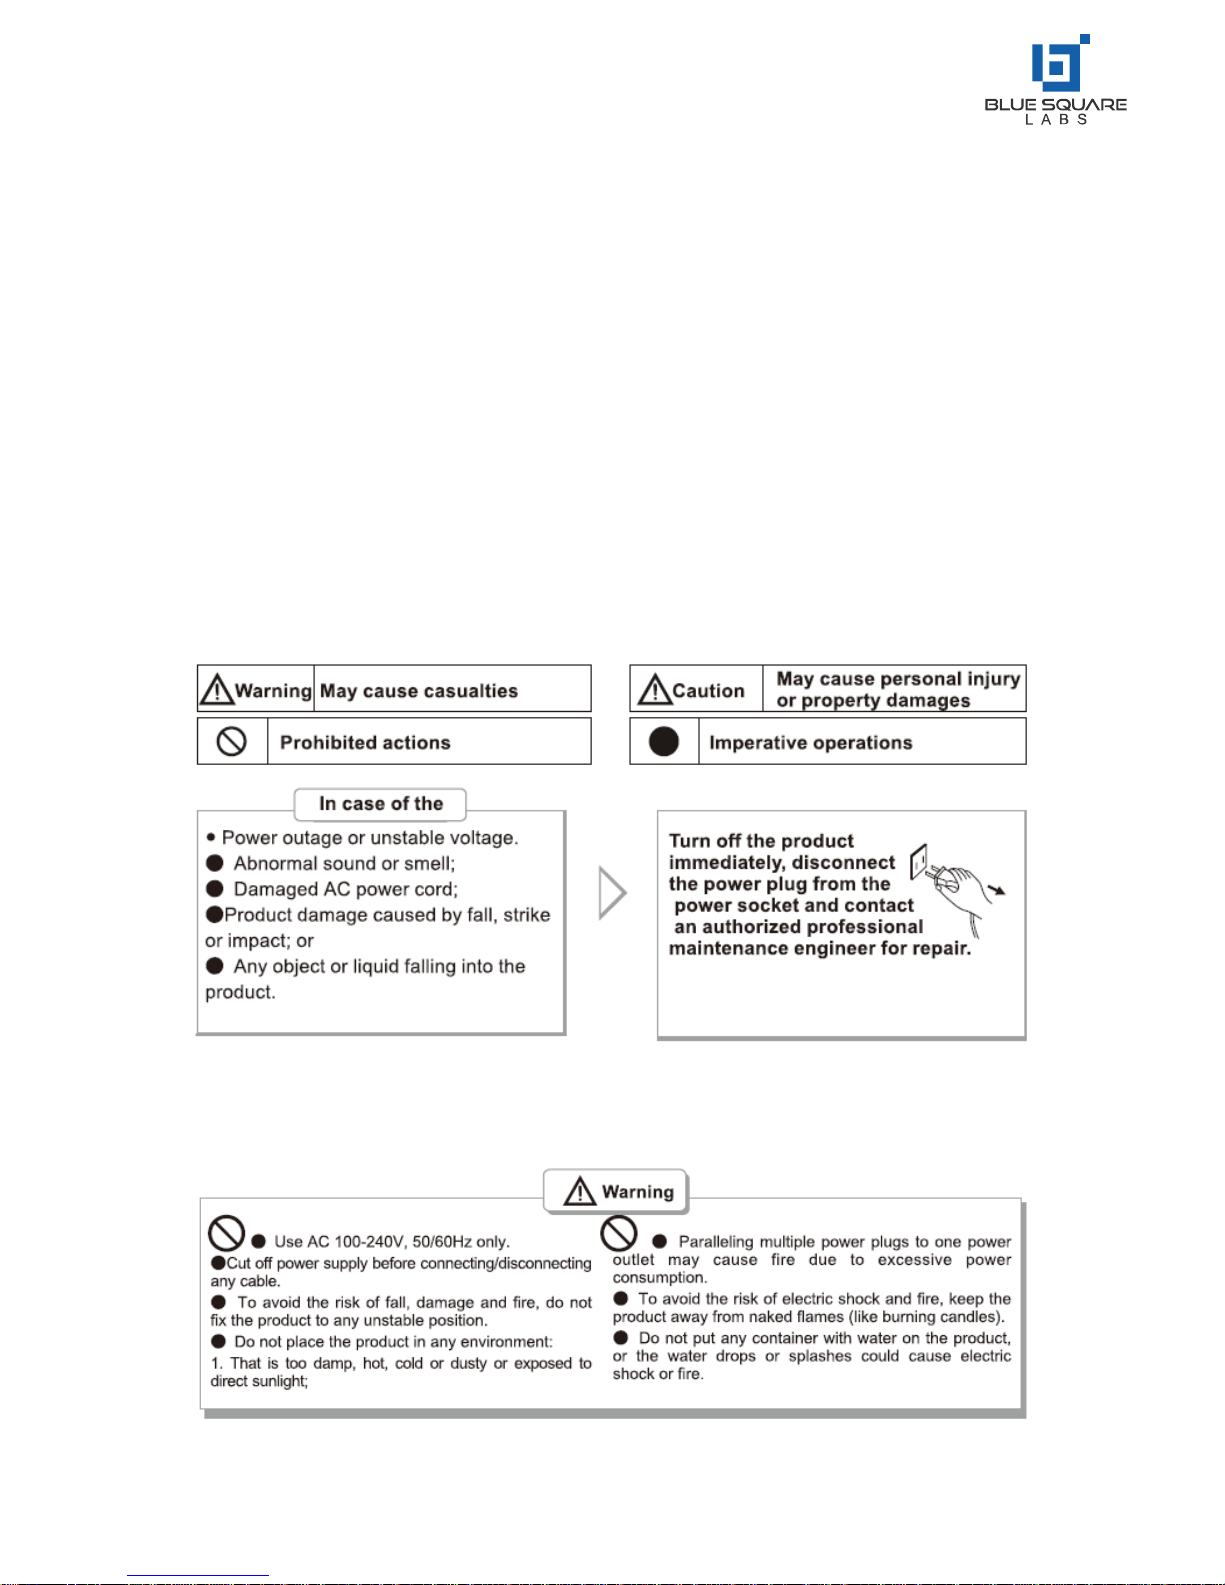
•In case of any flammable gas leakages, do not connect, or disconnect the power plug of this
product, or any other electrical appliance close to the gas leak. Open all door and windows
immediately.

2
Safety Warning and Precautions –Cont.

3
Safety Warning and Precautions –Cont.
Installation and Connection
Packing List:
•Interactive LED Display Panel
•Remote Control
•User Manual
•IEC Power Cable
•2 x Touch Pens
•3M HDMI Cable
•Disc (Optional)
•Warranty Card
•Certificate of Conformity
•Flat Wall Mount Bracket (Pre-Installed)
•2 x AAA Batteries
Caution:
If you experience any operating problems, debug issues, connection errors, or operation faults
please contact your dealer.

4
Installation and Connection –Cont.
Interfaces
PORTS:
Please Note:
Different models in the same brand may have slightly different ports. The above pictures are subject to the actual product
1. Power Socket
2. HDMI In
3. HDMI Out
4. LAN Port
5. VGA In
6. PC-Audio In
7. AV Out
8. YPbPr/YCbCr In
9. AV In
10. Audio In
11. USB In
12. Headphone Out
13. Optical/SPDIF In
14. Touch USB In
15. OPS PC –USB In
16. RS232 In/Out
17. Front Headphone Out
18. MIC In
19. PC In
20. USB In –Media
21. LED Light Sensor
Caution: Please disconnect the power plug before installing or removing the product!

5
Installation and Connection –Cont.
Connection Diagram
Diagram for connecting the product to a PC
Caution: Please disconnect the power plug before installing or removing the product!
Please Note: This connection diagram in this manual is purely for reference, and is subject to actual operations

6
Installation and Connection –Cont.
Diagram for connecting the panel to another product
Caution: Please disconnect the power plug before installing or removing the product!
HDMI OUT will mirror the image from HDMI1, HDMI2, and HDMI3 –Daisy Chaining the video signals.
The maximum number of loops = 8

7
Installation and Connection –Cont.
Keys on the Control Panel
Control Buttons on the Front Panel
1.
Power On/Standby Button;
2.
Press this button to show the Settings menu
3.
VOL+ / VOL- Button; in the OSD menu, press these two
buttons to adjust the analogue value of a selected item; their
functions are identical to … on the remote control;
4.
CH+ / CH- button; in the OSD menu, press these two buttons
to select adjustment items up and down; their functions are
identical to … on the remote control;
5.
Enable/Disable the gesture function (showing the shortcut
menu by a swipe gesture on the left or right side);
6.
Indicator and remote receiver;
7.
On/Off button (“I” indicates On; “O” indicates off. This button
is optional, subject to the actual product)
Remark: Different models may have slightly different appearances. The above pictures are subject to
the actual product.

8
Remote Control
Install Batteries in the Remote
Remove the battery compartment cover and follow the polarity marks “+” and “-“ in the battery
compartment to install two AAA batteries (No.7, 1.5V)
Precautions for Use of Remote Control
•Aim the remote control at the IR receiver when using the remote control. Any object placed
between the remote control and the remote receiver may disturb normal operation.
•Protect the remote control from violent vibrations or shock. Never set, or place the remote
in direct sunlight, or in a heated environment as it may damage the controller.
•When the remote receiver on the main unit is in direct sunlight or strong light, it is possible
that the remote-control malfunctions. In such case, please change the angle of lighting or
the machine, or operate the remote control close to the remote receiver.
•Never use batteries of different types or mix a new battery with a used one. Always replace
batteries in pair.
•Never try to dispose of batteries in a fire, or recharge decomposed batteries. Never
recharge, short-circuit, disassemble/assemble, heat or burn any used batteries. Please
dispose of waste batteries according to applicable environmental regulations. Do not expose
batteries to any hot environment, like direct sunlight, over the fire, etc.
Remark: The actual appearance of the remote control may be different from the picture
9
Basic Operations
Power On/Standby
Insert the power plug into the power outlet. First turn on the On/Off button on the product,
alternatively; press the power button on the remote control to turn on the product. If you press
the button on the remote, when the panel is in a power-on state, the unit will enter Standby.
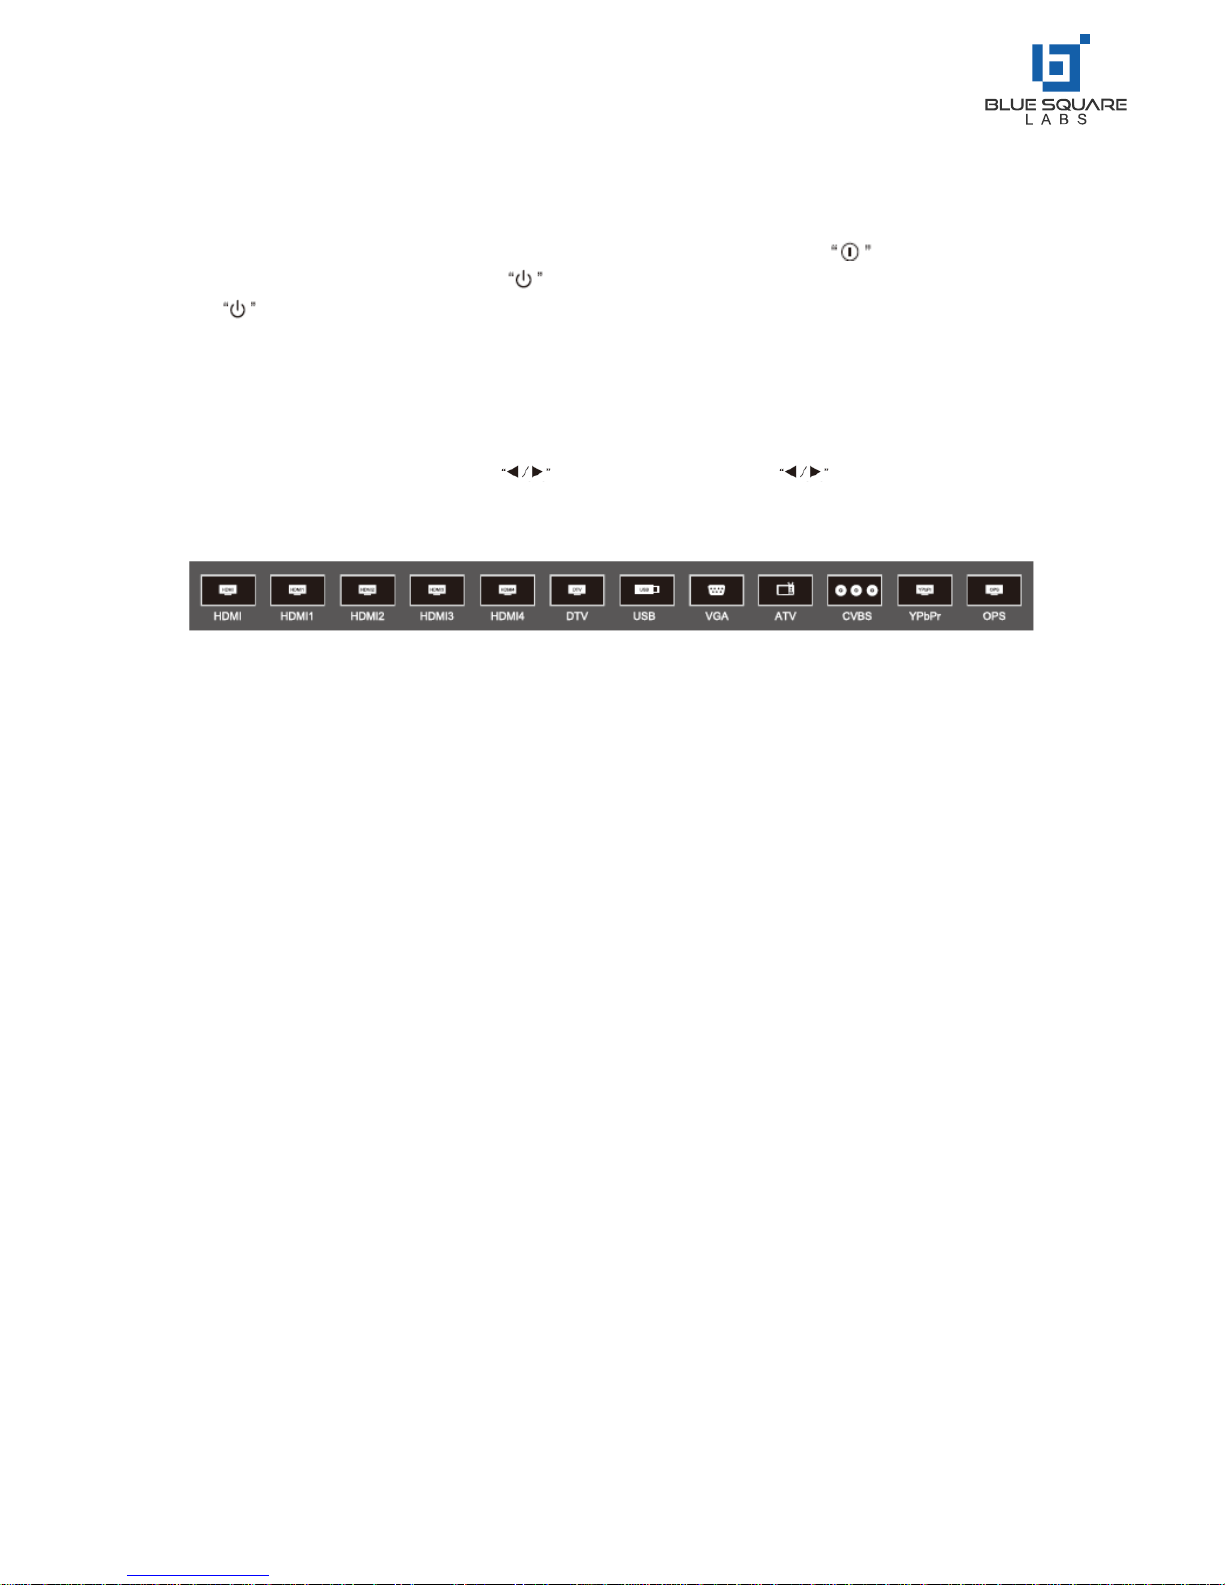
Source Selection
Upon start-up, press “SOURCE” on the remote control; the screen will display the “Input Source”
menu. At this moment you can press on the remote control or “ ” on the front panel to
select a source. Press “OK” on the remote control; the product will switch to the input source
selected.
Menu Operations
The menu operations described in this section are relative to the LCD panel when in standard
operation. For operations in the intelligent mode, please refer to the instructions below.
Sidebar Menu: First press Source once to show the sidebar by swiping on the right side; then press
Source again to close the sidebar.

10
Basic Operations –Cont.
Menu Operations
Press the “MENU” key on the remote control or on the front panel to display the main menu:
1. Press on the remote control of on the front panel to adjust settings. You can
adjust the following: Picture, Sound Mode, and Settings.
2. Press on the remote control or on the front panel to select the desired item in the
category.
3. Press “OK” on the remote control to enter the item to be adjusted.
4. Press on the remote control or on the front panel to change the value or
setting.
5. When the screen displays the main menu, press the “MENU” button to exit the main menu.
6. During menu operation, the colour of an option icon that cannot be operated will be greyed
out.

11
Basic Operations –Cont.
Settings List
Picture
Picture Mode
Select the picture
(Standard, Light, Soft, PC,
User)
Contrast
Measure the contrast and
adjust the picture between the
brightest white and the darkest
black that can be produced
Brightness
Adjust the overall brightness of
the picture. Increase the
analogue value to enhance the
brightness; decrease the
analogue value to reduce the
brightness (0-100)
Hue
Adjust the hue of pictures;
increase the analogue value to
change the hue to purple (0-
100)
Sharpness
Adjust the black-white
gradation of pictures: increase
the analogue value to improve
the sharpness; decrease the
analogue value to reduce the
sharpness (0-100)
PC Screen Adjustment
Automatically correct the
screen (valid only under VGA
signal)
Saturation
Adjust the colour depth of
pictures: increase the analogue
value to increase the colour
depth; depth the analogue
value to reduce the colour
depth (0-100)
Colour Temp
Adjust the overall colour
temperature of pictures:
Standard, Warm, and Cold
Zoom Mode
Adjust the aspect ratio:
Full Screen, 4:3, Movie and
Subtitle
PC Image Adjustment
Adjust the image displace
range in PC Mode (available
under PC signal source)
Please Note:
The analogue values of Contrast, Brightness, Hue, Sharpness and Saturation are
adjustable on in User Mode

12
Settings
OSD Time
Adjust the OSD time:
5s, 10s, 15s, 20s, 30s, and Constant
MHL Auto Switch
Adjust the MHL Auto Switch:
MHL switching can be adjusted ON or OFF. This function is
only adjustable when a source device is connected via HDMI4
Light Sensor
Front Light sensor can be toggled ON and OFF
HDMI CEC
CEC Control can be toggled ON and OFF
HDMI EDID Version
Adjust the HDMI EDID Version:
Default Mode, EDID1.4, and EDID2.0
Restore to Defaults
Restore all settings to factory defaults, and restart the system
Please Note:
Different models paired with different sources may alter the menu options dependant on conditions
Sound
Sound Mode
Select the sound effect mode: Standard, Music, Movie, and
User
Bass
Adjust the Bass Output:
Increase the analogue value to raise the bass level,; decrease
the analogue value to lower the bass lebel (0-100)
Treble
Adjust the Treble Output:
The greater the analogue value (0-100), the higher the treble
Sound Balance
Adjust the balance between the left and right channels:
Adjust the analogue value left to increase the volume of the
left in-built speaker; adjust the analogue value right to
increase the volume of the right in-built speaker. By default,
the parameter is set to 0 –allowing for the left and right
speaker to produce a balanced output at the same volume.
SPDIF Out
Select the digital sound output mode: PCM, RAW, and OFF
Please Note: The analogue values of Bass and Treble are adjustable only in User
Mode

13
Intelligent Platform Operations
Basic Operations
Press to display the main interface of the intelligent mode (as shown in the figure).
1. Press to select an app;
2. Press “OK” to run the app;
Special Tips
Operations may differ in Intelligent Mode if the User has installed their own apps. The app
operations in this manual are for reference only. Some functions cannot be achieved with the
remote control. To ensure convenient operation, user is suggested to operate with a USB mouse and
keyboard, connected via the appropriate USB inputs.
QuickStart
Prior to use, please familiarise yourself with the following operations.
Mouse Operation
1. Click: Click the mouse and then release it immediately;
2. Long Press: Click and hold down the left click for more than 3s; then release it;
3. Clicking the left mouse functions as the “OK” key on the remote control
4. Clicking the right mouse functions as the “Back” key on the remote control
Language and Keyboard Settings
Language: Select Settings > Preferences > Language in the intelligent mode, and press “OK”; press
to select the desired language. Then press “OK”
Selecting Keyboard Input
Select Settings > Preferences > Keyboard > Current Keyboard in Android Mode, and press “OK”
select the desired input method in the options menu and press “OK” to confirm the choice.
Setting Time and Date
Select Settings > Date & Time > Auto Determination of Date & Time in Android Mode, and press
“OK”. The system will automatically get the time from the network and update if the panel. If the
device is not connected to the network, the Time & Date will need to be set manually.

14
Screenshot:
Before taking a screenshot, please insert the USB storage device to a USB port of the product, and
press “SNAPSHOT” key. After taking a screenshot, the picture is stored in the
“:Pictures\Screenshots” folder in the USB storage device.
Intelligent Applications
APK Installer: The APK installer option helps users manage their desired apps. User can install setup
files stored in the local disk or installed as required. Tip: You can access, Settings > Security &
Restrictions > Unknown Sources to set whether it is allowed to install apps not from the Android
App Store and also set the preferred installation location to operate all apps.
How to install an app?
After entering APK installation, select Install and press “OK”. Select the path of the target setup file
in the local disk, then find the app install package in the box on the right side, and press “OK”.
How to delete an app?
First select Manage, and press “OK”; then select the app to be uninstalled, and press “OK”; lastly
select Uninstall and click “OK”; from here the system will automatically uninstall the app.
Multimedia Player
If the APK Installer is not pre-installed, you can access the file manager to select and install the
corresponding APK app
Connect the USB storage device via USB port; select Local Play in the main interface of intelligent
mode, and press “OK” to run it. The following categories can be accessed on the left side: All, Image,
Song, and Video.
Play Files in the Local Disk: Before playing a file in the local disk, first insert the USB storage device
to a USB port on the product.
Select Local Disk from the file directory in the middle, and press “OK”. Select Back in the directory;
press “OK” to return to the previous folders; select a directory folder, and press “OK” to enter the
folder; press “Back” to return to the desktop.
Caution:
1. It is possible that some non-standard USB devices will not be recognised.
2. The media system has certain restriction on the format of each file played. Errors may occur
if restrictions are not adhered to.
3. Do not plug in or remove the USB device when the system is playing a file, as this may cause
the system or USB device may fail.
15
4. This system supports USB flash drives, mobile hard drives and other devices with standard
USB1.1 and USB2.0 port transmission protocols.
5. The maximum output current of USB ports on the product is 500mA; the product will enter
Protect Mode if this limit is exceeded. If you connect an external device with heavy current,
it is suggested to use an external power supply.
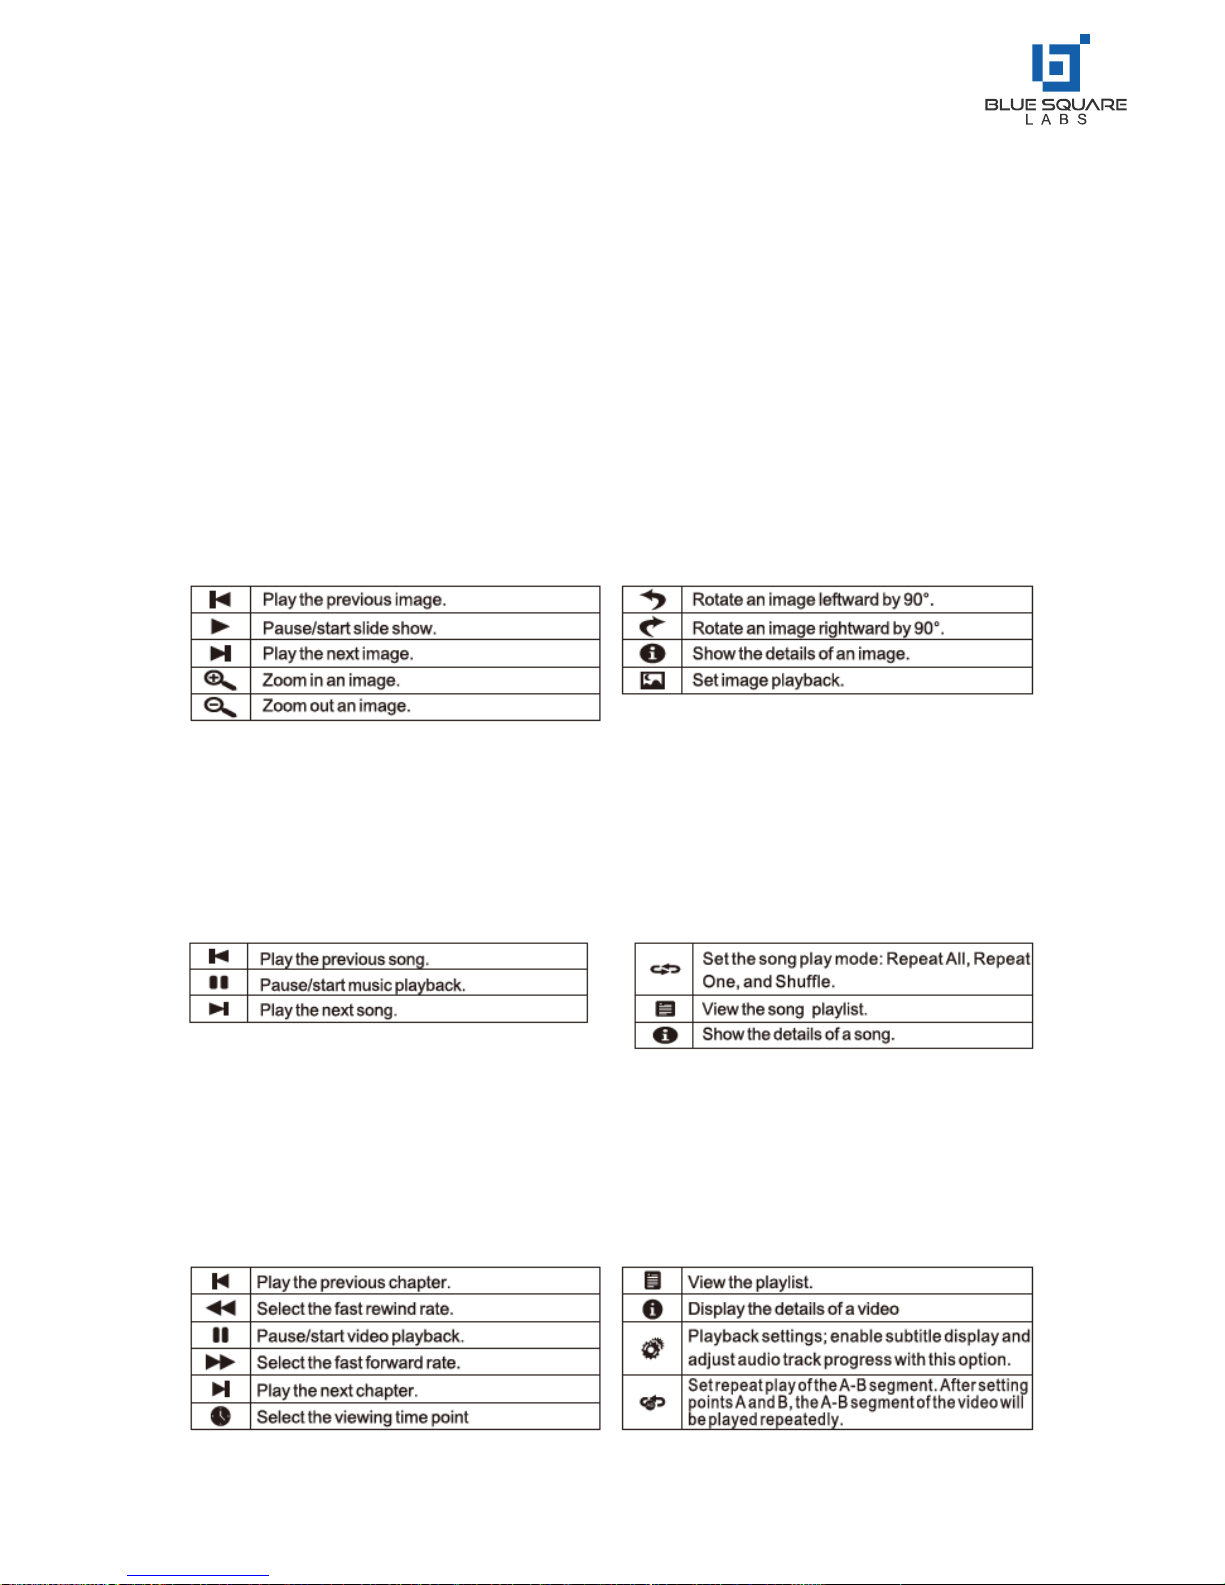
Description of option icons in the play interface
Options in Image Viewer
Options in Audio Player Menu
Options in Video Player Menu

16
During playback, press “OK” to display the menu options shown above. Select the corresponding
icon, and press “OK” to execute the operation. User can press “Back” to exit playback, or press the
following on the remote to perform a shortcut operation
Settings
Network Settings
Select Network Settings under Settings in the Intelligent Mode, and press “OK”
Wired Network Settings
Before using a fixed/wired
network, first connect one end
of the network cable to the
network port on the Blue Square
Labs panel. Connect the other
end to your network router.
1. If your router is set to automatically obtain an IP address, select Advanced Options > DHCP
for IP configuration, and press “OK”; the product will automatically obtain an IP address.
2. If your router is not set to automatically obtain an IP Address, you must complete the
network connection by following steps (select Static in TP configuration);
3. Select IP Address, and configure an available IP address;
4. Select Default Gateway, and configure an available gateway;
5. Select Network Prefix Valid Length, and configure a valid length of subnet mask;
6. Select Preferred DNS1 and Alternative DNS2, then; configure an available DNS server
address;
7. Select Save, and pre3ss “OK”; the system will give a prompt indicating the settings have been
set;
8. Select Subnet Mask, and configure an available subnet mask;
9. Select Default Gateway, and configure an available gateway;
10. Select Preferred DNS1 and Alternate DNS2, and configure an available DNS server address
for the product;
11. Select Save, and press “OK”; the system will give a prompt, indicating the settings have been
set

17
Intelligent Applications –Cont.
Wifi Hotspot –This is for setting the panel as a hotspot for wireless network connections
1. Select Wifi Hotspot, then press “OK” to enable the Wifi Hotspot function;
2. Select Configure Wifi Hotsport,a nd press “OK”;
3. Enter the network name (SSID) in the textbox. The default name in the system is
“AndroidAP”; you can also change it to another name;
4. Select Security, press “” to select the security type. If it is used as an open network, it is
necessary to set any password, but any devices searching out your network can be
connected to your open WiFi network. If you select WPA PSK/WPA2 PSK for encryption, you
need to enter a protection password having more than 8 bits. When other devices out the
WiFi network you have shared, the correct password must be entered to connect to your
network;
5. After selecting Encrpt, the system will automatically configure a password for you; you can
also enter a password in the password field;
6. Select Save, and press ”OK” to save the setting; other WiFi devices within the area will
search out your network during WiFi network search.
Caution: Please set the network password, but avoid using simple combinations such as
birth dates, etc.
This manual suits for next models
2
Table of contents


