Hitachi HILU75202 User manual

Ultra HD Interactive Flat Panel Display
Installation Manual
Model: HILU75202
''

QUICK SETUP GUIDE
1 Precautions and safety instructions
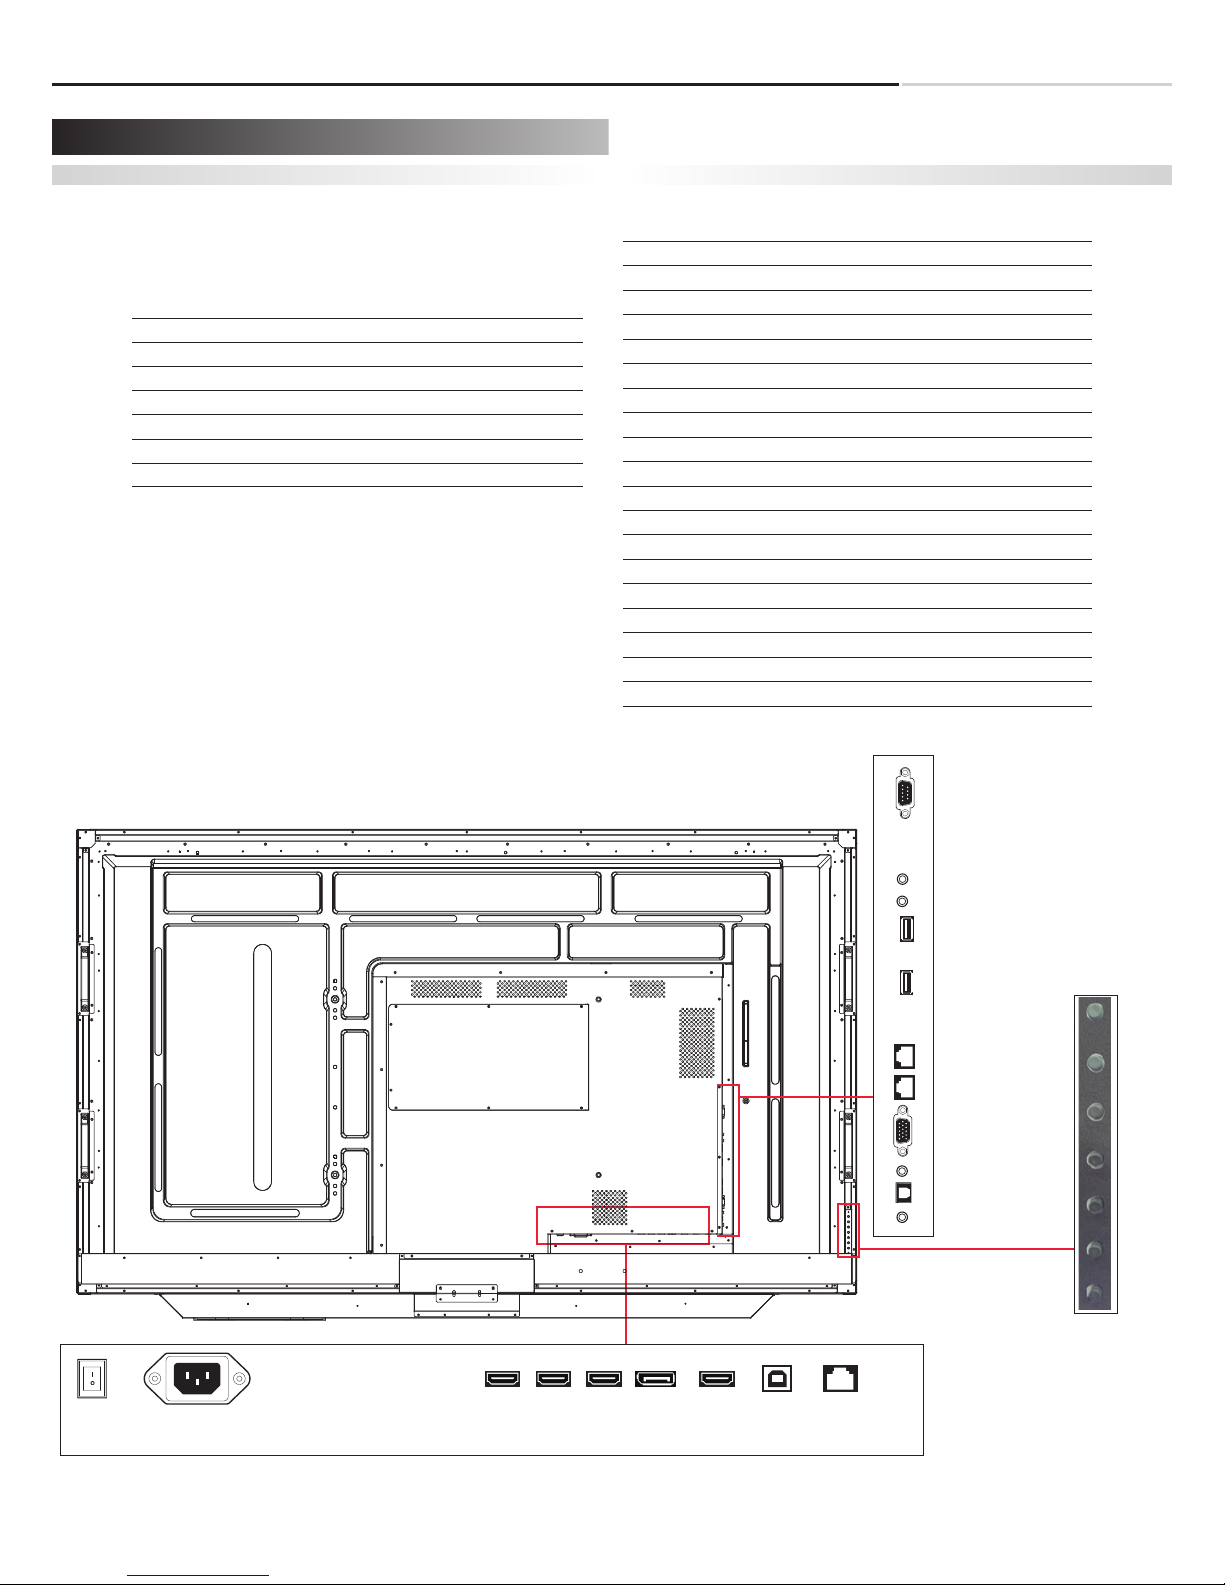
For further information, see the User Manual.
Please contact HITACHI directly if you
have questions on the use of the touch
monitor after reading the Installation Manual
and User Manual.
Important:
Please read the PRECAUTIONS, SAFETY
INSTRUCTIONS and this INSTALLATION
MANUAL carefully before installing
the touch monitor.
Before using the touch monitor, please read this quick setup
guide thoroughly to help protect against damage to your own
and other people‘s property and ensure your own and other
people‘s personal safety.
Be sure to observe the following instructions.
For your safety, be sure to observe the warnings contained
in this guide.
For installation or adjustment, please follow this quick setup
guide and refer all servicing to qualified service personnel.
Safety Precautions
If smoke or a peculiar smell comes from the monitor, remove the
power plug from the socket immediately.
Failure to do so may result in fire or electric shock.
Contact your dealer for inspection.
If the monitor has been turned on but there isn’t a picture,
remove the power plug from the socket immediately.
Failure to do so may result in fire or electric shock.
Contact your dealer for inspection.
If water is spilled or objects are dropped inside the monitor,
remove the power plug from the socket immediately.
Failure to do so may result in fire or electric shock.
Contact your dealer for inspection.
If the monitor is dropped or the cabinet is damaged, remove the
power plug from the socket immediately.
Failure to do so may result in fire or electric shock.
Contact your dealer for inspection.
To turn off the power of the monitor completely, remove the
power plug from the socket
If the power cord or plug is damaged or becomes hot, turn off the
main power switch of the monitor, make sure the plug has cooled
down and remove the plug from the socket.
If the monitor is still used in this condition, it may cause a fire or
an electric shock. Contact your dealer for replacement.
Moving and Carrying Notice
Moving Notice:
Moving the monitor requires at least four people. If not, it may drop and a serious
injury may result.
Carrying Notice:
This monitor is heavy; please follow the instructions below when you are ready to
carry the monitor. Failure to do so may cause injury.
Installation
(when installing the monitor, please follow the instructions in this
quick setup guide)
Don‘t install in a high-temperature environment.
If the monitor is used in a high-temperature environment or in
direct sunlight, it may cause the case or other parts to become
distorted or damaged resulting in overheating or electric shock.
Don‘t install in a high-humidity environment.
This may cause overheating or electric shock.
Don‘t install near any heat sources such as radiators, hot-air
outlets, stoves, or other apparatus that produce heat.
This may cause a fire or electric shock.
Don‘t overload sockets or cables beyond electrical capacity.
Don‘t use extension leads as this may cause a fire or electric shock.
Don‘t insert the power plug into an socket other than 100~240V AC.
This may cause a fire or electric shock.
Don’t use a damaged power plug or worn socket.
Don‘t insert the wrong plug as it may cause a fire or electric
shock.
Do not place monitors on unstable shelves or surfaces.
They could collapse and cause damage.
Only install the unit on vertical, stable and level surfaces.
2

2 Package contents
Don‘t place objects on the touch monitor.
If the touch monitor is covered or the vents are blocked, the
monitor could overheat and cause a fire.
If metal or liquid gets into the monitor, it may cause a fire
or an electric shock.
Do not place heavy objects on the monitor as they may fall
causing injury.
Please keep a minimum distance of 10 cm between the monitor
and the other objects for sufficient ventilation.
Don‘t move the touch monitor when it is connected to the power
cord and AV cables.
When moving the monitor, make sure you remove the plug
and cables from the socket or source.
When unpacking or carrying the monitor, at least 4 people
are needed. Make sure the monitor is carried upright.
Transport the monitor upright. Avoid placing the monitor
face up or face down.
Handle the monitor gently. Do not drop.
Wall mounting safety notes
1. Please make sure the bracket is fixed to a solid wall.
2. After assembling, please don‘t pull or shake violently.
3. Please don‘t install the bracket in direct sunslight or areas
of humidity / high temperature for fear that the quality
is affected.
4. Install the bracket at a minimum distance of 10 cm from other
objects / walls on either side. Only attach to vertical walls.
Unpacking
The e-Screen is packed in a cardboard box and may be banded
to 2 types of custom pallet depending on the number of units
shipped. The e-Screen is packed using cushions to protect
the monitor during shipping.
Before unpacking your monitor, prepare a stable, level, and
clean surface near a wall socket.
Set the LCD Monitor box in an upright position and open
from the top of the box before removing the top cushions.
Step 1: Cut the banding.
Step 2: Remove the top cushion and take
the accessories box out.
Packing list
Item Q’ty
1 Display 1
2 Carton 1
3 Bottom cushion 2
4 Top cushion 2
5 Packing bag 1
6 Accessories box 1
Contents of the Accessories box
- Power cord black
- OSD Remote control (1.5V (AAA) battery included)
- USB cable
- User Manual
- Warranty Card
- HDMI cable
- Pen
3

3 Installation
Power Input
Power Cord
The power cord, included, is used to connect the LCD monitor
and the wall socket.
Connect the power cord into main power socket of the monitor.
Signal Source Input
In/Output Interface
RS232C
Speaker out
USB 2.0
USB 3.0
LAN Out
LAN In
D-SUB
Audio in (D-SUB)
SPDIF
Audio line out
LAN
Touch USB in
HDMI Out
DisplayPort
HDMI In 1
HDMI In 2
HDMI In 3
AC in socket (Input: 100-240V~ 50/60Hz)
Power Switch
1
2
3
4
5
6
7
8
9
10
11
12
13
14
15
16
17
18
19
OSD 7Key
Power ON and OFF
Menu Display the main on-Screen Menu
Source PC, HDMI 1, HDMI 2, HDMI 3, DP
Vol + Volume Up
Vol - Volume Down
▲UP
▼DOWN
11
1
2
3
4
5
6
7
8
9
10
1213141516171819
POWER
RS232C
MENU
SOURCE
VOL +
VOL -
▲
▼
4
D-SUB IN
L(8Ω)
SPEAKER OUT
R(8Ω)
USB 2.0
USB 3.0
PC AUDIO IN
SPDIF
LINE OUT
LAN IN
LAN OUT
AC INPOWER
HDMI OUTDISPLAY
PORT IN
HDMI IN
1
HDMI IN
2
HDMI IN
3
USB FOR
TOUCH
LAN

The control panel of the monitor
1: LED Indicator
2 : USB
3 : Touch USB(for Laptop PC)
4 : HDMI IN (Connected to External)
Power Status
2
13 4
Condition
Blue Power on
Red Power off(stand-by)
Off
AC off
The Remote Control (RCU) Instructions
No. Function Description
1 Power Turns the monitor On and Off
Source Select source (PC, HDMI 1,
HDMI 2, HDMI 3 Displayport)
2
3
▲, ◀, ▶, ▼ Navigates through submenus and
settings
Volume + Increases the sound volume
Volume - Decreases the sound volume
Exit Closes the menu system
Menu Open the menu
Freeze Freezes the current source image
Mute Turns off the sound
Display Mode
Turning the monitor on
Important Notice
1. Correctly insert the power cord into the monitor and
into the power socket
2. Press the power button on the remote or front control panel.
Turning the monitor off
With the power on, press the power button on the remote or
front control panel to place the monitor in a standby mode. To
turn off power completely, disconnect the AC power cord from
the power outlet.
Adjusting the Volume
1. Using the remote, press the VOLUME+ or VOLUME- to increase
or decrease the volume.
2. Press the MUTE button to temporarily turn off all sound.
To restore the sound, press the MUTE button again.
Selecting the input source
1. Using the remote, press the desired source button (PC, HDMI 1,
HDMI 2, HDMI 3, DP)
2. Or press SOURCE on the monitor keypad, and toggle the source
button until you have reached the desired source, and press
ENTER
PC
HDMI 1
HDMI 2
HDMI 3
DP
3. If the monitor cannot find a source, a “No signal” message
will appear.
Battery insertion
Remote Control
Receiver
4 Operating the monitor
5
1
3
2
The USB cable (5 m) that Hitachi provides in this accessory box is
for use of connection to Touch USB at the back. Therefore, in case
of connecting USB cable to Touch USB in front, separate USB cable
is required and the length of cable is strongly recommended to be
less than 3 m to make sure signal intensity of touch sensor work
properly.
Other manuals for HILU75202
1
Table of contents
Other Hitachi Industrial Monitor manuals