BluePoint Fasteners BP-27C User manual

Instruction
Manual
BP-27C
WARNING!
DO NOT OPERATE THE TOOL UNTIL YOU HAVE READ THIS TOOL TRAINING
MANUAL AND EDUCATION HAS BEEN RECEIVED ACCORDING TO
ANSI STANDARD A 10.3-1995.
READING AND FOLLOWING THIS INSTRUCTION MANUAL CAN HELP
AVOID SERIOUS INJURY OR DEATH.
01

Always keep this instruction manual together with the tool and ensure that
they are handed over together to any other operator.
General information
Explanation of Terminology
WARNING
The word WARNING is used to
emphasize a potentially
dangerous situation which could
lead to severe personal injury or
death.
CAUTION
The word CAUTION is used to
emphasize a potentially dangerous
situation which could lead to minor
personal injury or damage to the
equipment or other property.
Graphic Symbols
GENERAL INFORMATION
DANGER! TO AVOID SERIOUS INJURY OR DEATH:
NEVER PLACE YOUR HAND AT THE END OF THE NOSE PIECE OF THE BP-27C TOOL.
OPERATORS AND BYSTANDERS AROUND THE TOOL BEING USED MUST USE EYE AND
EAR PROTECTION. ALWAYS ASSUME THAT THE TOOL IS LOADED WITH A LOAD.
NEVER PLACE YOUR FINGERS ON THE NOSE PIECE OF THE LOADED OR UNLOADED
TOOL UNTIL THE TOOL NOSE PIECE IS AGAINST THE WORK BASE AND YOU ARE READY
TO DO A FASTENING. IF THE TOOL ACCIDENTALLY SHOOTS HIS/HER HAND OR ANY
PART OF THE BODY, THE PISTON CAN ENTER THE BODY AND CAUSE SERIOUS INJURY
OR DEATH. IT IS VERY IMPORTANT THAT THE OPERATOR OF THIS BP-27C TOOL READS
AND UNDERSTANDS THE ENTIRE MANUAL AND COMPLETES THE OPERATORS EXAM
WITH A 100% GRADE. THE WARRANTY DOES NOT APPLY UNTIL BLUEPOINT
FASTENERS RECEIVES A COPY OF OPERATORS EXAM AND A COPY OF YOUR RECEIPT
WHEN THE TOOL WAS PURCHASED.
General Warning
Read Instructions Before
Use
Use Safety Helmet
Use Eye Protection
Use Ear Protection
WARNING! Hot Surface
03
PRIOR TO OPERATING THE BP-27C TOOL, PLEASE STUDY THIS MANUAL CAREFULLY
AND DEVELOP A THOROUGH UNDERSTANDING OF THE CONTENTS. PROPER
TRAINING ACCORDING TO THE CURRENT ANSI STANDARD A 10.3, SAFETY
REQUIREMENTS FOR POWDER ACTUATED FASTENING SYSTEMS MUST BE
COMPLETED AND A BLUEPOINT FASTENERS QUALIFIED OPERATOR CARD MUST BE
OBTAINED PRIOR TO OPERATION OF THE TOOL. STATE, LOCAL, OR OTHER
REGULATIONS SHOULD ALSO BE FOLLOWED. LAWS, REGUATIONS, AND STANDARDS
REGARDING THE USE OF POWDER ACTUATED TOOLS MAY PERIODICALLY BE REVISED
WITHOUT NOTICE. ANY SUCH REVISIONS MAY CHANGE THE SAFETY AND OPERATING
PROCEDURES DESCRIBED IN THIS MANUAL. BLUEPOINT FASTENERS IS NOT
RESPONSIBLE FOR ANY SUCH REVISIONS WHICH OCCUR AFTER PUBLICATION OF THIS
MANUAL. IT IS THE RESPONSIBILITY OF THE USER TO MAINTAIN ALL KNOWLEDGE OF
THE LAWS, REGULATIONS, AND STANDARDS THAT APPLY TO POWDER ACTUATED
TOOLS.
WARNING!
BP-27C TOOL IS TO BE USED ONLY BY LICENSED OPERATORS. YOU MUST HAVE
A LICENSE BEFORE OPERATING IT. YOU MAY COMPLETE THE ENCLOSED EXAM
SUCCESSFULLY AND RETURN IT TO GET A TOOL OPERATOR’S CARD THAT WILL
BE ISSUED TO YOU, AND ALSO ACTIVATE YOUR WARRANTY. OPERATOR’S
LICENSE CAN ALSO BE OBTAINED DIRECTLY AT:www.bpfasteners.com
WARRANTY
Bluepoint warranty assures that the supplied tool is free of defects in workmanship
or material. Validity of this warranty is applied as long as the tool is handled and
operated correctly, serviced and cleaned properly in accordance with the Bluepoint
Instruction Manual and only if original Bluepoint components, consumables and
spare parts or other equivalent quality products are used. Parts requiring
replacement or repairs as a result of normal wear and tear are not covered under this
warranty.
All warranties or products described herein, expressed or implied, including the
warranties of merchantability or fitness for a particular purpose, are specifically
excluded, with the following exceptions: Bluepoint Fasteners will repair or replace, at
its option, any tool, part or element holding that, within 90 days after the sale, only if
Bluepoint is found to be responsible for a defective part in material or workmanship,
excluding normal wear.
All additional claims are excluded, specifically, Bluepoint is not obligated for direct,
indirect, incidental or consequential damages, losses or expenses in connection with,
or by reason of, the use of, or inability to use the tool for any purpose.
THIS IS THE ONLY WARRANTY AND REMEDY BLUEPOINT HAS AVAILABLE AND
IS IN NO EVENT LIABLE FOR ANY DIRECT, INDIRECT, INCIDENTAL OR
CONSEQUENTIAL DAMAGES, OR ANY OTHER DAMAGES.
02

Ensure that the correct
combination of piston,
fastener guide, and fasteners
are used.
Check the piston, nose piece
and the strip load and replace
the worn-out parts if
necessary.
Clean all the parts of the tool.
If the problem persists, DO
NOT use the tool . Have the
tool checked / repaired by a
Bluepoint professional.
SAFETY PRECAUTION
Never try to pry a cartridge from the
magazine strip or the tool.
Do not straighten your arms while
firing the tool. Keep them flexed.
Never leave the loaded tool
unattended.
Ensure that the tool is not loaded
before servicing, cleaning or
replacing parts and before storing it.
Always store cartridges and unused
tools unloaded, in a dry location,
and in a high or locked place, out of
children’s reach.
6. Temperature
Do not dismantle the tool when it is
hot.
Never exceed the recommended
maximum fastener driving rate. (700
fastenings / hour).
Stop if the plastic cartridge strip
melts. Allow the tool to cool down.
7. Requirements to be met by users
(Pre-requisites for users)
Only authorized, trained
professionals should operate,
service, and repair the tool. The
professional must be informed of
any special hazards that may be
encountered.
Operate the tool only if your full
attention is on the job.
Do not use the tool if you feel
unwell.
8. Personal Protective Equipment
(PPE)
The operator and all other
bystanders must always wear eye
and ear protection and a hard hat.
Prior to use
9. Read the Instruction Manual
carefully.
10. Inspection of tool
Ensure that the tool is not loaded.
Routinely check the tool for damage
and ensure that all controls operate
properly.
Check the buffer and piston for wear
(see table on last page of these
instructions).
11. Selection of the correct nose piece
/ piston / fastener combination
Using the wrong combination may
result in damage to the tool and / or
affect fastening quality.
05
1. General Safety Instructions
The following points must be
strictly observed at all times, in
addition to the specific safety
precautions listed in the individual
sections.
2. Use as recommended
The tool is designed for use only by
professionals in the construction
industry for fastening applications
where fasteners or composite
fasteners are driven into steel,
concrete.
3. Inappropriate use
Modification or manipulation of the
tool is not permitted.
Unless the tool is approved for such
use, it should not be used in a
flammable or an explosive
environment.
Use only BLUEPOINT fasteners,
cartridges, accessories or spare
parts of equivalent quality to avoid
risk of injury.
Strictly follow the instructions for
operation, care and maintenance
given in the Instruction Manual.
The tool should never be pointed at
self or any bystander.
The muzzle of the tool should never
be pressed against a hand or any
body part.
The nails are NOT to be driven into
materials such as marble, natural
rock, glass, copper, brass, bonze,
plastic, insulation materials, hollow
brick, glazed tile, thin sheet metal
(<4 mm), grey cast iron, spheroidal
cast iron or gas concrete.
The tool and its accessories may be
hazardous if used improperly by an
unauthorized person.
4. Workplace safety
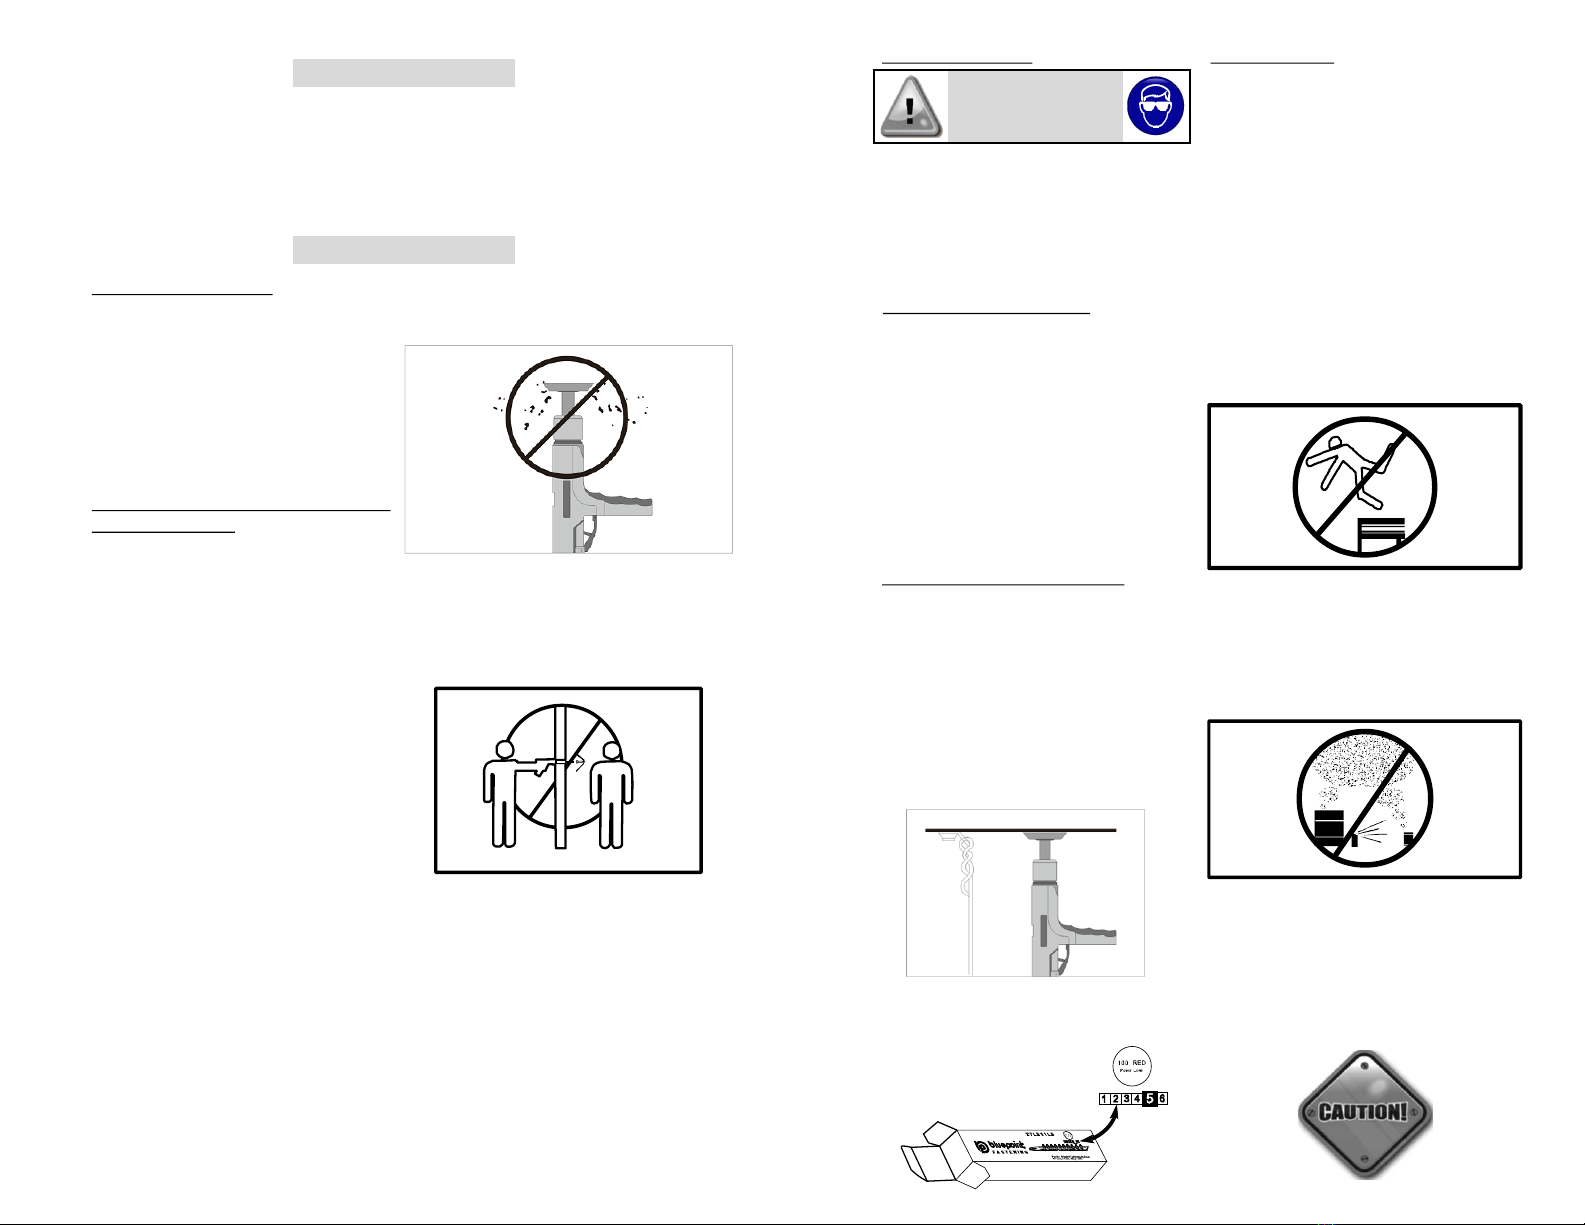
Avoid unergonomic body postures.
Hazardous objects should be
removed from the work area.
The tool is only for hand-held use.
Other bystanders, particularly
children, should not be allowed in
the work area.
Make sure nobody is behind or
below the point where the fastener
is to be driven.
The tool grip should always be kept
free of oil or grease.
5. Basic safety precautions
Operate the tool only in good
condition and only as directed.
Use the spall guard / stabilizer
when required.
If the cartridge fails to ignite or
misfires, please do the following:
Hold the tool pressed against
the working surface for 30
seconds.
If the cartridge still fails to fire,
withdraw the tool from the
working surface making sure it
is not pointed towards
anybody or yourself.
Manually advance by one
cartridge and use the
remaining cartridges on the
strip.
If 2-3 cartridges misfire in
succession (without making any
audible firing noise and if the
fastener is driven with significantly
less force), do the following:
Immediately STOP using the
tool.
Dismantle the tool.
SAFETY PRECAUTION
04

SAFETY PRECAUTION
06
1. Always check the tool first to
ensure that it does not contain a
strip or a fastener.
DAILY FUNCTION TEST
Tool operators and bystanders
must wear ear and eye protection.
Read the manual thoroughly before
operating the tool.
Never keep a hand over fastener
loading end of the tool. A serious
hand injury may occur from
penetration by the piston or a
discharged fastener.
2. Try the tool by depressing the nose
piece, barrel and firing pin spring
completely on a hard surface. You
should hear an audible clicking
sound. Let up on the tool and make
sure the barrel is open to
semi-open position.
SAFE HANDLING OF TOOLS
07
5. Never place your hands or any
other body part on the loading
end of the tool. It can cause serious
injury by the fastener or piston if
the tool is fired accidently.
7. Never point the tool at yourself or
others.
8. Never carry a loaded tool around
or play with the tool.
9. Never allow untrained persons to
operate the tool.
10. Using or cleaning tools, or
handling loads in poorly ventilated
areas may result in exposure to
lead and other substances known
to cause birth defects and physical
changes. Always ensure adequate
ventilation at all times and wash
thoroughly after exposure.
6. Always unload the tool and store
it along with the loads safely
locked in a toolbox.Keep the keys
away from children and
unauthorized persons.
1. Always make sure that the tool is
working properly before use.
Follow the Daily Function Test.
2. Always use certified BLUE POINT
loads from a box indicating the
type of load, power and number.
Never attempt to use unknown
power loads.
3. DO NOT carry loads in pockets
with loose pins or other objects.
Doing so may cause the load to fire.
4. DO NOT load a tool unless you
intend to use it immediately.
Unattended loaded tool in the
workplace may result in its
accidental discharge by others.
BP-27C IS NOT A STAND-ALONE TOOL.
IT MUST ALWAYS BE USED MOUNTED ON A BLUE POINT POLE.
Suitable Base Materials:
Only the following materials are suitable
for Powder-actuated fastening:
Structural Steel
Masonry Joints
Poured Concrete
DO NOT try to fasten into any other
type of materials. It can cause serious
injury or blindness.
Unsuitable Base materials that should
not be fastened to:
Never try to fasten into very hard or
brittle materials such as tile, glass, cast
iron or rocks of any kind. These
materials can break, or shatter causing
splinters to fly and may cause serious
injury to the tool operator and the
bystanders.
PREPARATION
BP-27Cis a semi-automatic feeding low velocity powder-actuated fastening
tool. Continuous feeding of powder loads for a wide range of applications,
make the BP-27C tool a versatile, portable, safe and reliable tool.
INTRODUCTION
Never attach directly to a base
where it can easily penetrate like
wood or gypsum board. These
types of materials may cause the
fasteners to penetrate through to the
other side making it dangerous for
other people in the work area.
Never fasten into a base material
that fails the center punch test.
Failure to check the suitability of the
base material can cause serious
injury to the eyes or other body parts.
Never try to fasten into very hard
or brittle materials.
Never attach directly to a base
where it can easily penetrate like
wood or gypsum board.
08
Center Punch Test
MUST WEAR EYE
PROTECTION WHILE
PERFORMING THIS TEST
1. Always check the hardness of the
base where you want to fasten.
2. Using a fastener as a center punch,
strike the fastener with a hammer
against the work surface and check
the results.
1. Operators and bystanders must
always wear approved ear and eye
protection. Failure to do so can
cause blindness or serious eye
injury from debris, and hearing loss
from exposure to constant or
repeated noise from the fastening
tool.
2. Keep the work area clear of
unnecessary materials and
bystanders that may interfere
with the safe operation of the
tool. Operating tool in a congested
or disorderly area may affect the
ability to operate safely.
Center Punch Test Result
1. The material is too hard for a
powder actuated fastening, if the
fastener point is flattened.
2. The material is too soft, if the
fastener easily penetrates it.
3. The material is too fragile, if the
material cracks or shatters.
4. The material is suitable for powder
actuated fastening, if the fastener
causes a small indentation in the
material.
Selection of Loads and Safety
1. Always make a fastening test after
ensuring that the base material is
suitable to determine the
appropriate power level. If
excessive power is used, the
fastener may pass completely
through the work material, causing
death or severe injury to someone
who may be in the path of the
fastener.
2. All operators must always select
the level of the loads by the power
level number to avoid the use of
incorrect loading.
Safety at Work
3. Never operate the tool when
explosive or inflammable
materials are close by.Powder
loads may create sparks when fired
and could ignite these materials or
vapors.
4. Always provide warnings within
50’of the area where fastening is
taking place: “CAUTION - Powder
Actuated Tool In Use”.Failure to
warn others can result in serious
injury or death to them. Contact
your supervisor for this sign.
Powder actuated
tool in use
09
BP-27C tool can be used for a wide
range of fastening applications on a
variety of substrate materials.
For best results, read and follow these
important instructions for fastening.
These guidelines will help you perform
the fastening operation most effectively
and safely. Powder actuated fastenings
are permanent solutions. Any attempt
to remove them may cause serious
injury.
This application is not recommended,
but if at all used, keep at least 3”edge
distance to avoid cracking the block and
excess penetration of fastener to avoid a
loss in holding value. Fastening is not
recommended for vertical joint.
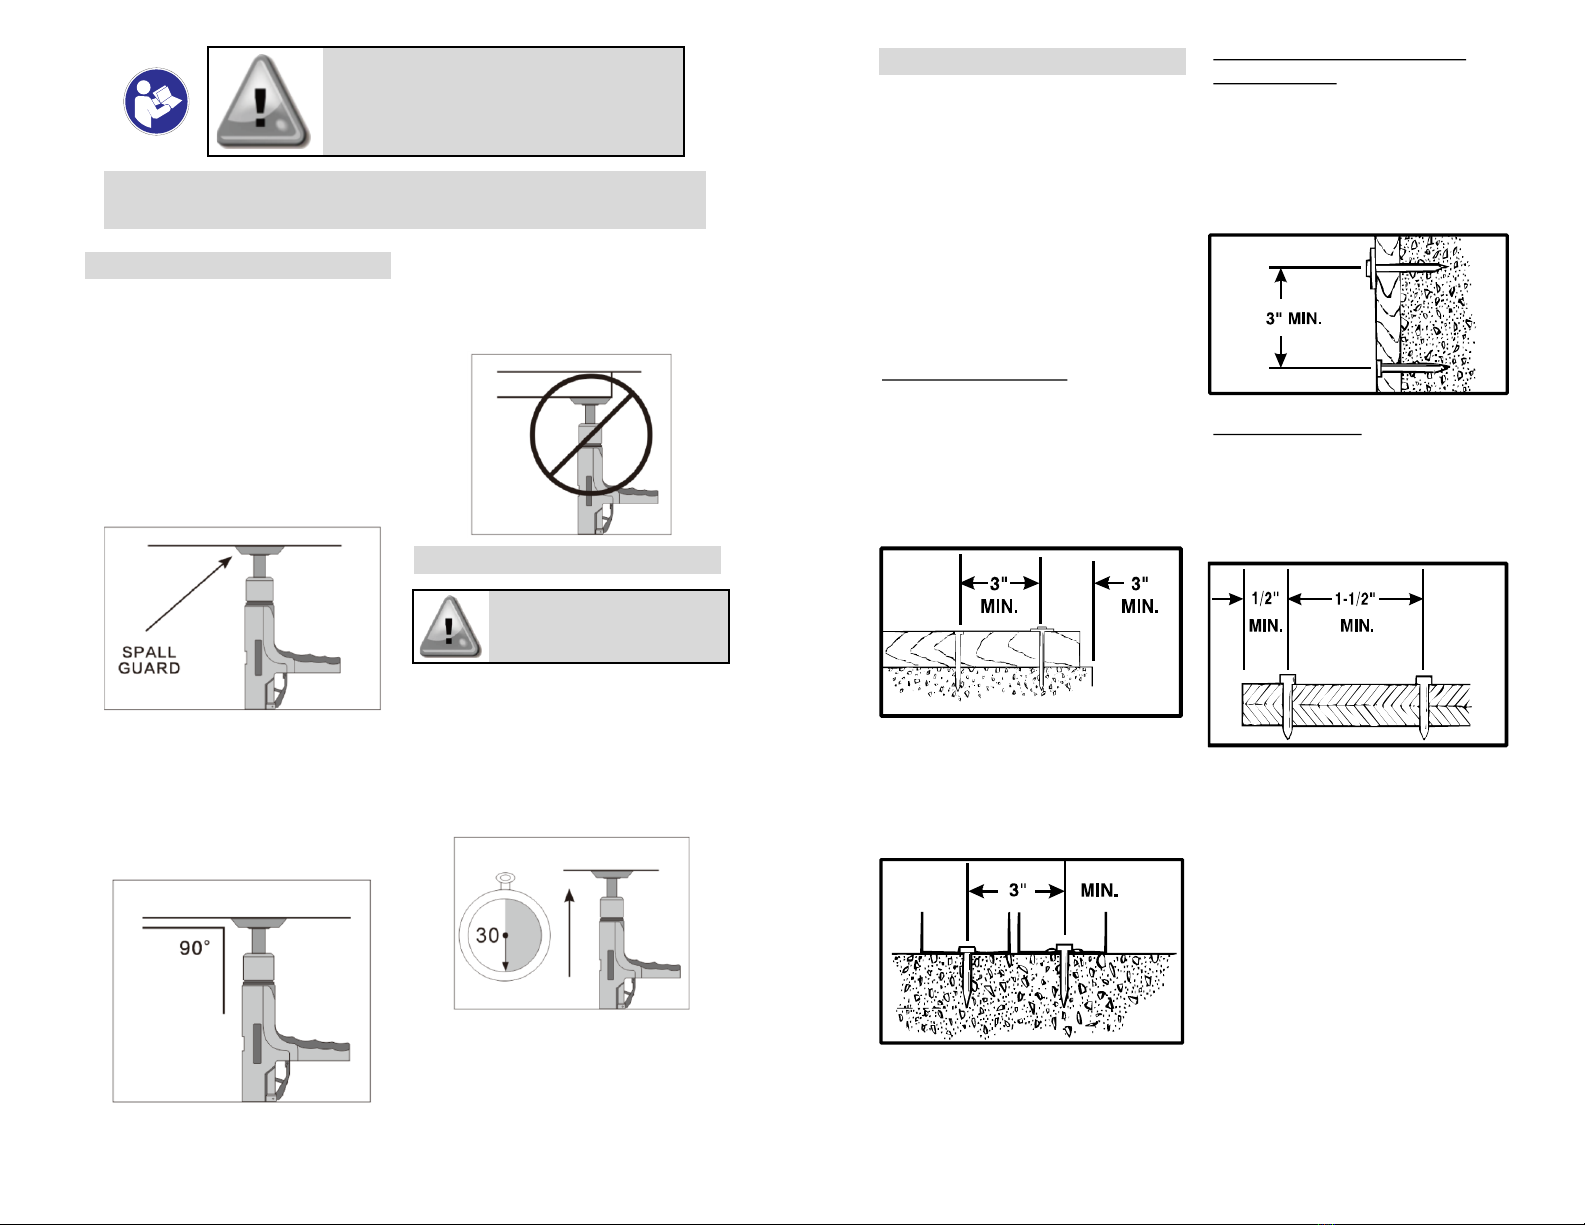
Fastening on Concrete
For fastening in concrete, keep a
minimum distance of 3”between
fastenings and 3”of any free edge.
Concrete thickness should be at least
three times the expected depth of
penetration into concrete. The drive
pin’s ideal penetration is 1”.
Fastening to Concrete Block or
Masonry Walls
Concrete Fasteners driven too close to
an edge or too close together can cause
the concrete edge to fail or transfer to
fly free.
APPLICATIONS OF FASTENERS
Fastening wood to concrete.
Penetration of thin gauge metal.
Fastening to Steel
BP-27Ctool can be used for fastening on
the flat surfaces of structural steel. For
steel fastening, always maintain a
minimum of 1-1/2”between the
fasteners and 1/2”from any edge.
11
FAILURE TO FOLLOW THESE
INSTRUCTIONS CAN RESULT IN INJURY TO
THE TOOL OPERATOR OR BYSTANDERS
10
5. Never drive a fastener close to
the edge of the base material
or close to another fastener.
See installation page.
MISFIRE PROCEDURE
If the tool does not fire, continue to
hold the tool against the work surface
for at least 30 seconds. Then carefully
open the tool, remove the load and put
it in a can of water or other non-
flammable liquid. Never discard the
load into a dumpster.
If the tool becomes stuck or jammed
with a powder charge, point the tool in
a safe direction and label it
immediately with “DANGER – DO NOT
USE – DEFECTIVE”.Lock the tool in a box
and contact your local dealer for
assistance from BLUEPOINT.
ALWAYS FOLLOW THE
MISFIRE PROCEDURE.
FASTENER DRIVING SAFETY
1. Use this tool ONLY to fasten into a
recommended base material.
2. DO NOT fire the tool without a
fastener. If the tool is fired without
a fastener, the piston can hit the
work surface causing serious injury
to you and bystanders.
3. Always use Spall Guard protection
whenever possible to minimize the
flying particles or debris.
4. Always use the tool firmly and
perpendicular to the work
surface and keep your hand
flexed before firing. Otherwise
the fastener may ricochet
causing injury.
BP-27C IS NOT A STAND-ALONE TOOL.
IT MUST ALWAYS BE USED MOUNTED ON A BLUE POINT POLE.
NOTE: Use of partially used
load strips.
If you want to use a partially fired load
strip, the end of the strip containing
the live loads should be placed into
the bottom of the tool handle. Count
the number of unfired loads in the
strip before inserting it and keep a
count as the fastenings are being
made, you can easily determine when
all the loads have been used.
13
6. Check the tool frequently to ensure
that the muzzle bushing and loads
strip track are clear, if you are
working at a site with dirt and
debris.
CHECK THE NOSEPIECE BUSHING
AND LOAD STRIP TRACK FOR
DEBRIS
IF YOU DECIDE NOT TO MAKE A
FASTENING AFTER THE TOOL HAS
BEEN LOADED, ALWAYS REMOVE
THE POWDER LOADS FIRST, THEN
THE FASTENER. THIS WILL PREVENT
ACCIDENTAL DISCHARGING OF THE
FASTENER OR PISTON INTO THE
OPERATION HAND.
Please watch the videos on our website: http://bpfasteners.com/licensing/video
5. After all 10 shots are fired, pull the
load strip from the TOP of the tool.
NEVER PULL IT FROM THE
BOTTOM.
4. After one shot is fired, point it in a
safe direction and insert the next
fastener into the Nosepiece, and
then press the Advance Lever
Assembly of the housing to
advance the next load, and repeat
the firing operation.
BP-27C OPERATING INSTRUCTIONS
12
BP-27C IS NOT A STAND-ALONE TOOL.
IT MUST ALWAYS BE USED MOUNTED ON A BLUE POINT POLE.
DO NOT USE EXCESSIVE
FORCE WHILE INSERTING A
FASTENER
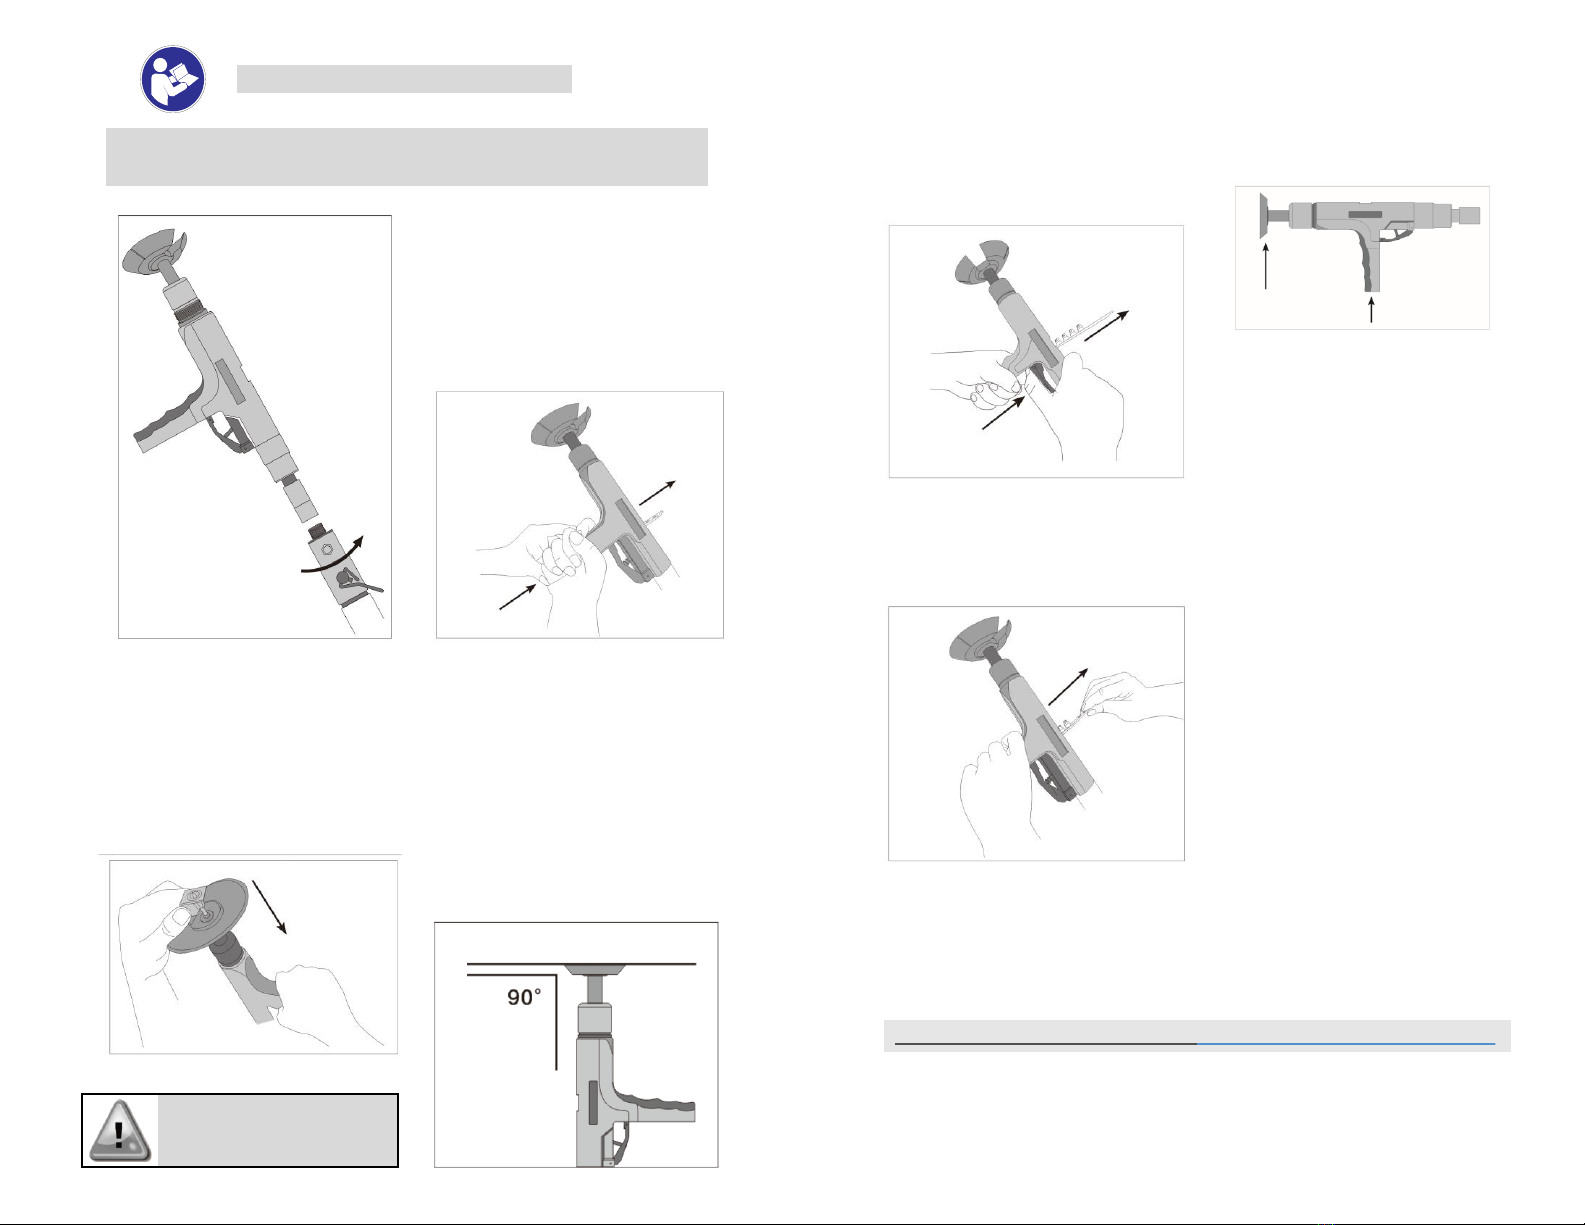
3. Raise the tool upwards carefully
without bumping any other object
and gently place it on the ceiling
where you want to fasten. Hold it
perpendicular to the work surface
and push upwards to compress the
firing pin spring and release the
sear to fire the tool. If the tool
does not fire, hold the tool for 30
seconds and then follow the
misfire procedure described on
page 10.
2. With the tool pointing in a safe
direction and your fingers off the
Advance Lever, insert the strip load
through the bottom of the handle
and push through until your fingers
touch the handle recess. Never try
to insert a load strip into the tool
from the top of the receiver.
1. After checking to make sure that the
tool is not loaded, point it in a safe
direction and insert a fastener into
the Nosepiece of the tool until it is
fully seated. If a clip assembly is
being used, be sure it is positioned in
the cutout section of the Spall Guard.

FASTENERS AND FASTENER ASSEMBLIES
15
.27 Caliber - Powder Load Strip
POWDER LOADS
TECHNICAL SPECIFICATIONS
BP-27C Tool
Tool Length 13-3/4”
Tool Weight 3.00 lbs
Load Caliber .27 caliber strip loads
(Brown, Green, Yellow, Red)
Fastener Capacity 1/2” to 1-1/4”
14
Model No.
Shank
Dia.
Shank
Length Description
PD22F10
.145”
7/8"
Smooth shank with flutePD25F10 1"
PD32F10 1-1/4"
PD157-78F
.157"
7/8"
Smooth shank with flutePD157-100F 1"
PD157-114F 1-1/4"
Model No. Size Description Color Power Power
Level
27ES11L5 6.8 x 11
.27cal long strip enhanced
loads Red strong 5
27LS11L5
6.8 x 11 .27cal long strip loads
Red strong 5
27LS11L4 Yellow medium 4
27LS11L3 Green low 3
27LS11L2 Brown lowest 2
.300” Dia. Head (PD series), .157” & .145” Dia. Shank Drive Pins and Assemblies
Model No.
Shank
Dia.
Shank
Length Description
PDAC90-25F10
.145"
1" With 90° angle clip
PDAC90-32F10 1-1/4"
PDAC120-25F10 1" With 120° angle clip
PDAC120-32F10 1-1/4"
PDACTH90-22F10 7/8" With Top hat and 90° angle clip
PD157-100C90
.157"
1" With 90° angle clip
PD157-114C90 1-1/4"
PD157-100C120 1" With 120° angle clip
PD157-114C120 1-1/4"
PD157-78THC90 7/8" With Top hat and 90° angle clip
PD157-78HNC
.157"
7/8”
With Top hat and Ninja clipPD157-100HNC 1”
PD157-114HNC 1-1/4”
Model No.
Shank
Dia.
Shank
Length Description
CC25-P25
.145"
1" With 1/4” conduit clip
CC38-P25 1" With 3/8” conduit clip
CC50-P25 1" With 1/2” conduit clip
CC50-P32 1-1/4"
CC75-P25 1" With 3/4” conduit clip
CC75-P32 1-1/4"
CC100-P25 1" With 1” conduit clip
CC100-P32 1-1/4"
Model No.
Shank
Dia.
Shank
Length Description
DN22P8
.145"
7/8"
With plastic washerDN27P8 1"
DN32P8 1-1/4"
DNACTH90-27P8 1" With Top hat and 90° angle clip
DNACTH90-32P8 1-1/4"
8mm Head (DN series), .145” Dia. Shank Drive Pins and Assemblies
BLUE POINT POLES FOR CEILING APPLICATIONS
BP-27C IS NOT A STAND-ALONE TOOL.
IT MUST ALWAYS BE USED MOUNTED ON A BLUE POINT POLE.
ALWAYS USE BLUE POINT POWDER LOADS AND FASTENERS
WITH BP-27C TOOL.

16
MAINTENANCE AND CLEANING TOOL
WARNING!
Remove the
cartridge strip from
the tool first.
1. All parts should be cleaned with oil
detergent and wire brushes
supplied with the tool kit.
2. Remove heavy dirt build-up with
the brush.
3. After cleaning with detergent oil,
all parts should be wiped
thoroughly dry.
4. Excess oil will tend to accumulate
dirt and dust. Use eye protection
when cleaning the tool. Excess dirt
or dust on the piston and cylinder
assembly of the receiver must be
cleaned daily.
Please review the condition of the
piston to check for damage or
deformation. For the tool to perform in
good operating condition and work well,
it is necessary to disassemble and clean
the tool when the dirt collects on the
side chamber or the tools seems to be
losing power. If the tool seems to be
losing power check for collected dirt in
the chamber, this may cause loss of
power. All parts must be cleaned as
above with oil and brushes. Be sure to
dry all parts when assembling your tool.
Depending on tool use, general
maintenance has to be done every six
months.
Use Eye Protection
TOOL DISASSEMBLY
WARNING!
Remove the
cartridge strip from
the tool first.
Use Eye Protection
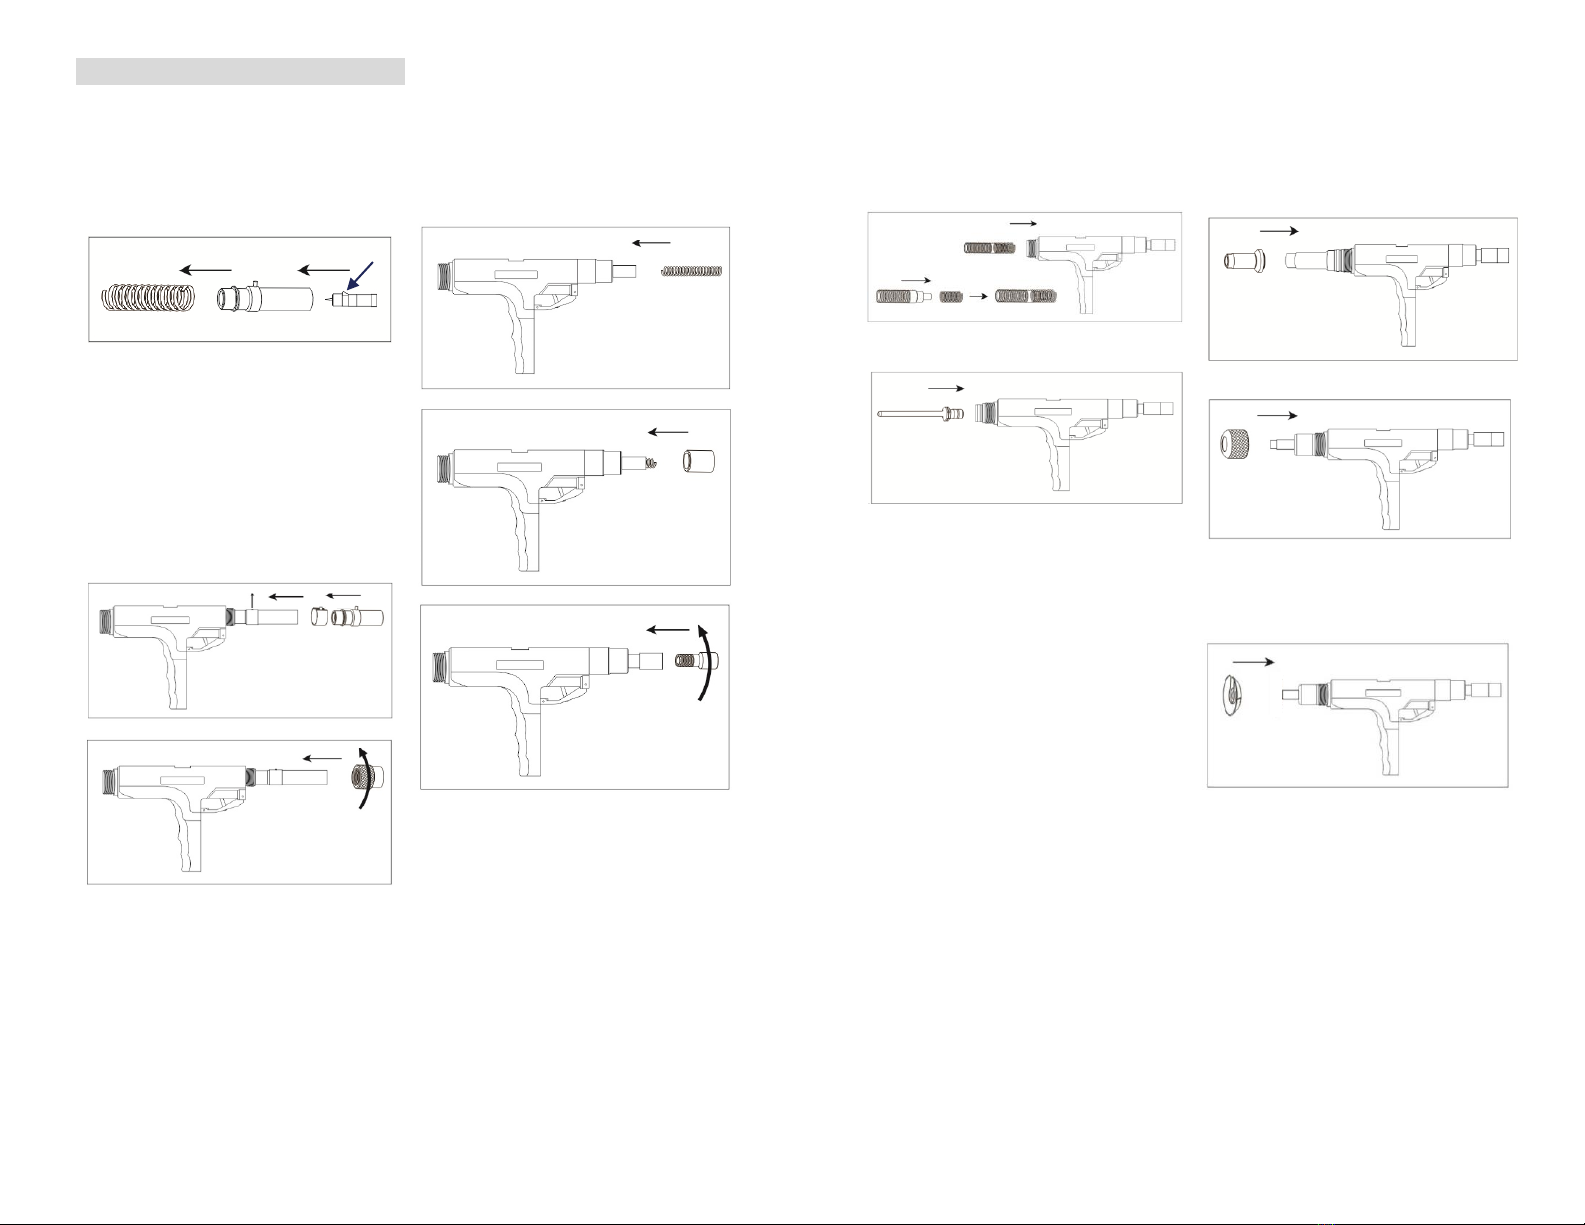
1. Remove the Spall Guard by gently
pulling it.
2. Unscrew the Guide Nut from the
Housing Assembly and pull the
Nosepiece.
Please watch the videos on our website: http://bpfasteners.com/licensing/video
BLUEPOINT BP-27C - Disassembly: https://youtu.be/c8t1VPttPXQ
BLUEPOINT BP-27C - Assembly: https://youtu.be/fBlAdIQSSYQ
17
NOTE: THE TOOL SHOULD BE CLEANED ONCE A WEEK
4. From the other end, unscrew the
Pole Connector from Firing Pin
Housing, remove Connecting Tube
and Firing Pin Spring.
3. Remove the Piston, Barrel and
Barrel Spring.
5. Press the Braking Pin and push in
the Firing Pin Assembly inside the
Firing Pin Housing. Remove it from
the other end. (You may use the
Piston to push it). Remove Firing Pin
Assembly Spring,
Press Breaking Pin
19
4. Change the direction of the Housing
Assembly, insert the Barrel Spring, the
Barrel and the Piston from the front end.
6. Assemble the Spall Guard onto the
Nosepiece.
5. Insert the Nosepiece into the Guide
Nut, then screw the Combination of
Nose Piece and Guide Nut onto the
Housing Assembly
18
HOW TO ASSEMBLE THE TOOL
3. Insert Firing Pin Spring and
Connecting Tube, press the Pole
Connector on the Firing Pin Spring and
screw it onto the Firing Pin Housing.
2. Insert the Firing Pin Assembly Spring
into rear of the Housing. Next insert the
combination of Firing Pin Housing and
Firing Pin Assembly into the Housing
Assembly. Ensure that the Braking Pin of
the Firing Pin Assembly is aligned into the
slot of the Housing Assembly and screw
the Locking Sleeve on the Housing
Assembly.
1. Press Braking Pin on Firing Pin
Assembly and push it into the Firing Pin
Housing. Piston may be used to push it
in further so that it projects out from the
other end.
Press Breaking Pin
21
TROUBLESHOOTING
PROBLEM POSSIBLE CAUSE POSSIBLE REMEDIES
Tool does not
fire Failure to depress
completely
Excessive dirt
buildup on breech
face not allowing
proper penetration
of firing pin
Firing pin and/or
firing pin assembly
damaged
WARNING
Never attempt to pry a
cartridge from the tool
See “Tool does not
completely depress”
After following misfire
procedure, check firing
pin indentation on load.
Clean breech face.
Replace damaged parts
If the problem continues:
Contact Bluepoint
distributor
Overdriving of
fasteners Excessive power
Soft base material
Use lower power level
load color and number
Check the base material
If the problem continues:
Contact Bluepoint
distributor
Tool does not
completely
depress
Incorrectly
assembled or
damaged parts
Check all parts for
damage and assemble
correctly
If the problem continues:
Contact Bluepoint
distributor
Reduction or
loss of power Piston is not
returning to the full
rear position
Worn or damaged
piston
Disassemble and clean
Barrel, Piston, Fastener
Guide and re-assemble
Replace damaged piston
If the tool cannot be
disassembled :
Contact Bluepoint
distributor
Strip does not
advance Strip not inserted in
tool correctly or is
damaged
Damaged indexing
mechanism
WARNING
Never attempt to pry a
cartridge from the
magazine strip or tool
Check load strip. Properly
dispose of damaged strip
Contact Bluepoint
distributor
Tool fails the
Daily Function
Test
Contact Bluepoint
distributor
20
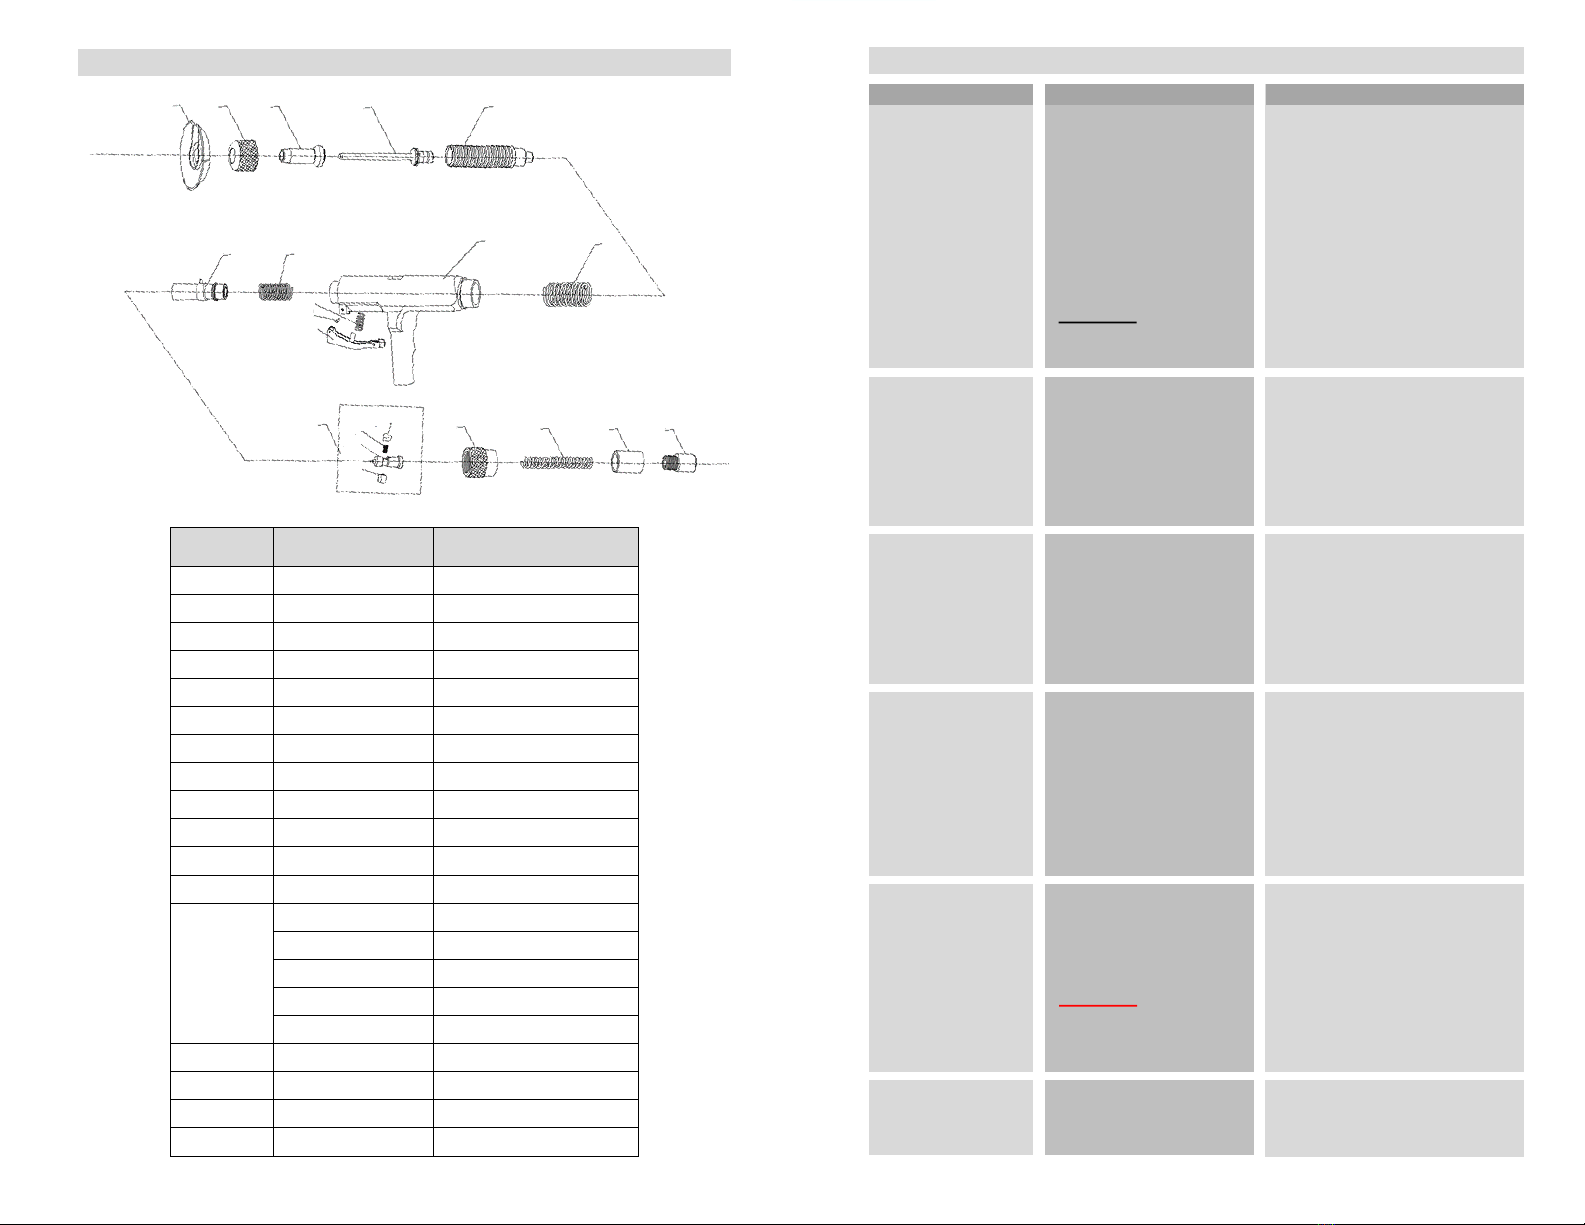
12345
6
7
8
9
10
11
12
13 14 15 16 17
13-1
13-2
13-3 13-4
BP-27C TOOL SCHEMATIC
S/N Item No. Part Name
1 BP27C-01 Spall guard
2 BP27C-02 Guide Nut
3 BP27C-03 Nosepiece
4 BP27C-04 Piston
5 BP27C-05 Barrel
6 BP27C-06 Barrel Spring
7 BP27C-07 Housing Assembly
8 BP27C-08 Advance Lever Spring
9 BP27C-09 Advance Lever Pin
10 BP27C-10 Advance Lever
11 BP27C-11 Firing Pin Assembly Spring
12 BP27C-12 Firing Pin Housing
13
BP27C-13 Firing Pin Assembly
BP27C-13-1 Braking Pin
BP27C-13-2 Firing Pin
BP27C-13-3 Braking Pin Spring
BP27C-13-4 Jacket
14 BP27C-14 Locking Sleeve
15 BP27C-15 Firing Pin Spring
16 BP27C-16 Connecting Tube
17 BP27C-17 Pole Connector

23
NOTES
22
NOTES

24
WARNING
14728 Yorba Court,
Chino, CA 91710 USA
Tel: 1-877-779-2583
www.bpfasteners.com
1. BP-27Cis not a stand-alone tool.
It must always be used mounted on a
Blue Point pole.
2. Read the manual before using the tool.
3. Never put your hand over the nose
piece or compress with your hand.
4. Never point the tool at yourself or
bystanders.
5. Only adults that are certified and
qualified, may operate the BP-27C tool.
6. Always unload the tool prior to
cleaning or maintenance.
7. Do not operate the tool in an explosive
or flammable atmosphere.
8. When fastening, if the cartridge does
not fire, hold the tool in place for at
least 30 seconds.
9. When advancing an unfired cartridge,
always keep the tool aimed away from
yourself and others.
SAFETY PRECAUTION
Table of contents
Other BluePoint Fasteners Tools manuals


 manual")


