Bluetens BLT15 User manual

User Manual
Ohjekirja - brugermanual - brukermanual

English
Suomalainen
Dansk
Norsk
TENS instructions
3
17
31
45
59
Mandataire CE
Representative for
european union
Bluetens France SAS
5 Passage St Bernard
75011 Paris - France
Importateur UE
EU importer
Bluetens limited
Unit 905, 9/F, Kowloon center
33 Ashley road, Tsimshatsui
Kowloon
Hong Kong
Fabricant
Manufacturer
Bluetens limited
Unit 905, 9/F, Kowloon center
33 Ashley road, Tsimshatsui
Kowloon
Hong Kong
2

Pre-requisites
Box content
The Bluetens
The Application
First use
Safety instructions
Technical characteristics
Customer Service
Guarantee
1
3
5
7
2
4
6
8
9
We thank you for purchasing a Bluetens device.
Bluetens is a medical device. To make best use of
it, you will find all relevant informations included
in this user manual.
For any additional information or to simply
give us your feedback, you can contact us at
Thank you !
3

Getting started with Bluetens is easy, here is some advice to let you benefit from it as
quickly as possible and safely.
1. Please read the safety instructions as well as the contraindications at page 28.
2. Your Smartphone should support the minimum system requirements :
3. You will need to install the Bluetens App on your Smartphone.
Download and install the Bluetens App. Make sure that your Smartphone’s battery is
suciently charged to download the Application. Proceed to download based on your
Smartphone.
4. Your Bluetooth must be ON.
It is not necessary to pair your Bluetens, your Smartphone will connect automatically as you
will launch the program. This means that you will not need to fill in a PIN code or change
your Bluetooth settings, Bluetens is small, strong and clever too!
Are all steps validated? So now we are ready to go through more serious things ;)
iOS : iPhone 4s or above, iOS 7 or above
Android : Bluetooth 4.0 compatible and Android 4.3 or above
iOS
This Application is available
on the Appstore under
«Bluetens Get Better». You
can also scan the QR code
below with your Smartphone.
Android
This Application is available
on the Play Store under
«Bluetens Get Better» . You
can also scan the QR code
below with your Smartphone.
1. Pre-requisites
4

Bluetens is the main unit of your well-being, it is the generator.
The Snap cable plugs into Bluetens on one side and the electrodes on the other side
with a «snap» (push button) system. Connectors are clipped to the electrodes.
Bluetens must be recharged via USB cable. While charging, the cable must be plugged,
on one side, into the USB charger or computer, and on the other side into Bluetens’
micro USB port.
This user manual will come with Bluetens and will allow you to get familiar with your
Bluetens in no time.
Bluetens is delivered with a protective case, allowing you to carry it safely, together
with its cables and electrodes, away from any liquid.
Electrodes are included into the box
Tip: for more details on your electrodes, read the instructions located in the plastic bag.
1
3
5
2
4
6
2. Box content
1
2
3
4
5
6
5

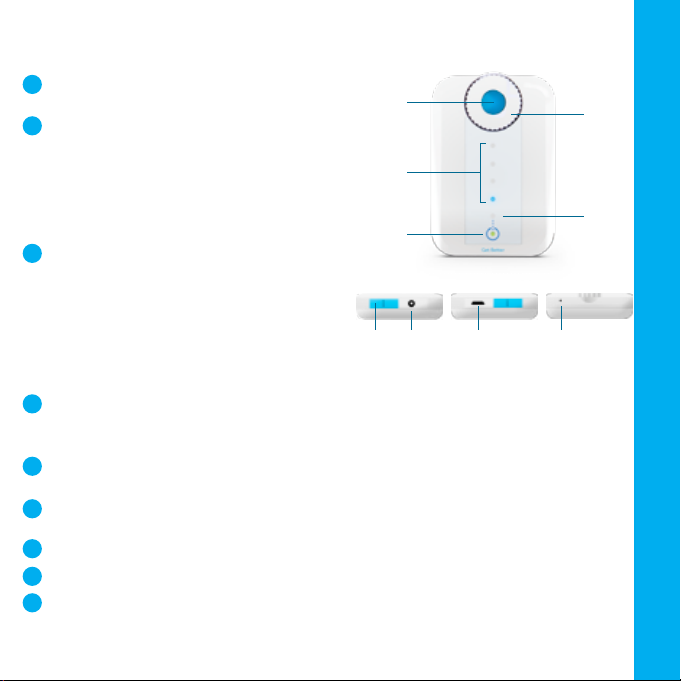
3. The Bluetens
ON/OFF Button: this button allows you to turn
Bluetens on and o.
Intensity adjustment knob : allows you to increase
or reduce the program’s intensity. To increase the
intensity, turn the knob to the right, and to reduce
it turn the knob to the left. Intensity increases in
increments of 1 up to the level of 60. Turning the
knob to the left you will reduce the intensity from 1
to the minimum level of 0.
Program intensityindicators : the firstindicator lights
up when a program is launched from the application.
When Bluetens is used in standalone mode (without
smartphone) the first indicator lights up when the
default program begins. For all 15 intensity levels a
blue indicator will light up, so you will see:
Charge indicator : when your Bluetens has less than 20% of battery remaining, charging light will blink.
When you charge Bluetens, the charge indicator will stop flashing and remain fixed until the battery is
fully recharged then turns o.
Voltage indicator : with a simple touch of the ON/OFF button the light will turn green. A second press
and the light will turn o.
Slider : for safetyreasons, you cannot recharge and use Bluetens at the same time, dragthe slider either
to charge mode or usage mode.
Electrode cable plug : electrode cable entry.
Micro USB plug : USB cable entry.
Reset button : this button will restore Bluetens to factory settings.
• 1 light from level 0 to 15
• 2 lights from level 16 to 30 • 3 lights from level 31 to 45
• 4 lights from level 46 to 60
6 7 8 9
1
3
5
2
4
1
2
3
4
5
6
7
8
9
6

RENAME
OPTION
If you want to rename your Bluetens,
click on «Rename», under «My Bluetens»
settings. Follow the guide and give your
Bluetens a unique name. It will help
you detect your Bluetens more easily if
several devices are switched on at the
same time.
SHORTCUT
If you want to browse through the App
when a program is in progress, the
shortcut button allows you to return to
the program page.
FAQ
Find all the answers to your questions
under «Settings», «Discovery», «FAQ».
PRO MODE
If you are a health professional, you can
activate the «Pro mode» and access each
program’s technical specifications. Go
to «Settings», «Pro mode», and then click
GO. After a quick evaluation of your
application, we will activate the «Pro
mode» on your App.
AUTOMATIC
PAIRING
Bluetens will pair with your Smartphone
automatically when you launch the program.
It’s ‘Plug and Play’ , no manual intervention is
necessary.
CALENDAR
Plan your session with «calendar», choose
the program, the number of sessions and the
number of days, then finish the full course of
your treatment.
FAVOURITES
Get quick access to your favourites
programs with «Favourites». On the program
description page, click the star to create a
shortcut under the «Favourites» menu.
DOWNLOAD
You can transfer the program of your choice
to Bluetens’ memory and enjoy it without
using your Smartphone! Once you have
downloaded the program, turn on your
Bluetens, wait for 10 seconds (or slide the
intensity wheel) and the program will begin.
4. The application
7
5. First use
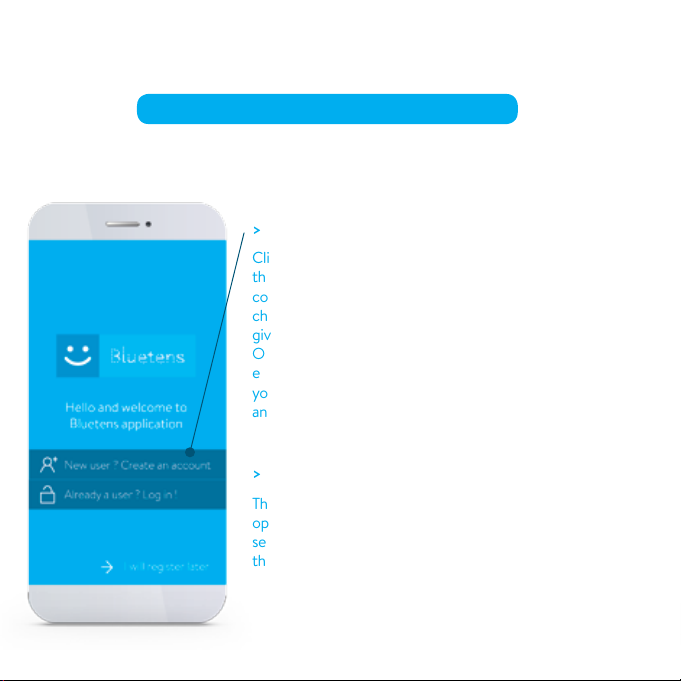
> Creation of a Bluetens account.
Click on «New user?» and create your account. Fill in
the mandatory fields, read and accept the terms &
conditions. If you are a health professional, select the
checkbox to enable the «Pro mode» application. This will
give you access to all programs’ technical information.
Once you have created your account, you will receive an
email with an activation link. Click on this link to validate
your account. You can also use Bluetens without creating
an account by clicking on «register later».
> A tutorial will be available during your first use.
The tutorial picks up the various stages of Bluetens
operation to ensure a safe use. During the following
sessions, you will bypass the tutorial and go directly to
the main menu.
LAUNCH THE BLUETENS APPLICATION
8

> The first step consists in defining the area and
action you are looking for.
Available body parts are :
Upper back • Back • Lower back • Abdomen •
Buttocks • Thigh • knee • Calf • Ankle • Foot •
Shoulder • Upper arm • Elbow • Forearm • Wrist.
>Rotate the wheel to select the desired body part,
then do the same for the desired action.
Cure
For physiotherapy care aiming to amplify
rehabilitation or allow a rapid pain relief eect.
Relax
For a relaxing massage or to ease muscle tension.
It is also very eective to improve the quality and
speed of recovery.
Tone
For a muscular work-out session.
>Then press «GO».
PROGRAM SELECTION
9

> Click on the program and access its
description :
• Description
• Intensity advices
• Use advices
All programs were created by our medical
team composed by French masseur-
physiotherapists, all State-certified,
practicing in clinics and private practices.
> Press «GO» and access to electrode
placement’s advices.
ACCESS THE LIST OF PROGRAMS
10

> Place the electrodes as shown in the
diagram.
Make sure you have placed the 4 electrodes
on your skin, Bluetens will not work unless
the 4 electrodes are connected.
Caution: Make sure that Bluetens is turned
o during the electrode placement. Turn it on
when requested.
Tip: You can find all our tips inside the
electrode bag.
> Then press «GO».
ELECTRODE PLACEMENT
11

> Turn Bluetens on by pressing «ON» when
requested.
Bluetens will automatically connect to your
smartphone and the program will start after a
few seconds.
> Adjust the program’s intensity turning
Bluetens wheel.
Access the program’s
description by pressing the
«Information» button.
To achieve greater eectiveness,
follow our intensity advices.
TURN YOUR BLUETENS ON
DURING THE PROGRAM
+
-
12

> If you want to stop the program, press the
«Stop» button. You will be redirected to the
main menu.
> A message will indicate the end of the
program.
Turn Bluetens o before removing the
electrodes.
Reposition the electrodes on the good side
of the plastic film and store them inside the
sealed bag.
PROGRAM TERMINATION
END OF THE PROGRAM
13

6. Safety instructions
CONTRAINDICATIONS
The use of Bluetens is forbidden for people
fitted with a pacemaker or epilepsy-prone.
Bluetens use is also not recommended for
pregnant women , and people with a hernia
or an incisional hernia. People suering from
heart weakness must avoid areas around the
heart. Don’t use Bluetens if you have heart
irregularities or heart diseases.
IMPORTANT !
Do not use Bluetens in water or in humid
environements (sauna, balneotherapy and
hammam, etc.). It is forbidden to place the
electrodes on the sinocarotid region (in
the front of the neck), on the transcranial
region (through the head) or transthoraxale
region (through the ribcage). To get it right,
please follow the electrode placement’s
advices, they have been prepared by health
professionals and correspond to areas of the
body where Bluetens will be more eective.
SAFETY PRECAUTIONS
Do not use Bluetens within a meter from
shortwave medical devices or microwave
equipment, which could modify the current
generated by the device. Use only the cable
provided by Bluetens. During sessions do
not disconnect the electrode cable because
power is on. The device must be turned o
first. Never take o the electrodes when
Bluetens is powered on. Never connect the
electrode cable to an external power source.
That could cause electric shock.
Do not use any damaged or defective
electrode cable. Always use the USB cable
provided by Bluetens to charge the device.
Never use Bluetens or the USB cable if
damaged. Keep Bluetens and its accessories
out of reach of children. Prevent any foreign
matter (soil, water, metal, etc.) from entering
the device. Do not use Bluetens while driving.
Never recharge Bluetens during its use;
a sliding part (the slider) prevents the
simultaneity of recharge and use as an extra
protection. In case of doubt, do not hesitate
to consult a doctor.
14

• Compact design
• Dual function mode (Bluetens/standalone)
• Program control byBluetooth 4.0 (BLE)
compatible smartphone
• Compatible with Android 4.3 and above, iPhone
4s, iOS7 and above
• Powered bya rechargeable built-in lithium-ion
battery
• Intensityadjustment on the device
• Medical certified device
• Electrode cables and USB included
• Reusable electrodes included
• Weight: 25 grams
• Battery : 3.7V 400mAH
• Voltage : 0-70V (charge a 500 )
• Frequency : 1Hz-1200Hz
• Output Current : Maximum 300mA (pic),
average of 20 mA
• Output voltage : Maximum 100 V (without load),
65V with load
• Power supply : USB
• USB (on charge) : 5V 1000mA, 5.0W
• Impulse form : symmetrical biphasic square pulse
• Maximum resistance : 1500 Ohm
• Automatic shut-o aftereach program : yes
• Ignition safety: 100%
• Classified as type BF
• CE regulations concerning Medical Devices
(Directive 93/42/EEC)
• ROHS : devices built without materials that can
have a harmful impact onthe environment
• Protection against electric shock class 2
• Device in contact withthe patient out heart area
• Read the label
RECOMMENDATIONS (storage and transport)
Temperature : 10°C / 45°C - Humidity level : 25% / 80%
Information on waste management
At the end of the product life, make sure to discard it properly, following the relevant national rules. We thank
you, in advance, for dropping the product in a place provided for this purpose in order to ensure a safe disposal
in the respect of the environment.
Bluetens must be used only in accordance with the proposed programs. Bluetens Limited cannot be held
responsible for any misuse or manipulation of Bluetens. Handle electrodes only when Bluetens is turned o.
Bluetens is a medical device, do not leave it near children. Your Bluetens is a class 2A medical device certified by
TÜV. It comes with a 2 year warranty. Hereby, Bluetens limited, declares that Bluetens is in compliance with the
essential requirements and other relevant provisions of 1999/5/EC directive and 3/42/EEC directive 9. A copy of
the Declaration of conformity is available on request to Bluetens Ltd, unit 905, 9/F, Kowloon center, 33 Ashley
Road,Tsimshatsui, Kowloon, Hong Kong or Bluetens France, 5 passage Saint Bernard, 75011 Paris, France and on
www.bluetens.com/doc
0123
7. Technical characteristics
15

We manage all after-sale questions live.
If you need assistance after the purchase of your Bluetens from one of our distributors, do not
Our agents will get back to you within 24 hours with a quick solution.
Bluetens is guaranteed for two years, this warranty does not cover damages caused by improper
maintenance or usage not compliant with the related documentation, accidents (shock, fire,
liquid), modifications, repairs, misuse or normal wear and tear. This guarantee covers material or
manufacturing defects. This guarantee covers products purchased directly from Bluetens or from a
Bluetens authorized dealer only.
GUARANTEE PERIOD
Your product is guaranteed two years from the date of purchase, the battery has a six month
guarantee.
NOT COVERED BYTHE GUARANTEE
Electrodes, clip, satchel, as well as cables and accessories included in the box do not benefit from
this guarantee.
BLUETENS AT YOUR SERVICE
In the event of a defect covered by the guarantee, Bluetens will send you a return slip and will be
responsible for the repairs or exchange of your device as well as of its return to you.
HOW TO GET CUSTOMER SUPPORT?
You can reach our Customer Service at any time at the following address:
8. Customer Service
9. Guarantee
16

Teknise vaatimukset
Pakkauksen sisältö
Bluetens
Sovellus
Ensimmäinen käyttökerta
Turvallisuusohjeet
Teknise ominaisuudet
Asiakaspalvelu
Takuu
1
3
5
7
2
4
6
8
9
Kiitämme sinua kun olet hankkinut Bluetens -
laitteen.
Bluetens on laite lääketieteelliseen käyttöön.
Laitteen parhaaseen käyttökokemukseen löydät
olennaisen tiedon tästä ohjekirjasta.
Voit ottaa meihin yhteyttä söhköpostitse
jos haluat antaa palautetta.
Kiitos!
17

Bluetensin käyttöönotto on helppoa.
Ohessa ohjeita mahdollisimman nopeaan ja turvalliseen käyttöönottoon.
1. Ole hyvä ja lue turvallisuusohjeet samoin kuin haittavaikutukset sivulla 28.
2. Älypuhelimesi tulee tukea minimissään seuraavia vaatimuksia:
3. Sinun pitää asentaa Bluetens- sovellus älypuhelimeesi.
Lataa ja asenna Bluetens- sovellus. Ennen tätä varmista, että älypuhelimesi akku on
riittävän hyvin ladattu. Seuraavassa näet, miten menetellä eri älypuhelimilla.
4. Bluetoothin täytyy olla PÄÄLLÄ.
Ei ole välttämätöntä pariuttaa Bluetensiä, älypuhelimesi yhdistää sen automaattisesti, kun
käynnistät ohjelman. Tämä tarkoittaa että sinun ei tarvitse täyttää PIN koodia tai vaihtaa
Bluetooth-asetuksiasi. Bluetens on pieni, voimakas ja myös älykäs!
Onko kaikki tehtytähän asti? Nyt olemme valmiita jatkamaan vakavampaan
käyttöön ;)
iOS : 4s tai uudempi, iOS 7 tai uudempi
Android : Bluetooth 4.0 yhteensopiva ja Android 4.3 tai uudempi
iOS
Ohjelmisto on saatavilla
Appstoressa «Bluetens Get
Better». Voit myös skannata
QR koodin älypuhelimellasi
Android
Ohjelmisto on saatavilla
Play Storessa «Bluetens
Get Better». Voit myös
skannata QR koodin
älypuhelimellasi
1. Tekniset vaatimukset
18

Bluetens on tärkein osa hyvinvointiasi, se on virtalähde.
Snap-kaapeli kiinnittyy Bluetensiisi toisella puolella ja elektroidit toisella puolella «snap»
(paina nappia) toiminnolla. Liittimet ovat typistetty elekroideihin.
Bluetens täytyy ladata USB-kaapelilla. Latausta varten kaapelin toinen puoli kytketään
USB-laturiin tai tietokoneeseen, ja toinen puoli kytketään Bluetensin mikro-USB-
porttiin.
Tämä ohjekirja tulee Bluetensin mukana ja mahdollistaa Bluetensin nopean
käyttöönoton.
Bluetens toimitetaan suojakotelossa. Tämä suojakotelo mahdollistaa turvallisen laitteen
mukanakuljetuksen, niin etteivät laitteen kaapelit ja elektrodit kastu.
Elektrodit sisältyvät pakkaukseen..
Vinkki: enemmän yksityiskohtaista tietoa elektrodeista saat tutustumalla muovisen pussin
mukana tulevaan erilliseen ohjeeseen.
1
3
2
4
5
6
1
2
3
4
5
6
2. Pakkauksen sisältö
19
3. Bluetens
ON/OFF (päällä/pois päältä) painike : Tämä painike
kytkee Bluetensin päälle ja pois päältä.
Voimakkuuden säätöpyörä : voit lisätä tai
vähentää ohjelman intensiteettiä eli voimakkuutta.
Lisätäksesi voimakkuutta, pyöritä pyörää oikealle,
ja vähentääksesi voimakkuutta pyöritä pyörää
vasemmalle. Voimakkuus lisääntyy yhden pykälissä
asteikolla 1-60. Vasemmalle voit vähentää
voimakkuutta aina yhteen tai nollaan asti.
Ohjelman voimakkuuden osoittimet :
ensimmäinen
osoitin valaistuu kun ohjelma käynnistetään
sovelluksesta.
Kun Bluetens on itsenäisessä tilassa
(ilman älypuhelinta) ensimmäinen osoitin valaistuu
oletusohjelman käynnistyessä. 15 voimakkuuden
välein sininen valo syttyy palamaan joten näet :
Latausilmaisin :
Kun Bluetensissä on alle 20% latausta jäljellä, latausvalo alkaa vilkkua. Kun lataat Bluetensiä,
latausvalo lopettaa vilkkumisen ja pysyy päällä kunnes akku on täysin ladattu. Täysin latautuneena latausvalo
sammuu.
Päälläolon osoitin : Kun painat ON/OFF (päällä/pois päältä) painiketta valo palaa vihreänä. Painaessasi
nappia taas valo sammuu.
Liukusäädin : Turvallisuussyistä et voi sekä ladata että käyttää Bluetensiä samaan aikaan. Raahaa
säädintä joko lataus- tai käyttötilaan.
Elekroidiportti : portti elektroidikaapelille.
Mikro-USB-portti : USB latausportti.
Nollauspainike : tämä painike nollaa (resetoi) Bluetensin tehdasasetuksiin.
• 1 valo välillä 0 - 15
• 2 valoa välillä 16 - 30 • 3 valoa välillä 31 - 45
• 4 valoa välillä 46 - 60
6 7 8 9
1
3
5
2
4
1
2
3
4
5
6
7
8
9
20
Other manuals for BLT15
1
Table of contents
Languages:


