Blunik Trip II PLUS User manual

BLUNIK TRIP — MANUAL
www.blunik.com
ENG

| v.01 |
BLUNIK TRIP = BLUNIK II PLUS — SPEED TABLE


BLUNIK II PLUS INSTRUCTIONS
· 3 ·
OPERATING MANUAL
CONTENTS
1. INTRODUCTION…………………………………………………………………….…………07
1.1 What is a regularity rally?…………………………….......…………………..............…..07
1.2 How to participate in a regularity rally…………………………….......................09
2. WHAT DOES THE BLUNIK II PLUS CONTRIBUTE TO REGULARITY?.…..…10
3. OPERATION OF THE BLUNIK II PLUS…………………………………….........……12
3.1 Key functions……………………………………………………………..........................…..13
3.2 BLUNIK II PLUS parameters…………………………………………........….......….….15
3.3 Stage programming……………………………………........…..…..............................19
4. INSTALLATION AND CONNECTION………………………………….………....……20
4.1 Connection……………………………………………………………………….................……20
4.2 The wheel sensors……………………………………………………………...........….....…20
5. HOW TO USE BLUNIK II PLUS…………………………………………….…..…......…21
5.1 Summary of the key functions with BLUNIK Inactive…....…....................21
5.2 Calibration……………………………………………………………………………............…..22
5.3 Start protocol – activate a stage………………………………….....................……22
5.4 Screens with BLUNIK Active……………………………………………………..............24
5.5 Actions with BLUNIK Active – against the clock section………………...….25
5.5.1 Distance corrections…………………………………………………………...….25
5.5.2 Our route mistakes……………………………………......…....…………...…..25
5.5.3 Verications………………………………………………………………........…...…26
5.5.4 Compensations………………………………………………………….......…...…26

· 4·
5.5.5 Light brightness…………………………………………………........…….....……27
5.5.6 How to nish a stage – deactivate a stage…………...….….............27
5.6 Summary of key actions with BLUNIK Active…………………….….……...…....28
6. MORE INFORMATION………………………………………………………….........……29
6.1 Rally language…………………………………………………….....…................................29
6.2 Importance of distance measurements………………………………...........…...29
6.3 How to synchronise the clock……………………………………………....…..........…31
6.4 Memories……………………………………………………....……….....……………........……31
6.5 Data validation……………………………………....……….....……………........….........…32
6.6 Change the brightness of the night light……………....……………..........…..…32
6.7 Stage related concepts…..……………………………..........................................…33
6.8 Stage operation modes……………………………..........................................…….33
6.9 Programming a dierent stage……………………………………....…….....…......…34
6.10 Sensor selection……………………………………....………..............…..................…34
6.11 Sensor verication……………………………………....……….................…...........…37
6.12 Sensor information……………………………………....………................…...........…37
6.13 Manual calibration........................……………………………………....………..........37
6.14 Automatic calibration……………………………………....………..........................…38
6.15 START modes……………………………………....………...........................................39
6.16 START button actions……………………………………....………..........................…40
6.17 Accuracy adjustments……………………………………....………........…..............…41
6.18 Changing the average on an external reference……………………….....…42
6.19 Changing the average -unknown……………………………………....……….....…42
6.20 Distance corrections……………………………………....………...........................…43
BLUNIK II PLUS INSTRUCTIONS
· 5 ·
6.21 FINISH button actions……………………………………………….........…......……....43
6.22 Usage of Oset………………………………………………………………................……43
6.23 Calculations made by the ZERO/Calculate button………………........……44
6.24 “Imposed average” mode............................…………………………....……........46
6.25 “Road book” mode………………………………………………………………....…......…47
6.26 “Long sections” mode……………………………………………………………….....……48
6.27 “Imposed tables” (JP) mode………………..………………………………......…....….49
6.28 “Learn / copy” mode…………………………………………………….....…...............…49
6.29 “Partial copy” mode………………………………………………………………........….…50
6.30 SCREEN II Driver’s screen…………………………………………………...….........…..51
6.31 B-Sport Drive………………………………………………………….....…………….....…….52
6.32 B-Sport Calculator………………………………………………….....……………......……53
6.33 B-Acustic Drive………………………………………………………….....……………...……54
6.34 B-Super-Acustic Drive…………………………………………………….....…………...…55
6.35 B-Pad……………………………………………………………………………….............…...…56
6.36 B-Data-Fast…………………………………………………………………..........…....…...…56
6.37 B-Remote…………………………………………………………………….....……...……...…57
6.38 B-Pedal…………………………………………………………………….........….......……...…58

· 6·

BLUNIK II PLUS INSTRUCTIONS
· 7 ·
1. INTRODUCTION
This manual aims to explain a little about the world of tests done in classic
cars.
There are dierent organised activities that can be done in a vehicle (car or
motorbike):
Concentrations.
Navigation rallies. Tests that rely on skill following a route using
maps, road books, etc.
Regularity rallies. Tests in which, apart from following a set route,
we have to comply with certain times and speeds. They are usually
run on public roads and respecting driving regulations.
Speed rallies. They are run on circuits closed to the trac with
maximum safety measures both in the vehicle and on the road.
Specially prepared vehicles are required.
Regularity sport rallies. This is a mixture of regularity and speed
and always run on circuits closed to trac.
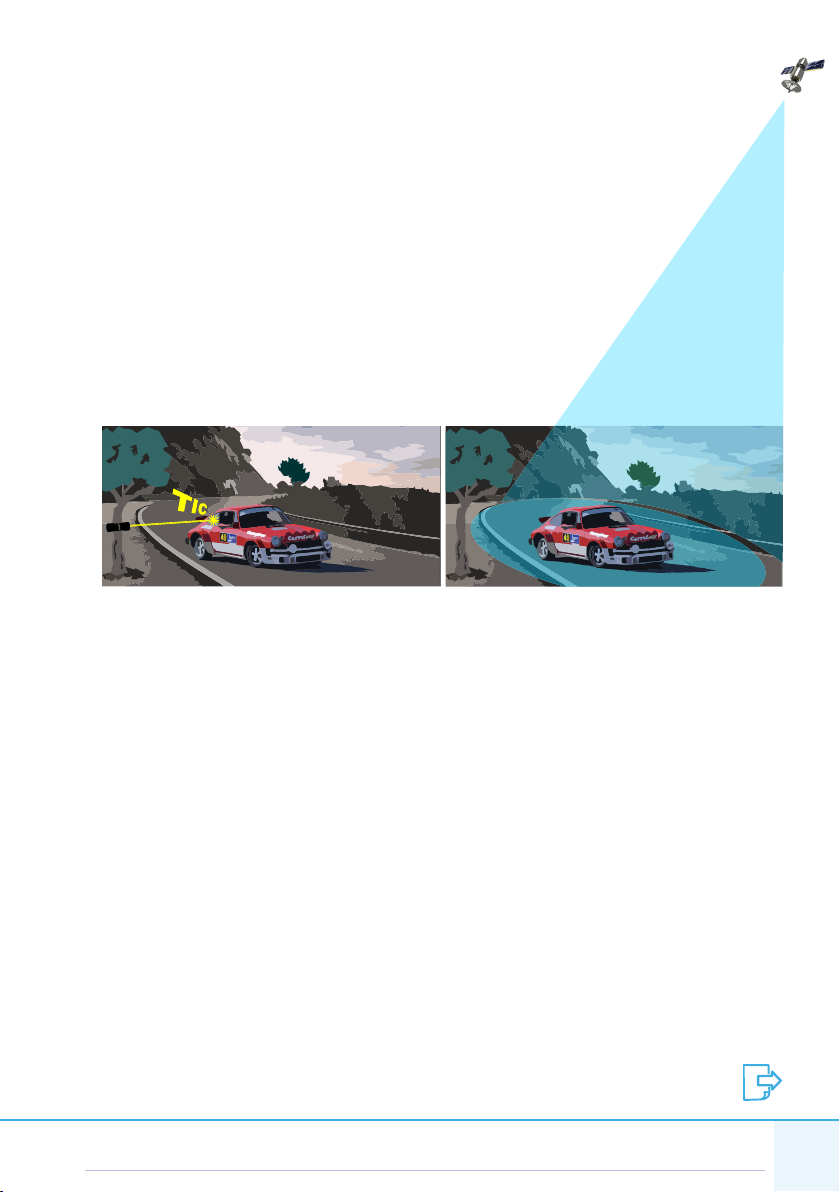
1.1. WHAT IS A REGULARITY RALLY?
A regularity rally is a style of rally in which absolute speed is not the
principal objective, but rather the control of the speed, the time and the
distance travelled.
The organiser of a regularity
rally gives us a route to
follow (Road book) and some
specications about speeds,
times and distances with which
we have to comply (regulation).
V (km/h) = e(km) x 3600
t
(seg)
d (km) = v(km/h) x t(seg)
3600
t(seg) = e (km) x 3600
v (km/h)
e= v x t
v= e/t
t= e/v

· 8·
There are many ways of giving us these specications. We can be set points
that we have to pass irrespective of the time. We can be given specic times
for passing certain points. We can also be given the average speed that we
have to meet for a set distance. They can set reproducing the same times as
in a previous run through the same area as a specication. The variations are
almost innite.
The organiser monitors our stage times at the opportune points. The
objective is to deviate as little as possible from the set times.
It is as if we had to chase a hare. It would be very easy; but since we cannot
see the hare, we just have to imagine it.
Our clock must be perfectly synchronised with it. Easy! We have to measure
the distance in exactly the same way. Dicult!
To put it another way: The hare runs the theoretical distance in the
theoretical time and we follow the actual distance in real time.
We will be penalised for any time or distance deviation.
We will be penalised for being outside the time limits.
We will be penalised for not following the same route.
The classication is established with the sum of all the penalties. Whoever
has the lowest penalties wins the rally.
+info: RALLY LANGUAGE — page:029
BLUNIK II PLUS INSTRUCTIONS
· 9 ·
Nowadays some regularity rally organisers measure the road with extreme
precision (in metres) and take our stage times in tenths of a second.
Some of the participants in these precision rallies achieve spectacularly tight
results. With your Blunik II Plus, you can also manage this.
In a badly measured rally it is almost impossible to achieve good results. It
all becomes a matter of luck. When we realise that the measurements are no
good, it is already too late to make corrections. Whatever we do, our results
will only get worse.
When a rally is well measured, but timed with little precision (manually or by
GPS) if we go round with maximum precision, we increase the possibilities of
our times being better than our rivals. Over greater distances, the inaccuracy
of the timekeeping aects us less.
1.2. HOW TO PARTICIPATE IN A REGULARITY RALLY
We will need a vehicle that complies with the specications laid down
in the rally regulations.
We have to be a 2 person team: pilot and co-pilot.
We need a good understanding of what a regularity rally is.
• It is not a race. It is not a question of speed.
• They will monitor that we follow the route.
• They are going to monitor lap times at certain points along the
route.
Our automobile must have a certain level of preparation.
• Mechanically reliable.
• Some kind of distance measurer. The vehicles own can be used
as to start with.
• A clock/stop-watch.

· 10·
• Some kind of system allowing us to compare the organiser’s
parameters without own route. Time/distance tables set at
dierent speeds printed out on paper are usually used.
By using these elements well we can now manage an acceptable classication
in a regularity rally.
CO-PILOT TASKS
Follow the road book (route).
At set intervals determine the time dierence. Or determine the
distance dierence every so often.
Tell the pilot whether he needs to accelerate of slow-down.
Compensate for the automobile tracking if it is not the same as the
organiser’s.
PILOT TASKS
Drive skilfully, controlling the car to perfection.
Follow the navigator’s orders.
Sometimes this is not easy, some of the imposed measures can be
very tricky to stick to on twisty roads.
2. WHAT DOES THE BLUNIK II PLUS CONTRIBUTE TO
REGULARITY?
BLUNIK II PLUS uses the accumulated experience of many pilots and co-
pilots from all types of regularity rallies.
It brings together all the necessary functions for precision regularity in a
single device.

BLUNIK II PLUS INSTRUCTIONS
· 11 ·
PRECISION REAL DISTANCE MEASUREMENT (ODOMETER)
The BLUNIK II measures distance from information from sensors installed in
the non-driving wheels of our automobile.
The BLUNIK II has a calibration system with accuracy of +/-1m in 10km.
The BLUNIK II has special functions to compensate for the majority of
common errors in the way the sensors work.
The BLUNIK II can adapt itself to the organiser’s way of measuring distances
and our way of driving.
PRECISION CLOCK-STOPWATCH
The BLUNIK II PLUS clock has hours, minutes, seconds and tenths of a
second, with great accuracy and an ease of synchronisation with the ocial
time of any rally
RAPID CALCULATOR OF SPACE/TIME/DISTANCE TABLES.
The BLUNIK II includes practically all the systems used by the dierent
organisers of regularity rallies.
The BLUNIK II constantly calculates the theoretical distance depending on
the imposed speed and the time elapsed.
The BLUNIK II makes all the necessary calculations with maximum precision
using a super-fast microprocessor.
It also always has the possibility of recalculating from the start so as to
correct all types of situation that is imposed after the start.
BLUNIK II OPERATING MODE
The BLUNIK II works with the concept of distance. It continually compares the
theoretical distance with the actual distance travelled. The device tells us
at all times about the dierence between these two distances.
The regularity indications are by coloured lights (LED), numbers, graphics
and/or noises.
BLUNIK II BUTTONS
The BLUNIK II keypad has only 12 keys. These keys are real “clicking” keys
so as to avoid entry errors.
EL BLUNIK II PLUS is designed so that you can access the majority of its
functions with the minimum presses of the keys.
· 12·
BLUNIK II SCREEN-DISPLAY
The BLUNIK II screen has 2 lines of 16 characters. At any given point of the
rally only the necessary information is displayed on the screen. Too much
information is bad information.
BLUNIK II POWER SOURCE
The BLUNIK II is powered by the automobile battery. It has an internal battery
so that the BLUNIK can be turned on outside the vehicle to program it or set
the time. The BLUNIK II works perfectly without the internal battery.
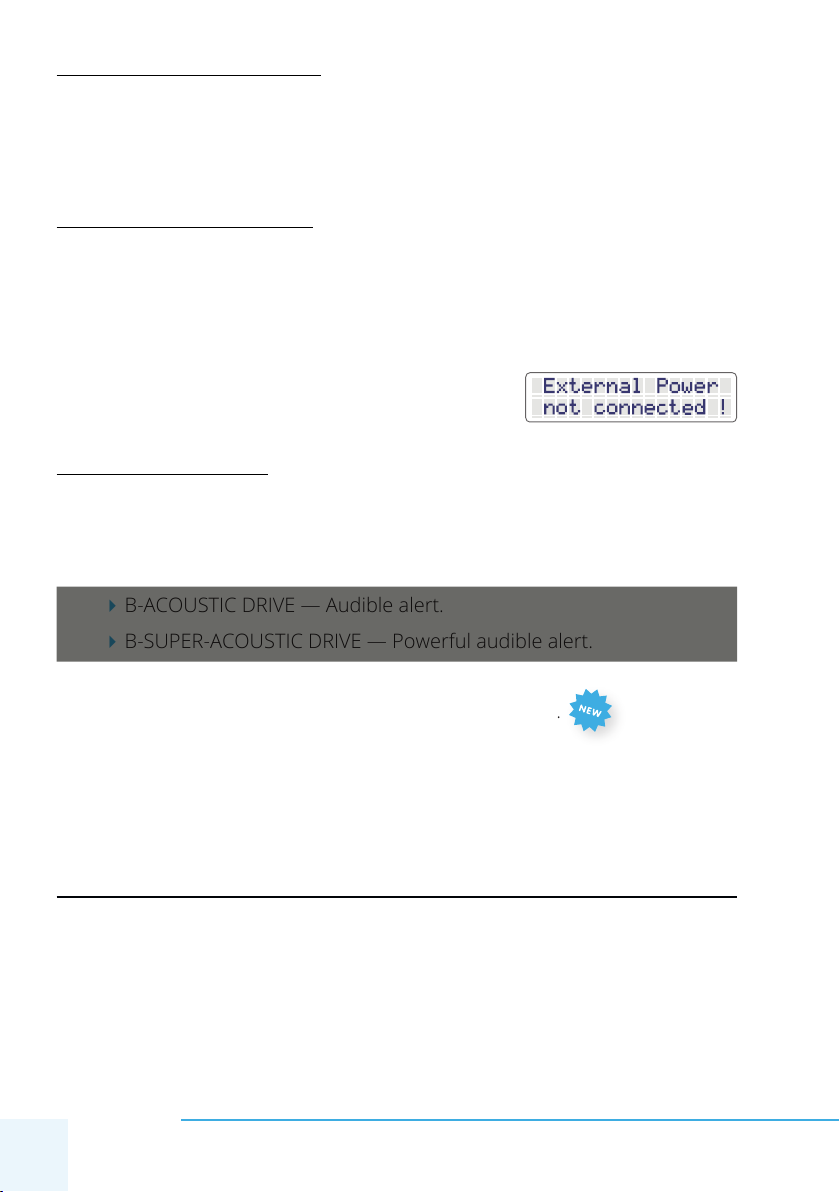
Some of the BLUNIK II accessories do not work if it is not connected to the
automobile battery.
If the power source is not correct, this message appears:
BLUNIK ACCESSORIES
B-SCREEN II — Screen for the pilot.
B-SPORT DRIVE — Racing-line compensator.
B-SPORT CALCULATOR — Racing-line compensator + Calculator.
B-ACOUSTIC DRIVE — Audible alert.
B-SUPER-ACOUSTIC DRIVE — Powerful audible alert.
B-PAD — Number keypad.
B-DATA-FAST — New element for fast data entry.
B-REMOTE — Remote control.
B-PEDAL — Pedal to mark distances accurately.
3. BLUNIK II PLUS OPERATION
The BLUNIK II PLUS does the mathematical, mechanical and boring part of
the regularity rally and leaves the strategic and sporting part in the hands of
the pilot and co-pilot.
It is the co-pilot that thinks and decides what to do at any given time, using
the BLUNIK functions. We need to know the BLUNIK II well for it to do what
we decide quickly, eciently and without mistakes.
BLUNIK II PLUS INSTRUCTIONS
· 13 ·
* Let’s start by studying the functions of the keys (there are only 12).
By using BLUNIK we can forget about the ‘fear’ of pushing buttons. In very
few cases can the erroneous pressing of a BLUNIK II button cause a serious
error and even if it does, there is always a way of xing it, if we understand
the BLUNIK well.
We can trust our BLUNIK device. It is very reliable and is designed so that we
don’t go wrong for silly mistakes like forgetting to press ENTER.
The buttons need pushing when it’s logical to push them. The BLUNIK will
never call us stupid for making the mistake of not pushing a button!
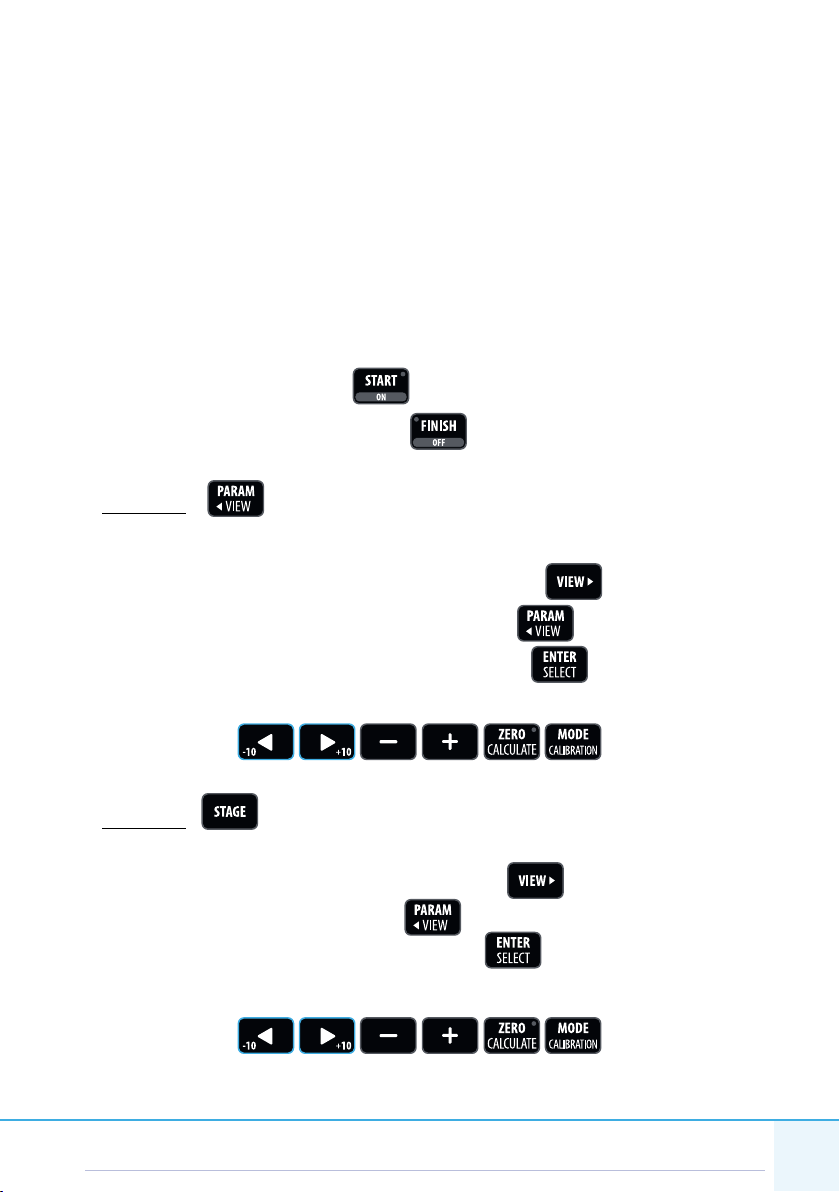
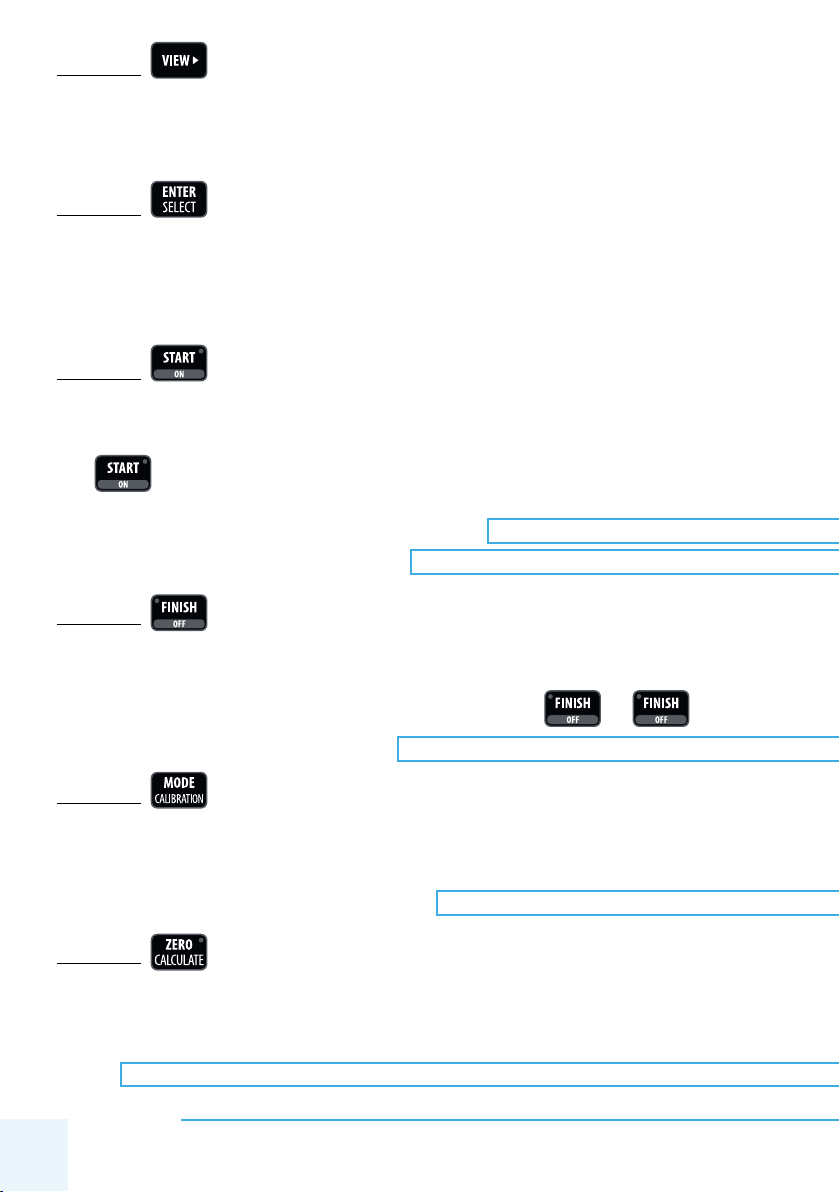
3.1. BUTTON ACTIONS
Turn the device on with the button.
Turn the device o by holding the button until it turns o.
BUTTON
To access the programming of the parameters.
To move from one parameter to the next we use
To go back to the previous parameter we use
We always nish parameter programming with
Within the parameter programming the following keys are also used:
BUTTON
To access the programming of the sectors.
To move from one screen to the next we use
To return to the previous we use
We always nish sector programming with
Within the sector programming the following keys are also used:
· 14·
BUTTON
The only function of this button is to change the screen.
It can always be pushed with no danger of making a false manoeuvre.
BUTTON
This is the BLUNIK executive button.
This button pre-activates the selected sector so that it becomes the active
sector (activating the count-down).
BUTTON
This button directly activates the selected sector, if it isn’t already.
This sector becomes the active sector (BLUNIK Active).
The on activating the sector always sets the real total distance to ZERO.
+info: START MODES — page:039
+info: START BUTTON ACTIONS — page:040
BUTTON
This deactivates (terminates) the sector. It is the most “dangerous” button.
This is why in order to terminate a sector we have to push it twice.
+info: FINISH BUTTON ACTIONS — page:043
BUTTON
This determines the distance counting mode (with BLUNIK active). It serves
to change the operational of the sector that we are programming. It is also
used for calibration.
+info: HOW TO CALIBRATE — page:037
BUTTON
Sets the Partial distance counter to zero.
It also serves to run the dierent calculations that the BLUNIK II performs.
+info: CALCULATIONS PERFORMED BY THE ZERO/CALCULATE BUTTON — page:044
+
BLUNIK II PLUS INSTRUCTIONS
· 15 ·
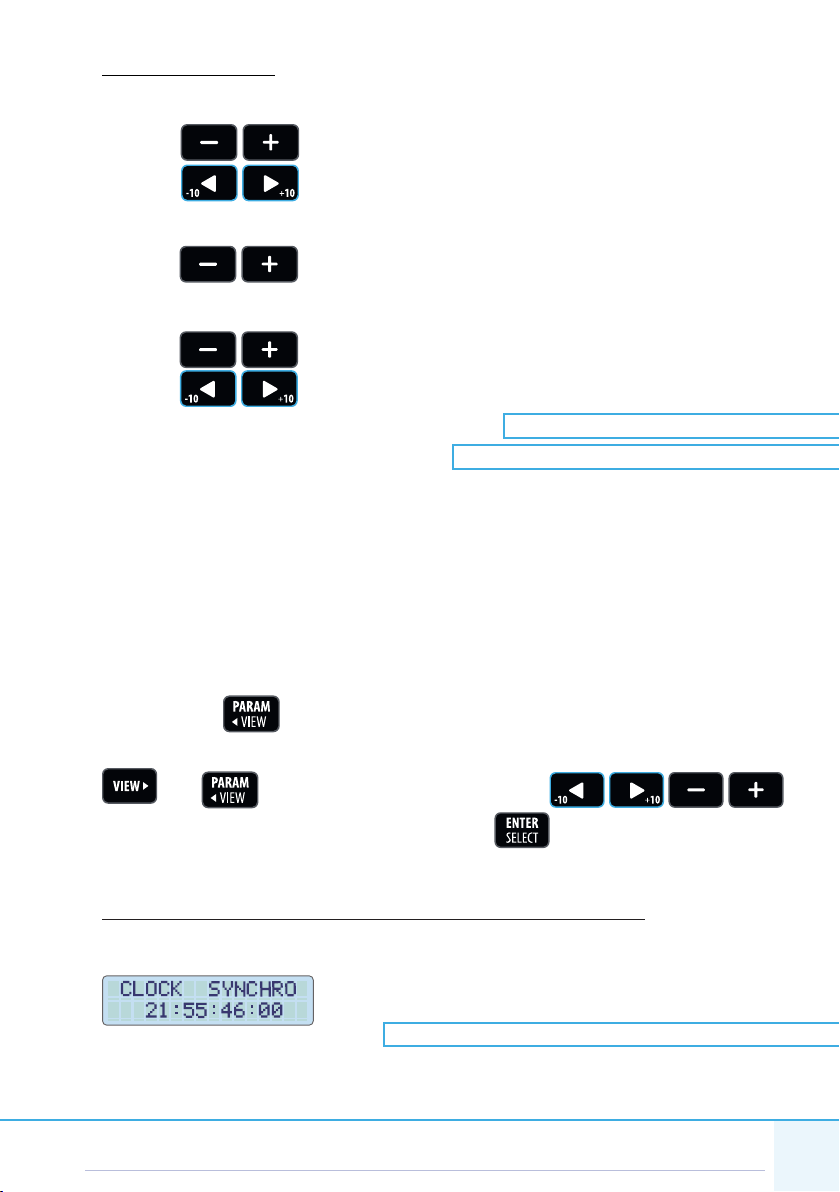
OTHER BUTTONS:
When we are in Parameter or sector programming:
Buttons To input data.
Buttons To input data.
When we are in BLUNIK Inactive.
Buttons To change the selected sector.
When we are in BLUNIK Active.
Buttons To correct Total Distance.
Buttons To correct Total Distance with a single click.
+info: DATA VALIDATION — page:032
+info: DISTANCE CORRECTIONS — page:043
3.2. BLUNIK II PLUS PARAMETERS
Let’s start to familiarise ourselves with the Parameters.
The parameters are usually programmed or reviewed before starting each
rally. Sometimes during a rally it may be necessary to adjust a value. The
BLUNIK shows us the most appropriate parameters for each circumstance.
We push the to access the parameter programming.
We can move between the Parameter screens by using the buttons
and . To vary the parameters we use
To abandon the Parameter Screens we use
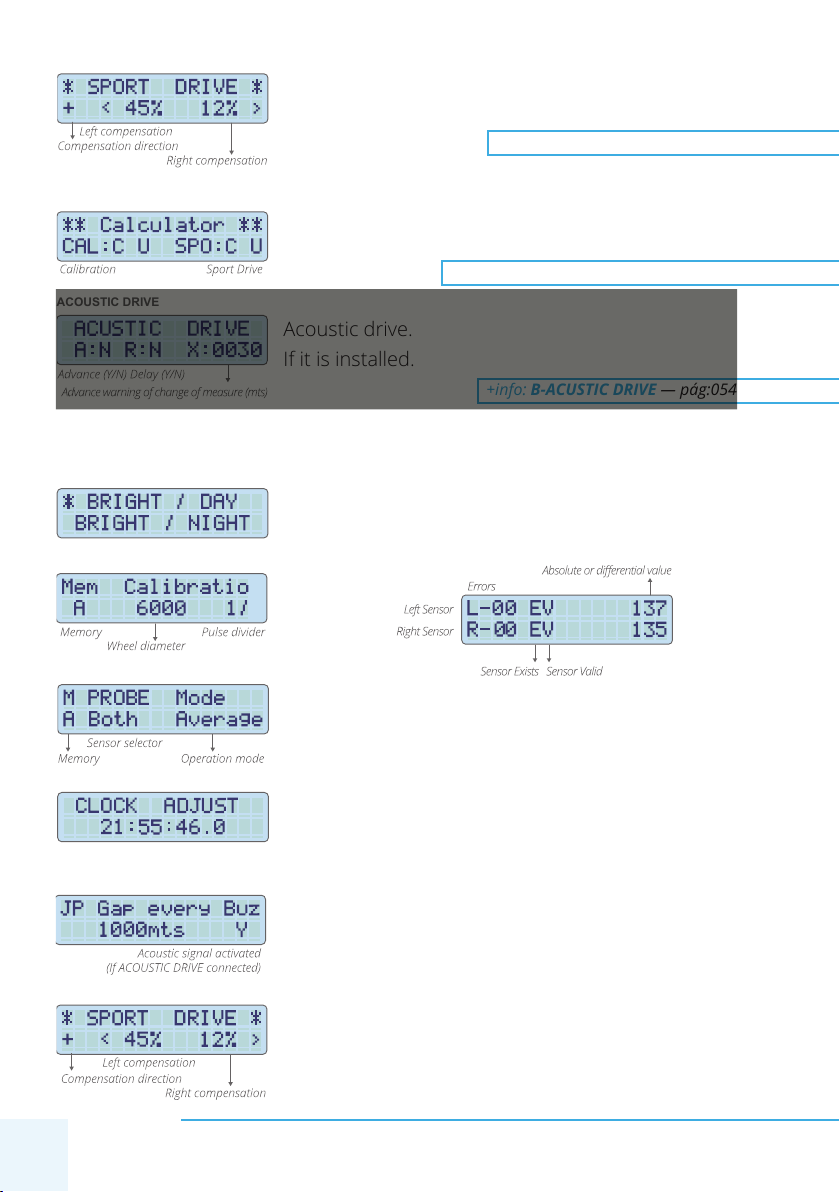
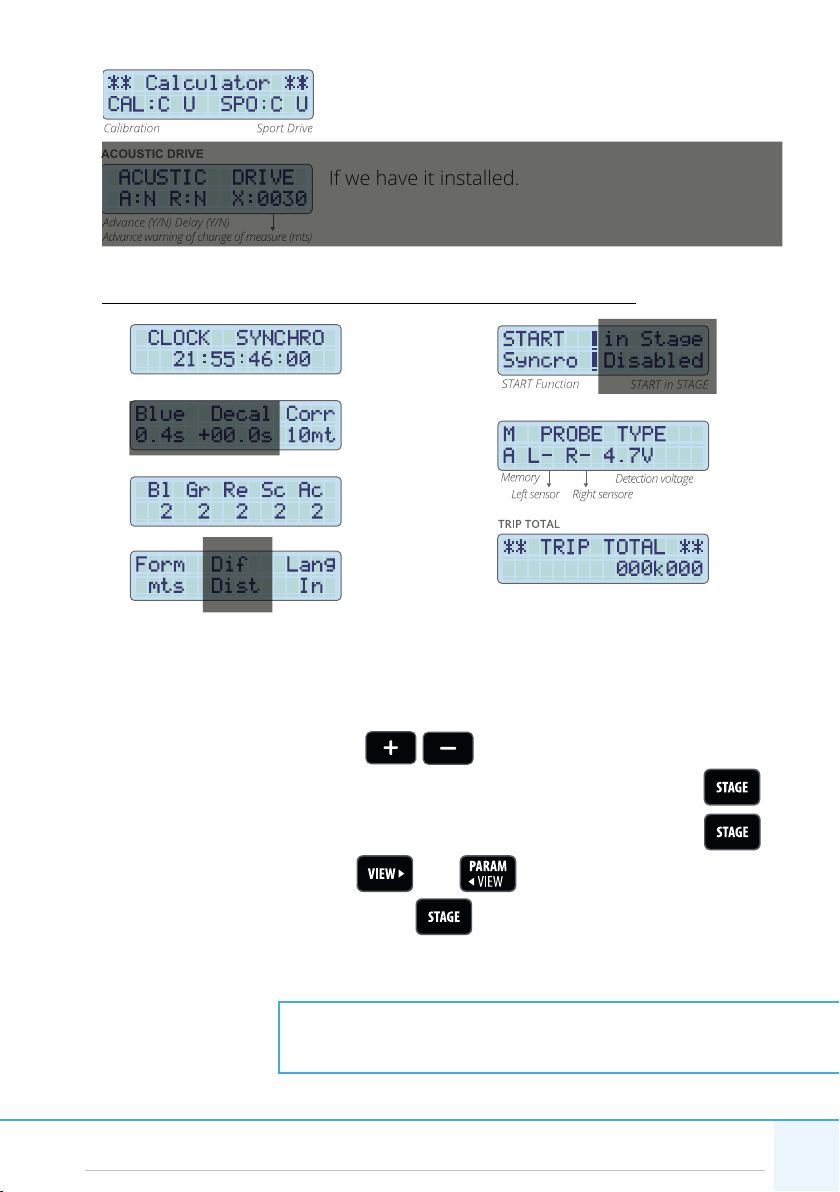
QUICK DESCRIPTION OF THE BLUNIK II PLUS PARAMETER SCREENS
This is the screen to synchronise the clock.
+info: HOW TO SYNCHRONIZE THE CLOCK — page:031
CLOCK

· 16·
Allows the alteration of the brightness.
+info: CHANGING THE BRIGHTNESS OF THE LIGHT — page:032
Screen showing us our calibration and the memory
selected.
+info: MEMORIES — page:031
+info: HOW TO CALIBRATE — page:037
+info: SENSOR VERIFICATION — page:037
Screen for selecting with which sensor/s we want to
measure and how we want to measure.
+info: MEMORIES — page:031
+info: SENSOR SELECTION — page:034
We use this screen to decide on our precision level
during the Timed sections.
Blue: as of what precision margin we want the blue light to turn on.
Decal: how many seconds we want to be permanently ahead or behind.
With the button we change the Signal.
Corr: Corrections with the buttons are 10mts by default. We
can reduce this value if we wish.
+info: PRECISION ADJUSTMENTS — page:041
+info: DISTANCE CORRECTIONS — page:043
This screen only appears in BLUNIK Active. It is
for the provisional calibration and osetting of the
time.
Calib Adj: This is for a temporary adjustment of the calibration:
• For example, if it starts to rain, our wheels will turn more and our
BLUNIK II will measure more metres.
• To correct this we adjust Calib Adj to -1.0m/km.
• By pressing we change the symbol.
Decal: When we want to lap ahead or behind, we can use this parameter.
DAY/NIGHT
CALIBRATION
SENSOR SELECTOR
ACCURACY
ADJUSTMENTS

BLUNIK II PLUS INSTRUCTIONS
· 17 ·
• With the button we change the indicator.
• With less we go behind.
• With more we go ahead.
In manually Timed Rallies to the second or in rallies where the decimals are
truncated it may be advantageous to go with a 0.5 second delay (program
-0.5 sec).
Note: The values we enter into this screen are only valid while the BLUNIK remains Active.
Screen where we can adjust the brightness of the
lights and the screens for Night time.
With this screen we can format the
Trip / Dif. format / Language.
Form: The distance format can be changed between metres and
decimetres.
Dif: We can choose the regularity dierence in metres or in seconds.
Lang: We can choose screen languages between French or English.
Actions of the button.
+info: START BUTTON ACTIONS — page:040
Screen to determine the gap in JP mode.
+info: IMPOSED TABLES MODE (JP) — page:049
Screen for conguring the electrical characteristics
of the sensors used.
+info: MEMORIES — page:031
This is an absolute Trip total. This can only be reset
from this screen by pressing
+info: CHANGE THE BRIGHTNESS OF THE NIGHT TIME LIGHT —page:032
ILLUMINATION
FORMAT
START BUTTON
TABLES GAP
SENSOR CONNECTION
· 18·
Layout compensator.
If it is installed.
+info: B-SPORT DRIVE — pág:052
Calculator.
If it is installed.
+info: B-SPORT CALCULATOR — pág:053
Acoustic drive.
If it is installed.
+info: B-ACUSTIC DRIVE — pág:054
In BLUNIK Active we have access to the following screens
Allows the selection of the brightness.
And also optionally to these parameters:
When the sector is in JP Mode (Tables).
If we have it installed.
SPORT DRIVE
SPORT CALCULATOR
ACOUSTIC DRIVE
DAY/NIGHT
CALIBRATION
SENSOR VERIFICATION
SENSOR SELECTOR
CLOCK ADJUST
TABLES GAP
SPORT DRIVE
BLUNIK II PLUS INSTRUCTIONS
· 19 ·
If we have it installed.
If we have it installed.
PARAMETERS WITH ACCESS ONLY IN BLUNIK INACTIVE
3.3. STAGE PROGRAMMING
Only with the BLUNIK Inactive can we change the stage selected with:
The selected stage is the one we are going to program by pushing
Access to the programming of the selected stage is made pressing
To change the screen press and
To return to the start screen press
The stage programming allows the conguration of the operational mode of
each of the stages.
+info: STAGE RELATED CONCEPTS — pág:033
+info: PROGRAMMING A DIFFERENT STAGE — pág:034
+info: DATA VALIDATION — pág:032
SPORT CALCULATOR
ACOUSTIC DRIVE
CLOCK START BUTTON
ACCURACY
SENSOR CONNECTION
ILLUMINATION
FORMAT
Table of contents
Other Blunik Measuring Instrument manuals

Popular Measuring Instrument manuals by other brands

Boumatic
Boumatic TouchPoint OPERATION, SERVICE AND MAINTENANCE INSTRUCTIONS

Vitec Multimedia
Vitec Multimedia FOCUS FS-H60 user manual

Farmcomp
Farmcomp Wile Rice Operator's manual

Omega
Omega HHF141 Series user guide

FMS
FMS EMGZ309.EIP Series operating manual

X4-Life
X4-Life Inspector III instruction manual


