blupura BLUBAR Specification sheet

1
6
0
3
0
0
1
5
1
2
E
N
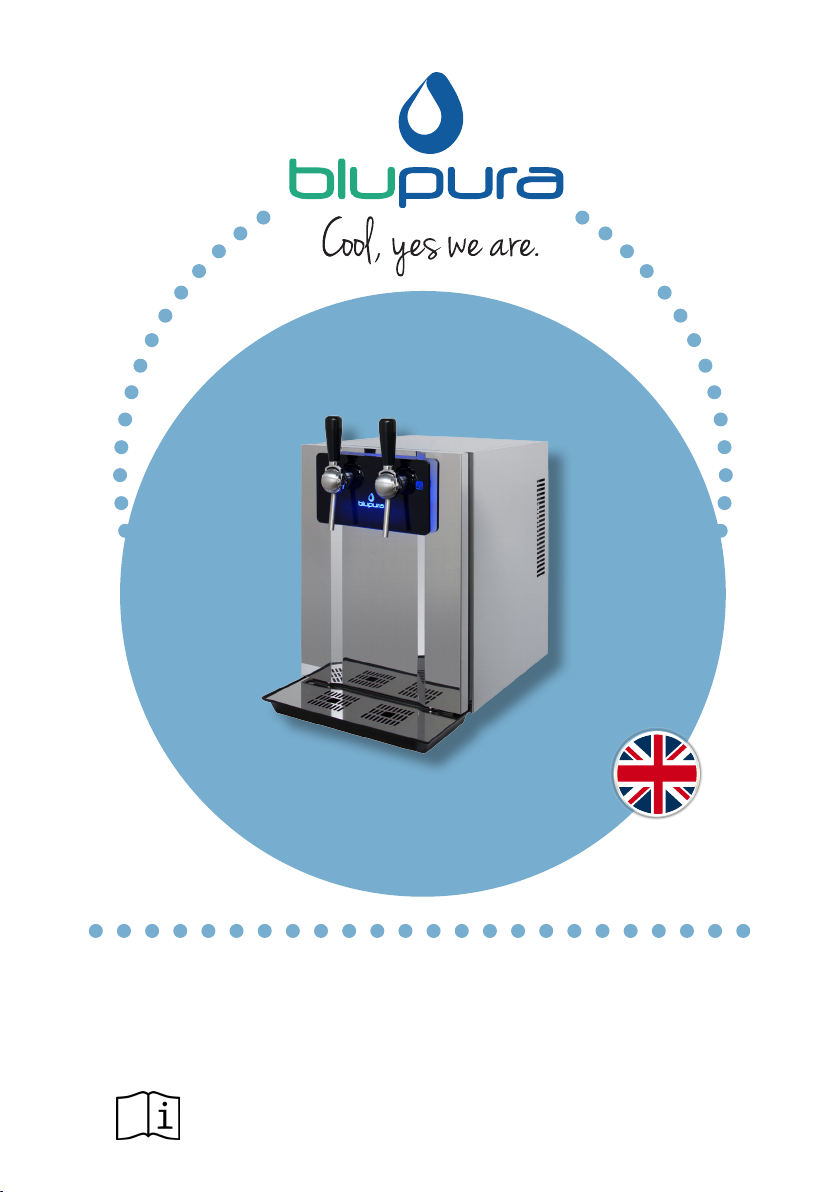
BEER TAP, IT, FLOOR STANDING
BLUBAR
U
s
e
&
M
a
i
n
t
e
n
a
n
c
e
M
a
n
u
a
l
Before Install or use the product read to the precautions and
general recommendations inside.


3
Precautions and general recommendations
This appliance is intended to be used in household and similar
applications such. Appliance for internal use only. Place the unit
away from water jets.
Always connect the water cooler to a water main that supplies
drinking water only.
Before each installation, the unit must be sanitized by an
authorized technician.
After installation, ensure that the unit is not resting on the power
cable.
Check that the unit is level and that it is resting on a floor with
sufficient load-bearing capacity, in an environment that is suitable for its dimensions and its use.
Before any maintenance or cleaning operation is carried out, remove the plug from the socket or
disconnect the power supply.
Ensure that the product is not sited close to sources of heat.
To guarantee adequate ventilation, leave at least 10 cm of space around the unit.
Install the product in a clean, dry, well-ventilated environment. The product is designed to
function in environments with a temperature range of between 5°C and 32°C - Climate Class N.
Take care not to damage the cooling fluid circuit: it is filled with R290, which is a highly flammable
gas. It is essential to ensure that the tubes of the refrigerant circuit are not damaged.
Ensure that it is possible to disconnect the power supply either by removing the plug or via a two-
pole circuit-breaker, with an opening distance of the contacts that allows complete disconnection
in the conditions of overvoltage category III, placed upstream of the plug.
Check that the voltage shown on the serial number plate corresponds to the voltage being
supplied at the installation site.
The unit must not be cleaned with a water jet. Do not position other electrical equipment in the
immediate vicinity of the water cooler.
Turn off the main water inlet tap if the unit is not to be used for a long period.
Keep the areas surrounding the unit dry to avoid the risk of people slipping.
If the supply cord is damaged, it must be replaced by the manufacturer, its service agent
or similarly qualified person in order to avoid a hazard. Do not use extension leads or
adapters.
This appliance is intended to be used by persons (including children aged from 8 years)
with reduced physical, sensory or mental capabilities, or lack of experience and knowledge,
provided that they have been given supervision or instruction concerning use of the
appliance by a person responsible for their safety. Children should be supervised to ensure
that they do not play with the appliance. The appliance is only to be installed in locations
where it can be overseen by trained personnel.
The Appliance shall be protected by a ground-fault circuit interrupter.
This equipment is to be installed in compliance with the local plumbing codes. Water
pipe connections and fixtures directly connected to a potable water supply shall be sized,
installed, and maintained in accordance with federal, state, and local codes.
This publication is based on information available when approved for printing. Continuing design
refinements could cause changes that may not be included in this publication.

4
Index
• BEFORE INSTALLING THE WATER COOLER 5
• RECOMMENDATIONS FOR SAFEGUARDING THE ENVIRONMENT 6
• CERTIFIED 7
• ASSOCIATIONS 8
• INTERNATIONAL AWARDS 8
• DESCRIPTION OF THE UNIT 9
• PANEL DESCRIPTION (MOD. BEER TAP) 14
• KEYPAD DESCRIPTION (MOD. I.T.) 15
• FUNCTIONS OF THE VOLUMETRIC KEYPAD 16
• TECHNICAL FEATURES 18
• INSTALLATION 25
• INSTALLATION OF THE CO2CYLINDER (FIZZ MODEL) 29
• HANDLING THE GAS CYLINDERS 30
• SANITIZATION – NOTES 31
• ORDINARY MAINTENANCE 32
• SERVICE HISTORY 33
• WARRANTY CONDITIONS 34

5
Before installing the water cooler
Congratulations for choosing a BLUPURA product.
We have designed and manufactured this product with great care to ensure that
it will dispense water of the highest quality.
In order to get the most out of your water cooler, please read the instructions in
this manual and retain the manual for future reference.

6
Recommendations for safeguarding the environment
Packaging materials
The packaging materials are 100% recyclable.
Please follow the local guidelines on waste
disposal. For safety reasons keep the packaging
material out of the reach and sight of children.
Scrappage
The water cooler is made using recyclable material.
This unit is marked in compliance with European Directive 2012/19/UE
on Waste Electrical and Electronic Equipment (WEEE). By ensuring that
the product is scrapped correctly, you are helping to prevent potential
negative consequences for the environment and for health. The symbol
on the unit indicates that the product should not be treated as domestic waste
but should be taken to a dedicated recycling centre for electrical and electronic
equipment. Immediately prior to scrapping, cut off the power cable.
For more information on the treatment, recovery and recycling of this product,
please contact the appropriate local office, the waste disposal service or the
reseller from which the product was purchased.
Information on the natural, eco-friendly refrigerant gas used in
this cooler
This product contains no CFCs or HFCs, which contribute to global warming.
Indeed, it is the first water cooler on the market to use natural refrigerant.
The refrigerating system is filled with HC R290 – Propane: a natural gas that does
not contribute to global warming and that, thanks to its specific characteristics,
allows for substantial energy savings to be made.

7
Certified
See official list
Materials compliant for contact with drinking water
This unit is intended for the dispensing of drinking water, and so the materials
that enter into direct contact with water meet the criteria for food-grade
components pursuant to the current legislation. In addition, the unit is
manufactured in compliance with Italian Ministerial Decrees 174 of 06/04/2004
and 25 of 07/02/2012.
Electrical safety
This water cooler is designed, manufactured and marketed in compliance with:
• the safety objectives of the Machinery Directive 2006/42/CE;
• the protection requirements of the Electromagnetic Compatibility Directive
2014/30/EU.
The electrical safety of the product is ensured only when it is properly connected
to an efficient, legally compliant grounding circuit.
D.M. 174
1
0
0
%
M
A
D
E
I
N
I
T
A
L
Y
C
E
R
T
I
F
I
C
A
T
E
I
T
P
I
rosso032 c
UNI EN ISO 9001:2015
UNI EN ISO 14001:2015
ANSI/UL 399
*
* Blubar 150/80 Beer Tap/IT, Blubar 150/80 Beer Tap/IT Fizz,

8
Associations
International Awards
2015 - BEST PROMOTION OF HEALTH AND HYDRATION
EUROPEAN AQUA AWARDS 2015, ROME
2015 - BEST ENVIRONMENTAL PRACTICE/GREEN INITIATIVE
EUROPEAN AQUA AWARDS 2015, ROME
2014 - BEST PROMOTION OF HEALTH AND HYDRATION
EUROPEAN AQUA AWARDS 2014, BUDAPEST
2013 - BEST PRODUCT INNOVATION
EUROPEAN AQUA AWARDS 2013, BERLIN
2012 - BEST ENVIRONMENTALLY FRIENDLY PRACTICE
EUROPEAN AQUA AWARDS 2012, ISTANBUL
2011 - BEST PRODUCT DESIGN/INNOVATION
EUROPEAN AQUA AWARDS 2011, ODESSA
2010 - BEST ENVIRONMENTALLY FRIENDLY PRACTICE
EUROPEAN AQUA AWARD 2010, PRAGUE

9
Description of the unit
BLUBAR — a new watercooler with a modern and elegant design.
The main features of the unit are as follows:
• A modern design using strong materials
and a front plexiglass panel with an elegant
lighting.
• Highly insulated ice-bank.
• Cooling serpentine coil made with the best
AISI 316 stainless steel for drinkable water.
• 2 supply options: cold water + cold sparkling
water
• Body and internal parts made entirely from
stainless steel.
• Professional carbonator and dispensing taps made with AISI 316 stainless-
steel.
• Easy opening for maintenance.
• Dispensing point for bottles of up to 32 cm.

10
Front view (mod. BEER TAP, I.T.)
Mechanical taps (mod. BEER
TAP) or dispensing buttons
(mod. IT)
1Drip tray with ice bank drain
pipe
4
Anti-shock feet
5
Removable top cover
2
BLUBAR plexiglass
3
12
3
4
5

11
Rear view (mod. BEER TAP, I.T.)
Ice bank inlet pipe joint Ø8 mm
(excluding mod. BEER TAP 30)
1Energy Saving button (mod. I.T.
80)
5
Ice bank level (excluding mod.
BEER TAP 30)
4Power cable
8
Adjustable thermostat
6
Drinkable water inlet pipe joint
Ø8 mm
2
CO2inlet pipe joint Ø8 mm
3General switch
7
1
2
3
4
5
6
7
8

12
Front view (Mod. FLOOR STANDING)
Mechanical taps (mod. BEER
TAP) or dispensing buttons
(mod. IT)
1Front panel
4
Rear wheels
5
Adjustable front feet
6
BLUBAR plexiglass
2
Drip tray with grid
3
12
3
4
5
6

13
Rear view (Mod. FLOOR STANDING)
Drip tray waste pipe Ø40mm
1Ice bank overflow outlet pipe
OD17xID12 mm
3
Power cable
4
Drinkable water inlet pipe Ø3/8’’
(9,5mm) in mod. 150 or Ø5/16’’
(8mm) in mod. 80
2
1
2
3
4

14
Panel description (mod. BEER TAP)
P.1 Cold sparkling water
P.2 Cold still water
Pull forward the tap knob to start the dispensing process.
Bring it back up to stop it.
P. 1 P. 2

15
Keypad description (mod. I.T.)
P.1/P.2 Cold sparkling water dispensing buttons
P.3/P.4 Cold still water dispensing buttons
P. 5 Energy Saving button (on the back in mod. I.T. 80)
L.1 BLUE Led (STAND-BY):
Fast flashing - Little or no water at the inlet
Slow flashing - Little or no CO2at the inlet
L.2 GREEN Led:
Fixed - ENERGY SAVING mode active
Flashing - Programming mode active
Rear view
P. 1
P. 2
P. 5
L.1
L.2
P. 3
P. 4

16
Functions of the volumetric keypad
The water cooler (I.T. model) is equipped with a VOLUMETRIC dispensing system.
The dispensing quantities are easily PROGRAMMABLE during installation.
On turning on the unit, the default settings are as follows: the upper buttons
dispense 200 ml of water (a cupful), whereas the lower buttons dispense 1000 ml
(1 litre).
BUTTON FUNCTIONS:
- SPARKLING WATER UPPER DISPENSER button (P.1)
- COLD WATER UPPER DISPENSER button (P.3)
- SPARKLING WATER LOWER DISPENSER button (P.2)
- COLD WATER LOWER DISPENSER button (P.4)
The pre-set quantity of water is dispensed, but you can stop the dispensing
process at any time by pressing the button again.
SETTING THE QUANTITIES:
Thanks to the Volumetric dispensing functionality, you can customize the pre-set
quantities dispensed by each of the 4 buttons. Normally, the upper buttons are
used for the dispensing of small quantities, with the lower buttons being used for
the dispensing of larger quantities.
To enter the programming mode, press and hold (for > 4 seconds) the following
combination of buttons: P.5 + P.3 + P.4 (Energy Saving button + the two cold
water buttons). When you enter the programming phase, you will hear three
consecutive beeps.
In this phase, Led L.1 + L.2 start to flash.
To set the maximum dispensing limit for a specific button, press the button
in question to start the dispensing process and press it again once you have
reached the desired quantity. Repeat the process for the remaining buttons.
To exit from the programming mode, press and hold (for > 4 seconds) the
following combination of buttons: P.5 + P.3 + P.4 (Energy Saving button + the two
cold water buttons), save the data and set the new limits.
The maximum settable quantity for each button is around 3,0 litres, which equates
to a 65-second dispensing session.
FUNCTIONALITY WITH ALARMS ACTIVATED:
“NO WATER” ALARM: This alarm is triggered when the pump sends the NO
WATER signal. In this case, the associated BLUE led L.1 starts to flash quickly and
the sparkling water dispensers do not work. The other dispensers continue to
work as normal. To reset the alarm, turn the unit off and back on again.

17
“NO GAS” ALARM: This alarm is triggered when the CO2pressure switch sends
the NO GAS signal. In this case, the associated BLUE led L.1 starts to flash slowly
and all of the dispensers continue to work as normal. To reset the alarm, connect
a new CO2cylinder.
ENERGY SAVING (STAND BY)
The function is activated pressing button P.5 for less than 4 seconds.
The ENERGY SAVING (STAND BY) mode slows down the activation time of the
compressor; the compressor functions for 30 minutes every 8 hours.
When the unit is on STAND BY, the GREEN Led L.2 is on and Led L.1 is off. When
it is not on STAND BY, the L.2 light is off. Once the STAND BY function has been
activated, it can be deactivated using button P.5 or any other button for the
dispensing of water.

18
Technical Features – Technical Data Plate
15 Year of manufacture
09 Month of manufacture
00247 Serial number
[mod. BLUBAR]

19
Technical Features - dimensions (mm)
19,8in
501,8mm
12,9in
328,1mm
22,2in
565,1mm
14,2in
360,2mm
B
C
D
1
2
A
3
2
1
4
A
5
6
C
B
Disegno di proprietà della
BLUPURA
Srl - Vietata qualsiasi riproduzione - Disegno eseguito con CAD, vietato fare modifiche o correzioni manuali
PRODUZIONE
PROTOTIPO
DISEGNO VALIDO PER
NOTE
..../..../....
02
.....................
..
.....................
..
- Quote di CONTROLLO Contrassegnate con:
*
Grado di Precisione: MEDIA - UNI EN 22768/1
- Quote senza indicazioni di Tolleranza:
01
..../..../....
Rev.
Descrizione Modifica
Data
Disegnatore
............ ............
BLUBAR IT manuale
Disegno di proprietà della
BLUPURA
Srl - Vietata qualsiasi riproduzione - Disegno eseguito con CAD, vietato fare modifiche o correzioni manuali
11/12/2015
1:20
GGuzzini
APPV'D
CHK'D
DRAWN
NAME
SIGNATURE
DATE
TITLE:
PRODUCT:
MATERIAL:
WEIGHT:
A4
SHEET 1 OF 1
SCALE:
2
1
xxxxx
xxxxx
DISEGNO ANNULLATO
DATA
FIRMA
MOD. 503 Rev. 00 18/09/2015
[mod. BLUBAR I.T. 80]

20
Technical Features - dimensions (mm)
[mod. BLUBAR BEER TAP 30]
[mod. BLUBAR BEER TAP 80]
22,3in
566mm
19,8in
502mm
12,6in
321mm
14,2in
360mm
22,2in
565mm
17,5in
444mm
B
C
D
1
2
A
3
2
1
4
A
5
6
SCALE:
SHEET 1 OF 1
A4
C
WEIGHT:
B
MATERIAL:
PRODUCT:
TITLE:
DATE
SIGNATURE
NAME
DRAWN
CHK'D
APPV'D
NOTE:
M.Pediconi
1:10
11/12/2015
EDV TT BP -View
Disegno di proprietà della
BLUPURA
Srl - Vietata qualsiasi riproduzione - Disegno eseguito con CAD, vietato fare modifiche o correzioni manuali
19,35in
492mm
12,52in
318mm
22,34in
567mm
12,68in
322mm
1,13in
29mm
21,13in
537mm
Table of contents
Other blupura Water Dispenser manuals
Popular Water Dispenser manuals by other brands

Culligan
Culligan HD-202 Brochure & specs

Arctic Spas
Arctic Spas Onzen Technical guide

Primo Water
Primo Water Deluxe T355 quick start guide

Elkay
Elkay EFY8 Series Installation, care & use manual

GE
GE SmartWater GXSF18G Owner's manual and installation instructions

eSpring
eSpring Water Purifier owner's manual