BMZ Drive Systems V7 User manual

BMZ Drive Systems V7
Operating Instructions

Page 2of 28 Version 1.1
Addresses, identification and notes
BMZ Batterien-Montage-Zentrum GmbH
Am Sportplatz 28
63791 Karlstein am Main
Germany
Phone: +49 6188 9956-0
Fax: +49 6188 9956-900
E-Mail: kontakt@bmz-group.com
BMZ Drive Systems V7 comprising:
Motor (#23084),
New-Style Display (#27937) or Sportive Display (#27938),
Rechargeable battery V7 (#29600 or #30900)
Country of origin: Germany
Code: CE
BMZ Service Center
Am Sportplatz 15-17
63791 Karlstein am Main
Germany
Phone number for E-Bike dealers: +49 6188 9956-9833
Phone number for technical questions about the drive system: +49 6188 9956-680
Fax number: +49 6188 9956-699
E-Mail: cs.ebike@bmz-group.com
Operating Instructions BMZ Drive Systems V7
Article number: #31329
Version: 1.1 (21 Jun 2017)
Subject to change.
All contents of these instructions are protected by copyright.
© by BMZ GmbH, Karlstein, 2017.
Masthead
Product
identification
Customer service
Document
identification
Copyright

Contents
21 Jun 2017 Page 3 of 28
Contents
1Motor 5
1.1 Safety guidelines 5
1.2 Intended use 5
1.3 Explanation of the figure 6
1.4 Operation 6
1.5 Cycling and advice 6
1.6 Maintenance and cleaning 7
1.7 Inspection 7
1.8 Transport 7
1.9 Waste Disposal 7
1.10 Technical data 8
2Display 9
2.1 Safety guidelines 9
2.2 Intended use 9
2.3 Explanation of the figures 9
2.4 Description 9
2.4.1 Variants 9
2.4.2 Explanation of symbol 9
2.4.3 Charging status display 10
2.4.4 Support levels display 10
2.4.5 Multifunctional display 11
2.4.6 Control elements 11
2.4.7 USB slot 11
2.5 Assembly 11
2.5.1 Mount the New-Style display 11
2.5.2 Remove New-Style display 12
2.5.3 Mount the Sportive Display 12
2.6 Commissioning 12
2.7 Operation 13
2.7.1 Switching on the E-Bike system 13
2.7.2 Switching off the E-Bike system 13
2.7.3 Change support level 13
2.7.4 Activate pushing aid 13
2.7.5 Switch the lights on and off 13
2.7.6 Switchover the multifunctional display 14
2.7.7 Change the settings on the New-Style Display 14
2.7.8 Change the settings on the Sportive Display 14
2.7.9 Charge external devices via USB. 14
2.8 Maintenance and cleaning 14

Page 4of 28 Version 1.1
2.9 Waste Disposal 15
2.10 Technical data 15
3Rechargeable battery 16
3.1 Safety guidelines 16
3.2 Intended use 17
3.3 Explanation of the figures 17
3.4 Assembly 18
3.4.1 Insertion and removal of the rechargeable battery 18
3.4.2 Locking and unlocking the rechargeable battery latch 18
3.5 Commissioning 19
3.5.1 Check the rechargeable battery before using it for the first
time 19
3.5.2 Charging the rechargeable battery 19
3.5.3 Charging status display 20
3.6 Operation 21
3.6.1 Switch rechargeable battery on and off 21
3.6.2 Operating modes of the rechargeable battery 21
3.7 Maintenance, cleaning and storage 21
3.8 Transport 22
3.9 Waste Disposal 22
3.10 Technical data 22
4Charger 23
4.1 Safety guidelines 23
4.2 Intended use 24
4.3 Explanation of the figures 24
4.4 Commissioning 24
4.4.1 Connect the charger to the mains supply. 24
4.5 Operation 24
4.5.1 Charging the rechargeable battery 24
4.5.2 Charging process 25
4.5.3 LED status displays 25
4.6 Maintenance and cleaning 26
4.7 Waste Disposal 26
4.8 Technical data 26
5Other lists/indices 27
5.1 List of figures 27
5.2 List of tables 27

1 Motor
21 Jun 2017 Page 5 of 28
1Motor
1.1 Safety guidelines
WARNING
There is a risk of danger, if the safety instructions are not observed.
Non-observance of safety information and instructions can lead to an electrical
shock, fire and/or serious injuries.
Please observe all safety information and instructions both in these
and in all other instructions included with the E-Bike.
CAUTION: Risk of burns from touching the motor casing.
CAUTION: Risk of injury if the E-Bike system is activated
unintentionally. Please remove the rechargeable battery before
working on the E-Bike (e.g. assembly, maintenance, working on the
chain etc.), or transporting or storing it.
CAUTION: Risk of injury when using the pushing aid without the
wheels touching the floor. Only use the pushing aid when pushing the
E-Bike.
CAUTION: Please do not make any changes to your E-Bike. Never try to
increase the performance capability of the E-bike system; otherwise,
you could reduce the service life of the parts and risk damage to the E-
Bike system and to the E-Bike. Also, any manipulation of the E-Bike
system will invalidate the guarantee and warranty. Incorrect handling
of the system also poses a risk to your safety and others on the road.
If any unauthorised changes are made to the E-Bike system, there is a
risk of high personal liability costs or even criminal proceedings, if the
accident is a result of the manipulation.
Observe all national regulations relating to the approval and use of E-
Bikes.
Never open the motor. This is maintenance-free and may only be
repaired by qualified specialists and only using original spare parts.
This retains the motor safety. If the motor is opened without
authorisation, the warranty becomes invalid.
All components of the E-Bike system and parts that are mounted to
the motor (e.g. chain wheel, chain wheel bracket, pedals) may only be
replaced with parts approved by the cycle manufacturer. This protects
the motor from damage (e.g. from overloading).
Read and observe the safety instructions and information in the
operating instructions of the rechargeable battery and in the E-Bike
operating instructions.
Please keep these instructions for future reference.
1.2 Intended use
The motor is only designed to drive your e-Bike and may not be used for other
purposes.

1 Motor
Page 6of 28 Version 1.1
1.3 Explanation of the figure
The illustrations are outlines only and details may vary on your E-Bike.
1.4 Operation
For more information about using the E-Bike, please refer to chapter 2.7.
The E-Bike system is only functional when the display is mounted.
1.5 Cycling and advice
The BMZ E-Bike system provides electromotor support to the cyclist in a Pedal
Electric Cycle (Pedelec). The support provided depends on the force applied by the
cyclist onto the pedals. The E-Bike drive only provides support, if the cyclist is
pedaling. This is independent of the support level.
The E-Bike drive switches off automatically at speeds in excess of 25 km/h. If the
speed drops below 25 km/h, the support starts again automatically.
Once exception is the pushing aid function that allows the E-bike to be pushed easily
without turning the pedals at a speed of up to 6 km/h. The pedals may also turn
when the pushing aid is activated.
You can ride the E-Bike like a normal bike at any time by either switching off the E-
Bike system or setting the support level to Off (see 2.7.2). The same applies when the
rechargeable battery is empty.
Take some time to familiarise yourself with your E-Bike system before you use it in
normal road traffic. Test the various support levels until you feel safe handling this
product. Before going on longer trips, familiarise yourself with how different
parameters and ambient conditions impact on the range of your E-Bike.
The E-Bike system supports several motor setups. These are set individually for each
bike model in cooperation with the bike manufacturers. You can obtain detailed
information about your E-Bike's motor setup from your cycle manufacturer and your
bicycle dealer.
The range is affected by many factors such as:
Figure
1
Motor with design
cover and mounted
cranks
NOTE:
When does the
E-Bike drive work?
Shut-off at over
25 km/h
Pushing aid
Cycling without
support
Familiarisation
Motor setups
Influences on the
range

1 Motor
21 Jun 2017 Page 7 of 28
Support level: the higher the support level, the lower the range.
Switching behaviour
Type of tyres
Tyre pressure
Age, care and charging status of the rechargeable battery
The route profile (gradients) and quality (surface)
Weather conditions (e.g. oncoming wind, ambient temperature etc.)
Weight of the E-Bike
Load
Please observe the operating and storage temperature of the E-Bike components.
Protect the motor, display and rechargeable battery from extreme temperatures (e.g.
intensive sunshine without ventilating at the same time). The components
(especially the rechargeable battery) can be damaged by extreme temperatures.
1.6 Maintenance and cleaning
Keep all components of the E-Bike clean, especially the contacts of the rechargeable
battery and its bracket. Clean this carefully with a dry and soft cloth.
None of the components, including the motor, may be dipped into water or cleaned
with a high-pressure device. Please contact an authorised dealer for servicing or
repairs to the E-Bike.
1.7 Inspection
On reaching a mileage of 15,000 km, the drive belt needs to be replaced by a service
centre authorised by BMZ.
You can obtain information about your responsible service centre from your bicycle
dealer.
1.8 Transport
When transporting a complete E-Bike, please note the transport information
pertaining to the rechargeable batteries (see 3.8).
1.9 Waste Disposal
Motor, display, rechargeable battery, speed sensor, accessories and packaging should
be disposed of in an environmentally-compatible manner. Do not dispose of your E-
Bike and its components in the household waste system.
In compliance with the European Directive 2012/19/EU electrical devices that are no
longer serviceable, and in compliance with the European Directive 2006/66/EG faulty
or spent rechargeable batteries/batteries, must be collected separately and disposed
of in an environmentally-friendly manner.
Please hand in all spent rechargeable batteries and non-functional displays to an
authorised bicycle dealer.
Careful handling
Only for EU countries

1 Motor
Page 8of 28 Version 1.1
1.10 Technical data
Motor
Art. No.
#23084
Dimensions (mm) 213 x 150 x 128
Weight
3,400 g
Rated voltage
36 V DC
Type of protection:
IP56
Max. torque
90 N m
Continuous rated power 250 W
Support up to
25 km/h
Working temperature range
-10 … 50 °C
Table 1
Technical data motor

2 Display
21 Jun 2017 Page 9 of 28
2Display
2.1 Safety guidelines
WARNING
There is a risk of danger, if the safety instructions are not observed.
Non-observance of safety information and instructions can lead to an electrical
shock, fire and/or serious injuries.
Please observe all safety information and instructions both in these
and in all other instructions included with the E-Bike.
CAUTION: Risk of injury if the E-Bike system is activated
unintentionally. Please remove the rechargeable battery before
working on the E-Bike (e.g. assembly, maintenance, working on the
chain etc.), or transporting or storing it.
CAUTION: Risk of injury when using the pushing aid without the
wheels touching the floor. Only use the pushing aid when pushing the
E-Bike.
Please keep these instructions for future reference.
2.2 Intended use
The display and control unit is only intended for use with the BMZ E-Bike system. It
serves to display driving and status-relevant information and to control the motor.
2.3 Explanation of the figures
All illustrations are outlines only and details may vary on your E-Bike.
2.4 Description
2.4.1 Variants
The compact Sportive Display is a display and control unit in one. It can be installed
unobtrusively near the handle and is less susceptible to damage in case of a fall.
The large New-Style display is easy to read and has additional functions. The system
is controlled easily via the control unit near the handle.
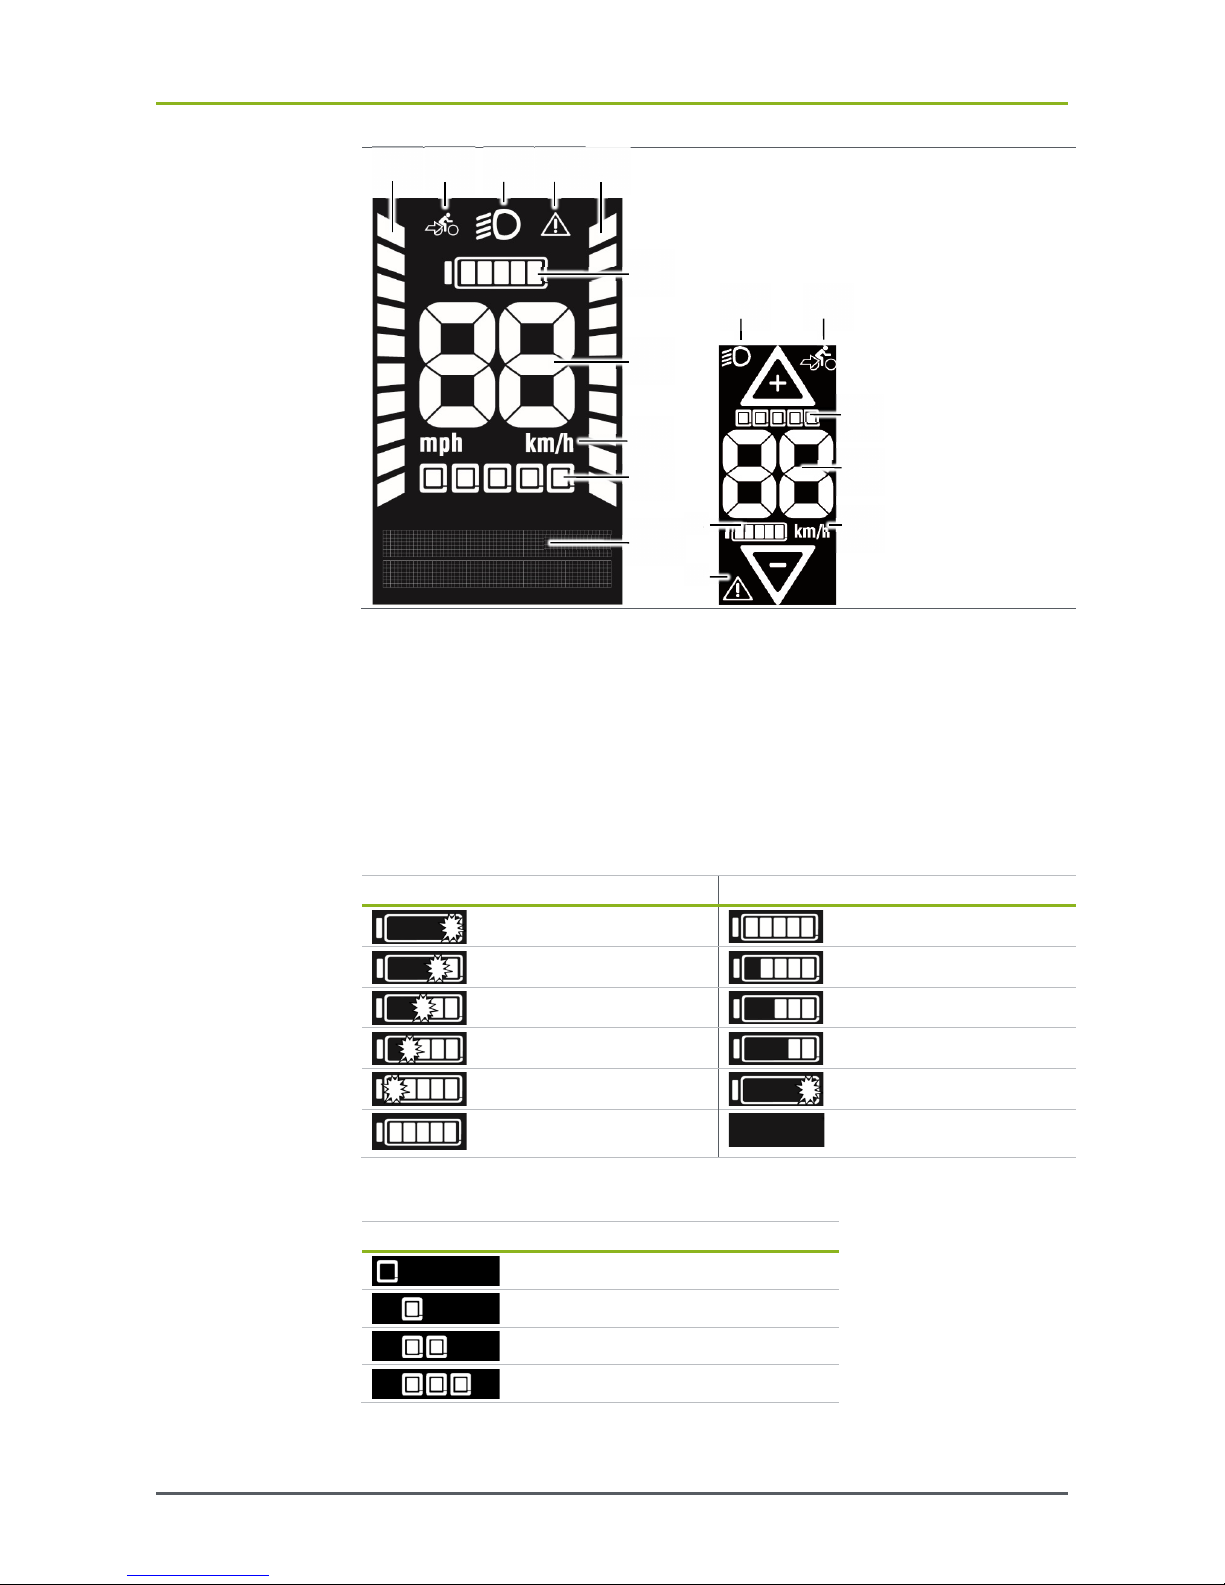
2.4.2 Explanation of symbol
The various displays have a similar design. The New-Style display also has a
multifunctional display and a display that shows the ratios of the performance by the
rider and that of the motor.
Sportive Display
New-Style Display
2 Display
Page 10 of 28 Version 1.1
Symbols
1Pushing mode
2Lighting
3Warning
4Charging status
(2.4.3)
5Speed
6Unit (km/h, mph)
7Support level (2.4.4)
8Performance ratio
cyclist
9Performance ratio
motor
10 Multifunctional
display (2.4.5)
2.4.3 Charging status display
The charging status of the rechargeable battery (4) is shown in five segments on the
display. One segment corresponds to about 20% of the rechargeable battery capacity
(see 3.5.3).
If the charging status is < 20 %, the charging status display will begin to flash. If the
charging status is < 5 %, the charging status display will disappear. In this state the
motor support is switched off to ensure that the lights can be used for a further two
hours.
during charging during driving
0-19 %
100-80 %
20-39 %
79-60 %
40-59 %
59-40 %
60-79 %
39-20 %
80-99 %
19-5 %
100 % < 5-0 % Emergency
mode, motor off
2.4.4 Support levels display
Display
Support level
off
1 (minimum)
2
3 (maximum)
Figure 2
Display symbols new
style (left) and: Sportive
(right)
Emergency mode
Table
2
Charging status display
= flashes
Table 3
Support level display
31 2
4
5
6
7
9
10
8
4 6
2 1
3
5
7

2 Display
21 Jun 2017 Page 11 of 28
2.4.5 Multifunctional display
Key functions. In order to… Unit
Time (Time of Day)
hh:mm (24 h or 12 h am/pm)
Tour dist. (Trip Distance)
km | mi
Tour kcal (Trip Calories)
kcal
Tour time (Trip Time) hh:mm
Ø Speed (Avg. Speed)
km | mi
Max speed (Max-Speed)
km/h | mi/h
Tot. dist. (Total Distance)
km | mi
Tota. time (Total Time)
hh:mm
Individual functions can be deactivated depending on the E-Bike model. You can
obtain detailed information from your cycle manufacturer and your bicycle dealer.
2.4.6 Control elements
11
On/off (button)
12 Light (button)
13 Pushing aid (button)
14 Up (rocker)
15 Menu (touch field)
16 Down (rocker)
2.4.7 USB slot
This display has a micro USB slot (17) on the lower side. You can charge other devices,
e.g. mobile phone, using a suitable USB cable.
17
Micro-USB slot
The charging current is 0.5 amps. Observe the allowed charging currents of your
devices.
2.5 Assembly
2.5.1 Mount the New-Style display
Motor and battery are mounted.
Table
4
Multifunctional display
NOTE:
Figure 3
Control elements
Figure 4
Rear side of Sportive
Display
NOTE:
Requirement
14
11
12
13
15
16
17
2 Display
Page 12 of 28 Version 1.1
Allen 2.5 mm
Allen 3 mm
Intermediate cable
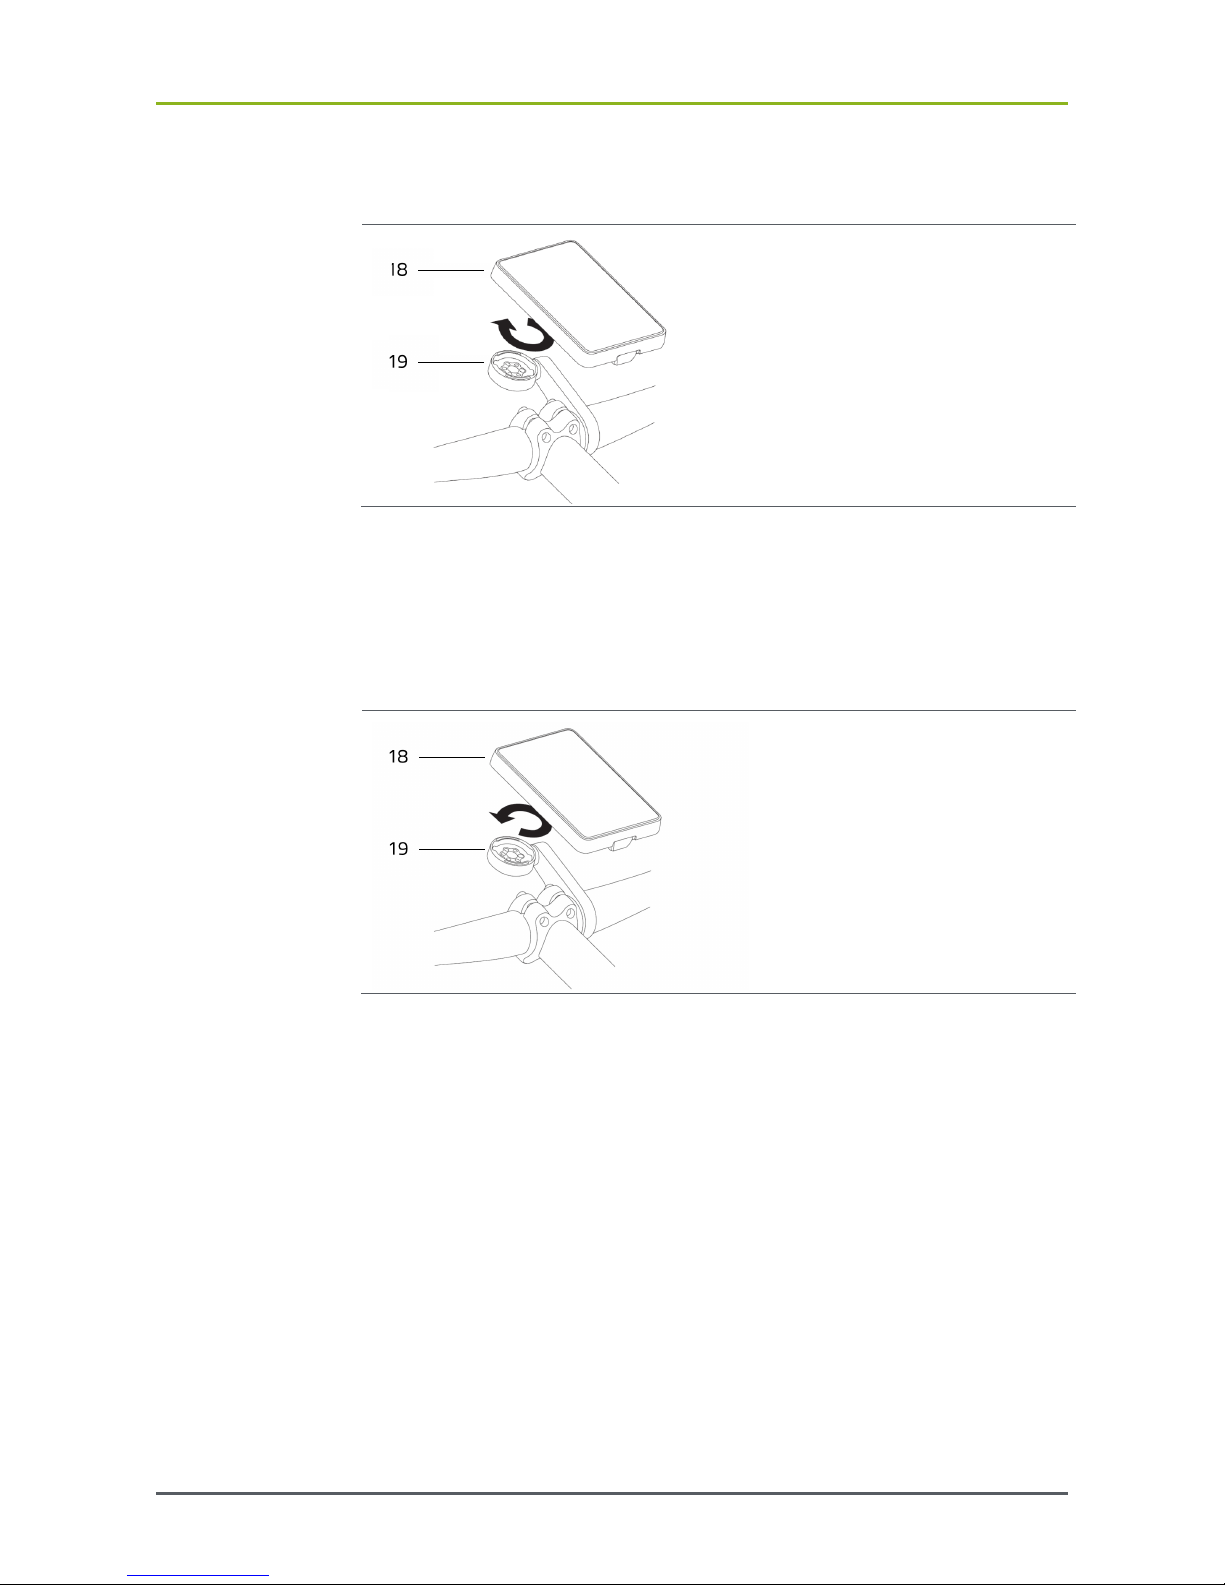
18 New-Style Display
19 Display bracket
1. Mount the control unit within reach on the handlebars. (allen 2.5 mm)
2. Mount the display bracket in the centre of the handlebar (allen 3 mm).
3. Place the New-Style display into the bracket at an angle of 45° to the
left and the twist until straight.
4. Connect the display to the motor via an intermediate cable.
2.5.2 Remove New-Style display
18 New-Style Display
19 Display bracket
1. Disconnect the display from the intermediate cable.
2. Turn the New-Style display by 45° to the right and remove by lifting
upwards.
2.5.3 Mount the Sportive Display
Motor and battery are mounted.
Allen screwdriver 2.5 mm
1. Mount the Sportive Display close to the left handle.
2. Connect the connector to the motor.
2.6 Commissioning
You do not need to take any further steps to commission the display after mounting
it. The display is operational as soon as it has been fitted into the bracket.
Tools
Figure 5
Mount the New-Style
display
Instructions
Figure 6
Remove the New-Style
display
Requirement
Tools
Instructions
18
19
18
19

2 Display
21 Jun 2017 Page 13 of 28
It is only fully functional if the speed sensor and the cables have been mounted
correctly and the rechargeable battery is adequately charged.
2.7 Operation
2.7.1 Switching on the E-Bike system
Press the LED button on the rechargeable battery.
The display unit activates automatically.
The E-Bike system is now operational.
2.7.2 Switching off the E-Bike system
If the bike is not moved, the display unit and motor switch to standby mode.
However, this can also be activated manually.
If you only want to park your E-Bike briefly, you can switch to the standby mode as
follows:
Press the On/Off button briefly
The display is switched off.
The rechargeable battery remains in the
Active Mode
for two hours
(see 3.6.2).
As soon as you move the E-Bike again, the display and motor are reactivated and the
E-Bike system is available again. After two hours in the Active Mode the
rechargeable battery switches to the Deep Sleep mode (see 3.6.2).
There are two ways of completely deactivating the E-Bike system:
Press the On/Off button longer (> 3 s).
OR
Press the LED button on the rechargeable battery longer (> 3 s).
The display unit, motor and rechargeable battery will be switched
off completely.
After completely switching off the system, it needs to be started again via the LED
button on the rechargeable battery to reactivate it (see 3.6.1).
Scott E-Bikes can only be switched off via the rechargeable battery.
2.7.3 Change support level
Press rocker Up to increase the support level.
Press rocker Down to decrease the support level.
2.7.4 Activate pushing aid
Keep the pushing aid button pressed (min. 3 s).
To finish, release button.
2.7.5 Switch the lights on and off
Press the Light button briefly.
NOTE:
Standby mode
Complete
deactivation
NOTE:
Scott E-Bikes

2 Display
Page 14 of 28 Version 1.1
2.7.6 Switchover the multifunctional display
Touch the touch field Menu
2.7.7 Change the settings on the New-Style Display
You can make the following settings:
Range
Value
Reset trip Reset all values for driving time, calorie
consumption, average speed to 0
Reset all Reset all values including total trip distance
and time to 0
Date
DD/MM/YY
Time format 24/12
Time
hh/mm
Language
German/English
Metric/Anglo-American
km/mi
1. Press the Light button for three seconds.
2. Press the Menu touch field as often as required until the required
menu is displayed.
3. Set the values with the rocker Up and Down.
4. Touch the touch field Menu to confirm.
The settings menu can be quitted by pressing the Menu touch field in the last area.
The settings menu can be quit immediately by pressing the Light button.
2.7.8 Change the settings on the Sportive Display
The Sportive Display can show miles or kilometres.
1. Press the Light button for three seconds.
2. Set the unit with the rocker Up and Down.
3. Press the Light button for three seconds to confirm.
2.7.9 Charge external devices via USB.
Place the display unit into the bracket.
Open the flap on the USB interface.
Use a suitable USB cable to connect the USB interface with the
respective end device.
"CHArG" is shown briefly in the display.
2.8 Maintenance and cleaning
Keep all components of the E-Bike clean, especially the contacts of the rechargeable
battery and its bracket. Clean them carefully with a dry and soft cloth.
None of the components, including the motor, may be dipped into water or cleaned
with a high-pressure device.
Please contact an authorised dealer for servicing or repairs to the E-Bike.
Instructions
Overview
Table 5
Settings New-Style
Display
Instructions
NOTE:
Overview
Instructions

2 Display
21 Jun 2017 Page 15 of 28
2.9 Waste Disposal
Motor, display, rechargeable battery, speed sensor, accessories and packaging should
be disposed of in an environmentally-compatible manner. Do not dispose of your E-
Bike and its components in the household waste system.
In compliance with the European Directive 2012/19/EU electrical devices that are no
longer serviceable, and in compliance with the European Directive 2006/66/EG faulty
or spent rechargeable batteries/batteries, must be collected separately and disposed
of in an environmentally-friendly manner.
Please hand in all spent rechargeable batteries and non-functional displays to an
authorised bicycle dealer.
2.10 Technical data
New-Style display (#27937)
Dimensions (mm)
Display: 44 x 62.5 x 8
Control unit: 18 x 46 x 19.75
Display range: 38 x 50
Weight
Display unit: 67 g
Rated voltage
36 V DC
Type of protection:
IP65
Working temperature range
-10 … 60 °C
Storage temperature range
-20 … 85 °C
USB charging voltage
5 V DC
USB charging current max.
500 mA
Lighting
Rated voltage
6 V
Rated current max.* 500 mA
Rated output*
Front light: 2.6 W
Rear light: 0.6 W
The rated current and the rated output of the lighting may vary depending on the
rechargeable battery that is used. You can obtain detailed information from your
cycle manufacturer and your bicycle dealer.
Only for EU countries
Table 6
Technical data display
Table 7
Technical data lighting

3 Rechargeable battery
Page 16 of 28 Version 1.1
3Rechargeable battery
3.1 Safety guidelines
WARNING
There is a risk of danger, if the safety instructions are not observed.
Non-observance of safety information and instructions can lead to an electrical
shock, fire and/or serious injuries.
Injuries or damage is also possible as a result of dangerous reactions of chemical
substances that leak from the rechargeable battery resulting from non-observance
of the safety instructions.
Please observe all safety information and instructions both in these
and in all other instructions included with the E-Bike.
CAUTION: Risk of injury if the E-Bike system is activated
unintentionally. Before working on the E-Bike (e.g. assembly,
maintenance, working on the chain etc.), or transporting or storing it,
please remove the rechargeable battery from the E-Bike.
CAUTION: Risk of injury when using the pushing aid without the
wheels touching the floor. Only use the pushing aid when pushing the
E-Bike.
Risk of short circuits! Do not open, dismantle or chop up the
rechargeable battery. Opening the rechargeable battery will invalidate
the warranty.
Risk of explosion! Protect the rechargeable battery from heat (e.g. also
from permanent exposure to sunlight), fire and submersion into water.
Risk of burns and fire caused by short circuits! Keep small metal
objects (e.g. paper clips, nails, screws, keys etc.) away from the
rechargeable battery. These could bridge the contacts. All warranty
claims toward BMZ will become invalid in case of short circuit damage
resulting from this.
Risk of skin irritation or burns from leaking fluids: if used incorrectly,
fluid can leak from the rechargeable battery. Avoid contact with this.
In case of accidental contact, rinse the affected areas with water. If the
fluid comes into contact with mucous membranes (e.g. eyes), please
seek medical attention immediately.
Do not expose the rechargeable battery to mechanical impacts. There
is a risk of damage to the rechargeable battery.
The risk of short circuits and fire or an electrical shock is higher, if a
damaged rechargeable battery is used. Never continue to use a faulty
or damaged rechargeable battery.
Vapours may irritate the respiratory organs. Vapours may be created if
the rechargeable battery is damaged or used incorrectly. Let in fresh
air and seek medical advice if symptoms persist.
Risk of fire due to use of other chargers. Only charge the rechargeable
battery with the charger supplied with the E-Bike system.

3 Rechargeable battery
21 Jun 2017 Page 17 of 28
Only use the rechargeable battery in conjunction with E-Bikes with the
original BMZ E-Bike system. This is the only way to protect the
rechargeable battery from dangerous overloading.
Risk of injury or risk if other rechargeable batteries are used: only use
rechargeable batteries approved by the bike manufacturer for your E-
Bike. The warranty and liability will become invalid if other
rechargeable batteries are used.
Keep the rechargeable battery away from children.
Always keep the rechargeable battery dry and clean.
Always keep the contacts of the rechargeable battery clean. If they are
soiled, clean them with a dry cloth.
Avoid unnecessary charging. Do not charge the rechargeable battery
for a longer period, if you are not going to use it.
Please keep these instructions for future reference.
Never leave the rechargeable battery and charger unattended during
charging.
3.2 Intended use
The rechargeable battery is designed and intended for use in a BMZ E-Bike system.
The battery must only be used with bikes/components in compliance with the bike
categories 1 and 2 according to the international standard (ASTM F2043-13 Standard
Classification for Bicycle Usage):
Category 1: This is a set of conditions for the operation of a
bicycle/component on a regular paved surface where the tires are
intended to maintain ground contact.
Category 2: This is a set of conditions for the operation of a bicycle that
includes Condition 1 as well as unpaved and gravel roads and trails
with moderate grades. In this set of conditions, contact with irregular
terrain and loss of tire contact with the ground may occur. Drops are
intended to be limited to 15 cm (6") or less.
If a bicycle/component is used in a higher category than defined, the stress on its
materials will increase. This results in a shortened life span of all components and, in
extreme cases, can lead to the failure of important components. This means an
increased danger of accidents and injury.
3.3 Explanation of the figures
All illustrations are outlines only and serve as examples. The details may vary from
your own E-Bike because the BMZ E-Bike system can be combined with a number of
different rechargeable battery variants. You can obtain detailed information about
the rechargeable battery used in your E-Bike from your cycle manufacturer and your
bicycle dealer.

3 Rechargeable battery
Page 18 of 28 Version 1.1
3.4 Assembly
3.4.1 Insertion and removal of the rechargeable battery
The BMZ E-Bike system can be combined with a number of different rechargeable
battery variants. The assembly and removal of the rechargeable battery depends on
the rechargeable battery model used. You can obtain detailed information about this
from your cycle manufacturer and your bicycle dealer.
Always switch the rechargeable battery off before placing it into or removing it from
the bracket.
3.4.2 Locking and unlocking the rechargeable battery latch
20
Rechargeable battery
latch
The various assembly variants of the rechargeable battery require various
rechargeable battery latch designs. You can obtain detailed information about locking
Figure 7
Insertion of the
rechargeable battery
NOTE:
Figure
8
Rechargeable battery
latch
20

3 Rechargeable battery
21 Jun 2017 Page 19 of 28
and unlocking the rechargeable battery from your cycle manufacturer and your
bicycle dealer.
3.5 Commissioning
3.5.1 Check the rechargeable battery before using it for the first
time
The rechargeable battery is partially charged when delivered. Therefore, test the
rechargeable battery before you charge it for the first time or use it with your E-Bike.
Activate the rechargeable battery by pressing the LED button.
The charging status display should now switch from 'empty' to 'full'
and then the current display status is shown for approx. 4
seconds.
If no LED on the charging status display shines or if the
rechargeable battery cannot be activated, it may be possible that
the cell voltage is too low and the rechargeable battery needs to be
charged.
If at least one but not all LEDs of the charging status display shine,
the rechargeable battery should be fully charged before it is used
for the first time.
3.5.2 Charging the rechargeable battery
21 Charging connector
22 Charging connection
Only use the charger supplied with your E-Bike. Only this charger matches your
rechargeable battery.
The rechargeable battery is partially charged when delivered (approx. 30-50 %). To
guarantee the full performance of the rechargeable battery, charge it completely with
the charger before it is used for the first time (see also, chapter 4).
The rechargeable battery can be charged separately or on the E-Bike without
reducing the service life.
Connect the charger to the mains supply.
Figure
9
Charging the
rechargeable battery
(example)
NOTE:
21 22

3 Rechargeable battery
Page 20 of 28 Version 1.1
The LED status display of the charger should now be active (see
4.5.3).
Rechargeable battery not on the E-Bike
Connect the charger connector to the charging socket of the
rechargeable battery.
Charging begins.
Some rechargeable batteries may have two charging connections. It does not matter
which of the two connections is used for the charging process.
Rechargeable battery on the E-Bike
Connect the charger connector to the free charging socket of the
rechargeable battery.
Charging begins.
Interrupting the charging process does not damage the rechargeable battery.
If the rechargeable battery cannot be charged, the cell voltage has undercut the
critical value of 2V per cell and the rechargeable battery is faulty.
Do not charge a damaged rechargeable battery and do not use it. Please contact an
authorised dealer.
The rechargeable battery reaches its maximum service life, if it is charged in ambient
temperatures between 10 and 30°C.
3.5.3 Charging status display
23
Charging status
display
24 LED button
The five LEDs on the charging status display (23) show the charging status of the
rechargeable battery after pressing the LED button (24). Each LED equates to about
20% capacity. All five LEDs will light up when the rechargeable battery is fully
charged. The charging status of the activated rechargeable battery is also shown on
the display of the display unit (see 2.4.3). If the capacity of the rechargeable battery
lies below 10 %, the first LED on the charging status display flashes.
The rechargeable battery can be charged with and without the display unit. Without a
display unit, the charger can only be monitored on the charging status display. The
display unit can be removed during the charging process or can even be positioned
after the start of the charging process. The charging status is shown with the
charging status display on the rechargeable battery and via the bar on the display (4,
Figure 2, page 10). During the charging process, the LEDs of the charging status
display on the rechargeable battery shine. Each LED that shines permanently
NOTE:
NOTE:
NOTE:
NOTE:
NOTE:
Figure 10
Charging status display
When cycling and
when the
rechargeable battery
is disconnected
During charging
23
24
Table of contents
Popular Bicycle Accessories manuals by other brands

BOS Suspension
BOS Suspension iDYLLE 39 SE Service manual

Giant
Giant NEOSTRACK user manual

SR Suntour
SR Suntour RUX RC2 DH Setup guide

Nova Ride
Nova Ride Oversized Pulley Wheel System Sram AXS Red... Mounting manual

Specialized
Specialized Speedzone Comp CR2302 user manual

SRAM
SRAM Rock Shox TwistLoc user manual


