Body Break 16116390-1 User manual

Folding Recumbent Cycle
RETAIN FOR
FUTURE REFERENCE
MAURICE PINCOFFS CANADA INC. 6050 DON MURIE STREET, NIAGARA FALLS,
ONTARIO L2E 6X8
OWNER`S
MANUAL
Model No.
16116390-1
• Assembly
• Operation
• Exercise
• Parts
• Warranty
CAUTION:
You must ead and
unde stand this
owne ’s manual
befo e ope ating
unit.

CUSTOMER SERVICE 1-888-707-1880 MAURICE PINCOFFS CANADA ©2009
1
MANUFACTURE’S ONE-YEAR LIMITED WARRANTY
You BODY BREAK ecumbent cycle is wa anted fo one yea f om the date of pu chase
against defects in mate ial, when used fo the pu pose intended, unde no mal conditions, and
p ovided is eceives p ope ca e. Any pa t found defective o missing will be sent at no cost
when etu ned in acco dance with the te ms of this wa anty.
This wa anty is not t ansfe able and is extended only to the o iginal owne .
The wa anty shall not apply to exe cise cycles units which a e (1) used fo comme cial o
othe income p oducing pu poses, o (2) subject to misuse, neglect, accident o unautho ized
epai s and alte ations.
This wa anty p ovided he ein is in lieu of all othe exp ess wa anties. Any implied wa anties,
including any implied wa anties of me chantability o fitness fo pa ticula pu pose, a e limited
in du ation to the fi st 12 months f om the date of pu chase. All othe obligations o liabilities,
including liability fo consequential damages, a e he eby excluded.
REPAIR PARTS AND SERVICE
All of the pa ts fo the exe cise cycle, shown in figu e can be o de ed f om Mau ice Pincoffs
Canada Inc. 6050 DON MURIE STREET, NIAGARA FALLS, ONTARIO L2E 6X8. When
o de ing pa ts, the pa ts will be sent and billed at the cu ent p ices. P ices may be subject to
change without notice. Check o money o de must accompany all o de s. Standa d ha dwa e
items a e available at you local ha dwa e sto e.
To ensu e p ompt and co ect handling of any e o s, o to answe any questions, please call
ou Toll F ee numbe : 1-888-707-1880, o local numbe 1-905-353-8955 o fax
1-905-353-8968 o email
custome se vice@pincoffs.ca
Office hou s a e f om 8:30 AM to 5:00 PM
Monday to F iday Easte n Standa d Time.
Always include the following info mation when o de ing pa ts
Model Numbe
Name of Each Pa t
Pa t Numbe of Each Pa t
TABLE OF CONTENTS
WARRANTY 1
DIAGRAM & PARTS LIST 10-12
SAFETY PRECAUTIONS 2
MONITOR INSTRUCTIONS 13
PRE-ASSEMBLY CHECK LIST 3
TROUBLE SHOOTING 14
HARDWARD PACKING LIST 4
TRAINING GUIDELINES 15-17
ASSEMBLY INSTRUCTION 5-9
STRETCHING 18-19

CUSTOMER SERVICE 1-888-707-1880 MAURICE PINCOFFS CANADA ©2009
2
SAFETY PRECAUTIONS
Thank you fo pu chasing ou p oduct. Even though we go to g eat effo ts to ensu e the
quality of each p oduct we p oduce, occasional e o s and /o omissions do occu . In any
event should you find this p oduct to have eithe a defective o a missing pa t please contact
us fo a eplacement.
This p oduct has been designed fo home use only. P oduct liability and gua antee conditions
will not be applicable to p oducts being subjected to p ofessional use o p oducts being used
in a gym cente .
This exe cise equipment was designed and built fo optimum safety. Howeve , ce tain
p ecautions apply wheneve you ope ate a piece of exe cise equipment. Be su e to ead the
enti e manual befo e assembly and ope ation of this machine. Also, please note the following
safety p ecautions:
1. Read the OWNER’S OPERATING MANUAL and all accompanying lite atu e and
follow it ca efully befo e using you cycle.
2. If dizziness, nausea, chest pains, o any othe abno mal symptoms a e expe ienced
while using this equipment, STOP the wo kout at once. CONSULT A PHYSICIAN
IMMEDIATELY.
3. Inspect you exe cise equipment p io to exe cising to ensu e that all nuts and bolts
a e fully tightened befo e each use.
4. The cycle must be egula ly checked fo signs of wea and damage. Any pa t found
defective must be eplaced with a new pa t f om the manufactu e .
5. Fitness equipment must always be installed on a flat su face, It is ecommended to use
an equipment mat to p event the unit f om moving while it is being used, which could
possibly sc atch o damage the su face of you floo .
6. No changes must be made which might comp omise the safety of the equipment.
7. It is ecommended to have a minimum of 2’ safe clea ance a ound the exe cise
equipment while in use.
8. Keep child en and pets away f om this equipment at all times while exe cising.
9. Wa m up 5 to 10 minutes befo e each wo kout and cool down 5 to 10 minutes
afte wa d. This allows you hea t ate to g adually inc ease and dec ease and will help
p event you f om st aining muscles.
10. Neve hold you b eath while exe cising. B eathing should emain at a no mal ate in
conjunction with the level of exe cise being pe fo med
11. Always wea suitable clothing and footwea while exe cising. Do not wea loose fitting
clothing that could become entangled with the moving pa ts of you cycle.
12. Ca e must be taken when lifting o moving the equipment, so as not to inju e you back.
Always use p ope lifting techniques.
13. Use weight should not exceed 250 lbs.
WARNING: BEFORE BEGINNING ANY EXERCISE PROGRAM CONSULT YOUR
PHYSICIAN. THIS IS ESPECIALLY IMPORTANT FOR INDIVIDUALS OVER THE AGE OF 35
OR PERSONS WITH PRE-EXISTING HEALTH PROBLEMS. READ ALL INSTRUCTIONS
BEFORE USING ANY FITNESS EQUIPMENT. WE ASSUME NO RESPONSIBILITY FOR
PEROSNAL INJURY OR PROPERTY DAMAGE SUSTAINS BY OR THROUGH THE USE OF
THIS PRODUCT.

CUSTOMER SERVICE 1-888-707-1880 MAURICE PINCOFFS CANADA ©2009
3
PRE-ASSEMBLY CHECK LIST
1
69
5
3
61
4
6
68
PART NO. DESCRIPTION Q’TY
1 F ont f ame 1
2 Rea f ame 1
69 F ont stabilize 1
5 Rea stabilize w/ adjustable end caps 1
3 Handleba w/ pulse 1
61 Seat 1
4 Back est suppo t b acket 1
62 Back est cushion 1
22 Monito 1
68L/R F ont end caps w/t anspo tation wheel 2
Inne box 1

CUSTOMER SERVICE 1-888-707-1880 MAURICE PINCOFFS CANADA ©2009
4
HARDWARE PACKING LIST
PART NO. DESCRIPTION Q’TY SKETCH
6 Cap nut M8 4
19 Ca iage bolt M8*75mm 2 6 19
64 Cu ve washe M8 4
25 Sp ing washe M8 4 64 25
50 Quick elease knob 1
60 Ca iage bolt M8*45mm 2 50 60
15L Pedal (left) 1
15R Pedal ( ight) 1 15L 15R
21 Adjustable knob 2
31 Nylon nut M10 1 21 31
32 Flat washe M10 2
55 Hex head bolt M10*118mm 1 32 55
59 Sc ew M6*15mm 4
63 Allen head bolt M8*40mm 2 59 63
51 Plastic cap M10 4
52 Lock pin 1 51 52
74 Allen w ench 1
75 Unive sal w ench 2 74
75
23 Sc ew M4*16mm 4
54 Seat post sleeve 1
23 54
NOTE:
1. Above desc ibed pa ts a e all the pa ts you need to assemble this machine. Befo e you
sta t to assemble, please check the ha dwa e packing to make su e they a e included.
2. All the othe pa ts desc ibed on page 11-12(pa ts list) a e p e-assembled at the facto y.

CUSTOMER SERVICE 1-888-707-1880 MAURICE PINCOFFS CANADA ©2009
5
ASSEMBLY INSTRUCTION
This manual is designed to help you easily assemble, adjust and use this machine. Please
ead this manual ca efully. Fo the sake of familia izing you self with the pa ts identified in the
inst uction, fi st study the ove view d awing.
Set all pa ts in a clea a ea on the floo and emove the packing mate ial. Refe to the pa ts
list fo help to identify the pa ts.
It will take two people to assemble you unit.
STEP 1. ATTACHING THE FRONT STABILIZER AND REAR FRAME
Attach the f ont stabilize (69) to the f ont b acket of the main f ame (1) using 2 allen
head bolts ( 6), 2 flat washe s ( 4) and 2 sp ing washe s ( 5) which a e p e-assembled
on the f ont of the main f ame (1).
Attach the f ont end caps (68R/L) with t anspo tation wheel (66) to the ends of the f ont
stabilize (69) and secu e using 4 sc ews ( 3).
Secu e 2 adjustable knobs ( 1) to the bottom of the f ont stabilize (69).
Note: The adjustable knobs ( 1) a e used to level you cycle.
Attach the ea f ame ( ) to the f ont f ame (1) using 1 hex head bolt (55), 2 flat washe s
(3 ) and 1 nylon nut (31).
Fasten the 2 plastic caps (51) to the ends of the bolt (55).
Inse t the lock pin (5 ) into the ea f ame ( ).
NOTE: Make su e you fasten the bolts secu ely to avoid shaking and discomfo t when cycling.
26
25
24
23
23
21
21
68R
68L
1
55
5131
32
32
2
69
CUSTOMER SERVICE 1-888-707-1880 MAURICE PINCOFFS CANADA ©2009
6
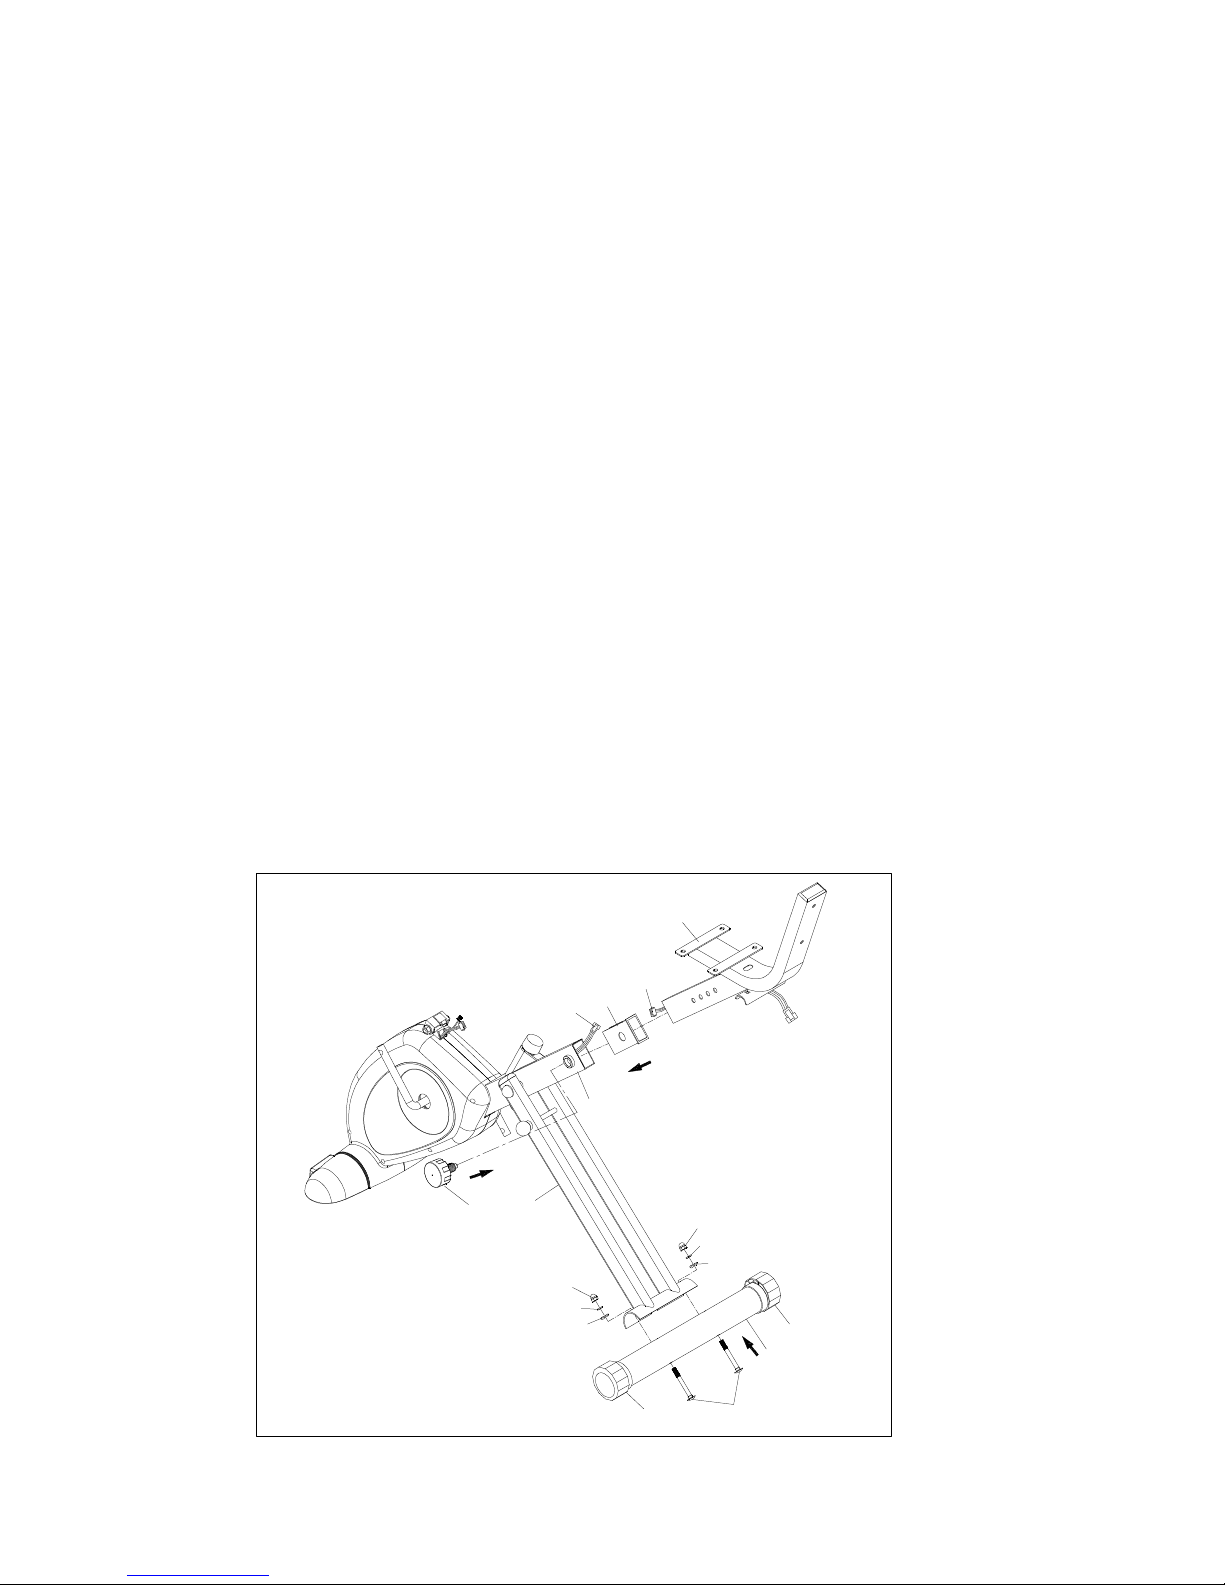
STEP . ATTACHING THE REAR STABILIZER AND THE BACKREST SUPPORT
BRACKET
Attach the ea stabilize (5) with two end caps (18) to the ea b acket of ea f ame ( ).
Secu e using 2 ca iage bolts (19), 2 cu ve washe s (64), 2 sp ing washe s ( 5) and 2
cap nuts (6).
NOTE: If the cycle is not on even g ound, you can use the end caps (18) to adjust
the level you cycle.
Inse t the seat post sleeve (54) into the main tube of the f ont f ame (1).
Connect the uppe senso wi e (72) to the lowe senso wi e (73)
Inse t the back est suppo t b acket (4) into the mounting tube of the main f ame (1).
Secu e in you desi ed position using the quick elease knob (50).
NOTE: Ensu e that the wi e is safely tucked inside the opening so that the wi e does
not get pinched when inse ting the back est suppo t b acket into the f ame.
HOW TO USE QUICK RELEASE KNOB
A) TIGHTEN THE QUICK RELEASE
(1) Inse t the quick elease knob (50) th ough the hole of seat post mounting tube (1) and the
back est suppo t b acket (4).
(2) Tighten the quick elease knob (50) in a clockwise di ection.
Please note quick elease is with +/- ma k on su face.
B) LOOSEN THE QUICK RELEASE
(1) Loosen the quick elease knob (50) in a counte clockwise di ection.
(2) Pull the quick elease knob (50) and slide the back est suppo t b acket (4) into you desi ed
position.
(3) Inse t the quick elease knob back and tighten in a clockwise di ection.
NOTE: Ensu e that you fasten the bolts secu ely to avoid shaking and discomfo t when
cycling.
6
25
64
6
25
64
19
2
1
54
4
50
18
5
18
73
72

CUSTOMER SERVICE 1-888-707-1880 MAURICE PINCOFFS CANADA ©2009
7
STEP 3. ATTACHING THE HANDLEBAR
Connect the uppe senso pulse wi e (7 ) to pulse wi e (71) f om the handleba (3).
Attach the handleba (3) to the ea b acket of back est suppo t b acket (4) using 2
ca iage bolts (60), 2 cu ve washe s (64), 2 sp ing washe s ( 5) and cap nut (6).
Note: Ensu e that the wi es a e safely inse ted inside the main f ame to avoid
pinching the wi es.
60
6
25
64
71
72
STEP 4. ATTACH THE SEAT AND BACK CUSHION
Attach the seat (61) to the welded b acket of uppe back est suppo t b acket (4).
Secu e using 4 sc ews (59).
Attach the back est cushion (6 ) to the welded tube of back est suppo t b acket (4).
Secu e using 2 allen head bolts (63).
61
62
59
59
63
2
1
4

CUSTOMER SERVICE 1-888-707-1880 MAURICE PINCOFFS CANADA ©2009
8
STEP 5. ATTACH THE MONITOR AND THE PEDAL
Connect the senso wi e (48) to the monito ( ).
Connect the lowe pulse wi e (73) to the monito ( ).
Attach the monito ( ) to the monito b acket on the f ont f ame (1).
Fasten 2 plastic caps (51) to the ends of the bolt (46).
Note: Befo e sliding the monito on the up ight post, please ensu e all wi es a e
safely tucked inside the opening of the up ight post. This will ensu e that the
monito slides on easily and avoids pinching the wi es.
Connect each pedal (15R / 15L) to the matching c ank a m (1 ).
NOTE: The ight pedal “R” should be th eaded on clockwise. The left pedal “L”
should be th eaded on counte -clockwise.
22
51
48
15L
15R
1
73
51
FIRMLY TIGHTEN ALL NUTS AND BOLTS
YOUR UNIT IS NOW FULLY ASSEMBLED

Custome Se vice 1-888-707-188 Mau ice Pincoffs Canada Inc. ©2009
9
HOW TO STORE YOUR BIKE
Loosen the lock pin (5 ) and fold the ea f ame ( ) towa d the f ont main f ame (1).
Inse t the lock pin (5 ) into the hole of the b acket of f ont f ame (1) and th ough the
ea f ame ( ) to secu e in folded position.
2
1

Custome Se vice 1-888-707-188 Mau ice Pincoffs Canada Inc. ©2009
10
DIAGRAM
51
51
55
32
52
1
22
8
89
9
10L
11
32
12
14
15L
15R
10R
8
9
62
61
57
56
58
2
3
4
60
59
59
6
25
64
47
23
23
26
6
25
64
6
25
64
18
18
19
5
25
24
37 24 36
3534
33
32 7
27
29
28 30
31
31
31
32
32
38
34
3940
43
42
41
44
45
46
53 54
50
51
51
48 49
20
17
71
16
8
8
70
16
73 72
32
21
68L
68R
67
66
65
21
65
66
67 59

Custome Se vice 1-888-707-188 Mau ice Pincoffs Canada Inc. ©2009
11
PART LIST
KEY NO. PART NO. DESCRIPTION Q’TY
1 39001 F ont f ame 1
2 39002 Rea f ame 1
3 39003 Handle ba 1
4 39004 Back est suppo t b acket 1
5 39005 Rea stabilize 1
6 39006 Cap nut M8 4
7 39007 Idle wheel b acket 1
8 39008 Machine sc ew M4*15mm 6
9 39009 Machine sc ew M4*25mm 4
10L 39010L Chain cove left 1
10R 39010R Chain cove ight 1
11 39011 C ank bea ing assembly 1
12 39012 C ank w/pulley 1
13 39013 Magnet 1
14 39014 V-belt 1
15L 39015L Pedal left 1
15R 39015R Pedal ight 1
16 39016 Nylon Nut M10*7mm 2
17 39017 Foam inse t 1
18 39018 Adjustable end cap 2
19 39019 Ca iage bolt M8*75mm 2
20 39020 Flat head sc ew M5*15mm 1
21 39021 Adjustable knob 2
22 39022 Monito w/senso wi e 1
23 39023 Machine sc ew M4*16mm 4
24 39024 Flat washe 21*8.5*2mm 3
25 39025 Sp ing washe M8 6
26 39026 Allen head bolt M8*55mm 2
27 39027 Flat head bolt M10*32mm 1
28 39028 Flat washe 3
29 39029 Bea ing 2
30 39030 Sleeve 13*10*5mm 1
31 39031 Nylon nut M1*9mm 3
32 39032 Flat washe 20*10.5*2mm 7
33 39033 Sp ing 1
34 39034 Bea ing 2
35 39035 Clip 17mm 1
36 39036 Magnetic flywheel 1

Custome Se vice 1-888-707-188 Mau ice Pincoffs Canada Inc. ©2009
12
PART NO. PART NO. DESCRIPTION Q’TY
37 39037 Allen head sc ew M8*20mm 1
38 39038 Magnet suppo t b acket 1
39 39039 Key 1
40 39040 Axle 1
41 39041 P ess sp ing 1
42 39042 Nut M5 1
43 39043 Sc ew M5*20mm 1
44 39044 Bushing 25.4*10*20mm 2
45 39045 Monito b acket 1
46 39046 Hex head bolt 1
47 39047 Tension knob 1
48 39048 Senso w/wi e 1
49 39049 Machine sc ew M5*15mm 1
50 39050 Quick elease knob 1
51 39051 Plastic cap M10 4
52 39052 Lock pin 1
53 39053 Plastic cap 2
54 39054 Seat post sleeve 1
55 39055 Hex head bolt M10*118mm 1
56 39056 Foam g ip 2
57 39057 Flat cap 2
58 39058 Squa e cap 30*60 2
59 39059 Sc ew M6*15mm 4
60 39060 Ca iage bolt M8*45mm 2
61 39061 Seat 1
62 39062 Back cushion 1
63 39063 Allen head bolt M8*40mm 2
64 39064 Cu ve washe M8 4
65-1 39065-1 Sc ew M6*75mm 2
66 39066 T anspo tation wheel 2
67 39067 Nylon nut 2
68R-1 39068R-1 F ont end cap 1
68L-1 39068L-1 F ont end cap 1
69-1 39069-1 F ont stabilize 1
70 39070 Hand pulse 1
71 39071 Pulse wi e 1
72 39072 Uppe pulse wi e 1
73 39073 Lowe pulse wi e 1
74 39074 Allen W ench 1
75 39075 Unive sal w ench 2

Custome Se vice 1-888-707-188 Mau ice Pincoffs Canada Inc. ©2009
13
MONITOR INSTRUCTION
Function button
MODE : P ess mode button to select the desi ed function
RESET : P ess mode button fo th ee seconds to eset all values to ze o
Function
Scan: Displays each function in sequence eve y 4 seconds. The display loop is
time, speed, distance, calo ies and pulse.
Time: Displays you elapsed wo kout time up to 99:59
Speed: Displays the cu ent speed up to 99.9 KM pe hou .
Distance: Displays the cumulative distance t aveled du ing you wo kout up to
99.9KM
Calo ie Displays the cumulative calo ies bu ned at any given time du ing you
wo kout up to 999 cal.
NOTE: This data is a ough guide used fo compa ison of diffe ent
exe cise sessions, which cannot be used fo medical pu poses.
G ipped pulse The monito will display the use ’s cu ent hea t ate in beats pe minute
du ing the wo kout. Both hands must hold the g ipped pulse fo a hea t
ate eading du ing you wo kout.
NOTE: This data is a ough guide used fo compa ison of diffe ent
exe cise sessions, which cannot be used fo medical pu poses
Remarks:
1. The monito will tu n on automatically by p essing any key o sta ting you exe cise
p og am.
2. The monito will shut off automatically if no signal is detected fo fou minutes and keep
all function values. You may p ess the mode key o sta t the exe cise p og am to have
the monito esume.
3. If monito is illegible o pa tial segments appea , emove batte ies and e-install.
4. Monito equi es 2 “AA” batte ies.
5. Recha geable batte ies a e not ecommended.

Custome Se vice 1-888-707-188 Mau ice Pincoffs Canada Inc. ©2009
14
TROUBLE SHOOTING
Problem Cause Correction
Monito does not display Batte ies defective Replace batte ies
No speed o distance
displays on the monito
Gea box not connecting
p ope ly
Secu ely plug sending unit into
extension wi e and the back of
the monito
Sending unit not wo king
p ope ly
Replace sending unit
Monito not wo king p ope ly Replace monito
No tension Tension cont ol cable not
connected
Secu ely plug tension cont ol
cable into the extension tension
cont ol cable
Tension cont ol not wo king
p ope ly
Replace the tension cont ol
know w/cable
Magnetic wheel not wo king
p ope ly
Replace magnetic wheel
Hea t ate not displaying Pulse wi e not connected not
connected
Secu ely plug wi es into the back
of the monito
Hand pulse defective Replace hand pulse g ip o ea
clip
Monito not wo king p ope ly Replace monito
G inding C ank bea ing defective Replace c ank bea ings
Idle pulley defective Replace idle pulley
Mag wheel defective Replace magnetic wheel
Squealing V-belt slipping Adjust v-belt

Custome Se vice 1-888-707-188 Mau ice Pincoffs Canada Inc. ©2009
15
TRAINING GUIDELINES
Exercise
Exe cise is one of the most impo tant facto s in the ove all health of an individual. Listed
among its benefits a e:
Inc eased capacity fo physical wo k (st ength endu ance)
Inc eased ca diovascula (hea t and a te ies/veins) and espi ato y efficiency
Dec eased isk of co ona y hea t disease
Changes in body metabolism, e.g. losing weight
Delaying the physiological effects of age
Physiological effects, e.g. eduction in st ess, inc ease in self-confidence, etc.
Basic Components of Physical Fitness
The e a e fou all encompassing components of physical fitness and we need to b iefly define
each and cla ify its ole.
St ength is the capacity of a muscle to exe t a fo ce against esistance. St ength
cont ibutes to powe and speed and is of g eat impo tance to a majo ity of spo ts people.
Muscula Endu ance is the capacity to exe t a fo ce epeatedly ove a pe iod of time, e.g. it
is the capacity of you legs to ca y you 10 Km without stopping.
Flexibility is the ange of motion about a joint. Imp oving flexibility involves the st etching of
muscles and tendons to maintain o inc ease suppleness, and p ovides inc eased
esistance to muscle inju y o so eness.
Ca dio-Respi ato y Endu ance is the most essential component of physical fitness. It is the
efficient functioning of the hea t and lungs
Aerobic Fitness
The la gest amount of oxygen that you can use pe minute du ing exe cise is called you
maximum oxygen uptake (MVo2). This is often efe ed to as you ae obic capacity.
The effo t that you can exe t ove a p olonged pe iod of time is limited by you ability to delive
oxygen to the wo king muscles. Regula vigo ous exe cise p oduces a t aining effect that can
inc ease you ae obic capacity by as much as 20 to 30%. An inc eased MVO2 indicates an
inc eased ability of the hea t to pump blood, of the lungs to ventilate oxygen and of the
muscles to take up oxygen.
Anaerobic Training
This means “without oxygen” and is the output of ene gy when the oxygen supply is insufficient
to meet the body’s long te m ene gy demands. (Fo example, 100 mete sp int).
The Training Threshold
This is the minimum level of exe cise which is equi ed to p oduce significant imp ovements in
any physical fitness pa amete .
Progression
As you become fitte , a highe intensity of exe cise is equi ed to c eate an ove load and
the efo e p ovide continued imp ovement
Overload
This is whe e you exe cise at a level above that which can be ca ied out comfo tably. The
intensity, du ation and f equency of exe cise should be above the t aining th eshold and should
be g adually inc eased as the body adapts to the inc easing demands. As you fitness level
imp oves, so the t aining th eshold should be aised.
Wo king th ough you p og am and g adually inc easing the ove load facto is impo tant.

Custome Se vice 1-888-707-188 Mau ice Pincoffs Canada Inc. ©2009
16
Specificity
Diffe ent fo ms of exe cise p oduce diffe ent esults. The type of exe cise that is ca ied out is
specific both to the muscle g oups being used and to the ene gy sou ce involved.
The e is little t ansfe of the effects of exe cise, i.e. f om st ength t aining to ca diovascula
fitness. That is why it is impo tant to have an exe cise p og am tailo ed to you specific needs.
Reversibility
If you stop exe cising o do not do you p og am often enough, you will lose the benefits you
have gained. Regula wo kouts a e the key to success.
Warm Up
Eve y exe cise p og am should sta t with a wa m up whe e the body is p epa ed fo the effo t
to come. It should be gentle and p efe ably use the muscles to be involved late .
St etching should be included in both you wa m up and cool down, and should be pe fo med
afte 3-5 minutes of low intensity ae obic activity o callisthenic type exe cise.
Warm Down or Cool Down
This involves a g adual dec ease in the intensity of the exe cise session. Following exe cise, a
la ge supply of blood emains in the wo king muscles. If it is not etu ned p omptly to the
cent al ci culation, pooling of blood may occu in the muscles
Heart Rate
As you exe cise, so the ate at which you hea t beat also inc eases. This is often used as a
measu e of the equi ed intensity of exe cise. You need to exe cise ha d enough to condition
you ci culato y system, and inc ease you pulse ate, but not enough to st ain you hea t.
You initial level of fitness is impo tant in developing an exe cise p og am fo you. If you a e
sta ting off, you can get a good t aining effect with a hea t ate of 110-120 beats pe
minute(BPM). If you a e fitte , you will need a highe th eshold of stimulation.
To begin with, you should exe cise at a level that elevates you hea t ate to about 65 to 70%
of you maximum. If you find this is too easy, you may want to inc ease it, but it is bette to lean
on the conse vative side.
As a ule of thumb, the maximum hea t ate is 220 minus you age. As you inc ease in age, so
you hea t, like othe muscles, loses some of its efficiency. Some of its natu al loss is won back
as fitness imp oves.
The following table is a guide to those who a e “sta ting fitness”.
Age 25 30 35 40 45 50 55 60 65
Ta get hea t Rate
10Second Count 23 22 22 21 20 19 19 18 18
Beats pe Minute 138 132 132 126 120 114 114 108 108
Pulse Count
The pulse count(on you w ist o ca otid a te y in the neck, taken with two index finge s)is done
fo ten seconds, taken a few seconds afte you stop exe cising. This is fo two easons: (a) 10
seconds is long enough fo accu acy, (b) the pulse count is to app oximate you BPM ate at
the time you a e exe cising. Since hea t ate slows as you ecove , a longe count isn’t as
accu ate.
The ta get is not a magic numbe , but a gene al guide. If you’ e above ave age fitness, you
may wo k quite comfo tably a little above that suggested fo you age g oup.
The following table is a guide to those who a e keeping fit. He e we a e wo king at about 80%
of maximum.
Age 25 30 35 40 45 50 55 60 65
Ta get hea t Rate
10 Second Count 26 26 25 24 23 22 22 21 20
Beats pe Minute 156 156 150 144 138 132 132 126 120

Custome Se vice 1-888-707-188 Mau ice Pincoffs Canada Inc. ©2009
17
Don’t push you self too ha d to each the figu es on this table. It can be ve y uncomfo table if
you ove do it. Let it happen natu ally as you wo k th ough you p og am. Remembe , the ta get
is a guide, not a ule, a little above o below is just fine.
Two final comments:(1) don’t be conce ned with day to day va iations in you pulse ate, being
unde p essu e o not enough sleep can affect it;(2) you pulse ate is a guide, don’t become a
slave to it.
Endurance Circuit Training
Ca diovascula endu ance, muscle, st ength, flexibility and coo dination a e all necessa y fo
maximum fitness. The p inciple behind ci cuit t aining is to give a pe son all the essentials at
one time by going th ough you exe cise p og am moving as fast as possible between each
exe cise. This inc eases the hea t ate and sustains it, which imp oves the fitness level. Do not
int oduce this ci cuit t aining effect until you have eached an advanced p og am stage.
Body Building
Is often used synonymously with st ength t aining The fundamental p incipal he e is
OVERLOAD. He e, the muscle wo ks against g eate loads than usual. This can be done by
inc easing the load you a e wo king against.
Patronization
This is the te m used to va y you exe cise p og am fo both physiological and psychological
benefits. In you ove all p og am, you should va y the wo kload, f equency and intensity. The
body esponds bette to va iety and so do you. In addition, when you feel you self getting
“stale’, b ing in pe iods of lighte exe cise to allow the body to ecupe ate and esto e its
ese ves. You will enjoy you p og am mo e and feel bette fo it.
Muscle Soreness
Fo the fi st week o so, this may be the only indication you have that you a e on an exe cise
p og am. This, of cou se, does depend on you ove all fitness level. A confi mation that you a e
on the co ect p og am is a ve y slight so eness in most majo muscle g oups. This is quite
no mal and will disappea in a matte of days.
If you expe ience majo discomfo t, you may be on a p og am that is too advanced o you
have inc eased you p og am too apidly.
If you expe ience PAIN du ing o afte exe cise, you body is telling you something.
Stop exe cising and consult you docto .
What to Wear
Wea clothing that will not est ict you movement in any way while exe cising. Clothes should
be light enough to allow the body to cool. Excessive clothing that causes you to pe spi e mo e
than you no mally would while exe cising, gives you no advantage. The ext a weight you lose
is body fluid and will be eplaced with the next glass of wate you d ink. It is advisable to wea
a pai of gym o unning shoes o “sneake s”.
Breathing during Exercise
Do not hold you b eath while exe cising. B eathe no mally as much as possible. Remembe ,
b eathing involves the intake and dist ibution of oxygen, which feeds the wo king muscles.
Rest periods
Once you sta t you exe cise p og am, you should continue th ough to the end. Do not b eak
off halfway th ough and then esta t at the same place late on without going th ough the
wa m-up stage again.
The est pe iod equi ed between st ength t aining exe cises may va y f om pe son to pe son.
This will depend mostly on you level of fitness and the p og am you have chosen. Rest
between exe cises by all means, but do not allow this to exceed two minutes. Most people
manage with half minute to one minute est pe iods

Custome Se vice 1-888-707-188 Mau ice Pincoffs Canada Inc. ©2009
18
STRETCHING
St etching should be included in both you wa m up and cool down, and should be pe fo med
afte 3-5 minutes of low intensity ae obic activity o callisthenic type exe cise. Movements
should be pe fo med slowly and smoothly, with no bouncing o je king. Move into the st etch
until slight tension, not pain, is felt in the muscle and hold fo 20-30 seconds. B eathing
should be slow, hythmical and unde cont ol, making su e neve to hold you b eath.
HEAD ROLLS
Rotate you head to the ight fo one
count, feeling the st etch up the left side of
you neck. Next otate you head back fo
one count, st etching you chin to the ceiling
and letting you mouth open. Rotate you
head to the left fo one count, and finally,
d op you head to you chest fo one count.
SHOULDER LIFTS
Lift you ight shoulde up towa d you ea
fo one count. Then lift you left shoulde up
fo one count as you lowe you ight
shoulde .
SIDE STRETCHES
Open you a ms to the side and continue
Lifting them until they a e ove you head.
Reach you ight a m as fa upwa d towa d
the ceiling as you can fo one count. Feel
the st etch up you ight side. Repeat this
action with you left a m.
QUADRICEPS STRETCH
With one hand against a wall fo balance,
each behind you and pull you ight foot up.
B ing you heel as close to you buttocks as
possible. Hold fo 15 counts and epeat with
left foot up.

Custome Se vice 1-888-707-188 Mau ice Pincoffs Canada Inc. ©2009
19
INNER THIGH STRETCH
Sit with the soles of you feet togethe with
you knees pointing outwa d. Pull you feet
as close into you g oin as possible. Gently
push you knees towa ds the floo . Hold fo
15 counts.
TOE TOUCHES
Slowly bend fo wa d f om you waist, letting
you back and shoulde s elax as you st etch
towa d you toes. Reach down as fa as you
can and hold fo 15 counts.
HAMSTRING STRETCHES
Sit with you ight leg extended. Rest the
sole of you left foot against you ight inne
thigh. St etch towa d you toe as fa as
possible. Hold fo 15 counts. Relax and
then epeat with left leg extended.
CALF / ACHILLES STRETCH
Lean against a wall with you left leg in f ont
of the ight and you a ms fo wa d. Keep You
ight leg st aight and the left foot on the floo ,
then bend the left leg and lean fo wa d by
moving you hips towa d the wall. Hold, then
epeat on the othe side fo 15 counts.
This manual suits for next models
1
Table of contents
Other Body Break Exercise Bike manuals

Body Break
Body Break 16116865-1 User manual

Body Break
Body Break 16116737 User manual

Body Break
Body Break 16116699 User manual

Body Break
Body Break 16116807 User manual

Body Break
Body Break 16116718 User manual

Body Break
Body Break 16116837 User manual

Body Break
Body Break 16116718 User manual

Body Break
Body Break 16116828 User manual

Body Break
Body Break 16116901 User manual


