Fortis SX2000 User manual


Table of Contents
Important Safety Warnings...........................................................................................................2
Parts List................................................................................................................................................2
Exploded View....................................................................................................................................4
Assembly Steps..................................................................................................................................5
perating Instructions.....................................................................................................................7
Resistance Adjustment...............................................................................................................7
Seat Adjustment............................................................................................................................7
Handlebar Adjustment................................................................................................................7
Chain Adjustment.........................................................................................................................7
Exercise Instructions........................................................................................................................8
Warm-up Phase.............................................................................................................................8
The Exercise Phase.......................................................................................................................8
Muscle Toning................................................................................................................................9
Weight Loss....................................................................................................................................9
Use......................................................................................................................................................9
1

Important Safety Warnings
CAUTION: Before starting any exercise program, consult with your physician or
health professional.
IMPORTANT: Read all instructions carefully before using this product. Keep a
copy of this guide handy for future reference.
•You can stop the bike immediately by using the emergency break on the
left side of the handlebars.
•Keep the bike away from children. Do not allow children to play nearby
while you are using the bike.
•Do not ride the bike in the standing position.
•Wear appropriate clothing, suitable for biking.
•Always wear rubber soled shoes or tennis shoes while riding.
•Always place the bike on a flat, stable surface.
•This bike is suitable for users up to 100kg.
•Before use, check that all of the fastenings on the unit are securely
tightened. If you find any defective parts, do not use the bike. Contact the
Kogan customer support team immediately.
•Check the brakes and brake pads before use.
•Examine the bike at regular intervals for proper maintenance.
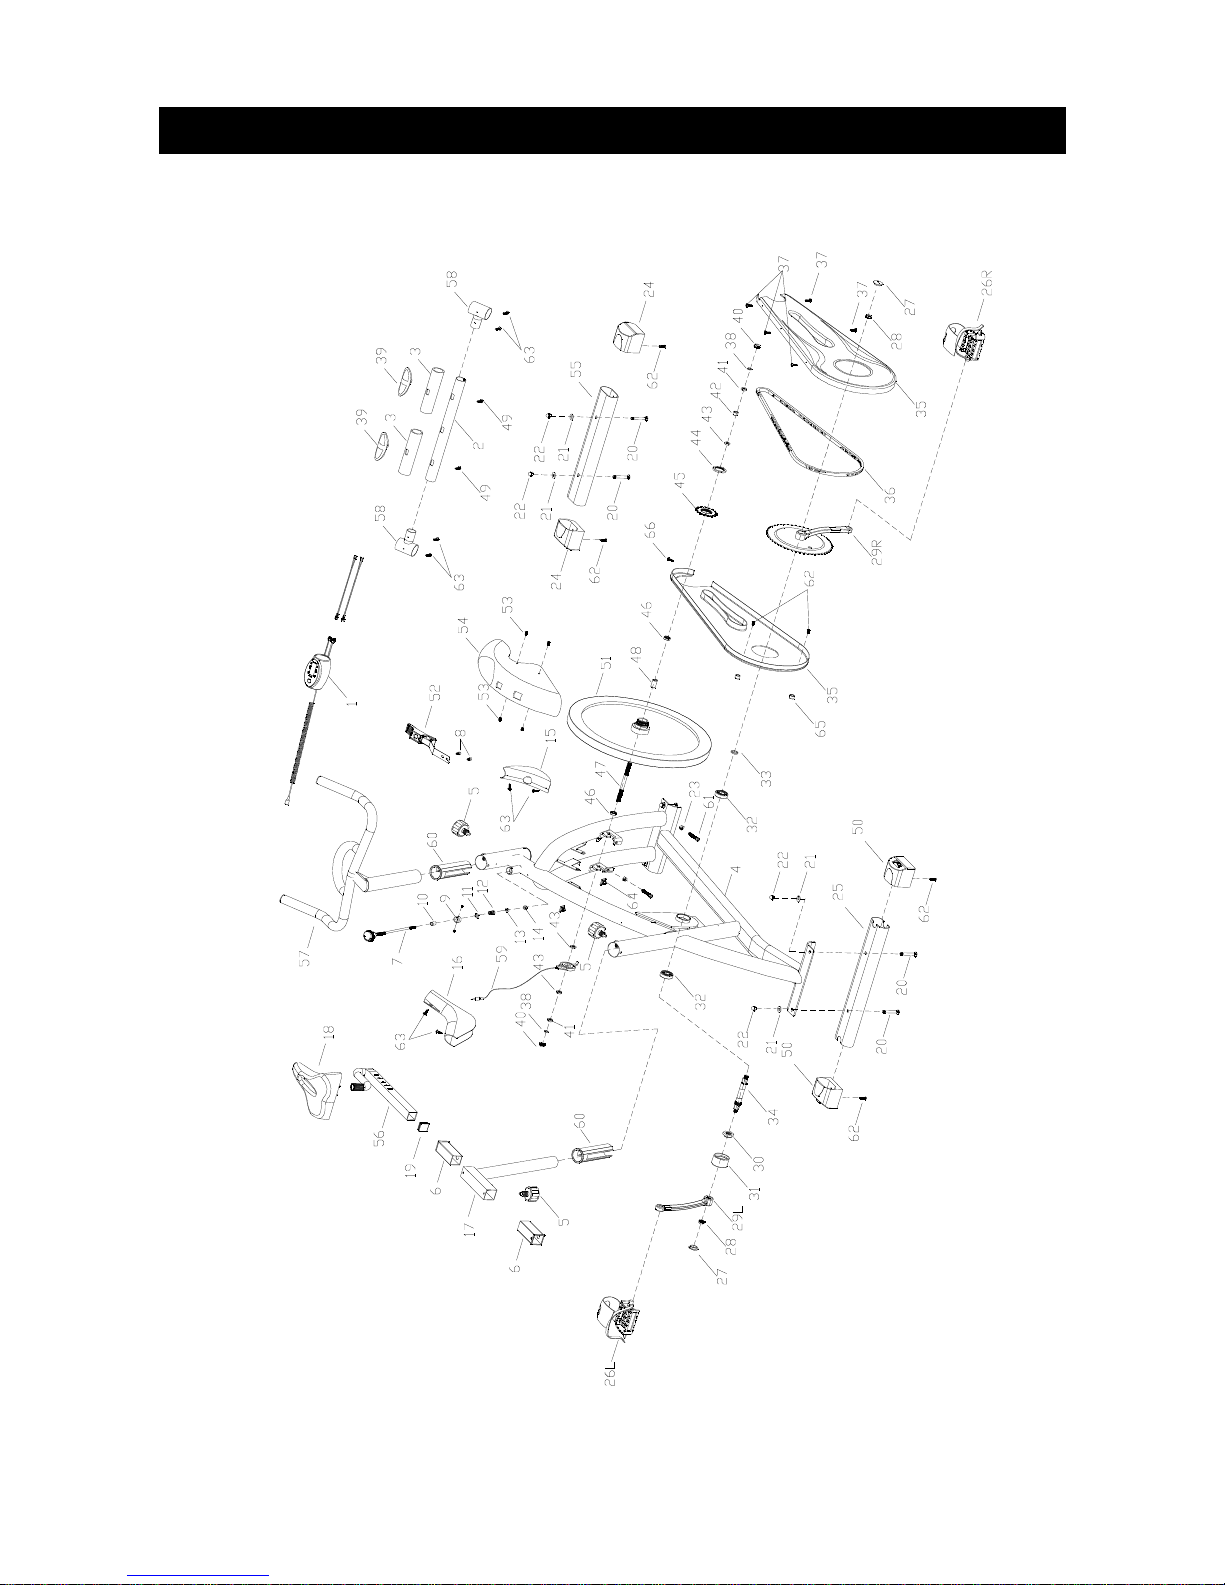
Parts List
Part # Des ription QTY Part # Des ription QTY
1 Monitor 1 32 6203 Bearing 2
2 Handrail tube 1 33 Sleeve Φ18*Φ22*6 1
3 Handle form 2 34 AxisΦ17*116 1
4 Main frame 1 35 Chain cover 2
5 Spring button 3 36 Chain 1
6 Bushing(30*30)2 37 Screw ST4.8 14×, head 9φ5
7 Tension knob 1 38 Washer d10 2
8 Screw M5 11×, head 8Φ2 39 HAND PAULSE 2
9 Stand of tension adjuster 1 40 Flange nut M10 1 20× ×Φ , S15 2
10 Bushing(12φ ×φ9X12)1 41 Hex nut M10 1×, S=15, H=9 2
11 Nut M8 1 42 Bushing 1
12 Spring 12.4 1.6φ ×φ 1 43 Hex nut M10 1×, S=17, H=4 2
13 Hex nut M6 1 44 Nut M33 1×1
14 Nylon nut M6 1 45 Small wheel 1
15 Front decorative cover 1 46 Bearing 6000Z 2
16 Back decorative cover 1 47 Axle M10 1 L48 l45xL56× × × 1
17 Seat tube 1 48 Bushing 1
18 Seat 1 49 Screw ST4×20, head 8φ2
2

19 End cap(30*30)1 50 Rear End Cap 2
20 Bolt M8×55, 4 51 Flywheel 1
21 Flat Washer d8 4 52 Brake 1
22 Nut 4 53 Screw M5*15 4
23 Bolt M8 2 54 Flywheel cover 1
24 Front end cap 1 55 Front bottom tube 1
25 Rear bottom tube 1 56 Horizontal seat tube 1
26 Pedal L&R 2 57 Handle bar 1
27 End cap for crank 2 58 Handlebar fitting 2
28 Bolt M10 18×, S=14 2 59 Inductor 1
29 Crank L&R 2 60 Sleeve(φ50 x φ38)2
30 Hex nut M20*1.5 1 61 Bolt M8 40×2
31 Bearing sleeve φ50 1 62 SCREW ST4.8*20 6
63 SCREW ST4.8*16 4 64 Self-adhesive plastic fixed
block
2
65 SCREW ST6*12 1
Please refer to the exploded parts diagram on next page.
Check that all parts are present before commencing.
3

Exploded View
4

Assembly Steps
Step One
Use 2 x bolts (20), 2 x flat washers (21),
2 x nuts (22) each to assemble the
front bottom tube (55) and rear
bottom tube (25) with the main frame.
Step Two
Firmly screw the pedals (26) into the
crank arms (29) correspondingly.
5

Step Three
Assemble the seat (18) with the
horizontal seat tube.
Step Four
To connect the Handle Bar (57) with
the main frame (4). Then connect the
monitor (1) and the inductor (59).
After assembling the product, check that all of the fastenings are fixed securely.
6

Operating Instru tions
Resistan e Adjustment
Pedalling resistance is controlled by the tension knob located under the
handlebar. To increase resistance, turn the tension knob clockwise, whereas to
decrease the resistance, turn the tension knob anti-clockwise.
PRESS THE TENSI N KN B AS AN EMERGENCY BRAKE
Seat Adjustment
Properly adjust the seat to ensure maximum exercise efficiency and comfort.
The most appropriate seat position while be while the rider has one knee slightly
bent when one pedal is at a 90 degree angle to the ground.
1. To adjust the seat height, simply turn the adjustable knob loose, then
move the seat up or down to the required height, then retighten the knob.
2. To adjust the seat position, turn the adjustable knob loose, move the seat
backwards or forwards to the right position, then retighten the knob.
Handlebar Adjustment
To adjust the handle bar height, simply turn the adjustable knob loose, then
adjust the bar to the required height and retighten the knob.
Chain Adjustment
The chain on the bike has been pre-adjusted and should not require immediate
attention. Continuous use of the bike may cause the chain to stretch or become
loose, needing adjustment. To adjust the chain, loosen the nuts on both sides of
the main axle, then tighten the bolts and nuts on the two sides of the axle.
CAUTI N: Ensure you have tightened all of the bolts and nuts before beginning
your workout.
7

Exer ise Instru tions
Using your SPIN BIKE provides you with several benefits, it will improve your
physical fitness, tone muscle and in conjunction with calorie controlled diet help
you lose weight.
Warm-up Phase
This stage helps get the blood flowing around the body and the muscles
working properly. It will also reduce the risk of cramp and muscle injury. It is
advisable to do a few stretching exercises as shown below. Each stretch should
be held for approximately 30 seconds, do not force or jerk your muscles into a
stretch - if it hurts, STOP.
The Exer ise Phase
This is the stage where you put the effort in. After regular use, the muscles in
your legs will become stronger. Work to your own pace, but it is very important
to maintain a steady tempo throughout. The rate of work should be sufficient to
raise your heart beat into the target zone shown on the graph below.
This stage should last for a
minimum of 12 minutes, although
most people start at about 15-20
minutes.
As you get fitter you may need to train longer and harder. It is advisable to train
at least three times a week, and if possible space your workouts evenly
throughout the week.
8
Side Bends
Forward Bends
uter Thigh
Inner Thigh
Calf/Achilles

Mus le Toning
To tone muscle while on your SPIN BIKE you will need to have the resistance set
quite high. This will put more strain on your leg muscles and may mean you
cannot train for as long as you would like.
If you are also trying to improve your fitness you need to alter your training
program. You should train as normal during the warm up and cool down phases,
but towards the end of the exercise phase you should increase resistance,
making your legs work harder than normal.
You may have to reduce your speed to keep your heart rate in the target zone.
Weight Loss
The important factor here is the amount of effort you put in. The harder and
longer you work, the more calories you will burn. Effectively, this is the same as
if you were training to improve your fitness, the only difference is your goal.
Use
The tension control knob allows you to alter the resistance of the pedals. A high
resistance makes it more difficult to pedal, whereas a low resistance makes it
easier.
For the best results, set the tension while the bike is in use.
If you have any problems or on erns regarding this produ t, please onta t
the Kogan ustomer support team.
9
Other Fortis Exercise Bike manuals

Fortis
Fortis SK-2200A User manual

Fortis
Fortis FSSPNBKX13A SX1000 User manual

Fortis
Fortis RC-400A User manual

Fortis
Fortis FSEMSB2200A User manual

Fortis
Fortis AEXR-270 User manual

Fortis
Fortis FSRCMBIK2XA User manual

Fortis
Fortis FSUDSKBIKWA User manual

Fortis
Fortis EXR-200 User manual

Fortis
Fortis FSRCMBIK1XA User manual

Fortis
Fortis FSBIKMGTRNA User manual