Boehringer Ingelheim FreVAX 101 User manual

1
User Manual: FreVAX™
Contents
1. About this User Manual................................................................................................................... 4
2. Transport and storage ..................................................................................................................... 4
3. General safety advice for operating and cleaning........................................................................... 4
4. General description and information.............................................................................................. 5
4.1. Description .............................................................................................................................. 5
4.2. Packaging contents.................................................................................................................. 5
4.3. Operating requirements.......................................................................................................... 5
4.4. Target species.......................................................................................................................... 5
4.5. Mode of action ........................................................................................................................ 5
5. Bottle connection / disconnection .................................................................................................. 7
6. Device Start ..................................................................................................................................... 8
7. User Menu....................................................................................................................................... 9
8. Sensors .......................................................................................................................................... 11
8.1. Position Sensor...................................................................................................................... 11
8.2. Air Detection Sensor.............................................................................................................. 11

2
8.3. Nozzle Sensor ........................................................................................................................ 11
9. Vaccination Process....................................................................................................................... 11
10 Device Cleaning ......................................................................................................................... 13
10.1 Rinsing ................................................................................................................................... 13
10.2 Cleaning of the device ........................................................................................................... 14
11. Maintenance and Repair ........................................................................................................... 14
11.1. Cylinder Service ................................................................................................................. 14
11.2. Maintenance and repair service........................................................................................ 16
12. Dismantling................................................................................................................................ 18
13. The battery and the charger...................................................................................................... 19
14. Troubleshooting ........................................................................................................................ 21
15. Technical Specifications............................................................................................................. 22
16. Disposal ..................................................................................................................................... 22
17. EC declaration............................................................................................................................ 23

3
FreVAX™ User Manual
This user manual is part of the FreVAX™ injector and an important part of the safe usage concept.
- Read the user manual carefully and follow the instructions –
© copyright · Henke-Sass, Wolf GmbH · 8300053415 – 10/20 · Subject to amendments in technology and design ·Printed in Germany
The FreVAX™ injector is manufactured by:
Henke-Sass, Wolf GmbH
Keltenstrasse 1
78532 Tuttlingen
Germany
Tel. +49 74 62 94 66 207
Fax +49 74 62 94 66 52 08
www.henkesasswolf.de
E-mail: [email protected]

4
1. About this User Manual
While reading the user manual you will see that it includes warning signs, to alert you
to risks arising from incorrect usage of the product that could result in death, injuries
or material damage. Always take careful note of these warnings! The warning signs are
highlighted as shown on the right.
2. Transport and storage
Protect the product against external forces (e.g. impacts, shocks and knocks) during transport
Check the FreVAX™ injector for any transport damage before use.
Transport and/or store the FreVAX™ injector in its original packing.
Store the FreVAX™ injector so that it is protected from sunlight.
Do not store the batteries at temperatures lower than 5°C.
Never store the FreVAX™ injector in a wet or damp condition (e.g. directly after cleaning).
3. General safety advice for operating and cleaning
Direct contact between the vaccine and/or rinsing fluid and the eyes and/or respiratory tract of
the operator can be harmful. In these cases, seek immediate medical advice and show the vaccine
information sheet.
Use the FreVAX™ device for vaccinating piglets only (around weaning until end of nursery)with
aqueous vaccines.
Keep children out of the operating area.
Do not point the FreVAX™ device towards any part of your body or towards other people! In case
of accidental injection of vaccine and/or rinsing fluid, seek immediate medical advice and show
the vaccine information sheet.
Beware of the spike in the bottle holder. It may contain residues of the vaccine and/or rinsing
fluid. In case of a spike wound, seek immediate medical advice and show the vaccine information
sheet.
Do not operate the safety cylinder around the injection heads with your hand when starting,
vaccinating or cleaning.
If the safety cylinders are pressed when fingers or any other part of the body are in front of the
injection heads, there is a danger of accidental self-injection with vaccine or rinsing fluid. Seek
immediate medical advice and show the vaccine information sheet.
Wear safety goggles and a mask when using the FreVAX™ device. Ensure goggles are clean for
optimal vision.
Wear rubber gloves when cleaning the FreVAX™ device.
Do not throw the battery into water. Protect the battery from water and humidity, which could
cause it to leak and release hazardous substances.
Do not throw the battery into fire, nor heat the battery. It may explode and/or release hazardous
substances.
Do not expose the battery to temperatures higher than 60°C. It may explode and/or release
hazardous substances.
Only veterinary practitioners or operators instructed by a veterinary practitioner are permitted to
work with the FreVAX™ device and vaccines.
Dropping the device while it is loaded with liquid may cause an unintended release.

5
To prevent leakage, reduce the pressure inside the bottles by piercing them with a sterile needle
prior to mounting a bottle on the device. Hold the FreVAX™ device upside down when mounting
a new bottle.
Releasing the trigger of the FreVAX™ device will immediately switch off all controls, making it
impossible to give an injection.
When expelling residual vaccine or rinsing fluid from the device, always position the injection
nozzles on a cloth in a receptacle placed on a firm base. Never inject into the air.
If the safety cylinders remain jammed around the injection nozzles after firing, immediately
release the trigger of the FreVAX™ device and contact your supplier.
Operating the FreVAX™ device for a longer period of time may induce cramps in the operator’s
hands. Regular breaks are recommended.
4. General description and information
4.1. Description
FreVAX™ is intended for the needle-free intra-muscular vaccination of piglets with either 1ml or 2ml
volume.
4.2. Packaging contents
-FreVAX™ device (1)
-Spare cylinder (2)
-Two batteries (3)
-Battery charger (incl. international socket adapters) (4)
-PET bottle for use with defined cleaning liquids (5)
-Universal bottle collars (Ø20mm & Ø30mm) (6)
-Tubing adapter (7) + Tubing (under the device)
-Threaded bottle collar for use with PET bottle (8)
-Lubricant for cylinder service (10ml white oil) (9)
-Wrist strap (10)
Note: Before using FreVAX™ for the first time, charge the
batteries in the battery charger. Please read chapter 13 on how to optimize the lifetime and
durability of the batteries.
4.3. Operating requirements
Please read the user manual carefully before first use.
4.4. Target species
FreVAX™ should only be used for vaccinating piglets around weaning until end of nursery. It must not
be used on older pigs, breeding animals (sows, boars) or in other species. The functionality of the
FreVAX™ device should only be tested on an appropriate surface, such as a sponge or a thick cloth in
a receptacle.
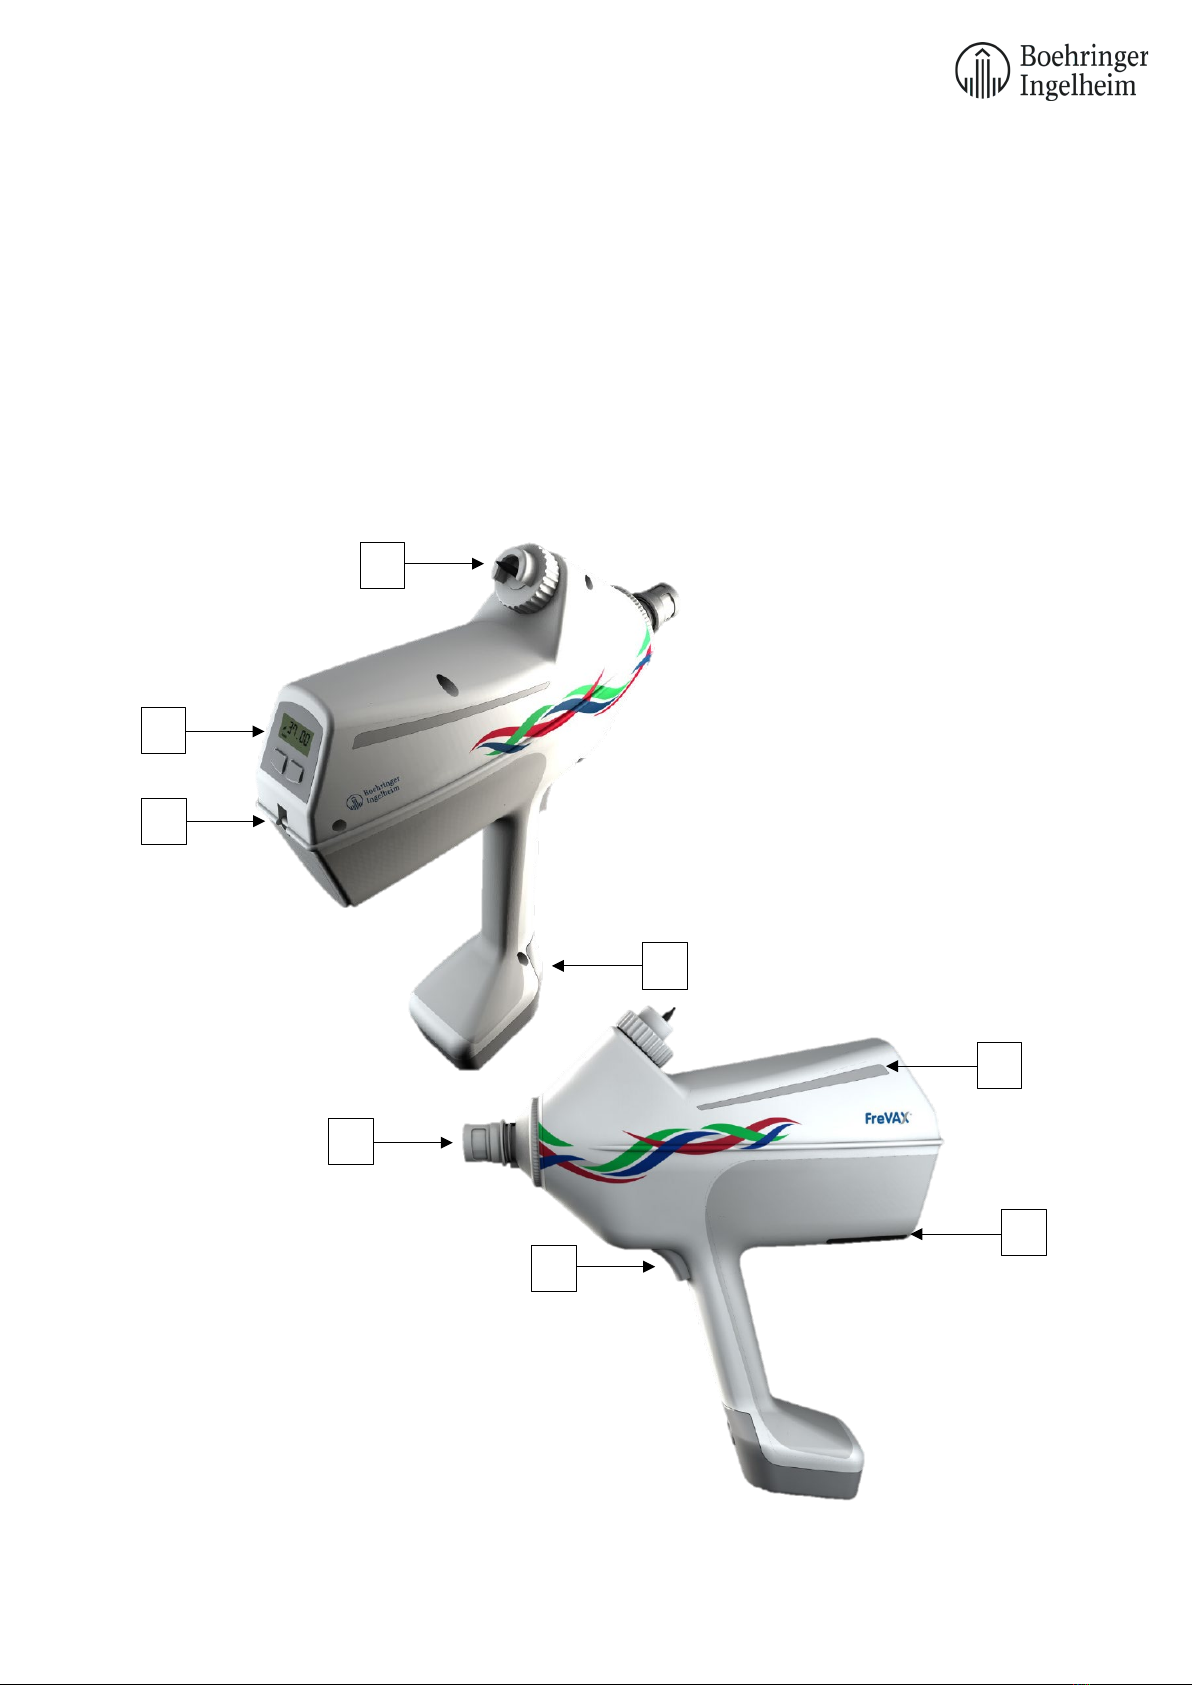
4.5. Mode of action
FreVAX™ has a bottle holder equipped with a draw-off spike (see ‘A’ in diagram on next page), on
which bottles can be mounted. Vaccination takes place through the injection head (E). The injection
head is fitted with a mechanical safety cylinder.
A pen counter, day counter, bottle counter and a service counter are integrated in the FreVAX™
device. The two buttons underneath the screen (B) operate its display. The LED bars (H) on each side
1
2
3
4
5
6
6
7
8
9
10
6
of the device are an optical indicator for every action that is carried out during the vaccination process
(see chapter 9).
The FreVAX™ device comes with two batteries and a battery charger. Before use, insert a charged
battery into the base of the FreVAX™ device (D).
Operation of the FreVAX™ begins with inserting a bottle of vaccine into the bottle holder (A) and
pressing the trigger (F) to activate the injector. This will start the pump and vaccine is automatically
drawn out of the bottle. The rinsing fluid, which is present inside the tube during storage, is pumped
out of the tubes via the injection head.
The device comes with an eyelet to mount a shoulder strap (C) as well as a slot (G) for the wrist strap
supplied.
D
A
B
E
F
C
G
H

7
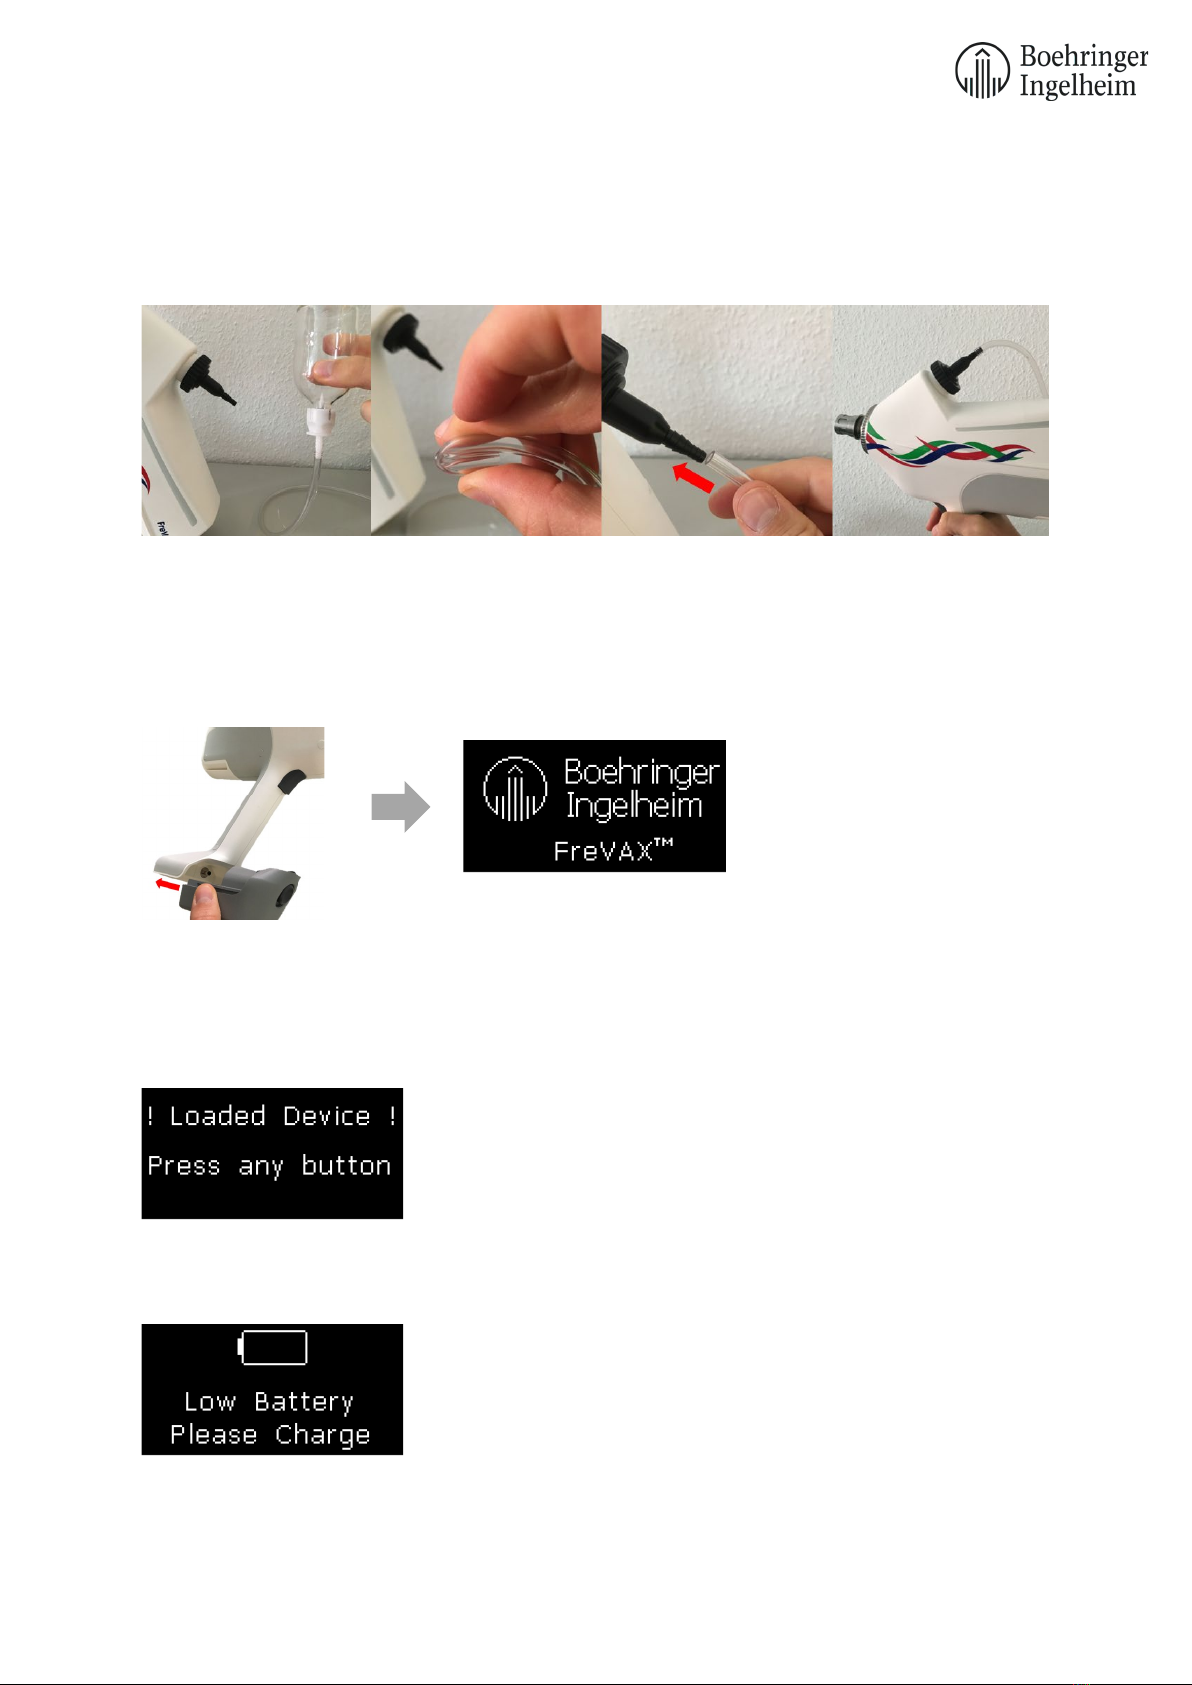
5. Bottle connection / disconnection
Connect a bottle (vial) of vaccine or rinsing fluid (see chapter 9 “Device Cleaning”) to the device by
following these steps:
a. Unscrew the bottle collar (white adaptor on the picture) from the
bottle mount spike.
CAUTION: The spike is very sharp as it has to puncture the stopper of
a vaccine bottle. Please avoid unintended contact with the tip of the
spike.
b. Attach the bottle collar to the bottle as shown on the picture.
c. Pre-puncture the stopper of the vaccine bottle centrally with a
sterile needle to avoid rubber particles being drawn into the spike of
the vaccination device. Place the injector on a solid surface (as shown
on the picture) and push the bottle onto the spike using the pre-
punctured hole.
CAUTION: Without pre-puncturing of the bottle stopper
, rubber
particles may be drawn into the device,
leading to potential
dysfunction by blocked valves and / or nozzle.
d. Connect bottle to device by screwing the collar onto the thread
(clockwise) until it is tight. Please make sure to screw only the white
collar, not the bottle itself. After completion of this step, check if the
bottle sits tightly.
e. Turn the injector back into an upright position. Insert the battery at
the bottom of the handle. This step will activate the device.
To disconnect a bottle from the device, proceed in the reverse order. Always make sure to have the
draw-off spike of the device pointing downwards when connecting or disconnecting a bottle.
8
Otherwise, vaccine will be spilled over the device while a bottle is being connected to or disconnected
from the bottle mount.
If using the tubing collar to connect a larger bottle via tubing, prefill the tubing (!) prior to attaching it
to the tubing collar. When the tube starts to fill, kink the tube just before the end to prevent loss of
vaccine. Then quickly connect the tubing to the adapter.
6. Device Start
Once the vaccine bottle is connected, insert the battery and the device will turn on, showing both the
Boehringer Ingelheim and the FreVAX™ logos on the display. Both logos are shown for 1 second.
If the battery is sufficiently charged:The display will switch initially to the User Menu, unless the
device is in a loaded condition (cylinder filled with vaccine / rinsing fluid) – in which case the display
will show “! Loaded Device ! Press any button” and the LED bars turn red.
By pressing one of the display buttons, the device will rinse once, to
unload the device. The liquid will be sprayed out through the injection
head.
Afterwards, the device will switch to the initial display of the User Menu (see chapter 7).
Before pushing the trigger for the first time, make your settings in the User Menu.
If the battery is too low: The display will show “Low Battery Please
Charge”.
9
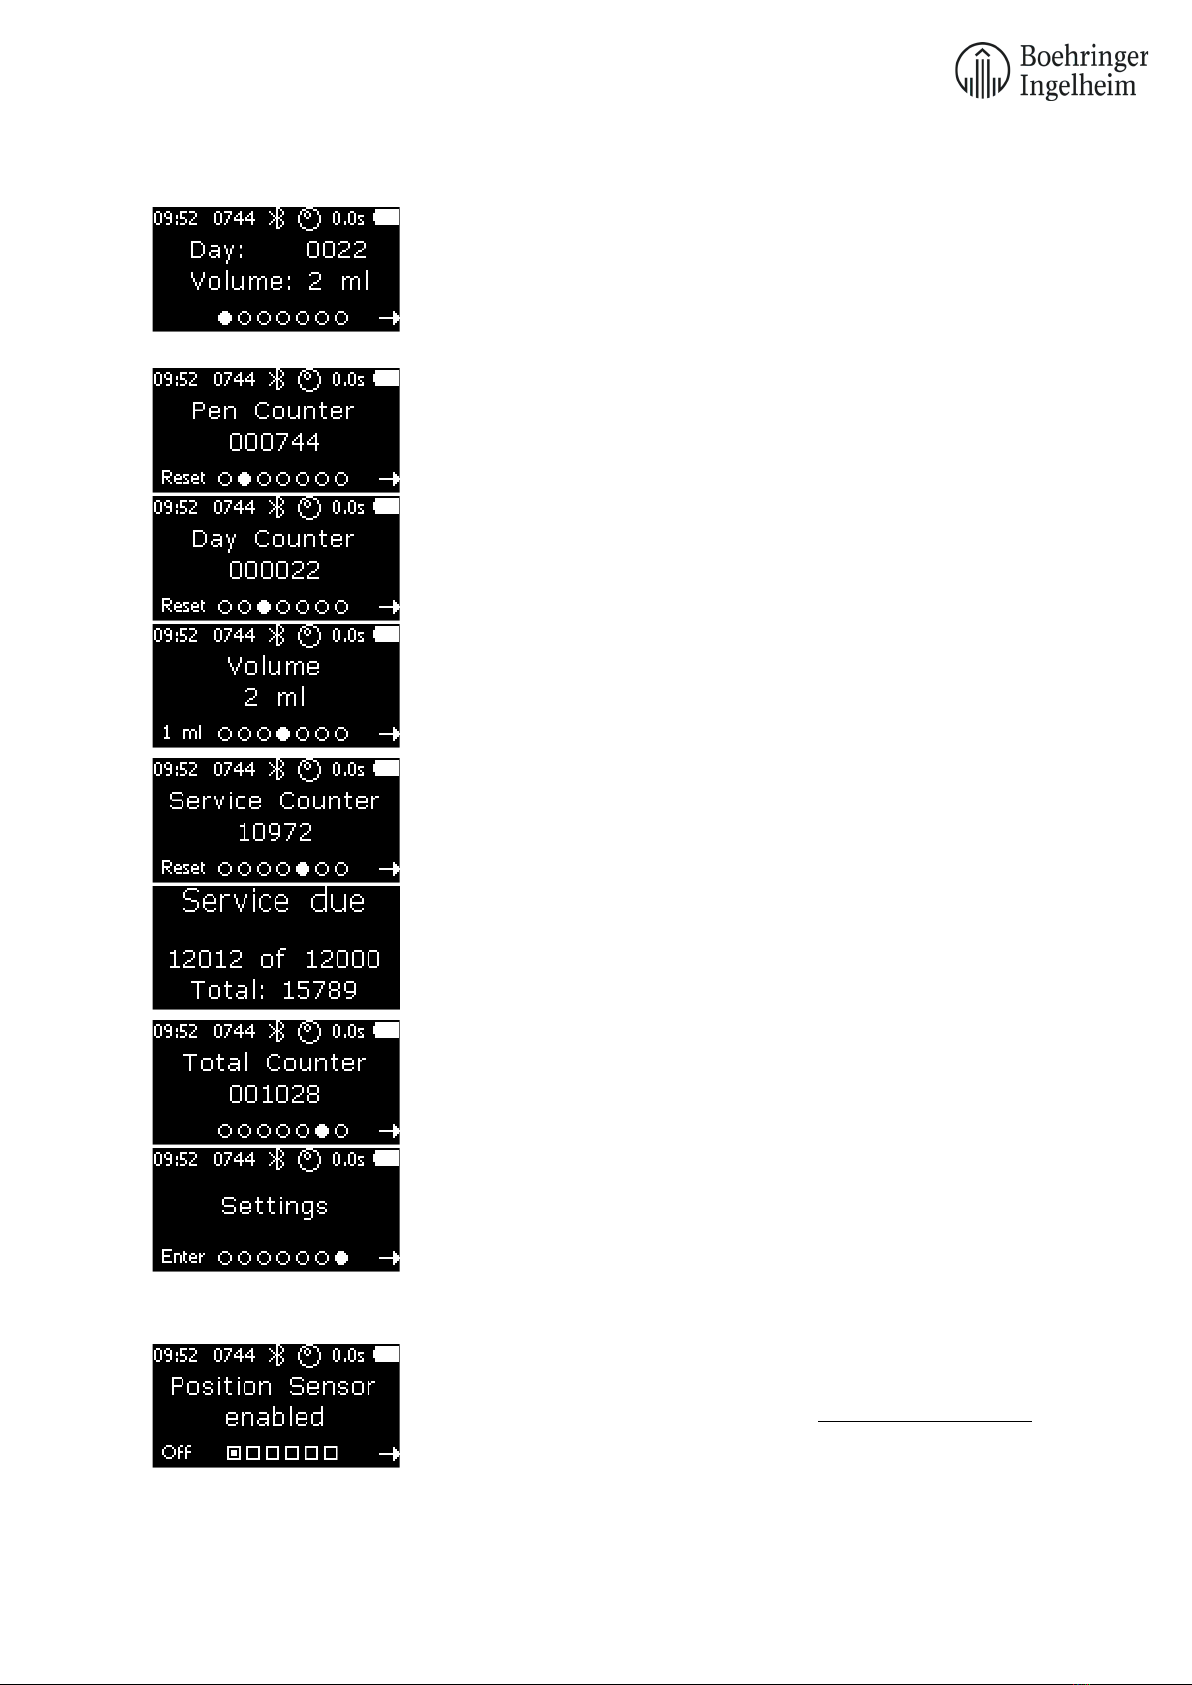
7. User Menu
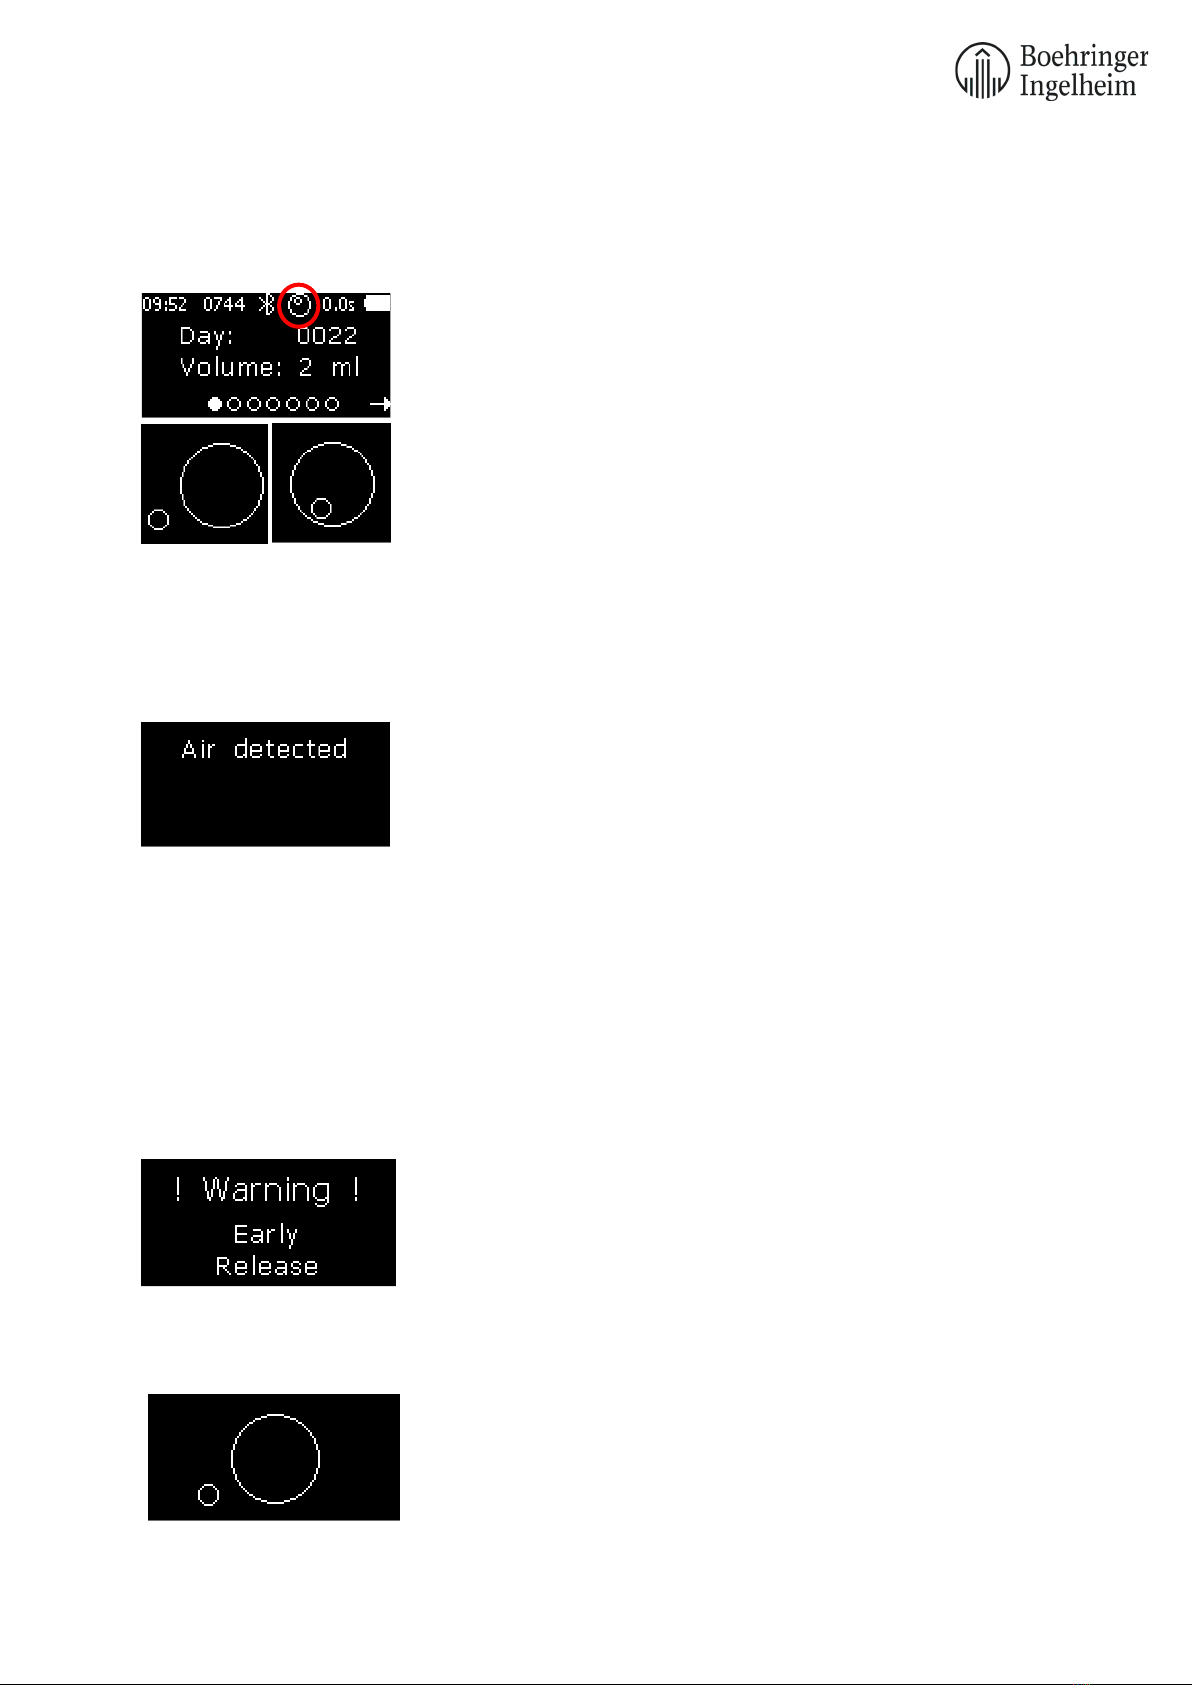
The initial display of the User Menu will show the most relevant
information, including battery level, da
y counter, currently set
volume, time, activated sensors (see chapter 8) and Bluetooth. The
dots at the bottom of the screen are to indicate the current menu
page.
On the second page, the Pen Counter is shown. To reset this pen
counter, press and hold the left display button for two (2) seconds.
On the third page, the Day Counter is shown. T
o reset the day
counter, press and hold the left display button for two (2) seconds.
On the fourth page, the volume can be adjusted. The currently set
volume is shown in the middle, the optional volume is shown on the
lower left side. Press the left display button to choose the optional
volume. The dose will be changed only upon usage of the device (after
the rinsing cycles and before the first injection).
The fifth page shows the Service Counter, which is counting from
12,000 to 0. If the value falls below 0, the counter continues counting
negatively. Press and hold the left display button for two (2) seconds
to reset the service counter.
A ‘Service due’ message appears after there have been 12,000 or
more injections, showing that a cylinder service needs to be
performed (see chapter 11.1)
The sixth page shows the Total Counter. This counter cannot be reset.
The last page shows the submenu “Settings”. Enter the submenu with
the left display button. Pushing the right display button returns the
screen to the initial display (see above).
Submenu “Settings”:
On the first page of the submenu, the Position Sensor can be
controlled. Press the left display button to disable or
enable the
position sensor. Recommended setting is an enabled Position Sensor.
(Disabling is only recommended when using the tubing adapter
supplied with the device and having vaccine delivered via tubing.) For
further details, see chapter 8 “Sensors”.
10
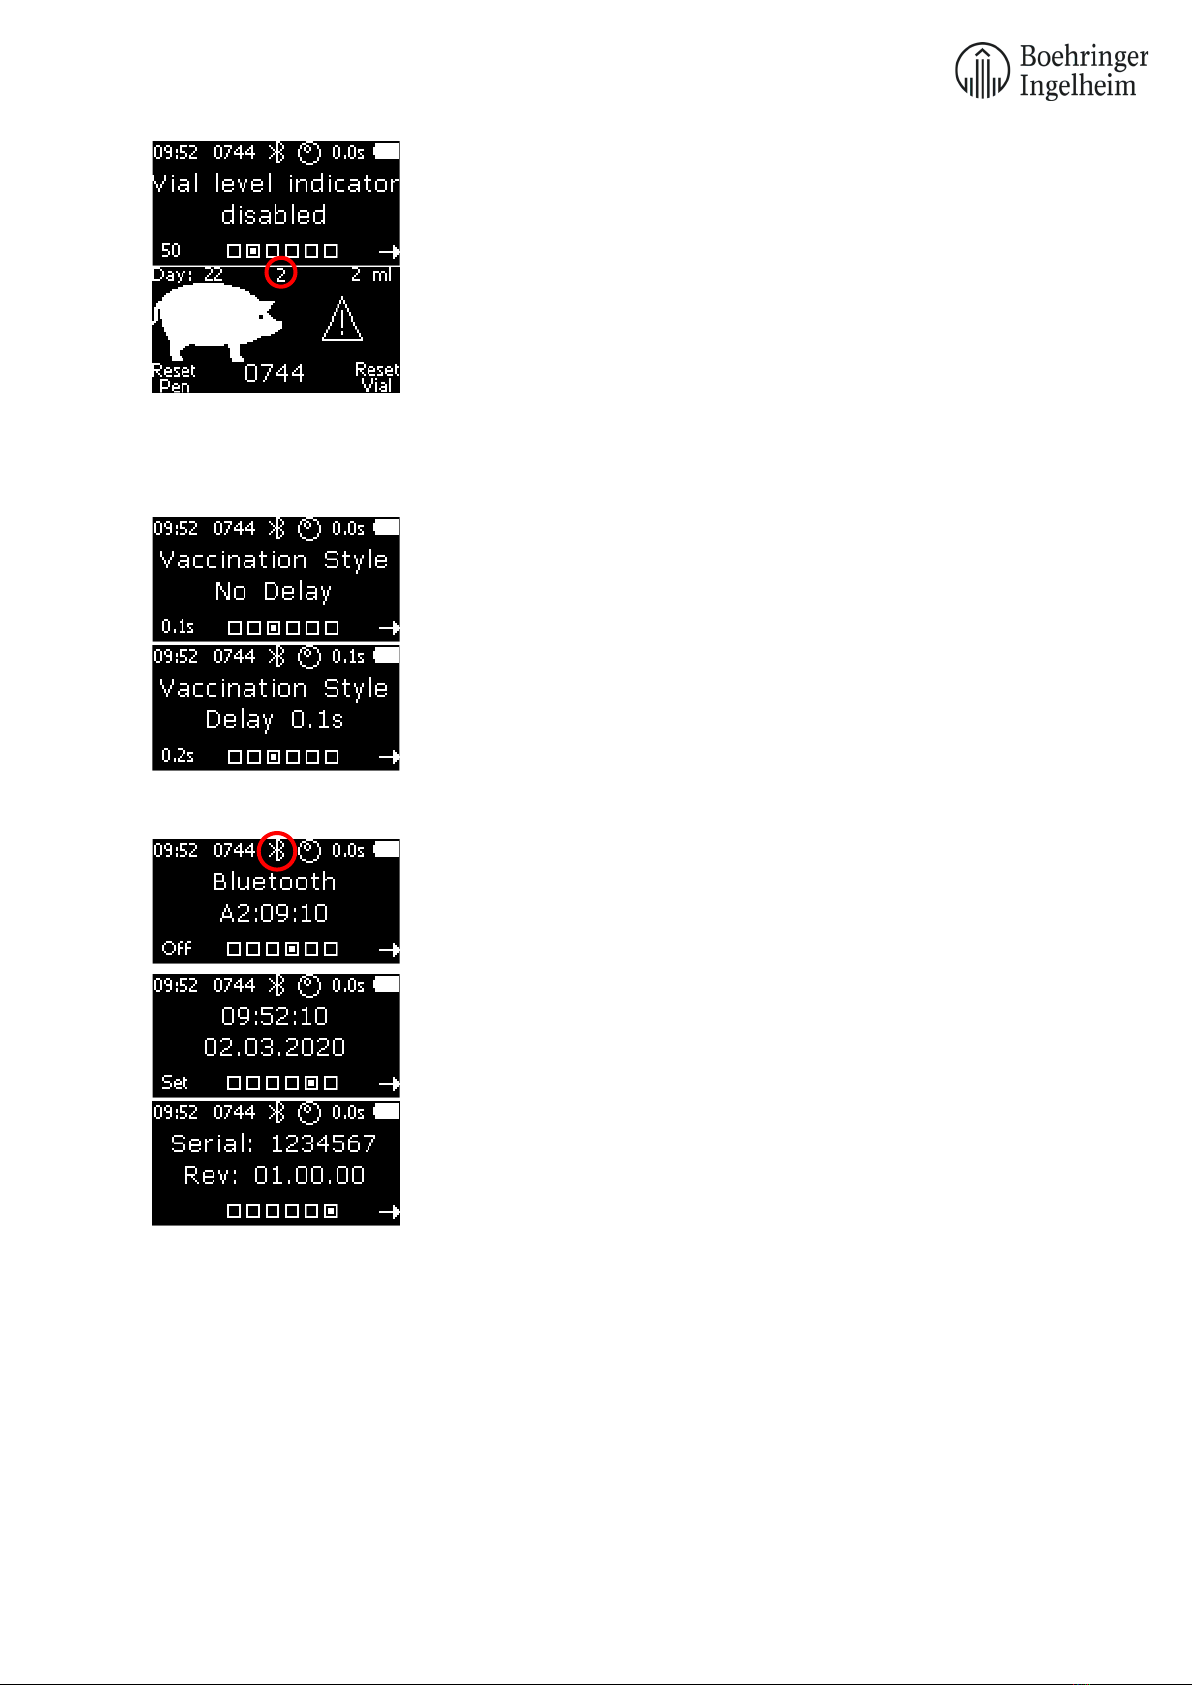
On the second page, the Vial level indicator can be controlled. This
indicator will give an optical warning (via yellow LED bars and warning
sign between piglets on the display) once you have used 90% of the
vaccine inside the connected bottle. When this warning appears, you
have 10% left inside the bottle that is moun
ted to the FreVAX™
device. This allows for a better overview on when to change a bottle
during the vaccination session. To activate the vial level indicator,
choose the size of the bottle / canister you want to mount by pushing
the left display button (50ml, 100ml, 200ml, 500ml, 1000ml, 2000ml,
5000ml, all above 200ml ideally being connected via tubing.)
CAUTION: The vial level indicator is a simple counter that needs to be
set up according to the bottle size mounted to the device. It counts
backwards from the set volume to zero, the current counter reading
is shown in the top center of the display.
On the third page, the Vaccination Style can be selected. Default
vaccination style is “No Delay”, which is for lifting / presenting the
piglets to a second person who is vaccinating them with min. time
lapse between applying the device to the skin of the piglet and the
injection itself. Press and hold the left display button to select the
alternative setting “Delay ?? s”, which offers vaccination of the piglets
by
only one person and leaving the piglets on the floor during
injection. If vaccinating on the floor, a preferred time between skin
contact and injection can be selected, to enable the worker to ensure
proper contact between the device and the piglet before the injection
is released. The device offers settings from 0.1s to 1s by tenths.
On the fourth page, Bluetooth can be controlled. Press the left display
button to disable or enable the Bluetooth antenna.
If using the
FreVAX™ App, enabled Bluetooth is required. If not using the
FreVAX™ App, disabled Bluetooth is recommended and will help to
conserve battery power.
The fifth page shows date and clock
. The format of the clock is
hh:mm:ss and the format of the date is dd.mm.yyyy. By pressing the
left display button, you can set the date and clock.
On the last page, the serial number (PT1.0x) and the software version
is shown. Press the right display button to return to the “Settings”
page of the user menu. Press the right display button again to reach
the initial display of the user menu.
11
8. Sensors
The FreVAX™ device is equipped with several sensors to guarantee an optimal vaccination result.
8.1. Position Sensor
This sensor allows for continuous control of the correct holding
position of the device. Once the trigger has been pushed, before
allowing liquid to be drawn into the device the position sensor will
check if it is held upright in order to avoid drawing in air. If the device
is held in the correct angle, which is indicated by the small circle being
inside the big circle, liquid from the attached bottle will be drawn in.
Once the device is fully loaded with liquid, the holding position is no
longer relevant until the trigger is activated again.
Please note: When using the tubing adapter to deliver vaccine, no position sensor reading is needed
because there is no bottle mounted on top of the device. In this case, the position sensor can be
disabled (user menu
settings
position sensor
off).
8.2. Air Detection Sensor
This sensor measures whether fluid or air is drawn into the device. If
air is drawn in, e.g. by emptying the bottle and not fitting a new one
in time, a warning “Air detected” is shown. Afterwards, only rinsing is
possible, indicated by blue flashing LED bars, until the air exits at the
injection head. This takes a minimum of 3 rinsing cycles, as the liquid
circuit has a volume of a little less than 6 ml and one rinsing cycle
moves a volume of 2 ml. After the rinsing process, you will be able to
vaccinate again (indicated by white flashing LED bars).
8.3. Nozzle Sensor
This sensor enables an extra safety precaution when using the injector. Once the FreVAX™ device is
ready for vaccination (white flashing LED bars), push and hold the trigger. When the device is applied
to the skin of the piglet, the safety sleeve around the injection head will slide back, releasing the
vaccine. If either the trigger is not pushed or the safety sleeve around the injection head does not
slide back, no vaccine will be released. This allows for a high level of user safety.
Furthermore, the nozzle sensor measures if the minimum contact
time between device and piglet for administration of the full dose is
fulfilled. If the injector is released too early, implicating an underdose,
the device will give an optical warning via red flashing LED bars and a
written notification on the display.
9. Vaccination Process
Press the trigger to load the device. The position sensor indicates
the position of the bottle in the holder of the FreVAX™.

12
When the FreVAX™ is held in the right position, the small circle is
inside the big circle and the device begins to load. This function
helps to reduce the risk of drawing air into the system.
At the first run of a new session or after every restart of the device,
the FreVAX™ will be rinsed for three (3) times to flush out remaining
rinsing fluid inside the system and to fill the cylinder with vaccine. No
vaccine will be wasted during this procedure as approximately three
(3) doses of liquid fit into the liquid circuit of the device. The display
will let you know, once the third and last rinsing cycle is completed.
Rinsing is indicated by a blue light LED. If you are changing the battery
and
the changeover between removing the empty battery and
inserting the new one takes less than 5 minutes, the rinsing will be
skipped as vaccine is already in the device.
After three (3) rinsing cycles, press and hold the trigger to load the
device for the first injection. During loading, “Load Device
" is
displayed.
After loading, the device is ready to vaccinate, which is indicated by a
white flashing LED and an illustration of walking piglets
on the
display. At this stage, (1) the first injection cycle can be started, (2)
another rinsing cycle can be carried out or (3) the pen counter or vial
level indicator can be reset.
With option (2) above, another rinsing cycle can be carried out by
pressing one of the display buttons and simultaneously pushing the
trigger. If the dose is set to 1 ml, the device will automatically change
the volume back to 2 ml for rinsing. If the dose is set to 2 ml, rinsing
will be carried out without a change of volume.
The device will automatically switch back to the set dose after the
rinsing cycle, which is indicated by yellow flashing LED bars. This is
only relevant when the dose was set to 1 ml prior to rinsing.
For the option (3) above, to reset the pen counter
or vial level
indicator, press the according display button without simultaneously
pushing the trigger.

13
In option (1), an injection cycle is released once the trigger on the
handle is pressed and held while counter-pressure is generated on
the safety sleeve around the injection head (the two-way security
mechanism) by applying and pressing the injection head onto the skin
of a piglet.
1. Press and hold trigger on the handle of the device.
2. Apply the injection head (A) to the skin of the piglet
perpendicularly (!), add a certain pressure to make the safety
sleeve (B) move backwards and release the injection.
3. During injection, the display will indicate that the device is
currently injecting by showing “Vaccination”. The required
time per injection is 0.1 sec for 1 ml and 0.2 sec for 2 ml.
During this time, make sure that the nozzle of the device stays
pressed onto the skin of the piglet perpendicularly.
4. The device will indicate that the injection was administered
successfully by a green light LED and a notification on the
display. If the device was removed from the skin of the piglet
too early, the device will indicate this by a red light LED. Thus,
the classification into good or bad injection is based on a time
measurement (see point 3 above).
5. After each injection, release the device from the skin of the
piglet to enable the next loading cycle and injection. When
kept in contact with the piglet’s skin after an injection and still
reloading, the device will show “Please rele
ase Nozzle”
before another injection can go into the same piglet by
mistake. Additionally, the LED bars will flash white and red in
alternation.
By keeping the trigger continuously pressed, FreVAX™ automatically prepares itself for the next
vaccination. The next pig can now be vaccinated by pressing the nozzle against its skin.
After administering a vaccination, a small residue of vaccine is visible on the piglet's skin. This is normal
with needle-free intramuscular vaccination and does not affect vaccine efficacy.
10 Device Cleaning
10.1 Rinsing
The cleaning procedure mentioned hereafter should be carried out after each vaccination session.
•Leave the battery attached to the device.
•Disconnect the vaccine bottle (vial).
•To clean the fluid path inside the device (section between bottle attachment and nozzle, shown
in picture below), mount a bottle of Isopropanol or a mix of demineralized water and detergent
to the device, using the 100ml PET bottle and threaded bottle adapter supplied. Start the
rinsing program by pressing both display buttons at the same time for 2 seconds. This way, the
device will automatically perform ten (10) rinsing cycles in a row without any further action
required.

14
•Disconnect the bottle of Isopropanol or soap solution from the device and connect a bottle of
clear demineralized water or PBS (phosphate buffered saline). Start the rinsing program again
(10 rinsing cycles) to make sure that all residuals of isopropanol or soap solution are flushed
out of the device. This step will avoid any harm to / chemical reaction with the vaccines
attached after cleaning.
10.2 Cleaning of the device
Prior to cleaning your device from the outside, remove the battery (!) at the bottom of the handle.
The below mentioned cleaning procedure should be carried out after each vaccination session.
•Immerse the nozzle / front part into any commercially available disinfectant while wearing
rubber gloves and turning / moving the safety sleeve around the injection head to remove all
traces of dirt.
•Clean the grey housing and the battery either by wipe disinfection (e.g. Meliseptol wipes), or
by using a sponge soaked with a water-detergent mix. The device is water resistant according
to IP protection class 54.
•After cleaning, dry the device with a clean cloth / towel.
•Make sure your FreVAX™ device is completely dry before putting it back into the case.
11. Maintenance and Repair
11.1. Cylinder Service
Service of the FreVAX™ is required after 12,000 injections. When service is due, the message “Service
due” will appear on the FreVAX™ display.
For maintenance, the cylinder needs to be replaced by the included spare cylinder using a 22 mm and
a 15 mm wrench. Maintenance should be done in a clean environment.

15
This step-by-step instruction is in addition to the user instructions delivered with the FreVAX™
device. Please read the user instructions carefully before operating the device and/or
performing cylinder service.
Always remove battery before doing cylinder service!
Make sure, that no bottle with rinsing/cleaning fluid is placed in the bottle holder of the device.
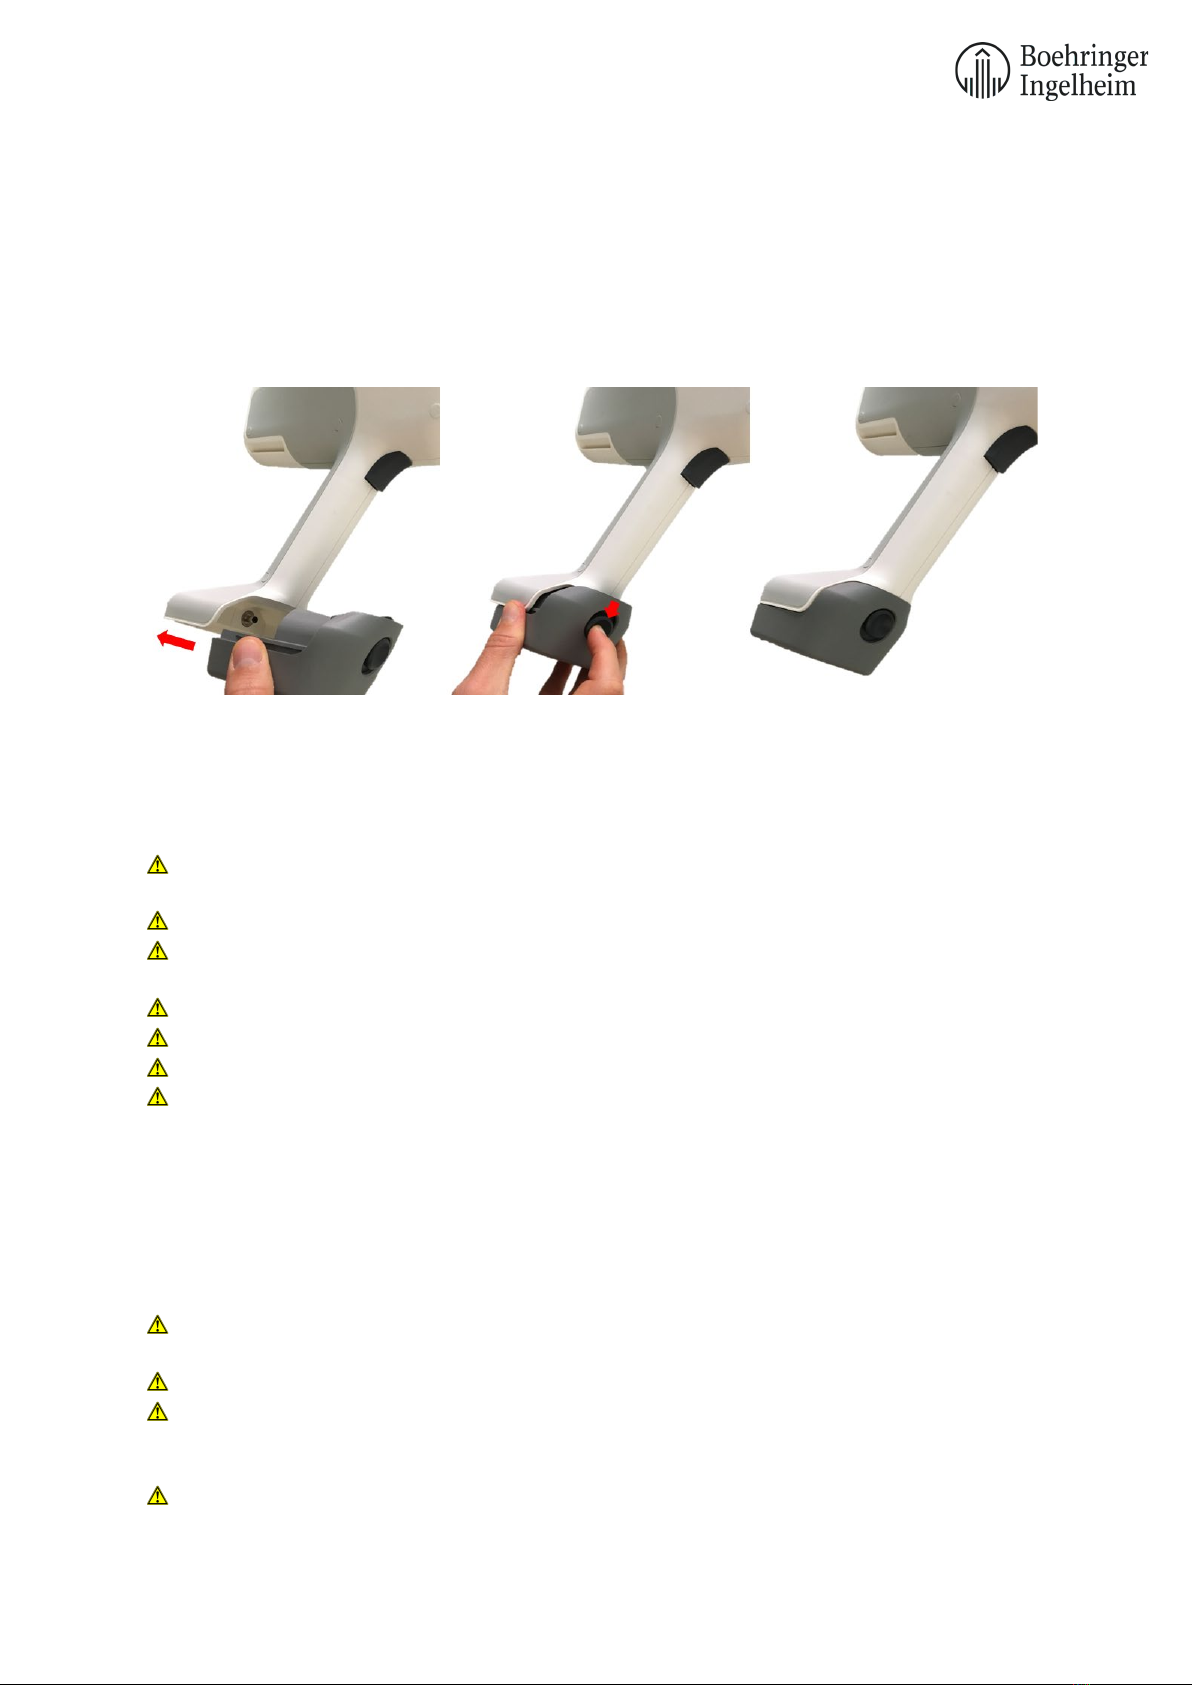
Step 1: Unscrew injection head
•Place the device on a solid surface.
•Carefully unscrew the injection head with a 22 mm wrench.
•If the wrench does not hold the injection head properly, rotate
the safety cylinder slightly.
•Remove injection head (incl. safety sleeve) and spring.
•Remove the valve (valve body and spring).
As soon as injection head and valve are dismounted: Ensure that the
exposed tip of the FreVAX™ is protected from dirt.
Hold the device with the head facing downwards in order to drain
residues of vaccine or rinsing fluid.
Step 2: Remove old cylinder
•Unscrew the old cylinder with a 15 mm wrench.
•Hold the device with the head facing downwards and only then (!)
remove the cylinder from the device by pulling. This will allow you
to drain remaining vaccine or rinsing fluid.
Step 3: Lubricate the piston rod
•Prior to lubrication, clean the piston chamber and piston rod by wiping it with
a cotton cloth or Q-tip/cotton bud.
•Lubricate the tip of the piston rod using a fingertip or Q-tip/cotton bud soaked
in the supplied white oil.
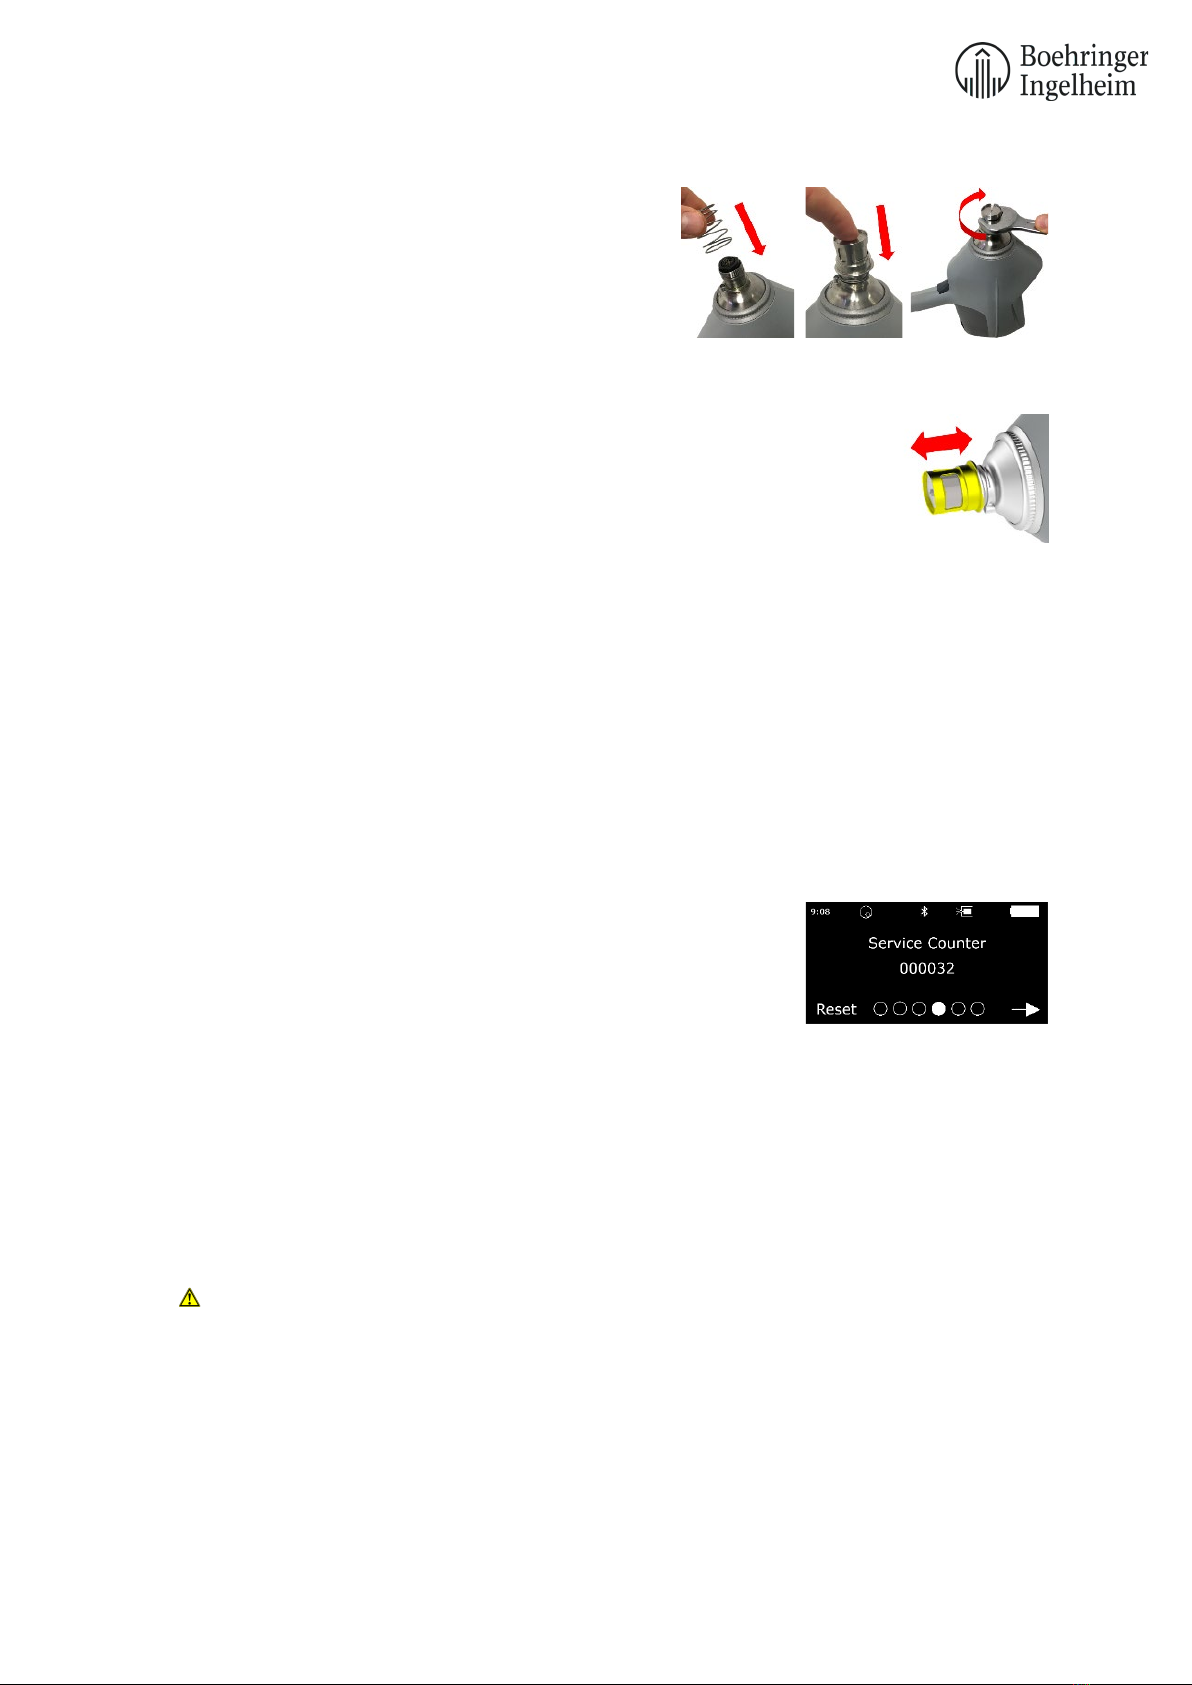
Step 4: Insert new cylinder
•Lubricate the o-rings on the exterior wall of the new cylinder with
white oil.
•Insert the new cylinder into the opening of the piston chamber and
press down until it sits firmly.
•Remove the yellow protection cap, taking care that the o-ring
and valve below the protection cap will stay in place.
•Tighten the new cylinder with a 15 mm wrench while pressing
the cylinder down until the thread will engage.
16
Step 5: Tighten the injection head
•Put the large spring in between the front part of
the device and the injection head.
•Clean (!) the injection head and then carefully
tighten it with the safety sleeve over it by using a
22 mm wrench and pushing the injection head
down until the thread will engage.
Step 6: Check the injection head
•Check if the injection head is sitting correctly and if the safety cylinder
around the injection head (marked yellow) is moving smoothly.
Step 7: Flush
•Fit a bottle with rinsing/cleaning fluid into the holder and rinse until a clean and continuous
jet is coming out of the injection head. (Use rinsing program, see 10.1)
Step 8: Check functionality
•If the injection head is not operating properly (no clean and continuous jet of rinsing fluid is
coming out), please repeat cylinder service.
Step 9: Reset Service Counter
•After successful completion of cylinder service, please
reset service counter.
•Starting from the initial screen, push the right button three
times until reaching menu point “Service Counter”.
•Press button “Reset” for at least 3 seconds.
•The counter returns to "0".
11.2. Maintenance and repair service
For certain problem reports, maintenance or repair in an approved service point is necessary. The
message “Factory Service” will appear on the FreVAX™ display. The FreVAX™ device has to be sent to
an approved service point. Details can be found in the table on the following page. Please contact
Henke-Sass, Wolf to arrange return of the device and fill out the supplied return form.
CAUTION:In case of a necessary return of the device to the manufacturer, please remove
the batteries from the case (as per dangerous goods regulation of all common forwarders)!
To learn more on what sort of failure occurred, download the FreVAX™ App for iOS or Android and run
a self-diagnosis by starting the App, connecting the App to your device and thereafter pushing the
button “Run diagnosis” in the App.

17
Defect Action
sequence
Action Service Point
Display button
Replacement of Display button
Henke-Sass, Wolf
Display
Replacement of Display
Henke-Sass, Wolf
Nozzle Sensor
1
Cylinder Service + Replacement of safety
sleeve around injection
head
Farm / User
2
Replacement of Nozzle Sensor (if sensor
itself is defective)
Henke-Sass, Wolf
Trigger
Replacement of Trigger
Henke-Sass, Wolf
Battery
1
Charge battery (100%)
Farm / User
2
Use second battery and compare
perfomances (indicates whether the
defect is caused by the battery or the
device itself)
Farm / User
3
New battery (available as spare part)
Farm / User
Charger
New charger (available as spare part)
Farm / User
Air detection
1
Cylinder service
Farm / User
2
Mount included 100ml PET bottle filled
with destilled water and press the bottle
during loading to increase suction
pressure
Farm / User
3
If both doesn't help, repair through
manufacturer
Henke-Sass, Wolf
Position sensor
1
Optionally, use device without position
sensor
Farm / User
2
Replacement of position sensor
Henke-Sass, Wolf
Bluetooth
1
Restart device and check if Bluetooth
works now
Farm / User
2
Replacement of Bluetooth module
Henke-Sass, Wolf
Device storage
Repair
Henke-Sass, Wolf
Motor
Repair
Henke-Sass, Wolf
Ambient Light
Sensor
1
Optionally, use device without ambient
light sensor
Farm / User
2
Replacement of ambient light sensor
Henke-Sass, Wolf
LED (complete or
single colors)
1
Optionally, use device without LED
functions
Farm / User
2
Repair of LED
Henke-Sass, Wolf
NOTE: Repair or maintenance by unauthorized persons will lead to a loss of warranty!
Unauthorized opening of FreVAX™ devices or battery packs may cause harm and is not allowed!
All works on the electrical system may only be carried out by qualified electricians of the
manufacturer.

18
12. Dismantling
The FreVAX™ device may only be dismantled by authorized service engineers. In case of
unauthorized dismantling, the device will lose its warranty.
Do not open the FreVAX™ device by yourself due to health and safety risks!
19
13. The battery and the charger
Battery
The battery of the FreVAX™ is a rechargeable Lithium Ion (Li-Ion) battery. At least 1,000 injections can
be administered by using a fully functioning and charged battery.
The battery should be slotted into the opening in the base of the FreVAX™ device:
A fastening button will hold the battery in position. The battery can be removed from the base by
pushing down the button at the front of the battery and by pulling out the battery.
Use only appropriate batteries in the FreVAX™. The use of other batteries can lead to injuries and
fire hazard.
Do not expose the battery to mechanical shocks.
Stop using the battery if it becomes abnormally hot, or if discoloration, deformation or abnormal
conditions are detected during use, charge or storage.
Replace the battery when its running time between charges becomes much shorter than usual.
It is recommended that batteries are not recharged before falling below 50% loading capacity.
Never store empty batteries as this could damage them and make them unusable.
Never send/ ship defective batteries to any destination. Instead, please dispose of them correctly.
Charger
Charge the battery using only the charger supplied. Connect the battery to the charger and connect
the charger to an electric socket. When connected correctly, the charging process will start
automatically.
Check the charger regularly for damage, especially the connection cable and the housing. Do not
use damaged battery chargers.
Always grasp the plug, not the cable, when removing the mains plug from the socket.
Faulty electrical installation or too high mains voltage can lead to electric shock. Only connect the
battery charger to an easily accessible socket, so that you can quickly disconnect it from the power
supply in the event of fault.
If you charge the battery improperly, the battery, battery charger and the FreVAX™ device may
be damaged. Charge the battery at an ambient temperature between 0°C and 45°C.

20
The LEDs have the following functions:
LED lights orange:
Battery is empty and charging
LED lights yellow:
Battery is partly charged and still
charging.
LED lights green:
Battery is fully charged.
The battery charger is not waterproof!
Operate the battery charger indoors only!
Table of contents
Other Boehringer Ingelheim Medical Equipment manuals


Popular Medical Equipment manuals by other brands


Getinge
Getinge Arjohuntleigh Nimbus 3 Professional Instructions for use

Mettler Electronics
Mettler Electronics Sonicator 730 Maintenance manual

Pressalit Care
Pressalit Care R1100 Mounting instruction

Denas MS
Denas MS DENAS-T operating manual

bort medical
bort medical ActiveColor quick guide

AccuVein
AccuVein AV400 user manual


