Bogen NQ-ZPMS User manual

Zone Paging Microphone Station
UserGuide
NQ-ZPMS
© 2023 Bogen Communications LLC
All rights reserved
740-00183A
230420

i
Contents
Using the Zone Paging Microphone Station . . . . . . . . . . . . . . . . . . . . . . . . . . . . . . . . 1
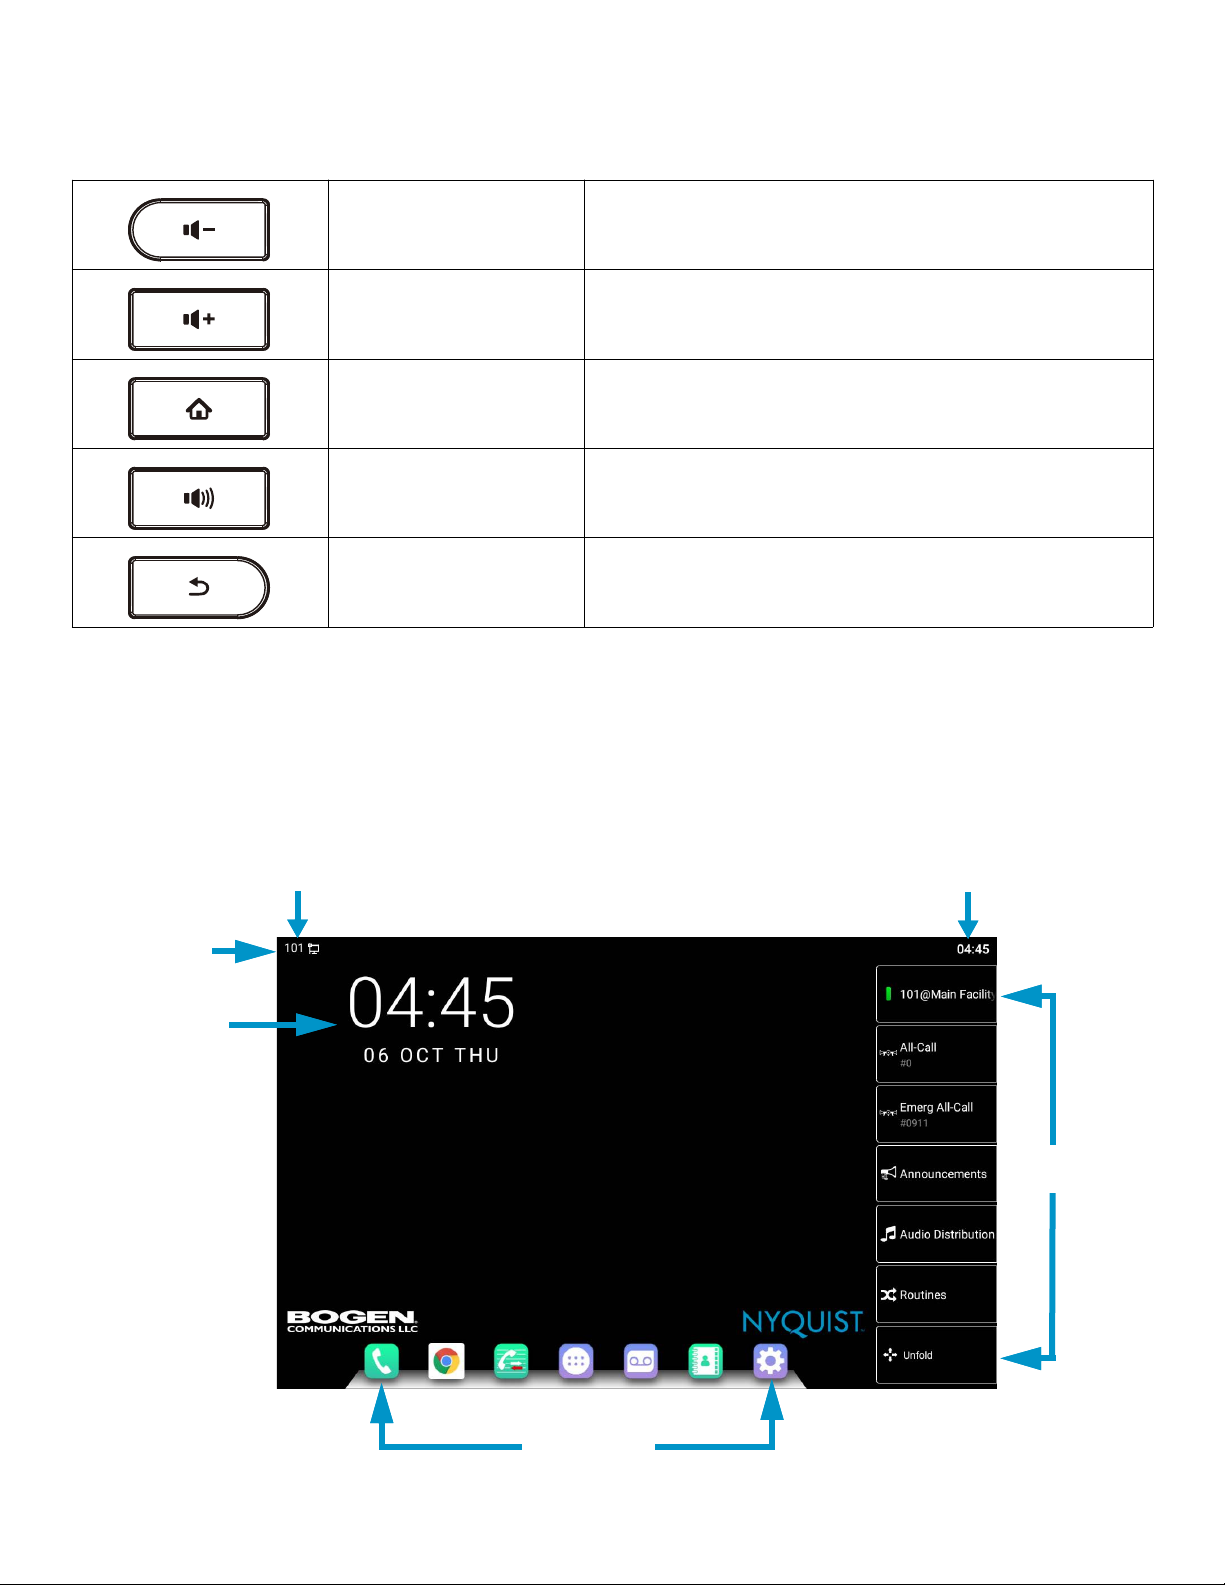
Hardware Components and Features . . . . . . . . . . . . . . . . . . . . . . . . . . . . . . . . . . . . . . . . . .1
Configuring the NQ-ZPMS . . . . . . . . . . . . . . . . . . . . . . . . . . . . . . . . . . . . . . . . . . . . . . . . . . . .6
Add a Station for the NQ-ZPMS . . . . . . . . . . . . . . . . . . . . . . . . . . . . . . . . . . . . . . . . . . . . .6
Set up with DHCP and DHCP option 66 available . . . . . . . . . . . . . . . . . . . . . . . . . . . . . .6
Set up with DHCP (DHCP option 66 unavailable) . . . . . . . . . . . . . . . . . . . . . . . . . . . . . .7
Set up with static IP address (DHCP unavailable). . . . . . . . . . . . . . . . . . . . . . . . . . . . . . .8
Validate the Provisioning Procedure . . . . . . . . . . . . . . . . . . . . . . . . . . . . . . . . . . . . . . . .10
Updating Firmware . . . . . . . . . . . . . . . . . . . . . . . . . . . . . . . . . . . . . . . . . . . . . . . . . . . . . . .11
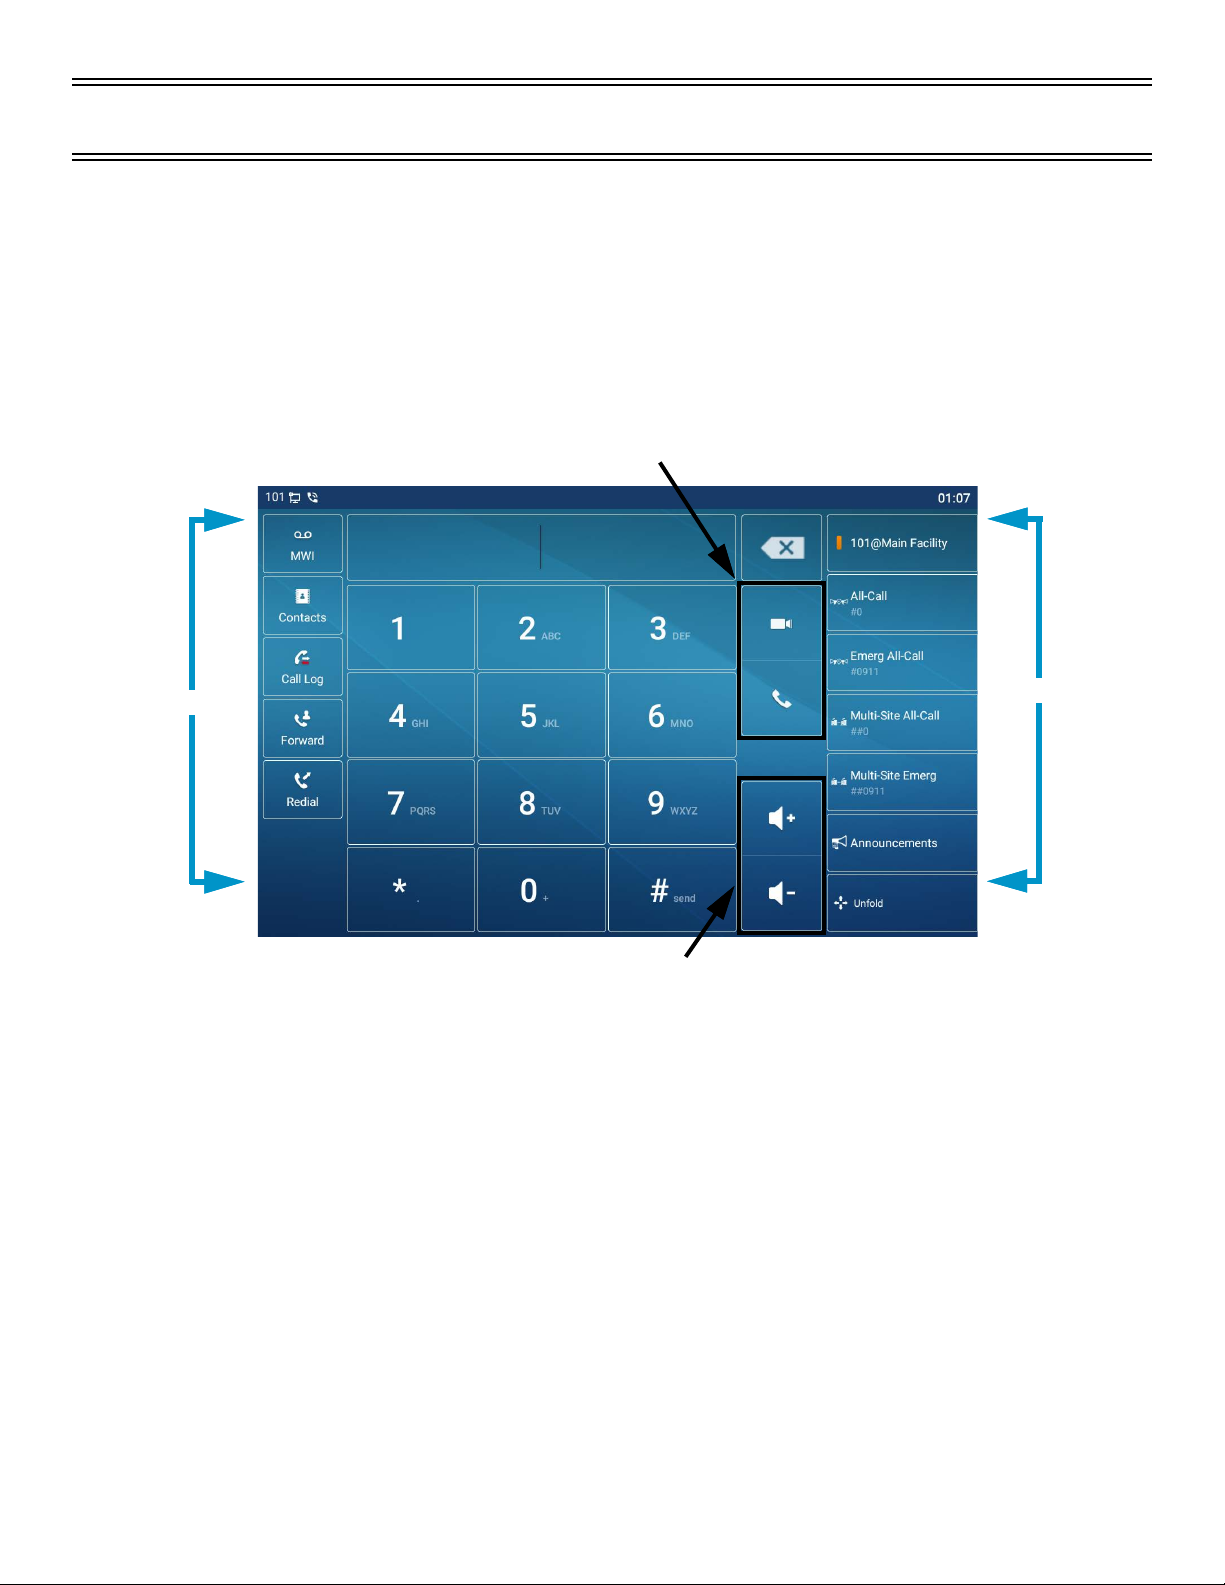
Making Pages . . . . . . . . . . . . . . . . . . . . . . . . . . . . . . . . . . . . . . . . . . . . . . . . . . . . . . . . . . . . . .12
Multi-Site Emergency-All-Call Paging . . . . . . . . . . . . . . . . . . . . . . . . . . . . . . . . . . . . . . .12
Multi-Site All-Call Paging . . . . . . . . . . . . . . . . . . . . . . . . . . . . . . . . . . . . . . . . . . . . . . . . . .12
Emergency-All-Call Paging . . . . . . . . . . . . . . . . . . . . . . . . . . . . . . . . . . . . . . . . . . . . . . . .12
All-Call Paging . . . . . . . . . . . . . . . . . . . . . . . . . . . . . . . . . . . . . . . . . . . . . . . . . . . . . . . . . . .13
Zone Paging . . . . . . . . . . . . . . . . . . . . . . . . . . . . . . . . . . . . . . . . . . . . . . . . . . . . . . . . . . . . .13
Record a Page . . . . . . . . . . . . . . . . . . . . . . . . . . . . . . . . . . . . . . . . . . . . . . . . . . . . . . . . . . .13
Making Calls . . . . . . . . . . . . . . . . . . . . . . . . . . . . . . . . . . . . . . . . . . . . . . . . . . . . . . . . . . . . . . .14
Sending Text Messages Between Phones . . . . . . . . . . . . . . . . . . . . . . . . . . . . . . . . . . . . . .15
Changing the Event Schedule . . . . . . . . . . . . . . . . . . . . . . . . . . . . . . . . . . . . . . . . . . . . . . . .15
Playing Alarms . . . . . . . . . . . . . . . . . . . . . . . . . . . . . . . . . . . . . . . . . . . . . . . . . . . . . . . . . . . . .16
Playing Tones . . . . . . . . . . . . . . . . . . . . . . . . . . . . . . . . . . . . . . . . . . . . . . . . . . . . . . . . . . . . . .16
Forwarding Calls . . . . . . . . . . . . . . . . . . . . . . . . . . . . . . . . . . . . . . . . . . . . . . . . . . . . . . . . . . .16
NQ-ZPMS–based Call Forward . . . . . . . . . . . . . . . . . . . . . . . . . . . . . . . . . . . . . . . . . . . . .17
DTMF-based Call Forward . . . . . . . . . . . . . . . . . . . . . . . . . . . . . . . . . . . . . . . . . . . . . . . . .18
Using the Voice Mail Feature . . . . . . . . . . . . . . . . . . . . . . . . . . . . . . . . . . . . . . . . . . . . . . . . .18
Recording Announcements . . . . . . . . . . . . . . . . . . . . . . . . . . . . . . . . . . . . . . . . . . . . . . . . . .19
Playing Recorded Calls . . . . . . . . . . . . . . . . . . . . . . . . . . . . . . . . . . . . . . . . . . . . . . . . . . . . . .19
Restart Nyquist Server . . . . . . . . . . . . . . . . . . . . . . . . . . . . . . . . . . . . . . . . . . . . . . . . . . . . . .20
Reboot NQ-ZPMS . . . . . . . . . . . . . . . . . . . . . . . . . . . . . . . . . . . . . . . . . . . . . . . . . . . . . . . . . .20
Stop Announcement . . . . . . . . . . . . . . . . . . . . . . . . . . . . . . . . . . . . . . . . . . . . . . . . . . . . . . . .21
Stop Scheduled Audio . . . . . . . . . . . . . . . . . . . . . . . . . . . . . . . . . . . . . . . . . . . . . . . . . . . . . .21
Using Audio Distribution . . . . . . . . . . . . . . . . . . . . . . . . . . . . . . . . . . . . . . . . . . . . . . . . . . . .21
Launching Routines . . . . . . . . . . . . . . . . . . . . . . . . . . . . . . . . . . . . . . . . . . . . . . . . . . . . . . . . .22
Customizing Line Keys . . . . . . . . . . . . . . . . . . . . . . . . . . . . . . . . . . . . . . . . . . . . . . . . . . . . . .23
Viewing NWS Alerts on the NQ-ZPMS . . . . . . . . . . . . . . . . . . . . . . . . . . . . . . . . . . . . . . . .23
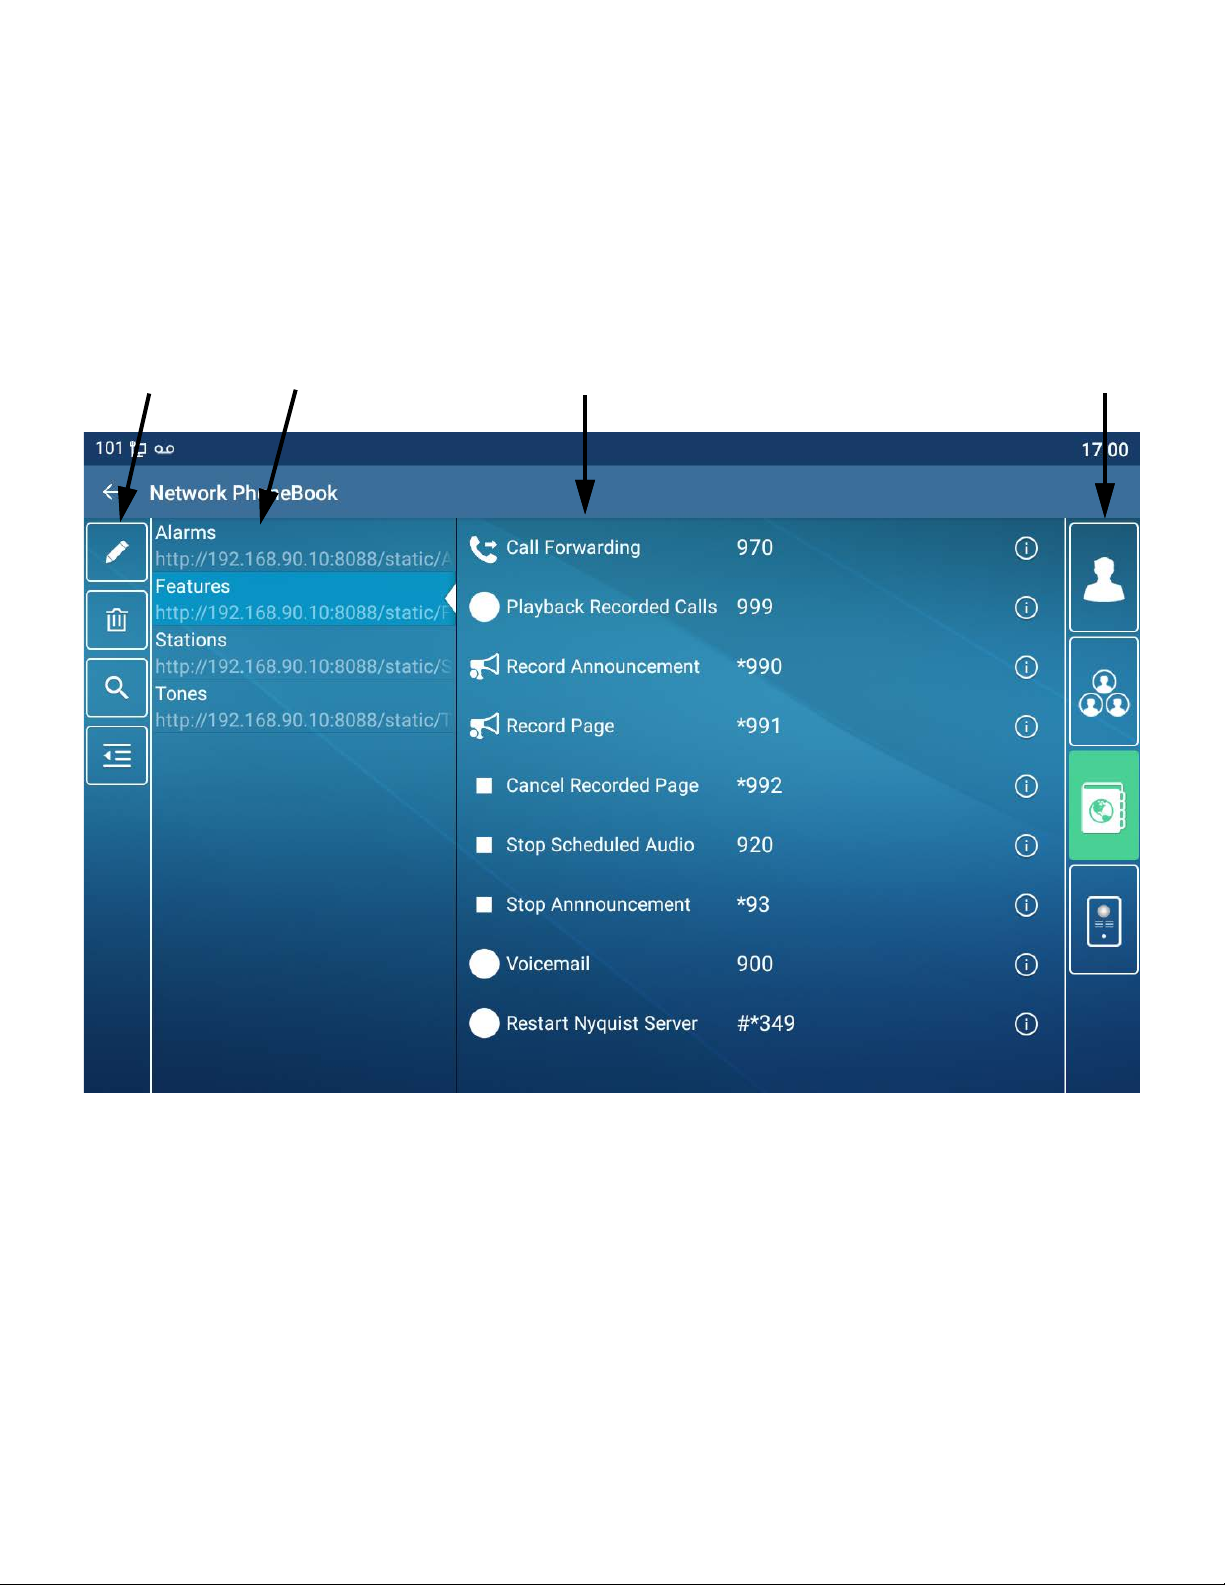
Access the Nyquist Web Interface . . . . . . . . . . . . . . . . . . . . . . . . . . . . . . . . . . . . . . . . . . . .25
Appendix A: Nyquist DTMF Feature Dialing Codes . . . . . . . . . . . . . . . . . . . . . . . . . . 27
Alarm/Tone Activation . . . . . . . . . . . . . . . . . . . . . . . . . . . . . . . . . . . . . . . . . . . . . . . . . . . . . .27
Announcements . . . . . . . . . . . . . . . . . . . . . . . . . . . . . . . . . . . . . . . . . . . . . . . . . . . . . . . . . . . .28

ii
Calling . . . . . . . . . . . . . . . . . . . . . . . . . . . . . . . . . . . . . . . . . . . . . . . . . . . . . . . . . . . . . . . . . . . .29
Call Parking/Call Pickup . . . . . . . . . . . . . . . . . . . . . . . . . . . . . . . . . . . . . . . . . . . . . . . . . . . . .30
Call Forwarding . . . . . . . . . . . . . . . . . . . . . . . . . . . . . . . . . . . . . . . . . . . . . . . . . . . . . . . . . . . .30
Conferencing . . . . . . . . . . . . . . . . . . . . . . . . . . . . . . . . . . . . . . . . . . . . . . . . . . . . . . . . . . . . . .31
Call Transfer . . . . . . . . . . . . . . . . . . . . . . . . . . . . . . . . . . . . . . . . . . . . . . . . . . . . . . . . . . . . . . .31
Monitoring/Recording . . . . . . . . . . . . . . . . . . . . . . . . . . . . . . . . . . . . . . . . . . . . . . . . . . . . . .32
Paging . . . . . . . . . . . . . . . . . . . . . . . . . . . . . . . . . . . . . . . . . . . . . . . . . . . . . . . . . . . . . . . . . . . .33
Voicemail . . . . . . . . . . . . . . . . . . . . . . . . . . . . . . . . . . . . . . . . . . . . . . . . . . . . . . . . . . . . . . . . . .34
Walking CoS . . . . . . . . . . . . . . . . . . . . . . . . . . . . . . . . . . . . . . . . . . . . . . . . . . . . . . . . . . . . . . .35
Dial Codes Used for Simulating Calls to Admin Station from Station Call Switches . .35
Audio Distribution . . . . . . . . . . . . . . . . . . . . . . . . . . . . . . . . . . . . . . . . . . . . . . . . . . . . . . . . . .36
Routines . . . . . . . . . . . . . . . . . . . . . . . . . . . . . . . . . . . . . . . . . . . . . . . . . . . . . . . . . . . . . . . . . .36
Miscellaneous Dial Codes . . . . . . . . . . . . . . . . . . . . . . . . . . . . . . . . . . . . . . . . . . . . . . . . . . .37
Alternate Dialing Codes . . . . . . . . . . . . . . . . . . . . . . . . . . . . . . . . . . . . . . . . . . . . . . . . . . . . .38

1
Using the Zone Paging Microphone Station
The Bogen NQ-ZPMS Zone Paging Microphone Station is primarily designed for high zone-count
commercial applications (e.g., transportation hubs, etc.), wherever a lot of zone paging occurs, or where
a flexible microphone station is desired; however, it can also be used as an alternative to the NQ-T1100
Admin Phone.
The phone’s color touch screen provides rapid, efficient, and reliable control over many Nyquist fea-
tures, such as pages, announcements, audio distributions, routines, tones, and managing school/site
bell schedules. Its flexible gooseneck microphone, coupled with quick access to a large number of soft
zone page buttons, makes it ideal for “busy” paging applications with lots of paging zones, such as
transportation terminals or large commercial facilities.
This manual guides you through the use of the NQ-ZPMS with the Nyquist system.
Tip: Simplified setup, configuration, and usage instructions are available in the NQ-ZPMS Quick Installa-
tion Guide..
Hardware Components and Features
The main components of the NQ-ZPMS are the 10.1-inch, 1280×800 pixel, color touchscreen display
and five feature keys.
Figure 1. Hardware Components
Touch Screen
Feature Keys

2
The feature keys are described in the following table:
The touchscreen display has two resting display screens: Desktop and Line Keys. In addition, there are
other predefined screens—such as the Call Dialer—which are displayed during various device opera-
tions. Each of the display screens and most SoftKey screens can be customized through the Nyquist
server and/or the phone’s configuration settings.
Desktop Screen
Figure 2. Desktop Display screen
Table 1. Feature Keys
Decrease Volume Decreases the volume of the ringer, speaker, hand-
set, or headset.
Increase Volume Increases the volume of the ringer, speaker, hand-
set, or headset.
Home Returns the display screen to the Home page.
Speakerphone Activates and deactivates hands-free speaker-
phone mode.
Return Returns the display screen to the previous page or
menu.
Status Bar
Time
Extension
Line Keys
Time/Date
Shortcuts

3
On the Desktop screen (shown in Figure 2, “Desktop Display screen,” on page 2), the touchscreen dis-
plays the date and time, shortcuts to various phone functions, the first six Line Keys, and the Unfold
button, which displays the Line Keys screen. At the top of the screen is a status bar, which displays this
device’s extension, connection state, and various indicators, such as message waiting, forward enabled,
Tip: The shortcut buttons and widgets that are displayed on the desktop can be customized by touching and
holding the screen or widgets.
Line Keys Screen
Figure 3. Line Keys screen
The Line Keys mode (shown in Figure 3, “Line Keys screen,” on page 3) displays the Line Keys (sometimes
known as Direct Station Selection[DSS] keys or Function Keys), which can be customized per station via
the Nyquist controller’s Edit Line Keys feature. It allows you to quickly initiate pages, access and
change Schedules, start Routines, manage Audio Distribution, and many other Nyquist features. It also
displays one Line Key for each Nyquist-defined zone, each Line Key programmed to initiate a page
operation to that zone.
Above the Line Keys are four dots, representing the four pages of Line Keys that can be displayed, with
the current page indicated by a blue dot. Swipe left or right on the screen to view the other pages.
On the right edge of the screen are seven Softkeys, which are NQ-ZPMS function keys: Dialer, MWI (for
Message Waiting Indicator), Contacts, Call Log, Forward, Redial, and Collapse, which displays the Desk-
top screen.
Status Bar
Time
Extension
Line Keys
Page indicators
Network, Call Log, and
Message (MWI) indicators
Softkeys

4
Important: The Line Keys mode is the default for the NQ-ZPMS. For this reason, this document will
assume that this is the starting screen for most operations.
Dialer Screen
The Dialer screen (shown in Figure 4, “Dialer screen,” on page 4) is displayed when the receiver is lifted
to dial a number. In addition to the expected keypad, volume keys, and call initiation keys, i.e., the
handset icon for voice calls and camera icon for video calls (video calls are not supported by Nyquist),
it also displays a list of Softkeys along the leftmost edge, as well as the first six Line Keys and the Unfold
key on the rightmost edge.
Figure 4. Dialer screen
Network PhoneBook Screen
The Network PhoneBook screen (shown in Figure 5, “Network PhoneBook Screen (Features phonebook
selected),” on page 5) provides access to a variety of features.
The screen is divided into four columns:
•Operations: Provides editing, deleting, searching, and the “Hide/Show Phonebooks” button, which
can hide or show the Phonebooks column.
•Phonebooks: Provides an editable list of Phonebooks, the defaults being:
• Alarms
• Features
• Stations
• Tones
Softkeys
Call initiation keys
Volume control keys
Line Keys

5
•Phonebook Entries: Displays a list of entries for the selected Phonebook, including their names and
DTMF codes. Selecting an item will activate it. Selecting the information icon ⓘ will open the display
screen for this entry.
•Lists: Provides buttons for four types of lists:
• Contacts
• Group
• Network PhoneBook
• DoorAccess List (not used by the Nyquist system)
Figure 5. Network PhoneBook Screen (Features phonebook selected)
Other Phonebook Screens
The Contacts and Group keys in the Lists columnprovide access to other Phonebook-related features of
the NQ-ZPMS. These features are beyond the scope of this document, but they can be customized
through this interface or by accessing the Phonebook tab of the NQ-ZPMS’s web interface.
Operations Phonebooks Phonebook Entries Lists

6
Configuring the NQ-ZPMS
Add a Station for the NQ-ZPMS
Before continuing with the following configuration instructions, the NQ-ZPMS must be manually added
to the Nyquist system as a Station. Refer to the Nyquist System Administrator Guide for instructions on
adding the NQ-ZPMS IP phone, using a Device Type of NQ-ZPMS Zone Paging Microphone Station.
Note: You will need to know the MAC address of the NQ-ZPMS device being added, which can be found
on the back of the device.
Once a new station has been added to the Nyquist system, the steps necessary to configure the NQ-
ZPMS is determined by the network scenario in which the NQ-ZPMS will be installed:
•”Set up with DHCP and DHCP option 66 available” on page 6
•”Set up with DHCP (DHCP option 66 unavailable)” on page 7
•”Set up with static IP address (DHCP unavailable)” on page 8
Once the NQ-ZPMS has been configured, see ”Validate the Provisioning Procedure” on page 10 to vali-
date that it has been successfully configured.
Set up with DHCP and DHCP option 66 available
If your Nyquist network is configured to use DHCP to allocate IP addresses, and the DHCP server has
been set up to provide the Nyquist server’s IP address via DHCP option 66, then all you need to do is
plug the NQ-ZPMS into the network using a PoE (Power over Ethernet) network port. When using
DHCP with option 66, the NQ-ZPMS will automatically obtain an IP address, automatically download
configuration information from the Nyquist server, and automatically register a VoIP SIP account with
the Nyquist server. No further configuration is required on the NQ-ZPMS.
If your NQ-ZPMS has previously been configured, it may not currently be setup for automatic provi-
sioning. If this is the case, you should reset the device.
Resetting the NQ-ZPMS using the touch screen interface:
1Connect NQ-ZPMS to the network using a PoE network port.
2Once the NQ-ZPMS has started, if you are prompted for the language and time zone, the phone
has already been reset.
3Press the NQ-ZPMS’s Home feature key.
4Touch the Phone Settings shortcut key .
5Touch Maintain (scroll to the bottom of the page).
6Enter the admin password (default is bogen), then touch OK.
7Touch Phone Reset.
8Touch Reset.
9Touch Reset to reset and reboot the NQ-ZPMS.

7
Set up with DHCP (DHCP option 66 unavailable)
The following steps will set up the NQ-ZPMS for use in a network environment where DHCP will
provide the NQ-ZPMS with an IP address, but will not provide the Nyquist server’s IP address via DHCP
option 66, which will therefore need to be configured manually.
Configuring the NQ-ZPMS using the web interface
1Connect NQ-ZPMS to the network using a PoE network port.
2Once the NQ-ZPMS has started, specify the language and time zone (if prompted for them).
3Identify the NQ-ZPMS’s Internet Protocol (IP) address by doing one of the following:
• Press the NQ-ZPMS’s Home feature key, press the Phone Settings shortcut key , then press
the Network menu item to display its IP address.
• Locate the IP address in your network’s Dynamic Host Configuration Protocol (DHCP) client
table.
4Open your computer’s web browser, enter the NQ-ZPMS’s IP address (for example, http://
192.168.0.10 or 192.168.0.10) in the address bar, and then press Enter. You may see a warning that
the connection to this address is not secure, which is because the device is using HTTP instead of
HTTPS. Continue to the site. The browser will display the NQ-ZPMS’s web UI.
5On the login page, enter the Username (default is admin) and Password (default is bogen) and click
Login.
6Click System from the left (vertical) menu.
Tip: If the menu tabs are not visible, refresh the page.
7Click the Auto Provision tab from the top (horizontal) menu.
8Enable the Save Auto Provision Information checkbox (optional).
9Configure the Static Provisioning Server section:
a) Set Server Address to the IP address of the Nyquist server
b) Set Configuration File Name to <zpms-mac-address>.cfg, where <zpms-mac-address> is the
lowercase MAC address of the NQ-ZPMS.
Tip: Be sure to use lowercase letters and remember to append “.cfg” to the MAC address.
c) Set Protocol Type to TFTP.
d) Set Update Mode to Update After Reboot.
10 Click the Apply button.
11 Click the Autoprovision Now button (in the Autoprovision Now section).
12 The phone will download its configuration information from the server and register a VoIP SIP
account with the Nyquist server.
Configuring the NQ-ZPMS using the touch screen interface

8
1Connect NQ-ZPMS to the network using a PoE network port.
2Once the NQ-ZPMS has started, specify the language and time zone (if prompted for them).
3Press the NQ-ZPMS’s Home feature key.
4Touch the Phone Settings shortcut key .
5Touch Maintain (scroll to the bottom of the page).
6Enter the admin password (default is bogen), then touch OK.
7Touch Auto Provision.
8Touch Server Address, enter the Nyquist server’s IP address, and touch OK.
9Touch Config file name, then enter <zpms-mac-address>.cfg (where <zpms-mac-address> is the
lowercase MAC address of the NQ-ZPMS, which can be found on the back of the device).
Tip: You can enter digits by touching and holding the letter on which the superscript number is displayed.
10 Touch Protocol Type and select TFTP.
11 Touch Update Mode and select Update after reboot.
12 Touch the back arrow twice to return to the Phone Settings menu.
13 Touch Reboot to reboot the NQ-ZPMS.
The phone will reboot, automatically download its configuration information from the server, and reg-
ister a VoIP SIP account with the Nyquist server.
Set up with static IP address (DHCP unavailable)
The following steps will set up the NQ-ZPMS using a static IP address instead of DHCP-allocated IP
addresses.
When you first plug the NQ-ZPMS into your network, it typically receives an IP address via DHCP
because DHCP is the phone’s default configuration; it does not have a static IP address set by default.
Configuring the NQ-ZPMS using the web interface
Important: To connect to the web interface, the NQ-ZPMS must already be assigned an IP address.
If the device does not have access to a DHCP server to provide it with a temporary IP
address, then follow the instructions under Configuring the NQ-ZPMS using the touch-
screen interface to manually configure the IP settings.
1Identify the NQ-ZPMS’s temporary (DHCP-assigned) IP address by doing one of the following:
• Press the NQ-ZPMS’s Home feature key, the Phone Settings shortcut key , then the Network
menu item to display its IP address.
• Locate the IP address in your network’s Dynamic Host Configuration Protocol (DHCP) client
table.

9
2Open your computer’s web browser, enter the NQ-ZPMS’s IP address (for example, http://
192.168.0.10 or 192.168.0.10) in the address bar, and then press Enter. You may see a warning that
the connection to this address is not secure, which is because the device is using HTTP instead of
HTTPS. Continue to the site. The browser will display the NQ-ZPMS’s web UI.
3On the login page, enter the Username (default is admin) and Password (default is bogen) and click
Login.
4Click Network from the left (vertical) menu.
Tip: If the menu tabs are not visible, refresh the page.
5Click the Basic tab from the top (horizontal) menu.
6Select Static IP from the IPv4 Settings section.
7Enter desired values for IP, Subnet mask, Default gateway, Primary DNS Server, and Secondary
DNS Server.
Tip: If you do not know which DNS addresses to use, you can specify publicly available DNS servers, such as
Cloudflare 1.1.1.1 (1.1.1.1 and 1.0.0.1) or Google Public DNS (8.8.8.8 and 8.8.4.4).
8Click the Apply button.
9The NQ-ZPMS’s IP address should immediately change to the new IP address. Enter the NQ-ZPMS’s
new IP address in the address bar of your browser and press Enter to navigate back to the device’s
web interface.
10 Click System from the left (vertical) menu.
11 Click the Auto Provision tab from the top (horizontal) menu.
12 Configure the Static Provisioning Server section:
a) Set Server Address to the IP address of the Nyquist server
b) Set Configuration File Name to <zpms-mac-address>.cfg, where <zpms-mac-address> is the
lowercase MAC address of the NQ-ZPMS.
c) Set Protocol Type to TFTP.
d) Set Update Mode to Update After Reboot.
13 Click the Apply button.
14 Click the Autoprovision Now button (in the Autoprovision Now section).
15 The phone will reboot, automatically download its configuration information from the server, and
register a VoIP SIP account with the Nyquist server.
Configuring the NQ-ZPMS using the touchscreen interface
1Connect NQ-ZPMS to the network using a PoE network port.
2Once the NQ-ZPMS has started, specify the language and time zone (if prompted for them).
3Press the NQ-ZPMS’s Home feature key.
4Touch the Phone Settings shortcut key, .

10
5Touch Ethernet.
6Touch Network Mode.
7Select Static.
8Enter desired values for IP address, Subnet mask, IP gateway, Primary DNS, and Secondary
DNS.
Tip: If you do not know which DNS addresses to use, you can specify publicly available DNS servers, such as
Cloudflare 1.1.1.1 (1.1.1.1 and 1.0.0.1) or Google Public DNS (8.8.8.8 and 8.8.4.4).
9Touch Save.
10 Touch the back arrow.
11 If the NQ-ZPMS will be connected to a VLAN, touch Advanced, touch VLAN, and select the config-
ure the device according to your VLAN setup. When complete, return to the Phone Settings menu.
12 Touch Maintain (scroll to the bottom of the page).
13 Touch Auto Provision.
14 Touch Server Address, enter the Nyquist server’s IP address, and touch OK.
15 Touch Config file name, then enter <zpms-mac-address>.cfg, where <zpms-mac-address> is the
lowercase MAC address of the NQ-ZPMS, which can be found on the back of the device.
Tip: You can enter digits by touching and holding the letter on which the superscript number is displayed.
16 Touch Protocol Type and select TFTP.
17 Touch Update Mode and select Update after reboot.
18 Touch the back arrow twice to return to the Phone Settings menu.
19 Touch Reboot to reboot the NQ-ZPMS.
20 The phone will reboot, automatically download its configuration information from the server, and
register a VoIP SIP account with the Nyquist server.
Validate the Provisioning Procedure
The NQ-ZPMS has successfully completed the provisioning process if:
• the device appears in the Stations Status view of the Nyquist server with a valid IP address and a
Status other than Unavailable, and
• at least one active line (e.g., Account1) appears as Registered on the NQ-ZPMS after pressing Phone
Settings , then Account.
Tip: If you need to adjust the time, date, time zone, or Daylight Savings Time settings for the NQ-ZPSMS, you
can do so via the device’s Settings / Date & Time / Date & Time menu.

11
Updating Firmware
Upon installing a new NQ-ZPMS, you should promptly ensure it is using the latest firmware. There are
two mechanisms for doing this: (1) via the NQ-ZPMS web interface and (2) via the NQ-ZPMS touch-
screen interface.
Warning The phone will be offline and unavailable during the upgrade process.
Update firmware via web interface:
1Log into the web interface, then click System from the left (vertical) menu.
Tip: If the menu tabs are not visible, refresh the page.
2Click the Upgrade tab from the top (horizontal) menu.
3If the server contains NQ-ZPMS firmware files with a version newer than the current firmware ver-
sion, the Upgrade button under the Firmware Information section will be enabled.
4Click the Upgrade button and press OK.
5The upgrade progress will be displayed as a circle with the percentage complete.
6During this process, the NQ-ZPMS will display download and upgrade status, indicating the current
firmware version, the upgraded firmware version, and a progress bar.
7Wait for the firmware upgrade to complete.
Update firmware via touchscreen interface:
1Press the NQ-ZPMS’s Home feature key.
2Touch the Phone Settings shortcut key .
3Touch Maintain in the System section (scroll to the bottom of the page).
4Touch Update.
5If the server contains NQ-ZPMS firmware files with a version newer than the current firmware ver-
sion, the Update button will be enabled.
6Click the Update button and press OK.
7During this process, the NQ-ZPMS will display download and upgrade status, indicating the current
firmware version, the upgraded firmware version, and a progress bar.
8Wait for the firmware upgrade to complete.
Important: For some releases, it may be necessary to repeat this process twice for the firmware to be
fully updated. Check the Current Software/Firmware Version after the process has
completed; if it has not been updated, repeat the process a second time.

12
Making Pages
Nyquist allows the following types of pages:
• Multi-Site All-Call
• Multi-Site Emergency-All-Call
• All-Call
• Emergency All-Call
• Zone
• Recorded
Note: The ability to make pages is determined by the Class of Service (CoS) configuration assigned to
your NQ-ZPMS station by your system administrator. If you do not have access to a paging feature but
the key is still present, "Access Denied" will be displayed under the feature label.
Multi-Site Emergency-All-Call Paging
A Multi-Site Emergency-All-Call page is an emergency page that plays simultaneously throughout
multiple sites that are configured in the facilities list. It has the highest priority of all pages.
To make a hands-free Multi-Site Emergency-All-Call page using the touch display:
1If you would like to use the handset, lift it off the cradle.
2Touch the Multi-Site Emerg button.
3Talk into the phone’s handset or microphone.
4Hang up the handset or touch the red ”hang up” button when finished.
Multi-Site All-Call Paging
A Multi-Site All-Call Page is a non-emergency page that plays simultaneously throughout multiple sites.
To make a hands-free Multi-Site All-Call page:
1If you would like to use the handset, lift it off the cradle.
2Touch the Multi-Site All-Call button.
3Talk into the phone’s handset or microphone.
4Hang up the handset or touch the red ”hang up” button when finished.
Emergency-All-Call Paging
An Emergency-All-Call page is a high priority page that simultaneously plays throughout the facility. An
Emergency-All-Call page has a higher priority than an All-Call or Normal page.
To make a hands-free Emergency-All-Call page:

13
1If you would like to use the handset, lift it off the cradle.
2Touch the Emerg All-Call button.
3Talk into the phone’s handset or microphone.
4Hang up the handset or touch the red ”hang up” button when finished.
All-Call Paging
An All-Call page is a non-emergency page that simultaneously plays throughout the facility.
To make a hands-free All-Call page:
1If you would like to use the handset, lift it off the cradle.
2Touch the All-Call button.
3Talk into the phone’s handset or microphone.
4Hang up the handset or touch the red ”hang up” button when finished.
Zone Paging
You can choose to page only certain areas of the facility, called zones. The zones, which are collections
of stations, must be created through the Nyquist controller’s web-based interface before zone paging
from the NQ-ZPMS can occur.
To make a zone page using the zone Line Keys:
1If you would like to use the handset, lift it off the cradle, then press the Unfold line key.
2Touch the line key for the zone that you want to page.
3Talk into the phone’s handset or microphone.
4Hang up the handset or touch the red ”hang up” button when finished.
Important: If the target zone of a zone page is associated with a message queue, pages placed to
that zone will be recorded and queued. If if it not associated with a message queue, the
pages will be played in real time. To force a real-time page, you can explicitly place a
non-queued page by dialing DTMF code #{zone}* (see ”Paging” on page 33).
Record a Page
You can record a page to be added to a zone queue. The maximum length of time for a recorded page
is 60 minutes; if the recording exceeds 60 minutes, it will time out and not be saved. If the recording is
silent for 60 seconds, it will time out and not be saved.
Pages in a zone’s queue are played in the order that they are placed in the queue. A live page started
on a zone that is playing a recorded page will cause the recorded page to be terminated and sent back
to the queue. The interrupted message will play again from the beginning of the message when the
zone becomes idle. Multi-Site Emergency-All-Call, Multi-Site All-Call, Emergency All-Call, All-Call,

14
Alarm, Tone, and Emergency Announcement will also interrupt any queued messages playing in any
zones. All re-queued messages will play again from the beginning of the message when the applicable
zones become idle.
Selecting Disable Audio will cause playback paging of all recorded messages to stop. The messages
will resume play from the beginning when audio is re-enabled.
To record a page for page queuing:
1If you would like to use the handset, lift it off the cradle, then press the Unfold line key.
2Touch the Record Page key.
3Touch the keypad button to display the keypad.
4Enter the zone number to be paged followed by the pound (#) key.
5Wait for the tone and then record your message.
6Hang up when finished.
Making Calls
The steps for making calls depend on whether you are making the call from the display and speaker or
from the handset and whether you know the extension that you want to call.
To make a call by dialing the extension number:
1If you would like to use the handset, lift it off the cradle, then press the Unfold line key.
2Touch the Dialer Softkey.
3Dial the extension.
4Touch the call button (or video button, to place a video call).
5When finished with the call, either select the end call button or hang up the handset.
To make a call using the Network Phone Book:
1If you would like to use the handset, lift it off the cradle.
2Touch the Home feature key.
3Touch the PhoneBook key.
4If the PhoneBooks list (second column) is not displayed, touch the Hide/Show Phonebooks button
(bottom of the first column) to display it.
5Select the Stations phone book.
6Navigate to the station that you want to call, and then select that station.
7When finished with the call, either select the end call button or hang up the handset.
Calls can be placed to any extension, or to any Nyquist feature using DTMF codes, as described in
”Nyquist DTMF Feature Dialing Codes” on page 27.

15
Sending Text Messages Between Phones
Text messages can be sent between Nyquist phones (e.g., NQ-T1100, NQ-ZPMS).
To send a text message to another Nyquist phone:
1Touch the Home feature key.
2Touch the Menu icon, .
3Touch the Message icon.
4Touch NEW MESSAGE.
5Touch the To field and type in the recipient’s extension.
6Touch the Type message field and type in the text message.
7Touch the “send message” arrow icon (to the right of the message) to send the message.
When the NQ-ZPMS receives a new message, it plays a tone, displays a a small message icon on the top
left corner of the desktop, and the power LED begins slowly blinking red. To display a new message,
either swipe down from the top of the desktop and select New SMS or access the Message menu as
described above.
Changing the Event Schedule
Nyquist allows the setting of bells and announcements to be played at specific times and in specific
zones. More than one schedule can be created for a school/site. For example, a school/site may have an
early release day on Wednesday and have classes begin and end at different times on that day than on
the other days of the week. Based on this example, a Regular Schedule or an Early Release Schedule can
be selected for the current day.
The Schedules feature available via the NQ-ZPMS provides a quick way to change the bell schedule for
the day. For example, if you normally use an Early Release Schedule for Wednesdays but want to use
this schedule for today (which is slated to use the Regular Schedule), you can select the Early Release
Schedule through the NQ-ZPMS.
To change today’s schedule:
1If you would like to use the handset, lift it off the cradle, then press the Unfold line key.
2Touch Schedules.
3Touch the schedule that you want for the day. If you have more than one site appearing in the
Schedules view, ensure you have selected the schedule for the desired site.
An asterisk (*) appears before the current schedule. Selecting None disables the schedule, which also
disables scheduled tones, audio, and routines included in the schedule.
4When prompted, enter the System Password.

16
Playing Alarms
You can play a facility alarm from a list of default alarms and those created through the Admin Web UI.
To play (or stop) an alarm:
1If you would like to use the handset, lift it off the cradle, then press the Unfold line key.
2If an Alarms line key has been defined, touch the Alarms key. If not, do the following:
a) Touch the Contacts key.
b) If the PhoneBooks list (second column) is not displayed, touch the Hide/Show Phonebooks
button (bottom of the first column) to display it.
c) Select the Alarms phone book.
3To stop an alarm that is already active, select STOP Alarm.
4Navigate to the alarm that you want and select that alarm. The alarm plays continuously until you
manually stop it.
5To end the alarm, touch the end call button or hang up the handset.
Playing Tones
Nyquist provides tones that can be used with events, such as bell schedules or announcements. In addi-
tion to the default tones, tones can also be created or uploaded via the Admin Web UI.
To play (or stop) a tone:
1If you would like to use the handset, lift it off the cradle, then press the Unfold line key.
2If a Tones line key has been defined, touch the Tones key. If not, do the following:
a) Touch the Contacts key.
b) If the PhoneBooks list (second column) is not displayed, touch the Hide/Show Phonebooks
button (bottom of the first column) to display it.
c) Select the Tones phone book.
3To stop a tone that is already active, select STOP Tone.
4Navigate to the tone that you want and select that tone.
5To end the tone, touch the end call button or hang up the handset.
Forwarding Calls
If your phone’s station has the appropriate CoS parameter set, you can forward your calls to another
Nyquist extension, whether it’s a physical station or a Web UI station. You can select to always forward
calls, forward calls if you are on another call, or forward calls if they are not answered within a specified
number of seconds.

17
If the NQ-ZPMS remains busy for more than two minutes, an Analog-Call-Switch-and-Speaker or Digi-
tal-Call-Switch-and-Speaker caller will be told that the call cannot be completed and to please try
again. The call switch will return to the idle state.
Important: The NQ-ZPMS provides two distinct mechanisms for forwarding calls, each with its own
advantages and disadvantages. One mechanism is accessed via the NQ-ZPMS–based
Forward softkey of the Line Keys screen (see Figure 3, “Line Keys screen,” on page 3),
while the other is accessed via the DTMF-based Call Forwarding menu item of the
PhoneBook / Features menu (see Figure 5, “Network PhoneBook Screen (Features
phonebook selected),” on page 5). The Forward softkey mechanism is implemented by
the NQ-ZPMS device (and shows a status icon on the screen when active); the Call For-
warding menu item is implemented by—and more compatible with—the Nyquist sys-
tem (but does not show a status icon on the screen). If both mechanisms are used
simultaneously, the Nyquist-based Call Forwarding mechanism (via PhoneBook / Fea-
tures) will take precedence.
NQ-ZPMS–based Call Forward
To forward calls using the Forward softkey (NQ-ZPMS forwarding):
1Touch Forward.
2Specify a forwarding number for one or more of the forwarding options (e.g., always forward, busy
forward, no answer forward). Note that a forwarding option cannot be enabled unless its corre-
sponding forwarding number has been specified.
3Enable one or more of the forwarding options:
•Enable always forward: forwards all incoming calls to the Always forward number.
•Enable busy forward: forwards incoming calls to the Busy forward number when this station is
busy.
•Enable no answer forward: forwards incoming calls to the No answer forward number when an
incoming call has rung for the number of seconds specified in No ans. fwd wait time (0~120).
Caution Forwarding calls via the NQ-ZPMS–based mechanism requires that two of the intercom call licenses
be available while the call is being placed, but only one once the call has been answered. If an inter-
com call license is not available, the caller will hear a message indicating that all circuits are busy.
This limitation does not exist when using the Nyquist-based mechanism.
To disable Call Forwarding using the Forward softkey (NQ-ZPMS forwarding):
1Touch Forward.
2Disable the forwarding options.
Caution If you use the Forward menu option and attempt to forward to an extension that is already forward-
ing to your extension, you will not receive an error, but call forwarding will not be activated.
Other manuals for NQ-ZPMS
1
Table of contents
Other Bogen Microphone System manuals

Bogen
Bogen ENHANCER ESYS1 User manual

Bogen
Bogen UDMS16BP User manual

Bogen
Bogen UHF8011BP/HH User manual

Bogen
Bogen ENHANCER ESYS1 User manual

Bogen
Bogen ENHANCER ESYS1 User manual

Bogen
Bogen UDR800 User manual

Bogen
Bogen UDMS16BP User manual

Bogen
Bogen ENHANCER ESYS1 Manual

Bogen
Bogen Enhancer User manual

Bogen
Bogen UDMS800HH User manual