BOJ HORIZON EASY SYSTEM User manual


- 2 -
We would like to express many thanks for your purchse this pressure cooker.
And we sincerely hope that you would carefully read and understand all
instruction of this manual operation.
CONTENTS
I. Name and structure
II. Important notice
III. Six-level safety device
IV. Direction for use
V. Emergency actions when abnormal
VI. Care and cleaning
VII. Main technical parameters
VIII. Cooking time
English

- 3 -
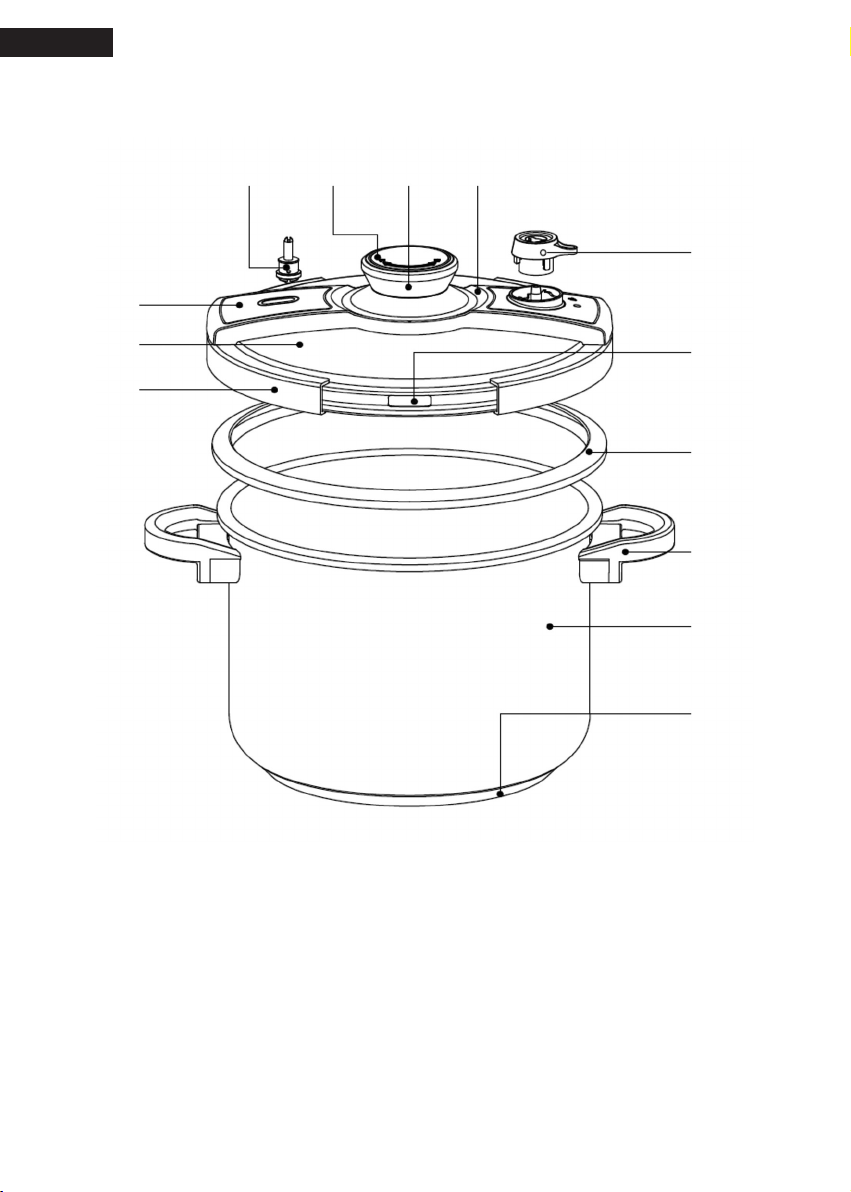
I. Name and structure
1 - Composite bottom
3 - Handle
5 - Safety vent
7 - Panel
9 - Knob cover
11- Decorative sheet
13- Clamp
2 - Pressure cooker pot
4 - Silicon gasket
6 - Pressure control device
8 - Knob
10- Float-controlled valve
12- Lid
1
2
3
4
5
6
78910
11
12
13
English

- 4 -
Pressure cooker parameter
II. Important notice
1. Read all the instructions
2. Pressure cooker are for domestic use only, not recommended for any other uses.
3. Do not leave children near the pressure cooker while cooking. Pressure cooker can
use only persons above 18 years old.
4. Do not touch hot surfaces.Use handles or knob. If necessary use protection.
5. Always make sure that the working valve, safety valve, gasket, oat-controlled valve,
lid and the pressure cooker itself was clean, without any grease stains.
6. The boiling point of the liquid in the pressure cooker should be below 120 degrees.
After boiling, a large amount of steam will be produced.
7. Do not use this pressure cooker for high pressure frying with oil.
8. No dry cooking in the unit.
9. The minimal quantity of liquid in the pot is 1/3 of the total capacity of the pressure
cooker. The total amount of the food should not exceed 2/3 of its total capacity. For
food that expands considerably during cooking, such as rice, dehydrated vegetables or
stewed fruits, do not ll the pressure cooker with contents more than half of the pot.
10. Please be careful with the pressure cooker cooking apple juice, sago, oatmeal,
noodles, pasta, beans and other easy to produce foam, splashes, may clog the pres-
sure release device food.
11. The pot should not be stored for a long time, alkali, salt, sugar and vinegar
steaming water and other objects, the use of time after cleaning and kept dry.
12. When the steam in the pressure cooker is discharged from the oat safety valve
or the sealing ring is discharged from the safety window of the edge of the pot, the re
source shall be turned off immediately, and the cold is prevented, the cause is found
out, and the utility model can be used again after troubleshooting.
DS22C1-5L
DS22C1-6L
DS24C1-6L
DS24C1-8L
DS26C1-10L
DS26C1-12L
22CM
22CM
24CM
24CM
26CM
26CM
5.0L
6.0L
6.0L
8.0L
10 L
12 L
80kPa
80kPa
80kPa
80kPa
80kPa
80kPa
70-100kPa
70-100kPa
70-100kPa
70-100kPa
70-100kPa
70-100kPa
130—170kPa
130—170kPa
130—170kPa
130—170kPa
130—170kPa
130—170kPa
180--300 kPa
180--300 kPa
180--300 kPa
180--300 kPa
180--300 kPa
180--300 kPa
Product Model Caliber
cm
Capacity
(L)
Gravity
valve
Spring
valve
Safety
valve
Second safety
pressure
English

- 5 -
13. When the pressure cooker is moving in a working state should be especially
careful, at end with, not allowed to push, bump and throwing.
14. When using a pressure cooker, do not focus the safe window on the user or person.
release device is blocked before use, or it should be cleaned in time.
15. Absolutely forbid to cover anything on the pressure regulating valve of the pressure
cooker.
16. There is pressure in the pot, shall not be forced to open the lid, the lid is not in place,
not heating cooking.
17. When the pressure cooker is working with a pressure vessel, check whether the
release device is blocked before use, or it should be cleaned in time.
18. Do not cook the pressure cooker in a microwave oven or an oven.
19. When the pressure cooker fails, please go to the designated or authorized repair
station to repair it.
20. Please use the genuine accessories.
III. Six-level safety device
1. Pressure Regulator Valve:It regulates the operating pressure level to maintain the
desired pressure level and temperature. The over pressure is released off by a spring
system.
2. Float safety valve:When the lid is correctly closed, the pressure of the pot can press
up, and the valve stem rises and the lid is locked.
3. If the lid is incorrectly or incompletely closed, the pressure don’t rise, the oat safety
valve stem can’t rise, and always in a state of discouragement. So should stop heating,
recorrect the lid.
4. Float safety valve can automatically detect the pressure in the pot, when the pressure
in the pot is lower than the safety opening pressure, the valve stem will fall, allowing
the cooker to be opened.
5. Float safety valve: when the pressure regulator valve can not work properly, and
pressure is too high, the oat safety valve is working to exhaust excess steam, so that
the pressure will not continue to rise.
6. Safety vent: the edge of the lid is provided with a safety went, when the pressure
regulator valve and the safety valve can’t work properly. So the pressure is too high, the
gasket is extruded from the window, so that the pressure is quickly released.
English

- 6 -
IV. Direction for use
1. When you use it for the rst time.
1)Please read the instructions carefully, especially the “ notes”.
2)Fill the pressure cooker up to 1/2 with water, Turn off the pressure cooker as
required. Heat it until the regulator valve is exhausted.
3)After cooling down, open the lid and rinse with water.
2. Normal operation:
1)Before each use, make sure that the exhaust pipe is unimpeded. If it is blocked,
clean it with a thin rod. Float safety valve to ensure cleanliness and exible
movement. The position of gasket is correct.
2)When using pressure cooker, must pay attention to the expansion of food and do
not cook more than maximum quantity.
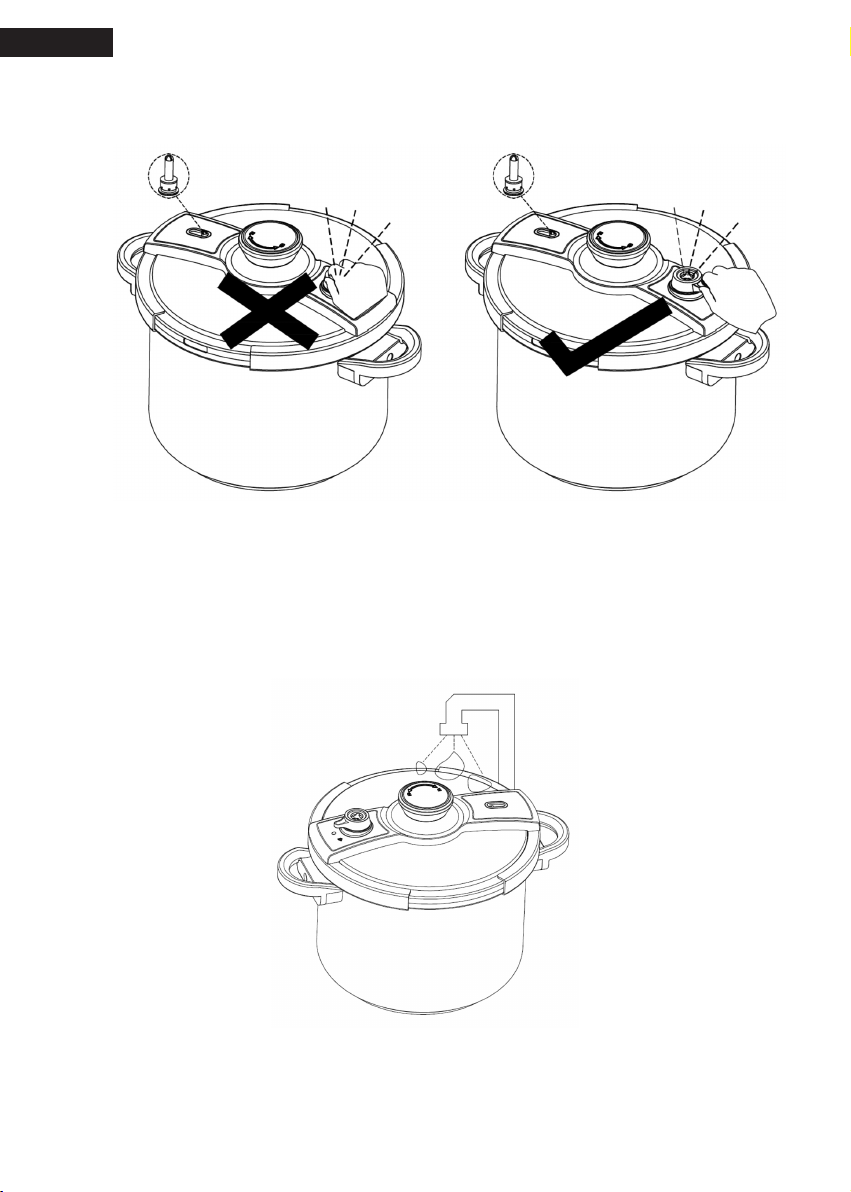
3)Closing the lid: rstly, make sure the clamp is opening (hold the knob with your
right hand, and the two clamps are at the top of the edge of the lid). Button the lid
and body, and then use right hand holding the knob clockwise 90 degrees.
Pay attention to the clamps on both ends of the lid must be in place with the pot
and lid. When necessary, especially new pressure cooker, press the lid and turn the
knob properly.
English

- 7 -
3. Heating:
1) The pressure cooker should be laid at on the stove, and when heated by the
electric stove, the diameter of the furnace plate should not be bigger than the pot’s.
When using a gas stove, the ame must not roll the wall of the pan.
2) Rotating the pressure limiting valve to the desired location. 1/ is 80 + / - 5 % Kpa.
When the pressure in the pot reaches the required pressure, the pressure limiting
valve will automatically exhaust, at this time can reduce the re source or close the
re source.
English
- 8 -
3) Heating to 2~3 minutes, the oat safety valve hole will be a small amount of
steam discharged. Continue to heat, the pressure of pot will increase, the oat safety
valve began to work properly, this phenomenon will immediately disappear.
4) Cooling (decompression):
The cooling method of pressure cooker:
1)Turn the regulating valve to the steam release position, and the steam will be
released automatically.
2)If you want to quickly cool the water cooling, turn the tap on the pan.
It is important to note that the water can’t be rushed through the relief valve.
3)Natural cool and turn off the heat source, and the pressure drop, the oat valve
red cap down, then open the lid.
4) Open the pressure cooker:
When opening the lid, one hand holds the pot handle and the other hand turns the
knob, then lift the lid off.
English

- 9 -
V. Emergency actions when abnormal
The oat safety
valve does not
rise after
heating.
Problem Causes Solution
(1)The cover is not in place and
the moving plate is stuck against
the oat safety valve stem.
(2)The heat source is too low to
boil the liquid.
(3)The gasket is too dirty,
deformed or damaged.
(4)The pressure cooker has
little liquid.
(1) the correct closing after
inspection.
(2) the heat source should be
increased.
(3) the gasket should be
cleaned or replaced.
(4) the uid should be checked
and added to the appropriate
capacity.
After heating,
steam sound
is heard from
the pressure
regulating valve,
but no steam is
discharged.
(1) the pressure regulating
valve is jammed by debris.
(2) the nozzle pipe is blocked by
cooking residue.
(3) enter dry-burning condition.
(4) the stove is tilting.
(1) remove the debris from the
pressure limit valve.
(2) remove food residue with
cleaning pin.
(3) quickly ame out, check the
reason and add the liquid.
(4)Keep the stove at.
Steam escapes
from safety
valve.
(1)Regulator pipe is blocked.
(2)Excessive loading.
(3)Heat is too heat.
(1)Remove residue and with
cleaning pin.
(2)Reheat after decreasing the
load of the cooker.
(3)Check food in cooker, reheat
by moderate heat.
Steam escapes
from all
directions.
(1)Both regulator and safety
valve malfunction.
(2)Gasket is not properly
installed.
(3)Gasket is damaged.
(4)The clearance between the lid
and the inner sealant ring is dirty.
(5)Lid is not properly shut.
(1)Remove residue and with
cleaning pin.
(2)Reinstall gasket.
(3)Replace gasket.
(4)Remove residue and dirt to
shut the lid properly.
(5)Recover the lid.
Opening and
closing is not
exible.
(1) Using substandard gasket.
(2) The oat relief valve red cap
has not dropped completely.
(3)Excessive opening and
closing cover, resulting in the
deforming of the tongue and
other parts.
(1)Replace the same specication
and model of the correct gasket.
(2) Wait for the oat safety valve
red cap to drop completely.
(3) Do not push too hard. If there
are obstacles, analyzing the
reasons for the removal and then
open them again. If the parts
are deformed, please revise or
replace them.
English

- 10 -
VI. Care and cleaning
1. Maintenance of the whole pot
a.Use a cleanser to remove dirt thoroughly.
b.Don’t wash the pressure cooker in the dishwasher. Do not use abrasive cleaning
products, and do not use metal brushes and other hard objects to scrub surface.
c.Wash the water thoroughly and keep it dry.
d.Do not contact with metal or other types of metal.
e.When not in use, place the lid on the pan.
2. Maintenance of the gasket:
a.Clean the gasket with clean water before use, and then put it in the lid after drying
it.
b.Gasket can be used with a little cooking oil to prolong its life and improve its per-
formance.
c.After use, you must remove the gasket, clean with clean water or detergent, and
put d.The lid in the correct position after drying.The gasket should be naturally laid
out during daily use or put the lid on the pan, and put the lid on the pan.
e.Gasket shall be replaced in one or two years depending on the frequency of use.
If there is damage, cracks or surface folds, cracks and other conditions should be
replaced in time.
3. Maintenance of pressure regulating valve, nozzle pipe and oat safety valve:
a.If the pressure valve, nozzle pipe, oat safety valve is blocked by food residue or
other clutter, then shall be both removed with a ne rod and rinsed with water. Also
conrm whether the fastening nut is loose, if is, it should be tightened again.
b.After each use, the pressure regulating valve should be cleaned. The regulating
valve will be raised directly with the thumb and forenger and clean the dirt inside
the valve body with clean water. Check the safety valve should also be checked
regularly cleaning, cleaning can be easily from the top of the pan off, after cleaning
can be as it is on the spiral, the pot should be reversed after cleaning to check whe-
ther the valve stem free fall. Wash the protective cover with hot water, clean it well
and then use it again.
English

- 11 -
4. Remove the coke oven
a.Please remove the coke oven with soft wood products such as wooden chopstic-
ks or large wooden spoon.
b.If the coke is strong, it should be dry. Soak the dried food in the oil until it is soaked
and then pour in the hot water. Soak it for a while. Do not use sharp tools such as
knives to remove, which will damage the pan
VII. Main technical parameters
1.Tightness: no leakage shall be allowed between 20kpa and the nominal working
pressure.
2.Work pressure: 0.9 to 1.1 times nominal working pressure, the gravity valve 80kpa
plus or minus 5%; Spring valve 70kpa-100kpa plus or minus 10%.
3. Safety pressure: within 130-170kpa range.
4. Pressure of gasket pressure: 180kPa- 300kPa.
5. Internal pressure: 360kpa.
6. Damage pressure: more than 500kpa.
7. Cover safety: the pressure in the pan is greater than 5kpa, and the pot lid will not
open.
8. Cover safety: when the lid is not in place, the pressure shall not exceed 5kpa.
9. Anti-blocking safety: the exhaust pipe is equipped with anti-jam nut and
anti-plugging cover.
English

- 12 -
VIII. Pressure cooker parameter
Asparagus ( whole )
Beans, French
Brussel sprouts
Cabbage, white
Cauliower
Pasta
Porridge
Potatoes, whole
Rice
Wheat
Beef (stewed in pieces )
Chicken ( in pieces )
Duck
Filet steak
Fish
Goose
Mutton ( in pieces )
Pig’s Knuckle
Rabbit ( in pieces )
Turkey
3-4
6-8
4
3-4
3-4
5-6
15-20
4-6
4-8
15-20
15-20
10-15
15
8-10
4-8
18-22
10-15
15-20
13-18
15
First gear
First gear
First gear
First gear
First gear
First gear
First gear
First gear
First gear
First gear
Second gear
Second gear
Second gear
Second gear
Second gear
Second gear
Second gear
Second gear
Second gear
Second gear
Foods Cooking time in minutes
English
- 13 -
Deseamos expresarle nuestro agradecimiento por la compra de esta olla a
presión y esperamos que lea atentamente y comprenda todas lasinstrucciones
de este manual de funcionamiento.
ÍNDICE
I. Nombre y estructura
II. Aviso importante
III. Dispositivo de seguridad de seis niveles
IV. Instrucciones de uso
V. Acciones de emergencia en caso de anomalía
VI. Cuidado y limpieza
VII. Principales parámetros técnicos
VIII. Tiempos de cocinado
Español
- 14 -
I. Nombre y estructura
1 - Fondo compuesto
3 - Asa
5 - Ventilación de seguridad
7 - Panel
9 - Cobertura del pomo
11 - Lámina decorativa
13 – Abrazadera
2 - Recipiente de olla a presión
4 - Junta de silicona
6 - Dispositivo de control de la presión
8 - Pomo
10 - Válvula controlada por otador
12 - Tapa
1
2
3
4
5
6
78910
11
12
13
Español

- 15 -
Parámetros de la olla a presión
II. Aviso importante
1. Lea todas las instrucciones.
2. La olla a presión es únicamente de uso doméstico y no se recomienda para ningún
otro uso.
3. No deje a los niños cerca de la olla a presión mientras cocina. La olla a presión solo
puede ser utilizada por personas mayores de 18 años.
4. No toque las supercies calientes. Utilice las asas o el pomo. Si es necesario, utilice
protección.
5. Asegúrese siempre de que la válvula de trabajo, la válvula de seguridad, la junta,
la válvula controlada por otador, la tapa y la propia olla a presión estén limpias y sin
manchas de grasa.
6. El punto de ebullición del líquido en la olla a presión debe ser inferior a 120 grados.
Tras la ebullición, se producirá una gran cantidad de vapor.
7. No utilice esta olla para freír a alta presión con aceite.
8. No la utilice para cocinar en seco.
9. La cantidad mínima de líquido en el recipiente es de 1/3 de la capacidad total de la
olla a presión. La cantidad total de alimentos no debe superar los 2/3 de su capacidad
total. El contenido de la olla a presión no debe ser superior a la mitad del recipiente
cuando cocine alimentos cuyo tamaño aumenta considerablemente durante el
cocinado, como el arroz, las verduras deshidratadas o las compotas.
10. Tenga cuidado con la olla a presión al cocinar zumo de manzana, sagú, avena,
deos, pasta, judías y otros alimentos que producen espuma y salpicaduras fácilmen-
te, ya que se puede obstruir el dispositivo de liberación de la presión.
11. No almacene sal, salsa de soja, álcali, azúcar, vinagre o agua de vapor dentro de la
olla durante mucho tiempo. Límpiela y séquela siempre después de cada uso.
DS22C1-5L
DS22C1-6L
DS24C1-6L
DS24C1-8L
DS26C1-10L
DS26C1-12L
22CM
22CM
24CM
24CM
26CM
26CM
5.0L
6.0L
6.0L
8.0L
10 L
12 L
80kPa
80kPa
80kPa
80kPa
80kPa
80kPa
70-100kPa
70-100kPa
70-100kPa
70-100kPa
70-100kPa
70-100kPa
130—170kPa
130—170kPa
130—170kPa
130—170kPa
130—170kPa
130—170kPa
180--300 kPa
180--300 kPa
180--300 kPa
180--300 kPa
180--300 kPa
180--300 kPa
Modelo del
producto
Calibre
cm
Capacidad
(L)
Válvula de
gravedad
Válvula de
resorte
Válvula de
seguridad
Segunda presión
de seguridad
Español

- 16 -
12. En caso de que salga vapor por la válvula de seguridad por otador o el anillo de
estanqueidad se escape por la ventilación de seguridad (ventanilla de seguridad), se
debe apagar inmediatamente la fuente de calor. Una vez se haya averiguado la causa
y solucionado el problema, se podrá volver a usar la olla.
13. Tenga mucho cuidado cuando mueva la olla en estado de funcionamiento. Llévela
en posición horizontal y colóquela con cuidado. No empuje, golpee ni arroje la olla.
14. Cuando utilice la olla a presión, no coloque la ventilación de seguridad (ventanilla
de seguridad) frente al usuario u otra persona.
15. Está absolutamente prohibido tapar la válvula reguladora de presión de la olla.
16. Cuando haya presión en la olla, no se debe forzar la apertura de la tapa. Si la tapa
no está colocada correctamente en su sitio, no se podrá realizar la cocción.
17. Antes de usar la olla a presión, compruebe si se ha bloqueado el dispositivo de
desbloqueo o si debe limpiarse previamente.
18. No use la olla a presión en el microondas o en el horno.
19. Si falla la olla a presión, diríjase al puesto de reparación designado o autorizado
para su reparación.
20. Utilice los accesorios originales
III. Dispositivo de seguridad de seis niveles
1. Válvula reguladora de presión: regula el nivel de presión de funcionamiento para
mantener el nivel de presión y la temperatura deseados. La sobrepresión se libera
mediante un sistema de resortes.
2. Válvula de seguridad por otador: cuando la tapa esté cerrada correctamente y la
presión del interior del recipiente haga presión hacia arriba, el indicador de la válvula
subirá y la tapa se bloqueará.
3. Si cierra la tapa de forma incorrecta, la olla no podrá funcionar, ya que el vapor saldrá
por todas partes, por lo que hay que dejar de calentar. Compruebe la tapa y vuelva a
cerrar la olla correctamente.
4. La válvula de seguridad por otador puede detectar automáticamente la presión en
el recipiente. Cuando la presión en la olla es inferior a la presión de apertura de seguri-
dad, el indicador de la válvula se baja, permitiendo la apertura de la olla.
5. Válvula de seguridad por otador: cuando la válvula reguladora de presión no puede
funcionar correctamente y la presión es demasiado alta, la válvula de seguridad por
otador permite la liberación del exceso de vapor para que la presión no siga aumen-
tando.
6. Ventilación de seguridad: el borde de la tapa está provisto de una ventilación de
seguridad en caso de que la válvula reguladora de presión y la válvula de seguridad no
puedan funcionar correctamente. Si la presión es demasiado alta, la junta se extruye
por la ventanilla, de modo que la presión se libera rápidamente.
Español

- 17 -
IV. Instrucciones de uso
1. Antes del primer uso:
1) Lea atentamente las instrucciones, especialmente las “notas”.
2) Añada 1/3 de agua a la olla y ponga el agua a hervir durante media hora.
Después de enfriar y descomprimir la olla, abra la tapa.
3) Vierta el agua para deshacerse del olor antes del primer uso, limpie y seque la
olla.
2. Funcionamiento normal:
1) Antes de utilizar la olla a presión, asegúrese de que el dispositivo de control de
la presión, la válvula de seguridad por otador, la junta de estanqueidad, la tapa y el
cuerpo de la olla estén limpios, sin suciedad ni grasa. Si alguna pieza está obstrui-
da, límpiela con una varilla na. Asegúrese de que la junta esté colocada correcta-
mente.
2) Al utilizar la olla a presión, debe tener en cuenta que los alimentos se hinchan y,
por tanto, no debe cocinar más de la cantidad máxima recomendada.
3) Cierre de la tapa: en primer lugar, asegúrese de que la abrazadera está abierta
(sujete el pomo con la mano derecha y compruebe que las dos abrazaderas están
en la parte superior del borde de la tapa). Encaje la tapa con el cuerpo de la olla a
presión y luego use la mano derecha para girar el pomo 90 grados en el sentido de
las agujas del reloj.
Preste atención a las abrazaderas en ambos extremos de la tapa para que queden
colocadas en su lugar correctamente en la olla y la tapa. Si fuera necesario, sobre
todo cuando la olla es nueva, presione la tapa y gire el pomo adecuadamente.
Español

- 18 -
3. Calentar:
1) La olla a presión debe colocarse plana sobre la cocina a gas y, cuando se caliente
con una cocina eléctrica, el diámetro de la placa de calor no debe ser mayor que el
del recipiente. Cuando se utiliza una cocina a gas, la llama no debe invadir la pared
de la olla.
2) Gire la válvula reguladora de presión hasta la posición deseada. La primera posi-
ción es de 70 kPa y la segunda de 100 kPa. Cuando la presión en la olla alcanza la
presión requerida, la válvula reguladora de presión se descarga automáticamente.
En este momento puede reducir o apagar la fuente de calor.
Español

- 19 -
3) Tras calentar la olla 2 o 3 minutos, se descargará una pequeña cantidad de vapor
por el oricio de la válvula de seguridad por otador. Siga calentando, la presión
de la olla aumentará y la válvula de seguridad por otador comenzará a funcionar
correctamente (Fig. 7).
4) Enfriar (descompresión):
Método de enfriamiento de la olla a presión:
1) Gire la válvula reguladora a la posición de salida de vapor y el vapor se expul-
sará automáticamente.
2) Coloque la olla a presión en el fregadero sin agua, abra el grifo y vierta agua
sobre la tapa (evite que caiga agua sobre la manilla o el regulador de presión)
hasta que baje el indicador rojo de la válvula de seguridad. Este método reduce
la presión rápidamente (Fig. 8).
Es importante tener en cuenta que no debe caer agua a través de la válvula de
descarga.
3) Apague la fuente de calor y deje que la olla a presión se enfríe por sí sola.
Cuando haya bajado el indicador rojo de la válvula de cierre, puede abrir la tapa.
4) Abrir la olla a presión:
Para abrir la tapa, sujete con una
mano el asa de la olla y
gire el pomo con la otra.
Luego levante la tapa.
Español

- 20 -
V. Acciones de emergencia en caso de anomalía
La válvula de
seguridad por
otador no sube
después de
calentar la olla.
Problema Causas Solución
(1) La tapa no está colocada
correctamente.
(2) La fuente de calor es dema-
siado baja para hervir el líquido.
(3) La junta está demasiado su-
cia, deformada o dañada.
(4) La olla a presión tiene poco
líquido.
(1) Cierre la olla correctamente
después de la inspección.
(2) Se debe aumentar la fuente
de calor.
(3) Se debe limpiar o cambiar la
junta.
(4) Se debe revisar y añadir el
líquido a la capacidad adecuada.
Tras calentar,
se escucha el
sonido del vapor
desde la válvula
reguladora de
presión, pero no
expulsa vapor.
(1) La válvula reguladora de pre-
sión está atascada por residuos.
(2) El tubo de tobera está obstrui-
do por los residuos del cocinado.
(3) Se ha iniciado un estado de
quemado en seco.
(4)La cocina a gas está inclinada.
(1) Elimine los residuos de la válvula
reguladora de presión.
(2) Elimine los restos de alimentos
con una varilla de limpieza.
(3) Apague rápidamente la llama,
compruebe el motivo y añada líquido.
(4)Mantenga la cocina a gas recta.
Sale vapor de la
válvula de
seguridad.
(1) El tubo del regulador está
obstruido.
(2) Carga excesiva.
(3) Calor excesivo.
(1)Elimine los restos de alimentos
con una varilla de limpieza.
(2)Vuelva a calentar la olla después
de disminuir su contenido.
(3)Compruebe la comida en la olla
y vuelva a calentar a fuego moderado.
El vapor se
escapa por
los bordes del
cuerpo.
(1) La tapa no está cerrada
correctamente.
(2) La junta no está instalada
correctamente o está sucia.
(3) La junta de estanqueidad
está dañada.
(4)El cuerpo de la olla está
deformado.
(1) Coloque la tapa de nuevo y
compruebe otra vez.
(2) Lave la junta y colóquela en
su sitio.
(3) Cambie la junta.
(4)Deje de usar la olla.
La apertura y
el cierre no se
realizan con
normalidad.
(1) Se ha utilizado una junta de
calidad inferior.
(2) El indicador rojo de la válvula
de cierre no ha bajado comple-
tamente.
(3) Apertura y cierre de la cu-
bierta excesivos, lo que provoca
la deformación de la lengüeta y
otras partes.
(1) Cambie la junta por otra del mis-
mo modelo y las mismas caracterís-
ticas.
(2) Espere a que el indicador rojo de la
válvula de seguridad por otador baje
completamente.
(3) No ejerza demasiada fuerza. Si
hay algún obstáculo, analice la causa
y deje que un profesional solucione el
problema. Si las piezas están defor-
madas, revíselas o cámbielas.
Español
This manual suits for next models
6
Table of contents
Languages:
Other BOJ Electric Pressure Cooker manuals


Popular Electric Pressure Cooker manuals by other brands


Cosori
Cosori CMC-CO601-SUS user manual

STARFRIT
STARFRIT 024604 Instructions for use and care

Fissler
Fissler Vitavit Edition Design Instructions for use

Power Pressure Cooker
Power Pressure Cooker XL PPC772 owner's manual

WMF
WMF Perfect Fusiontec user manual

Power Cooker
Power Cooker YBD60-100 owner's manual