BOJ PC-1000-5 User manual
USER MANUAL - MANUAL DE USO - MANUAL DE INSTRUÇÕES -
MANUEL D’UTILISATION - دليل المستخدم
PC-1000-5
ELECTRIC PRESSURE COOKER
Olla a presión eléctrica - Panela de
pressão elétrica - Autocuiseur électrique
ﺔﻴﺋﺎﺑﺮﻬﻜﻟا ﻂﻐﻀﻟا ةﺮﺠﻨﻃ

English
- 2 -
CONTENTS
Security Section
Introduction
Product Structure Diagram
Control Panel
Common Messages
Preparations
Water Testing
Caution
Function Introduction
Pressure Cooking
Sauté
Slow Cook
Yogurt Pasteurization
Culture
Function Button
Cleaning
Troubleshooting

English
- 2 - - 3 -
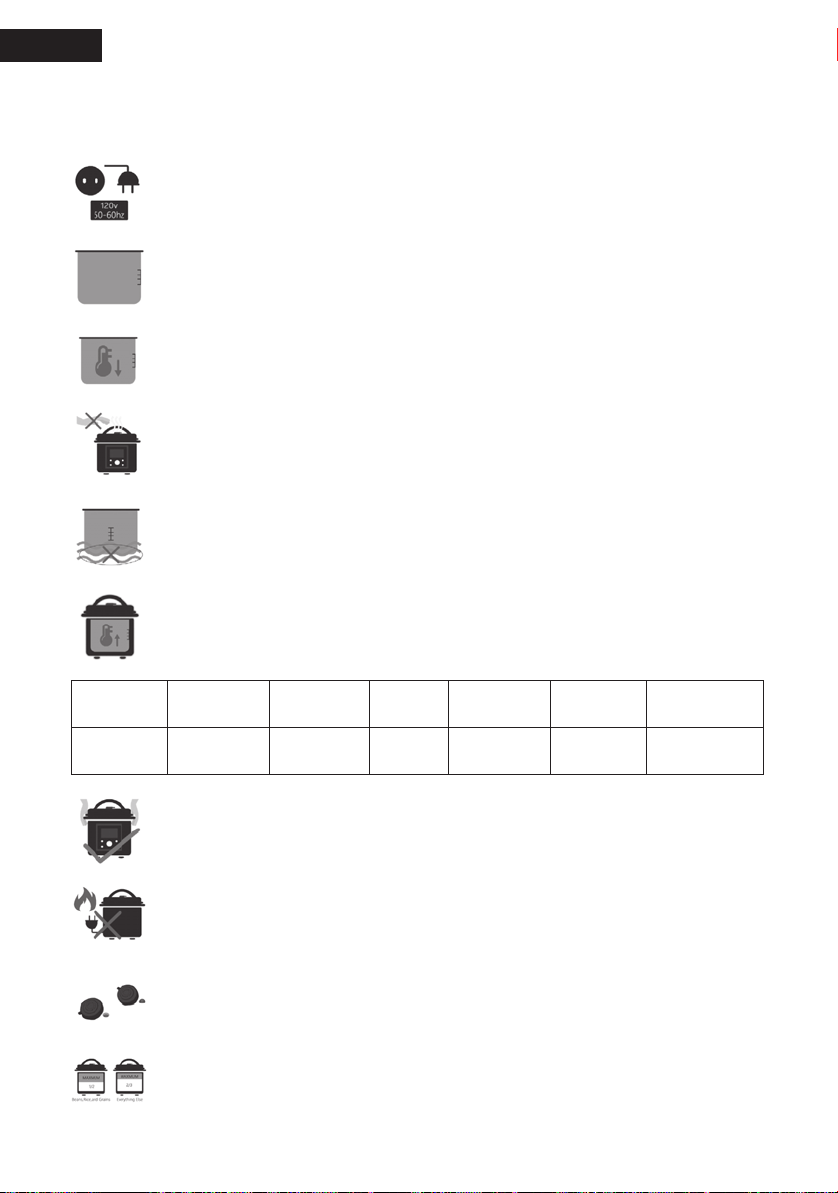
Security Section
We always put your safety rst. To ensure the safe use, please be sure to observe the following
safety precautions.
1. Please use 230V~50Hz power socket. Be sure to connect the plug to Electric
Pressure Cooker before inserting it into the wall socket. Press Cancel before
pulling out the plug to ensure that no program is running.
2. Do not use any pot other than Electric Pressure Cooker. When there are foreign
bodies at the bottom of the inner pot and on the surface of the heating plate,
please remove them before using.
3. Make Electric Pressure Cooker cool down before cleaning.
4. When the product is working, the limbs must not be close to the outlet of the
exhaust valve, so as to avoid scalding. Do not cover or block the steam valve and
oat valve with cloth or other objects.
5. When the Electric Pressure Cooker is running or when it is being cleaned. Never
touch the Electric Pressure Cooker base, power cord or plug with any liquid.
6. During cooking and after cooking, the surface of Electric Pressure Cooker will
become hot. Please pay attention to prevent scalding.
7. Always use the side handles to carry the Electric Pressure Cooker, so be sure to
prevent burns. When moving the Electric Pressure Cooker containing hot liquid, do
not move the cookware during operation.
8. Keep the power cord away from the heat source. Do not hang the power cord over
the edge of the table or counter to avoid pulling and damaging the power cord.
9. Do not open the Electric Pressure Cooker lid by force. After the pressure is
released, the lid will oat to the downward position.
10. When cooking under pressure, the total amount of food and water never exceeds
the maximum lling line. (beans and rice shall not exceed 1/2) (others shall not
exceed 2/3).
MODEL POWER
SUPPLY
RATED
POWER VOLUME CALBER OF
INNER POT WEIGHT DIMENSION
PC-1000-5 230V ~50Hz 1000 W 5.5L 16x22cm 7.41 kg 33x31.11x31.75 cm

English
- 4 -
11. Do not allow children to use it alone, and keep it out of reach of infants to avoid
electric shock and scalding.
12. Please use original accessories. (Accidents may result from using parts
recommended by non-original manufacturers).

English
- 4 - - 5 -
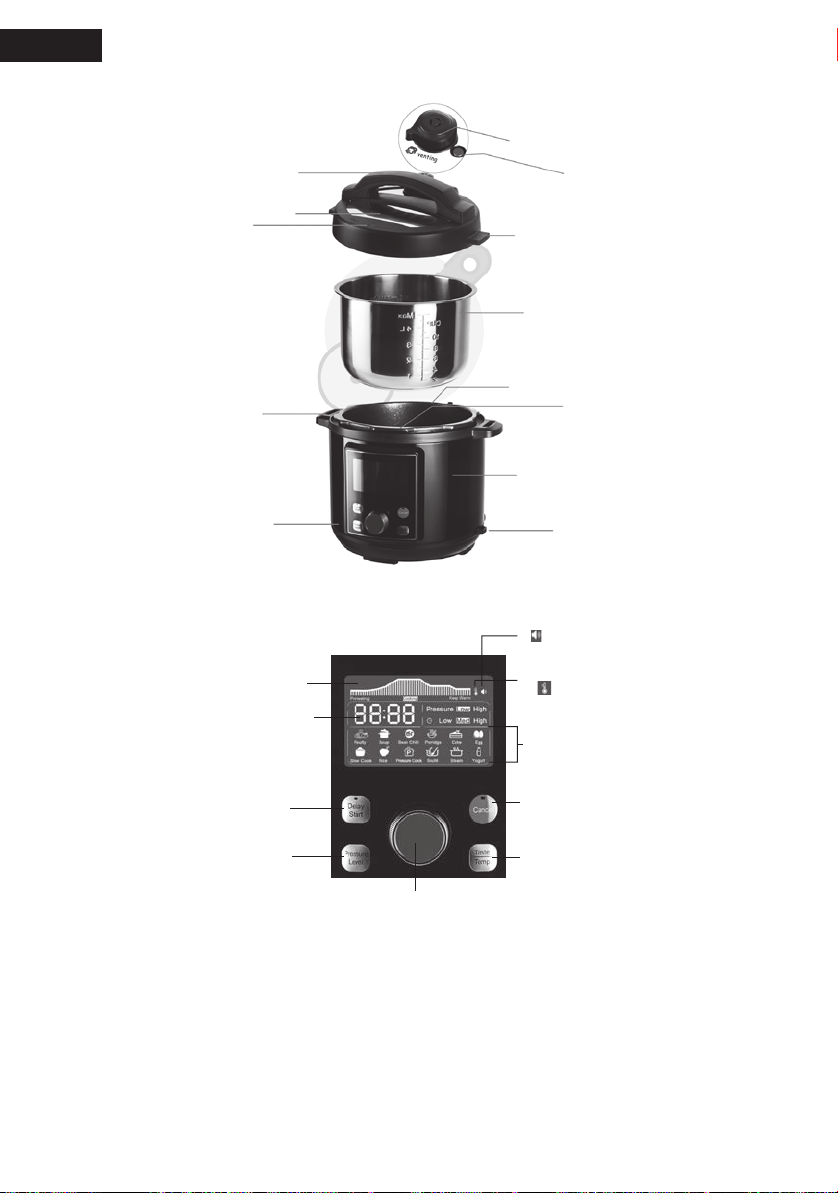
Product Structure Diagram
Control Panel
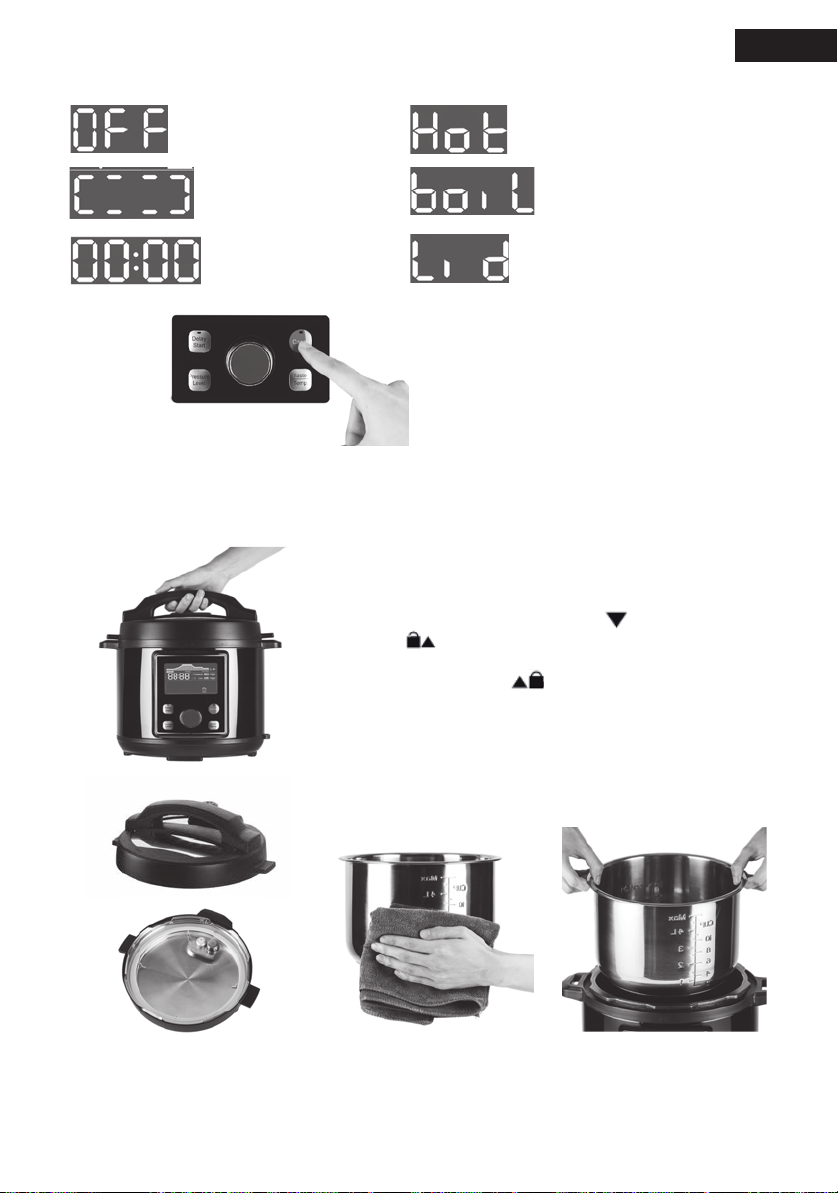
To turn the sound on
1. Press Cancel to stop all programs. The LCD screens will display OFF.
2. Press and hold Cancel again for at least 4 seconds. The LCD screen will display S on
Note: Sometimes the knob is too sensitive and jump to another program. It’s a normal
phenomenon.
Steam Vent and Handle
Lid Top Handle
Lid
Lid Positioning Marker
Base Handle
Control Panel with LCD
Display
Float Valve
Lid Side Handle
Base Exterior Pot
Heating Element
Base
Base and Heating Unit
Stainless Steel
Inner Pot
Sound(ON/OFF)
Preset Cooking Programs
End any running program; LCD
screen will display OFF
Central Dial. Choose smart Program
adjust the time, temperature
Sound Indicator depicts whether sound is
ON or OFF. Safety alerts never turn OFF.
Adjust Taste or Temperature
Pressure Level Indicator
Temperature & Taste Indicator
Time & Temperature Indicator
depicts cook time, massages
or temperature
Sets amount of time until
a cooking program starts
Adjust pressure level
Progress Indicator. Displays
progress stage (Preheating,
Cooking, or Keep Warm)

English
- 6 -
Common Messages
Electric Pressure Cooker is
plugged in: no programs are
running
Sauté preheating is complete
Lid is not locked in place
Pasteurizing
Electric Pressure Cooker is
preheating
Time Indicator displays
Cook Time Delay Start time, and
Keep Warm elapsed time
Selected the wrong program? No
problem! Press Cancel at anytime
to stop a program
Preparations
- After removing the outer packaging, please pay attention to all warning labels.
- Please read all the safety instructions in this manual before inserting and using the machine.
1. Open the product package carefully.
2. Open lid and close lid.
3. To lock the lid in place, align the mark on the lid with the
To lock the lid in place, align the
mark at the top of the Electric Pressure Cooker base
and turn the lid clockwise to the
mark at the top of the Electric Pressure Cooker base
mark. If the sound is
turned on and your Electric Pressure Cooker is plugged in, a
little tune plays to let you know the lid is secure.
4. After cleaning the silicone gasket, the lid and its
components, wipe it clean. Refer to the cleaning
instructions.

English
- 6 - - 7 -
1. Inspect and install silicone gasket and oat valve.
2. Install the water receiver.
3. Secure the Power Cord.
Water Testing
Please perform a water test on Electric Pressure Cooker before using to verify its function.
Please follow the steps below to complete this test.
1. Place the stainless steel inner pot into the Electric Pressure Cooker base. Turn on the
power.
2. Pour 3 cups of water into the stainless steel inner pot by using the attached measuring
cup.
3. Lock lid in place and turn steam hole handle to Sealing.
4. Select Steam and press Start.
5. Rotate the button, adjust the time to 2 minutes, and press Start again.
6. At this time, the display screen will show the, and the graph will show the
preheating state. Steam will be released until the oat is fully raised. When pressure
is reached, the timer begins to count down. After the program is complete, Electric
Pressure Cooker beeps and automatically switches to the keep warm.
1. ADD 3 CUPS WATER
ADJUST TIME
(ROTATE THE KNOB, ADJUST TIME TO 2 MINUTES) AFTER CYCLE COMPLETES, TURN TO
VENTING FOR QUICK RELEASE
2. LOCK LID 3. TURN TO SEALING 4. SELECT STEAM

English
- 8 -
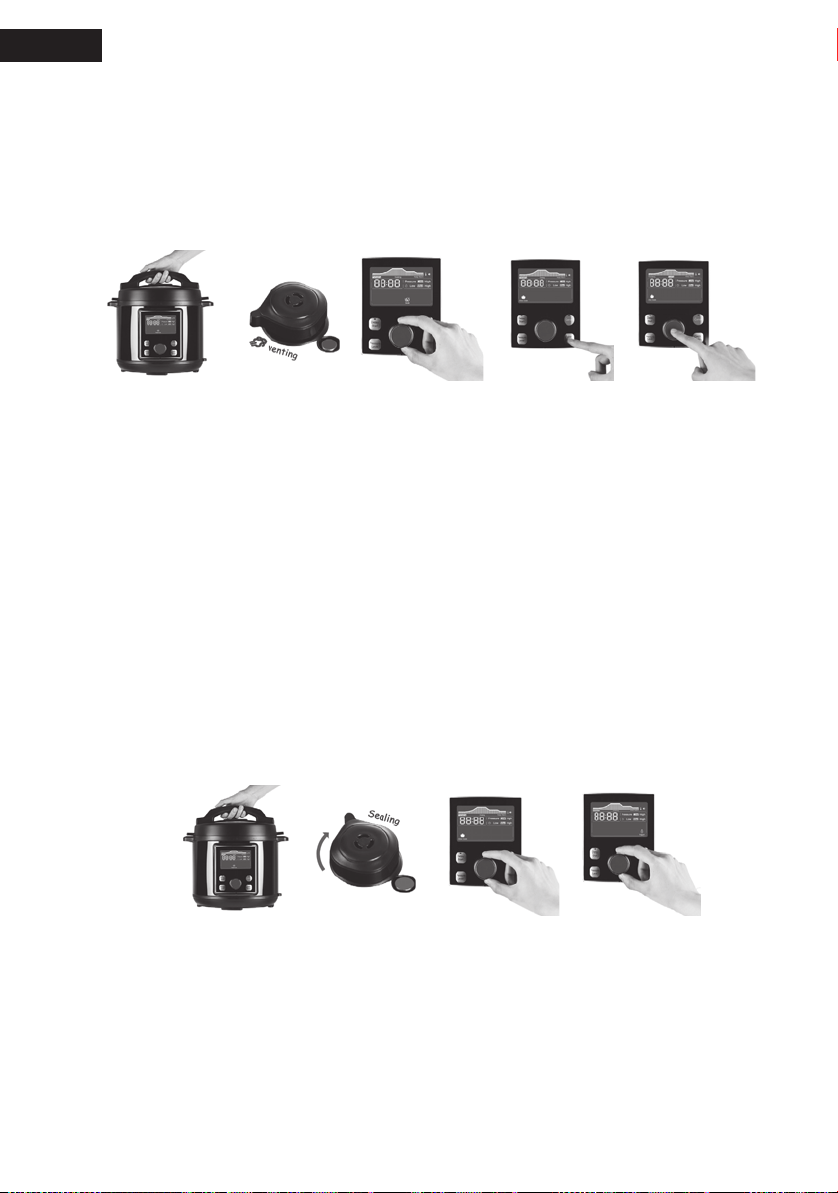
Caution
You can make the pressure release naturally or use the quick release feature.
Natural release: do nothing and stress will release itself.
When the oat returns to its original position, the lid will
automatically unlock, which may take 10-40 minutes or
more. Don’t try to open the lid by force.
Quick release: turn steam hole handle to vent hole (keep
nger away from actual steam outlet); The pressure is
released at a faster rate.
When the oat returns to its original position, the lid unlocks.
Don’t try to open the lid by force.
Which method should I use?
Most recipes will specify whether to use fast or natural releases. For foods with large amounts of
liquids, starch content or potentially foaming ingredients, such as oatmeal, beans, pasta or soup,
use natural release methods to prevent the splashing of thick liquids.
FUNCTION INTRODUCTION
Pressure Cooking
The Electric Pressure Cooker is equipped with the following preset pressure cooking programs:
poultry, beans/chili, soup, rice, porridge, eggs, steam, and cakes. You can also use pressure
cooking to manually set up your own custom program functionality. Complete the following steps
to run the pressure cooking program:
1. Add the prepared ingredients to the inner pot and
put the inner pot into the base of the pressure
pot. (The minimum amount of liquid required
for cooking is 1 cup. The water content of oil
and oil-based liquid is not enough to meet the
requirements. Acceptable liquids include water,
wine, beer, stock, gravy and juice.)
2. When power-on, the LCD screen will display OFF.
3. Lock cover in place and turn steam hole handle to
Sealing position. Then rotate the knob, select the
pressure cooker program, and press start.
4. Adjust the time, pressure and taste according to
your recipe and press Start again.
5. The pressure cooker starts to work after 3 beeps. The display will show time, pressure
level, mode and preheat progress indicators. The preheating period can last from a few
minutes to 40 minutes or longer. As the pressure cooker heats up, the oat will rise.
When pressure is reached, progress indicators and timers start automatically.
6. At the end of the cooking cycle, the cooker beeps and goes into heat preservation
mode. The LCD displays the elapsed time. After 24 hours, it automatically switches to
OFF and enters standby mode.
1. LOCK LID
3. ROTATE THE KNOB
PRESS START
2. TURN TO SEALIN
4. ADJUST TIME
(OPTIONAL)

English
- 8 - - 9 -
Note: during preheating, it is normal for some steam to be released from the steam relief
valve and occasionally sputtering. As the cooker heats up and pressure increases,
the oat valve rises
Sauté
1. Put the inner pot into the base and switch on the power.
2. Turn the knob and select sauté. Press Start. Adjust the time and press Start again.
3. Press Temp to enter the temperature control interface, and rotate the knob to change
the temperature. The knob rotates inversely to “-” and clockwise to “+” (temperature
range: 130°C -185°C).
4. The pressure cooker will make 3 beeps and
start working. The LCD will show the. When the
operating temperature is reached, the LCD will
display the remaining working time.
5. Add ingredients and mix to a stainless steel pot
and cook according to the recipe.
6. After cooking, press cancel. The LCD screen will
display OFF.
Note: Do not close the lid when using Sauté function.
Please drain the water in the pot before adding
oil to prevent splashing. When cooking foods
that are easily swellable or high in fat/high in
oil content, be careful of splashing oil when
opening the lid. Avoid burns.
Slow Cook
Slow cook function is very suitable for recipes that require long cooking time.
Follow these steps to use it:
1. Put the ingredients into the pot, then place the inner pot into the base, and turn on the
power.
2. Lock the lid in place, dial the oat valve to VENTING. Rotate the knob and select the
Slow Cook. After pressing the start key, it enters the time adjustment interface.
3. By default, the program Slow Cook for 4 hours. You can also manually rotate the knob
to adjust the time as required.
4. Press Temp. to select the temperature (Low 91.66°C, Med 95.55°C, High 97.78°C), and
press the Start key again to enter the working state.
PREHEATING COOK TIME INDICATOR
(DISPLAYS SELECTED
TIME)
KEEP WARM ELAPSED
TIME INDICATOR (COOKING
COMPLETE)
1. OPEN LID
3. ADJUST TIME
(OPTIONAL)
2. ROTATE THE KNOB
PRESS START
4. PRESS TEMP.
TO CHANGE
TEMPERATURE
English
- 10 -
5. Then your Electric Pressure Cooker will beep 3 times and the LCD screen will display to
indicate that the Electric Pressure Cooker is preheating. When preheating is complete,
the LCD screen will display the remaining cook time.
6. When cooking is complete, the Electric Pressure Cooker beeps several times and
automatically switches to Keep warm. The LCD screen will now display the elapsed
time after cooking complete. After 24 hours, the Electric Pressure Cooker will
automatically switch to OFF.
7. Press Cancel and remove the lid.
Yogurt Pasteurization
Making yogurt with Electric Pressure Cooker is simple and fun. Just need some milk and a little bit
of active culture, a cup of nutritious yogurt is made!
Please follow these steps to make yogurt, the rst step: pasteurization
1. Pour the right amount of milk into the pot, put it into the base and turn on the power.
2. Lock the lid in place and move the valve to the Sealing position.
3. Rotate the knob, select the yogurt and press start. When you press Temp to select High
mode, the display will display Boil, press Start, indicating is ready to pasteurize.
4. The program will enter the work after 3 beeps. After the work is completed, the screen
will display OFF (under this function, the work will not automatically enter the state of
heat preservation after completion).
5. Remove the stainless steel with milk pan, put the pot on the hob, cooling to the milk to
44.44 °C. Use a food thermometer to measure temperature.
Culture
The second step, yogurt activity culture
1. Add the active culture into the hot milk in the pot and stir well.
2. Replace the inner pot and close the lid. Steam release handles can be left in ventilated
or sealed positions.
1. OPEN LID 3. ROTATE THE KNOB
PRESS START
2. TURN TO VENTING
4. PRESS TEMP
TO CHANGE THE
TEMPERATURE
5. PRESS START
1. LOCK LID 3. ROTATE THE KNOB
PRESS START
2. TURN TO SEALING
4. ADJUST TO HIGH
(PRESS TEMP TO SET
THE HIGH)

English
- 10 - - 11 -
3. Select Yogurt and keep it in LOW mode. Press Start. The program defaults to 8 hours.
Rotate the knob, adjust the fermentation time according to your preference, and press
Start again.
4. The program will enter the work after 3 beeps. When nished, Electric Pressure Cooker
beeps again and the screen shows OFF.
5. Remove the lid and transfer the yogurt to a clean jar to cool.
FUNCTION BUTTON
Delay Start
1. Put the ingredients in the inner pot and place them in the base. Switch on the power.
2. Lock the lid in place and transfer the steam hole handle to the seal or vent according to
the requirements of the selected procedure. Select the program and press start.
3. Press the Delay Start. Rotate the knob and adjust the reservation clock. The knob
rotates inversely to “-” and the knob rotates clockwise to “+”. Press Delay Start again to
adjust the minute. After adjustment, press the knob to conrm the start.¬¬
4. Electric Pressure Cooker will start with three beeps and the display will show the
countdown time. After the delay process is completed, the pressure cooker will
automatically start cooking according to the set cooking procedure.
Note: You can still change the pressure level during the delayed cycle. The process of Sauté,
Sterilize and Yogurt has no reservation function.
Taste/Temperature Selection:
Select the program, after adjusting the time, press the “Taste” button continuously, and the
LCD screen frame shows “Low”, “Med”, “High”. If not to select, the taste is defaulted to memory
selection.
This button is used for temperature adjustment in the function of Sauté, Slow Cook and Yogurt.
Pressure Level:
Select the program, and after setting the time, press “Pressure Level” to select pressure. Press
“Pressure Level” continuously, and Low “and” High “will be displayed in the loop box of the LCD
screen. If not to select, the taste is defaulted to memory selection.
1. LOCK LID 3. ROTATE THE KNOB
PRESS START
2. TURN TO SEALING 4. ADJUST TO LOW
PRESS START

English
- 12 -
CLEANING
Please wash all parts and accessories after use.
1. Always unplug and let your Electric Pressure Cooker cool
to room temperature before cleaning.
2. Never use harsh chemical detergents, scouring pads, or
powders on any of the unit’s parts or components.
3. The stainless steel pot, silicone gasket, steamer basket are all dishwasher safe. Additionally, the
measuring cup, soup ladle, and rice paddle are top-rack dishwasher safe.
4. Remove the gasket by pulling it out and away from the
inside of the lid. After washing the gasket, return it securely
to its original position by pressing it rmly into place.
5. Clean the outer body of the Electric Pressure Cooker with a
damp cloth or sponge. Check that the steam vent and oat
are free of debris or food. Wipe the inner base rim with a
dry cloth to prevent rusting.
6. Check whether the steam vent handle is blocked by foreign
bodies. Make sure that the silicone gasket, oat valve,
anti-block shield, water storage box and other parts have
been installed correctly. Wipe the lid and the pot body
clean with a cloth.
Tip: Inner pot, more acute hard water staining may require a
vinegar dampened sponge and some scrubbing to remove
If there is tough or burned food residue at the bottom, soak in hot water for a few hours for easy
cleaning
Harsh chemical detergents
Grip tight and pull out
Grip tight and pull out

English
- 12 - - 13 -
TROUBLESHOOTING
The following abnormal phenomena occur in use, which is not entirely machine failure. Please
check again before contacting customer service support.
Phenomena Reason How to resolve
Difcult to close the lid
The oat is stuck Pull down oat and then close lid
Sealing ring is not place properly Install the sealing ring properly
Difcult to open the lid
The oat valve did not fall after
venting
Gently press the oat valve with
chopsticks
There is pressure in the pot Open the lid after the pressure in
the pot decreases
Air leakage of lid
No sealing ring or seal ring not
installed in place Install the sealing ring as required
Foreign body is sticking on sealing
ring Clean sealing ring
The damage of sealing ring Change sealing ring
Air leakage of oat valve
The oat valve gasket is stuck with
food waste Clean oat valve seal ring
Abrasion of oat valve seal gasket Replace oat valve gasket
Float valve cannot rise
Too little food and water in the pot Add food and water as required
Leakage of pot lid or exhaust valve Contact customer service support
Exhaust valve exhausting
continuously while
working
Exhaust valve is not in sealed
position
Put the exhaust valve in the sealed
position
Failure in controlling of the pressure Contact customer service support
When working, the hot disk
is not heated
The closed lid is not in place Close the lid again
Failure of electric heating plate Contact customer service support
Circuit fault Contact customer service support
LCD can’t display
Fuselage temperature is too high
Unplug the power supply and
reconnect it after cooling. If the
fault is not removed, please contact
customer service support
Circuit board failure Contact customer service support
Can’t turn on the machine
Internal parts damaged during
transport Contact customer service support
Lack of power cord/base rubber
foot falling off Contact customer service support
English
- 14 -
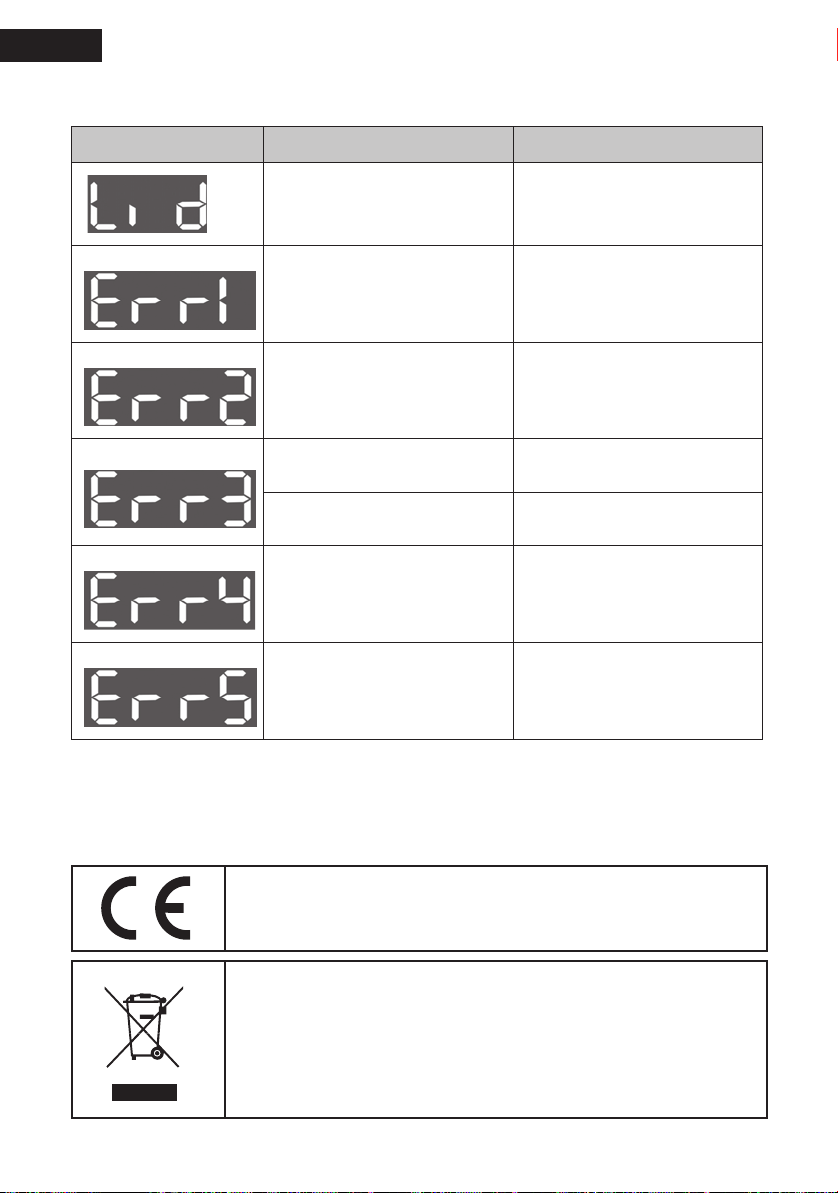
In certain rare situations, the Electric Pressure Cooker LCD screen will show a error code. Use this
table to determine the cause of the error and its corresponding solution.
Phenomena Reason How to resolve
The lid of the pot is not fastened Close the lid
Open circuit protection of bottom
temperature sensor
Unplug power and contact
customer service immediately
Short-circuit protection of bottom
temperature sensor
Unplug power and contact
customer service immediately
Failed to place the inner pot
properly
Unplug the power and place the
inner pot correctly
The temperature is too high; the
inner pot contains no liquid
Unplug the power and add the liquid
as prescribed
High voltage sensor fault Unplug power and contact
customer service immediately
Low voltage sensor fault Unplug power and contact
customer service immediately
At the end of its service life, this product may not be disposed of in the
normal household waste, but rather must be disposed of at a collection
point for recycling electrical and electronic devices. The materials are
recyclable according to their labelling. You make an important contribution
to protecting our environment by reusing, recycling or utilising old
devices in other ways. Please ask the municipal administration where the
appropriate disposal facility is located.
The device complies with the European Directives 2014/35/EU, 2014/30/
EU and 2009/125/EC.

Español
- 15 -
- 14 -
ÍNDICE
Seguridad
Presentación
Esquema de la estructura del producto
Panel de control
Mensajes comunes
Preparación
Prueba de agua
Precaución
Introducción de las funciones
Cocción a presión
Salteado
Cocción lenta
Pasteurización de yogur
Cultivo
Botón de función
Limpieza
Resolución de problemas
Español
- 16 -
Seguridad
Para nosotros, su seguridad siempre es lo primero. Para garantizar un uso seguro, asegúrese de
respetar las siguientes medidas de seguridad.
1. Utilice una toma de corriente de 230V~50Hz. Asegúrese de conectar la clavija a la
olla a presión eléctrica antes de enchufarla en la toma de la pared. Pulse Cancelar
antes de extraer el enchufe para asegurarse de que no haya ningún programa en
marcha.
2. No utilice ninguna otra olla además de la olla a presión eléctrica. En caso de haber
pequeñas partículas en el fondo de la olla interna y sobre la supercie de la placa
calefactora, retírelas antes de usar el aparato.
3. Deje que la olla a presión eléctrica se enfríe antes de limpiarla.
4. Cuando el producto esté en marcha, debe mantener las manos alejadas de la
salida de la válvula de escape para evitar quemaduras. No cubra o bloquee la
válvula de vapor ni la válvula otante con paños u otros objetos.
5. Cuando la olla a presión eléctrica esté en marcha o cuando se esté limpiando, no
toque nunca la base, el cable de alimentación o el enchufe con ningún líquido.
6. Durante y tras el cocinado, la supercie de la olla a presión eléctrica estará
caliente. Tenga cuidado para evitar quemaduras.
7. Utilice siempre las asas laterales para transportar la olla a presión eléctrica y
evitar quemaduras. No mueva la olla a presión eléctrica llena de líquido caliente
cuando esté en marcha.
8. Mantenga el cable de alimentación alejado de la fuente de calor. No deje que
el cable de alimentación cuelgue por el borde de la mesa o de la encimera para
evitar tirar de él y dañarlo.
9. No abra la tapa de la olla a presión eléctrica a la fuerza. Una vez que se haya
liberado la presión, la tapa descenderá.
10. Cuando cocine con presión, la cantidad total de alimentos y agua no debe
superar la línea de llenado máximo (las judías y el arroz no deben superar la 1/2)
(el resto no debe superar los 2/3).
MODELO FUENTE DE
ALIMENTACIÓN
POTENCIA
NOMINAL VOLUMEN CALIBRE DE LA
OLLA INTERNA PESO MEDIDAS
PC-1000-5 230V ~50Hz 1.000 W 5,5L 16x22 cm 7,41 kg 33x31,11x31,75
cm

Español
- 16 - - 17 -
11. No deje que los niños utilicen el aparato sin supervisión y manténgalo alejado de
los niños pequeños para evitar descargas eléctricas y quemaduras.
12. Utilice accesorios originales. (Si utiliza piezas no recomendadas por el fabricante
original, esto puede provocar accidentes).
Español
- 18 -
Esquema de la Estructura del Producto
Panel de Control
Para encender el sonido:
1. Pulse Cancel para detener todos los programas. En la pantalla LCD podrá verse OFF.
2. Vuelva a pulsar y mantenga pulsado el botón Cancel durante al menos 4 segundos. En
la pantalla LCD podrá verse S ON.
Nota: En ocasiones, el botón giratorio es demasiado sensible y salta a otro programa. Es
algo normal.
Salida de vapor y Botón giratorio
Asa superior de la tapa
Tapa
Marca de posición de la tapa
Asa de la base
Panel de control con
pantalla LCD
Válvula otante
Asa lateral de la tapa
Olla exterior de la base
Elemento calefactor
Base
Base y unidad de
calentamiento
Olla interna de
acero inoxidable
Sonido (ON/OFF)
Programas de cocción predeterminados
Finaliza cualquier programa
en marcha; en la pantalla LCD
podrá verse OFF
Botón central. Elige el programa
inteligente, ajusta el tiempo, la
temperatura
El indicador de sonido muestra si el
sonido está encendido o apagado. Las
alertas de seguridad nunca se apagan
Ajusta el sabor o la temperatura
Indicador del nivel de presión
Indicador de temperatura y sabor
Indicador de tiempo y
temperatura; muestra el
tiempo de cocinado, mensajes
o temperatura
Establece la cantidad de
tiempo que pasa hasta
que empieza un programa
de cocción
Ajusta el nivel de presión
Indicador del progreso.
Muestra la fase del progreso
(precalentamiento, cocinado o
conservación del calor)
Español
- 18 - - 19 -
Mensajes Comunes
La olla a presión eléctrica está
enchufada: no hay ningún
programa en marcha
El precalentamiento del salteado
se ha completado
La tapa no está bien cerrada
Pasteurizando
La olla a presión eléctrica está
precalentando
El indicador de tiempo muestra
el tiempo de cocinado, el tiempo
de inicio programado y el tiempo
transcurrido de conservación
de calor.
¿Ha seleccionado el programa
equivocado? ¡No hay problema!
Pulse Cancelar en cualquier
momento para detener el
programa.
Preparación
- Tras retirar el embalaje externo, preste atención a todas las etiquetas de advertencia.
- Lea todas las instrucciones de seguridad de este manual antes de colocar y utilizar el aparato.
1. Abra el embalaje del producto con cuidado.
2. Abra y cierre la tapa.
3. Para encajar la tapa, alinee la marca de la tapa con
la marca
Para encajar la tapa, alinee la marca
de la parte superior de la base de la olla a
presión eléctrica y gire la tapa en el sentido de las agujas
del reloj hasta la marca
presión eléctrica y gire la tapa en el sentido de las agujas
. Si el sonido está encendido
y su olla a presión eléctrica está enchufada, sonará una
pequeña melodía para hacerle saber que la tapa está bien
cerrada.
4. Tras limpiar la junta de silicona, la tapa y sus componentes,
limpie la olla con una bayeta. Consulte las instrucciones de
limpieza.

Español
- 20 -
1. Examine e instale la junta de silicona y la válvula otante.
2. Instale el colector de agua.
3. Fije el cable de alimentación.
Prueba de agua
Realice una prueba de agua en la olla a presión eléctrica antes de usarla para vericar su
funcionamiento.
Siga los siguientes pasos para realizar esta prueba.
1. Coloque la olla interna de acero inoxidable en la base de la olla a presión eléctrica.
Póngala en marcha.
2. Vierta 3 tazas de agua en la olla interna de acero inoxidable con el vaso medidor.
3. Ajuste la tapa y gire el botón del oricio de vapor hasta la posición de sellado (Sealing).
4. Seleccione la función Vapor y pulse Start.
5. Gire el botón, ajuste el tiempo en 2 minutos y vuelva a pulsar Start.
6. En este momento, en la pantalla se verá y el gráco mostrará el estado del
precalentamiento. El vapor se liberará hasta que la válvula otante esté completamente
levantada. Cuando se alcance la presión, el temporizador empezará la cuenta
atrás. Cuando se complete el programa, la olla a presión eléctrica pitará y cambiará
automáticamente a la función de conservación del calor.
1. AÑADA 3 TAZAS DE
AGUA
AJUSTAR TIEMPO
(GIRE EL BOTÓN, AJUSTE EL TIEMPO EN 2 MINUTOS) CUANDO SE COMPLETE EL
CICLO, GIRE A LA POSICIÓN DE
VENTILACIÓN (VENTING) PARA UNA
LIBERACIÓN RÁPIDA.
2. CIERRE LA TAPA 3. GIRE HASTA
LA POSICIÓN DE
SELLADO
4. SELECCIONE LA
FUNCIÓN VAPOR
This manual suits for next models
1
Table of contents
Languages:
Other BOJ Electric Pressure Cooker manuals


Popular Electric Pressure Cooker manuals by other brands


GoWISE USA
GoWISE USA GW22601 instruction manual

Cuckoo
Cuckoo CRP-HR08 Fuzzy Series operating instructions

Presto
Presto Pressure Canner and Cooker instructions

Cuckoo
Cuckoo Fuzzy Series operating instructions

Mellerware
Mellerware Juno Instructions for use

Barton
Barton 99908 Owner's manual and safety instructions