BOJ PC-1100-5 User manual

USER MANUAL - MANUAL DE USO - MANUAL DE INSTRUÇÕES -
MANUEL D’UTILISATION - دليل المستخدم
PC-1100-5
INDUCTION PRESSURE COOKER
Olla a presión inducción - Panela de
pressão indução - Autocuiseur induction
ﺚﺤﻟا ﺔﻴﻨﻘﺘﺑ ﻞﻤﻌﺗ ﻲﺘﻟا ﻂﻐﻀﻟا ةﺮﺠﻨﻃ

English
- 2 -
CONTENTS
WELCOME TO YOUR NEW KITCHEN ASSISTANT
SAFETY FIRST
GETTING TO KNOW YOUR INDUCTION PRESSURE COOKER
QUICK START GUIDE
USING YOUR INDUCTION PRESSURE COOKER
PRESSURE LEVEL + DELAY TIMER SETTING
PRESSURE LEVEL
USING PRESSURE ADJUST FUNCTION
DELAY TIMER
USING DELAY TIMER FUNCTION
COOKING TIME SETTING
TEMPERATURE + WARM/CANCEL + REHEAT FUNCTIONS
ADJUST TEMPERATURE (ROAST AND DEEP FRY FUNCTIONS ONLY)
USING THE SHORTCUT WARM/CANCEL FUNCTION
USING THE REHEAT FUNCTION
MIDWAY ADDITION + SAFETY LOCK FUNCTIONS
USING THE ‘MIDWAY ADDITION’ FUNCTION
USING SAFETY LOCK FUNCTION
CLEANING AND MAINTENANCE
HOW TO DISASSEMBLE AND REASSEMBLE THE COVER PLATE AND SEAL RING
FOR CLEANING
HELP, SOMETHING’S GONE WRONG!
SPECIFICATIONS

English
- 2 - - 3 -
WELCOME TO YOUR NEW KITCHEN ASSISTANT
Congratulations on your purchase of the Induction Pressure Cooker.
The Induction Pressure Cooker is sophisticated and suitable for many cooking processes,
including steaming, stewing, roasting, deep frying, slow cooking, braising, thawing and baking.
The pre-set programs allow preparation of popular recipes including rice, pizza, yoghurt, pasta and
much more.
The Induction Pressure Cooker offers great versatility and its 24-hour delayed timer allows the
appliance to automatically begin cooking when the countdown time ends. The large digital display
screen provides a clear and simple operating display to help you select the right menu option.
The Induction Pressure Cooker’s advanced induction heating technology sets it apart from
conventional cooking methods. The energy supplied directly to the cooking vessel capturing the
heat source as well as its numerous capabilities allow the retention and preservation of more
nutrients. The technology saves time and conserves energy through the use of high temperature
and pressure to cook food in a shorter time frame.
The simple-to-clean, innovative design of the Induction Pressure Cooker ensures clean-up is easy.
For even greater results and more inspirational ideas, visit our website and recipe archive or refer
to the complimentary recipes provided.
SAFETY FIRST
TO ENSURE YOUR SAFETY AND TO GET THE BEST PERFORMANCE FROM
YOUR INDUCTION PRESSURE COOKER, PLEASE READ THESE INSTRUCTIONS
CAREFULLY.
Take care when moving the cooker to another location, use the handle
connected to the base of the appliance to relocate.
Do not touch the cover plate after the appliance has operated as the plate takes
time to cool down.
If the inner bowl, cover plate or seal ring is damaged, stop using the cooker to
avoid injury.
Please contact Customer Support and Warranty.
Do not dismantle the cooker or replace the units. Please contact Customer
Support and Warranty.
Do not continue to use the broken seal ring or one that is not originally
provided.
Do not use the cooker near inammable materials or in a humid environment.
When adjusting the pressure-limiting valve, ensure your face or hands are not
near the vent.
Use a wooden or plastic spoon to avoid damage to the non-stick coating of the
inner bowl.
If the power line is damaged, stop using the appliance immediately and contact
Customer Support and Warranty.
Do not place the inner bowl on any other source of heat. Do not replace the
inner pot with other containers.

English
- 4 -
Before opening the lid ensure the cooker is switched off and unplugged.
Keep the heat preservation time to less than six hours.
Check the air-out vent on the lid of the cooker regularly to avoid a blockage.
It’s abnormal for excessive air to escape from the cover during the process of
cooking. Stop using the appliance immediately, unplug the cooker and contact
Customer Support and Warranty.
This appliance must not be immersed. The appliance is not to be used
by persons (including children) with reduced physical, sensory or mental
capabilities, or lack of experience and knowledge, unless they have been
given supervision or instruction children being supervised not to play with the
appliance.
This appliance is not intended to be operated by means of an external timer or
separate remote-control system.
The temperature of accessible surfaces may be high when the appliance in
operation. The container must not be opened until the pressure has decreased
sufciently.
Never force the appliance open. Make sure that the pressure inside the
appliance has returned to normal before opening the appliance. See
instructions for use for reference.
Never use the appliance without adding any form of liquid. This could cause
serious damage to the appliance.
Do not ll the appliance to more than two-thirds full. For food that plumps up
considerably during cooking, such as rice, dehydrated vegetables or compotes,
do not ll the appliance to more than half full.
Do not fry food with oil while the appliance is pressurised.
This appliance is intended to be used in households and similar applications such as: staff kitchen
areas in shops, ofces and other working environments; farm houses; by clients in hotels, motels
and other residential type environments; bed and breakfast type environments.
FAILURE TO FOLLOW SAFETY INSTRUCTIONS AND WARNINGS COULD RESULT IN SERIOUS
INJURY. MISUSE OF YOUR INDUCTION PRESSURE COOKER MAY DAMAGE YOUR APPLIANCE
AND VOID YOUR WARRANTY.
English
- 4 - - 5 -
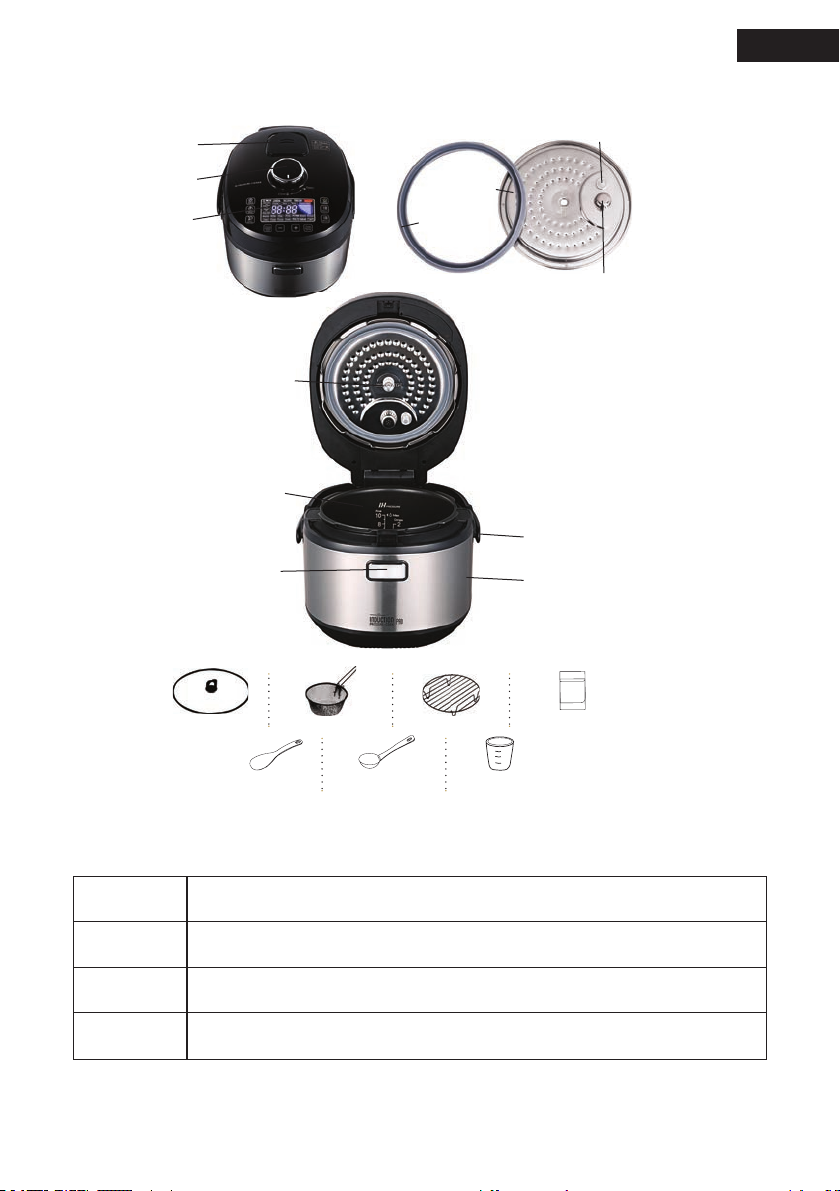
GETTING TO KNOW YOUR INDUCTION PRESSURE COOKER
QUICK START GUIDE
Top view
Interior view
Accesories
Anti-overow cover
Rice paddle Ladle Measuring cup
Fry basket Steam rack Instruction manual
Fixed nut
inner bowl
Open button Water collection
container
Handle
Cover plate view
Pressure oat
Exhaust valve inlet
Cover plate
Air-out vent
Opne/Close
handle
Digital control
panel Seal ring
1Press Menu 1 or Menu 2 button to select cooking function.
2Adjust cooking time, pressure level and delay time if required.
3Press and hold Start/Reheat button to initiate cooking.
4You may adjust cooking time and temperature for Roast and Deep Fry functions
if required.
English
- 6 -
USING YOUR INDUCTION PRESSURE COOKER
1To open the cooker, turn the ‘open/close’ handle to the ‘open’ position. Press
the ‘open’ button at the front of the appliance to open the cover.
2
Ensure the pressure oat and exhaust valve inlet are clean, the seal ring is
properly positioned on the outer rim of the cover plate and the water collection
container is empty and properly positioned at the back of the appliance. Refer
to page 10 for cleaning and maintenance instructions.
3
Remove the inner bowl and insert the water and ingredients as required. Ingre-
dients and water added to the bowl must sit within the ‘No.2’ water line and
‘Max’ water line (located within the inner bowl).
Note: Wipe down and ensure there are no spills on the outer rim of the inner
bowl before you return the inner bowl to the cooker.
4
To close the lid, push the lid down to shut close. Hold and turn the ‘open/close’
handle to the ‘close’ position.
Note: Leave the lid open for Deep Fry and Roast functions. To initiate cooking,
turn the ‘open/close’ handle to the ‘close’ position. You may use the anti-over-
ow cover to cover the pot during cooking process.
5Switch the cooker’s power on at the mains switch. The screen will display ‘----‘
representing the ‘standby’ mode.
6
Select the desired preset function by moving through the options within “Menu
1” or “Menu 2” button.
Menu 1: Slow Cook Low, Slow Cook High, Simmer/DIY, Keep Warm.
Menu 2: Meats, White Rice, Stew, Soup, Porridge, Steam, Braise, Cake, Pizza,
Pasta, Roast, Deep Fry, Defrost, Yoghurt.
Note: The pressure level is set automatically. However, numerous preset
functions have the ability to be adjusted as required. Refer to page 7 for recom-
mended parameters for each preset function.
7
Select the desired cooking time by pressing the “Time/Temp” button, use “-”
and “+“ buttons to adjust the cooking time.
Note: You may switch back and forth between hours and minutes by pressing
the “Time/Temp” button. Please refer to page 8 for recommended parameters
for each function.
8
Press and hold the ‘Start/Reheat’ button in the Digital Control Panel to initiate
cooking.
The cooker will enter preheat mode and the pressure inside will reach the
required point. The lid cannot be opened at this point. Once the pressure has
reached required level, the countdown timer will appear on the screen.
9
Steam Release is the process of releasing pressure and steam within the
cooker for meats, stew, soup, porridge, steam and white rice functions. This
function will automatically begin after the main cooking process has ended. For
other functions, steam releases intermittently during cooking process.
Note: Please do not open the cooker cover when the “Release Pressure” indica-
tor light ashes or is on. Only open the cooker cover after hearing a beep sound
and the indicator light is off which indicate the steam releasing process has
complete.
10
When cooking is complete, the appliance will automatically switch to keep
warm mode and the countdown timer will automatically begin.
Note: Do not open the lid when the indicator light for “Keep Warm” is still on.
Wait until the steam is completely released or it will splatter and cause danger.
English
- 6 - - 7 -
11
To cancel the keep warm function, press ‘Warm/Cancel’ and switch off the
cooker and unplug from the mains power. For safety concerns, the status
of standby ‘----’ is set automatically when the appliance is not in use for a
consecutive period of more than 12 hours.
12 Once the cooker is switched off and removed from the power supply, open the
lid according to the instructions provided in step 1 and remove the inner bowl.
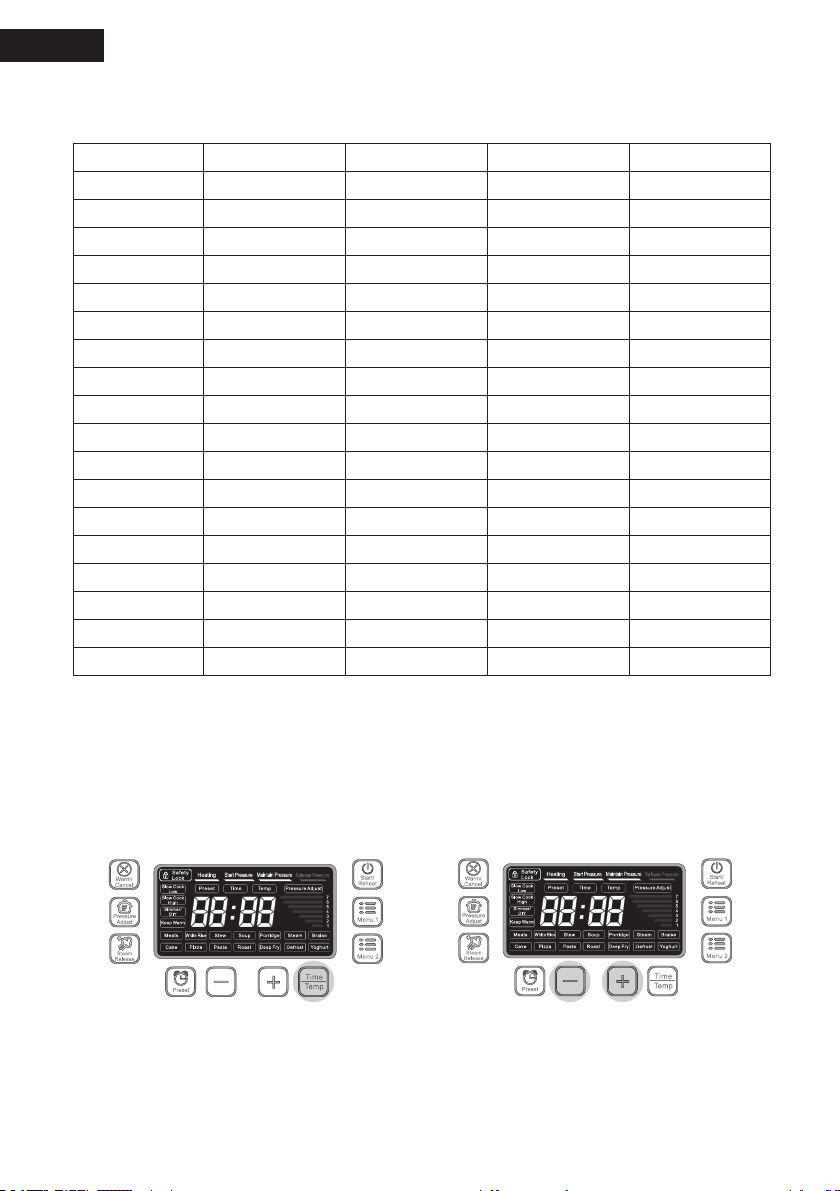
PRESSURE LEVEL + DELAY TIMER SETTING
PRESSURE LEVEL
Pressure level can be adjusted when you select meats, stew, soup, porridge and steam functions.
USING PRESSURE ADJUST FUNCTION
1. Follow the instructions on Page 5 to select the desired preset function and cooking
time.
2. Press the “Pressure Adjust” button.
3. Press the “Pressure Adjust” again to select your desired pressure level.
4. To delay start the cooking process, please follow the DELAY TIMER procedure in below
section.
5. To initiate cooking, press and hold “Start/Reheat” button.
DELAY TIMER
The delay timer function is available when you select slow cook, simmer/DIY, keep warm, meats,
white rice, stew, soup, porridge, steam and braise functions.
USING DELAY TIMER FUNCTION
1. Follow the instructions on Page 5 to select the desired preset function and cooking
time.
2. Press the “Preset/ Safety Lock” button.
3. Use “-” and “+“ buttons to adjust the time.
Note: You may switch back and forth between hours and minutes by pressing the
“Preset/ Safety Lock” button.
4. Press and hold “Start/Reheat” button to initiate the timer.
Menu/Pressure
rating Meats Stew Soup Porridge Steam White Rice
Default 3 3 6 3 4 3
Maximum 7 7 7 7 7 /
Minimum 2 2 2 1 2 /
Menu/
Delay
Timer
Slow
Cook
Simmer/
DIY
Keep
Warm Meats White
Rice Stew Soup Porridge Steam Braise
Default 2 hrs 2 hrs 2 hrs 2 hrs 2 hrs 2 hrs 2 hrs 2 hrs 2 hrs 2 hrs
Maximum 24 hrs 24 hrs 24 hrs 24 hrs 24 hrs 24 hrs 24 hrs 24 hrs 24 hrs 24 hrs
Minimum 1 min 1 min 1 min 1 min 1 min 1 min 1 min 1 min 1 min 1 min
English
- 8 -
COOKING TIME SETTING
Follow the instructions on Page 5 to select the desired preset function, cooking time can be
adjusted for all functions as shown below.
TEMPERATURE + WARM/CANCEL + REHEAT FUNCTIONS
ADJUST TEMPERATURE (ROAST AND DEEP FRY FUNCTIONS ONLY)
Only after the cooker has started, temperature can be adjusted for Roast and Deep Fry functions if
required.
Note: Cooking time can also be adjusted.
Button Function Default Max time Min time
MENU 1 Slow Cook Low 3 hrs 12 hrs 1 hr
MENU 1 Slow Cook High 3 hrs 12 hrs 1 hr
MENU 1 Simmer/DIY 1 hr 6 hrs 1 hr
MENU 1 Keep Warm 6 hrs 24 hrs 1 hr
MENU 2 Meats 35 mins 2 hrs 15 mins
MENU 2 White Rice 18 mins 28 mins 18 mins
MENU 2 Stew 70 mins 12 hrs 45 mins
MENU 2 Soup 30 mins 2 hrs 15 mins
MENU 2 Porridge 25 mins 2 hrs 5 mins
MENU 2 Steam 15 mins 2 hrs 5 mins
MENU 2 Braise 50 mins 2 hrs 30 mins
MENU 2 Cake 45 mins 75 mins 45 mins
MENU 2 Pizza 45 mins 59 mins 25 mins
MENU 2 Pasta 10 mins 30 mins 5 mins
MENU 2 Roast 30 mins 59 mins 5 mins
MENU 2 Deep Fry 30 mins 59 mins 5 mins
MENU 2 Defrost 30 mins 59 mins 20 mins
MENU 2 Yoghurt 8 hrs 12 hrs 6 hrs
Press the “Time/Temp” button to select
between Time or Temp.
Use “-“ and “+” button to raise or lower
the cooking time or temperature.

English
- 8 - - 9 -
USING THE SHORTCUT WARM/CANCEL FUNCTION
1. Press and hold “Warm/Cancel” button to start the process. Keep warm time will display
when the indicator light is on. The cooker shuts down automatically in 12 hours.
2. To end the process, press and hold “Warm/Cancel” button.
Note: The automatic keep warm function starts when any one of the functions ends.
USING THE REHEAT FUNCTION
1. Press and hold “Start/Reheat” button to start, and the green light will turn on.
2. Press “Time/Temp” button.
3. Use “-” and “+“ buttons to select your desired reheating time.
4. Once complete, the appliance will automatically switch to the keep warm mode.
5. Press and hold “Warm/Cancel” button to end the process.
Note: Both keep warm and reheat functions can only initiate when the cooker is in
‘standby’ mode.
MIDWAY ADDITION + SAFETY LOCK FUNCTIONS
USING THE ‘MIDWAY ADDITION’ FUNCTION
1. To use the function, press the “Steam Release” button on the digital control panel for
3 seconds and the appliance will release steam automatically (which will take a few
minutes). Once the
2. steam is completely released, the appliance will buzz and the “Release Pressure”
indicator light will go off.
3. Safely open the cover and add food into the pot.
4. After the food is added, close the cover, and the cooker will resume the previous
operation until the cooking is done.
5. Once complete, the appliance will automatically shift to the keep warm mode.
6. Press and hold “Warm/Cancel” button to end the process.
USING SAFETY LOCK FUNCTION
1. After the cooking process has started, press and hold the “Preset/Safety Lock” button
for 3 seconds.
2. The indicator light of “Safety Lock” will turn on.
3. To cancel it, press and hold the “Preset/Safety Lock” button for 3 seconds.
CLEANING AND MAINTENANCE
1. Unplug the cooker from the power supply and clean after each use.
2. Using a soft, damp cloth, wipe the outer surface of the machine. You can use a mild
detergent to remove dried food if required.
3. Clean the inside of the cooker including seal ring, cover plate, exhaust valve inlet and
outlet, pressure oat, air-out vent, oat valve, water collection container (located at the
back of the appliance). Then wipe dry.

English
- 10 -
4. Use sponge or non-metal brush to clean the inner bowl and wipe dry.
5. Use a tiny brush to clean air-out vent and pressure-limiting valve.
HOW TO DISASSEMBLE AND REASSEMBLE THE COVER PLATE AND SEAL RING FOR
CLEANING
Note: Ensure the cooker is switched off before disassembling.
When the cooker lid
is open, unscrew the
xed nut and remove
the cover plate.
Remove the seal
ring from the rim of
the cover plate and
wash both the cover
plate and seal ring
using water and mild
detergent. Ensure
the pressure oater
moves freely and
exhaust valve inlet
are clean and free of
residue build up.
Install the seal ring to
the rim of the plate
and ensure the seal is
positioned correctly.
Install the cover plate
to the cooker and x
it with the nut.
HELP, SOMETHING’S GONE WRONG!
PROBLEM POSSIBLE CAUSE SOLUTION
The lid of the Induction
Pressure Cooker is hard to
close.
The lid may be placed
improperly on the appliance. Place the seal ring properly.
The lid of the Induction
Pressure Cooker is hard to
remove.
If the seal ring is properly
placed, the pressure oat may
be stuck.
Ensure the pressure oat is
clean, refer to page 9 for the
cleaning instructions.
If the lid is hard to remove, the
oat valve may be stuck and
not able to fall.
Gently push the valve to
release the oat valve.
There is air leaking from the
cover.
The seal ring may not be xed
properly.
To ensure the seal ring is xed
properly, refer to the cleaning
instructions.
There are food remains on the
valve.
The seal ring will need to
be cleaned to remove food
remains.
The seal ring may be broken.
The seal ring will need to be
replaced, contact Customer
Support and Warranty.

English
- 10 - - 11 -
There is air leaking from the
oat valve.
There may be food remains
on the oat valve.
The oat valve seal will need
to be cleaned.
The oat valve seal ring is
broken.
The oat valve seal ring will
need to be replaced, contact
Customer Support and
Warranty.
The oat valve will not rise
while the Induction Pressure
Cooker is operating.
If the oat valve is not rising,
there may not be enough food
or water.
Ingredients added to the bowl
must sit within the ‘No.2’
water line and ‘Max’ water
line.
There may be an air leak from
the cover or the pressure-limit
valve.
Contact Customer Support
and Warranty.
Water leaks from the back of
the appliance.
The water collection container
is full or not properly
positioned.
Unplug the appliance
immediately. Wipe the
appliance with a dry cloth,
empty the water collection
container and position it
properly.
It seems like too much air is
escaping from the pressure-
limit valve.
The pressure-limit valve may
be improperly placed or there
may be something on the
air-out rod.
The pressure-limit valve and
air-out rod will need to be
cleaned and reinstalled.
You may be operating above
the pressure level limit.
Contact Customer Support
and Warranty.
The screen is reading ‘E0
error’.
The uncover knob is not
switched to the closed
position.
Switch uncover knob to the
closed position.
The screen is reading ‘E1
error’.
This means the circuit at the
bottom sensor is open.
Contact Customer Support
and Warranty.
The screen is reading ‘E2
error’.
This means the circuit at
the bottom sensor has
malfunctioned.
Contact Customer Support
and Warranty.
The screen is reading ‘E3
error’.
This means that the inner
temperature of the Induction
Pressure Cooker is too high.
Stop using the appliance until
the temperature returns to
normal.
The screen is reading ‘E4
error’.
This means the circuit at the
top sensor is open and not
functioning properly.
Contact Customer Support
and Warranty.
The screen is reading ‘E5
error’.
A top sensor circuit has
shorted and will need repair.
Contact Customer Support
and Warranty.
The screen is reading ‘E6
error’.
The appliance is detecting low
temperature and air pressure,
and it will need repair.
Contact Customer Support
and Warranty.
The screen is reading ‘E7
error’.
This means the inner
temperature is too high and
the oat valve cannot rise.
This requires repair.
Contact Customer Support
and Warranty.

English
- 12 -
At the end of its service life, this product may not be disposed of in the
normal household waste, but rather must be disposed of at a collection
point for recycling electrical and electronic devices. The materials are
recyclable according to their labelling. You make an important contribution
to protecting our environment by reusing, recycling or utilising old
devices in other ways. Please ask the municipal administration where the
appropriate disposal facility is located.
The device complies with the European Directives 2014/35/EU, 2014/30/
EU and 2009/125/EC.
SPECIFICATIONS
Product Induction Pressure Cooker
Model PC-1100-5
Capacity 5L
Power 1250W
Product weight 6.3kg
Dimensions 38.5 x 32 x 29 cm

Español
- 13 -
- 12 -
ÍNDICE
BIENVENIDO/A A SU NUEVO ASISTENTE DE COCINA
LA SEGURIDAD ES LO PRIMERO
CONOZCA SU OLLA A PRESIÓN DE INDUCCIÓN
GUÍA DE INICIO RÁPIDO
CÓMO USAR SU OLLA A PRESIÓN DE INDUCCIÓN
AJUSTE DEL NIVEL DE PRESIÓN + AJUSTE DE LA PROGRAMACIÓN DEL INICIO
NIVEL DE PRESIÓN
UTILIZAR LA FUNCIÓN DE AJUSTE DE PRESIÓN
PROGRAMACIÓN DEL COCINADO
UTILIZAR LA FUNCIÓN DE PROGRAMACIÓN DEL COCINADO
AJUSTE DEL TIEMPO DE COCINADO
FUNCIONES DE TEMPERATURA + CALOR/CANCELAR + RECALENTAR
AJUSTAR LA TEMPERATURA (SOLO PARA LAS FUNCIONES ASAR Y FREÍR)
UTILIZAR LA FUNCIÓN ATAJO DE CALOR/CANCELAR
UTILIZAR LA FUNCIÓN RECALENTAR
FUNCIONES DE AÑADIR DURANTE EL COCINADO + BLOQUEO DE SEGURIDAD
UTILIZAR LA FUNCIÓN «AÑADIR DURANTE EL COCINADO»
UTILIZAR LA FUNCIÓN DE BLOQUEO DE SEGURIDAD
LIMPIEZA Y MANTENIMIENTO
CÓMO DESMONTAR Y MONTAR LA PLACA DE CUBIERTA Y EL ARO DE SELLADO
PARA SU LIMPIEZA
¡ALGO VA MAL, AYUDA!
CARACTERÍSTICAS
Español
- 14 -
BIENVENIDO/A A SU NUEVO ASISTENTE DE COCINA
Le damos la enhorabuena por hacerse con nuestra olla a presión de inducción.
La olla a presión de inducción es sosticada y adecuada para muchos procesos de cocción, entre
los que se incluyen la cocción al vapor, guisar, asar, freír, cocción lenta, estofar, descongelar y
hornear. Los programas predeterminados permiten preparar recetas populares como arroz, pizza,
yogur, pasta y muchas más.
La olla a presión de inducción ofrece una gran versatilidad y su temporizador de 24 horas permite
que el aparato empiece a cocinar de forma automática cuando naliza la cuenta atrás. La gran
pantalla digital le ofrece una interfaz de usuario clara y sencilla para ayudarle a seleccionar la
opción de menú adecuada.
La avanzada tecnología de calentamiento por inducción de la olla a presión de inducción la
distingue de los métodos de cocción convencionales. La energía suministrada directamente
al recipiente de cocción, que captura la fuente de calor, así como sus numerosas capacidades,
permite la retención y conservación de más nutrientes. Esta tecnología ahorra tiempo y conserva
la energía a través del uso de altas temperaturas y presión para cocinar alimentos en menos
tiempo.
El diseño innovador y fácil de limpiar de la olla a presión de inducción garantiza una limpieza más
sencilla.
Para conseguir todavía mejores resultados y más ideas, visite nuestra página web y el archivo de
recetas o consulte las recetas adicionales que se le han proporcionado.
LA SEGURIDAD ES LO PRIMERO
PARA GARANTIZAR SU SEGURIDAD Y SACAR EL MÁXIMO PARTIDO A SU OLLA
A PRESIÓN DE INDUCCIÓN, LEA ATENTAMENTE ESTAS INSTRUCCIONES.
Tenga cuidado cuando cambie la olla de sitio; utilice el asa de la base del
aparato para moverla.
No toque la cubierta tras usar el aparato, ya que necesita tiempo para enfriarse.
Si el recipiente interior, la cubierta o el aro de sellado están dañados, deje de
usar la olla para evitar lesiones.
Póngase en contacto con el departamento de atención al cliente y garantía.
No desmonte el aparato ni cambie piezas. Póngase en contacto con el
departamento de atención al cliente y garantía.
No utilice el aro de sellado si está roto o uno que no sea el original.
No utilice la olla cerca de materiales inamables o en entornos húmedos.
Cuando ajuste la válvula limitadora de presión, asegúrese de no tener la cara o
las manos cerca del conducto de ventilación.
Utilice una cuchara de madera o de plástico para no dañar el revestimiento
antiadherente del recipiente interior.
Si el cable está dañado, deje de usar el aparato de forma inmediata y póngase
en contacto con el departamento de atención al cliente y garantía.
Español
- 14 - - 15 -
No coloque el recipiente interno sobre cualquier otra fuente de calor. No
cambie la olla interior por otros recipientes.
Antes de abrir la tapa, asegúrese de que la olla está apagada y desenchufada.
No supere las seis horas de conservación de calor.
Compruebe regularmente el conducto de ventilación de la tapa para evitar que
se bloquee.
No es normal que se expulse demasiado aire por la tapa durante el proceso
de cocinado. Deje de usar el aparato inmediatamente, desenchufe el aparato y
póngase en contacto con el departamento de atención al cliente y garantía.
No debe sumergir este aparato. Este aparato no debe ser utilizado por
personas (incluidos los niños) con capacidades físicas, sensoriales o mentales
reducidas, o con falta de experiencia y conocimientos, a menos que estén bajo
supervisión o se les den instrucciones; los niños no deben jugar con el aparato.
Este aparato no está diseñado para funcionar por medio de un temporizador
externo o un sistema de control remoto independiente.
Cuando se utilice el aparato, la temperatura de las supercies accesibles podría
ser elevada. El recipiente no debe abrirse hasta que la presión haya descendido
lo suciente.
Nunca abra el aparato a la fuerza. Asegúrese de que la presión del interior del
aparato ha vuelto a la normalidad antes de abrirlo. Consulte las instrucciones
de uso como referencia.
No utilice nunca el aparato sin añadir algún líquido. Podría causar daños graves
al aparato.
No llene el aparato más de dos tercios. Para alimentos que se hinchen
considerablemente durante el cocinado, como el arroz, las verduras
deshidratadas o las compotas, no llene más de la mitad del aparato.
No fría alimentos con aceite mientras el aparato esté presurizado.
Este aparato está destinado a ser utilizado en el hogar y con aplicaciones similares como:
cocinas de empleados en tiendas, ocinas y otros entornos laborales; granjas; por clientes en
hoteles, moteles y otros entornos de tipo residencial y de pensión.
EL INCUMPLIMIENTO DE LAS INSTRUCCIONES DE SEGURIDAD Y ADVERTENCIAS PUEDE
PROVOCAR LESIONES GRAVES. EL USO INADECUADO DE SU OLLA A PRESIÓN DE INDUCCIÓN
PUEDE DAÑAR SU APARATO E INVALIDAR SU GARANTÍA.

Español
- 16 -
CONOZCA SU OLLA A PRESIÓN DE INDUCCIÓN
GUÍA DE INICIO RÁPIDO
Vista superior
Vista interior
Accesorios
Cubierta
antidesbordamiento
Pala para arroz Cucharón Vaso medidor
Cesta para freír Rejilla de vapor Manual de
instrucciones
Tuerca ja
Recipiente interno
Botón de apertura Recipiente
recolector de agua
Asa
Vista de la placa de cubierta
Válvula otante de presión
Entrada de la válvula de escape
Placa de
cubierta
Conducto de
ventilación
Botón giratorio de
apertura/cierre
Panel de control
digital Aro de sellado
1Pulse el botón «Menu 1» o «Menu 2» para elegir la función de cocción.
2Ajuste el tiempo de cocinado, el nivel de presión y el tiempo de programación si
fuera necesario.
3Pulse y mantenga pulsado el botón «Start/Reheat» para empezar a cocinar.
4Si fuera necesario, puede ajustar el tiempo y la temperatura de cocinado en las
funciones de asar y freír.
Español
- 16 - - 17 -
CÓMO USAR SU OLLA A PRESIÓN DE INDUCCIÓN
1Para abrir la olla, gire el botón de «apertura/cierre» a la posición «open». Pulse el
botón de apertura de la parte delantera del aparato para abrir la tapa.
2
Asegúrese de que la válvula otante de presión y la entrada de la válvula de escape
estén limpias, de que el aro de sellado esté bien colocado sobre el borde exterior de
la placa de cubierta y de que el recipiente de recolección de agua esté vacío y bien
colocado en la parte trasera del aparato. Consulte la página 20 para más informa-
ción sobre limpieza y mantenimiento.
3
Retire el recipiente interno e introduzca el agua y los alimentos según proceda. Los
alimentos y el agua añadidos al recipiente deben quedar entre la 2ª línea y la marca
«Max» (en el recipiente interno).
Nota: Límpielo y asegúrese de que no hay salpicaduras en el borde externo del reci-
piente interno antes de volver a meter el recipiente interno en la olla.
4
Para cerrar la tapa, empújela hacia abajo hasta que quede bien cerrada. Apriete y
gire el botón de «apertura/cierre» hasta la posición «close».
Nota: Deje la tapa abierta durante las funciones de freír y asar. Para empezar a
cocinar, gire el botón de «apertura/cierre» hasta la posición «close». Puede utilizar la
cubierta contra desbordamiento para cubrir la olla durante el proceso de cocinado.
5Encienda la olla desde el interruptor principal. En la pantalla se verá «----», lo que
signica que está en modo de espera.
6
Seleccione la función predeterminada que desee, moviéndose entre las opciones del
botón «Menu 1» o «Menu 2».
Menú 1: Cocción lenta baja, cocción lenta alta, cocer/personalizado, conservación
del calor.
Menú 2: Carnes, arroz blanco, estofado, sopa, gachas, vapor, guisar, pastel, pizza,
pasta, asar, freír, descongelar, yogur.
Nota: El nivel de presión se ajusta de forma automática. Sin embargo, en varias
funciones predeterminadas puede ajustarse según se necesite. Consulte la página
18 para descubrir los parámetros recomendados para cada función predeterminada.
7
Seleccione el tiempo de cocinado deseado pulsando el botón «Time/Temp» y utilice
los botones de «+» y «-» para ajustarlo.
Nota: Puede alternar entre horas y minutos pulsando el botón «Time/Temp». Consul-
te la página 19 para descubrir los parámetros recomendados para cada función.
8
Pulse y mantenga pulsado el botón «Start/Reheat» del panel de control digital para
iniciar el cocinado.
La olla entrará en modo precalentamiento y la presión del interior alcanzará el punto
deseado. En este momento, no puede abrirse la tapa. Una vez que la presión haya
alcanzado el nivel deseado, aparecerá la cuenta atrás en la pantalla.
Nota: Las instrucciones para añadir alimentos durante el proceso de cocinado
aparecen en la página 20.
9
La liberación del vapor es el proceso de liberación de presión y vapor del interior
de la olla para las funciones de carne, estofado, sopa, gachas de avena, cocción al
vapor y arroz blanco. Esta función se iniciará automáticamente cuando termine el
proceso de cocinado principal. En el resto de funciones, el vapor se libera de forma
intermitente durante el proceso de cocinado.
Nota: No abra la tapa de la olla cuando la luz indicadora de «Liberación de presión»
parpadee o esté encendida. Abra la tapa de la olla únicamente cuando haya escu-
chado un pitido y la luz indicadora se haya apagado, lo que indica que el proceso de
liberación del vapor ha nalizado.
10
Cuando termine el cocinado, el aparato pasará automáticamente al modo de conser-
vación de calor y la cuenta atrás empezará de forma automática.
Nota: No abra la tapa cuando la luz indicadora de «conservación del calor» esté
encendida. Espere hasta que el vapor se haya liberado por completo o salpicará, lo
que podría ser peligroso.
Español
- 18 -
11
Para cancelar la función de conservación del calor, pulse «Warm/Cancel», apague
la olla y desenchúfela. Por seguridad, el modo de espera «----» se activa de forma
automática cuando el aparato no se utiliza durante un periodo ininterrumpido de 12
horas.
12 Una vez que apague y desenchufe el aparato, abra la tapa según las instrucciones
del paso 1 y retire el recipiente interior.
AJUSTE DEL NIVEL DE PRESIÓN + AJUSTE DE LA PROGRAMACIÓN DEL TIEMPO
NIVEL DE PRESIÓN
El nivel de presión puede ajustarse al seleccionar las funciones de carne, estofado, sopa, gachas
de avena y cocción al vapor.
UTILIZAR LA FUNCIÓN DE AJUSTE DE PRESIÓN
1.Siga las instrucciones de la página 16 para seleccionar la función predeterminada y el
tiempo de cocinado deseados.
2.Pulse el botón «Pressure Adjust».
3.Vuelva a pulsar el botón «Pressure Adjust» para seleccionar el nivel de presión deseado.
4.Para retrasar el inicio del proceso de cocinado, siga las instrucciones del proceso de
programación del apartado siguiente, PROGRAMACIÓN DEL COCINADO.
5.Para iniciar el cocinado, pulse y mantenga pulsado el botón «Start/Reheat».
PROGRAMACIÓN DEL COCINADO
La función de programación del cocinado está disponible para las funciones de cocción lenta,
cocer/personalizado, conservación del calor, carnes, arroz blanco, estofado, sopa, gachas de
avena, cocción al vapor y brasear.
UTILIZAR LA FUNCIÓN DE PROGRAMACIÓN DEL COCINADO
1.Siga las instrucciones de la página 16 para seleccionar la función predeterminada y el
tiempo de cocinado deseados.
2.Pulse el botón «Preset/Safety Lock».
3.Utilice los botones de «+» y «-» para ajustar el tiempo.
Nota: Puede alternar entre horas y minutos pulsando el botón «Preset/Safety Lock».
4.Pulse y mantenga pulsado el botón de «Start/Reheat» para iniciar el temporizador.
Menú/Presión
nominal Carnes Estofado Sopa Gachas de
avena
Cocción al
vapor
Arroz
blanco
Por defecto 3 3 6 3 4 3
Máximo 7 7 7 7 7 /
Mínimo 2 2 2 1 2 /
Menú/
Programación
del inicio
Cocción
lenta
Cocer /
Personalizado
Conserv.
del calor Carnes Arroz
blanco Estofar Sopa Gachas de
avena
Cocción al
vapor Brasear
Por defecto 2 h 2 h 2 h 2 h 2 h 2 h 2 h 2 h 2 h 2 h
Máximo 24 h 24 h 24 h 24 h 24 h 24 h 24 h 24 h 24 h 24 h
Mínimo 1 min 1 min 1 min 1 min 1 min 1 min 1 min 1 min 1 min 1 min

Español
- 18 -
- 19 -
AJUSTE DEL TIEMPO DE COCINADO
Siga las instrucciones de la página 16 para seleccionar la función predeterminada deseada; el
tiempo de cocinado puede ajustarse en todas las funciones, como se muestra abajo.
FUNCIONES DE TEMPERATURA + CALOR/CANCELAR + RECALENTAR
AJUSTAR LA TEMPERATURA (SOLO PARA LAS FUNCIONES ASAR Y FREÍR)
Si fuera necesario, la temperatura puede ajustarse en las funciones asar y freír una vez que haya
empezado el cocinado.
Nota: El tiempo de cocinado también puede ajustarse.
Pulse el botón «Time/Temp» para
seleccionar entre tiempo y temperatura.
Utilice los botones de «-» y «+» para
reducir o aumentar el tiempo y la
temperatura de cocinado.
Botón Función Por defecto Tiempo máx. Tiempo mín.
MENÚ 1 Cocción lenta
baja 3 horas 12 horas 1 hora
MENÚ 1 Cocción lenta
alta 3 horas 12 horas 1 hora
MENÚ 1 Cocer/
Personalizado 1 hora 6 horas 1 hora
MENÚ 1 Conserv. del
calor 6 horas 24 horas 1 hora
MENÚ 2 Carnes 35 min. 2 horas 15 min.
MENÚ 2 Arroz blanco 18 min. 28 min. 18 min.
MENÚ 2 Estofar 70 min. 12 horas 45 min.
MENÚ 2 Sopa 30 min. 2 horas 15 min.
MENÚ 2 Gachas de avena 25 min. 2 horas 5 min.
MENÚ 2 Cocción al vapor 15 min. 2 horas 5 min.
MENÚ 2 Estofar 50 min. 2 horas 30 min.
MENÚ 2 Tarta 45 min. 75 min. 45 min.
MENÚ 2 Pizza 45 min. 59 min. 25 min.
MENÚ 2 Pasta 10 min. 30 min. 5 min.
MENÚ 2 Asado 30 min. 59 min. 5 min.
MENÚ 2 Freír 30 min. 59 min. 5 min.
MENÚ 2 Descongelar 30 min. 59 min. 20 min.
MENÚ 2 Yogur 8 horas 12 horas 6 horas

Español
- 20 -
UTILIZAR LA FUNCIÓN DE CALOR/CANCELAR
1.Pulse el botón «Warm/Cancel» para iniciar el proceso. El tiempo de conservación
del calor se mostrará cuando la luz indicadora se encienda. La olla se apagará
automáticamente tras 12 horas.
2. Para nalizar el proceso, pulse y mantenga pulsado el botón «Warm/Cancel».
Nota: La función automática de conservación del calor se iniciará cuando nalice
cualquiera de las funciones.
UTILIZAR LA FUNCIÓN RECALENTAR
1.Pulse y mantenga pulsado el botón «Start/Reheat» para empezar y la luz verde se
encenderá.
2.Pulse el botón «Time/Temp».
3.Utilice los botones «-» y «+» para seleccionar el tiempo de recalentamiento deseado.
4.Una vez completado, el programa pasará automáticamente al modo de conservación
del calor.
5. Pulse y mantenga pulsado el botón «Warm/Cancel» para nalizar el proceso.
Nota: Tanto la función de conservación del calor como la de recalentar solo pueden
iniciarse cuando la olla esté en modo de espera.
FUNCIONES DE AÑADIR DURANTE EL COCINADO + BLOQUEO DE SEGURIDAD
UTILIZAR LA FUNCIÓN «AÑADIR DURANTE EL COCINADO»
1.Para utilizar esta función, pulse el botón «Steam Release» del panel de control digital
durante 3 segundos y el aparato liberará automáticamente el vapor (tardará unos
minutos).
2. Una vez que se haya liberado todo el vapor, el aparato sonará y la luz indicadora de
«Liberación de presión» se apagará.
3.Abra la tapa con cuidado y añada alimentos a la olla.
4.Una vez que haya añadido los alimentos, cierre la tapa y la olla reanudará la función
anterior hasta que nalice el cocinado.
5.Una vez completado, el aparato pasará automáticamente al modo de conservación del
calor.
6. Pulse y mantenga pulsado el botón «Warm/Cancel» para nalizar el proceso.
UTILIZAR LA FUNCIÓN DE BLOQUEO DE SEGURIDAD
1.Una vez que el proceso de cocinado haya empezado, pulse y mantenga pulsado el
botón «Preset/Safety Lock» durante 3 segundos.
2.La luz indicadora del bloqueo de seguridad se encenderá.
3.Para cancelarla, pulse y mantenga pulsado el botón «Preset/Safety Lock» durante 3
segundos.
LIMPIEZA Y MANTENIMIENTO
1.Desenchufe la olla de la toma de corriente y límpiela después de cada uso.
2. Pase un paño suave y húmedo por la supercie externa del aparato. Puede utilizar un
jabón suave para retirar los restos secos de alimentos si fuera necesario.
This manual suits for next models
1
Table of contents
Languages:
Other BOJ Electric Pressure Cooker manuals


Popular Electric Pressure Cooker manuals by other brands


EUROPRO
EUROPRO PC107H owner's manual

Instant
Instant POT DUO PLUS Get started

WMF
WMF Perfect Premium user manual

Sharff & Mueller
Sharff & Mueller DUOPRO PLUS User manual book

Crown Food Service Equipment
Crown Food Service Equipment EC-2 Installation and operation manual

Cuckoo
Cuckoo CRP-HY10 Fuzzy Series operating instructions