Boland 4K49aHDR5 User manual

4K Monitor Series User Manual 1of 21
Ultra High Definition Serial Digital Interface
Multi Format 4K LCD Monitor
User Manual
4K Monitor Models
4K HDR Monitor Models
4K HDR OLED Monitors
4K49aHDR5
12/22/22

4K Monitor Series User Manual 2of 21
CAUTION ...........................................................................................................................................3
CAUTION ...........................................................................................................................................4
FEATURES ........................................................................................................................................5
CONTROLS, INDICATORS AND CONNECTIONS ....................................................................6
4K49AHDR5 FRONT...........................................................................................................................6
4K49AHDR5 REAR.............................................................................................................................6
FRONT KEYS OPERATIONS..................................................................................................................7
REAR PANEL ......................................................................................................................................8
MENU BASIC OPERATION............................................................................................................9
TO SHOW AND REMOVE THE MENU .....................................................................................................9
TO GO TO THE NEXT LEVEL ..................................................................................................................9
TO GO BACK TO THE PREVIOUS LEVEL.................................................................................................9
TYPICAL MENU OPERATION.................................................................................................................9
TURNING ON THE MONITOR ................................................................................................................9
VOLUME ADJUSTMENT.........................................................................................................................9
HOW TO SELECT VIDEO SOURCE BY OSD .......................................................................................10
PICTURE MENU .............................................................................................................................11
ADJUST...............................................................................................................................................11
COLOR TEMPERATURE CONTROL .....................................................................................................11
ASPECT RATIO ...................................................................................................................................11
PICTURE OPTION ...............................................................................................................................12
PEAKING FILTER ................................................................................................................................12
AUDIO MENU..................................................................................................................................13
SDI GROUP/CHANNEL.......................................................................................................................13
VOLUME .............................................................................................................................................13
DISPLAY MENU .............................................................................................................................14
MARKERS...........................................................................................................................................14
LEVEL METERS..................................................................................................................................14
TIME CODE.........................................................................................................................................15
OSD SET ...........................................................................................................................................15
U.M.D ................................................................................................................................................15
CAPTIONS..........................................................................................................................................16
VIDEO RANGE ....................................................................................................................................16
WAVEFORM & VECTOR .....................................................................................................................16
REMOTE MENU..............................................................................................................................17
GPI CONTROL ...................................................................................................................................17
SETUP MENU .................................................................................................................................18
FACTORY DEFAULTS & USER SETTINGS MEMORIES .....................................................................18
FUNCTION SWITCH.............................................................................................................................18
CONTROL ...........................................................................................................................................19
COMMUNICATION ...............................................................................................................................19
IP CONFIG..........................................................................................................................................19
FAN CONTROL....................................................................................................................................19
INFO MENU .....................................................................................................................................20
INPUT MODES SUPPORTED......................................................................................................20
SUPPORTED SIGNALS .......................................................................................................................20
SUPPORTED TIMINGS ........................................................................................................................20
MECHANICAL DIMENSIONS......................................................................................................21
4K49AHDR5 .....................................................................................................................................21

4K Monitor Series User Manual 3of 21
Caution
Before operating the set, please read this manual carefully.
WARNING:
To reduce the risk of electric shock does not remove cover (or back). No user serviceable parts inside. Refer
servicing to qualified service personnel. To prevent fire or shock hazard, do not expose the rear of the set to
rain or moisture. Do not rub or strike the Active Matrix LCD with anything hard as this may scratch, mark, or
damage the Active Matrix LCD permanently.
Unauthorized tampering with the inside of the monitor invalidates the warranty.
The manufacturer shall not warrant for any damage caused by improper maintenance and/or repair. Work by third
parties.
Important safeguards for you and your new product:
Your product has been manufactured and tested with your safety in mind. However, improper use can result in
potential electrical shock or fire hazards. To avoid defeating the safeguards that have been built into your new
product, please read and observe the following safety points when installing and using your new product and
save them for future reference.
Read Instructions
Follow Instructions
All operating and use instructions should be followed.
Retain Instructions
The safety and operating instructions should be retained for future reference.
Heed Warnings
All warnings on the product and in the operating instructions should be adhered to.
Cleaning
Disconnect the unit from the electricity supply before cleaning. Do not use abrasive cleaners. Use a damp
cloth for cleaning.
Water and Moisture
Do not use this apparatus near water.
Transporting Product
A product and cart combination should be moved with care. Quick stops, excessive force and uneven surfaces
may cause the product and cart combination to overturn.
Attachments
Do not use attachments not recommended by Boland as they may cause hazards.
Ventilation
Do not block any of the ventilation openings.
Install in accordance with the manufacturer’s instructions.
Power Sources
This product should be operated only from the type of power source indicated on the marking label. If you are
not sure of the type of power supply to your home, consult your supplying dealer.
Power Lead Polarization
This product is equipped with a three-wire grounding-type cord. This is a safety feature. Do not defeat the
safety purpose of the grounding-type cord.
Power Cord Protection
Power-supply cords should be routed so that they are not likely to be walked on or pinched by items placed
upon or against them, paying particular attention to cords at plugs, convenience receptacles and the point
where they exit from the product.

4K Monitor Series User Manual 4of 21
Caution
Outdoor Cable Grounding
If an outside antenna or cable system is connected to the product, be sure the antenna or cable system is
grounded so as to provide some protection against voltage surges and built-up static charges. A “face plate”
also needs to be installed with an isolating capacitor to prevent any damage from static.
Lightning
For added protection for this product during a lightning storm, or when it is left unattended and unused for
long periods of time, unplug it from the wall outlet and disconnect the antenna or cable system. This will
prevent possible damage to the product due to lightning and power-line surges.
Power Lines
An outside antenna system should not be located in the vicinity of overhead power lines or other electric light
or power circuits, or where it can fall into such power lines or circuits. When installing an outside antenna
system, extreme care should be taken to avoid contact with such power lines or circuits, as contact with them
might be fatal.
Earthing the product
This product must be earthed properly to comply with the safety regulations in the country of use. If you are
unsure of these regulations, please consult a qualified electrician.
Servicing
Do not attempt to service this product yourself as opening or removing covers may expose you to dangerous
voltages or other hazards. Refer all servicing to qualified service personnel. If the Set does not operate
properly, switch it off and call your dealer.
Damage Requiring Service
Isolate this product from the mains supply and refer servicing to qualified service personnel under the
following conditions:
If the power-supply cord or plug is damaged.
If the glass front has been damaged.
If there is ingress of water between the glass and the LCD screen.
If the product does not operate normally by following the operating instructions. Adjust only those controls
that are covered by the operating instructions as an improper adjustment of other controls may result in
damage and will often require extensive work by a qualified technician to restore the product to its normal
operation.
If the product has been dropped or the cabinet has been damaged.
If the product exhibits a distinct change in performance.
Safety Check
Upon completion of any service or repairs to this product, ask the service technician to perform safety checks
to determine that the product is in proper operating condition and the front seal is intact.
Mounting
The product should be mounted on a wall only as recommended in the instructions.
Power
This set operates on an AC supply; the voltage is as indicated on the label on the Manual. This appliance
must be earthed at all times through the chassis as well as through the power lead.

4K Monitor Series User Manual 5of 21
Features
This product is a multi-format Digital LCD Monitor to display all kinds of digital video input signals, as
12G/HD/SD-SDI//HDMI/SFP Digital.
A Professional High Definition Broadcast Monitor with a menu of convenient user interfacesand easy controls
for displaying and analyzing all the details from an HD-SDI orHDMI input source.
•4K includes 2x-4x inputs/ 2x-4x outputs(Dual link Not Supported)
•Quad Link Display (Square Division, 2 Sample interleave)
•HDMI input accepts up to 2160p
•HDMI 2.0 support (supportsHDCP 2.2)
•SFP Module inputs
•High Dynamic Range (HDR) display functions, PQ(2084), Hybrid Log Gamma, and Camera S-Log3
•Waveform & Vector Scope (YPbPr,RGB, Waveform &Vector)
•16 Ch Audio Lever Meter Display (SDI only)
•Supported 3D LUTs
•Custom 3D LUT File Import Through USB (17 .cube format)
•Color Temperature –User, VAR, 9300K, 6500K, 5400K, 3200K
•USB Firmware Upgrade
•Monitor Control via Ethernet /RS422 /RS232 /IR /GPI
•Supports4096 x 2160 Aspect.
•Aspect Ratios(Full Screen, 16:9, 4:3,14:9,1.85:1,2.85:1,Pixel to Pixel)
•Zero Scan / Pixel to Pixel mappings
•Closed Caption 608, 708
•Focus Assist / Peaking filter / False Color
•Time code
•Markers
•H / V Flip
•H / V Delay
•UMD
•Blue/Mono Only
•SupportsExternal GPI Control (RJ-45).
•Auto Calibration via CA-210, CA-310 (Minolta), K-10 (Klein) and many others on Windows

4K Monitor Series User Manual 6of 21
Controls, Indicators and Connections
4K49aHDR5 Front
IR
(Power)
SDI
SFP
QUAD
2SI
HDMI
F1
F2
F3
F4
F5
MENU?
?
?
INPUT?
ADJUST
HEADPHONE
USB
4K49aHDR5 Rear
GPI
ETHERNET
HDMI IN
RS-232C
SDI 4 IN
SDI 4 OUT
SDI 3 IN
SDI 3 OUT
SDI 2 IN
SDI 2 OUT
SDI 1 IN
SDI 1 OUT
SFP IN
AUDIO OUT R
AUDIO OUT L
UMD/IMD
RS-422 IN_OUT
DC 24V IN
SPEAKER

4K Monitor Series User Manual 7of 21
Controls, Indicators and Connections
Front Panel Keys Operation\
?? (Power)
Power ON/OFF Button.
?? SDI
Select SDI 1/ SDI 2 input signal.
?? SFP
Select SFP Input signal.
?? QUAD (4k)
Select QUAD-SDI (4x 3G 1080p SDI) input signal.
?? 2SI
Select 2-SAMPLEINT-SDI input signal.
?? HDMI
Select HDMI input signal
?? FUNCTION BUTTONS F1 ~ F5
Executes direct control of user-selected pre-set functions
(Undefined, Aspect,Color Only, Level Meter, Audio Group, Audio Channel, Audio mute,H/V Delay, Scan,
Flip, Marker on/off, Aspect/Area Marker, Waveform/Vector, Gamma Select, HDR Mode, and others)
?? MENU ?(Down)
Activates main OSD menu
Navigates higher menu in main OSD menu
?? ? (Up)
Executes function (by OSD help commands) in main OSD menu
Navigates higher menu in main OSD menu
?? ?(Left)
-Decreases sound volume of speakers
-Decreases values of user menu in main OSD menu
-Executes function (by OSD help commands) in main OSD menu
-Exits OSD menu
?? INPUT ?(Right)
-Increases sound volume of speaker.
-Increases values of user menu in main OSD menu
-Executes function (by OSD help commands) in main OSD menu
-Activates OSD menu of input source selecting
-Changes input source selection
?? ADJUST
Adjust Picture Menu (Volume ->Backlight Adjust ->Brightness -> Contrast -> Color -> Tint -> Sharpness)
Turn Right (with ‘Right’ button is same)
Turn Left (with ‘Left’ button is same)

4K Monitor Series User Manual 8of 21
Controls, Indicators and Connections
REAR Panel Copnnections
?? SDI 1 /SDI 2 INPUTS and LOOP OUTS(BNCs)
12G/3G/HD/SD SDI Inputs and Loop Outs
?? SDI 3/SDI 3INPUTS and LOOP OUTS(BNCs)
3G SDI 3+SDI 4Only, and Quad Inputsand Loop Outs
?? SFP IN
SFP Module IN
?? HDM (HDMI A 19)
High Definition Multimedia Input
?? RS-232C (DB9F)
Auto Color Calibration and Remote Control Functions Port
?? GPI (General Purpose Interface) (RJ-45)
GPI 1 ~ 7,Contact-Closure Control Port
?? ETHERNET (RJ-45)
Network System Control/ Firmware Upgrade
?? RS422 IN/OUT (DB9F)
Monitor System Control
?? DC 24V IN
?? USB Input (on Front)
Firmware Upgrades, LUT Ingests
?? HEADPHONE (on Front)
Headphone output
PIN NO Description
1,2 GND
3
4,5 + 24V
1
2
4
5
3
4K Monitor Series User Manual 9of 21
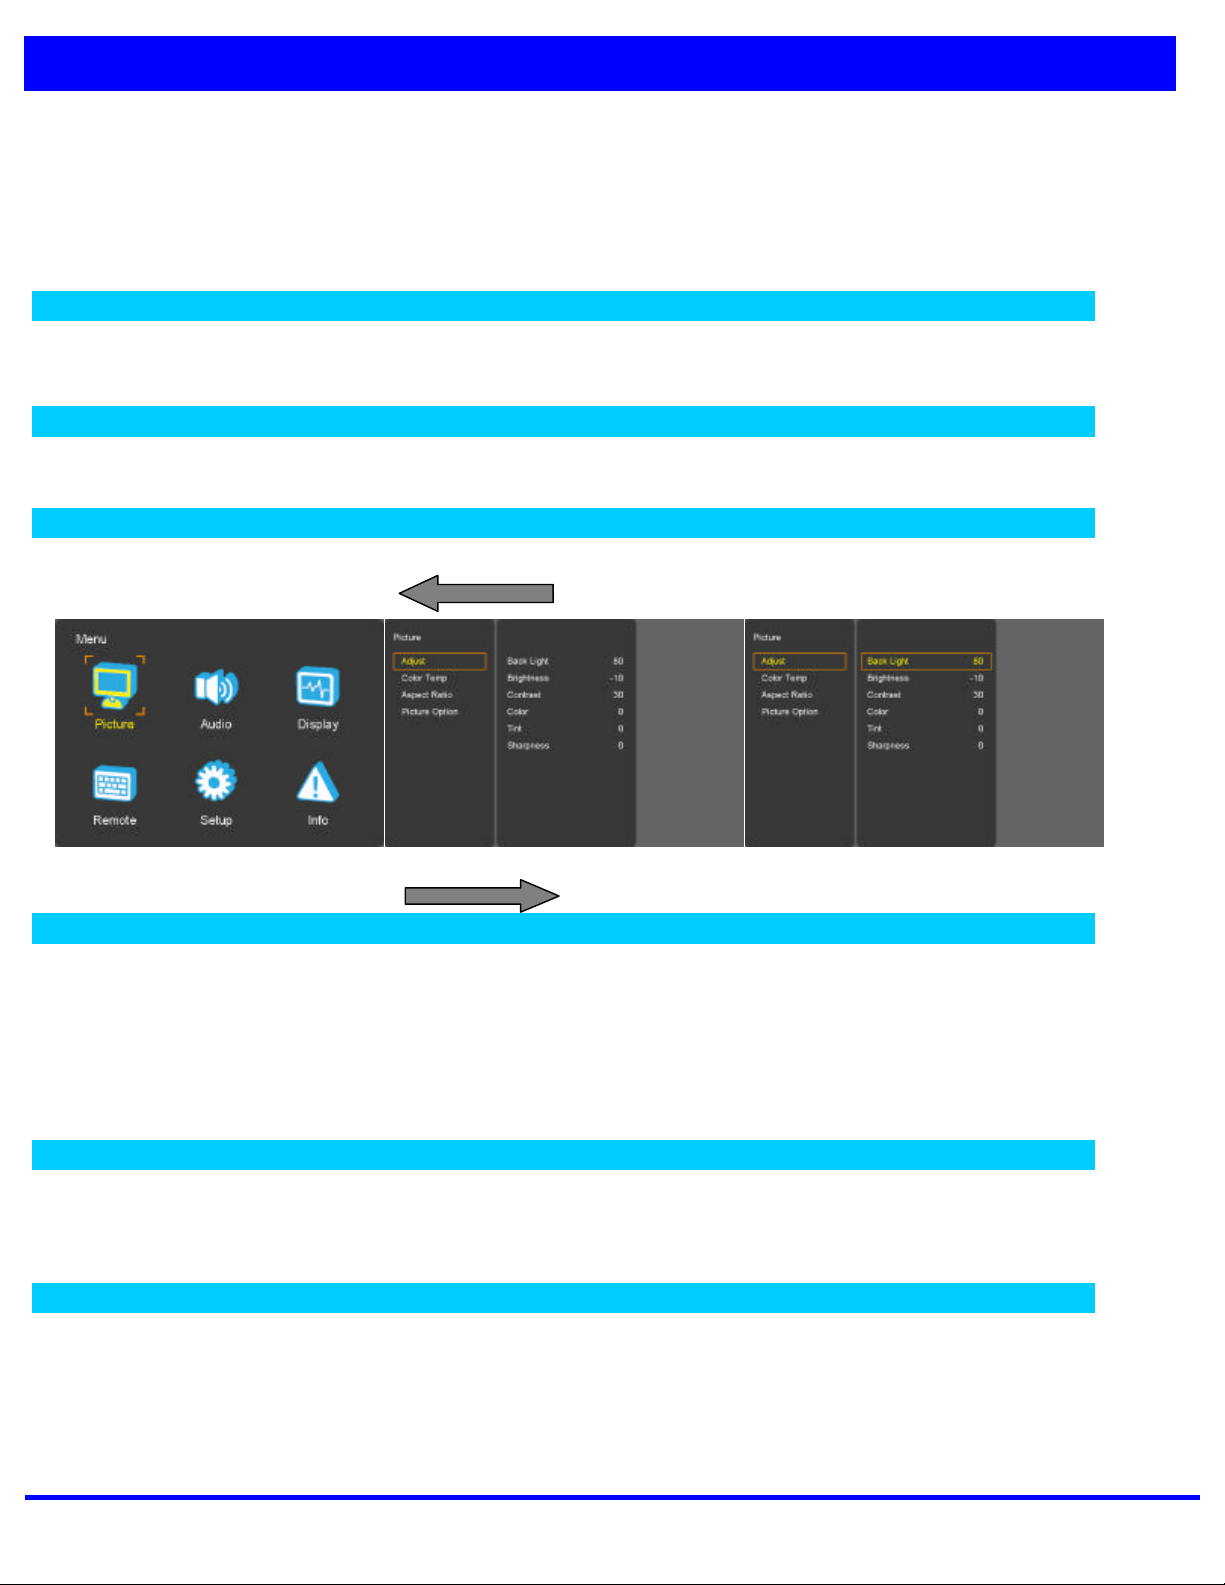
MENU Basic Operation
In this menu system, there are several ways to customize the menu settings provided.
Most menus consist of three levels to set up the options, but some require greater depth for the variety of settings. If
you press the MENU button, only the first and second level of the menu system will appear on the monitor screen. The
third level can be displayed by pressing INPUT?. If a menu has more than three levels, the pop-up dialogue box will
be displayed as the fourth or fifth level.
To show and remove the Menu
Press the MENU button to display the menu. A second press of the MENU button will take you back to monitor
viewing.
To go to the next level
Press INPUT?button.
To go back to the previous level
Press ?(Left) button
Typical Menu Operation
1. Press MENU button: The main menu will appear.
2. Use UP/DOWN button to select the desired menu option (icon).
3. While the desired menu option is selected, press INPUT to move to the second level.
4. Use UP/DOWN button to select the second menu option.
5. Press INPUT to move to the third level: Some menu options require additional steps.
6. Press MENU to return to the previous menu to return to monitor viewing.
Turning On the Monitor
1. First, connect power cord correctly. At this moment, the monitor switches to standby or power on mode.In standby
mode,in order to turn monitor on, press the Power button.
2. Select the viewing source by using INPUT button on Keypad in front of monitor
Volume Adjustment
1. Press the ADJUST button on Keypad.
2. If you want to switch the sound off, press the FUNCTION (Audio mute) button.
3. You can cancel this function by pressing the FUNCTION (Audio mute) or volume control button.
4K Monitor Series User Manual 10 of 21
MENU Basic Operation
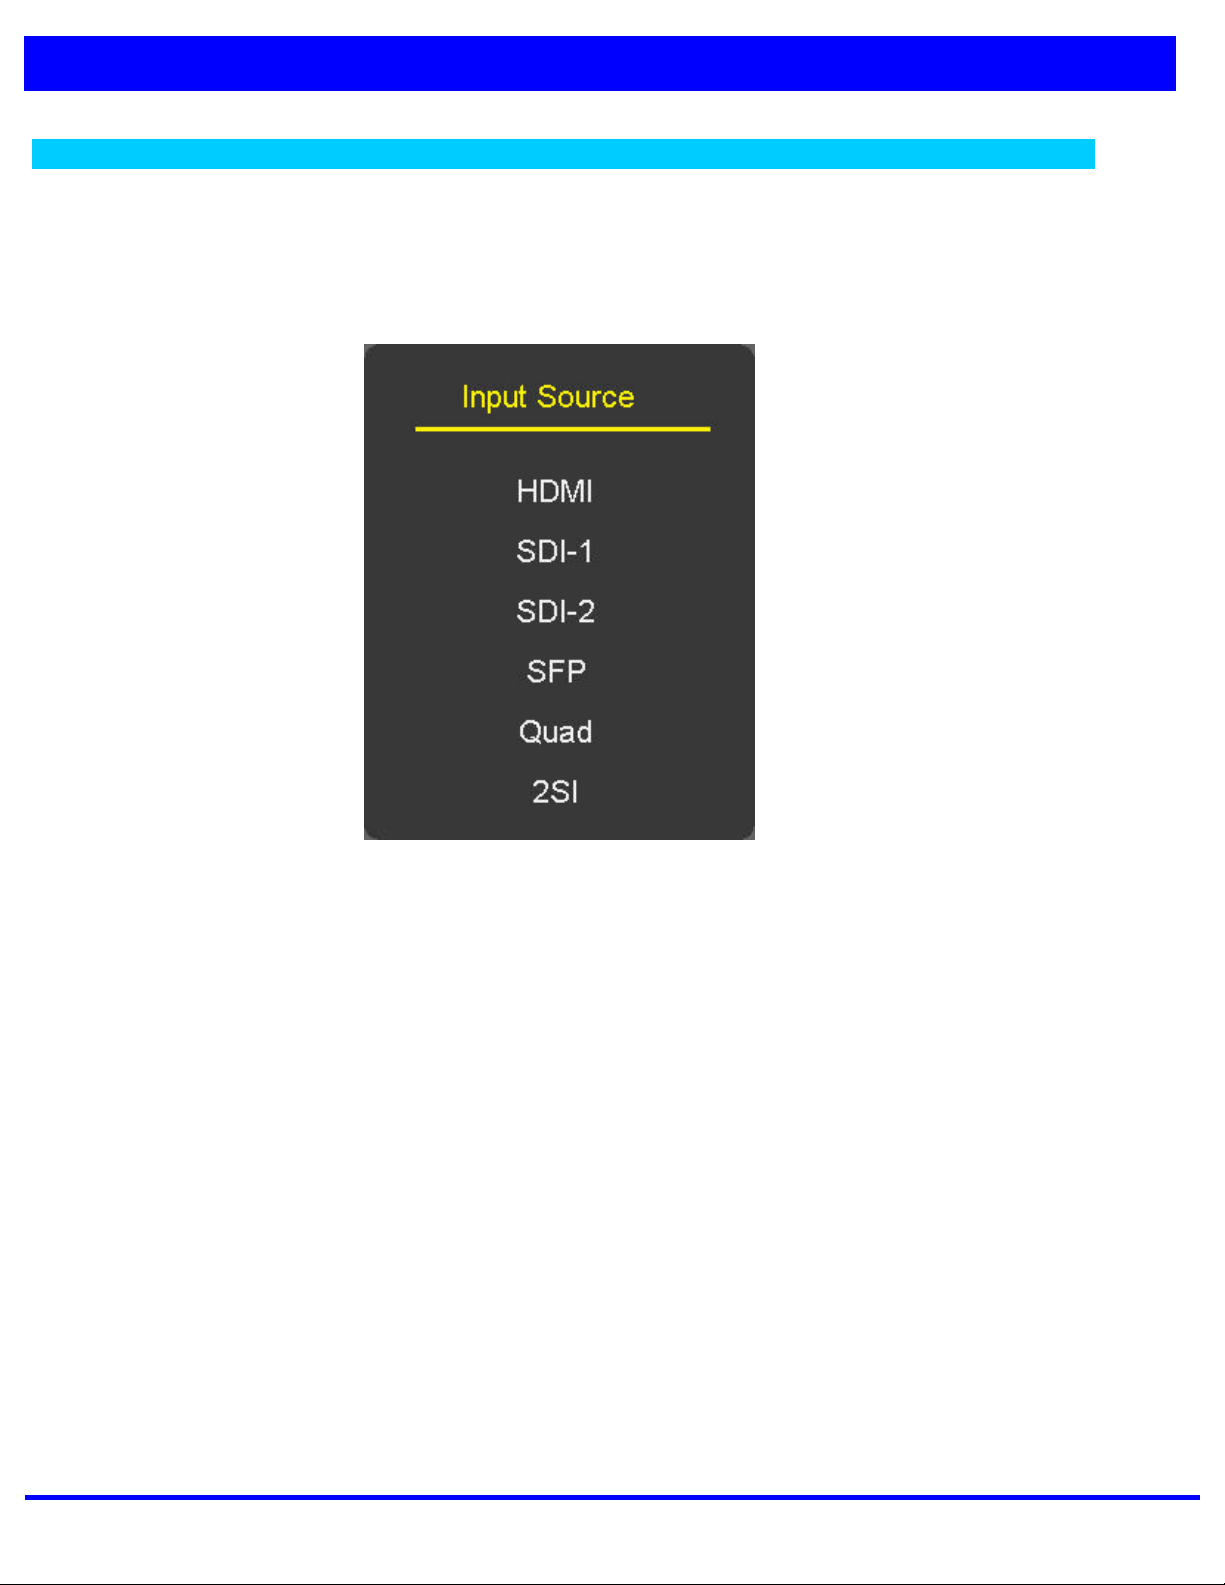
How to Select Video Source by OSD
1. Press the INPUT button and then UP/DOWN button to select each video source.
2. Press the INPUT button to go to desired video source.
3. If Input Name is enabled, The INPUT button goes into input name edit mode instead of selecting source.
And on most models, SDI 3 and SDI 4

4K Monitor Series User Manual 11 of 21
PICTURE MENU
Adjust
-Back Light Dimming or OLED Screen Brightness Level select (0~100)
-Adjust the values of Brightness (black level), Contrast (white level), Color,
Tint and Sharpness,directly from -50 to 50. A Value of Zero is nominally
the Calibrated detent point.
Color Temperature Control
-For Setting the Color temperature or adjusting RGB Gain/Offset value directly
-User (User setting RGB gain value), VAR (3200K ~ 9300K), Often used value( 9300K, 6500K, 5400K,3200K) and 3D
LUT Calibration value (D-Cinema =6302K) (CAUTION-VARIABLE USER MODE MAY UNCALIBRATE HDR MODES VALUES).
-Color Space: Native/BT.709/D-Cinema
Aspect Ratio
-Pixel to Pixel –Display size is an input size. If input resolution is bigger
than panel size, fit the panel size
-For setting the aspect ratio.
-Full Screen: The images are displayed with a panel size.
-Full Screen, 16:9, 4:3, 14:9, 13:9, 1.85:1, 2.35:1: The images are
displayed with each aspect ratio.
-Function-key operate Rotation, Full Screen, 16:9, 4:3, 14:9, 13:9, 1.85:1&
2.35:1
4K Monitor Series User Manual 12 of 21
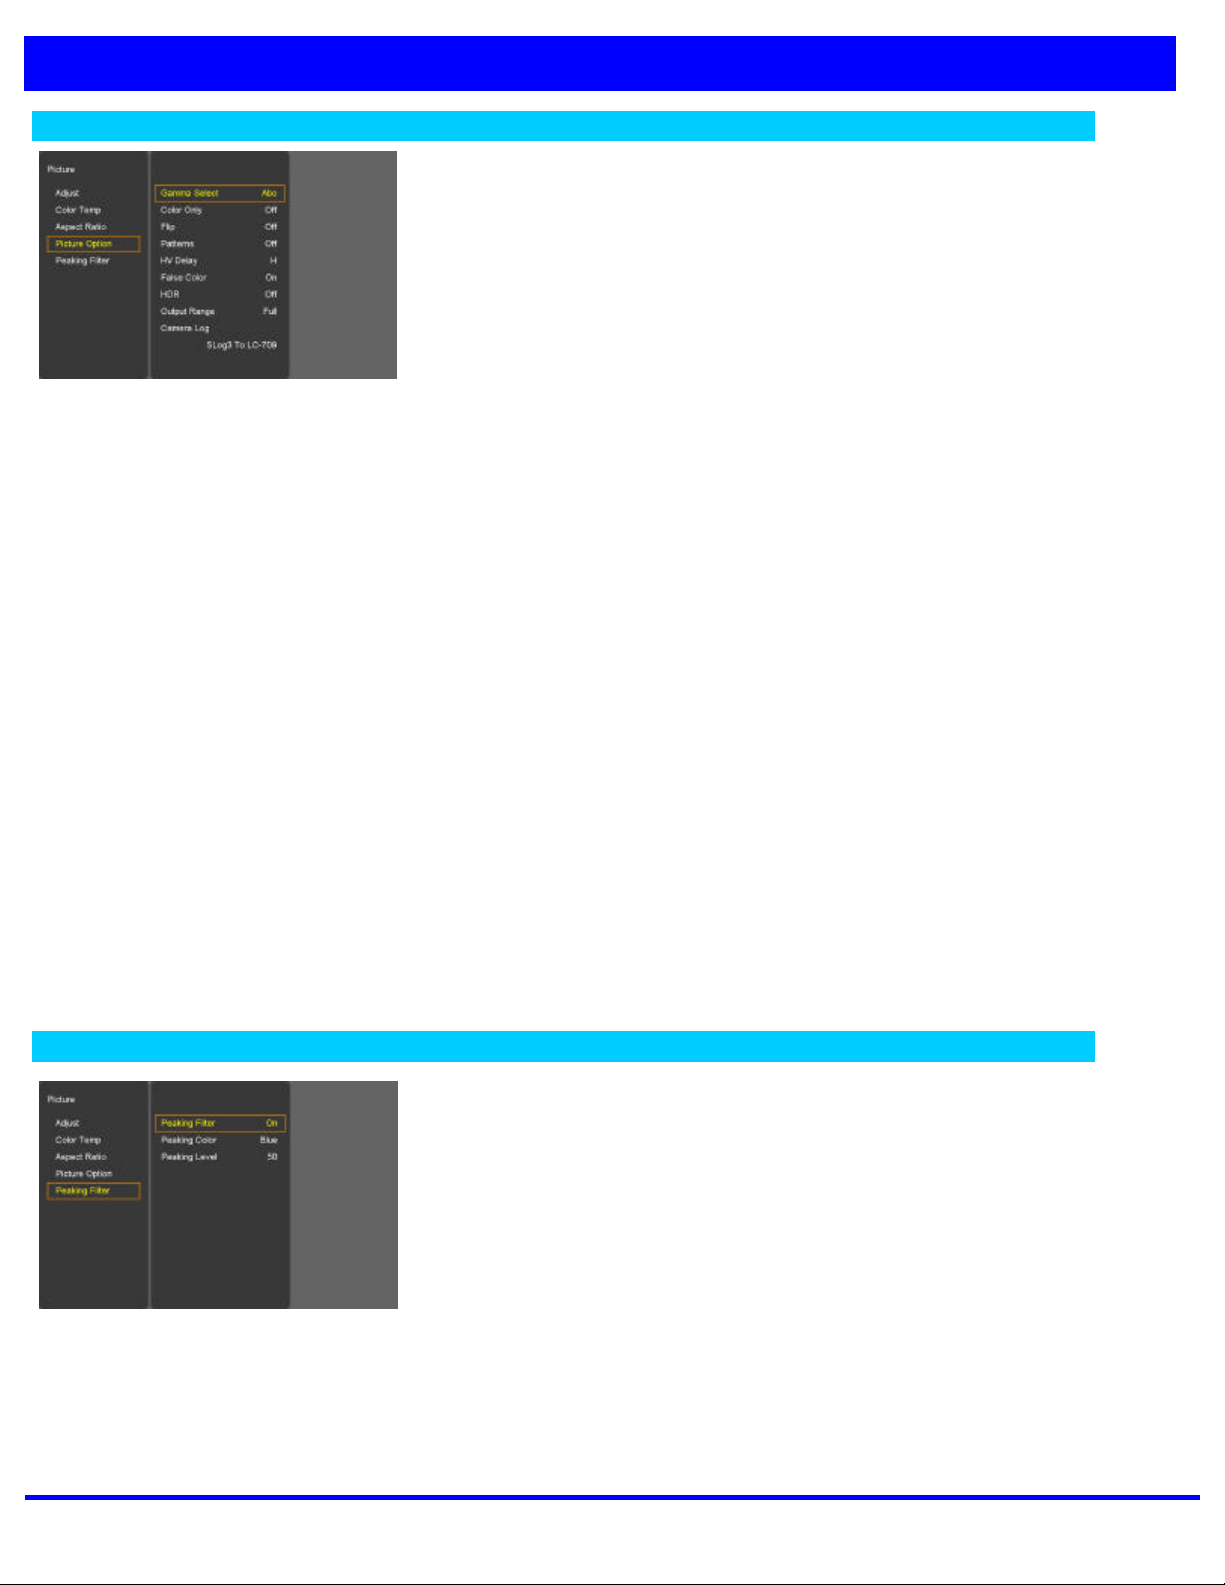
PICTURE MENU
Picture Option
?? Gamma Select
?Gamma Level Select (0.8 ~ 3.0)
?? Color Only
?Mono Color/Blue only Function on/off
?? Flip
?H-Flip / V-Flip / H+V-Flip (without OSD)
?? Patterns
?Auto Run, White, Red,Green, Blue, Yellow, Cyan, Magenta
?? HV Delay
?Off/ / H / V / H+V
?? False Color
?False Color on/off
?? HDR
?ST 2084-300 / ST 2084-1000 / ST 2084-10000 / HLG
?? Output Range
?Normal (16~235)/Full (0~255)
?? Camera Log
?Select a camera log for the input signal.
[Off,SLog3 To LC-709,Slog3 To LC-709TypeA, Slog3 To Slog2-709,
Slog3 To Cine+709, Slog2 To LC-709, Slog To LC-709TypeA, Slog2 To
Slog2-709, Slog2 To Cine+709, User]
?Import User Log: Allows the user to save the Log LUT from a USB memory stick presented to the monitor.
The saved LUT can be used by choosing User LUT.
If you insert a USB memory stick with user LUT data, and push Enter at the Import LUT Data menu, the data is
saved to the monitor.
The extension name of the LUT file is " ***.cube” .
Peaking Filter
-Peaking Filter: Peaking Filter On/Off.
-Peaking Color: Red/Blue/White/Violet.
-Peaking Level: 0~100.

4K Monitor Series User Manual 13 of 21
AUDIO MENU
SDI Group/Channel
-SDI Audio output Group & Channel source select
-Group 1 : Channel 1/2, 3/4
-Group 2 : Channel 5/6, 7/8
-Group 3 : Channel 9/10, 11/12
-Group 4 : Channel 13/14, 15/16
Volume
-Adjust the speaker or headphone Volume level.

4K Monitor Series User Manual 14 of 21
DISPLAY MENU
Marker
?? Aspect
-16:9, 4:3, 14:9, 13:9, 1.85:1, 2.35:1, 1.85:1&4:3, Custom fitted panel size
marker on screen.
?? Area
-Area: Draw dotted line Marker on screen in case of images. (16:9
95/93/90/88/80%, 4:3 95/93/90/88/80%, EBU Action 16:9/14:9/4:3, EBU
Graphic 16:9/14:9/4:3)
?? Center Maker
-“+” Marker on center of screen
?? Aspect L. Color
-Marker Line Color Select. (WHITE, YELLOW, BLUE, RED, BLACK)
?? Area L. Color
-Area Line Color Select. (WHITE, YELLOW, BLUE, RED, BLACK)
?? Line Width
-Marker line thickness setting.(0~10)
?? Custom Marker
-The user wants Marker size setting. (Below panel size)
Level Meter
-Display the audio level meter on screen in SDI/HDMI input.
-Audio level meter cannot display with OSD showing.
?? Scale
-Level Meter Scale mode selection
(Digital/Nordic/BBC/EBU/DIN/Expanded DIN/SMPTE VU/EBU VU/France VU)
4K Monitor Series User Manual 15 of 21
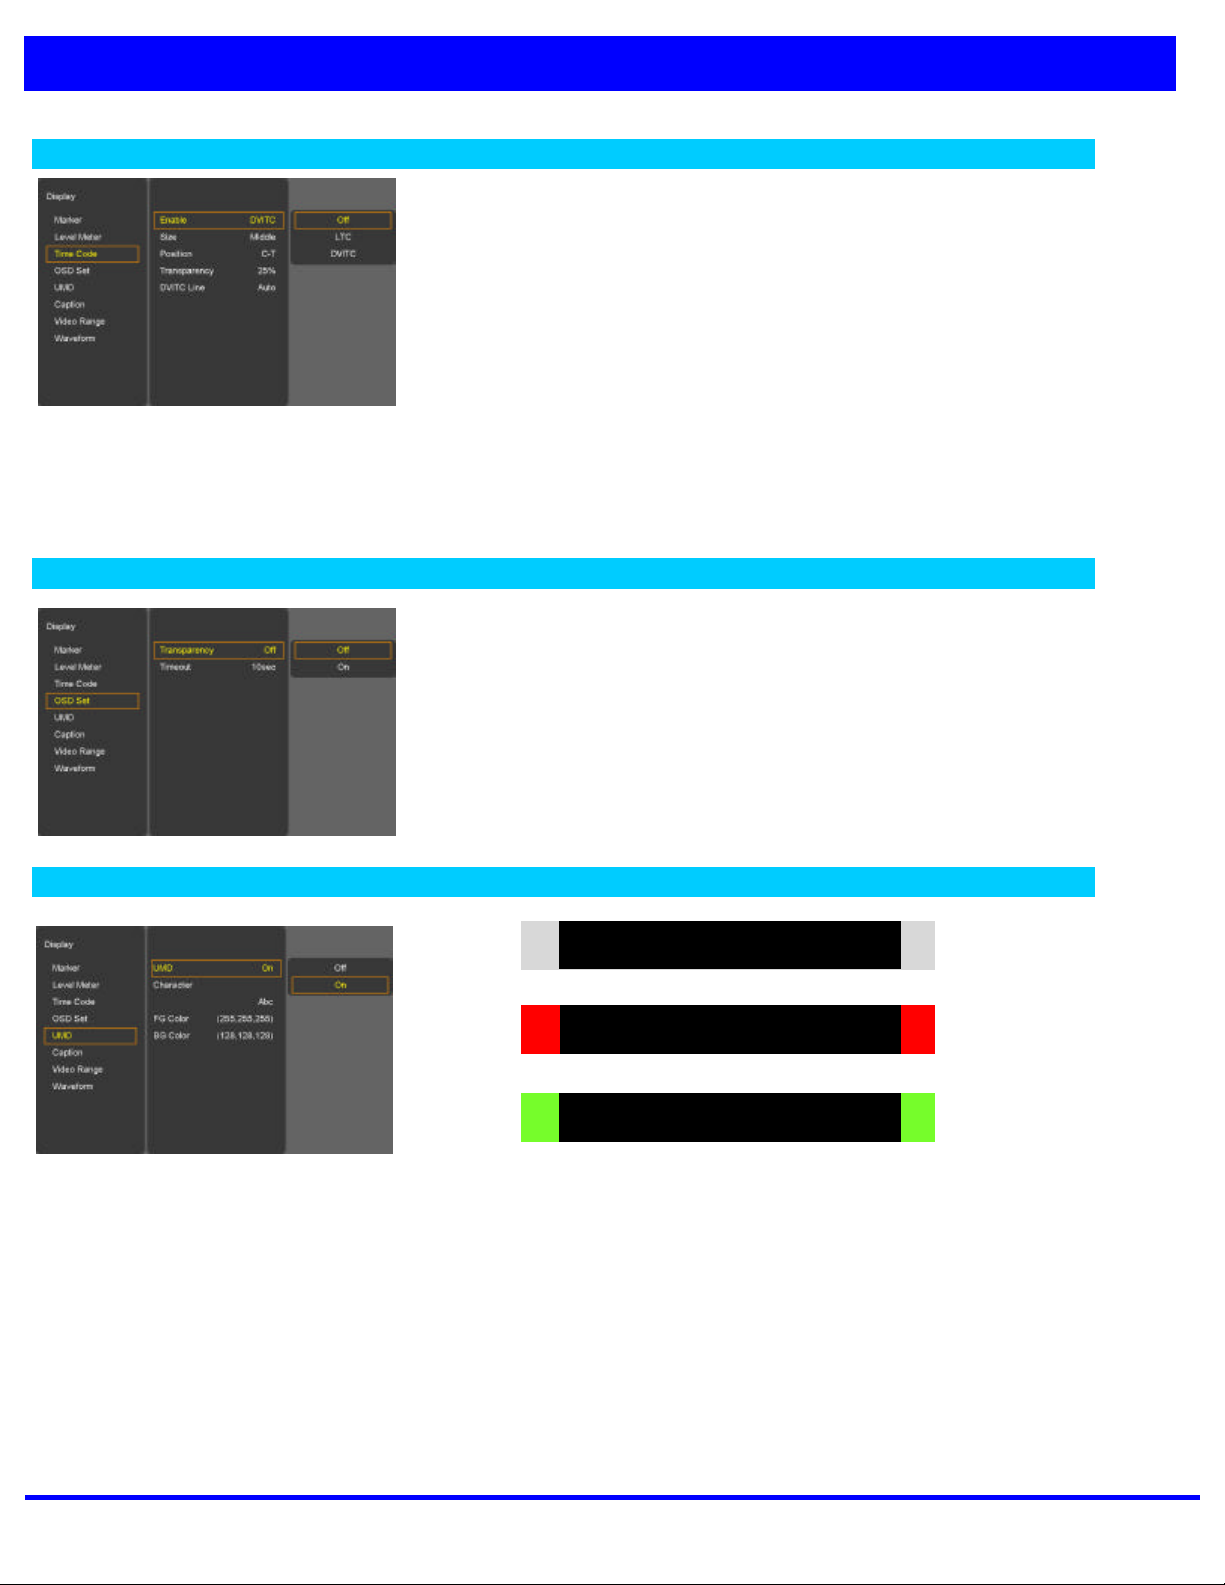
DISPLAY MENU
Time Code
?? Enable
-Time code Display (off/LTC/DVITC, SDI only)
?? Size
-Time code size select. (Small, Middle, Large)
?? Position
-Time code display position selects (L-T, C-T, R-T, L-B, C-B, R-B)
?? Transparency
-Disable blending Time code background with video image. (0%, 25%, 50%, 75%, 100%)
?? DVITC Line
-Auto, Line 1 ~ 31
OSD Set
?? Transparency
-Disable blending OSD background with video image.
?? Timeout
-OSD gone time setting. (On/5/10/20/30/40/50/60 sec))
U.M.D
?? UMD
-UMD display on/off
?? Character
-UMD Character Select
?? Position
-UMD display position select.(L-T, C-T, R-T, L-B, C-B, R-B)
?? FG Color
-UMD Character color Select (RGB_255_192_128_0_Transpareut)
?? BG Color
-UMD BG color Select (RGB_255_192_128_0_Transpareut)
UMD
Channel-012
Tally Red
Channel-012
Tally Green
Channel-012

4K Monitor Series User Manual 16 of 21
DISPLAY MENU
Caption
Caption
-608 Line21, 608 ANC, 608 Transcoded, 708 mode Select
?? 608 Caption
-608 Caption mode Select.(C/C1, C/C2, C/C3, C/C4, TEXT1, TEXT2,
TEXT3, TEXT4, OFF)
?? 708 Caption
-708 Service mode Select.(Service 1/Service 2)
Video Range
-Range Check: Range Check on/off.
-Y Max: Maximum luminance level.
-Y Min: Minimum luminance level.
-C Max: Maximum chroma level.
-C Min: Minimum chroma level.
-Color: Black/Blue/Red/Green
-Grid: Grid line on/off
-Blink: Y/C Min-Max to blink. (0~7)
Waveform
-Enable: Waveform, Vector Display on/off.(only SDI)
-Waveform Sel: Waveform Mode select. (Y, VT, Y+VT, YCbCr, GBR)
-Line All: Waveform & Vector Scope display.
-Line Select: Used to select specific Vertical Line for Waveform/Vector
scope.
-Line Number select: In WAVEFORM/VECTOR, use the Up/Down button
or Adjust Turn Right/ Left to select User’s desired line.
-Line Display: off/on/5 sec
-Intensity: 1~63 Green Trace Brightness

4K Monitor Series User Manual 17 of 21
R
EMOTE MENU
GPI Control
-For allocating functions to particular GPI pins.
-When remote control operations are to be performed using an external GPI Controller or contact switch.
-GPI Control: GPI function Enable/Disable
-GPI 1 ~ 7
GPI Function Description
Undefined Not set (no function allocated)
Tally R, Tally G For lighting up the Red or Green tally lamp.
Marker On/Off Displays the marker.
Function 1~5Activates FUNCTION 1~6 buttons
Aspect Sets the aspect ratio of the images
Aspect Marker Marker size Select.
Area Marker Area Marker size Select.
Center Marker Displays the center marker.
Input SDI1, Input SDI 2,
Input Quad,Input 2SI,Input HDMI Switches the input source.
Menu Key, Enter Key, Up Key, Down Key
Left Key, Right Key Use the key function by GPI.
H/V Delay H/V Delay On/Off
GPI 7 : Power Key(Fixed)

4K Monitor Series User Manual 18 of 21
SETUP MENU
Factory Default
-Factory Default: User Reset.
Function Switch
-Function 1~5: Select the function to be allocated to the FUNCTION
(F1~F5)front panel buttons.
Function1&2 button Description
Undefined Not set (no function allocated)
Aspect Sets the aspect ratio of the images
Color Only Execute Mono color or Blue Only
Level Meter Level Meter on/off
Audio Group Select the extract the embedded audio group in SDI input.
Audio Channel Select the extract the embedded audio channel in SDI input.
Audio Mute Toggles sound status of speaker/headphone in mute.
H/V Delay H Delay -> V Delay -> HV Delay -> off
Flip H -> V -> H+V -> off
Marker Marker on/off
Aspect /Area Marker Aspect/Area Marker Select
Waveform Waveform on/off
4K Monitor Series User Manual 19 of 21
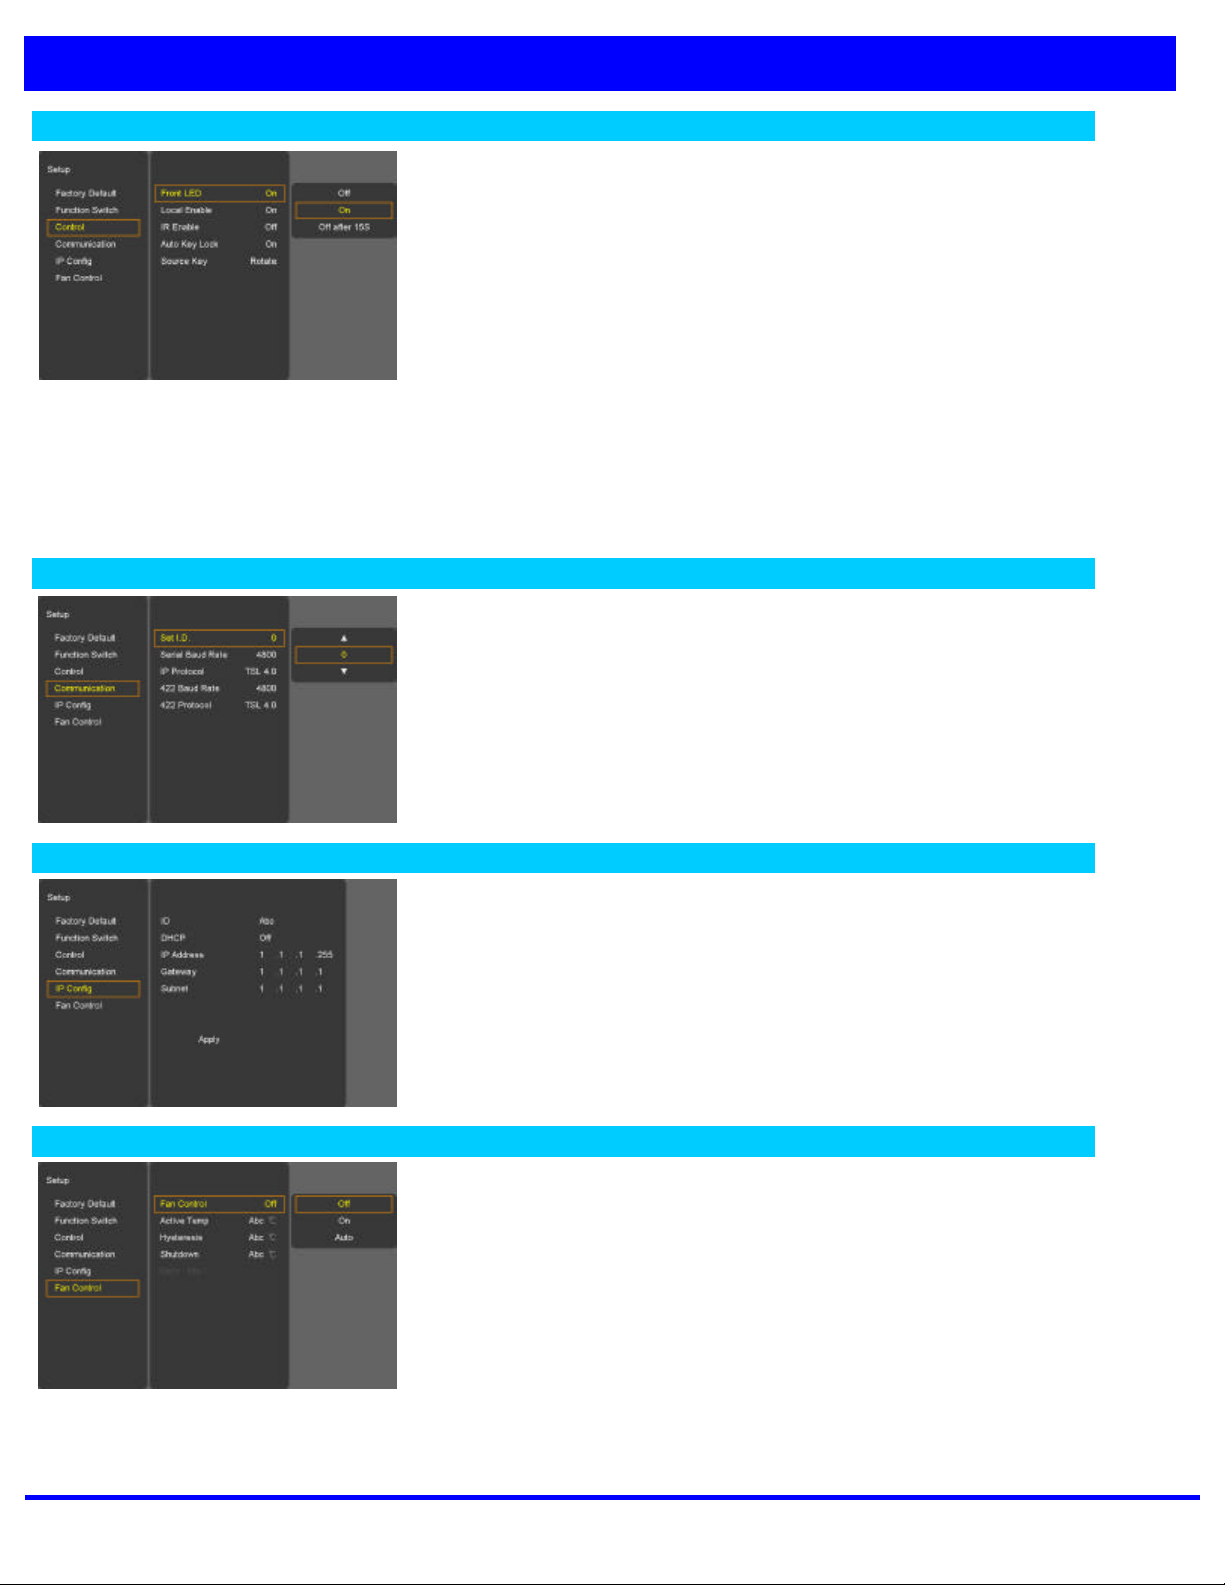
SETUP MENU
Control
?? Front LED
-Front LED on/off/off after 15s
?? Local Enable
-Power, up and down key is only worked, if Local enable is off.
?? IR Enable
-Select the controller of local or remote. If remote controller is selected,
both local (front key) and remote are worked. However select local, local
key only operated.
?? Auto Key Lock
-If it does not work 10 minutes to lock automatically. Key button is operated after being pressed about 2 seconds
?? Source Key (Front “Input” Button/ Remote Controller “Source” Button)
-Menu: Select the input signals to the input menu OSD.
-Rotate: Press Button to rotate the input source.
Communication
?? Set ID (01~99)
-If control each Board, must set ID numbers of each Board
?? Serial Rate _ 422 Baud Rate
-2400/4800/9600/19200/38400/57600/115200
?? IP Protocol
-Remcon / TSL 4.0, /TSL 5.0
?? 422 Protocol
-Remcon / TSL 4.0 / RDU
IP Config
?? ID
-Network ID Character Select
?? DHCP
-DHCP on/off (Manual IP settings –DHCP on)
* “Apply” enter all settings after.
Fan Control
?? Fan Control
-Internal Fan Controls driving option by temperature sensor Auto / force
on / force off
?? Active Temp
-Adjusts fan driving temperature by Celsius degree. It works only when the
Fan Control setting is Auto.
?? Hysteresis
-Adjusts fan driving hysteresis temperature by Celsius degree. (1~10°C)
?? Shutdown
-Automatic Monitor thermal shutdown self-protection is invoked at 85°C or above by turning itself OFF.

4K Monitor Series User Manual 20 of 21
I
NFO MENU
-Status Box Display of Model, F/W Version, FPGA, Operating Time, Serial
Number, etc.
Input Modes Supported
Supported Signals
Items Specifications
Serial Digital Interface 12G, 3G, HD, SDI (Dual Link Not Supported)
Supported
Signals HDMI 720p / 1080p / 2160p
Support Timings
?? SDI Input
SMPTE ST 2082 3840x2160(50/59.94/60p),
SMPTE-428.1M 2048x1080P(24/25)
SMPTE-425M(3G) 1920x1080P(50/60)
SMPTE-260M 1920x1035i(60/59.94)
SMPTE-259M 1920x1080i(50)
1920x1080i (50/59.94/60)
SMPTE-274M 1920x1080P (30Psf/25Psf/24Psf/30)
SMPTE-296M 1280x720P (50/59.94/60)
Table of contents
Other Boland Monitor manuals

Boland
Boland BVB07 User manual

Boland
Boland 6.5"- DHD65DB & LED User manual

Boland
Boland VIEWPORT v4x4b User manual

Boland
Boland v056 User manual

Boland
Boland ViewPort d084c User manual

Boland
Boland BVB4K-24 User manual

Boland
Boland BVB Series User manual

Boland
Boland LVB32 User manual

Boland
Boland BVB4K-31 User manual

Boland
Boland PVB17 User manual


