Bomma soap mini User manual
bomma
Installation Manual
for Pendant Light Fixtures
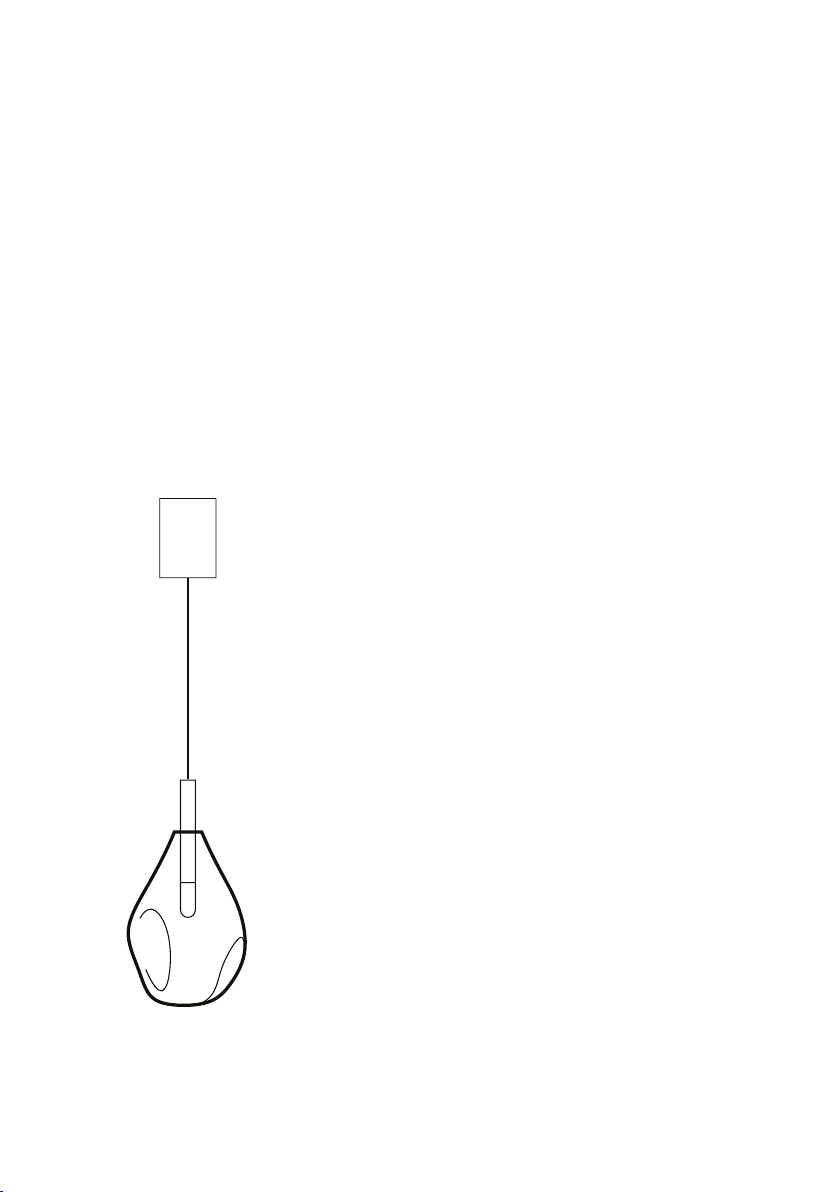
soap mini
Design by Ota Svoboda


Introduction
• Please read this user’s manual carefully prior to installation and follow its instructions
and recommendations.
• The installation of the pendant light requires more than one person.
• For safety reasons, as well as for warranty purposes, it is forbidden to use this product in
breach of this manual and other purposes stipulated in this manual.
• Prior to assembly, use an appropriate circuit breaker to turn off electricity.
• All interventions regarding the wiring of the light fixture may only be carried out by a
qualified electrician.
• Prevent children or persons with lowered sensory or psychological abilities from
handling the light fixture, as it contains small and fragile pieces that could be
dangerous when inappropriately handled or ingested.
• The producer bears no liability for damage caused by improper installation.
• The dimensions and weight of glass parts may differ slightly due to manual production.
• All Bomma products are made from hand-blown lead-free crystal. Any small bubbles,
non-melts and inhomogeneities in the glass are not a reason for complaint. This is a
characteristic feature of this traditional craft.
• The intensity and color shade of plated glass may vary slightly from product to product.
Small dots in the plating, especially visible after the light is on, are not a defect of the
product.
• The surface of the mounting may also include minor imperfections due to manual
production.
• The pendant light is intended for interior lighting.
Components included in the package
• Glass part of the light fixture
• Mounting
• Allen key
• Dimmable light source
• Installation manual
• Maintenance instructions
• Gloves
Technical parameters, specifications
• Voltage input: 12 V DC
• Protection: IP 20
• Input power: 1x LED lamp max. 1,2 W (G4)
• Cable length: 2,5 m
• Weight: ~ 0,25 kg
• Size: dia. 100 mm, H 200 mm
• Light source: G4, 1,2W LED, 120 lm, 2700 K, RA 90+
• Class: II.
Recommended light source: LED G4, max. 1,2 W.
Recommended transformer: Kanlux ADI 350 1-3 W, 220-240 V
∅ 10 mm
↑↓ 28 mm
Upon opening, first determine that there was
no damage occurred during transport and
that the light fixture is complete. Otherwise,
please contact your seller immediately, as
later claims may not be considered.
Assemble the lighting fixture according to
the manual, recognizing that its installation
wiring may only be carried out by a
qualified electrician following general legal
regulations.
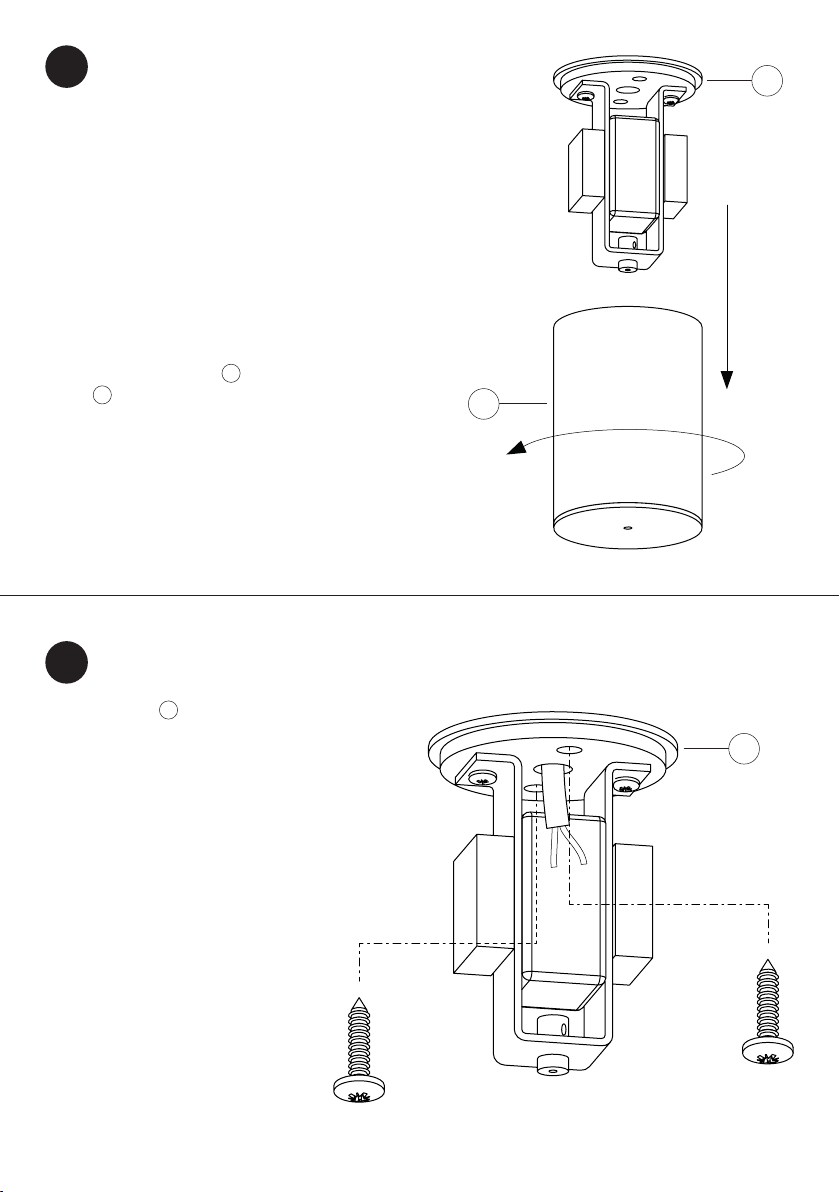
Unscrew the canopy 3from the anchor
plate 1.
1
1
Slip the plate 1on the incoming
power supply cable from the ceiling
and attach using appropriate screws
and wall plugs, which are not included
in the package. Select their size and
type according to the material of your
wall or ceiling and the weight of the
fixture.
2
1
3
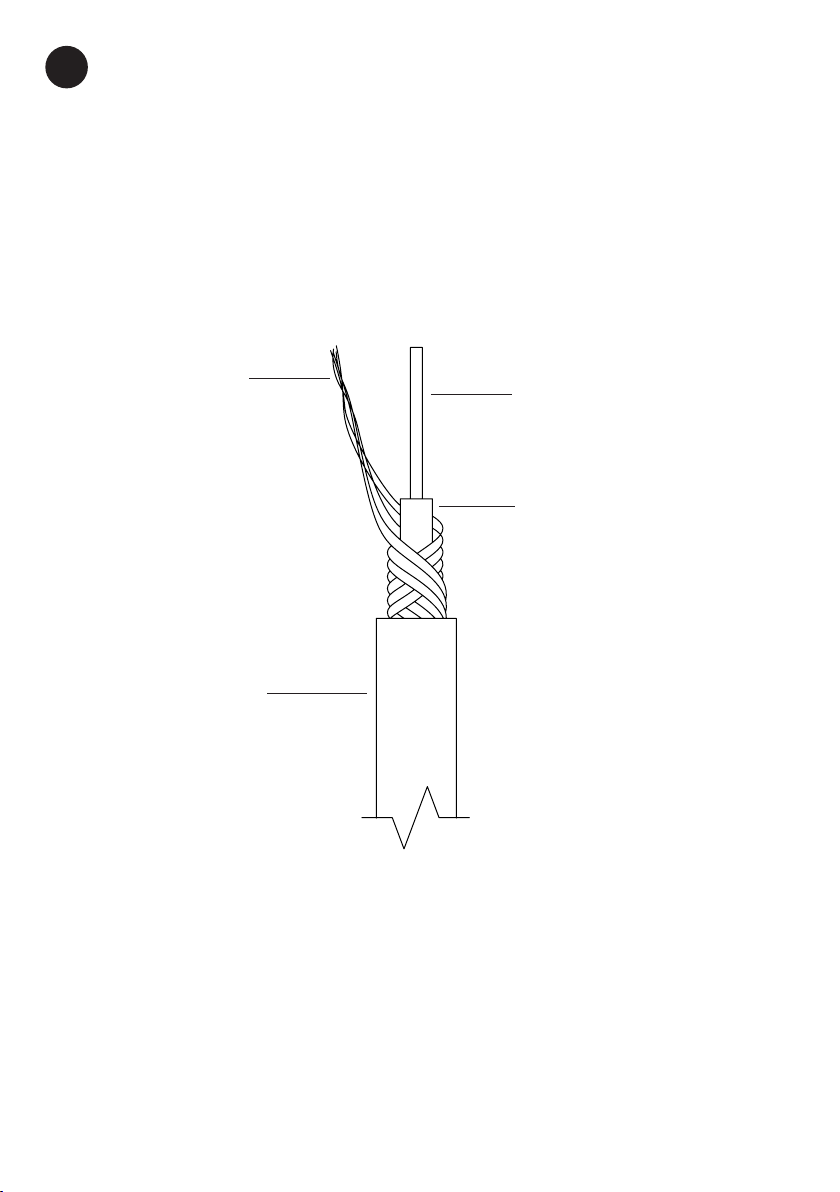
Shorten the cable to the required length for hanging the pendant light and remove
wire insulation according to the diagram. The cable (+) and metal braid (-) will serve
as conductors for electrical wiring.
3
cable +
inner wire
insulation
metal braid -
outer wire
insulation

Install wiring according to the diagram. Use
a 12V DC transformer 5.
5
12V
220V
INPUT
OUTPUT
L, N
5
Slip the cable 2through the canopy
3and then through the grommet 4.
Tighten the adjusting screw 10
to secure the cable. Tighten the adjusting
screw gently to avoid cable breaking.
4
3
2
10
4
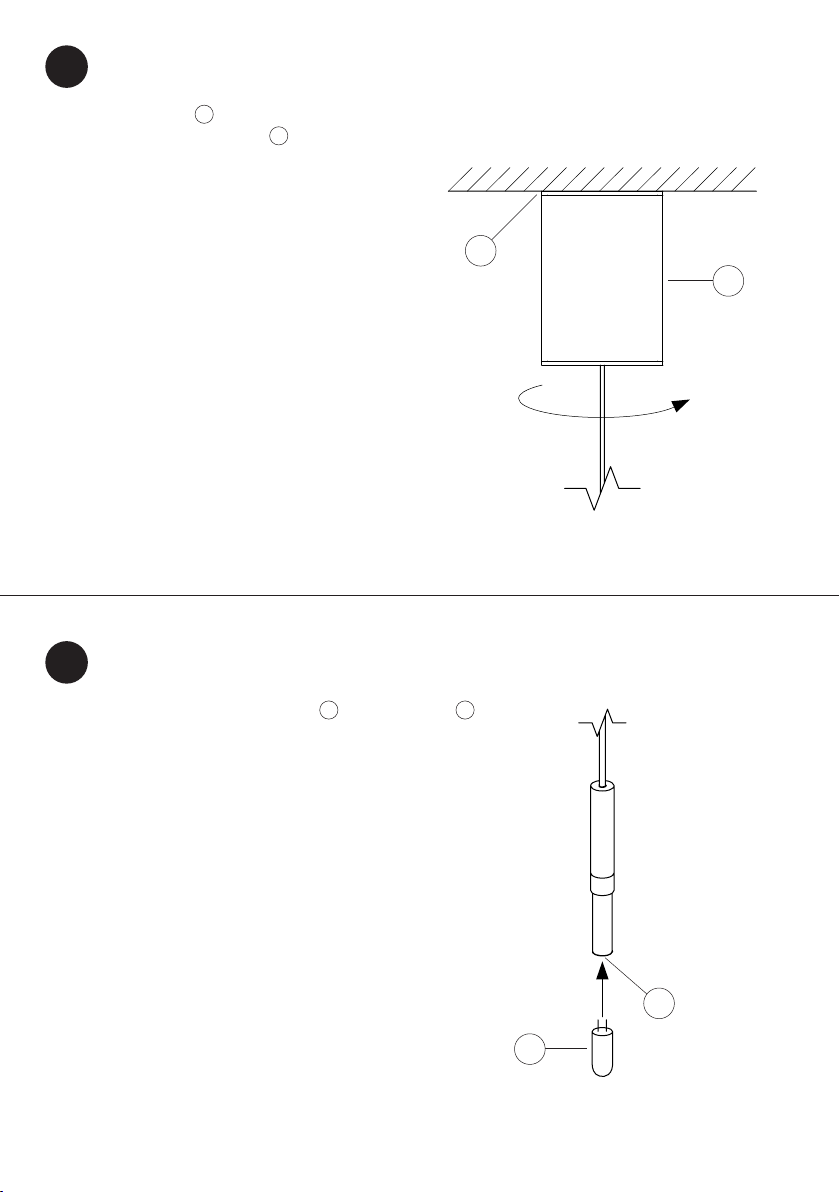
Move the canopy 3to the ceiling and
attach it to the base-plate 1using
screws.
Insert the dimmable light source 6into the base 7.
6
7
1
7
6
3

Attach the glass part 9onto the mounting 8.
Congratulations! You may now reconnect the power and turn the light on.
When dismantling, first turn off the light and disconnect from the power supply. Then
follow the above steps in reverse order. Use the original or similar packaging for possible
later transport of the light fixture to prevent damage.
8
9
8

Maintenance
• When unpacking, installing and cleaning
your fixture, handle the individual
components with outmost care,
particularly the glass parts, which are
very fragile.
• When installing and cleaning, touch
the plated glass only with the gloves
supplied. Failure to do so could cause
irreversible damage to the surface.
• Assembly and electric installation must
be carried out by certified electricians.
• Pendant lights are intended for interiors.
• We recommend consulting the
installation and the anchoring of
pendant lights in ceiling materials with
your project manager, technician or
another competent party.
• Do not cover nor touch the light source
while the light is on.
• Do not attempt any repairs or changes
to the components. Always contact our
specialized service.
• Spare parts that are not supplied or
approved by the producer may not be
used (with the exception of light sources
replacement).
• Do not expose the light fixture to
unsuitable environments where it could
become damaged (water, frost, heat).
• Ensure appropriate access (ladder,
scaffolding, aerial work platform) prior to
maintenance or cleaning pendant lights,
in order to comfortably reach and safely
handle the light fixture.
• Note: in some areas, the lighting fixture
may have sharp edges that may cause
injury. Beware while in immediate
proximity of the fixture.
• Perform cleaning and all maintenance
with the light turned off, ideally entirely
disconnected. Respect this rule for the
entire duration of installation.
• When changing a light bulb, always
disconnect the light fixture from its power
supply.
• We recommend hanging the fixture up
at sufficient height to avoid injury (e.g.
head injury) to persons moving within its
proximity.
• We recommend performing the
installation of pendant lights with more
than one person.
• After installation check whether the light
fixture is properly set in its base.
• Do not expose the light to inappropriate
strain and protect it from mechanical
damage.
• When in operation, the light source
becomes hot. Prior to any handling, wait
for the light source to naturally cool down
and do not expose it to fast cooling.
• Halogen light sources may not come in
contact with greasy materials, so do not
touch them with bare hands. Install them
using clean textile gloves or tea towels.
When cleaning halogen bulbs, it is best to
use alcohol-based cleaners.
• When changing a bulb, use the same or
recommended light source. Information
regarding the type appears both on the
label and in the installation manual.
• Do not hang any other components on
the light fixture, other than those listed in
the installation manual.
• Pay attention to checking all parts prior to
their installation. Damaged components
and glass parts (fragmentation, cracks)
may cause personal injuries to persons
moving within its proximity.
• Should any serious problem occur during
cleaning or maintenance, do not hesitate
to contact the producer.
• Any other handling of the pendant
light fixture should be performed by a
qualified technician or directly by the
producer.

Cleaning
• All cleaning and maintenance must be
carried out when the power is off, ideally
entirely disconnected.
• When cleaning, use fine-fabric gloves.
Particularly avoid handling metal-
coated crystal without gloves to avoid
fingerprints and loss of gloss.
• Use soft cloths to clean metal parts. Such
parts may be cleaned with a dry cloth or
a cloth dampened in warm water with a
mild detergent. Avoid the use of solvents
or technical benzene to clean metal
parts. Avoid alcohol-based cleaners that
may cause changes of surface colors.
• Clean light bulb using a soft dampened
cloth, antistatic brush with soft bristles or
a vacuum cleaner turned to low mode.
• Clean fine-steel surfaces with products
sold especially for this purpose.
• To clean the glass parts, use products in
concentrations recommended by their
producers. Immediately after cleaning,
dry the light fixture and hang it again.
• Never use liquid solutions or chemical
cleaners to clean the plated glass. Wipe
the surface with a soft, dry cloth only.
• Avoid cleaning removable parts of the
light fixture in a dishwasher.
Important notice
• The producer bears no responsibility
for damage caused by unprofessional
installation or inappropriate handling
of the light fixture, including installation
with accessories other than those
recommended by the producer.
• The producer bears no responsibility
for damage caused by unprofessional
interventions into the mounting and
safety features of the light fixture,
including damage to the product by
inappropriate power supply, storage
or use of the light fixture in a humid
environment.
• Do not place the light fixture in humid
environments, such as near a boiler or
other sources of water vapor. Do not
place the lighting fixtures in shower
enclosures or above bathtubs and never
touch them when you are in contact with
water.
• The producer reserves the right to make
minor changes to the construction of the
light fixture without prior notice.

bomma.cz
Date of packagingControl
Disposal
Upon the completion of the technical working life of the light fixture and its disconnecting
from power supply, dismantle and separate the individual parts. Hand over the separated
parts to the appropriate organizations responsible for waste disposal.
Waste Materials Catalog
Number Category Name
10 11 11* N Waste glass
in small particles
and glass powder
containing heavy metals
10 11 12 O Waste glass other than those
mentioned in 10 11 11
17 04 01 O Copper, bronze, brass
17 04 05 O Iron and steel
20 01 01 O Paper and cardboard
15 01 05 O Composite packaging
Contact
Bohemia Machine Ltd.
1177 Zámecká St.
58291 Světlá nad Sázavou
Czech Republic
+420 569 453 149
info@bomma.cz
www.bomma.cz
Instagram bomma_cz
Facebook bommacz

step beyond
Other Bomma Lantern manuals

Popular Lantern manuals by other brands

Clas Ohlson
Clas Ohlson TN-8414 manual

esotec
esotec Float 25 operating instructions

Selux
Selux Connect M60 LED SX 116 Mounting instructions

BEGA
BEGA 84 166 Instructions for use

AS LED Lighting
AS LED Lighting MidPower Line HML-057057 Mounting instructions

Waldmann
Waldmann LINURA.edge LEA Instructions for use

NORTHCLIFFE
NORTHCLIFFE LSW LED Series Installation instruction

V-TAC
V-TAC VT-511S Installation instruction

Endon
Endon Daley instruction manual

Hess
Hess LEDIA GL A Series Installation and operating instructions

Eurotops
Eurotops Flame instruction manual

Extel
Extel SUNLIGHT DETECT Installation and user guide


