Boneco A7056 User manual

A7056 Hygrostat


3
Gebrauchsanweisung (4 – 5)
de
Instructions for use (6 – 7) a
en
Mode d’emploi (8 – 9)
Gebruiksaanwijzing (14 – 15)
Istruzioni per l’uso (12 – 13)
a
a
a
fr
nl
it
Руководство по обслуживанию (10 – 11) a
ru

4
Vorwort
Herzlichen Glückwunsch, dass Sie sich für den Hygrostat A7056 entschieden
haben!
Allgemeines
Mediziner empfehlen eine relative Luftfeuchtigkeit von 40 – 60%.
Dann empfinden wir die Luft in einem Raum als ideal befeuchtet. Und ideal ist
sie dann auch für unsere Gesundheit, für die Tiere und Pflanzen im Raum, für
Möbel, Instrumente und vieles mehr.
Funktionsbeschreibung
Der Hygrostat A7056 wird zur Regulierung von Luftbefeuchtern und Luft-
entfeuchtern verwendet. Der Hygrostat schaltet diese Geräte automatisch an
oder ab je nach programmierter Soll-Luftfeuchtigkeit (Bereich 20 – 90%).
Auf diese Weise werden unnötige Gerätelaufzeiten vermieden. Beachten Sie
hierzu die nachfolgenden Kapitel.
Sicherheitshinweise
• GebrauchsanweisungvorderInbetriebnahmevollständigdurchlesenund
zum späteren Nachschlagen gut aufbewahren.
• DasGerätnuranWechselstromanschliessen–mitSpannunggemässdem
Typenschild am Gerät.
• DasGerätnurinWohnräumenundinnerhalbderspezifiziertentech-
nischen Daten verwenden. Ein nicht bestimmungsgemässer Gebrauch
kann Gesundheit und Leben gefährden.
• KinderkönnendieGefahrenbeimUmgangmitElektrogerätennicht
erkennen. Deshalb Kinder immer beaufsichtigen, wenn sie sich in der
Umgebung des Gerätes aufhalten.
• Personen,diemitderGebrauchsanweisungnichtvertrautsind,sowie
Kinder und Personen unter Medikamenten-, Alkohol- oder Drogeneinfluss,
dürfen das Gerät nicht oder nur unter Aufsicht bedienen.
• DasGerätnieinBetriebnehmen,wenneinKabeloderSteckerbeschädigt
ist, nach Fehlfunktionen des Gerätes oder wenn dieses heruntergefallen ist
oder auf eine andere Art beschädigt wurde.
• DasGerätdarfnurinkomplettzusammengebautemZustandinBetrieb
genommen werden.
• ReparaturenanElektrogerätendürfennurvonFachkräftendurchgeführt
werden. Durch unsachgemässe Reparaturen können erhebliche Gefahren
für den Benutzer entstehen.
• NiemalsdenNetzsteckeramKabelodermitnassenHändenausderSteck-
dose ziehen.
Vor Inbetriebnahme
Bevor Sie den Hygrostaten das erste Mal einsetzen, sollten Sie den ein-
gebauten Akku über Nacht aufladen. Dadurch gehen bei Stromausfall keine
Einstellungen verloren. Stecken Sie dazu den Hygrostaten in eine Netzsteck-
dose OHNE einen Luftbe- oder Entfeuchter anzuschliessen. Nicht in der Nähe
von wärmenden oder kühlenden Quellen positionieren.
de

5
Display- und Funktionstasten-Beschreibung
1. EIN/AUS-Schalter
2. AUF-Schalter
3. AB-Schalter
4. RESET (durch Drücken dieser Taste werden alle Einstellungen gelöscht)
5. LED grün angeschlossenes Gerät ist eingeschaltet
rot angeschlossenes Gerät ist ausgeschaltet
kein LED das angeschlossene Gerät wird NICHT durch den
Hygrostaten reguliert (= nicht programmiert)
6. Modussymbol für Luft-Befeuchter
7. Modussymbol für Luft-Entfeuchter
8. Anzeige Ist-Luftfeuchtigkeit(Zahluntenlinks)
9. Anzeige relative Soll-Luftfeuchtigkeit(Zahluntenrechts)
Einstellung des Betriebsmodus
(Luftbefeuchter oder Luftentfeuchter)
Drücken Sie die Taste solange, bis die LED nicht mehr leuchtet.
Drücken Sie danach gleichzeitig 3 Sekunden die beiden Tasten und
um den entsprechenden Modus zu wählen (siehe Symbole und im
Display).
Einstellung Luftfeuchtigkeitswert
Drücken Sie die Taste . Die LED leuchtet rot und die Modussymbole
und erlöschen. Mit den Pfeiltasten können Sie die von Ihnen
gewünschte SOLL-Luftfeuchtigkeit einstellen.
Inbetriebnahme
ZuerstBetriebsmoduseinstellen.SteckenSiedenNetzsteckerdesgewünsch-
ten Gerätes (Luftbefeuchter oder Luftentfeuchter) in die vorgegebene Öffnung
am Hygrostaten. Nach ein paar Minuten wird das angeschlossene Gerät bei
Unter- oder Überschreitung der eingestellten, relativen SOLL-Luftfeuchtigkeit
an-bzw. ausgeschaltet.
Nachdem das angeschlossene Gerät eingeschaltet hat, leuchtet die LED
«grün». Sie können das angeschlossene Gerät auch vorzeitig ausschalten,
wenn Sie auf die Taste drücken. In diesem Fall leuchtet die LED nicht.
Entsorgung
Übergeben Sie das ausgediente Gerät Ihrem Händler zur fachgerechten Ent-
sorgung. Weitere Entsorgungsmöglichkeiten erfahren Sie von Ihrer Gemeinde-
oder Stadtverwaltung.
Garantie
Die Garantiebestimmungen sind von unserer Landesvertretung festgelegt.
Wenden Sie sich vertrauensvoll an Ihren Fachhändler, wenn am Gerät trotz
strenger Qualitätskontrollen ein Mangel auftritt. Für eine Garantieleistung ist
die Vorlage des Kaufbelegs unbedingt erforderlich.
Rechtliche Hinweise
Das Gerät ist CE-zertifiziert und entspricht den Richtlinien
• 73/23/EWGfürelektrischeSicherheit,
• 89/336/EWGund92/31/EWGfürelektromagnetischeVerträglichkeit.
Technische Änderungen vorbehalten.
Die Gebrauchsanleitung ist urheberrechtlich geschützt.
Technische Daten
Abmessungen(LxBxH) 110x60x40mm
Leergewicht 140g
Netzspannung: 220V – 240V/50Hz,110V/60Hz
(entsprechend Steckerauslegung)
Feuchtigkeitsbereich: 20 % bis 90 %
Genauigkeit: +/–5 %
Messzyklus: alle10Sekunden
Schaltleistung: max.12A/2760W(OhmscheLast)
max.2A/460W(InduktiveLast)
de

6
Foreword
Congratulations on your choice of the Hygrostat A7056!
General information
Physicians recommend a relative humidity level of 40%-60%.
Our sense of well-being then tells us that the humidity of the air in the room
is ideal. And this level is also ideal for our health, for the animals and plants in
the room, for furniture, instruments and much more.
Functional Description
The hygrostat A7056 is used for the regulation of humidifiers and de-
humidifiers. The hygrostat switches these devices off and on automatically
depending on the programmed target air humidity (range 20 – 90%). In
this way, unnecessary running time is avoided. For more information on this,
see the following chapter.
Safety instructions
• Readtheoperatinginstructionscarefullybeforeusingtheapplianceand
keep them for later reference.
• Connecttheunitonlytoalternatingcurrentwithvoltageaccordingtothe
rating label.
• Onlyusetheapplianceindoorsandwithinthespecifiedtechnicaldata.
If used for a purpose for which it is not intended it could cause serious
danger to health and life.
• Childrencannotrecognisethehazardsassociatedwiththeusageof
electrical appliances. For this reason, always supervise children when
they are near the unit.
• Personswhoarenotfamiliarwiththeoperatinginstructions,aswellas
children and persons under the influence of medication, alcohol, or drugs
are not permitted to operate the appliance, or are only permitted to operate
it under supervision.
• Neverusetheapplianceifthereisanydamagetotheapplianceorcable,
after malfunction, after the appliance has been dropped or damaged in any
other way.
• Onlyoperatetheunitwhenitiscompletelyassembled.
• Repairsofelectricalappliancesareonlytobemadebyqualifiedservice
engineers. Improper repair work can cause considerable danger to the
user.
• Neverpulltheplugoutofthesocketbythecableorwithwethands.
Before Commissioning
Before using the hygrostat for the first time, you should charge the built-in
storage battery overnight. This prevents settings from being lost during
power failures. Plug the hygrostat into a plug socket WITHOUT connecting a
humidifier or dehumidifier. Do not do this near any warming or cooling sources.
a
en

7
Description of Display and Function Buttons
1. ON/OFF switch
2. UP control
3. DOWN control
4. RESET (pressing this key deletes all settings)
5. LED
green connected device is switched on
red connected device is switched off
noLED theconnecteddeviceisNOTregulatedbythehygrostat
(= not programmed)
6. Mode symbol for humidifier
7. Mode symbol for dehumidifier
8. Display – relative ACTUAL humidity (figure bottom left)
9. Display – relative target humidity (figure bottom right)
Setting of the Operating Mode
(Humidifier or Dehumidifier)
Press the button until the LED is no longer lit. Then press the two buttons
and simultaneously during 3 seconds in order to select the appropriate
mode (see symbols and in the display).
Setting of Humidity Value
Press the button . The LED lights up red and the mode symbols and
go out. With the arrow keys ,youcansettheTARGEThumiditythat
you wish.
Commissioning
First, switch to operational mode. Stick the mains plug of the desired device
(humidifier or dehumidifier) into the provided opening on the hygrostat. After
a few minutes, the connected device is switched on or off when the humidity
exceedsorfallsbelowthesetrelativeTARGEThumidity.
a
en
After the connected device is switched on, the LED lights up «green». You can
also switch the connected device off early if you press on the key . In this
case, the LED does not light up.
Disposal
Returnyourwornoutappliancetoyourdealerforproperdisposal.Youcan
obtain information on other ways to dispose of the unit from your local council.
Warranty
The warranty conditions are defined by our representative in the country
ofsale.Pleasecontactyourdealerif,despitestrictqualitycontrol,your
appliance becomes defective. You must present the receipt when making a
claim under the warranty.
Legal information
The appliance is CE-certified and complies with the Directives
• 73/23/EWGconcerningforelectricalsafety
• 89/336/EWGand92/31/EWGconcerningelectromagneticcompatibility
The right to make technical modifications is reserved.
The instructions for use are protected by copyright.
Technical data
Dimensions(LxWxH) 110x60x40mm
Weight 140g
Mainsvoltage 220V – 240V/50Hz,110V/60Hz
(corresponding to plug arrangement)
Humidity range 20 % to 90 %
Accuracy +/–5 %
MeasuringCycle every10seconds
Breakingcapacity max.12A/2760W(ohmresistiveload)
max.2A/460W(inductiveload)

8
Avant-propos
Félicitations,avecleHygrostatA7056,vousavezchoisilebonproduit!
Remarques générales
Les médecins recommandent une humidité relative de l‘air située entre
40et60%.C’estàcetteconditionquenousressentonsl’atmosphèred’un
espace comme agréablement humide. Il est alors idéal aussi pour notre santé,
pour les animaux et les plantes d’intérieur, pour les meubles, les appareils et
encore davantage.
Description du fonctionnement
L’hygrostat A7056 est utilisé pour la régulation d’humidificateurs et de
déshumidificateur d’air. L’hygrostat met l’appareil en marche ou l’arrête
automatiquementenfonctiondel’humiditédel’airprogrammée(plage
20–90%).Decettemanière,vousévitezdefairefonctionnerinutilementles
appareils.Veuillezlirepourcefaireleschapitressuivants.
Consignes de sécurité
• Etudiezlesinstructionsdeservicecomplètesavantlamiseenservice,
etgardez-lesbienpourdesconsultationsultérieures.
• Nebranchezl’appareilqu’aucourantalternatif–latensiondoit
correspondreàcelleindiquéesurlaplaquesignalétiquedel’appareil.
• N’utilisezl‘appareilquedansdeslocauxd’habitationetdansles
conditionspréciséesdanslesspécificationstechniques.Uneutilisation
non-conforme aux spécifications peut mettre en danger la santé et la vie.
• Lesenfantsnepeuventpasencoreconnaîtrelesdangersrésultantde
lamanipulationd’appareilsélectriques.Nelaissezpaslesenfantssans
surveillancelorsqu’ilssontàproximitédel‘appareil.
• Lespersonnesquinesontpasfamiliariséesaveclemoded’emploi,de
mêmequelesenfantsoulespersonnessousl’influencedemédicaments,
d’alcool ou de drogues, ne doivent en aucun cas manipuler l’appareil ci ce
n’est sous surveillance.
• Nemettezjamaisl’appareilenservicequanduncâbleouunepriseest
détérioré,niaprèsdesdysfonctionnementsouaprèsunechuteouautre
dommagequelconque.
• L‘appareilnedoitêtremisenservicequ’entièrementassemblé.
• Lesréparationsd’appareilsélectriquesnedoiventêtreexécutéesque
par des experts autorisés. Des réparations non professionnelles peuvent
causer des dangers considérables pour l’utilisateur.
• Nedébranchezjamaislapriseausecteurentirantsurlecâbleoulorsque
vos mains sont mouillées.
Avant la mise en service
Avantdepouvoirutiliserpourlapremièrefoisl’hygrostat,vousdevezcharger
la batterie fournie pendant une nuit. Ceci permet de garder en mémoire les
réglagesmêmeencasdecoupuredecourant.Insérezl’hygrostatdanslaprise
decourantSANSyraccorderd’humidificateuroudedéshumidificateurd’air.
Neleplacezpasàproximitéd’unesourcechauffanteouréfrigérante.
a
fr

9
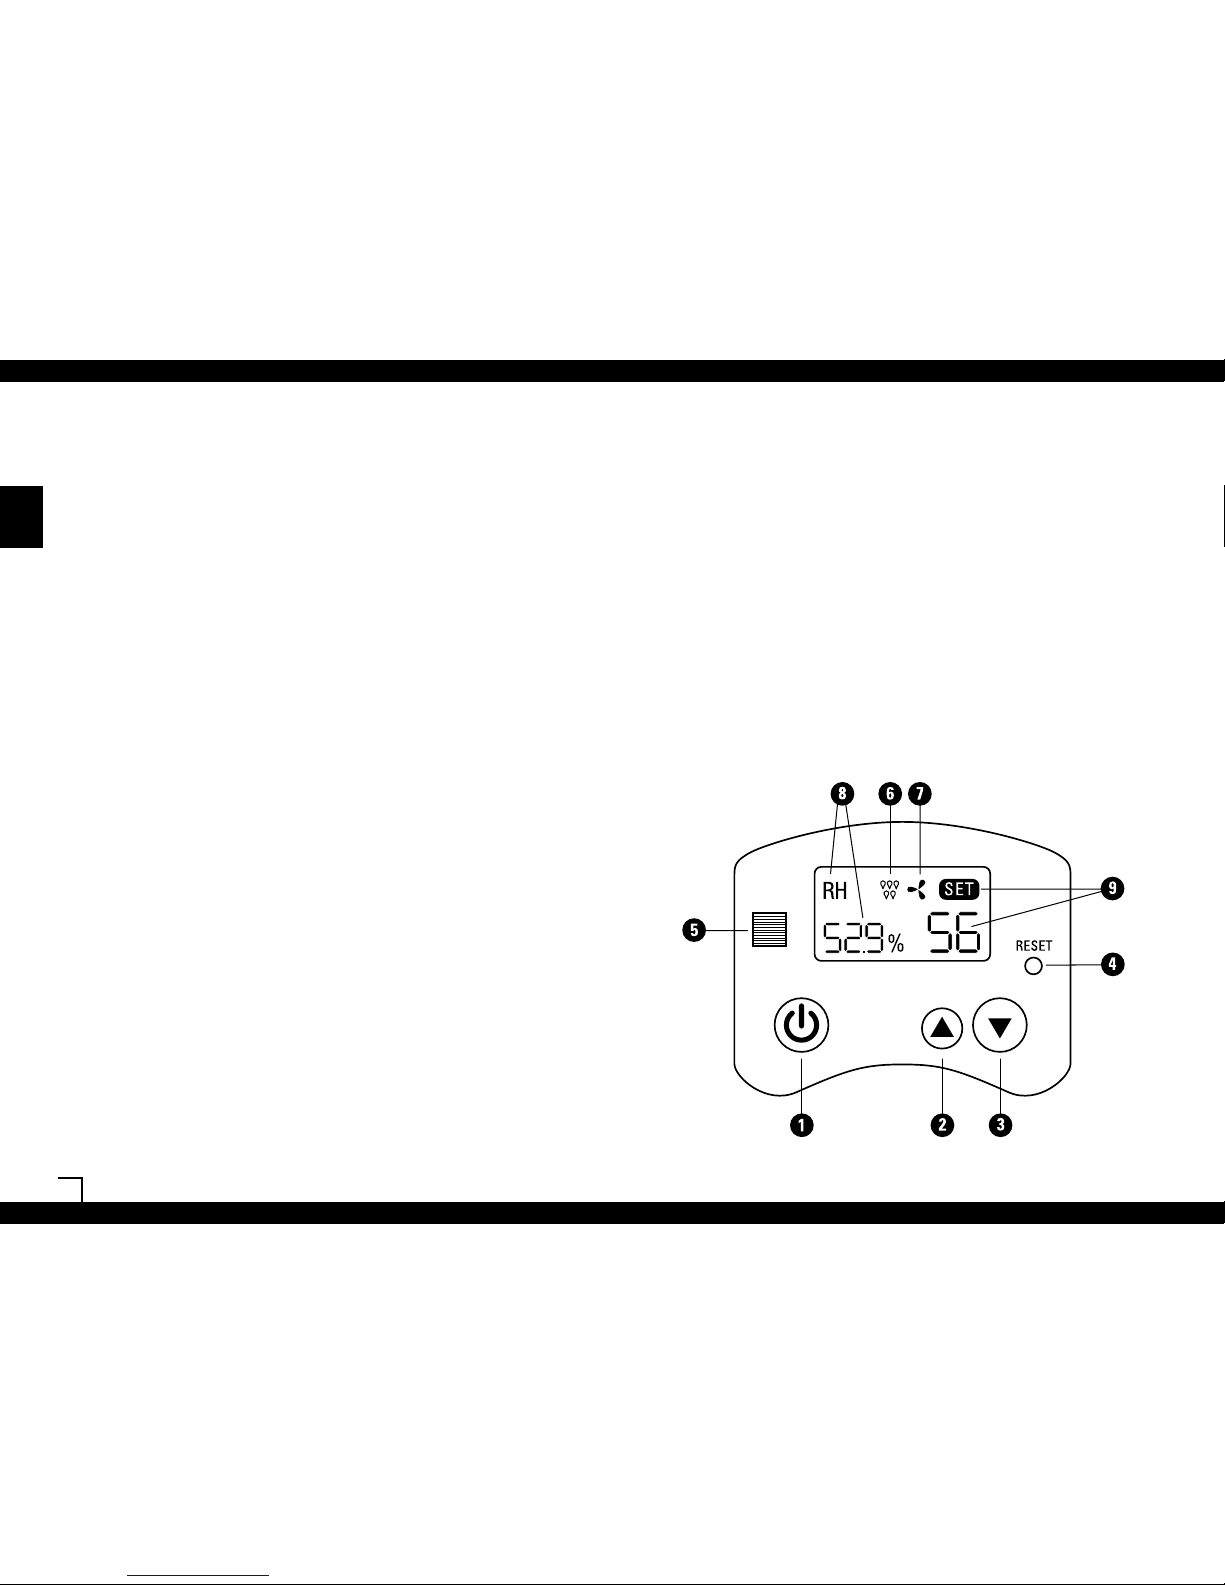
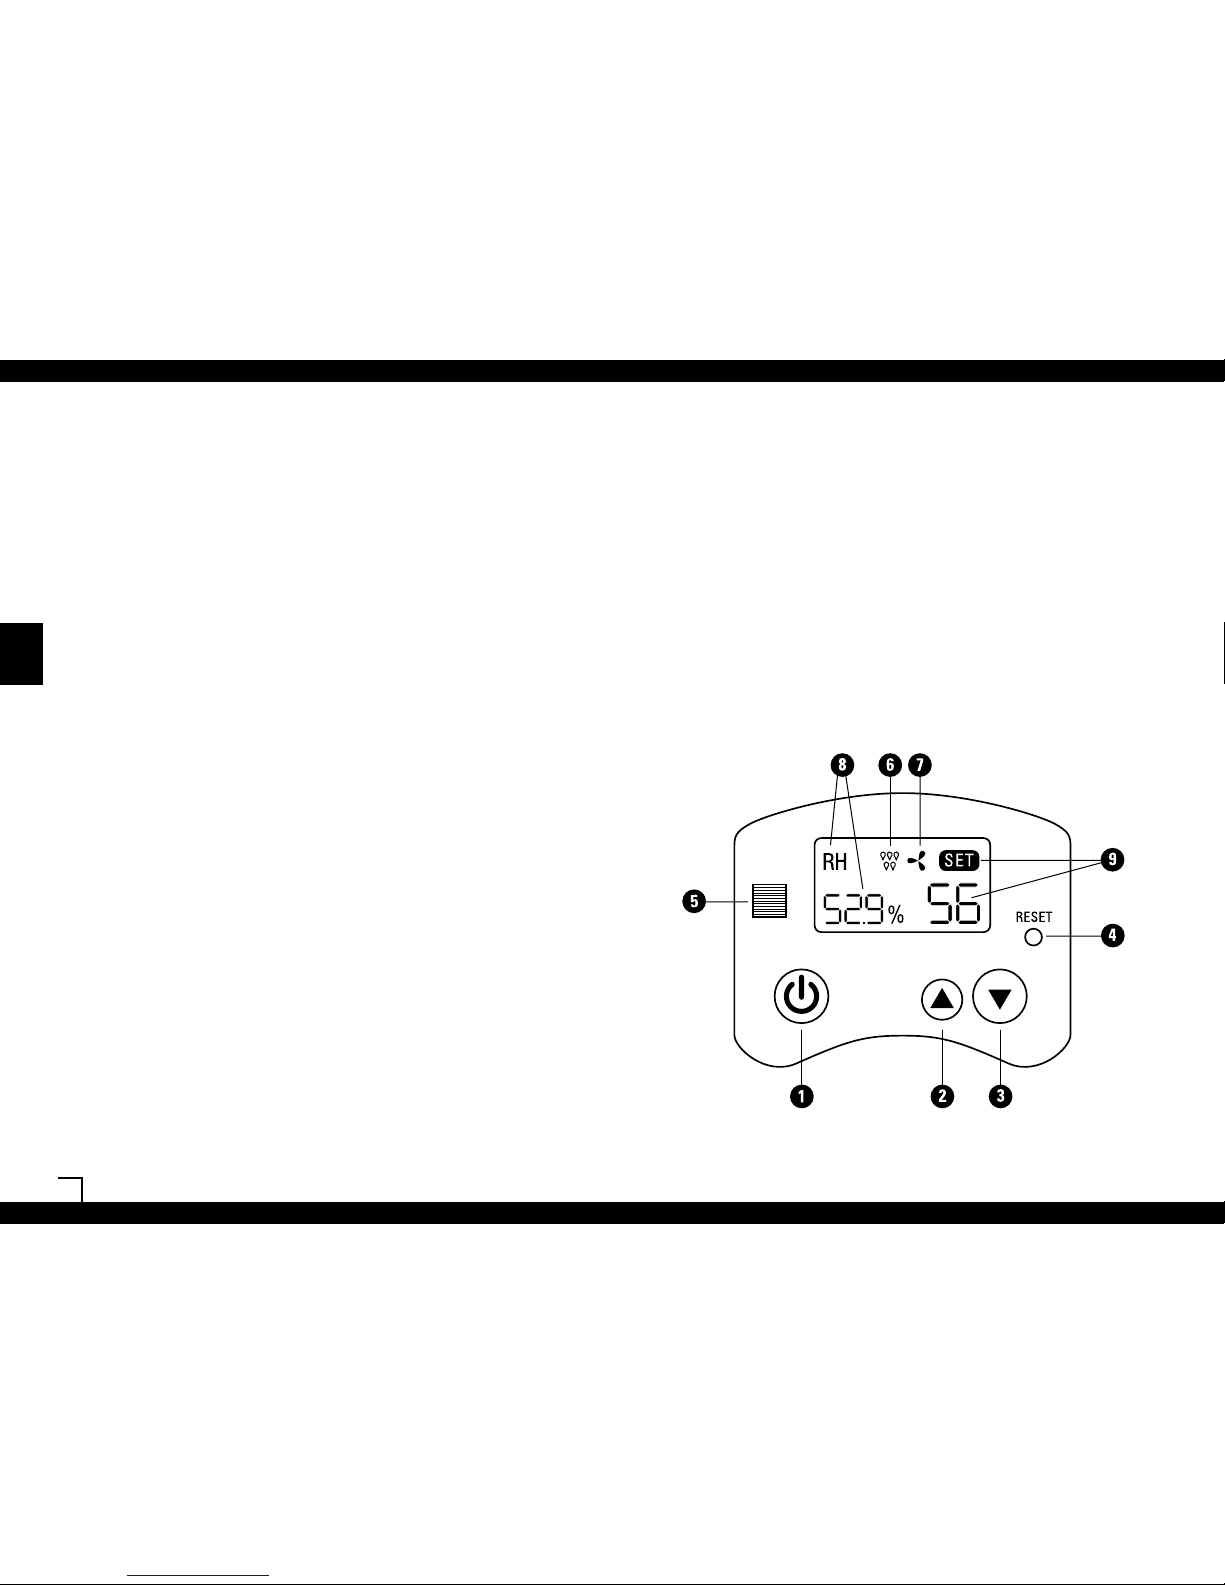
Description de l’écran et des touches de fonction
1. Interrupteur MARCHE/ARRÊT
2. Bouton «VERS LE HAUT»
3. Bouton «VERS LE BAS»
4. RESET
(enappuyantsurcettetouche,vouspouvezeffacertouslesréglages)
5. Témoin lumineux
témoin vert l’appareil connecté est en marche.
témoin rouge l’appareil connecté est hors service
témoin éteint l’appareil connecté n’est PAS régulé par le biais de
l’Hygrostat (= pas programmé)
6. Symbole pour un humidificateur d’air
7. Symbole pour déshumidificateur d’air
8. Affichage – humidité relative de l’air réelle (chiffre en bas à gauche)
9. Affichage – humidité relative de l’air programmée (chiffre en bas à droite)
Réglage du mode de fonctionnement
(déshumidificateur ou humidificateur)
Maintenezlatouche appuyéejusqu’àcequeletémoinlumineuxs’éteigne.
Appuyezensuitesimultanémentpendant3secondessurlestouches
et demanièreàsélectionnerlemodedefonctionnementsouhaité
(cf. symboles et à l’écran).
Réglage de l’humidité de l’air souhaitée
Appuyezsurlatouche . Le témoin lumineux s’allume et luit rouge. Les
symbolesetdisparaissent.Vouspouvezalorsréglerl’humidité
relativedel’airsouhaitéeàl’aidedesflèches .
Mise en service
Mettred’abordlemodedefonctionnement.Branchezlaprisesecteurdel’appareil
souhaité (humidificateur ou déshumidificateur d’air) dans l’orifice de l’hygrostat
prévuàceteffet.Aprèsquelquesminutes,sil’humiditérelativedel’airréelleest
supérieure ou inférieure à l’humidité, alors l’appareil connecté se met en route
ou s’arrêtera. Quand l’appareil connecté est en marche, le témoin lumineux luit
vert.Vousavezégalementlapossibilitéd’éteindreàtoutmomentl’appareilcon-
necté en appuyant sur la touche . Dans ce cas, le témoin lumineux est éteint.
Elimination
Retournezl‘appareiluséàvotrecommerçantpouruneéliminationcon-
formeàlalégislationenvigueur.Renseignez-voussurd’autrespossibilités
d’éliminationauprèsdevotreadministrationmunicipale.
Garantie
Lesrèglementsdegarantiesontdéterminésparnotrereprésentantnational.
Aucasoù–endépitdescontrôlesdequalitéstricts–undéfautsurgirait,
adressez-vousenconfianceàvotredistributeurspécialiste.Pourchaque
prestation de garantie, il est indispensable de présenter la facture.
Mentions légales
L‘appareil a obtenu la certification CE et est conforme aux directives européennes :
• 73/23/CEErelativeàlasécuritédesappareilsélectriques
• 89/336/CEEet92/31/CEErelativesàlacompatibilitéélectromagnétique.
Lefabricantseréserveledroitd’apporterdesmodificationsd’ordretechnique
à ses appareils. Le présent mode d’emploi est couvert par les lois relatives aux
droits d’auteur.
Spécifications techniques
Dimensions(LxLxH) 110x60x40mm
Poids 140g
Tensiond’alimentation 220V – 240V/50Hz,110V/60Hz
(selon les spécifications de la fiche)
Plages d’humidité 20 % à 90 %
Précision +/–5 %
Intervallesdemesure toutesles10secondes
Capacitédecoupure 12A/2760Waumaximum(chargeohmique)
2A/460Waumaximum(chargeinductive)
a
fr

10
Предисловие
Примите сердечные поздравления с тем, что Вы решились приобрести гигростат
A7056!
Общее
Врачи рекомендуют относительную влажность воздуха 40 – 60%.
В этом случае мы ощущаем воздух в помещении как идеально увлажненным.
И тогда он также становится идеальным для нашего здоровья, для животных и
растений в помещении, для мебели, инструментов и многого другого.
Описание функционирования
Гигростат A7056 используется для регулирования воздухоувлажнительных
установок и осушителей воздуха. Гигростат автоматически включает или
выключает эти устройства в зависимости от запрограммированной номинальной
влажности воздуха (область 20 – 90%). Таким образом избегают ненужной
продолжительности работы устройства. Для этого обратите Ваше внимание на
последующие главы.
Указания по безопасности
• Передвводомвэксплуатациюполностьюпрочестьинструкциюпо
эксплуатацииисохранитьвнадежномместедлядальнейшейсправки.
• Подключатьприбортолькокпеременномутоку–снапряжением в
соответствии с фирменной табличкой на приборе.
• Использоватьприбортольковжилыхпомещенияхивпределах
специфицированныхтехническихданных.Использованиенепоназначению
может подвергнуть опасности здоровье и жизнь.
• Детимогутнераспознатьопасности при обращении с электроприборами.
Поэтому нужно всегда присматривать за детьми, если они находятся
поблизости от прибора.
• Непозволяетсяобслуживатьприборилиможнообслуживатьтолькопод
наблюдениемлицам,плохознакомымсинструкциейпоэксплуатации, а
такжедетямилицам,находящимсяподвлияниеммедикаментов,в
состоянии алкогольного опьянения или под воздействием наркотиков.
• Никогданедопускатьприборвэксплуатацию,еслиповрежденкабельили
штепсельнаявилка,послеошибочныхфункцийприбора,или если он упал
или был поврежден каким-либо иным способом.
• Приборразрешаетсяприниматьвэксплуатациютольковсостоянии
комплектного монтажа.
• Разрешаетсятолькоспециалистампроизводитьремонтныеработыв
электроприборах.Вследствиенеквалифицированныхремонтныхработмогут
возникнуть серьезные опасности для потребителя.
• Никогданевытаскивайтештекеризштепсельнойрозеткизакабельили
мокрыми руками.
Перед вводом в эксплуатацию
Прежде чем Вы в первый раз используете гигростат, Вы должны зарядить в
течение ночи встроенный аккумулятор. Вследствие этого не будут потеряны
установки при отключении электросети. Для этого вставьте гигростат в сетевую
штепсельную розетку БЕЗ подключения воздухоувлажнительной установки
илиосушителявоздуха.Непозиционироватьвблизиисточниковтеплаили
охлаждения.
a
ru

11
Описание дисплейных и функциональных кнопок
1. Переключатель «включено - выключено»
2. Выключатель «Включение»
3. Выключатель «Выключение»
4. ПЕРЕЗАГРУЗКА (посредством нажатия этой кнопки стираются все установки)
5. Светоизлучающий диод
зеленый подключенный прибор включен
красный подключенный прибор выключен
светоизлучающийдиоднегорит подключенныйприборНЕ
регулируется гигростатом (= не
запрограммирован)
6. Режимный символ для осушителя воздуха
7. Режимный символ для воздухоувлажнительной установки
8. Идикация – относительная ФАКТИЧЕСКАЯ влажность воздуха (число внизу
слева)
9. Идикация – относительная номинальная влажность воздуха (число внизу
справа)
Установление режима эксплуатации
(воздухоувлажнительной установки или осушителя воздуха)
Держите нажатой кнопку в течение того времени, пока светоизлучающий
диод больше не будет светиться. Затем нажмите одновременно в течение 3
секунд обе кнопки и , чтобы выбрать соответствующий режим (смотри
символы и на дисплее.
Установление значения влажности воздуха
Нажмитенакнопку . Светоизлучающий диод светится красным
цветомирежимныесимволыистираются.Посредствомклавишисо
стрелкой Вы можете установить номинальную влажность воздуха,
желаемую Вами.
Ввод в эксплуатацию
Сначалаустановитьрежимэксплуатации.Вставьте штекер желаемого
прибора (воздухоувлажнительной установки или осушителя воздуха) в отверстие,
предназначенного для него, на гигростате. Через пару минут подключенный
прибор будет включаться или выключаться при сокращении или превышении
установленной, относительной номинальной влажности воздуха.
После того как включился подключенный прибор, загорится «зеленый»
светоизлучающий диод. Вы также можете подключенный прибор
преждевременно выключить, если нажмете на кнопку . В этом случае
светоизлучающий диод не горит.
Устранение отходов
Передайтеприбор,отслужившийсвойсрок,Вашемупродавцудля
квалифицированного устранения отходов. О других возможностях устранения
отходовсправляйтесьуВашегокоммунальногоилимуниципального
управления.
Гарантия
Гарантийные условия устанавливаются нашим представительством страны.
Доверительно обращайтесь к Вашему специализированномупродавцу,если
несмотря на строгий контроль качества возникнет дефект в приборе. Для
оказаниягарантийныхуслугнепременнотребуетсяпредъявлениеквитанциио
покупке.
Правовые указания
ПриборсертифицированЕвропейскимСообществомисоответствует
руководящим линиям
• 73/23/Европейскогоэкономическогосообществапоэлектробезопасности,
• 89/336/Европейскогоэкономическогосообществаи92/31/Европейского
экономического сообщества по электромагнитной совместимости.
Оставлено за собой право на технические изменения
Инструкцияпоэксплуатациизащищенаавторскимправом.
Технические данные
Габариты(длxшxв) 110x60x40мм
Весвпорожнемсостоянии 140гр
Сетевоенапряжение 220V–240V/50Hz,110V/60Hz
(соответственно штепсельному конструктивному исполнению)
Область влажности от 20% до 90%
Точность +/–5%
Измерительныйцикл каждые10секунд
Работапереключения максимально12A/2760W(омическаянагрузка)
максимально2A/460W(индуктивнаянагрузка)
a
ru

12
Prima di tutto
Ci congratuliamo con Voi per la scelta di un igrostato A7056!
Informazioni generali
I medici raccomandano di mantenere un livello d’umidità tra il 40 ed il 60%.
Ilnostrosensodibenesserecidicequandoinunambientel’umiditàdell’aria
èideale:idealeperlanostrasalute,perglianimalielepiante,imobili,gli
strumenti musicali e tanto altro.
Descrizione funzionale
L’igrostatoA7056serveperilcomandoelaregolazionediumidificatoriedeu-
midificatori.Ildispositivoattivaedisattivaautomaticamentequestiapparecchi
in base al valore impostato di umidità dell’aria (nell’intervallo tra 20% e 90%),
evitandodimantenerliinutilmenteinfunzione.Permaggioriinformazionisu
questopuntoconsultareicapitoliseguenti.
Prescrizioni di sicurezza
• Leggereattentamenteleistruzionid’impiegoprimadiutilizzare
l’apparecchio e conservarle per poterle consultare in futuro.
• Alimentarel’apparecchioesclusivamenteconcorrentealternataalla
tensione riportata sulla targhetta.
• Utilizzarel’apparecchiosoloall’internodiambientidomesticienel
campo d’impiego stabilito dalle specifiche tecniche. L’uso improprio
dell’apparecchio può provocare danni anche fatali alle persone.
• Ibambininonsonoconsapevolideirischiassociatiall’impiegodegli
apparecchielettrici,perciòoccorrenonperderlimaidivistaquandosono
vicini all’apparecchio.
• L’utilizzodell’apparecchiodeveesserevietato,opermessosolosotto
controllo, alle persone che non ne conoscono le modalità d’impiego, ai
bambini ed alle persone sotto l’influsso di medicine, alcol o droghe.
• Nonutilizzaremail’apparecchiosequestoodilcavod’alimentazioneo
la spina sono danneggiati, oppure dopo un guasto o se l’apparecchio ha
subitounurtoperunacadutaodèstatodanneggiatoinqualunque
maniera.
• Utilizzarel’apparecchiosoloseessoècompletamentemontato.
• Leriparazionidegliapparecchielettricidevonoessereeffettuatesoloda
personalequalificato.Riparazioninoneseguitearegolad’artepossono
causaregravipericoliperl’utilizzatore.
• Nonestrarremailaspinadallapresatirandoilcavooconlemanibagnate.
Prima della messa in servizio
Primadiutilizzarel’igrostatoperlaprimavoltaèopportunocaricareperuna
nottelabatteriaincorporata,inmodocheleimpostazioninonvadanoperdute
nelcasod’interruzionedell’alimentazione.Alloscopocollegarel’igrostatoad
unapresa,SENZAcollegarloadunumidificatoreodeumidificatore.Nonposizi-
onare l’igrostato vicino a sorgenti di calore o apparecchi di raffreddamento.
it

13
Descrizione del display e dei comandi
1. Interruttore Acceso/Spento
2. Tasto SÙ
3. Tasto GIÙ
4. RESET(l’azionediquestopulsanteazzeratutteleimpostazioni)
5. LED verde l’apparecchiocollegatoèinfunzione
rosso l’apparecchiocollegatoèdisattivato
spento l’apparecchiocollegatoNONècomandatodall’igrostato
(l’igrostatononèprogrammato)
6. Indicazione della modalità umidificatore
7. Indicazione della modalità deumidificatore
8. Display – umidità relativa EFFETTIVA(indicazioneinbassoasinistra)
9. Display – umidità relativa desiderata(indicazioneinbassoadestra)
Selezione della modalità di funzionamento
(Umidificatore / deumidificatore)
Premere il pulsante finché il LED si spegne.
Successivamente tenere premuti contemporaneamente i due pulsanti e
persceglierelamodalitàdifunzionamentodesiderata(osservaresuldisplayi
simboli e ).
Impostazione del valore di umidità
Premere il pulsante . Il LED rosso si accende ed i simboli della modalità
difunzionamentoesispengono.Impostareilvaloredesideratodi
umidità agendo sui tasti con la freccia .
Messa in servizio
Anzituttoattivarel’igrostatocomesopradescritto.Inserirelaspina
d’alimentazionedell’apparecchiodacomandare(umidificatoreodeumi-
dificatore)nellapresapresentesull’igrostato.Nelcorsodialcuniminuti
l’apparecchio collegato all’igrostato viene attivato o disattivato in base alla
differenzatral’umiditàeffettivaequellaimpostata.
Quandol’apparecchiocollegatoèinfunzioneilLEDverderestaacceso.
Selosidesideraèpossibiledisattivaremanualmentel’apparecchiocollegato
premendo il pulsante . In tal caso il LED si spegne.
Smaltimento
Consegnare l’apparecchio a fine vita al rivenditore, che provvederà ad uno smal-
timentocorretto.Inalternativaattenersialleprescrizionidelleautoritàlocali.
Garanzia
Lecondizionidigaranziasonodefinitedall’importatorenelPaeseincui
l’apparecchioèstatovenduto.Se,nonostanteilnostroseverocontrollodi
qualità,l’apparecchiodovessepresentaredifetti,contattareilrivenditore.
Perrichiederel’applicazionedellagaranziaoccorrepresentarelaprova
d’acquisto(scontrinoofattura).
Avvertenze legali
L’apparecchioportailmarchioCEedèconformealleDirettive
• 73/23/CEsullasicurezzaelettrica,
• 89/336/CEe92/31/CEsullacompatibilitàelettromagnetica.
Con riserva di modifiche tecniche.
Lepresentiistruzioniperl’usosonoprotettedadirittid’autore.
Dati tecnici
Dimensioni(LxLxA) 110x60x40mm
Pesovuoto 140g
Tensione di rete 220V – 240V/50Hz,110V/60Hz
(corrispondente al tipo di spina)
Campo d’umidità da 20% a 90%
Precisione +/–5 %
Ciclodimisura ogni10secondi
Portata max.12A/2760W(caricoresistivo)
max.2A/460W(caricoinduttivo)
it

14
Voorwoord
GefeliciteerdmetuwkeuzevandehygrostaatA7056!
Algemene informatie
Artsen adviseren een relatieve luchtvochtigheid van 40%-60%.
Ons gevoel van welbevinden vertelt ons dan, dat de vochtigheid van de lucht
inderuimteideaalis.Endezewaardeisookideaalvooronzegezondheid,
voor dieren en planten in de ruimte, meubels, instrumenten en nog veel meer.
Beschrijving van de werking
De hygrostaat A7056 wordt gebruikt voor het regelen van bevochtigers en
ontvochtigers.Dehygrostaatschakeltdezeapparatenautomatischinofuit,
afhankelijkvandegeprogrammeerdegewensteluchtvochtigheid(bereik
20-90%).Opdezewijzewordtvoorkomendathetapparaatonnodiginbedrijf
is.Zievoormeerinformatiehieroverhetvolgendehoofdstuk.
Veiligheidsinstructies
• Leesdebedieningsinstructieszorgvuldigdooralvorenshetapparaatte
gebruikenenbewaardeinstructiesomzelateropnieuwtekunnen
raadplegen.
• Sluitdeeenheiduitsluitendaanopwisselstroommeteenvoltagedat
overeenkomtmetdewaardeophettypeplaatje.
• Gebruikhetapparaatuitsluitendbinnenshuisenneemdaarbijdegespeci-
ficeerde technische data in acht. Indien het apparaat wordt gebruikt voor
eendoelwaarvoorhetnietbestemdis,kanernstiggevaarvoorgezondheid
en leven ontstaan.
• Kinderenkunnendegevarenwaarmeehetgebruikvanelektrische
apparatengepaardgaat,nietbeoordelen.Omdieredendientualtijd
toezichttehoudenopkinderendiezichindebuurtvandeeenheidbevinden.
• Personendienietvertrouwdzijnmetdebedieningsinstructies,evenals
kinderenenpersonendiemedicijnen,alcohol,ofdrugshebbengebruikt,
mogenhetapparaatniet,ofuitsluitendondertoezicht,bedienen.
• Gebruikhetapparaatnooitindienhetapparaatofdenetkabelbeschadigd
is,ofnaeenstoring,nadathetapparaatgevallenisofopeenanderewijze
beschadigd is.
• Bedienhetapparaatuitsluitendwanneerhetvollediggemonteerdis.
• Reparatiesaanelektrischeapparatenmogenuitsluitenddoordaarvoor
gekwalificeerde onderhoudsmonteurs worden uitgevoerd. Verkeerd
uitgevoerdereparatieskunnenaanzienlijkgevaarvoordegebruikertot
gevolg hebben.
• Trekdestekkernooitaandekabelofmetnattehandenuithetstopcontact.
Alvorens het apparaat in gebruik te nemen
Alvorens de hygrostaat voor de eerste maal te gebruiken, dient u de inge-
bouwdebatterijeennachtlangopteladen.Ditvoorkomtdatinstellingen
verloren gaan in geval van stroomuitval. Sluit de hygrostaat met de stekker
opeenstopcontactaanZONDERereenluchtbevochtigerof-ontvochtigerop
aan te sluiten Plaats het apparaat niet in de buurt van een verwarmings- of
koelingsbron.
nl

15
Beschrijving van display en bedieningsknoppen
1. AAN/UIT schakelaar
2. HOGER regeling
3. LAGER regeling
4. RESET(doordezeknopintedrukken,wordenalleinstellingengewist)
5. LED groen aangesloten apparaat is ingeschakeld
rood aangesloten apparaat is uitgeschakeld
geenLED aangeslotenapparaatwordtNIETdoorhygrostaat
geregeld (= niet in gebruik)
6. Functiesymbool voor luchtbevochtiger
7. Functiesymbool voor luchtontvochtiger
8. Display – WERKELIJKE relatieve vochtigheid (afbeelding linksonder)
9. Display – GEWENSTE relatieve vochtigheid (afbeelding rechtsonder)
Instellingen van de bedieningsfunctie
(Bevochtiger of Ontvochtiger)
Druk op de knop totdat de LED niet langer brandt. Druk vervolgens
gelijktijdiggedurende3secondenopdetweeknoppen en de
gewenstefunctietekiezen(ziesymbolenenindedisplay).
Vochtigheidswaarde instellen
Druk op de knop . De LED gaat rood branden en de functiesymbolen
engaanuit.Metdepijltoetsen en kuntudeGEWENSTE
vochtigheid instellen.
In bedrijf stellen
Schakel eerst de bedieningsfunctie in. Sluit de voedingsstekker van het
gewenste apparaat (bevochtiger of ontvochtiger) aan op de daarvoor bestemde
aansluitingvandehygrostaat.Naenkeleminutenwordthetaangesloten
apparaat in- dan wel uitgeschakeld wanneer de vochtigheid de ingestelde
GEWENSTErelatievevochtigheidoverschrijdt,danwelwanneerdevochtigheid
daalttotbenedendeingesteldeGEWENSTErelatievevochtigheid.
Nadathetaangeslotenapparaatwordtingeschakeld,gaatdeLED«groen»
branden.Ukunthetaangeslotenapparaatookvoortijdiguitschakelendoorop
de knop te drukken. In dat geval gaat de LED niet branden.
Afvoeren
Breng uw versleten apparaat terug naar uw dealer voor een correcte afvoer
vanhetapparaat.Neemvoorinformatieoveranderemanierenomdeeenheid
af te voeren contact op met de milieu-afdeling van uw gemeente.
Garantie
Degarantievoorwaardenwordenbepaalddooronzevertegenwoordigerin
hetlandvanverkoop.Neemcontactopmetuwdealerindienuwapparaat,
ondanksonzestriktekwaliteitscontrole,defectraakt.Udientderekeningte
overleggenbijhetindienenvaneengarantieclaim.
Wettelijke bepalingen
HetapparaatisCE-gecertificeerdenvoldoetaandeRichtlijnen
• 73/23/EWGbetreffendeelektrischeveiligheid,
• 89/336/EWGen92/31/EWGbetreffendeelektromagnetischecompatibiliteit.
Technischewijzigingenvoorbehouden.
Opdegebruiksaanwijzingrustauteursrecht.
Technische gegevens
Afmetingen(LxBxH) 110x60x40mm
Leeggewicht 140g
Netspanning 220V – 240V/50Hz,110V/60Hz
(overeenkomstig gebruikte aansluiting)
Vochtigheidsbereik 20% tot 90%
Nauwkeurigheid +/–5 %
Meetcyclus elke10seconden
Uitschakelvermogen max.12A/2760W(ohmresistievebelasting)
max.2A/460W(inductievebelasting)
nl

V-02
AIR-O-SWISS and BONECO are registered trademarks of PLASTON Group, Switzerland
www.airoswiss.com
www.boneco.com
Table of contents
Languages: