BonsenKitchen VS3802 User manual

2
Introduction
Congratulations on the purchase of this modern and high-quality product. This
instruction manual contain is important information on safety, usage and disposal.
Before using the product, familiarize yourself with all handling and safety guidelines.
This appliance may only be used as described and for the purposes indicated. Please
also pass these operating instructions on to any future owner(s).
Safety Instructions
Always abide by the following safety rules and instructions when using electrical
appliances and read these instructions carefully before using the vacuum sealer.
Read all instructions
Do not touch hot surfaces Use handles or knobs.
To protect against electric shock do not immerse cord or main unit in water or other
liquid.
Close supervision is necessary when any appliance is used by or near children.
Unplug from outlet when not in use and before cleaning.
Do not operate any appliance with a damaged cord or plug or after the appliance
malfunctions, or has been damaged in any manner. Contact customer service for
examination, repair or adjustment.
Do not use outdoors.
Do not let cord hang over edge of table or counter, or touch hot surfaces.
Do not place on or near a hot gas or electric burner, or in a heated oven.
Do not open the appliance cover during operations.
Always ensure the upper/bottom cover in correct location during operations.
This product is only authorized for domestic use and not for commercial or industrial
purposes. It is only intended for applications described in these instructions.
This vacuum sealer may be used by children aged 8 years old and over if they are
supervised by an adult and have been told how to use the appliance safely and are
aware of potential risks.

3
Cleaning and maintenance may not be carried out by children unless they are 8
years old or older and are supervised.
Children must not play with the vacuum sealer.
WARNING: Do not immerse the vacuum sealer in water or other liquids when cleaning
it. If the supplied power cord is damaged, it should be replaced by a qualified technician
in order to avoid a hazard
SAVETHESE INSTRUCTONS
OPERATING INSTRUCTIONS
If the SUPPLY CORD is damaged, it must be replaced by the manufacturer, its
service agent or similarly qualified person in order to avoid a hazard.
A short power-supply cord is to be provided to reduce the risk resulting from
becoming entangled in or tripping over a longer cord.
Longer extension cords are available and may be used if care is exercised in their
use.
If a extension cord is used,
1) The marked electrical rating of the extension cord should be at least as great as
the electrical rating of the appliance;
2) If the appliance is of the grounded type, the extension cord should be a
grounding-type 3-wire cord; and
3 ) The longer cord should be arranged so that it will not drape over the countertop or
table top where it can be pulled on by children or tripped over unintentionally.
Placement
Always place the vacuum sealer away from the edge of the countertop
Make sure the vacuum sealer is placed on a firm, flat surface.
Do not use the vacuum sealer outdoors or near water
WARNING: Do not place the vacuum sealer onto a metal tray or metal surface when
in use.
Personal Safety
WARNING: To protect against fire, electric shock and personal injury, do not immerse
the plug and vacuum sealer in water or any other liquid.

4
WARNING: Misuse of the vacuum sealer can cause personal injury.
Disconnect the vacuum sealer from power before cleaning and not in use.
Allow the vacuum sealer to cool down before putting on or taking off parts and
before cleaning.
Do not move the vacuum sealer while it is switched on.
Other Safety Considerations
Only use officially-provided attachments and accessories.
Do not use the vacuum sealer for any use other than its intended purpose.
Keep the vacuum sealer away from heat sources.
When using the vacuum sealer, make sure the lid is properly in place and secure
before operation.
CAUTION: To prevent damage to the vacuum sealer, do not use water or any liquid
when cleaning.
Disposal of packaging materials
The packaging protects the appliance from damage during carriage.
The packaging materials have been selected for their environmental friendliness and
ease of disposal, and are therefore recyclable.
Returning the packaging to the materials cycle conserves raw materials and reduces the
amount of waste that is generated. Dispose of packaging materials that are no longer
needed in accordance with applicable local regulations.
NOTE
►If possible, keep the original packaging during the warranty period so that the device
can be properly packed for returning in the event of a warranty claim.
Scope Delivery
The appliance is supplied with the following components as standard:
1x Vacuum Sealer
1x Roll Vacuum Bag
5x vacuum Bags (7.87*11.81Inch)
5 x Zipper Bags(9.84*11.02Inch)
2 x Vacuum Hose
1 x Wine Cork
►Check the package for completeness and for signs of visible damage.

5
►If the consignment is incomplete or damaged due to defective packaging or carriage,
Please contact us.
Installation Requirements
For safe and trouble-free operation of the device, the set-up location must fulfill the
following requirements:
When setting it up, place the appliance on a firm, flat and horizontal surface.
Do not place the device in a hot, wet or extremely damp environment or in the
vicinity of flammable materials.
The mains power socket must be easily accessible, so that the power cable can be
easily disconnected in the event of an emergency.
Electrical Connection
►Before you connect the appliance, compare the connection data (voltage and
frequency) on the data plate with that of your mains power network. These data must
agree so that no damage issue stained by the device.
►Ensure that the power cable is undamaged and is not routed over hot surfaces
and/or sharp edges.
►Ensure that the power cable is not taut or kinked.
►Do not let the power cable hang over edges (trip wire effect).
►Insert the plug into the mains power socket.
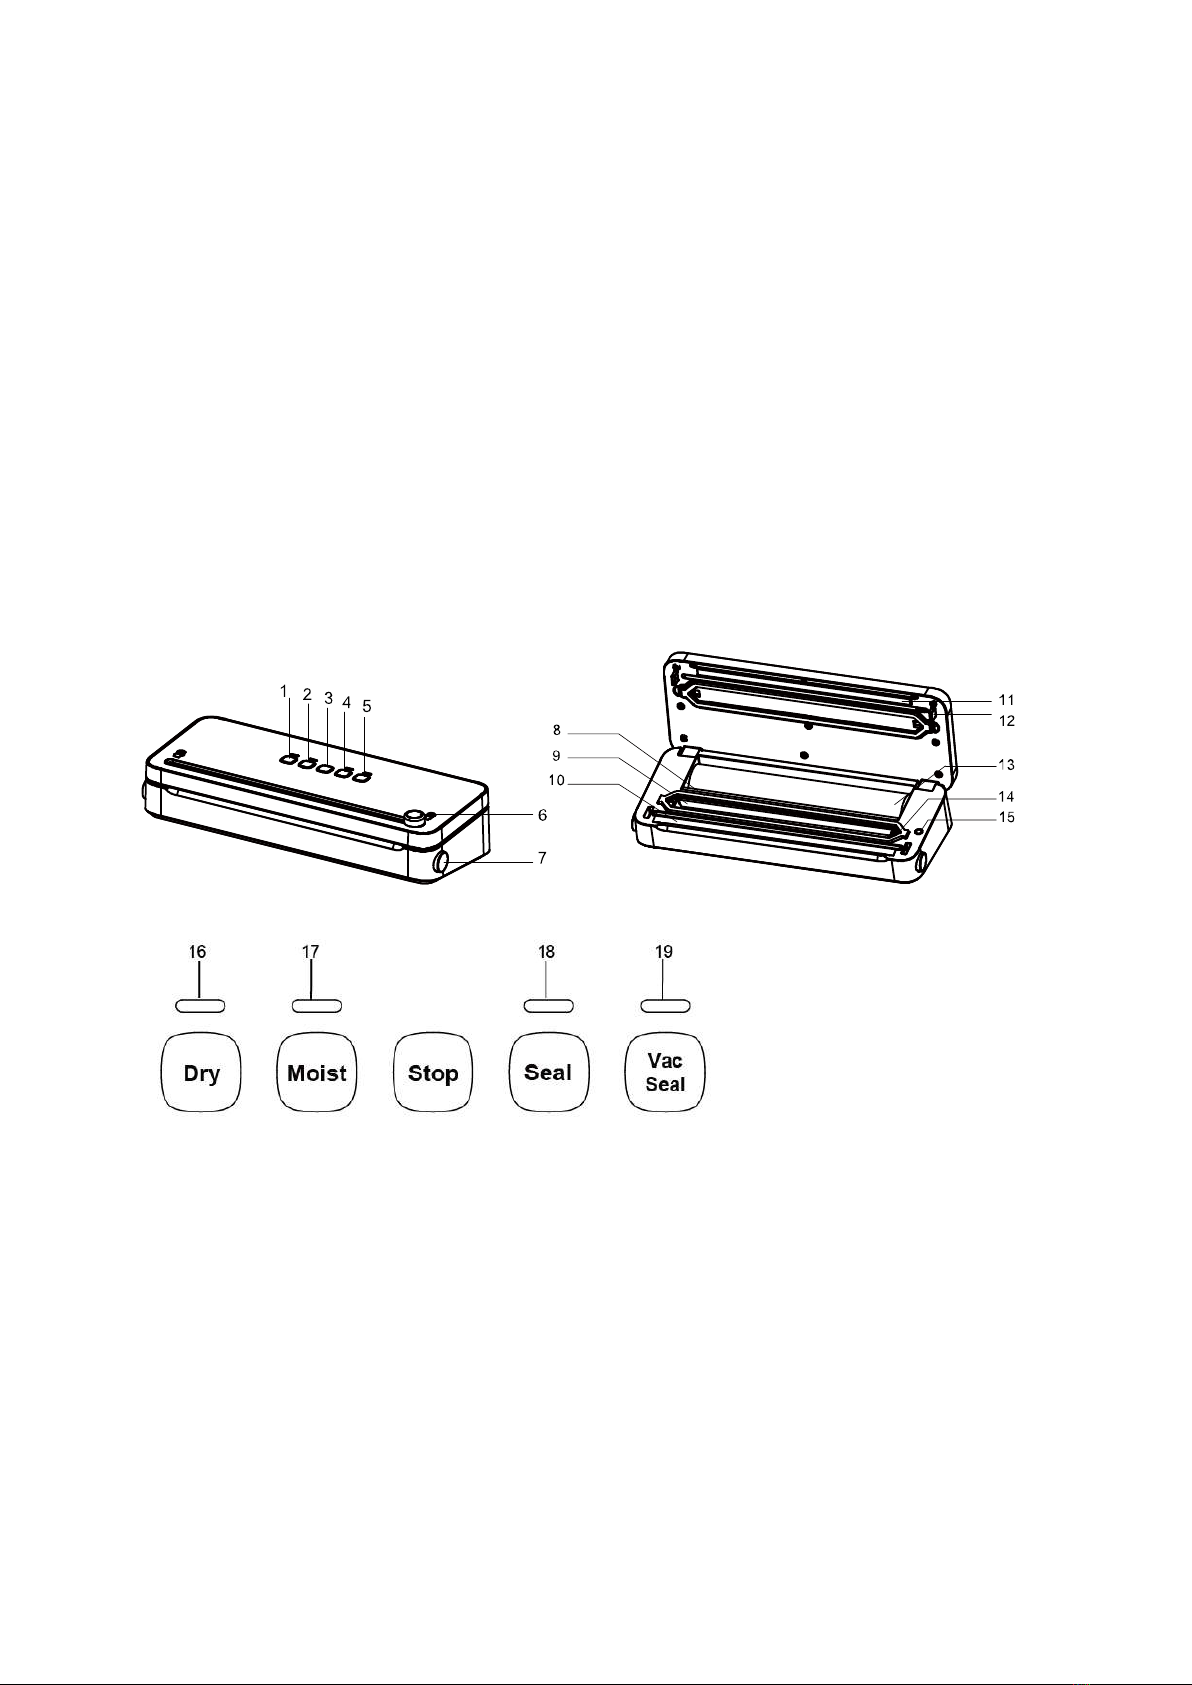
Sealing Vacuum bags
►The bag width may not exceed 11.81Inch. Otherwise it cannot be welded correctly.
►Use only nylon-PE films with a structure (points or grooves) on one side and that have
a structure(points or grooves) on one side and a thickness of approximately 0.006
-0.012 inch(6.8- 11.6mil).Otherwise the weld seam will not be tight and the appliance
may be damaged. You can recognize bags of this type from the information on the
packaging. The quality of the weld seam will vary depending on the type and
thickness of the bag.
►Cut the desired length for your bag from the roll. Open the appliance lid by pressing
the lid release and open the lid up wards .Lay the open end of the bag as far into the
appliance so that the opening of the bag is located central under the lower sealing
ring. The bag should be inserted no further than the behind sealing ring and must lie
between the front sealing ring. If the bag lies over one or both of the two sealing ring,
then the bag cannot be correctly welded.
►The bag opening must lie flat on the welding wire. Otherwise the welding does not

6
work properly. Close the appliance lid. The press seal presses the bag onto the
welding wire, to create a smooth seam. Ensure that both corners of the appliance lid
closed. If necessary, press the upper cover again and so that the appliance lid clicks
into place and locks tightly. Press the Food button Mode Selection. If the choice is dry,
the dry indicator will light on. If the moist is chosen, the moist indicator will light on.
►Ensure that the weld seam is properly closed. A correct weld seam should be a
smooth, straight stripe without any creases.
►Fill the bag so that no food scraps or liquids can leak out during welding and get into
the appliance.
►Wait 15 seconds before sealing the next bag to allow the appliance to cool down.
Parts
1. Buttons:
1)Dry 2)Moist 3)Stop 4)Seal
5)Vac Seal 15)External interface switch/Suction switch
2. Indicate Light:
16)Dry Indicator 17) Moist Indicator
18) Seal Indicator 19) Vac Seal Indicator
3. Other Parts:
6)Slide Cutter 7)Open Button 8)Vac Cotton
9)Vac Chamber 10)Heating Seal 11)Sealing Rubber Strip
12)Snap Lock 13)Roll holder 14)External Interface/Suction Interface

7
Functions & Vacuuming
Operating the equipment
1. How to Make a Bag from a Bonsenkitchen Vacuum Seal Roll:
Plug in the vacuum sealer, “Dry”
indicator light will turn on. Open the
lid by pressing buttons on both sides.
(Pic.1)
(Pic.1)
Pull bag material over the sealing
strip(Pic.2). Suggest to leave 20cm
(8 inches) or more of space to
vacuum seal. (Pic.3)
(Pic.2)(Pic.3)
Push down both sides of the lid until
hear a big lock-up sound. (Pic.4)
(Pic.4)
Press “Seal” button, sealing is
complete when “Seal” indicator
light turns off. Make sure the cutter
is on the edge then slide bag cutter
across the roll. (Pic.5)
(Pic.5)
20CM
(8Inches)
①②
③ ④

8
(Pic.1)
Press “Vac/Seal” button, it will
automatically vacuum then seal.
(Pic.3)
(Pic.3)
Open the lids by pressing the buttons
on both sides after “Vac” and “Seal”
indicator lights turn off. Take out the
bag. (Pic.4)
(Pic.4)
(Pic.2)
①②
③
④
After making a bag (as described in
the “How to Make a Bag from a
Bonsenkitchen Vacuum Seal Roll”
section, on page 7), Place item(s) in
bag, allowing at least 8cm(3 inches)
of space between bag contents and
the open end of bag. More space is
required for larger item(s) (Pic.1)
Push down both sides of the lid until
hear a big lock-up sound. (Pic.2)
Please check whether the dry light is
on. If not, press the dry button.
2. How to use “Dry”vacuum mode:
8CM
(3 Inches)

9
3. How to use “Moist”vacuum mode:
(Pic.2 )
(Pic.3 )
Open the lids by pressing the buttons
on both sides after “Vac” and “Seal”
indicator lights turn off. Take out the
bag. (Pic.4)
(Pic.4 )
Press” Moist” button, indicator light
turns on.(Pic.2)
Press “Vac/Seal” button, it will
automatically vacuum the seal.(Pic.3)
Push down both sides of the lid until
hear a big lock-up sound. (Pic.1)
(Pic.1 )
①②
③ ④

10
4. How to seal only:
If you want to seal a bag without
vacuuming, press “Seal” button,
indicator light turns on.(Pic.2)
(Pic.2 )
Open the lids by pressing the buttons
on both sides after indicator light turns
off, then take out the bag.
(Pic.3 )
Push down both sides of the lid until
hear a big lock-up sound. (Pic.1)
(Pic.1 )
①②
③

11
6. How to vacuum zipper bags:
Insert one end of Accessory Hose
into Accessory Port on appliance.
Insert the other end into port on the
jar. (Pic.1 universal interface)
(Pic.1)
Press the gray rubber button on the
appliance, it starts to vacuum. When
it has no sound, it means job has been
finished. You also can stop it whenever
you want, just press the button again.
(Pic.2)
(Pic.2)
①②
(Pic.1 )(Pic.2 )
①②
If you want to vacuum wine core,you can use the same vacuum hose,same operation.
Insert one end of Accessory Hose into
Accessory Port on appliance. Insert the
other end into port on the zipper bag.
(Pic.1 universal interface)
Press the gray rubber button on the
appliance, it starts to vacuum. When
it has no sound, it means job has been
finished. You also can stop it whenever
you want, just press the button again.
(Pic.2)
5. How to vacuum packaging jar:

12
7. How to install bag cutters:
Twist the cutter anticlockwise
approximately 100°(Pic.1)
1).Disassemble
2).Assemble
(Pic.1)
Assemble the knife and the
cap.(Pic.1)
Lift up the cap of cutter (Pic.2)
Twist the cap of cutter clockwise
approximately 100°(Pic.2)
(Pic.2)
(Pic.1) (Pic.2)
①②
①②

13
NOTE: Once you have sealed 5 bags continuously, allow the appliance to cool down for
about 1 minute. During this cool-down phase, you cannot start the appliance. After the
cool-down phase, you can use the appliance as normal.
Cleaning
►Remove the plug from the mains power socket before beginning to clean the device.
►Ensure there isn’t moisture can penetrate the device during leaning.
►Do not use aggressive or abrasive cleaning agents, as these may corrode the surface
of the casing.
►Do not use any hard or sharp objects to remove any adhesive from the welding wire.
Otherwise the welding wire or the insulation could be damaged.
►Clean the surface of the appliance with a lightly moistened cloth and a mild
detergent.
►Wipe off the upper and the lower sealing rings, as well as the press seal with a damp
cloth. Ensure that the appliance is dry before using it again.
Storage
►The appliance has a built-in cable retainer on the underside of the housing, on which
you can wrap the power cable when it is not in use. This prevents the power cable
from getting caught or soiled, or becoming a source of danger by hanging loosely
down.
►Store the appliance in a clean, dry place away from direct sunlight.
Warranty claim procedure
To ensure quick processing of your case, please observe the following instructions:
Please have the till receipt and the item number(S/N: 12345) available as proof of
purchase.
You will find the item umber as a sticker on the rear or bottom of the appliance.
If function or other defects occur, please contact the service centre listed either by
telephone or by email.
If you have any further assistance, please contact us:
Customer service: 1-888-965-8032

14
Warranty:
The warranty for this appliance is for 12 months from the date of the first purchase. The
warranty covers only claims for the material and manufacturing defects, but not for the
transport damage, wearing parts or for damage to fragile components, e.g. button or
seal ring.
The warranty is void in the case of the abusive and improper handling, use of force and
internal tampering not carried out by our authorized service branch. Your statutory rights
are not restricted in any way by this warranty. The warranty period is not extended by
repairs made under the warranty. This applies also to replaced and repaired parts. The
appliance has been manufactured with care and meticulously examined before delivery.
Please keep your receipt as proof of purchase.
Please contact with our Customer Service in case of a warranty claim.
Technical Data
Model No.: VS3802
Operating Voltage: 120V~ 60Hz 1.9 A
Power Consumption: 140W
Max. Width for Shrink-wrapping: 300mm (11.81Inch)
Vacuum Value: -70Kpa
Noise Level: about 72 dB
Product Dimension: 407*166*92mm (16.02*6.54*3.62Inch)
Other manuals for VS3802
1
Table of contents
Other BonsenKitchen Food Saver manuals
Popular Food Saver manuals by other brands

3M
3M 3M-Matic 7000r Instructions and parts list

Chesterton
Chesterton TwinHydrostatic 4410 Installation, Operation and Rebuild Instructions

U-Line
U-Line H-1250 manual

M. J. MAILLIS GROUP
M. J. MAILLIS GROUP SIAT SK20 Operation and maintenance manual

Brandt
Brandt SOU-110V instruction manual

Lund
Lund 67880 Original instructions