BORG DISPLAYS Protege User manual

620 16th Street #300, Denver Colorado 80202 720-961-4056 www.borgdisplays.com
BORG DISPLAYS
Protégé Hardware
Installation Manual
620 16th Street #300, Denver Colorado 80202 720-961-4056 www.borgdisplays.com
BORG DISPLAYS
Introduction:
Congratulations on your purchase of a Protégé touchscreen. This manual primarily covers the hardware
features and network essentials of the Protégé screen. As you read through this manual you will learn:
1. Protégé assembly and installation
2. Hardware features
3. Connections and Wiring
4. Software options
5. FAQ Support
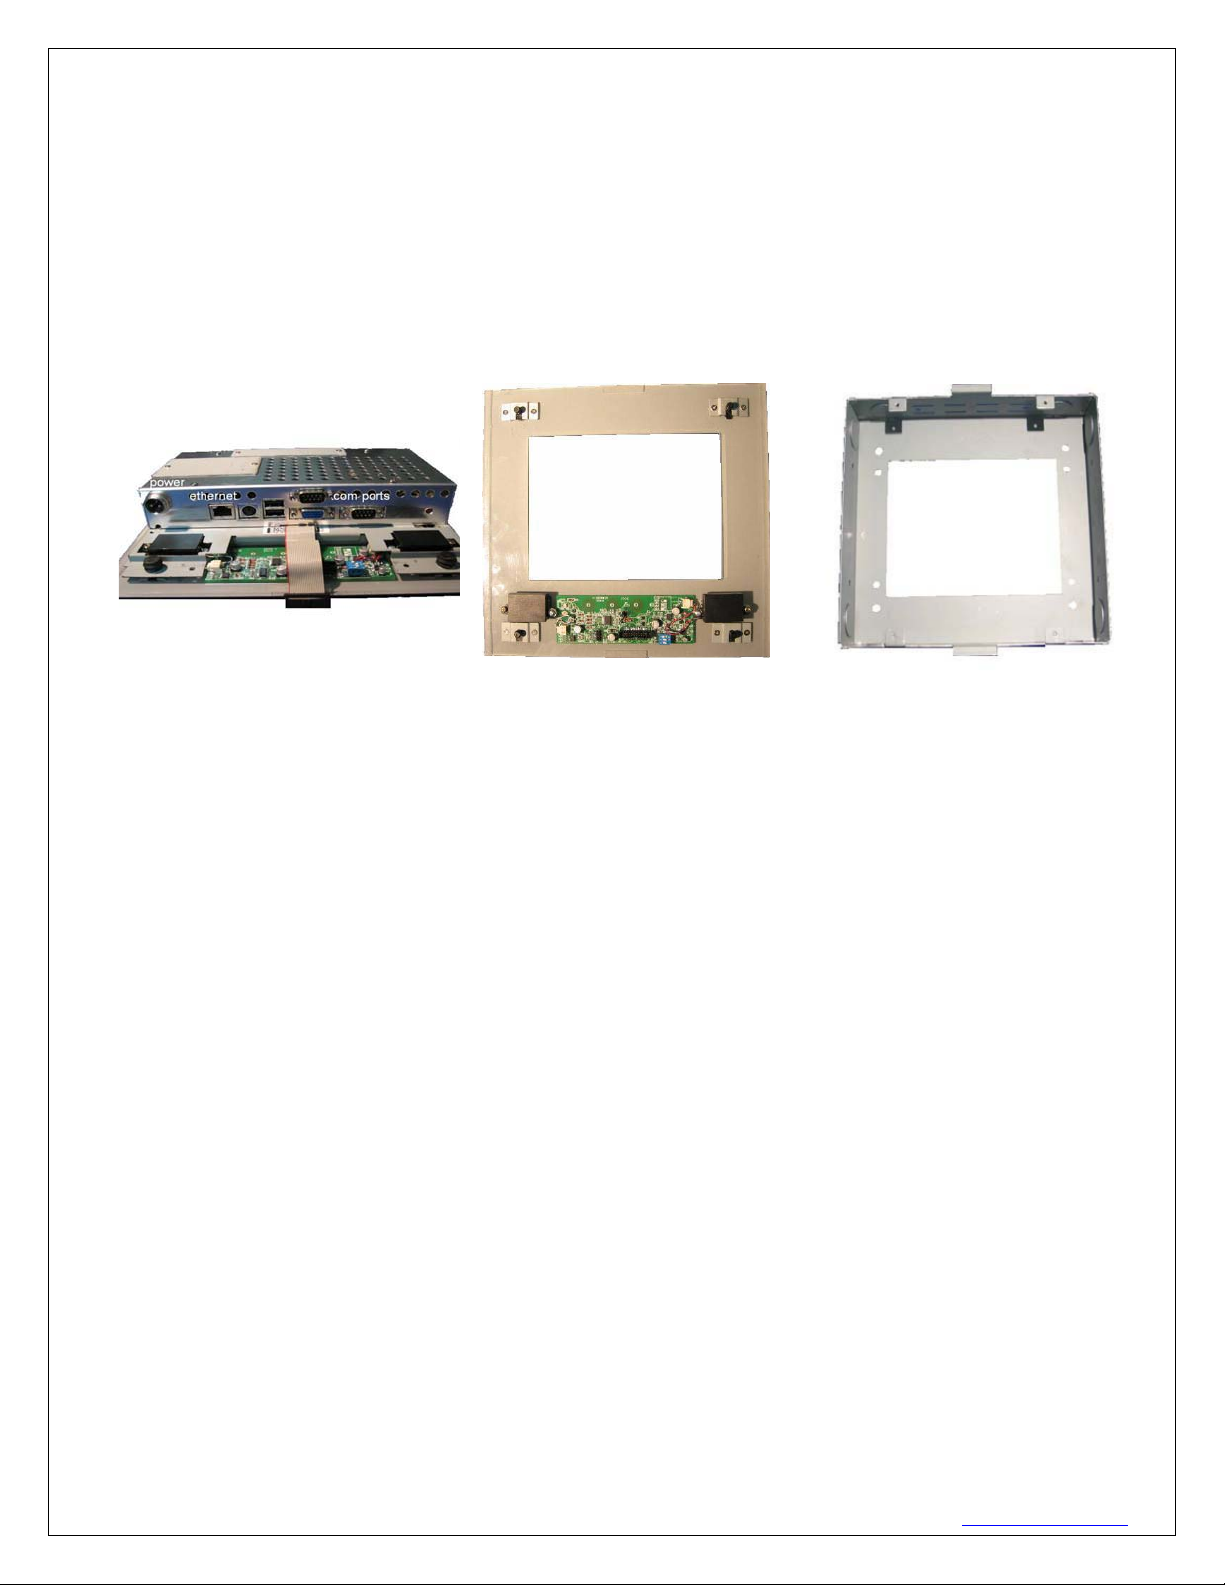
Main Unit Bezel Backbox
NOTE: The installation of Protégé should be performed by professional integrators. The following discussion
offers guidance based on standard physical configurations.
Assembly:
Protégé applies to most Protégé configurations with the following primary components:
- main unit – the electronics and display assembly
- snap-on front cover or bezel
- outer, rear metal housing, “Back-box” (mating screws to main unit provided)
- power supply, documentation CD, printed manual and collateral materials
Protégé is typically shipped with the Back-box and the Bezel detached from the Display Assembly. When the
bezel is separated from the system, fragile elements such as the display, fine wiring cables, electronic circuitry
may be exposed. Always exercise caution while supplying power and against damaging the exposed device
elements when handling the Display Assembly.
The Back-box may be optional in some deployments, but may be relevant for certain installations to provide an
added barrier for environmental shielding and limiting access to input/output connections. It is strongly
advised that the Back-box implementation be considered as the preferred approach. Borg will not
warrant INSTALLATIONS WITHOUT THE BACK-BOX.
Back box Installation:
PRE-DRYWALL - Unit should be affixed to the stud inset / flush to the stud where drywall will cover the unit.
One would then go in and cut out the bbox enclosure including over the 4 screw tabs. Then using longer
metal screws (not included), insert and screw in assembly. The outer left/right tabs on the assembly will
620 16th Street #300, Denver Colorado 80202 720-961-4056 www.borgdisplays.com
BORG DISPLAYS
keep it from going into the bbox and will hold onto the drywall – so do not cut out wider than the bbox when
cutting hole. The bezel then snaps onto the assembly for a flush mount.
POST-DRYWALL – Very near flush mount and may ultimately be easier. Pre-wire, then drywall, then score
and cut out around the a bbox template (using rear), screw and affix to a stud. Now the upper/lower tabs are
on the outside of the drywall, assembly goes in and its left/right tabs are on outside of drywall.
There are “knockouts” in the backbox to allow wiring (ethernet, power, serial) to be attached to the main unit.
Once the backbox and wiring is in place the main unit should be attached to the backbox using the four supplied
screws. Then the ribbon cable 20-pin electrical connector is attached to the bezel and the bezel snaps into the
grommets on the main unit.
DO NOT try to pry between the display and the inner perimeter of the Bezel – breakage and scratches to your
display are not covered under the product warranty; To reattach, align the Bezel carefully over the buttons on
the main unit and then snap on the Bezel near the four corners – do so with (preferably protected) hands and
not any heavy instrument.
Hardware Features:
Protégé and NEO controllers are characterized by either an 8" or 15” (diagonal) bright TFT Display with
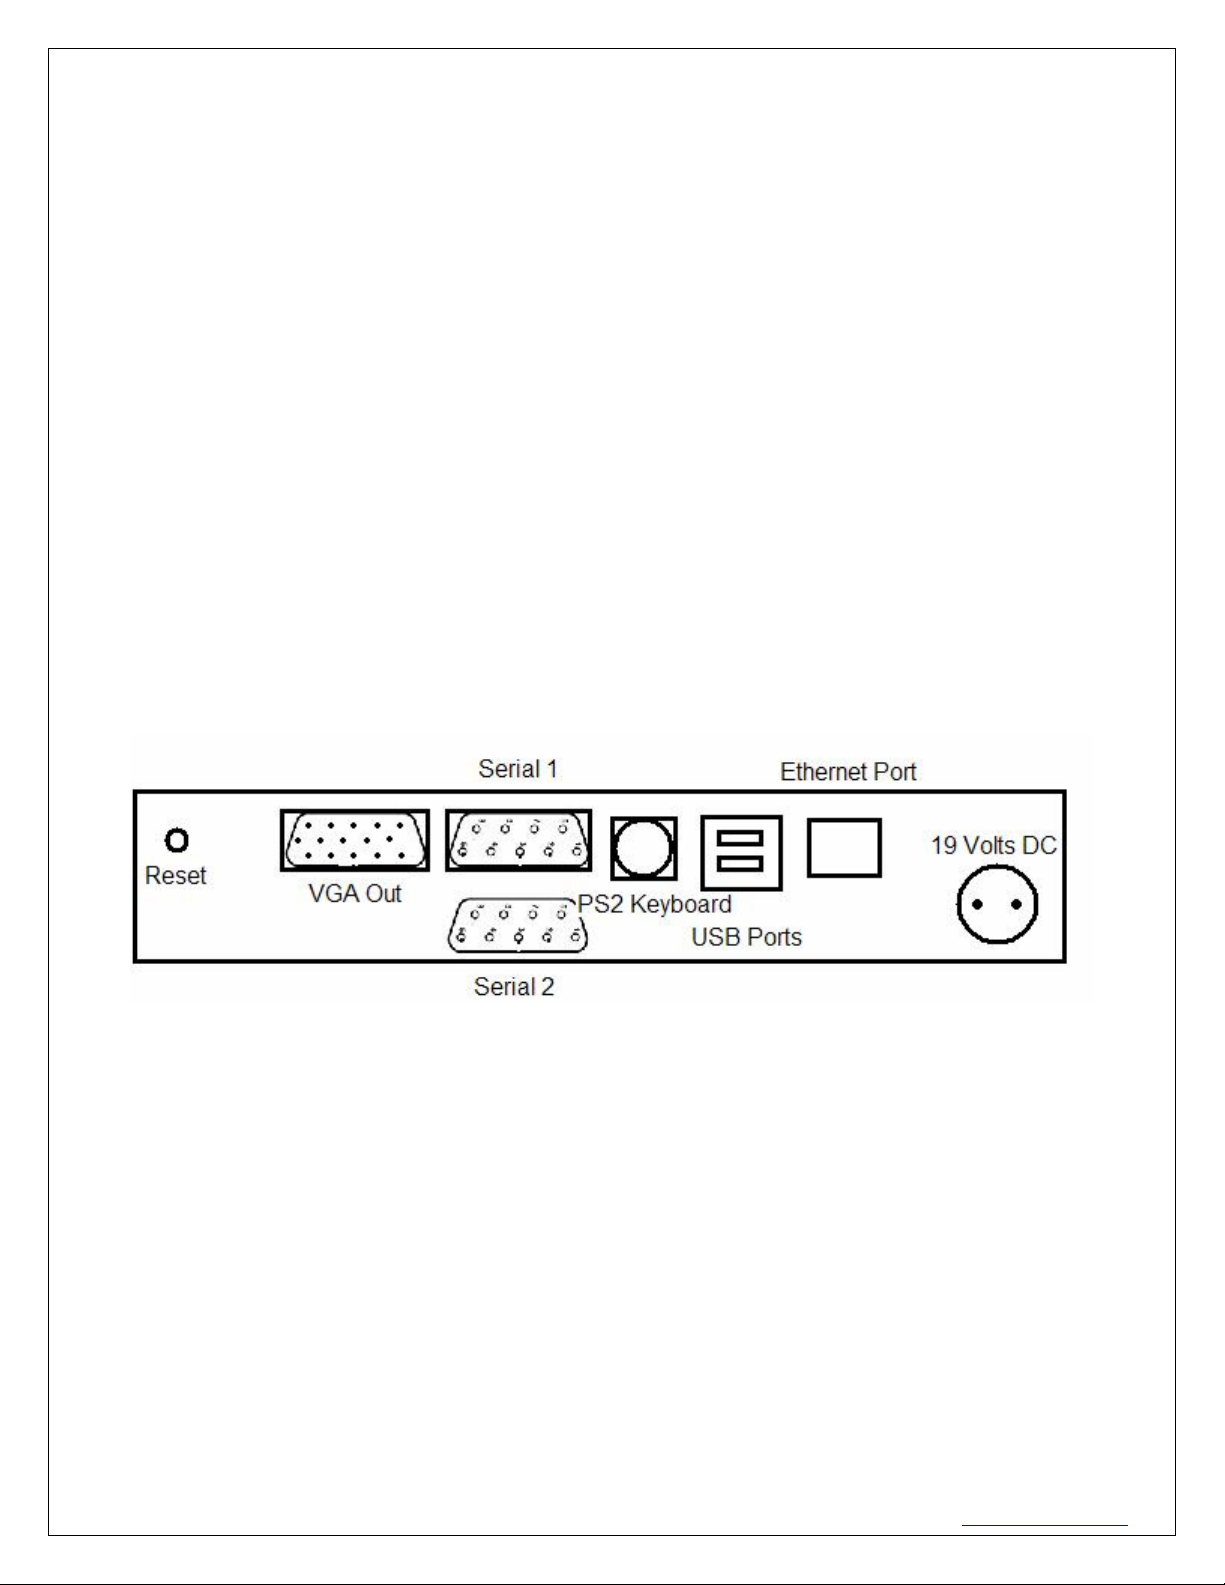
touch input enabled. The rear of the assembly offers an optimum set of input/output ports that include:
USB 1.1 ports x2
1 DC-in power jack (for 19 V input)
1 RJ45 port for 10/100 BaseT Ethernet
RS-232 Serial Port x2
Power Connections:
The Main Unit features a DC-in power jack. The Low Voltage (19V) side of the power supply can be
extended using 2 conductor wire. Please use the following wire guages depending on extension length.
1-25 FT 18 AWG
25-65 FT 16 AWG
65-125 FT 14 AWG
125-150 12 AWG
150-175 10 AWG
NOTE: The Power Jack and Plug are keyed to allow correct polarity and be affixed with a screw-type
connector insuring it stays in. Be sure to maintain correct polarity while extending the low voltage side.
620 16th Street #300, Denver Colorado 80202 720-961-4056 www.borgdisplays.com
BORG DISPLAYS
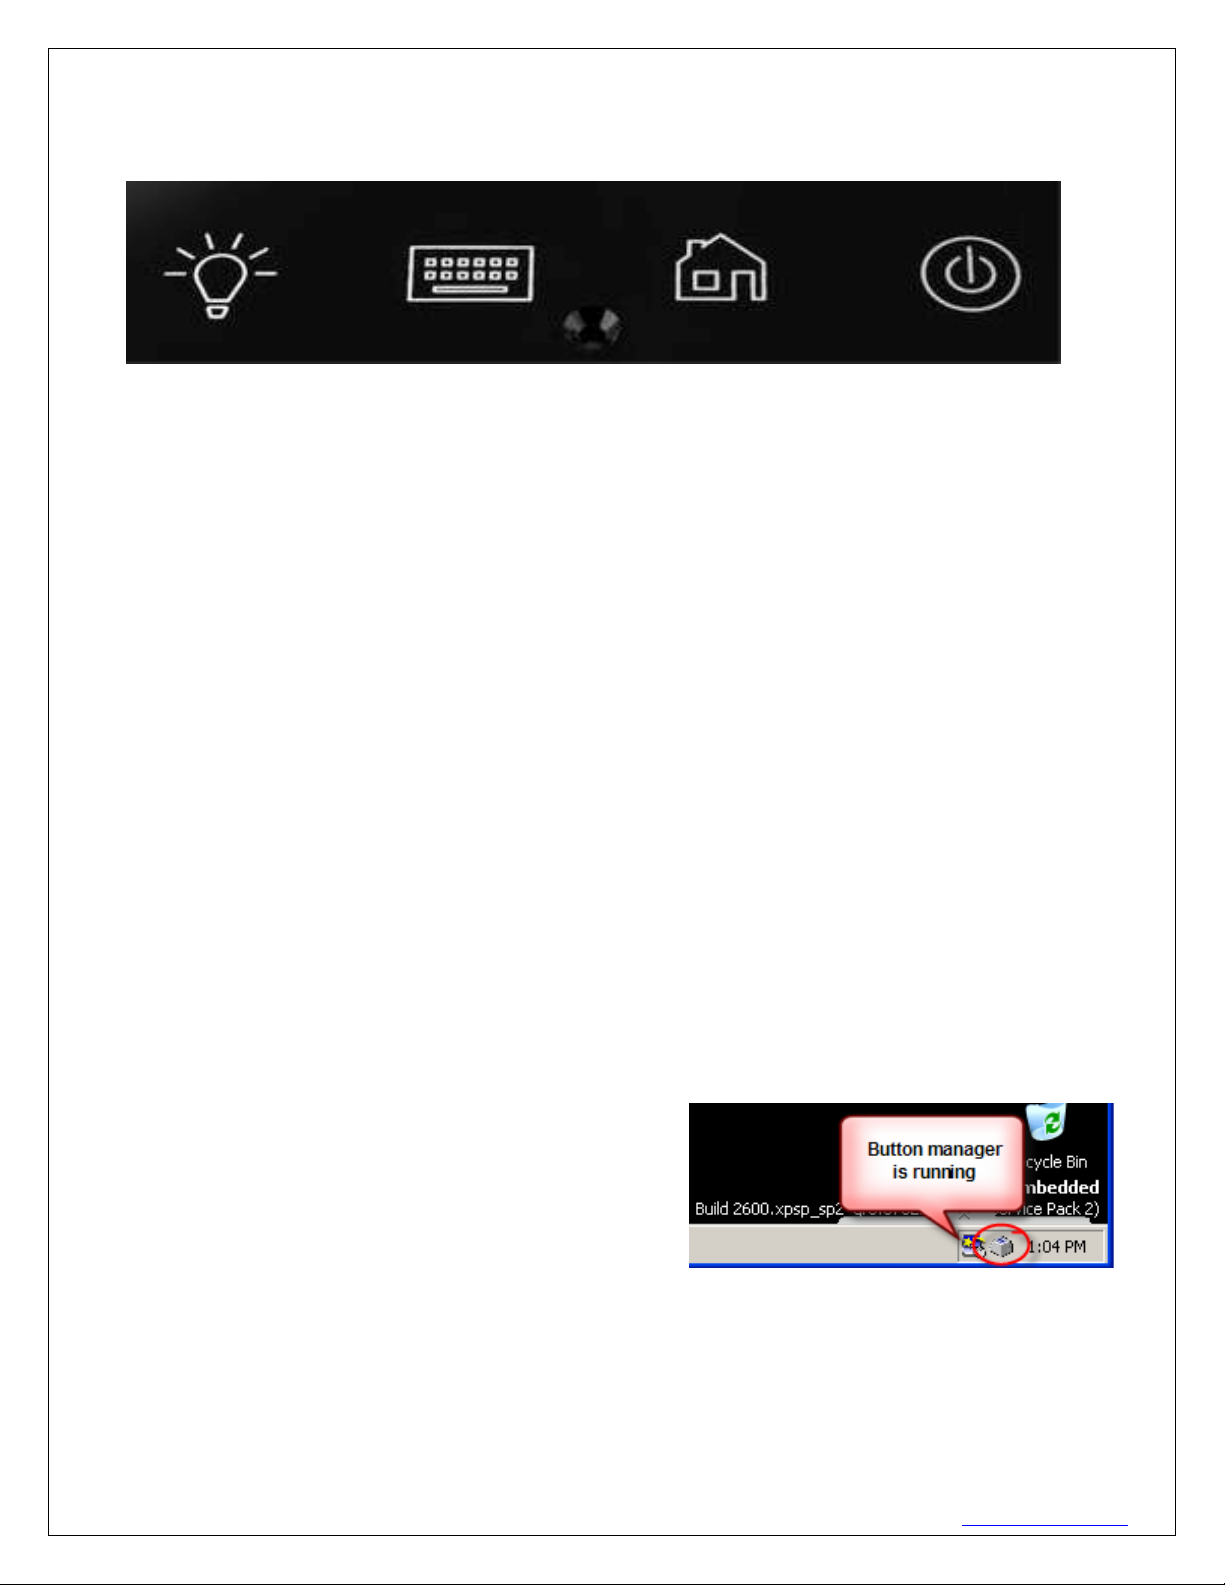
Front Panel Controls: (icons are customizable as an OEM)
The Front Panel has four Buttons which can be configured to accomplish different functions through the
configuration utility (below). The default Button Settings are as follows:
Button 1 activates the screen on/off
Button 2 activates the keyboard in browser mode
Button 3 Starts the Web Browser (IE or Firefox on Linux) and it brings up a URL of choice
Button 4 Pressing and holding for 5 Seconds powers the unit down or up.
The LED to the right of Button 4 displays green when the unit is on and red when powered down. The Buttons
can be disabled, configured, activate a sound, and launch a webpage (home page).
Software Configuration:
Borg provides a “standard” XPe firmware image. This provides the optimal flexibility for a variety of application
uses. Borg can provide custom images as needed.
XPe:
Internet Explorer ver 7 includes plugins for Flash ver 10
Media Player ver 10 – Screen Saver manager – User Manager (multiple user/passwords)
.Net 2.0
Button Monitor – configure bezel buttons to URLs, .EXE, alt+tab (toggle apps), screen saver, etc.
Startup Folder – launches apps upon power up
User Management – password on timeout, etc.
Button Configuration:
If the Button Monitor is running, you will see an icon in the lower-right corner on taskbar.
Click on the icon with mouse Left or Right button, the popup menu will be shown.

620 16th Street #300, Denver Colorado 80202 720-961-4056 www.borgdisplays.com
BORG DISPLAYS
Activate / Deactivate: Choose activate (Default) to enable the capacitive buttons monitor, or click it again to
deactivate the monitor function temporary.
Hide / Restore: To show or hide the main screen of Button Monitor.
About: Display the current version of Button Monitor.
Exit: Close Button Monitor. If you want to launch it again, run c:\MK-8 Button Monitor\btnMonitor.exe again.
Show the main screen of Button Monitor, we will introduce all functions in it page by page.
Status
Red Area 1: Useful buttons, same as popup menu that mentioned above.
Red Area 2: Function pages, click on each page to set different properties.
Red Area 3: The enable/disable indicator, it shows the current status of Button Monitor.
Red Area 4: A visual status indicator for each button.

620 16th Street #300, Denver Colorado 80202 720-961-4056 www.borgdisplays.com
BORG DISPLAYS
Option 1. Launch automatically when Windows start. Note: disable to run a proprietary application.
Option 2. Begin to monitor automatically after boot up.
Option 3. Beep when button is pressed.
Option 4. Launch full screen web page at startup. Leave text edit area empty to navigate default home page.
Option 5. is for OEMs or developers who want to “read” the status of a button push
Option 6. is in lieu of the Windows Display settings – allowing for a timed screen saver and wakeup after
touch or keyboard or capacitive button push
Button 1 - setting backlight
Click on “Enable Button1” checkbox to enable/disable Button1, when activated, press button1 will manually
turn LCD backlight off / on, and you can click on “Flash LED Indicator when LCD is off” checkbox you want the
red LED indicator on front bezel to be flashed when LCD backlight is turned off.
Note. The LED flashing function works only if the SW1 on touch sensor board is turned to ON position.
Button 2 setting keyboard

620 16th Street #300, Denver Colorado 80202 720-961-4056 www.borgdisplays.com
BORG DISPLAYS
Click on “Enable Button2” checkbox to enable/disable Button2, when activated, press button2 will bring a
Microsoft on-screen-keyboard (OSK) to a specific location on screen. You can turn OSK off by pressing
button2 again. 9 different default locations can be selected for the OSK.
Button 3
Click on “Enable Button3” checkbox to enable/disable Button3, when activated, press button3 will launch an
Internet Explorer Window and navigate to the page you assigned. Check the “KIOSK Mode” if you want this
IE window to be a full-screen (without toolbar and menu). Navigating in kiosk mode: Simply connect a USB
keyboard and hit CTRL+ESC to get the START menu then navigate either via USB mouse or UP/DN arrows
or TAB and ENTER on keyboard. Press button3 again will close the IE window that we opened earlier. Check
the “Specific URL”, and enter your assigned web page at the text bar below, then the IE will browse to your
assigned page when “Homepage Button” is pressed.
Click on “Enable Button4” checkbox to enable/disable Button4, when activated, pressing button 4 can
shutdown, reboot immediately or act as a Hot Key from the table below. This can be VERY useful to
navigate between multiple full screen applications (Alt+Tab), etc (see table below). WARNING: Button 4
has a dual mode whereby a single press activates the command configured above and pressing and
holding for 4 seconds will turn off the power.
Button 4 setting (Power or Hot
Key Button)

620 16th Street #300, Denver Colorado 80202 720-961-4056 www.borgdisplays.com
BORG DISPLAYS
Windows Hot Keys supported
Device Support: Borg understands the following solutions may work with Protégé
touchscreens but will neither guarantee nor verify the compatibility of each. The following is provided as
informational purposes only. Please also visit www.BorgDisplays.com/partners.html
Home Control
HAI Snaplink – Confirmed - copy Snaplink from USB stick to Start Folder on Protégé
ELK – ElkRM see instructions. www.elkproducts.com/products/m1/ElkRM.htm
Charmed Quark – Confirmed - Driver loaded on Protégé paths to CQC application hosted on PC
Myro Controls – OEM - Dedicated control platform with their custom XPe image on DOM.
Cortexa - OEM
HomeLogic – confirmed on Pro8 and 8a, 15a
Honeywell Vista / Envirocom – via their ICM module and kiosk mode IE.
Crestron – confirmed using their Xpanel .exe
Custom Home Control – Flash GUI in IE browser
Stardraw -
Mediallon –
N2Nets – OEM - confirmed JAVA support (special order)
Connected hearth – confirmed IE support
Commercial Control
Stardraw
Crestron – Xpanel
Aurora Multimedia
Web-device Control – too many to list
ReQuest - media servers via browser control
Kaledioscape - media server via browser control
Niveus – WMC server via Autonomic Mirage software client – www.autonomichome.com
Casatools - media server via browser control – www.casatools.com
SunPower - Solar Inverters
FatSpaniel – Flash and HTML interfaces for solar services
Many more untested but if you can render it on your PC, then it most likely will run on Protégé
HAI Myro Charmed Quark ELK

620 16th Street #300, Denver Colorado 80202 720-961-4056 www.borgdisplays.com
BORG DISPLAYS
FAQ – Features
VGA Port: The VGA D-Sub connector outputs exactly the same display as the internal LCD panel, thus it has two
display devices with one screen layout.
Button Monitor: If it is not present please contact customer support to get the zipped file. Setup procedure:
extract it and copy the extracted file named BtnMonitor_setup.exe to a USB drive, insert this USB to Pro8a and run
this setup file, it will create the directory and copy all necessary files for you automatically. If Button Monitor is
disabled, go to Start menu and open a window for the internet, connect a USB keyboard and type in c:\ on the
address line. A list comes up and I chose “c:\Button Monitor” This brings up a button monitor window and I double
clicked/tapped on btnMonitor.exe That restores the button monitor and places an icon on task bar to begin
configuration (See Installation Guide).
Disable Button Monitor: On the task bar there is a button monitor icon on the right hand side. Tap the button
for a drop-down menu. Select Hide/Restore, then click “deactivate” button and then “exit”
Screen Saver: >Button Monitor > Options – set time delay
Screen Resolution Pro15a > All 15” LCDs have XGA (1024x768) resolution maximum. Be careful to set
monitor properties in XPe to frequency, 1024x768 with 60Hz.
User Mgmt: > Start > Control Panel > User Account
Mirror: (Pro15a only)
Glow Bezel: (Pro8agl only) To test the edge glow function in QC application, first Disable Button Monitor (see
FAQ), then click on “GPIO Information” in main menu and you can see a green and red square as below image,
click on it will enable/disable edge glow feature for different colors. > Start > QC Application > GPIO
Network Drive:Our XPe image does support network drive by using TCP/IP, we have not tried Windows Home
Server in our lab, but believe WHS uses Client for Microsoft Network to access and it can be connected or mapped
as a network drive.
Power Consumption:
Pro8 AMD GEODE LX800 CPU:
1. Running at full power (LCD on, playing video, also playing music with its volume at maximum): 12W.
2. Idling with LCD on: 9.5W.
3. Idling with LCD off: 7.4W
Pro8a Intel ATOM 1.6GHz CPU:
1. Running at full power (LCD on, playing video, also playing music with its volume at maximum): 17.7W.
2. Idling with LCD on: 15.8W.
3. Idling with LCD off: 13W
Pro15a Intel ATOM 1.6GHz CPU:
1. Running at full power (LCD on, playing video, also playing music with its volume at maximum): 25.7W.
2. Idling with LCD on: 23.8W.
3. Idling with LCD off: 13W

620 16th Street #300, Denver Colorado 80202 720-961-4056 www.borgdisplays.com
BORG DISPLAYS
Programming API: The new GPIO Supports Pro8a with bezel edge glow. (Use notepad to open c:\Button
Monitor\style.ini, and change the value from 0 to 1 then save it.) Accepts more commands by using
POSTMESSAGE so that programmers can control the hardware in their own application.
WM_REDLED_ON = WM_USER + 12010; - Turn RED LED ON
WM_REDLED_OFF = WM_USER + 12011; - Turn RED LED OFF
WM_LCD_BK_OFF = WM_USER + 12016; - Turn LCD Backlight off
WM_LCD_BK_ON = WM_USER + 12017; - Turn LCD Backlight On
(Pro8a Edge Glow version only)
WM_EDGE_GREEN_ON = WM_USER + 12012; - Turn Green Edge grow LED ON WM_EDGE_GREEN_OFF =
WM_USER + 12013; - Turn Green Edge grow LED OFF WM_EDGE_RED_ON = WM_USER + 12014; -
Turn Red Edge grow LED ON WM_EDGE_RED_OFF = WM_USER + 12015; - Turn Red Edge grow LED OFF
Note. There is a sample application named c:\Button Monitor\Verify.exe can verify all POSTMESSAGE functions in
Button Monitor.
Firmware:
Media Player, Windows Explorer, User Manager, QC Hardware Test Utility
Internet Explorer 7.0 – flash 7plugin, javascript (JVM DOM available)
Button Monitor – 4 configurable hard buttons including Application and URL launch, Screen saver, Hot Keys, Boot
up modes, kiosk modes, lock down modes
FAQ - Support
NEO screen incomplete bootup – “X” in middle of screen: Possible interruption or corrupt DOM.
Log in and re-udpate. Do NOT interrupt update process.
Protégé white LCD upon boot: Somehow the video card settings were modified – attach a monitor to VGA
port with USB mouse and go to Control Panel > Display (make sure set to 800x600) > Settings > Advanced > Intel
Graphics…> Graphics Properties > Display Devices (Intel Clone) > Display Settings (800x600, 60Hz). See FAQ
Detail screenshots for more information below
Testing Bezel Glow: Button Monitor MUST be disabled - then launch the QC program under Start menu.
Start Folder: All folder structures are exactly the same as Windows XP, except we hide “All Programs” and
some useless link from Startup menu.
There is a fast way to access to Startup folder, move your mouse cursor to “Start” button and click Right mouse
button, select “Explore All Users” will bring you to Explorer and locate to the folder.
There are two Startup folders that you can use:
1. C:\Documents and Settings\Administrator\Start
Menu\Programs\Startup
2. C:\Documents and Settings\All Users\Start
Menu\Programs\Startup
Websites on XPe or see the MSDN forum:
http://social.msdn.microsoft.com/Search/enUS/?Refinement=52
%2c54&Query=xp+embedded

620 16th Street #300, Denver Colorado 80202 720-961-4056 www.borgdisplays.com
BORG DISPLAYS
Factory Restore: Last resort only if an application is running and you cannot remove it or log into it.
1. Insert USB keyboard
2. Press Ctrl-Alt-Del to open Windows Security.
3. Click on “Task Manger” button.
4. When “Windows Task Manager” is showed, click on “Applications” page.
5. Click on “New Task…” button.
6. Type “explorer” then click “OK”.
Then the desktop should be restored new, go to Control Panel to see if you can remove that unused
application, if you don’t see an option in “Add/Remove programs”, you have to remove it manually.
BIOS Boot Up: You can entry the BIOS configuration utility by using “Del” key while booting up.Here you can
change what driver to boot from including a network drive.
Correct Display Settings: >Start > Control Panel > Display > Settings – note resolution and frequency
(advanced) Select > Intel® Graphics Media Accelerator Drive for Mobile > “Graphics Properties” button
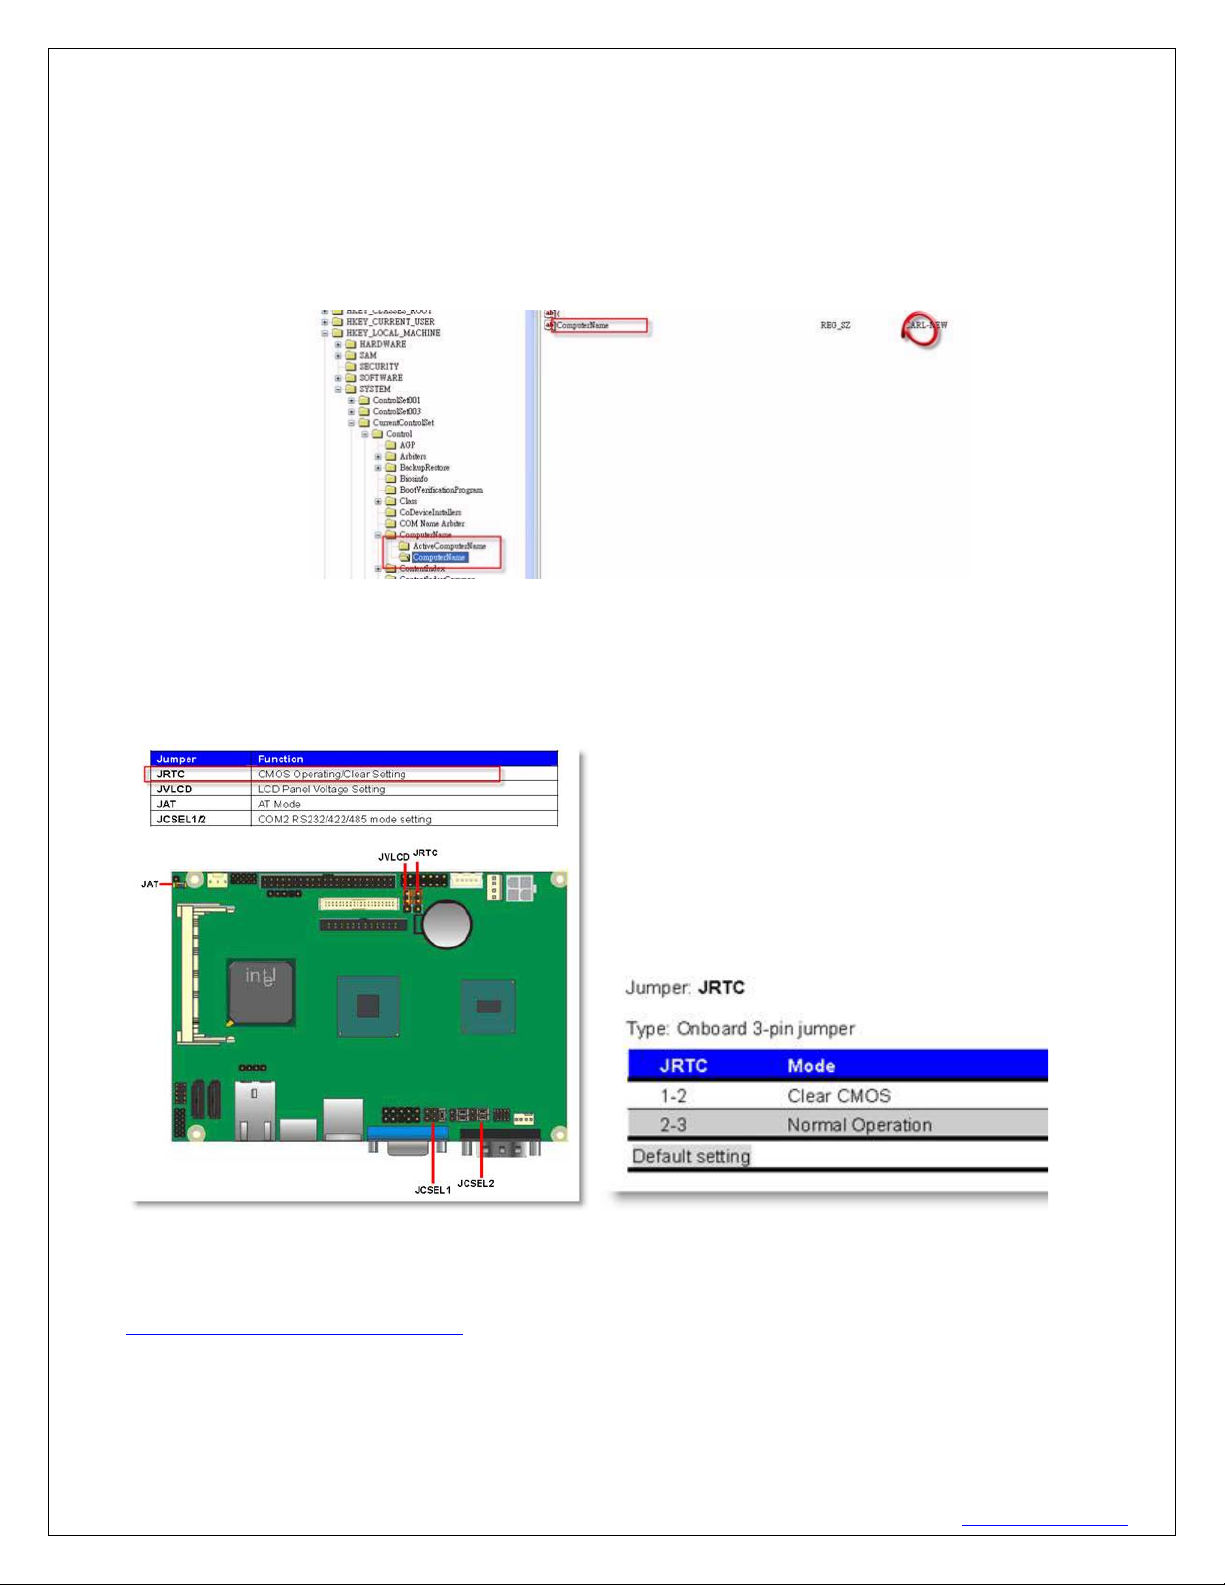
Change “Computer” name: To change computer name in XPe, the fastest way is to change the registry
directly.
620 16th Street #300, Denver Colorado 80202 720-961-4056 www.borgdisplays.com
BORG DISPLAYS
1. Click on “Start”…”Run” and type “regedit” then click OK button.
2. The computer name is stored in
\HEKY_LOCAL_MACHINE\SYSTEM\CurrentControlSet\Control\ComputerName\ActiveComputerName,
change the value (REG_SZ) of “ComputerNmae” to the new name that you want.
3. Locate to \HEKY_LOCAL_MACHINE\SYSTEM\CurrentControlSet\Control\ComputerName\ComputerName
and change the “ComputerName” item to the same name.
4. Close Registry Edit and Reboot.
Or seek a tool from SysInternals called “New_Sid”.
Motherboard CMOS: To clear/reset the CMOS setting and restore them to default, you can find the JREC
jumper on motherboard and clear the BIOS settings.
Firmware updates: To restore image onto Pro-8, Pro8a, Pro15a, you have to boot this machine under a pure
DOS environment, the fastest way is to prepare a clean USB thumbnail disk which is SMALLER than 4GB, make it
bootable and copy all necessary files to this USB disk (you can download a USB boot tool from
http://www.emink.com/files/usbtool.rar)
Downloading plugins: Some DVRs, devices, etc will be blocked from accepting a download. XPe prohibits
this by default for security reasons but can be overridden like a PC by going to Control Panel > IE Options >
Security > Place the URL and hit Add, then LOW for the security setting and try again.

620 16th Street #300, Denver Colorado 80202 720-961-4056 www.borgdisplays.com
BORG DISPLAYS
Remote Tech Support: Remote management capable. Download and run TeamViewer
http://www.teamviewer.com. Provide us the ID and password so we can exam it remotely.
Table of contents
Popular Touchscreen manuals by other brands

Elo TouchSystems
Elo TouchSystems 1739L user guide

Encelium
Encelium KX3 Touchscreen installation instructions

Johnson Controls
Johnson Controls Tyco HC2TCHPRO user manual

Elo TouchSystems
Elo TouchSystems 2242L user guide

HDI
HDI Edge Series quick start guide

Elo TouchSystems
Elo TouchSystems 1939L user guide


