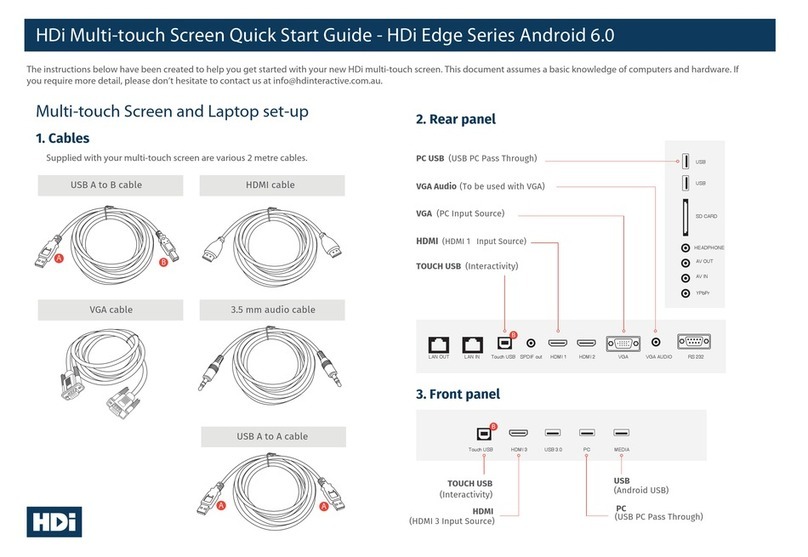
Now that you are familiar with the cables, connect the B end of the USB A to B to
the front / rear panel socket TOUCH USB. Then connect the A end to your laptop.
Tap to select
You have now connected your multi-touch screen and laptop. Turn on your laptop
and multi-touch screen. The multi-touch screen is now ready to use.
Source / Input Menu
Energy Saver
Mode
Mute
Vol -
Freeze / Unfreeze
Home
Vol +
Enter
CH +
CH -
If you are using HDMI, connect the cable to the front / rear panel HDMI socket and
to your laptop.
4. Connecting your Multi-touch-Screen and laptop 6. OSD
7. Touch Functions
5. Ready to use
1 2 3
4 5 6
7 8
0
INFO
E.S
MENU
OK
INPUT
EXIT
SLEEP
S.MODE
P.MODE
PRSNR
HOME L.S ZOOM TV
CHLIST
CH
VOL
9
USB A to B cable (Touch)
HDMI cable
Power
Power Source Menu Vol+ Vol- CH+ CH- Mute Eco Enter Home
HDi Multi-touch Screen Quick Start Guide - HDi Edge SeriesAndroid8.0
Power Source Menu Vol+ Vol- CH+ CH- Mute Eco Enter Home
TouchUSBType- C HDMI3 USB 3.0 PC MEDIA
Power Source Menu Vol+ Vol- CH+ CH- Mute Eco Enter Home
6
5
1
7
8
9
10
11
12
1 Click to open the left side bar
2 Annotation software
3 Go to all Android Apps
4 On screen user manual
5 Click to close the side bar
6 Click back home
7 Click to annotate
8 Quick access to OPS
9 Click to OSD menu
10 Click to change source
11 Click to reveal all open apps
12 Click to go back
6
6
5
5
1
1
2
2
3
3
4
4
7
7
8
8
9
910
10
Power Source Menu Vol+ Vol- CH+ CH- PC ES Enter Home
Lock / Unlock
OPS Power (On / O)
(Front panel buttons)
2 3 4
TouchUSBType- C HDMI 3 USB3.0 PC MEDIA
TouchUSBType- C HDMI3 USB 3.0 PC MEDIA
Power Source Menu Vol+ Vol- CH+ CH- Mute Eco Enter Home
TouchUSBType- C HDMI3 USB 3.0 PC MEDIA
