Bortoluzzi slider s20 Guide

Assembly
and adjustments
Montaggio
e regolazione
Montage
und Regulierung
MOVIMENTO
SCORREVOLE
COMPLANARE
ULTRALIGHT
ULTRA LIGHT
COPLANAR
SLIDING
MOVEMENT
ULTRA LIGHT
FLÄCHENBÜNDIGER
SCHIEBETÜRBESCHLAG
CONTENITORI
A TERRA
FLOOR
CABINETS
UNTERSCHRANK
2
Kit KitKit
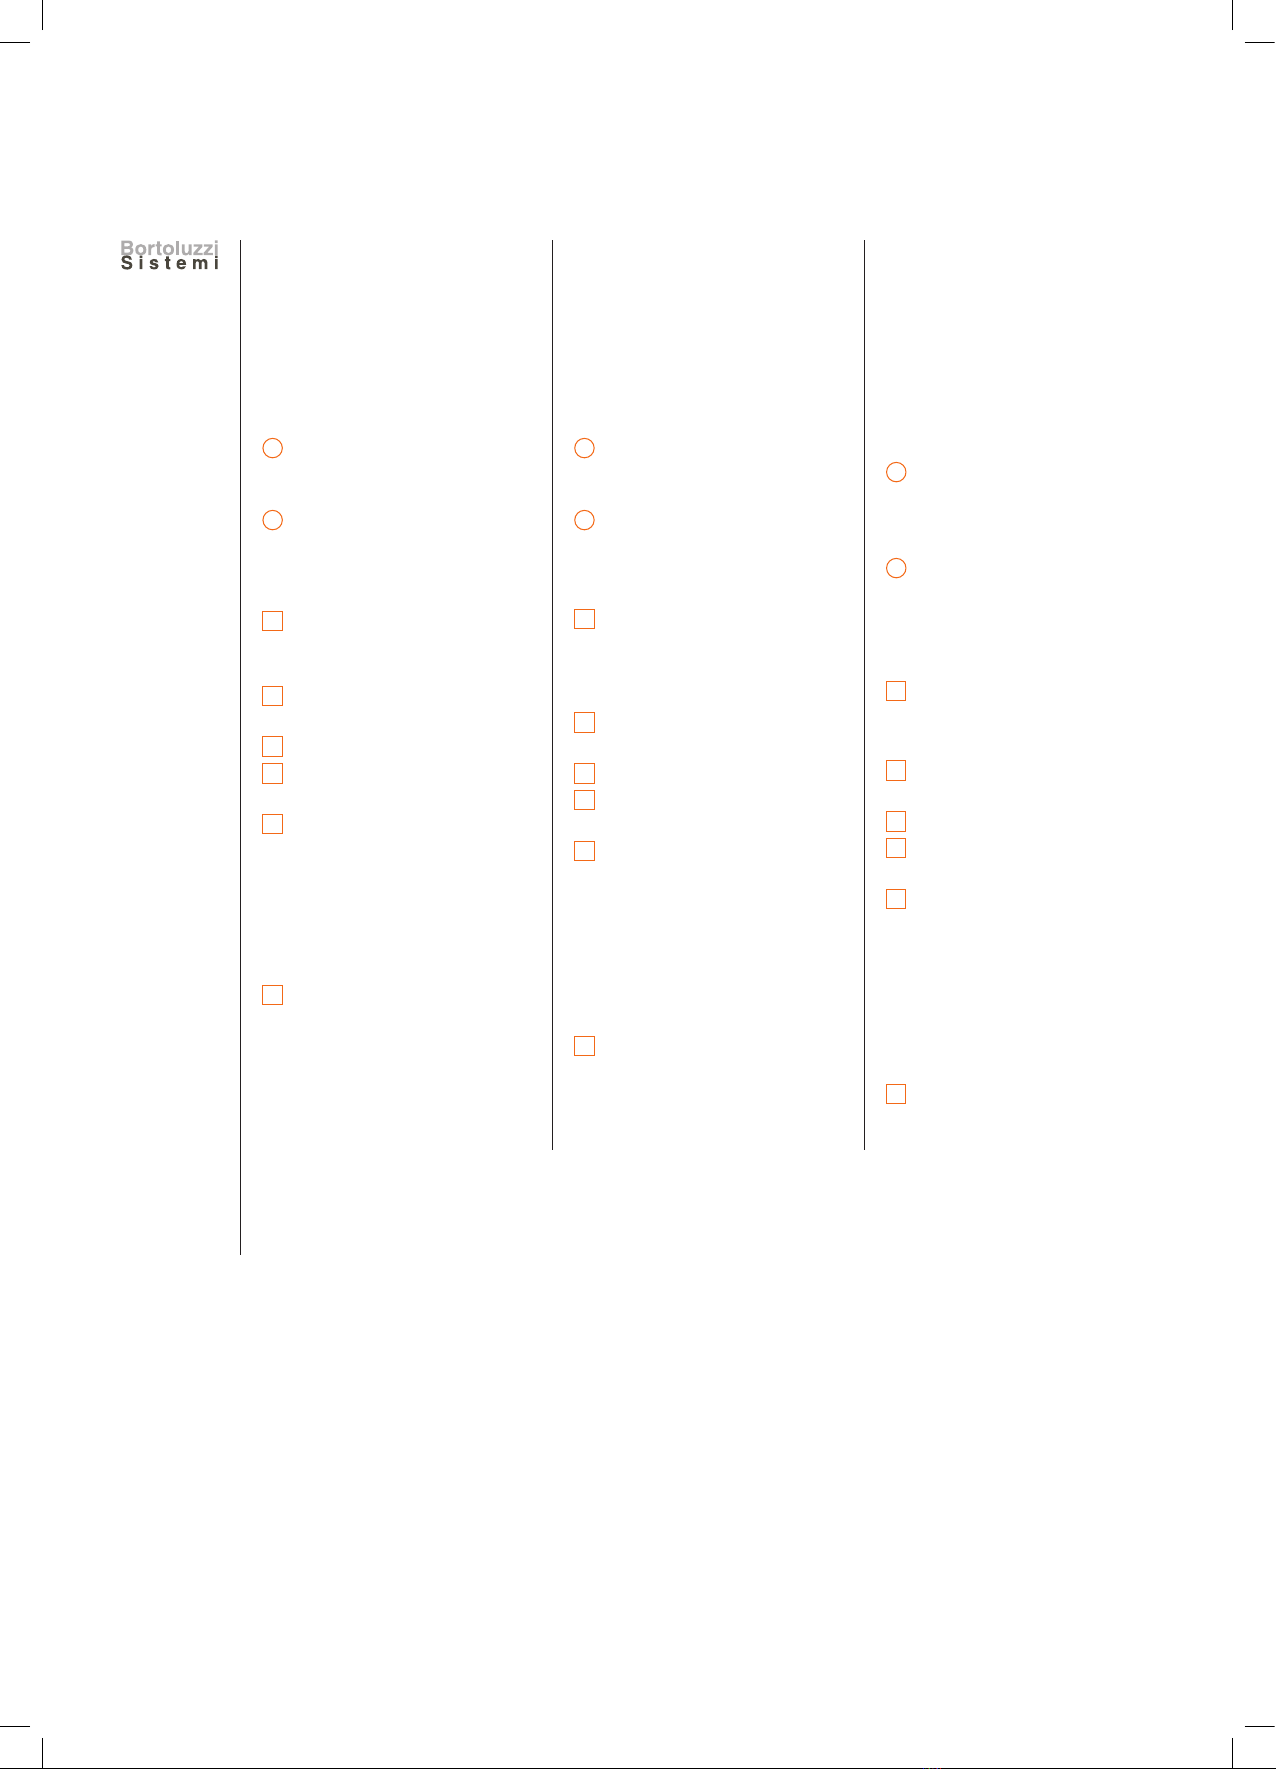
Il cliente riceverà una
scatola contenente:
1n. 1 binario di scorrimento
inferiore con carrelli
per applicazione ante;
2n. 1 binario di guida
superiore (intero).
PER OGNI ANTA
Cn. 1+1 regolatori per anta.
PER OGNI MECCANISMO
Bn. 2 bilancieri guida
superiori;
Dn. 2 staffe superiori;
En. 2 carter copertura staffe
superiori;
Fn. 4 paracolpi autoadesivi,
n. 1 chiave esagonale da
3 mm.
LA QUANTITÀ DEGLI
ELEMENTI SOTTO ELENCATI,
DIPENDE DAL MECCANISMO
An. 4 / 6 / 8 clip per
fissaggio binario
superiore.
The customer will receive a
box containing:
11 no. lower sliding track
complete with carriages
for doors;
21 no. upper guide runner
(in one or two sections).
FOR EACH DOOR
C1+1 no. door adjuster
blocks.
FOR EACH MECHANISM
B2 no. guides for upper
runner;
D2 no. upper brackets;
E2 no. cover plates for
upper brackets;
F4 no. adhesive buffers,
1 no. 3 mm allen key.
THE QUANTITY OF THE
FOLLOWING COMPONENTS
WILL VARY ACCORDING
TO THE LENGTH OF THE
MECHANISM
Ano. Either 4, 6, or 8
fixing clips for upper
guide runner.
Der Kunde wird eine
Schachtel erhalten,
die folgendes enthält:
1n. 1 untere Schiene
mit Laufwagen für den
Zusammenbau mit
den Türen;
2n. 1 obere
Führungsschiene
(ganz Teilen).
FÜR JEDE TÜR
Cn. 1+1 Reglerpaare für Türen.
FÜR JEDEN MECHANISMUS
Bn. 2 obere
Führungsausleger;
Dn. 2 obere Halterungen;
En. 2 Schutzkappen für die
oberen Halterungen;
Fn. 4 selbstklebende Pfuffer,
n. 1 Sechskantschlüssel
3 mm.
DIE MENGE DER ELEMENTE,
DIE UNTEN BESCHRIEBEN
WERDEN, IST VOM BESCHLAG
ABHÄNGIG
An. 4/6/8 Klips für die
Befestigung der
oberen Schiene.
3
CONTENITORI A TERRA
FLOOR CABINETS
UNTERSCHRANK
1
2
D E F
A B C
x 4 / 6 / 8 x 2 x 1
x 1x 1x 1 x 1
x 1
x 1
x 1
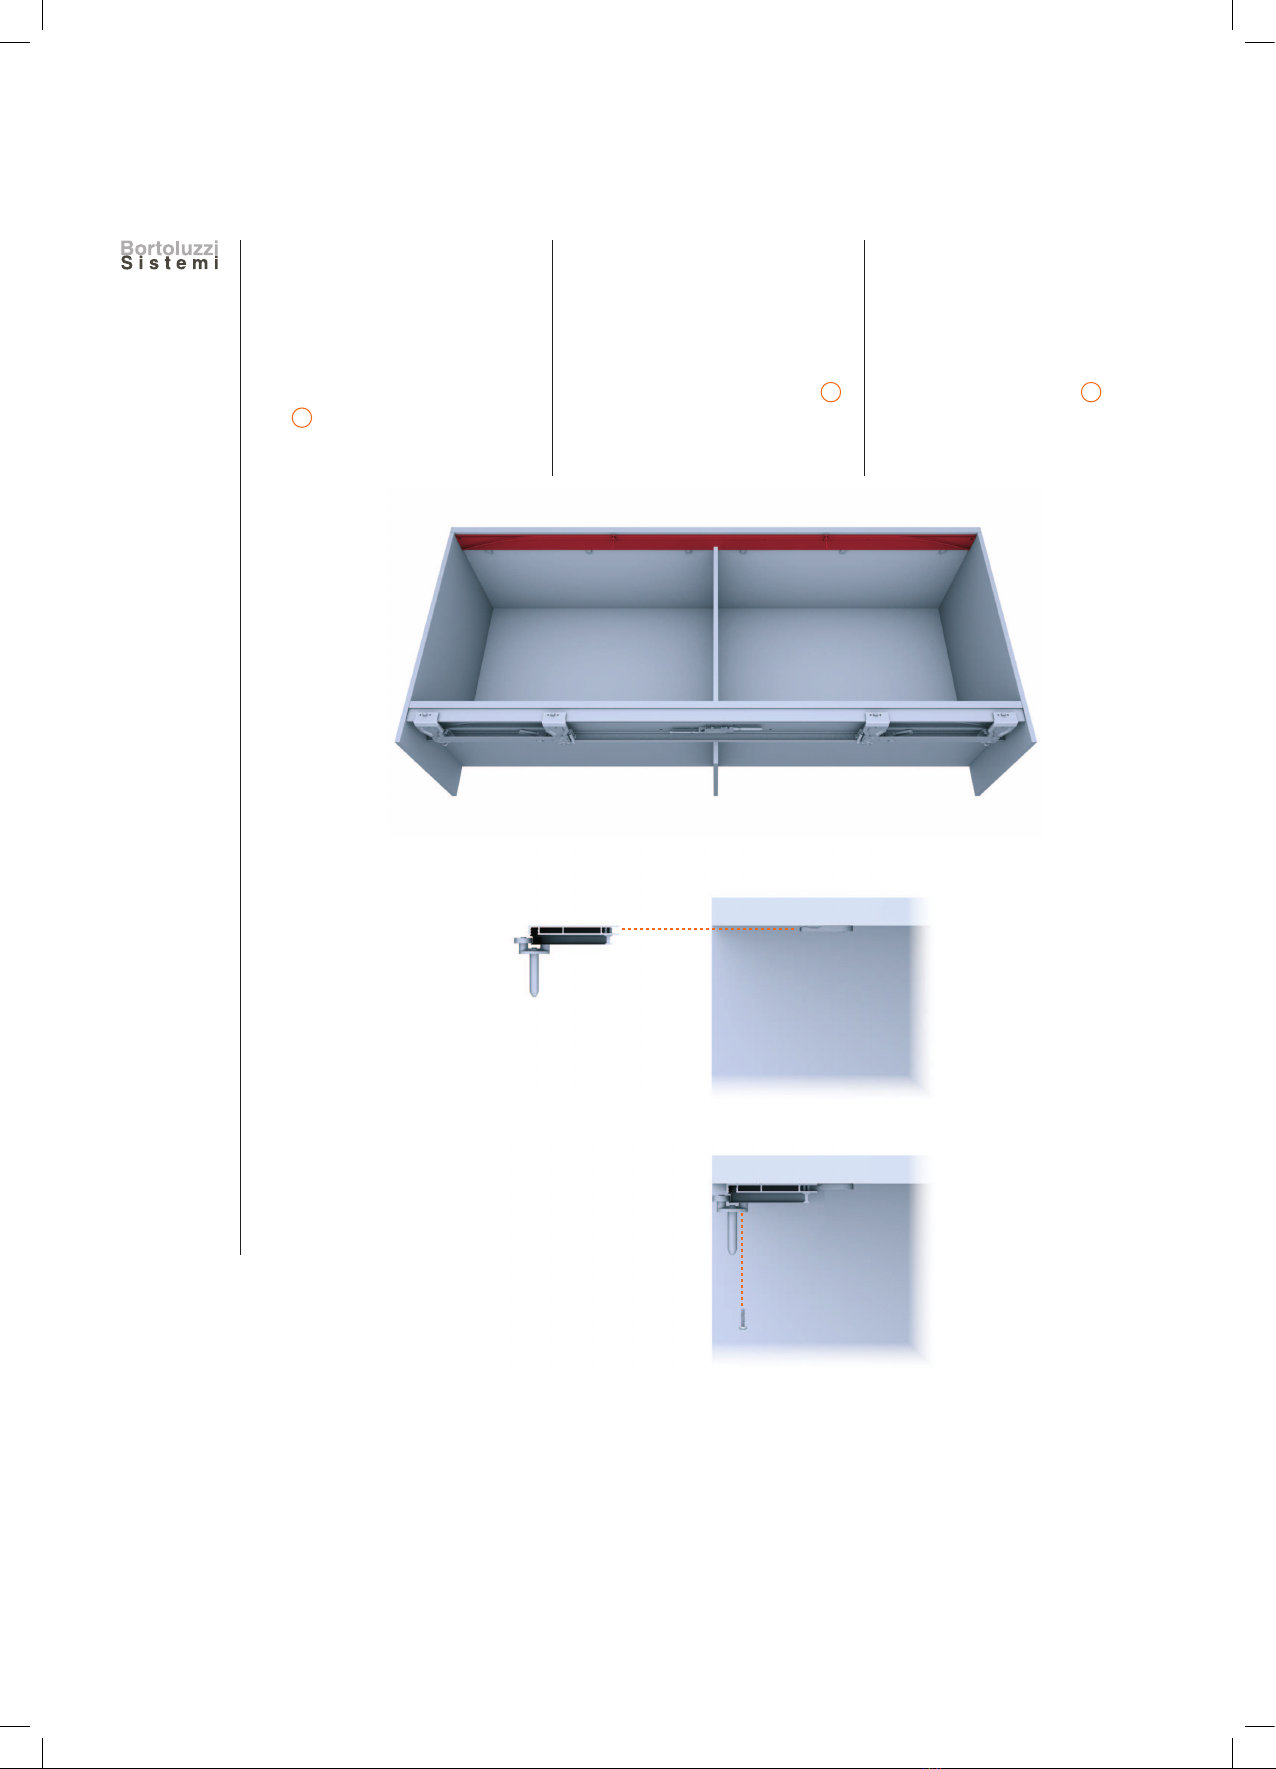
4
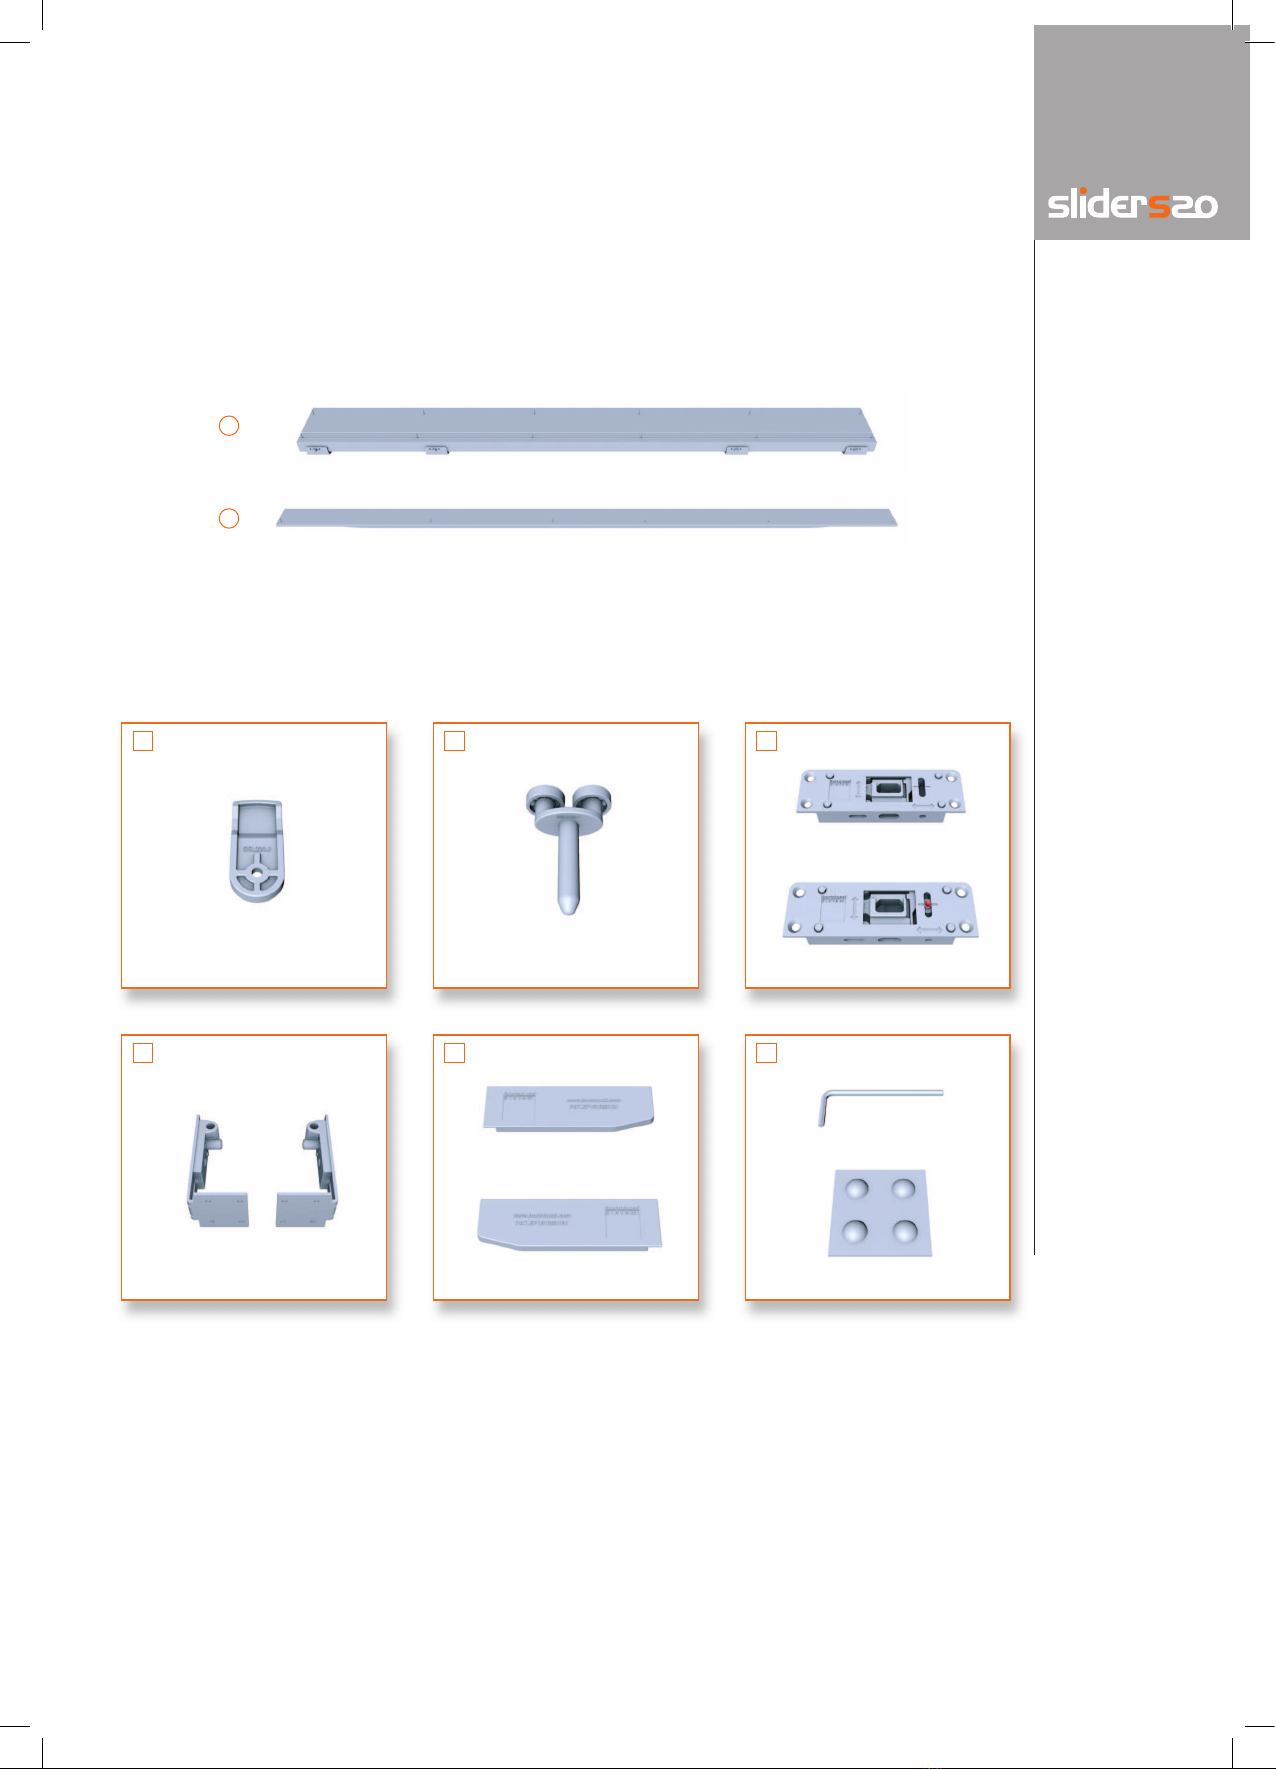
1) Mettere in bolla il contenito-
re.
1) Ensure the cabinet is plumb
and level.
1) Den Behälter ins Lot brin-
gen.
2) Applicare al cielo le clip in
plastica A con viti TC. 2) Fix the plastic clips A to
the top panel with wood-
screws.
2) Die Plastikklips A nach
oben mit TC (Sternkopf)
Schrauben befestigen.
MontageAssemblyMontaggio
5
CONTENITORI A TERRA
FLOOR CABINETS
UNTERSCHRANK
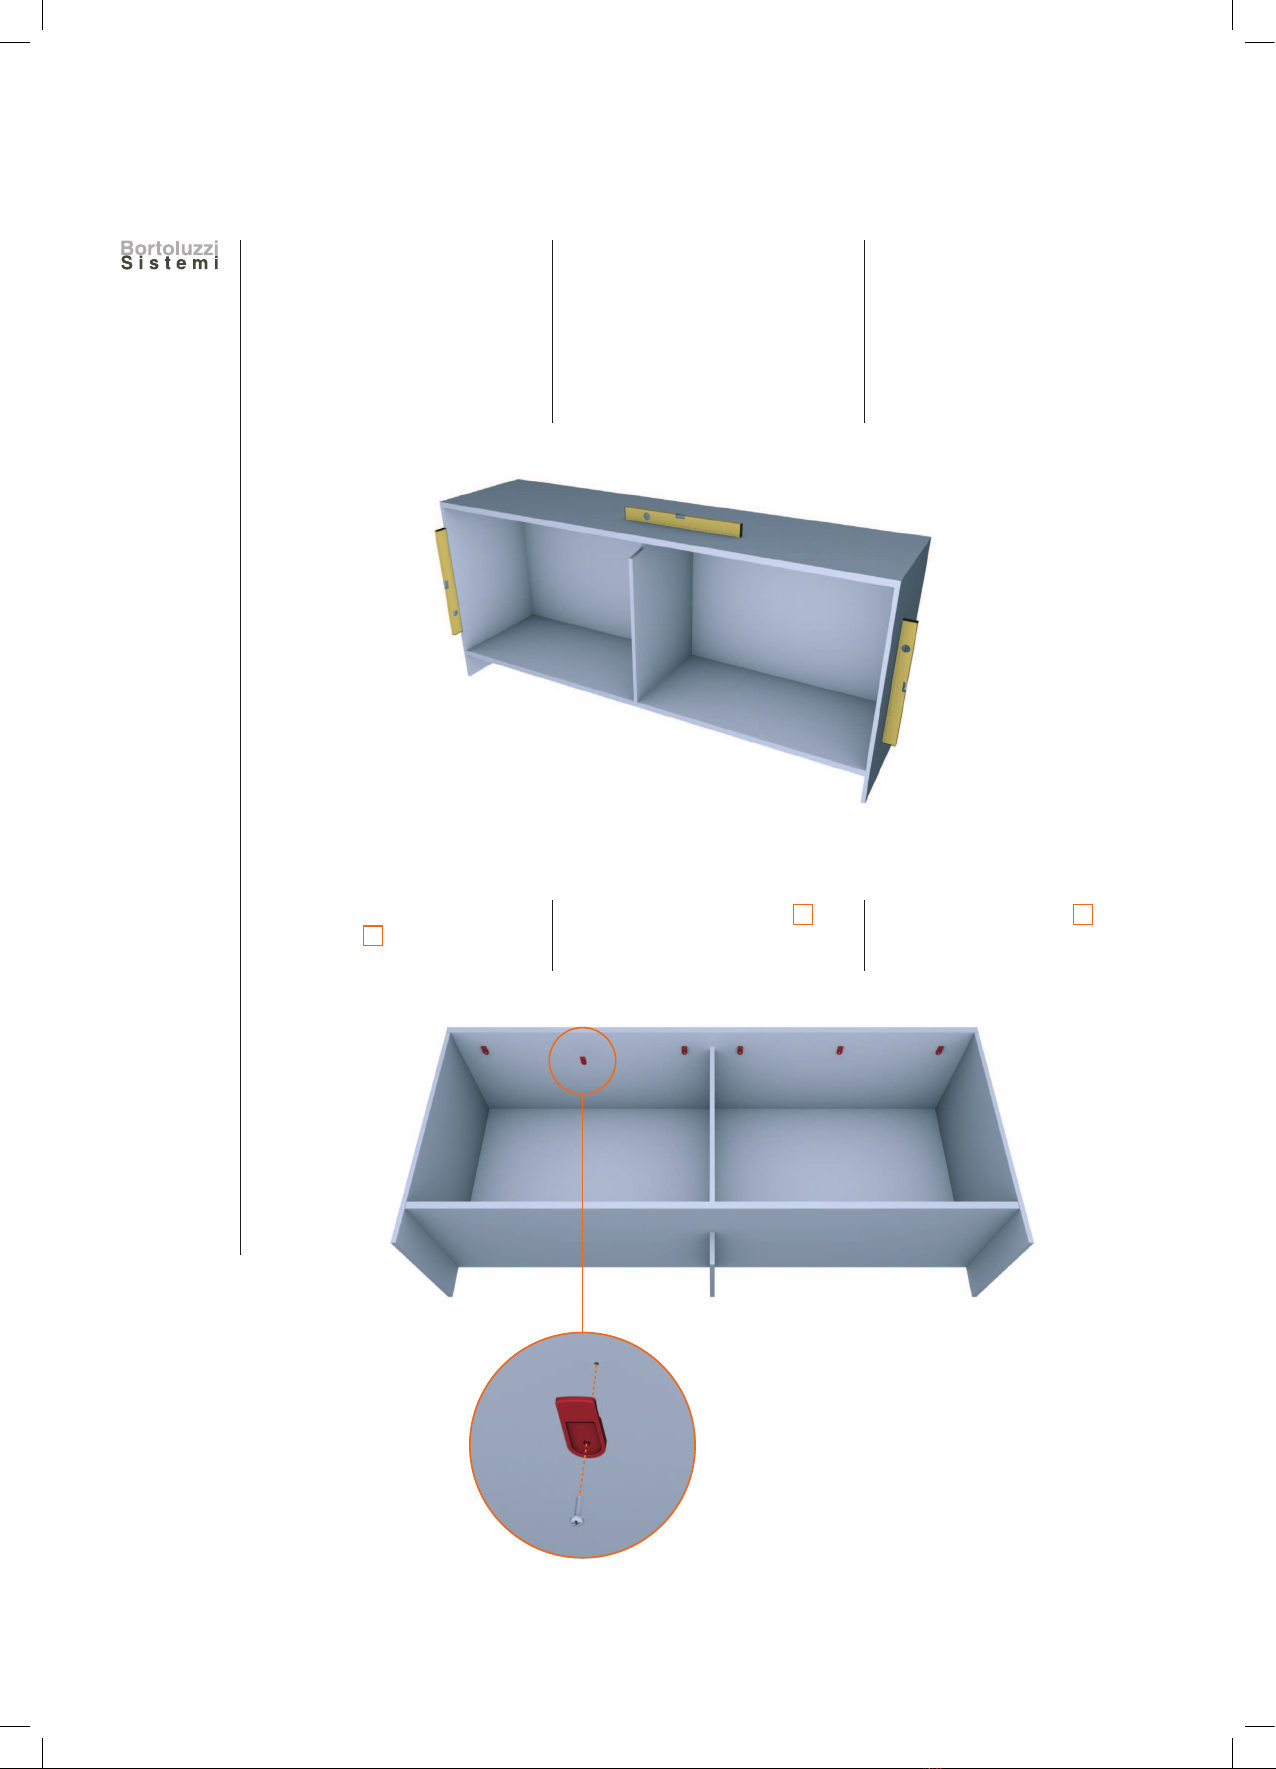
3) Applicare il binario di scorri-
mento inferiore 1e fissarlo
con viti autofilettanti TPS.
3) Position the sliding track 1
and fix it with self-tapping
screws.
3) Die untere Schiene befes-
tigen 1und sie mit den
gewindeschneidenden
Schrauben (TPS) fixieren.
4) Inserire i bilancieri B nella
guida del binario superiore
2.
4) Insert the runners B in the
track 2.
4) Die Ausleger B in die Füh-
rung der oberen Schiene
einsetzen 2.
6
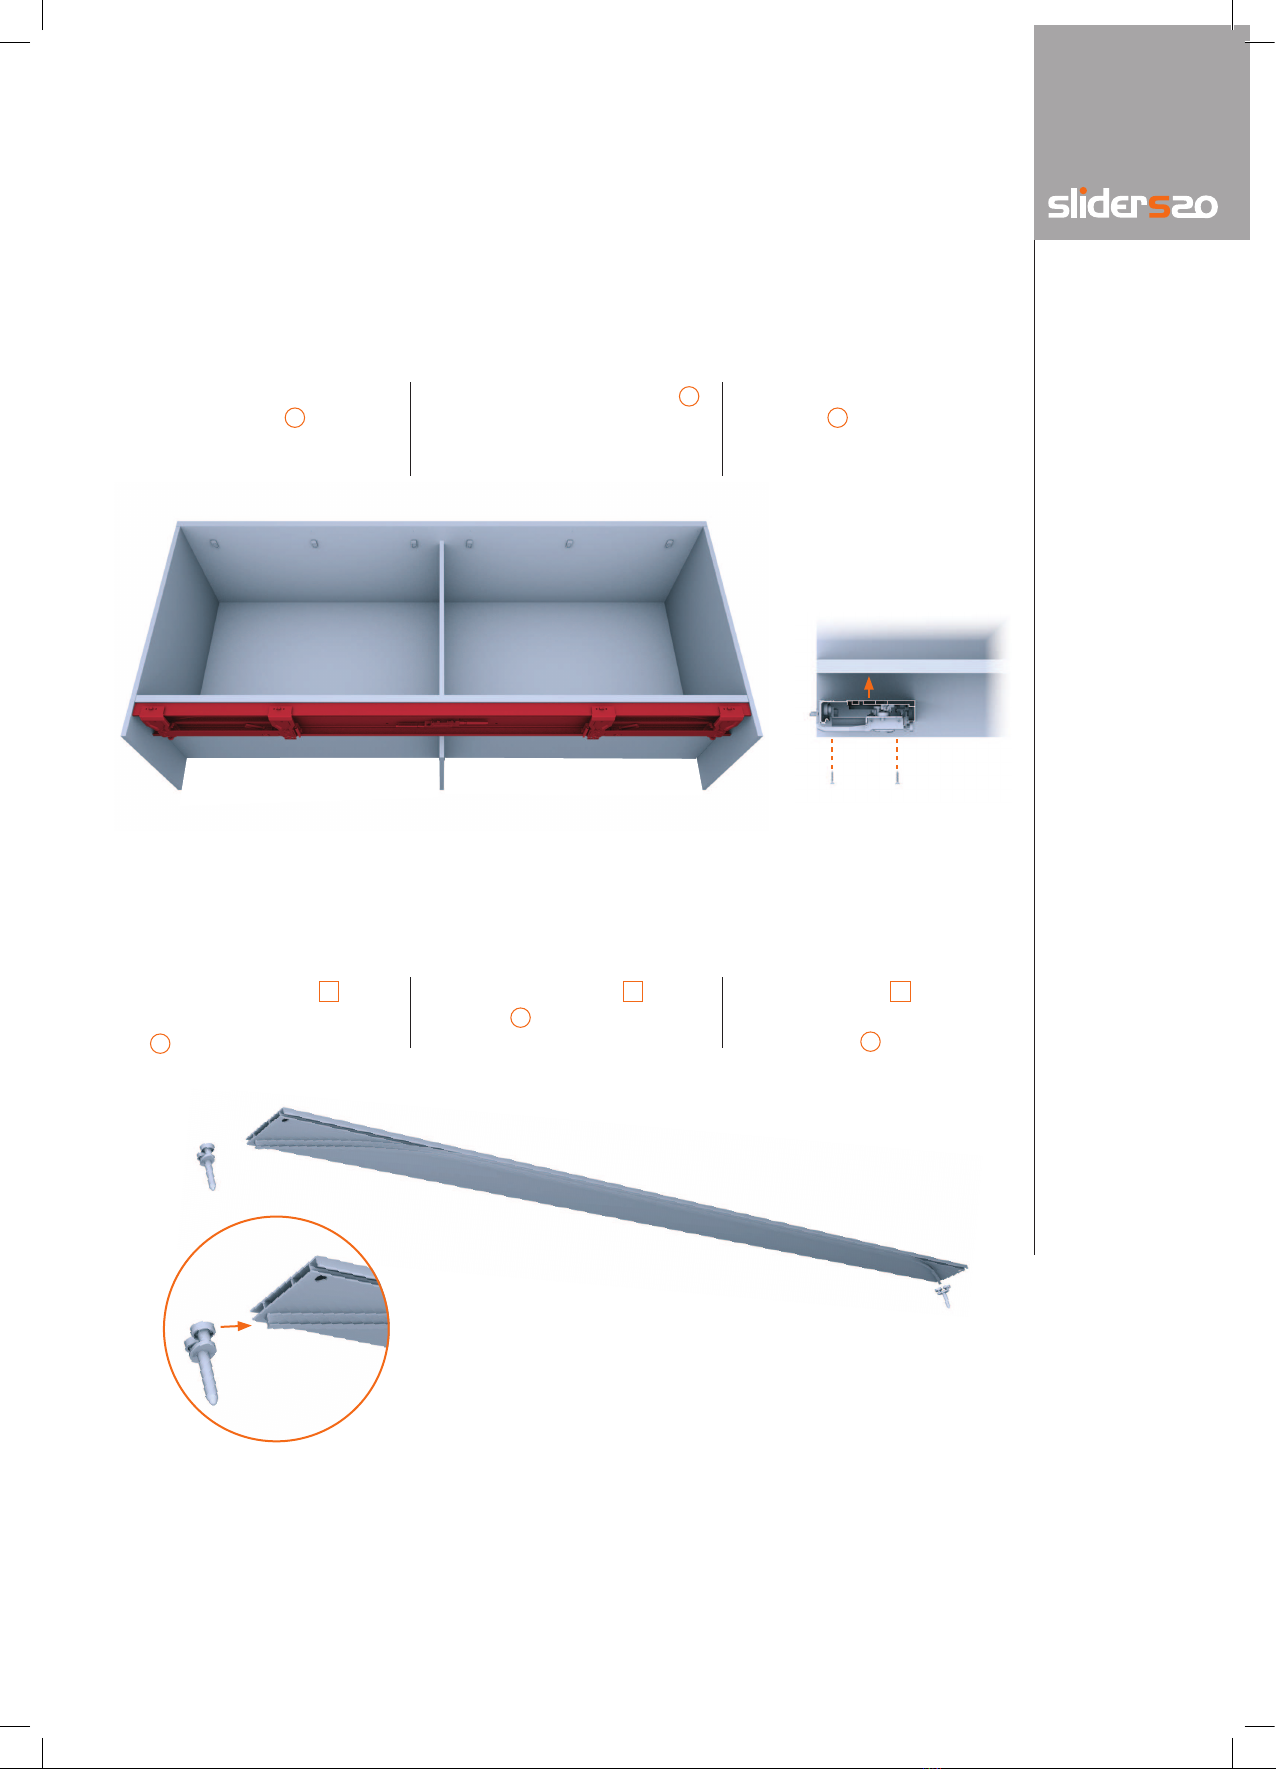
5) Inserire la guida superiore
2nelle clip e fissarla con
viti TC.
5) Die obere Führung 2in die
Klammern einsetzen und
sie mit TC Schrauben be-
festigen.
MontageAssemblyMontaggio
5) Insert the upper track 2
into the clips and secure it
with woodscrews.
7
CONTENITORI A TERRA
FLOOR CABINETS
UNTERSCHRANK
B BA A
A B
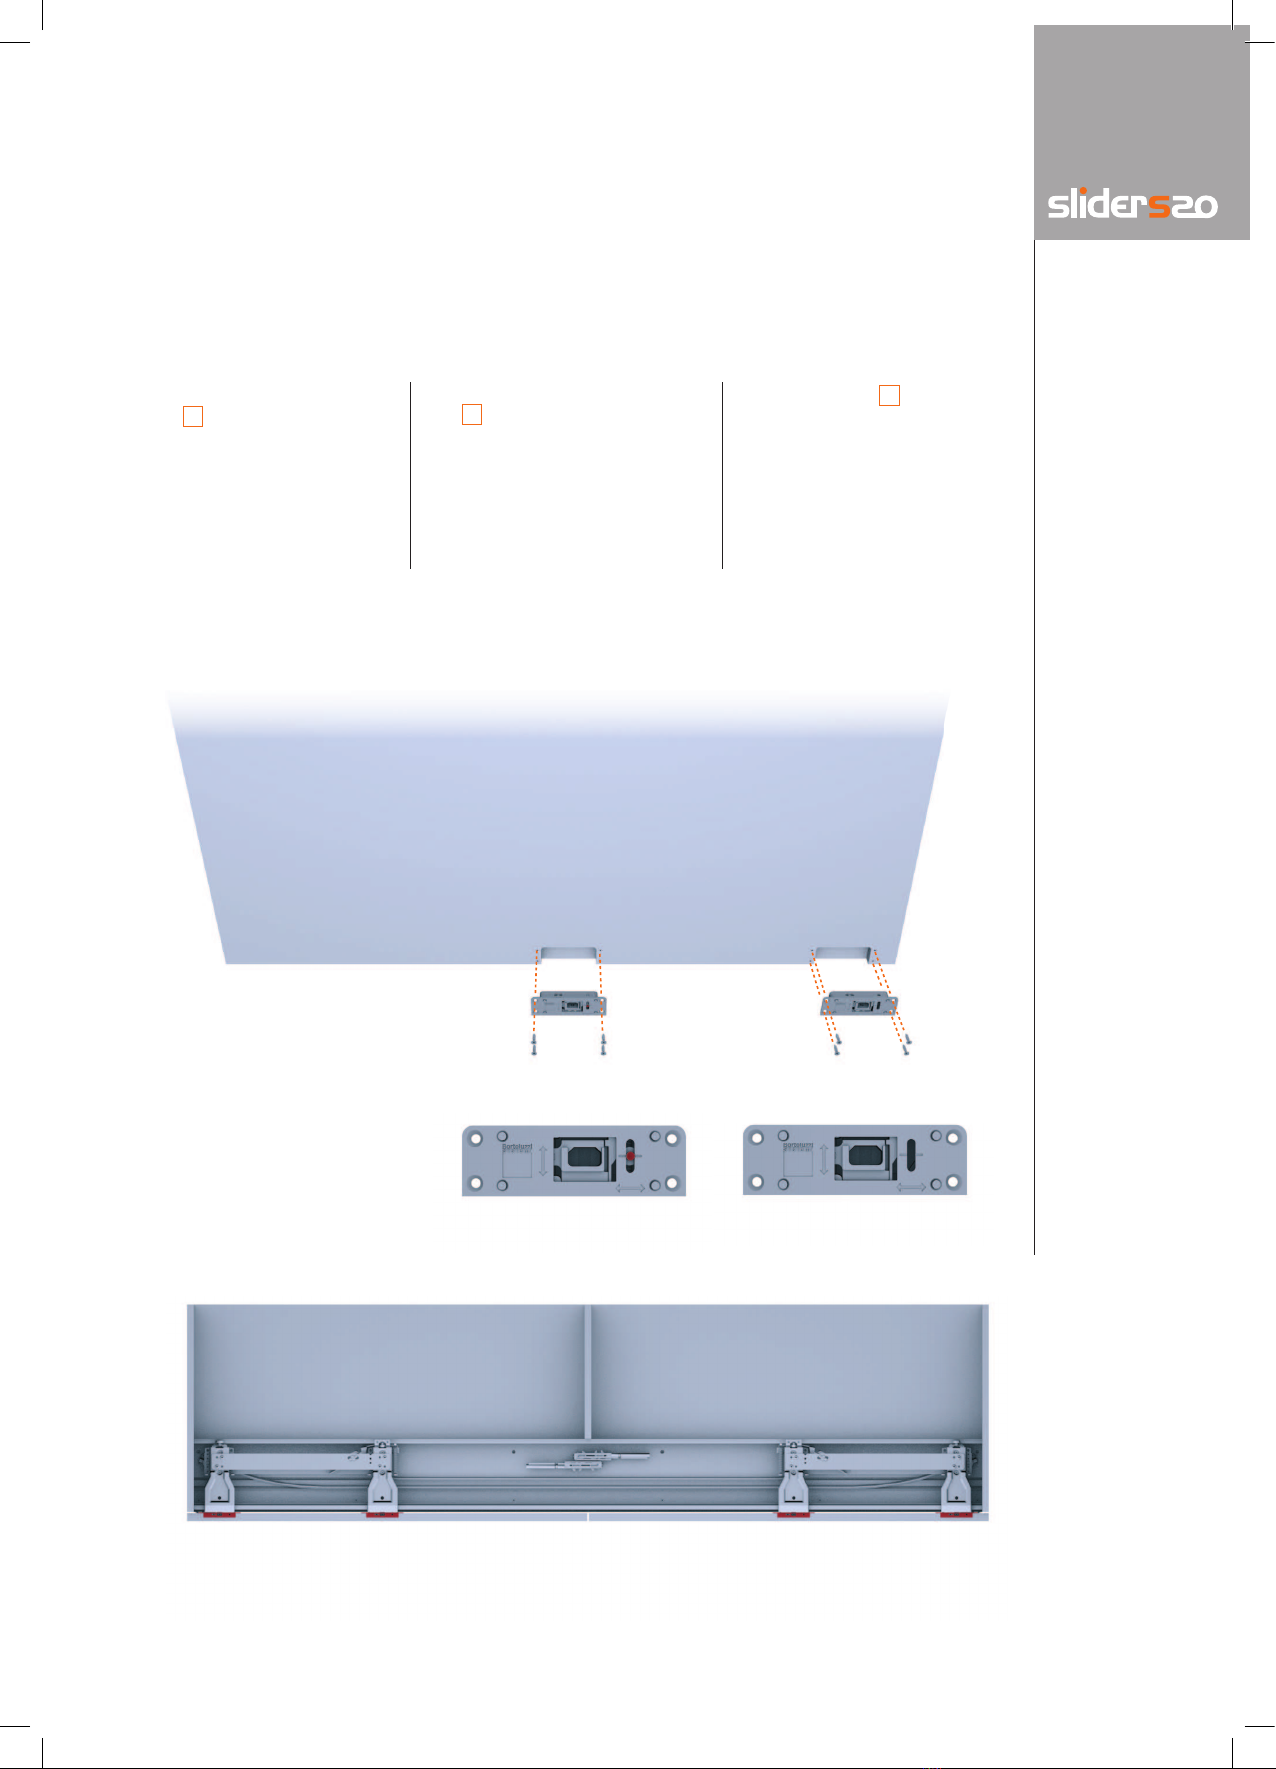
6) Fissare con viti TPS i regola-
tori C , verificandone la cor-
retta disposizione.
A= Regolatore
verticale e orizzontale.
B= Regolatore verticale.
4) Position the adjuster blocks
C on the doors checking
the correct arrangement.
A= Vertical and horizontal
regulator.
B= Vertical regulator.
4) Die Regler C an der Tür
befestigen, und die korrekte
Anordnung prüfen.
A= Waagrecht-senkrecht
Ausrichtungsbeschlag.
B= Senkrecht
Ausrichtungsbeschlag.
8
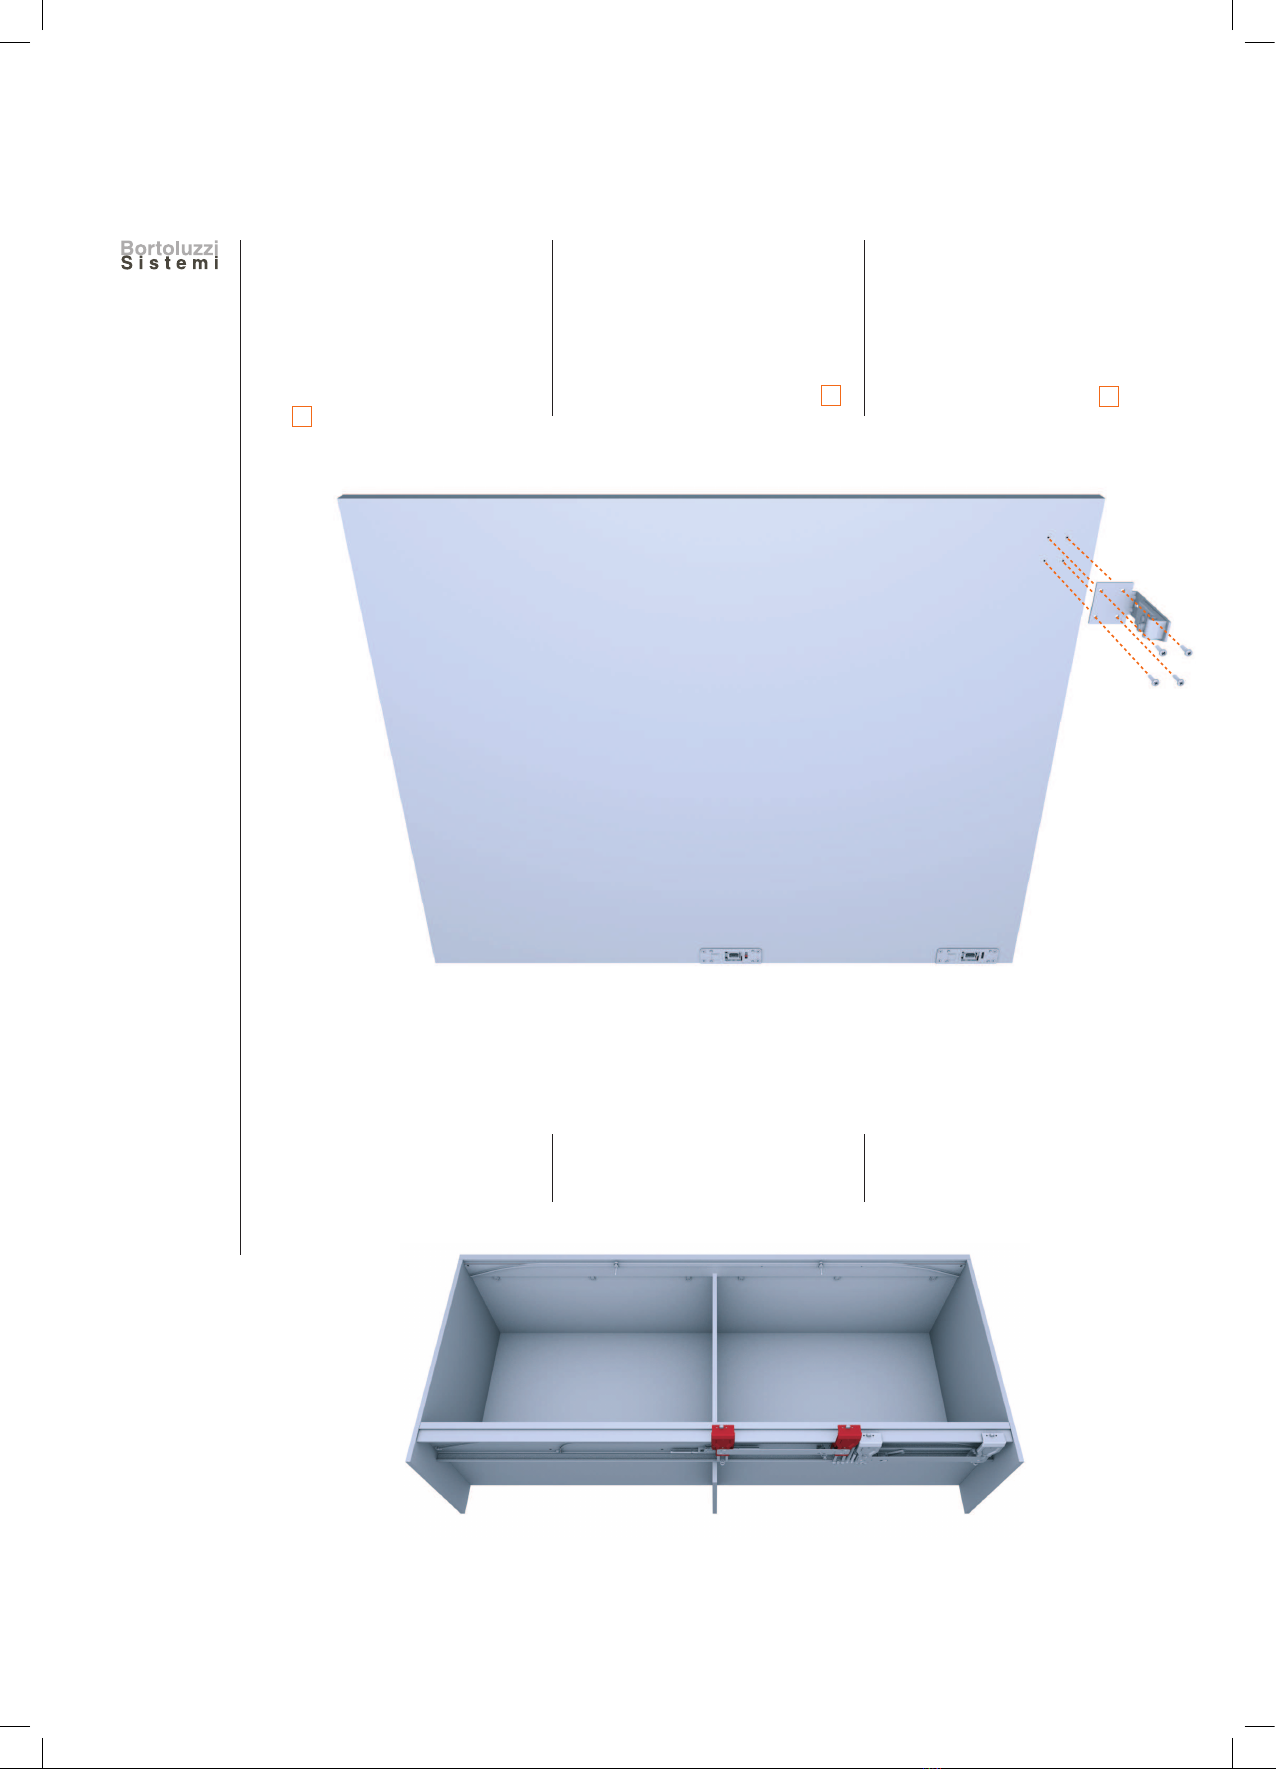
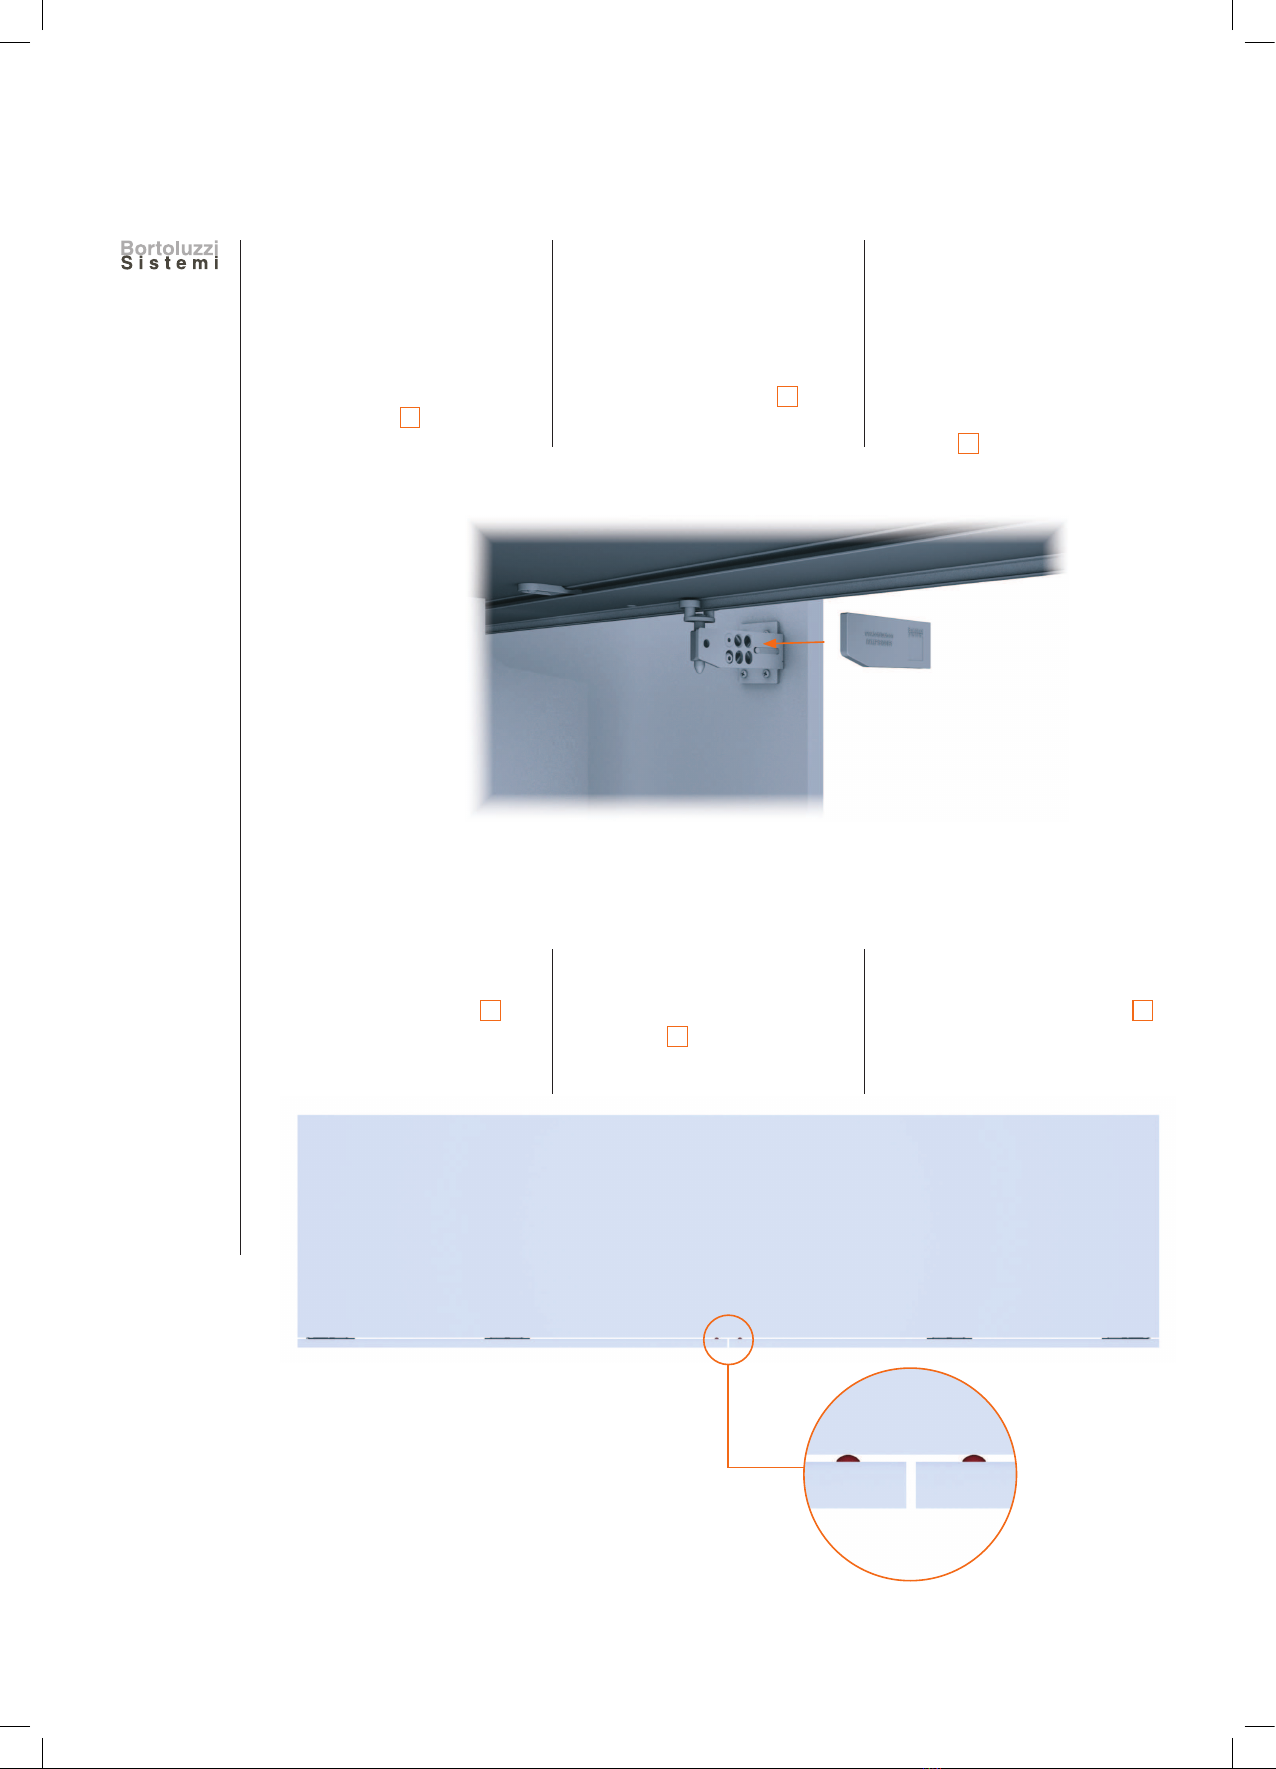
7) Fissare la staffa superiore
D con viti TC. 7) Fix the upper bracket D
with woodscrews.
7) Die obere Halterung D mit
TC Schrauben befestigen.
8) Estrarre una coppia di car-
relli fino a totale apertura.
8) Move one pair of carriages
until it is fully open.
8) Einen der Laufwagen bis
zur vollkommenen Öffnung
herausziehen.
MontageAssemblyMontaggio
9
CONTENITORI A TERRA
FLOOR CABINETS
UNTERSCHRANK
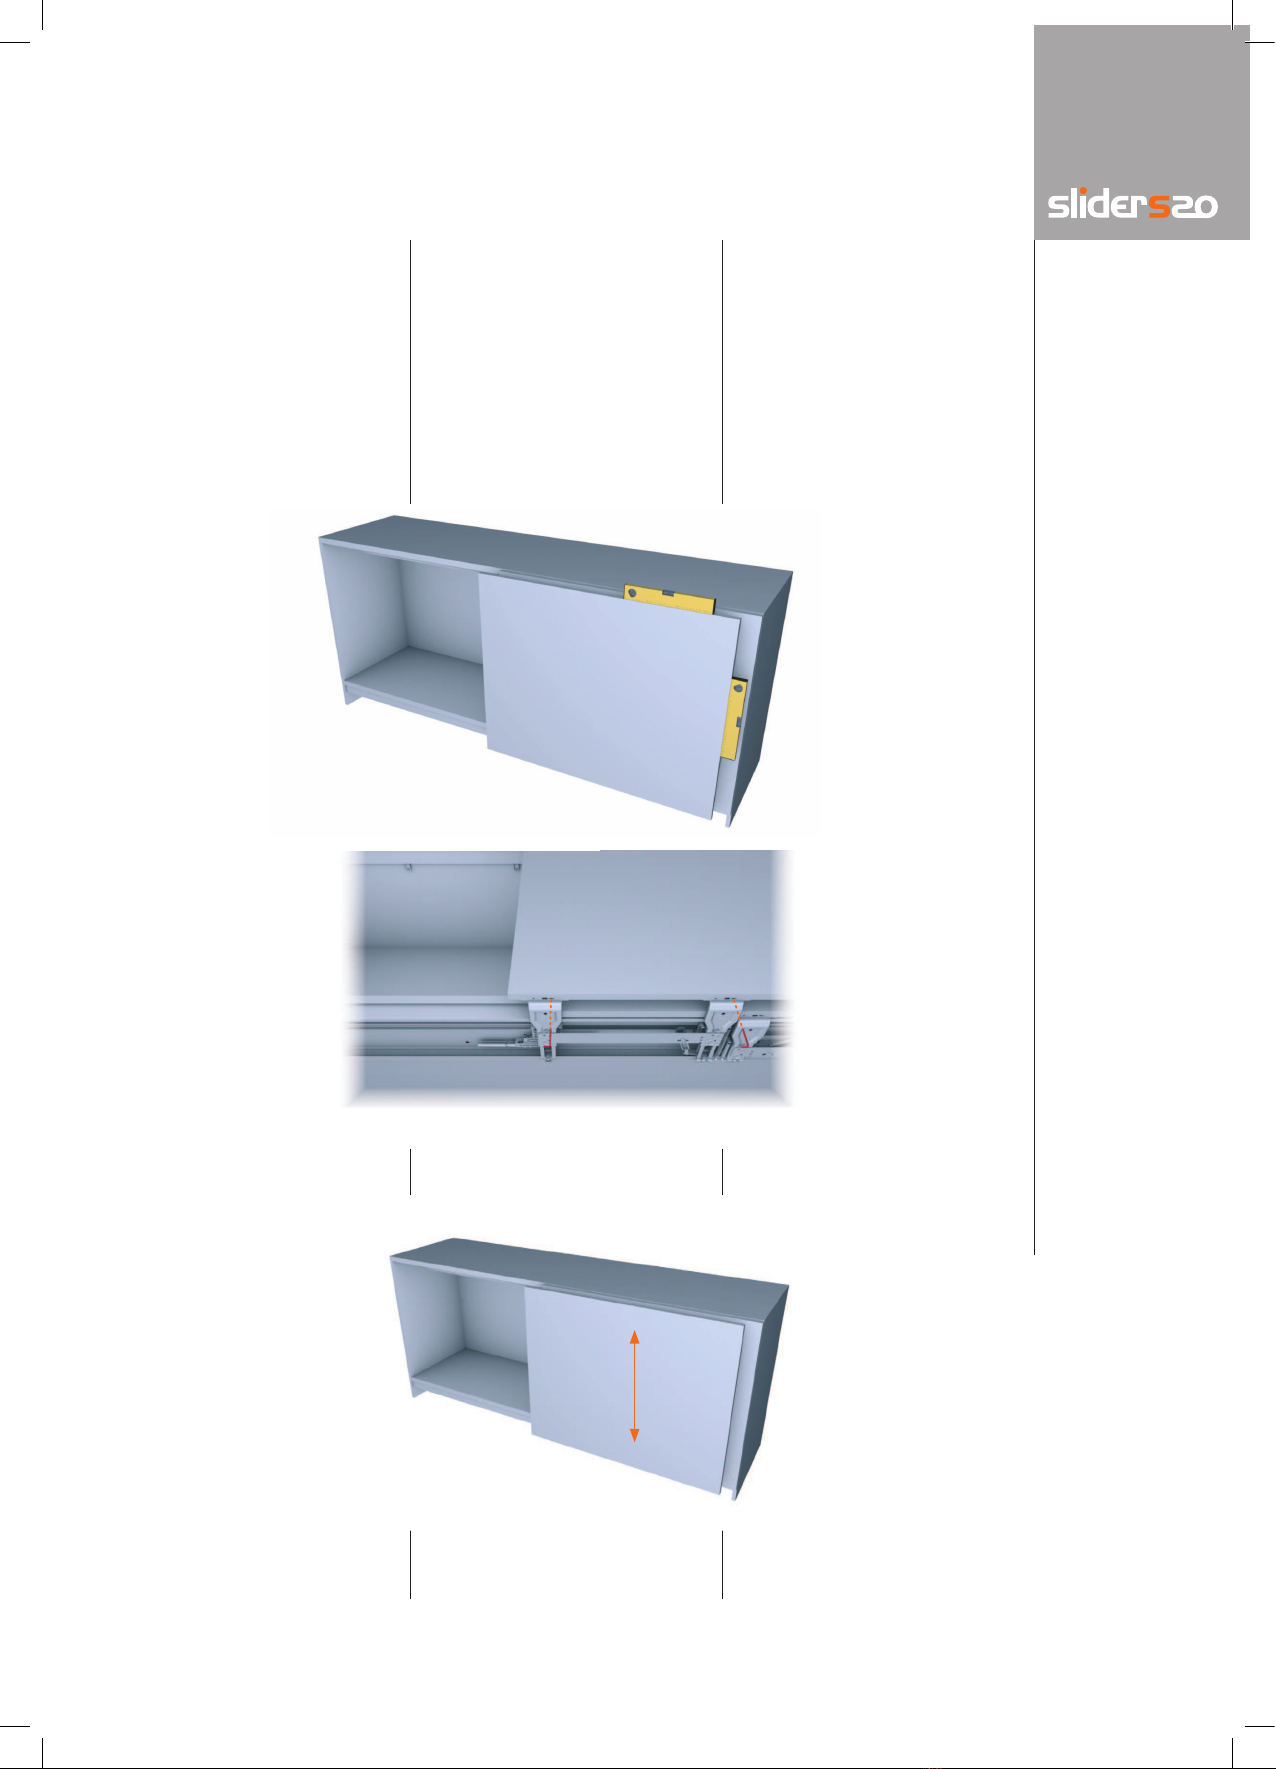
9) Applicare l’anta inserendo
prima il perno del bilancie-
re superiore nel foro della
staffa e poi i perni dei carrelli
inferiori nei regolatori.
9) Position the door by first lo-
cating the pin on the upper
guide into the hole in the
bracket and then the pins
of the lower carriages into
their holes in the adjuster
blocks.
9) Die Tür befestigen, indem
man vorher den Bolzen des
oberen Auslegers in das
Loch des Halters einsetzt,
und danach die Bolzen der
unteren Wagen in den Reg-
lern einsetzt.
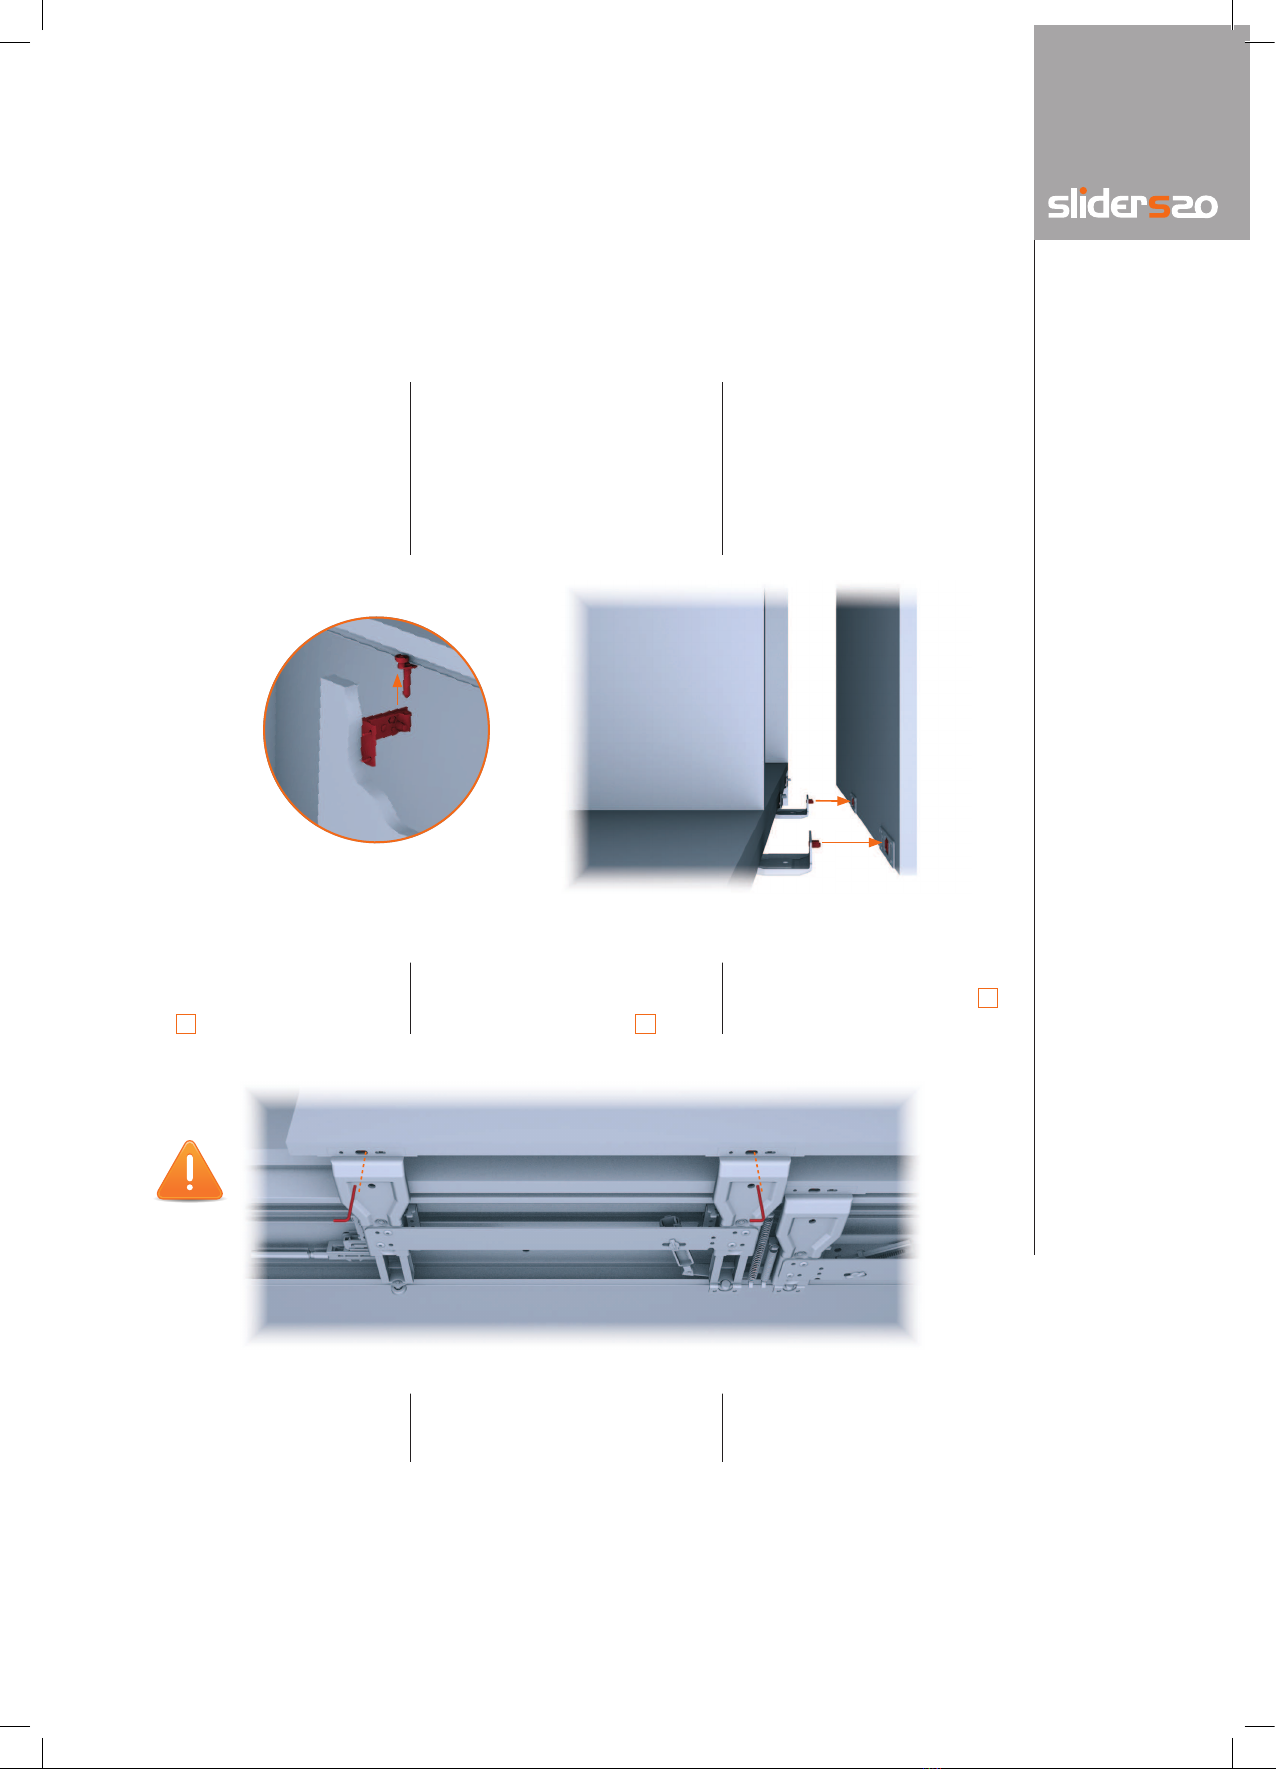
10) Importante! Bloccare
l’anta con chiave esagona-
le F .
10) Important! Fix the door
onto the carriages using
the 3 mm allen key F .
10) Die Türen mit den Sechs-
kantschrauben fixieren F .
Ripetere la procedura dal
punto 8 al punto 10 per la
seconda anta.
Repeat the procedure from
point 8 to point 10 for the
second door.
Die Montage für die zweite
Tür von Punkt 8 bis Punkt
10 wiederholen.
10
11) Coprire le staffe superiori
con i carter E .11) Clip the cover plate E onto
the upper bracket.
11) Die oberen Halterungen mit
den Schutzkappen verse-
hen E .
12) Applicare sul lato interno
delle ante i paracolpi auto-
adesivi in dotazione F , in
battuta su base e cielo al
centro del mobile.
12) Apply the adhesive decel-
erating components pro-
vided to the inside of the
doors F , sealing the bot-
tom and top in the centre
of the structure.
12) Auf der Innenseite der Tür-
flügel die mitgelieferten
selbstklebenden Puffer F
oben und unten in der Mit-
te des Möbelstücks anbrin-
gen.
MontageAssemblyMontaggio
11
CONTENITORI A TERRA
FLOOR CABINETS
UNTERSCHRANK
Ripetere le operazioni anche
sulla seconda anta. Chiude-
re le ante.
Repeat the operation on the
other door also. Close the
doors.
Die Vorgänge auch auf der
zweiten Tür wiederholen.
Die Türen schliessen.
13) Aprire completamente l’an-
ta e metterla in bolla agen-
do sui regolatori inferiori
nell’impronta di destra.
13) Completely open the door
and level it by adjusting
the lower regulators in the
rightslot.
13) Die Tür vollkommen öffnen
und sie ins Lot bringen, in
dem man die unteren Reg-
ler in der rechten Markie-
rung justiert.
Regolazioni RegulierungAdjustments
14) Allo stesso modo, regolare
la posizione verticale.
14) In the same way, adjust the
vertical position.
14) In gleicher Weise die senk-
rechte Lage justieren.

12
=
=
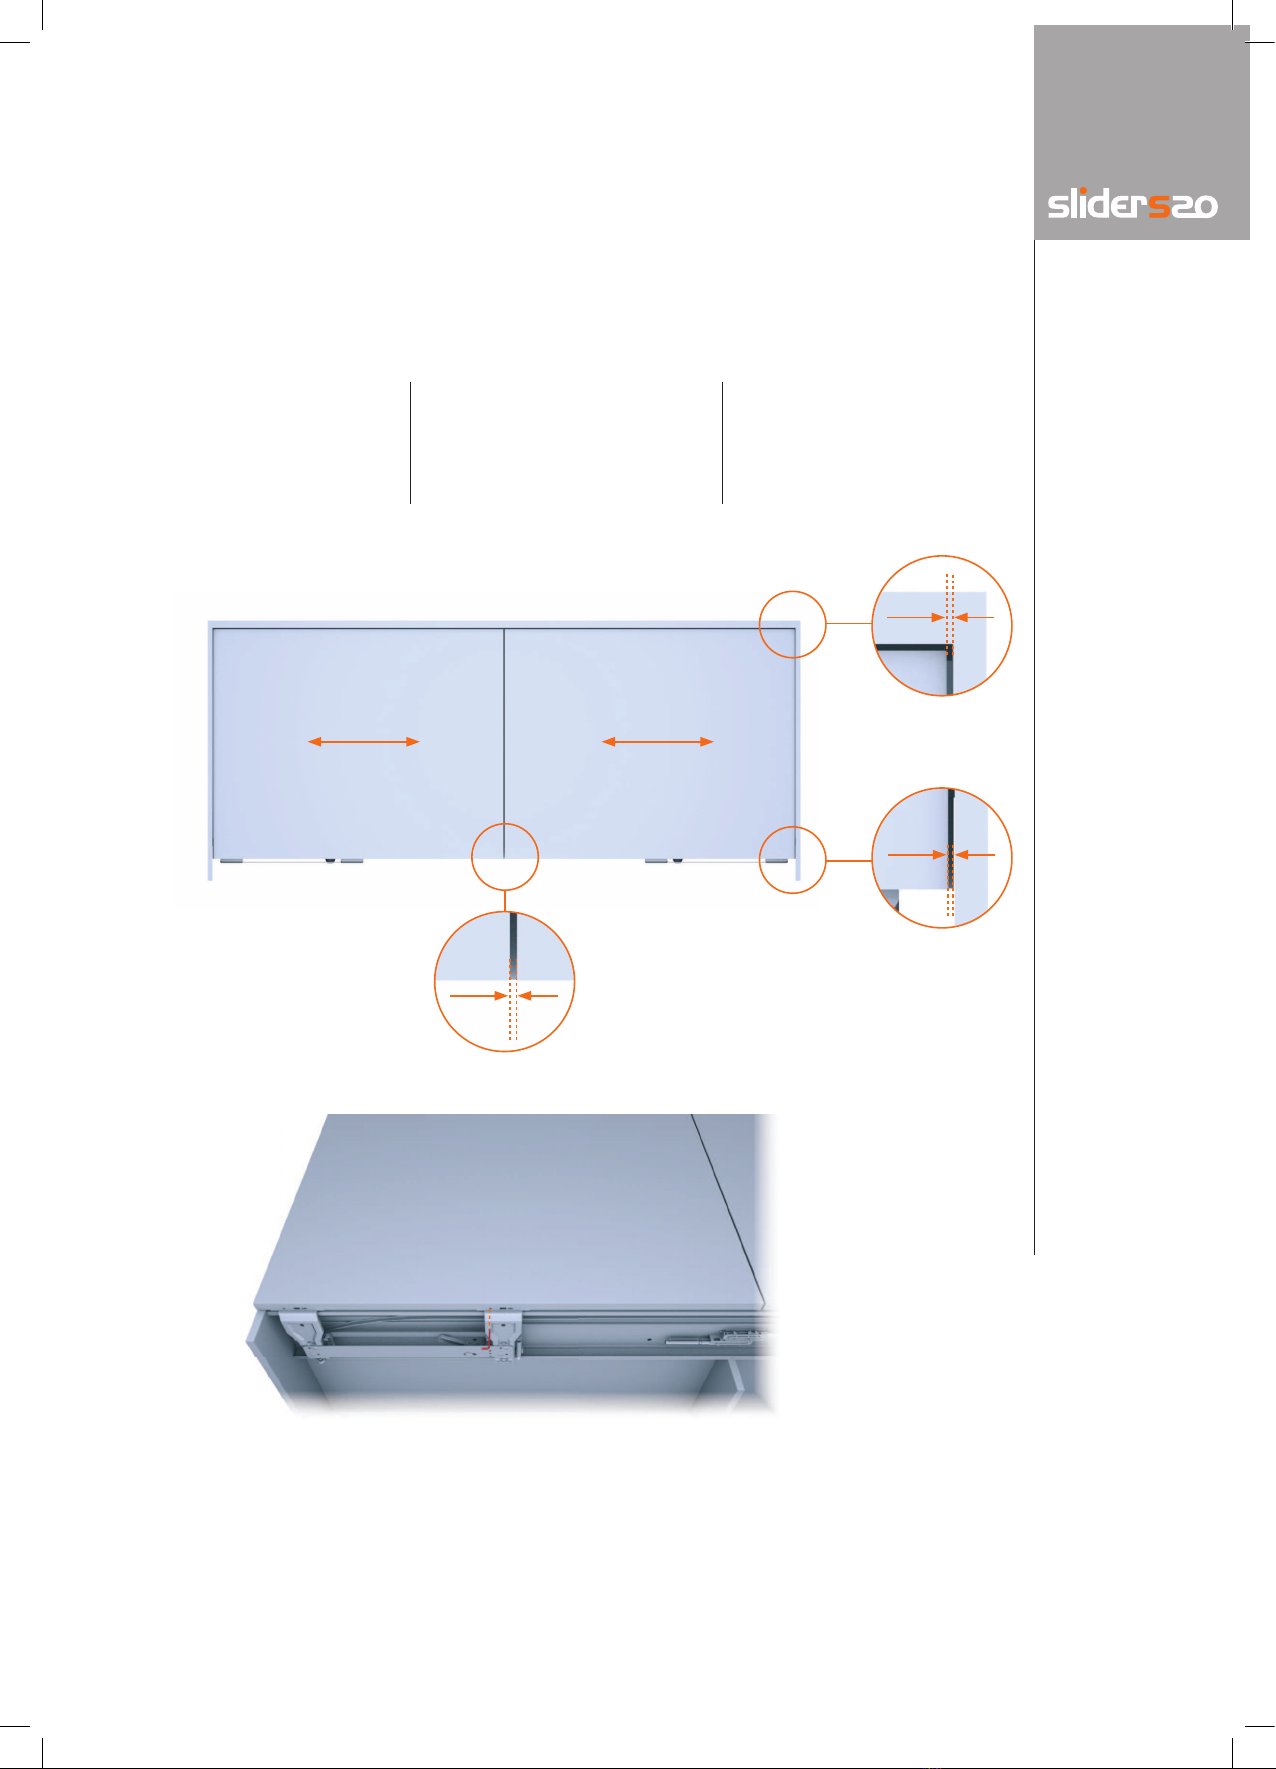
15) Se lo scuretto tra le ante
non risultasse parallelo,
agire sui regolatori verticali.
Attenzione: l’eventuale
regolazione deve essere
minima.
15) If the gap between the
doors is not parallel, adjust
it using the vertical adjust-
ers.
Attention: any adjust-
ment must be minimal.
15) Wenn der Spalt zwischen
den Türen nicht parallel
sein sollte, die senkrechten
Regler justieren.
Achtung: die etwaige
Regelung muss gering-
fügig sein.
Regolazioni RegulierungAdjustments
13
CONTENITORI A TERRA
FLOOR CABINETS
UNTERSCHRANK
16) Regolare la larghezza degli
scuretti tra ante e struttura
agendo sul regolatore cen-
trale nell’impronta di sini-
stra.
16) The doors can be adjusted
horizontally by using the
regulator in the left hand
slot in the central adjuster
block.
16) Die Spaltenbreite zwischen
den Türen und dem Korpus
einstellen, indem man den
Regler in der linken Markie-
rung justiert.
3 mm
3 mm
4 mm
14
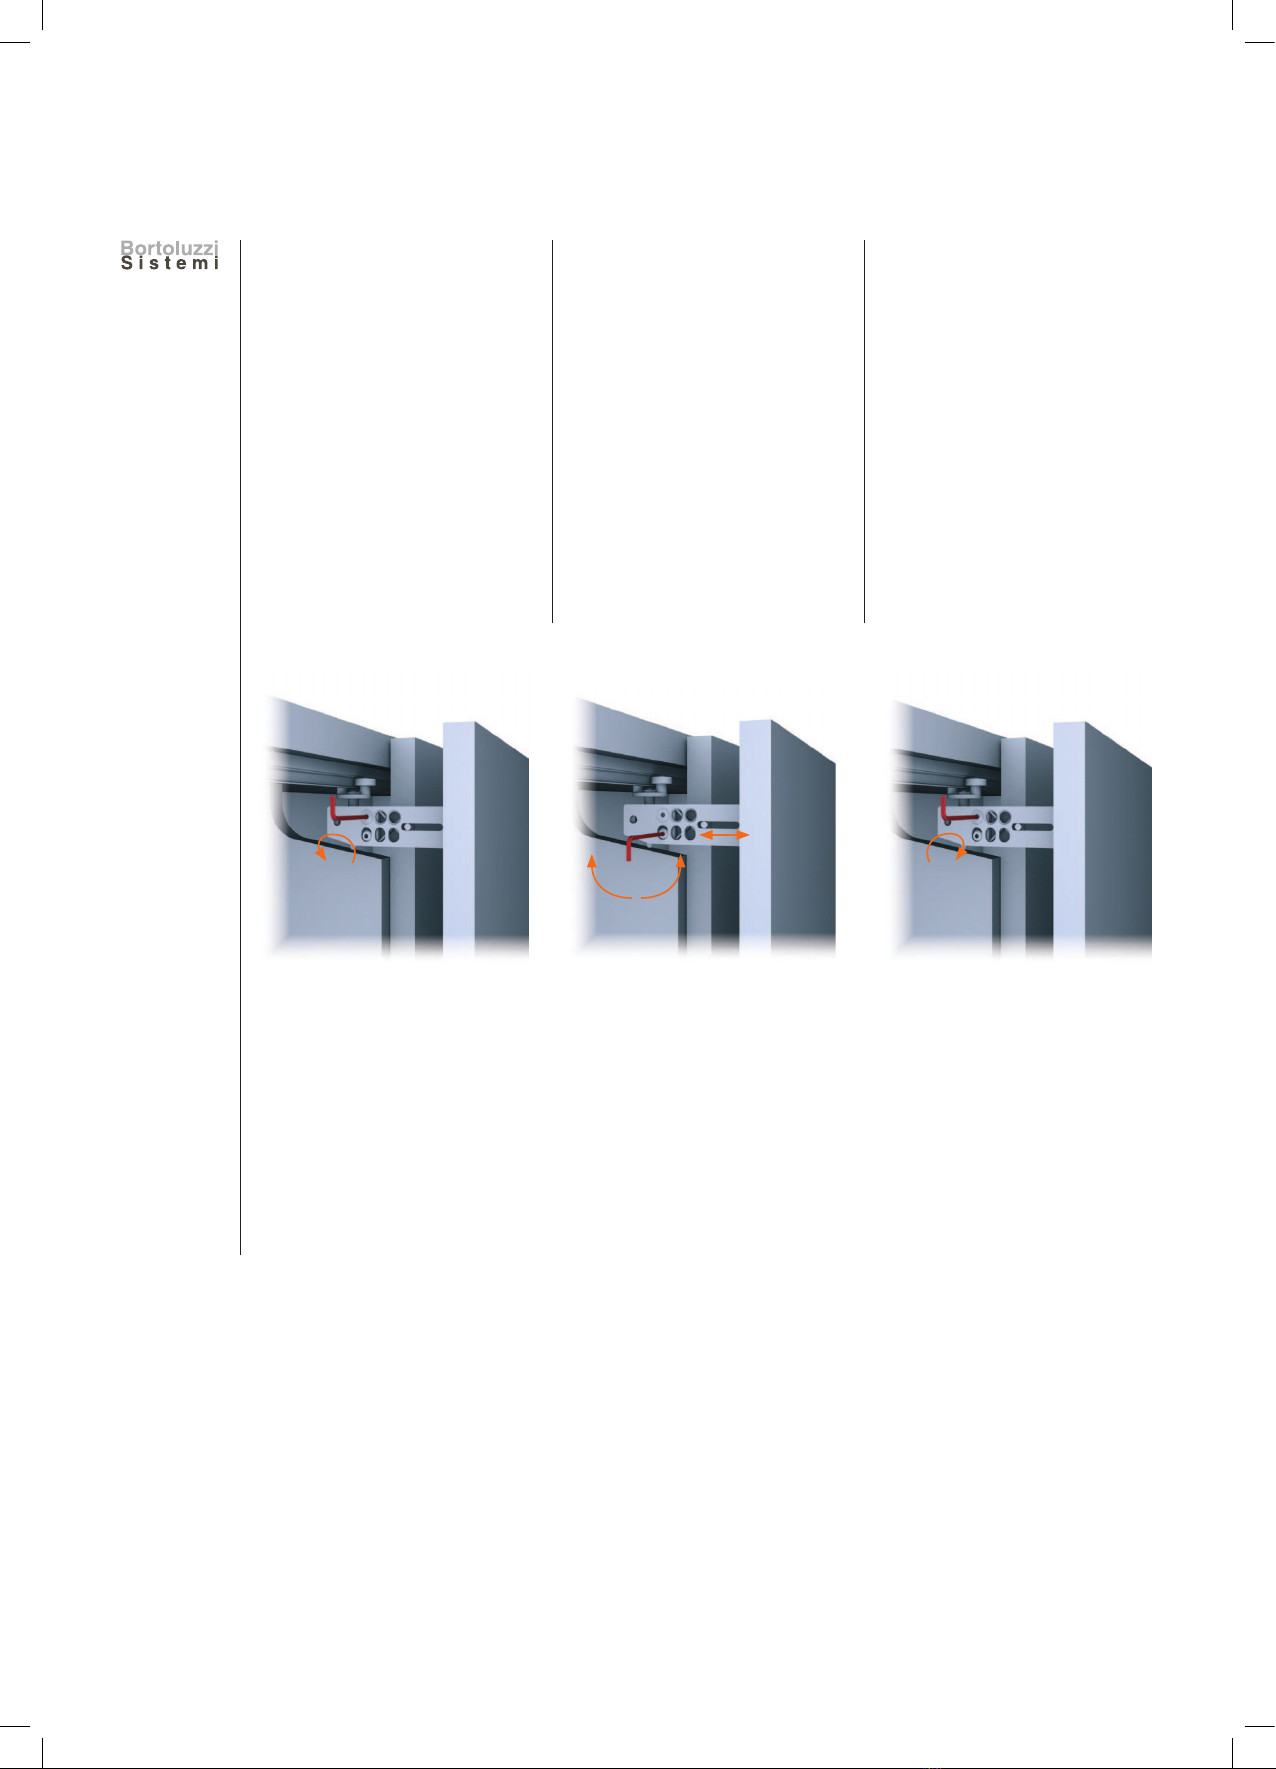
17) Per regolare lateralmente
l’allineamento tra anta e
struttura, agire sulla staffa
superiore fissata all’anta
nel seguente modo:
Aallentare la vite di fissag-
gio;
Bagire sull’eccentrico posto
sotto la vite;
Cchiudere la vite allentata al
punto A.
17) In order to change the gap
between the door and the
cabinet, use the adjust-
ment in the upper door
bracket as follows:
Aloosen the fixing screw;
BAdjust the cam below the
fixing screw;
CRe-tighten the fixing screw.
17) Um seitlich den Spalt der
Tür und dem Korpus einzu-
stellen wie folgt die oberer
Halterung, die an der Tür
befestigt ist, justieren:
Adie Halteschraube lockern;
Bauf den Exzenter unter der
Schraube einwirken;
Cdie bei Punkt Agelockerte
Schraube wieder festzie-
hen.
Regolazioni RegulierungAdjustments

Pulizia
La pulizia dei componenti deve
essere eseguita con acqua e sa-
pone mediante un panno mor-
bido. Evitare prodotti contenenti
solventi e componenti abrasivi.
Smaltimento
Una volta dismesso, il prodotto
e i suoi componenti non vanno
dispersi nell’ambiente, ma con-
feriti ai sistemi pubblici di smal-
timento.
Nota
L’Azienda produttrice si riserva
il diritto di apportare modifiche
tecniche senza preavviso.
Cleaning
Cleaning the components must
be executed using soap and
water with a soft cloth.
Avoid using products containing
solvents and abrasive products.
Disposal
Theproductsanditscomponents
must not be disposed of in the
environment; for disposal, please
use public disposal systems.
Note
The manufacturer reserves the
right to modify any product
without prior notice.
Reinigung
Die Reinigung der Teile muss mit
Wasser, Seife und einem wei-
chen Tuch erfolgen. Keine Pro-
dukte mit Lösungsmitteln oder
Schleifmittel verwenden.
Entsorgung
Die Produkte und die Produkttei-
le, die nicht mehr eingesetzt wer-
den, sollen nicht in die Umwelt
gelangen, sondern an den geeig-
neten Stellen entsorgt werden.
Hinweis
Der Hersteller behält sich das
Recht vor, Änderungen an den
Produkten ohne vorherige An-
kündigung vorzunehmen.

5029CTMMAST.1 (10-2012)
Bortoluzzi Sistemi spa
Via Caduti 14.IX.44, 45
32100 BELLUNO - Italy
Tel. + 39 0437.930866 r.a.
Fax + 39 0437.931442
www.bortoluzzi.com
Other manuals for slider s20
3
Table of contents
Other Bortoluzzi Indoor Furnishing manuals


Popular Indoor Furnishing manuals by other brands


Pfister
Pfister N-JOY 150628 quick start guide

Sunny Health & Fitness
Sunny Health & Fitness SF-BH6629 user manual

Amart Furniture
Amart Furniture CHLOE 72896 Assembly instruction

Habitat
Habitat VERONA AV LARGE VERO-AVL-SS20-A Assembly instructions

Safavieh Furniture
Safavieh Furniture AMH4125A quick start guide

Bedz King
Bedz King BK925 manual